
1. Flush Shaker Door Wine Rack with Hidden Bottle Cradles
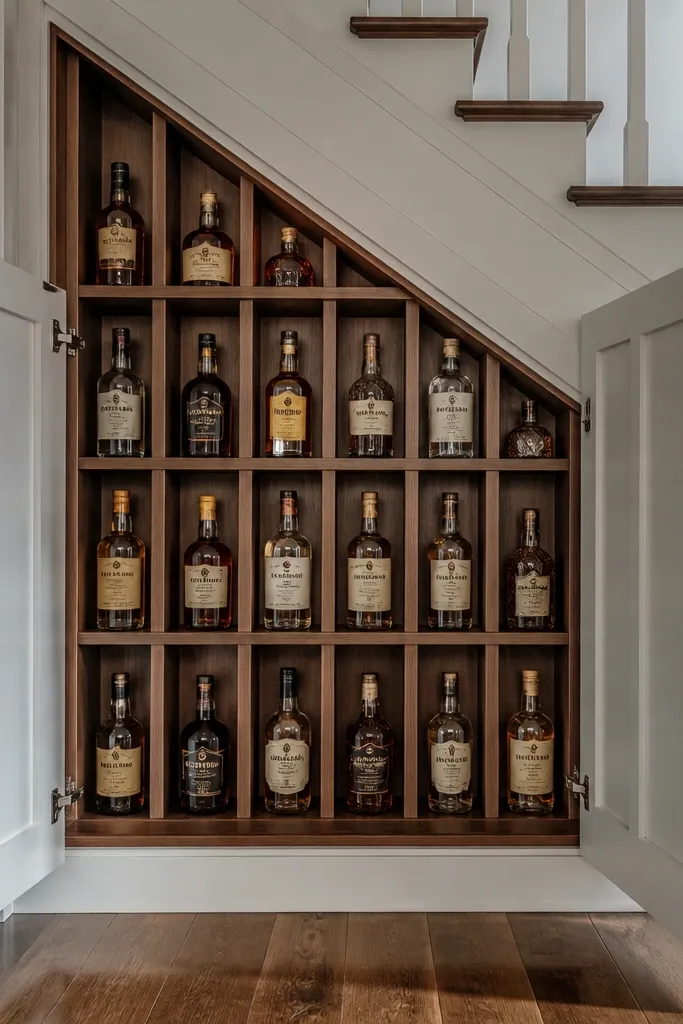
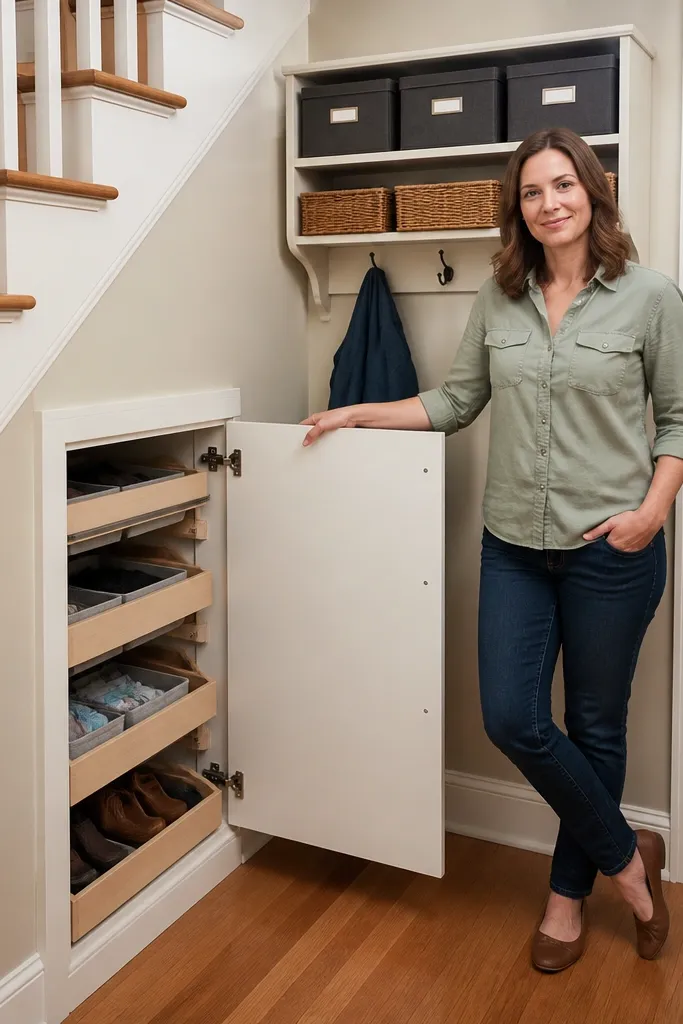
This is the under-stairs look that reads “built-in” instead of “storage shoved under a staircase.” You build a cabinet body and install shaker-style doors so the rack disappears when you close it. When the doors open, the bottle cradles line up in a tidy grid and the labels face the same direction, which makes the display look curated even with different bottle shapes. Use satin paint on the cabinet and keep the rack finish darker so bottles stand out. It’s a great fit for narrow under-stair runs where you want one clean face rather than open shelving.
Step 1: Build a basic cabinet box from 3/4 in plywood, sized to your under-stairs opening, leaving 1/8 in gaps for door clearance. Step 2: Cut bottle cradles from 3/4 in material using a simple 3.75 in slot width and a repeatable cradle shape, then mount them to a frame so bottles rest at a slight tilt. Step 3: Install hinges and magnetic catches, then add shaker door frames with consistent trim widths. Finally, prime and paint the cabinet with two coats, and seal the rack with a clear coat that wipes clean.
Editor's notePre-drill hinge holes and use a door spacer so both doors sit perfectly flush across the opening.
Skip thisDon’t mount the rack directly to thin drywall — find studs or add a side frame so the cabinet stays solid when loaded.
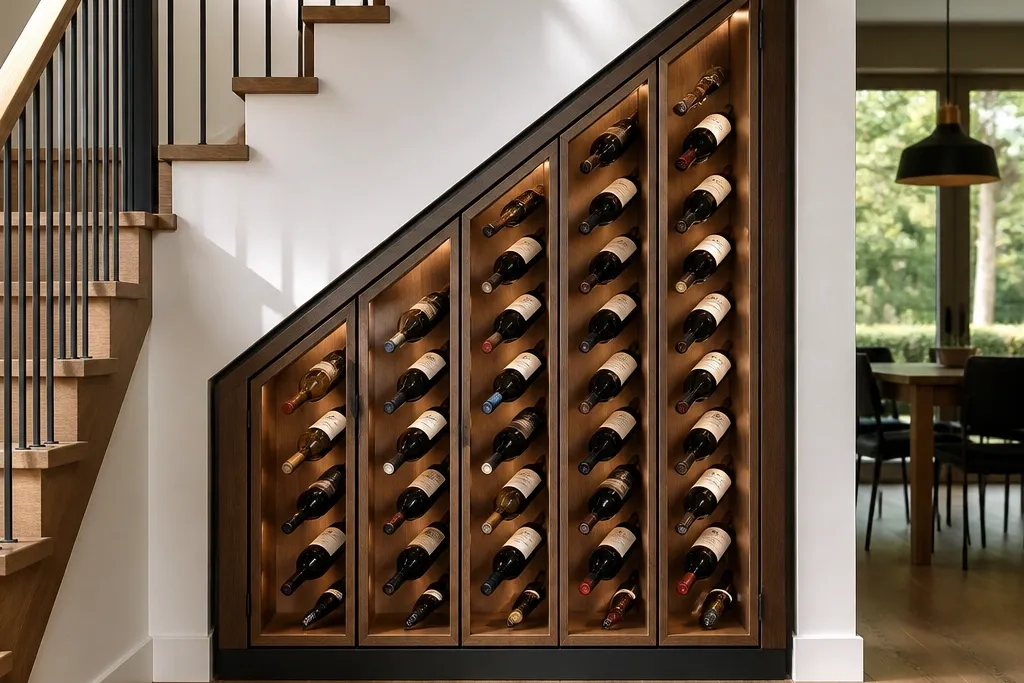
2. Walnut-Effect Slat Wall Wine Niche with Tilted Slots
If you want the most “design store” look, do a slat wall treatment under the stairs. Slats create shadow lines that make even simple bottle slots look intentional, and a walnut-effect finish makes the whole niche feel warm. This idea works because the slats act like a frame: each bottle slot is supported, and the bottles don’t bounce around. You get a wall feature that’s photogenic straight-on, with labels visible between slats. It’s best where you have at least 10 in of depth and a wall you can screw into.
Step 1: Make a backing panel from 3/4 in plywood, then mark slat positions so slot openings stay consistent across the run. Step 2: Cut slats (for example 1x2 in strips) and space them evenly, then attach them to the backing panel with screws through the slats into the plywood. Step 3: Cut angled bottle supports behind the slats so each bottle rests in a cradle at the same tilt. Finally, finish the slats with a walnut-toned stain or walnut-effect paint, then apply a clear protective topcoat.
Use a scrap board as a spacer for slat gaps so every slot reads the same in photos.
Skip wide, uneven slat spacing — it makes the rack look handmade and messy instead of clean.
3. Lower Cabinet + Open Bottle Display Shelf Combo
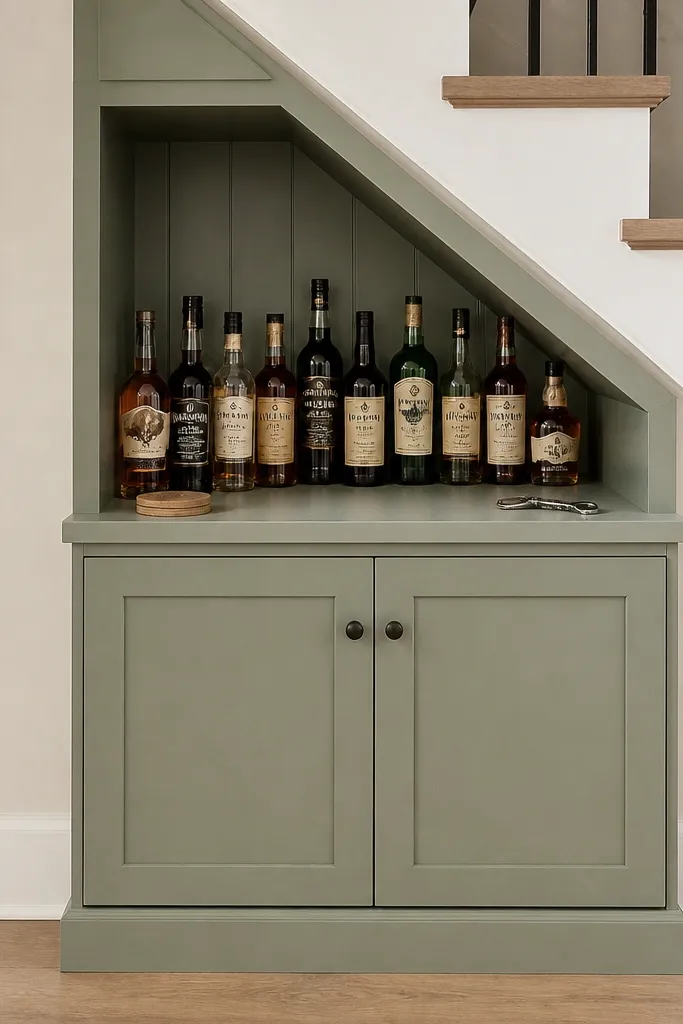
This layout is a crowd-pleaser because it hides the boring stuff and leaves the pretty bottles out. Put a closed cabinet on the bottom for extra bottles, coasters, and openers, then add an open rack shelf above for 8 to 12 bottles. The eye-catching part is the shelf line: straight, level, and framed with matching trim. Use a stain or dark paint for the rack shelf so the bottles look like part of the design. It’s especially good for under-stairs areas where you can’t get full depth for a full rack.
Step 1: Build a base cabinet from plywood with two shelves inside, sized to your under-stair floor footprint, and install doors with soft-close hinges. Step 2: Add a framed open shelf above with side rails and a front lip, then attach bottle cradles spaced for 3.75 in wide bottles. Step 3: Cut a simple backer panel to keep bottles from tipping forward, and mount the whole shelf assembly level. Finish by painting the base cabinet and staining the shelf frame, then seal both.
Make the open shelf front lip 1 in wide so labels don’t get dusty and bottles don’t slide.
Don’t make the open rack too deep — shallow racks cause bottles to lean and look crooked.
4. Corner-to-Wall Angled Rack with Decorative Trim Frame
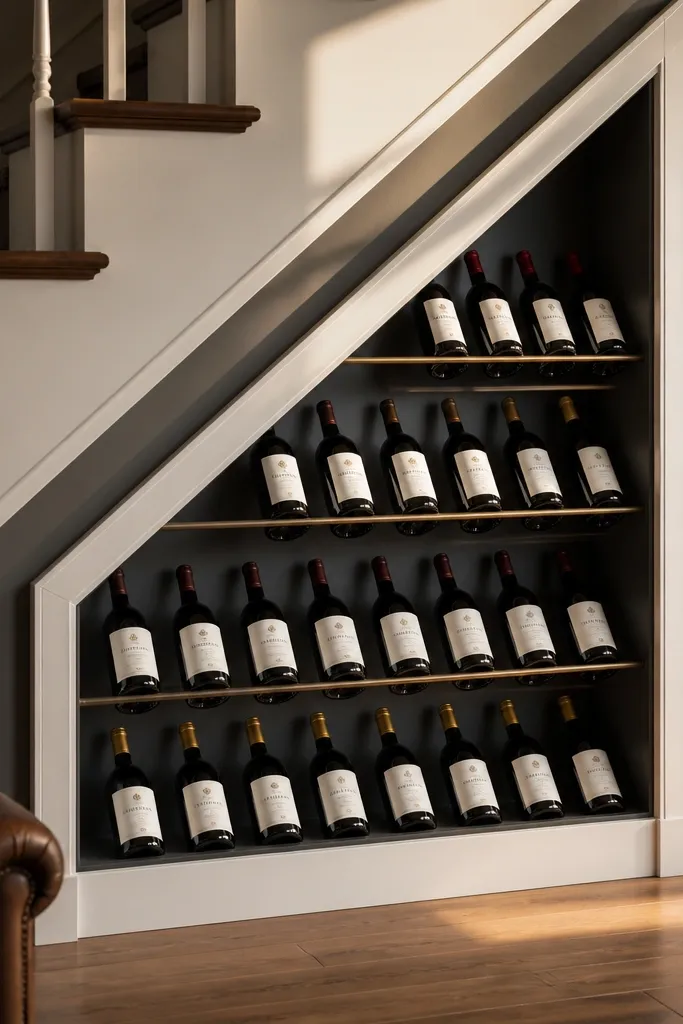
Under-stairs corners can look awkward, but an angled rack turns that corner into the focal point. This project uses an angled bottle rack that follows the geometry of the space, then wraps it in a decorative trim frame so the whole unit reads like furniture. The beauty is in the framing: consistent trim profiles and tight miters make it look custom. You store bottles on an angle for stability and display, while the trim hides the raw edges of the rack. It’s a good match for spaces where one side wall is set further back, creating a triangle under the stairs.
Step 1: Measure the angle formed by the two under-stair walls and build a wedge-shaped rack frame from 3/4 in plywood. Step 2: Cut bottle supports for a consistent cradle depth, then attach them to the wedge so every bottle sits at the same tilt. Step 3: Frame the outside with trim strips, mitering corners carefully and securing with brad nails and wood glue. Finally, paint or stain the frame, and add a clear coat to the rack supports.
Editor's noteUse a stop block when cutting bottle supports so every cradle matches exactly.
Skip thisDon’t rely on thin edge strips to hide cuts — use 3/4 in framing so the unit stays square.
5. Vintage-Style French Door Wine Cabinet Under the Stair
If you want charm without looking cluttered, use French-style doors on a compact wine cabinet. The arched panel look keeps the front pretty and the split doors reduce the awkward door size you get under stairs. Inside, you add a bottle rack with a clean grid so the bottles line up, and you can store extra bottles in a lower compartment. This is a strong aesthetic choice because the door details catch light and make the storage look like a real piece of furniture. It works best when you can fit a cabinet width of at least 26 in.
Step 1: Build a cabinet carcass from plywood with a fixed shelf at the height where the bottle rack starts, leaving room for the cradles to fit. Step 2: Install a bottle rack frame inside using evenly spaced vertical supports, then add cradle pieces that keep bottles from rolling. Step 3: Add two doors sized for the opening, then install hinges and a latch so the doors close flush. Finish with paint and a protective topcoat, then add decorative knobs in brushed brass or oil-rubbed bronze.
Editor's noteChoose door hardware with a centerline you can repeat across knobs — it makes the cabinet look designed.
Skip thisAvoid oversize knob plates — they make the cabinet look bulky and cheap.
6. Rope-Trim Industrial Wine Rack with Metal Channel Supports
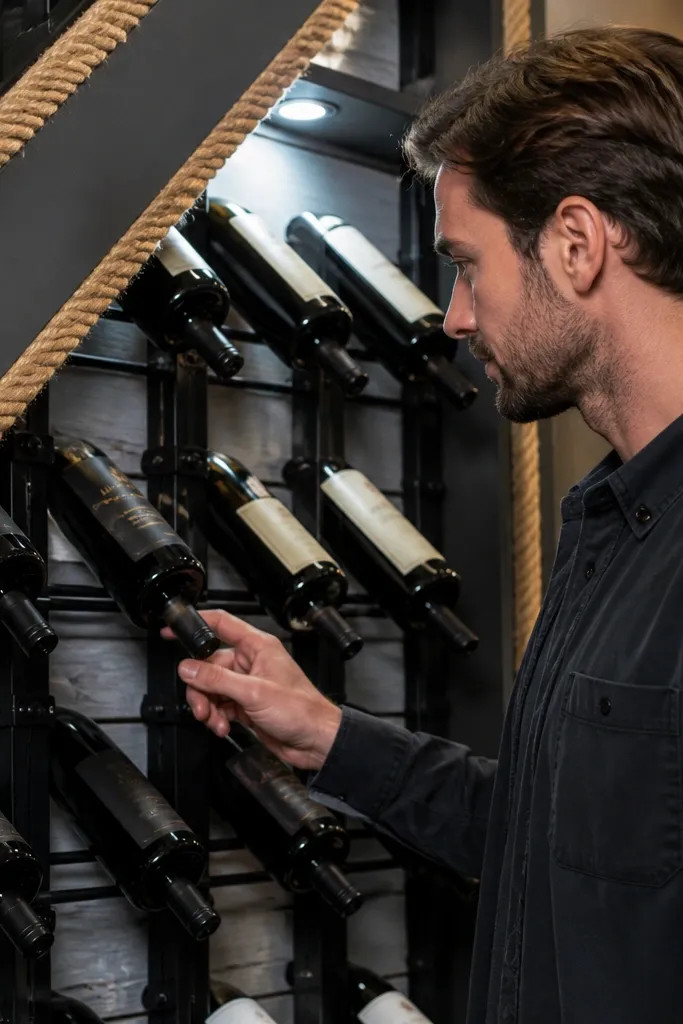
This one looks bold and intentional: metal channel supports keep the bottle positions steady, and rope trim adds texture that reads warm instead of cold. The industrial look works well under stairs because the space already feels architectural. You mount a simple backer panel, attach metal channels in a grid, then add bottle cradles that stop rattle. The rope trim frames the rack and makes it look like an art installation. It’s best if you want a darker palette and you have at least 9 in depth for channels and bottle clearance.
Step 1: Cut a backer panel from 3/4 in plywood, then mark a grid for bottle positions. Step 2: Screw metal U-channels or L-channels into the backer at the same tilt angle, then add small wood blocks where the bottle base rests. Step 3: Wrap rope trim around the perimeter and secure with screws or heavy-duty staples into the backer. Finish by painting the plywood matte black and sealing the wood blocks.
Pre-drill metal channel holes so you don’t strip screws into plywood.
Don’t skip wood blocks at bottle contact points — metal-only contact makes bottles clink and scratch.
7. Painted Color-Block Under-Stair Wine Wall
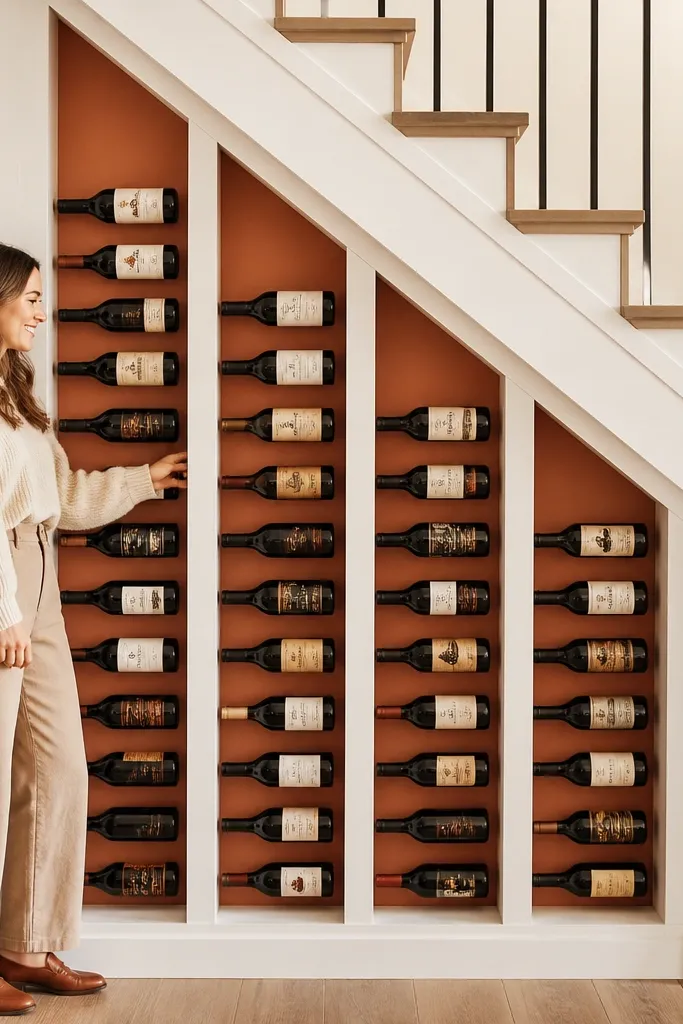
Color-blocking is the fastest way to make under-stairs wine storage look like decor. Use one background color for the panel and a contrasting color for the rack frame, so the bottles pop visually. This idea works because the storage becomes a graphic element: straight edges, consistent slot lines, and a finish that looks smooth in photos. You can do it with simple plywood panels, a bottle slot rack, and painted trim. It’s perfect for entryways or dining areas where you want the storage to look like part of the room, not hidden clutter.
Step 1: Build a flat panel from 3/4 in plywood sized to the under-stair wall area, then attach a rack frame behind it using bottle-slot supports. Step 2: Cut bottle slots or cradle supports and mount them so bottles sit at a consistent tilt. Step 3: Paint the background panel one color and the rack frame another, then seal everything with a durable topcoat. Finally, install a trim frame around the edges for a finished look.
Use painter’s tape edges and a foam roller to avoid brush marks — under-stair light shows every streak.
Avoid cheap flat paint on the rack frame — it scuffs fast when you pull bottles.
8. Glass-Front Wine Display Cabinet with Slim Black Frame
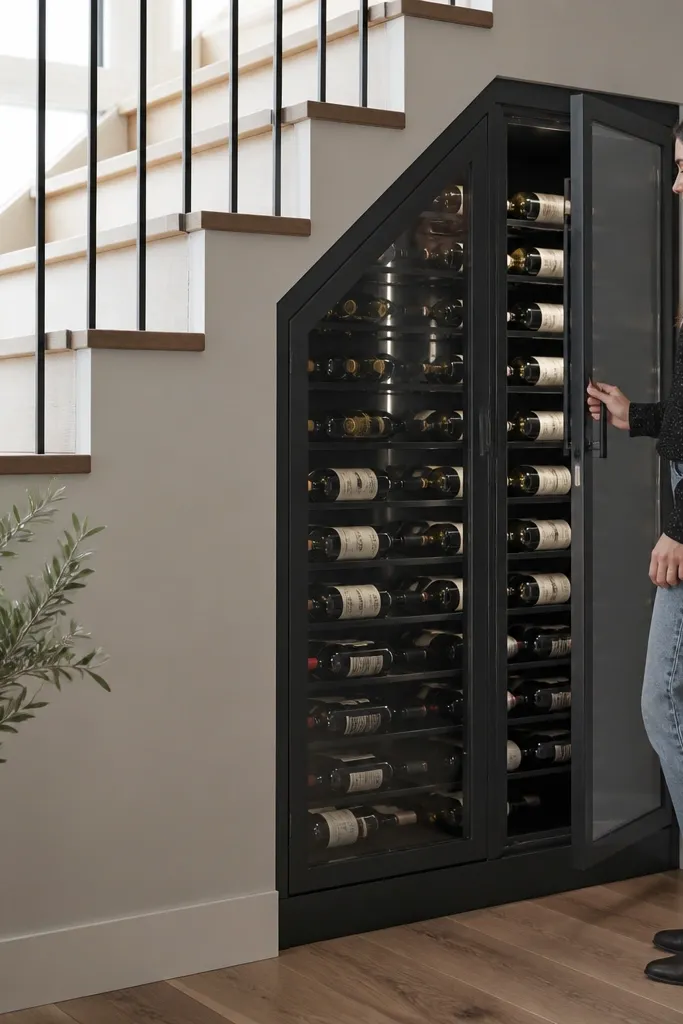
If you want maximum photogenic impact, glass-front cabinets make labels readable and add a “showroom” feel. The slim black frame keeps it modern and prevents the cabinet from looking bulky under the stairs. Inside, use a bottle rack with consistent slot spacing so bottles don’t lean. The glass also protects from dust and keeps everything looking clean between weekends. This works best where you can install hinges cleanly and you have enough height to fit the bottles without forcing awkward angles.
Step 1: Build a cabinet box from 3/4 in plywood and add an internal bottle rack frame with cradles for stable tilt. Step 2: Add a back panel and install two shelves for lower storage if you have height. Step 3: Frame the glass doors with thin black trim and mount them with glass-safe clips and proper screws. Finish the wood frame with matte black paint and add a clear protective coat to the interior rack.
Editor's noteUse magnetic catches and a door alignment jig so the glass doors close evenly.
Skip thisDon’t use flimsy door frames — glass doors show gaps instantly.
9. Rattan-Front Wine Storage Drawer Boxes
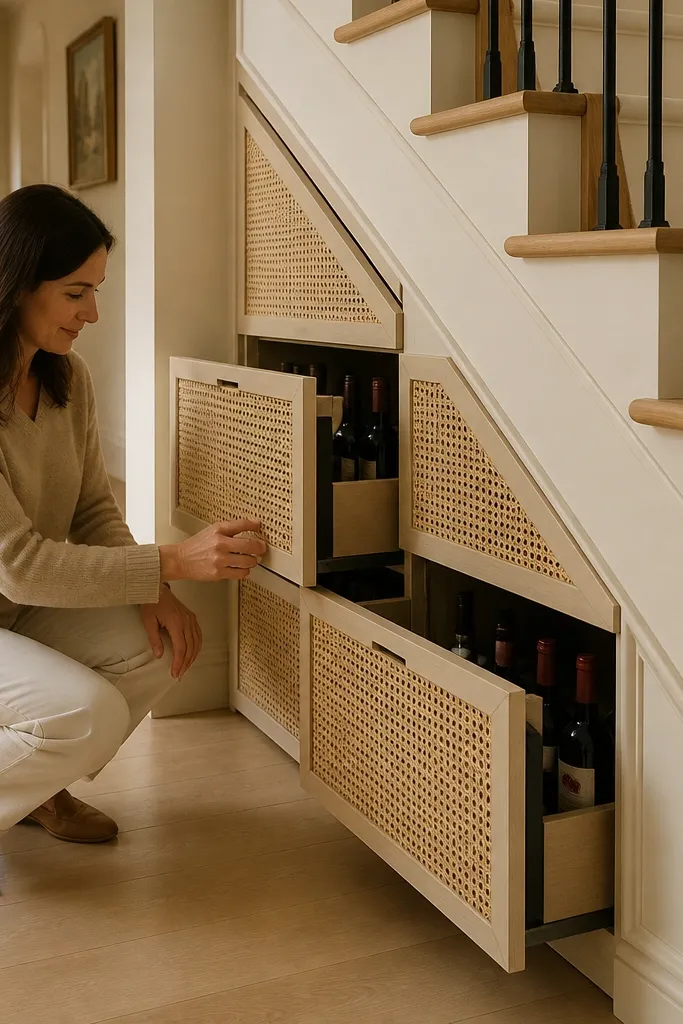
This is a softer, warmer take on under-stair wine storage. Instead of open shelves, you build drawer boxes with rattan fronts so you get airflow and texture, while bottles stay protected. The aesthetic is light and airy; labels peek through the rattan pattern without exposing the whole mess. This works well when your under-stairs area is visible from the hallway and you want something decorative instead of a big cabinet. It also helps if you don’t want to deal with glass doors or heavy hinges.
Step 1: Build shallow drawer boxes from plywood sized to your under-stair depth, leaving clearance for drawer slides. Step 2: Install a bottle cradle insert inside each drawer so bottles sit at a stable angle and don’t roll when you pull the drawer. Step 3: Attach rattan panels to the drawer fronts and mount handles on the sides or top rails. Finish by sealing the plywood with a wipe-on clear coat.
Editor's noteMount drawer slides level using a straightedge across both sides so drawers don’t rack.
Skip thisDon’t skip cradle inserts — loose drawers make bottles collide and look chaotic.
10. Reclaimed Barnwood Bottle Wall with Horizontal Display Rails
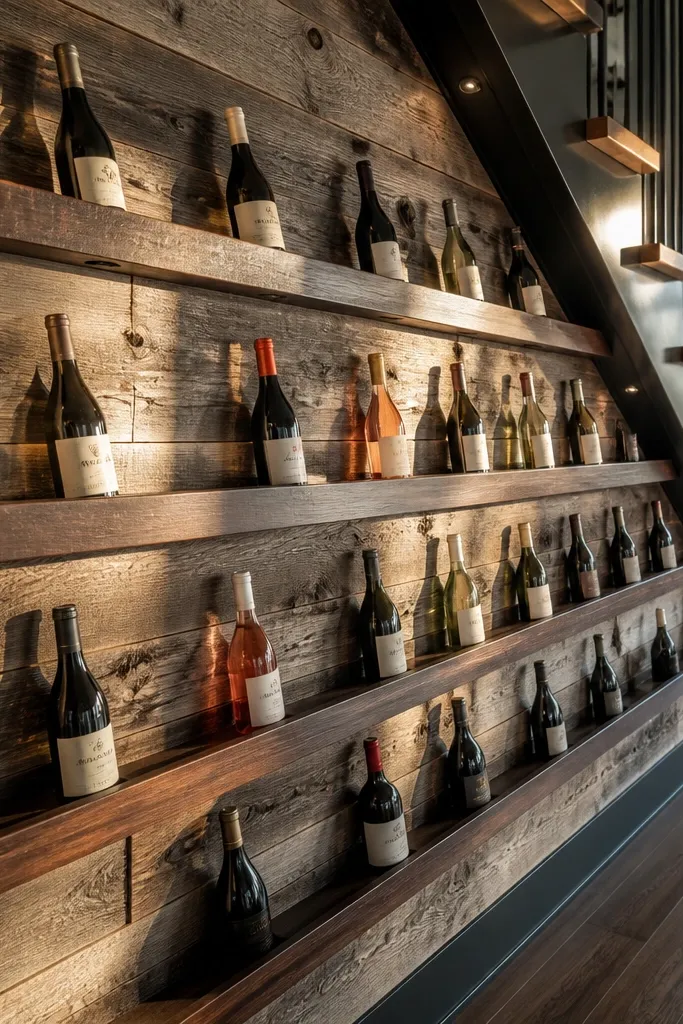
Reclaimed barnwood gives instant character, but the key to making it look clean is using horizontal rails with consistent bottle spacing. The rails create a repeating pattern that looks intentional, and the wood grain adds warmth that photographs beautifully. This storage idea works because each bottle is supported at the base and stabilized by the rail spacing. You also get a surface that looks like decor even when bottles are low. It’s best for under-stairs where you can mount a backer and screw into studs.
Step 1: Cut a plywood backer and mount barnwood boards as a flat backdrop, leaving enough clearance for rails. Step 2: Install horizontal rails at measured intervals so bottle bases rest securely, then add small stops to prevent forward movement. Step 3: Fill nail holes, sand lightly, and apply a clear matte sealer so the wood doesn’t look shiny. Finally, attach a slim trim frame around the edges for a finished look.
Choose rails that are all the same thickness so bottle tops line up in photos.
Don’t mix random board widths without a plan — it turns into clutter instead of a pattern.
11. Slim Pull-Out Wine Rack Under the Stairs
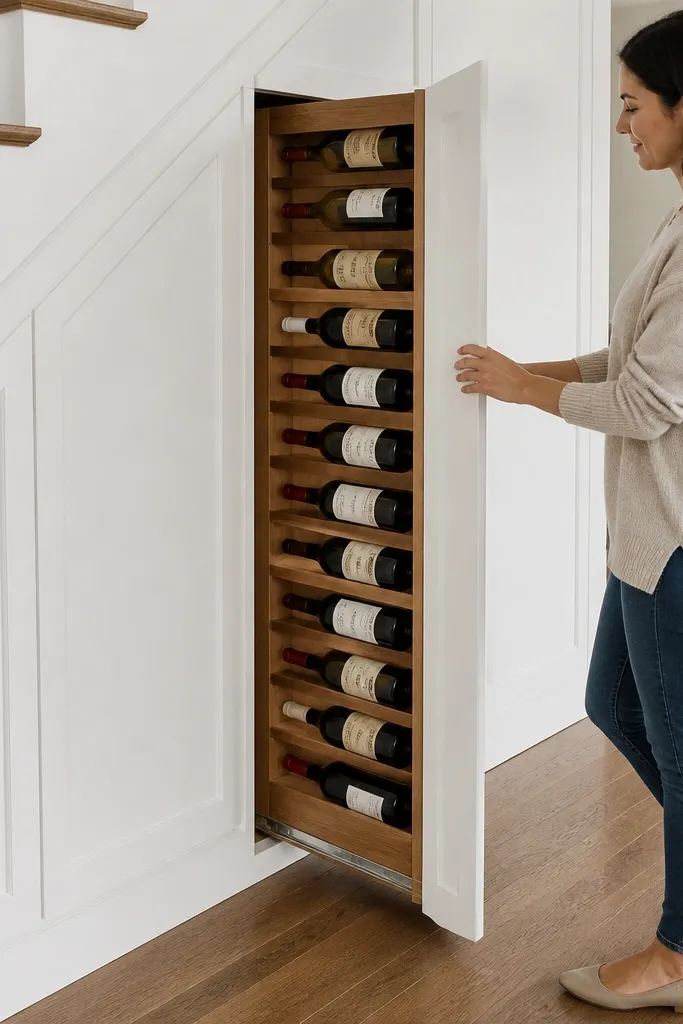
When depth is tight, a slim pull-out rack makes wine storage practical and still good-looking. It’s built like a drawer, which means you can keep the under-stair face clean and hide the bottles when you close it. The rack layout is strong visually because bottles line up in a straight pull-out plane. This idea works for smaller collections and for homes where you want easy access without opening a cabinet door every time. Use a sturdy slide system and a rigid rack frame so it feels solid, not wobbly.
Step 1: Build a pull-out frame from 3/4 in plywood sized to your available under-stair opening, then mount heavy-duty drawer slides to cabinet side walls. Step 2: Inside the frame, add bottle cradles or angled supports spaced for 3.75 in bottles and a consistent tilt. Step 3: Install a front face panel and a handle that matches your room hardware. Finish the rack frame with paint or stain and seal the contact points.
Use full-extension slides so you can reach the back bottle without reaching sideways.
Don’t overload a light slide — cheap slides sag and the rack starts to look crooked.
12. Vertical Bottle Columns with Decorative Base Trim
Vertical storage looks modern under stairs, and it’s surprisingly photogenic when you frame the columns. This project uses vertical bottle slots in a grid, then adds a decorative base trim that visually anchors everything. You can make the columns a single dark color so the bottles read like a design wall. It’s a good option for shallow spaces where angled racks don’t fit well. The look is clean and structured, and it’s easy to expand by adding more columns.
Step 1: Cut a grid board from 3/4 in plywood and mark slot spacing for bottle widths, then cut vertical slot dividers that leave a small clearance for bottle insertion. Step 2: Mount the grid inside a frame and attach a base trim board wide enough to hide the rack’s bottom edge. Step 3: Add a top cap to prevent bottles from falling forward and seal all wood surfaces. Finally, paint or stain the frame so it matches your room palette.
Editor's noteSand slot edges smooth so labels don’t snag when you pull bottles.
Skip thisAvoid slots that are too tight — bottles get stuck and the cabinet starts looking messy fast.
13. Floating Shelf Wine Rack with Back Panel and Brass Pegs
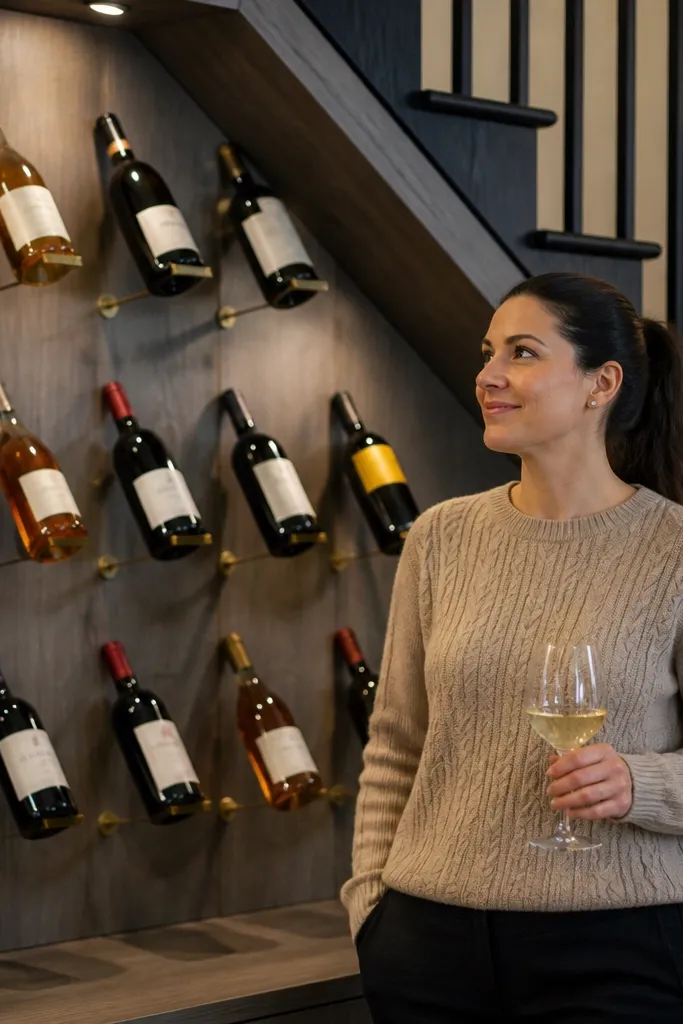
Floating shelves make under-stair storage feel lighter, and brass pegs add a warm metallic accent that looks great in hallway lighting. You mount a back panel behind the bottles, then use peg-style supports so bottles sit at a controlled angle. The result is a clean, airy display with minimal bulk. This is ideal when you want your wine storage to look like wall decor rather than a cabinet. It’s also quick because you’re building a simple shelf-and-support system, not a full cabinet.
Step 1: Install a strong back panel from 3/4 in plywood into studs where possible, then mark peg locations. Step 2: Mount floating shelf brackets to the wall, attach shelves, and install brass pegs or dowels that act as bottle supports. Step 3: Add a slim front edge lip on each shelf to stop bottles from sliding forward. Seal the shelf surface and finish the back panel to match your trim.
Editor's noteUse a level and measure from the same reference point on the stair stringer so the shelves line up visually.
Skip thisDon’t skip the back panel — peg-only support lets bottles drift and look uneven.
14. Cedar Lined Wine Cubby with Crown Trim Top
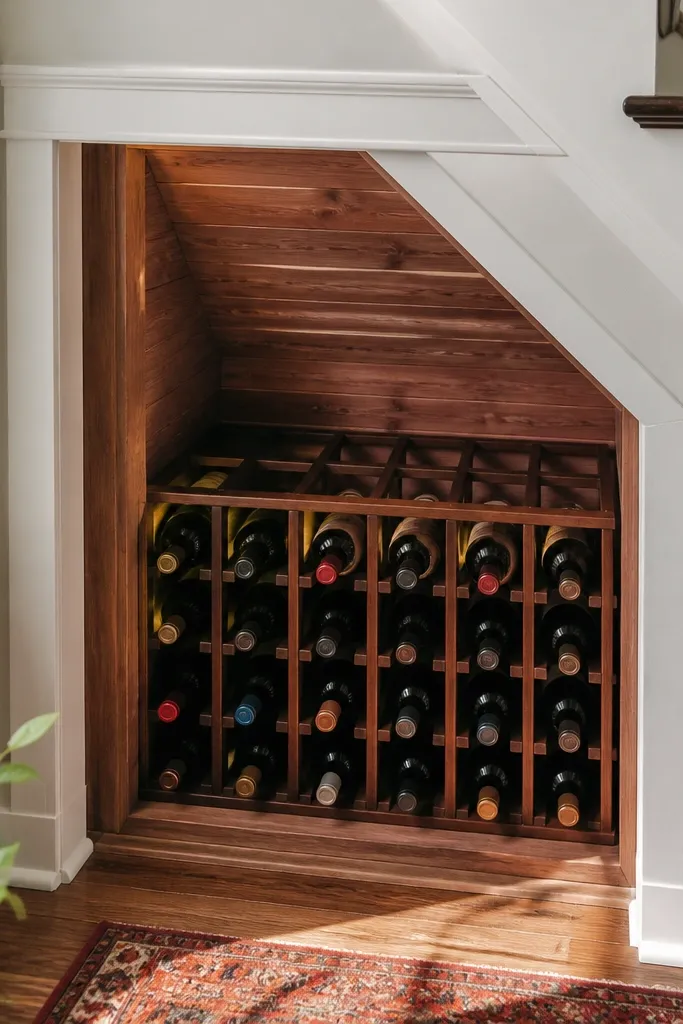
Cedar lining makes a big difference in how this looks and feels. It adds a warm color behind the bottles and gives the cubby a finished, built-in vibe. Add a simple crown trim at the top and the cubby reads as furniture instead of a gap filler. This project works best for a smaller section under the stairs where you can create one or two cubbies with doors. The cedar also helps with odor control and makes the interior feel premium.
Step 1: Build a cubby frame from 3/4 in plywood, leaving an opening sized for bottle storage and airflow. Step 2: Line the interior with cedar boards and screw them to the frame, then install bottle cradles at a consistent tilt angle. Step 3: Add a top crown trim piece and install a door or removable front panel. Finish by sealing cedar lightly and painting the exterior trim.
Editor's notePre-cut cedar pieces for tight corners so you don’t end up with visible gaps.
Skip thisAvoid sealing cedar with a thick glossy coat — it kills the warm look and can look plasticky.
15. Matte Black Metal Mesh Bottle Cage Behind Clear Acrylic Front
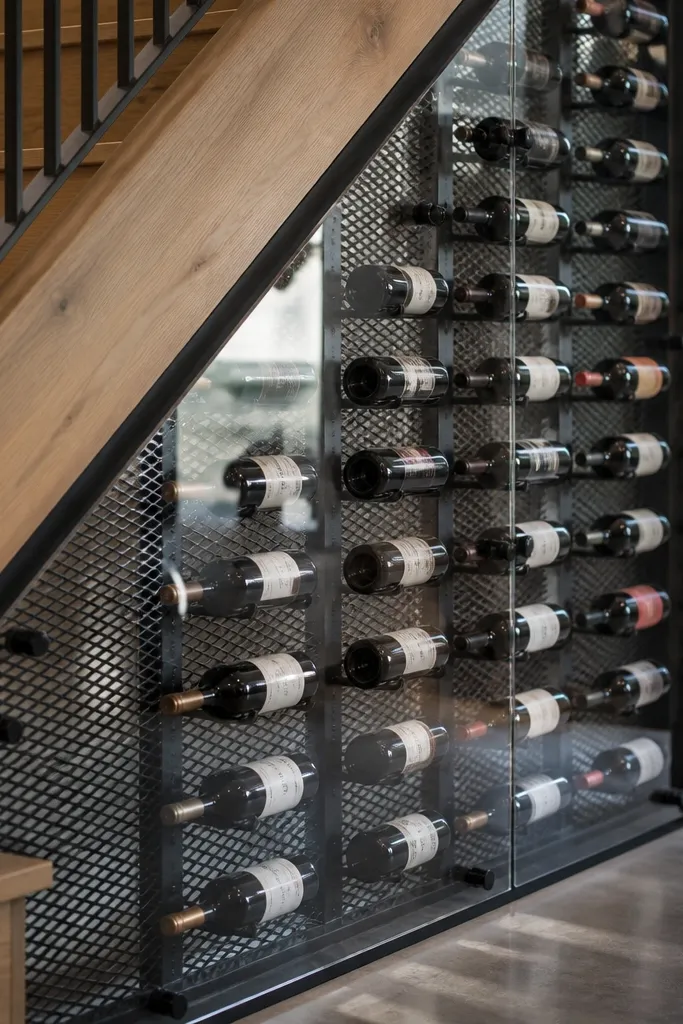
This is the “modern gallery” approach: a matte black mesh cage holds bottles in a neat plane, and a clear front keeps the look tidy and dust-free. The mesh adds texture and makes the bottles look like part of an art installation. You get an aesthetic that’s sharp in photos without needing complicated woodworking. This works best when you have stable wall mounting points and you want something visually light. Plan for enough depth so bottles sit fully within the cage and don’t press the clear panel.
Step 1: Build a rectangular frame from 1x2 or 3/4 in plywood and mount it to studs or a solid backing panel. Step 2: Attach metal mesh to the frame and add internal bottle cradles or stops so bottles rest securely in place. Step 3: Mount clear acrylic or polycarbonate in front using spacers so it doesn’t rattle. Finish the metal frame in matte black and seal the interior wood.
Editor's noteUse rubber spacers between acrylic and frame to prevent vibration noise and scratches.
Skip thisDon’t install acrylic tight to the frame — thermal expansion makes it crack over time.
16. Stained Wood Ladder Rack with Wine Glass Stop Rails
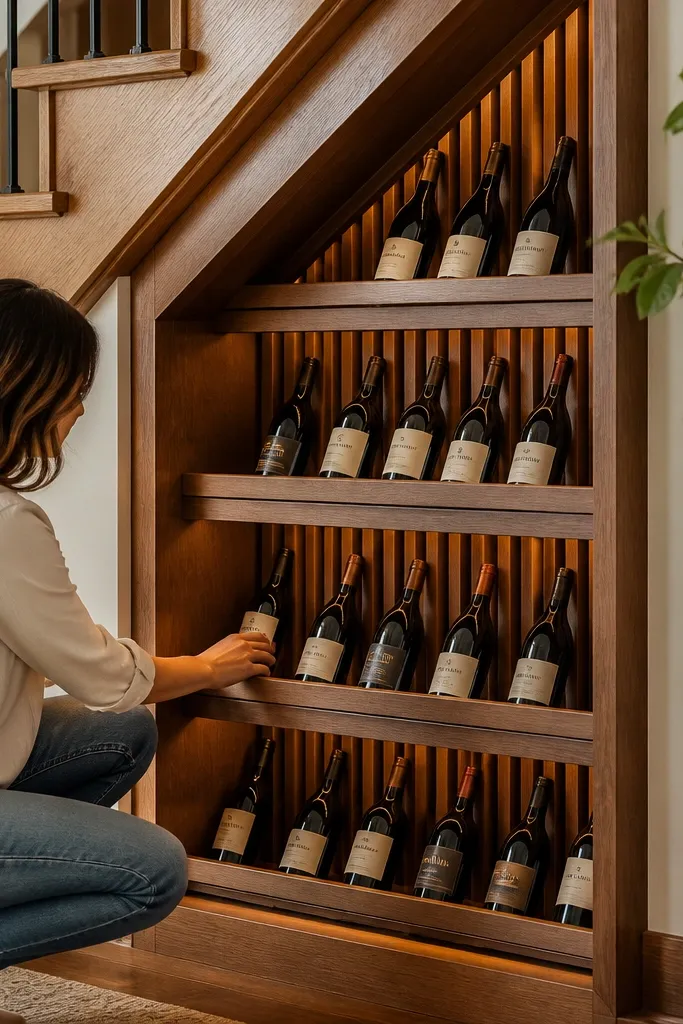
A ladder-style rack is visually strong because it creates repeating vertical lines behind the bottles. Add stop rails so bottles sit at the same angle and the whole unit looks intentional rather than improvised. Stained wood makes the rack look rich without needing expensive hardware. This idea is great when your under-stair area has width but not much height — the ladder lines guide the eye up and across. It also looks good with a mix of bottle colors because the wood tone ties everything together.
Step 1: Build a ladder frame from stained wood rails, using consistent spacing based on bottle width and desired tilt. Step 2: Attach bottle supports between the rails and add stop rails at the front so bottles cannot slide forward. Step 3: Install the ladder rack to a solid backing board and add a simple base trim for a finished edge. Finish with a clear topcoat so the wood wipes clean.
Use a single jig block to cut supports so every cradle height matches.
Avoid uneven front stop rails — that’s what makes bottles look crooked in photos.
17. Two-Tone Built-In Wine Bar Under Stairs with Bottle Drawer
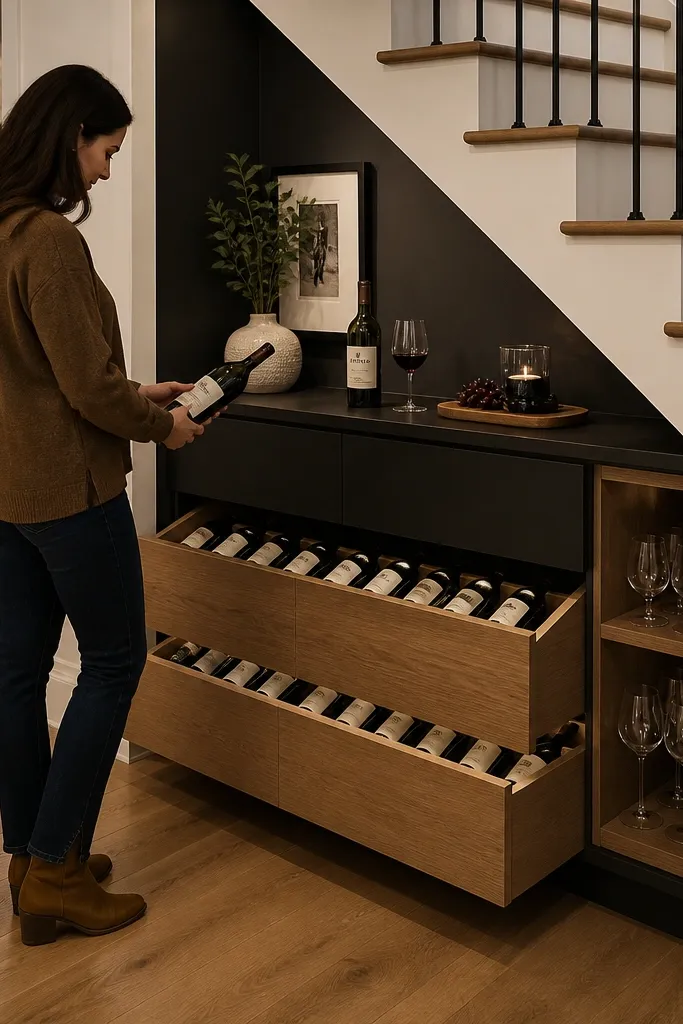
This is the “wine bar” look in a small footprint: a countertop face above and a bottle drawer below. The two-tone finish makes it feel designed, and the drawer keeps the bottles hidden when you don’t want to display them. You can store bottles in angled cradles inside the drawer, then add a small open shelf or stemware area above. It’s photogenic because you get a clean counter line plus a functional storage face. This is best when you have at least 30 in of width and enough height for a small bar top.
Step 1: Build a base cabinet under the stairs with a drawer opening sized for angled bottle cradles and install drawer slides. Step 2: Add a top bar shelf or countertop supported by the cabinet, then install a small back rail so bottles stay centered visually. Step 3: Line the drawer interior with bottle cradles spaced for standard bottles and add a front lip to stop drawer contents from shifting. Finish the cabinet in one color and the drawer face or trim in a contrasting tone, then seal all surfaces.
Keep the drawer face flush and use a consistent trim thickness so the bar reads straight from the room.
Don’t make the countertop overhang uneven — it makes the whole build look off immediately.
18. Hidden Lift-Out Wine Rack Inside a Step-Depth Cabinet
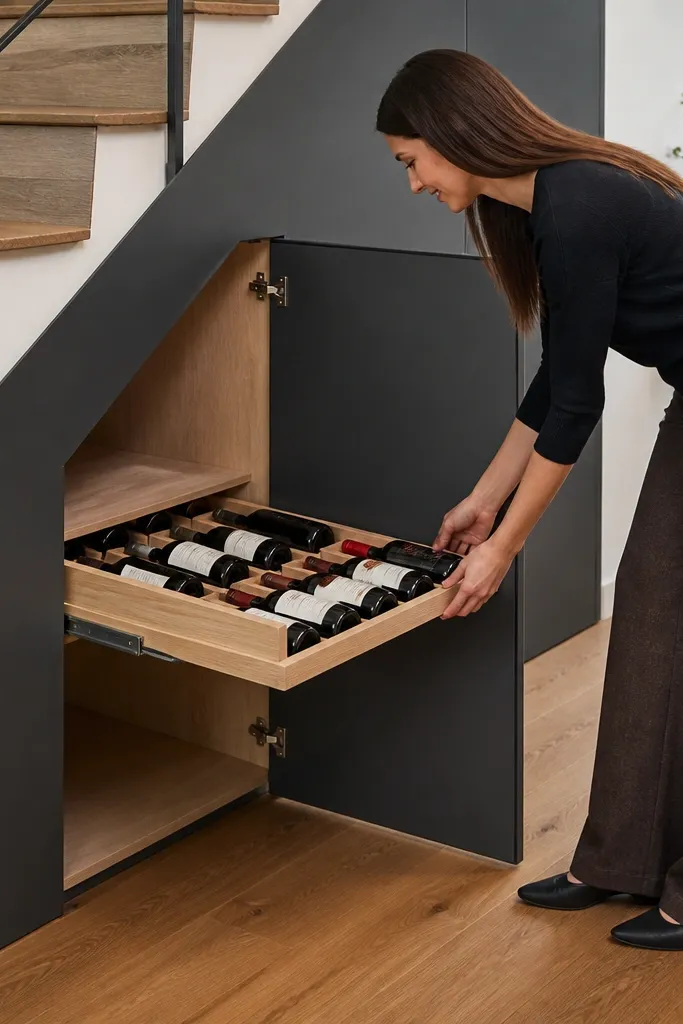
This idea is for under-stair spaces where the opening is narrow and you want everything tidy. You build a cabinet with a front door, then store bottles in a lift-out rack tray that slides out when you want to access them. Visually, the cabinet front stays clean and minimal, but the interior looks like a real wine storage system. The rack tray also makes it easier to wipe down and keep dust off bottles. It’s good for smaller collections and for households that don’t want a visible wine wall.
Step 1: Build a cabinet body from plywood and install a door with hinges aligned to your opening. Step 2: Create a lift-out rack tray from 3/4 in plywood with angled bottle cradles and side rails, then add drawer-style slides or glides inside the cabinet. Step 3: Add a handle to the tray and a front stop so it doesn’t pull too far. Finish the cabinet front with paint and seal the rack tray with clear coat.
Add a simple foam or rubber bumper at the tray stop so it closes quietly and doesn’t scratch paint.
Skip the front stop — without it the tray bangs into the cabinet and wears down the finish.
19. Whiteboard-Label Wine Rack with Chalk Paint Front Trim
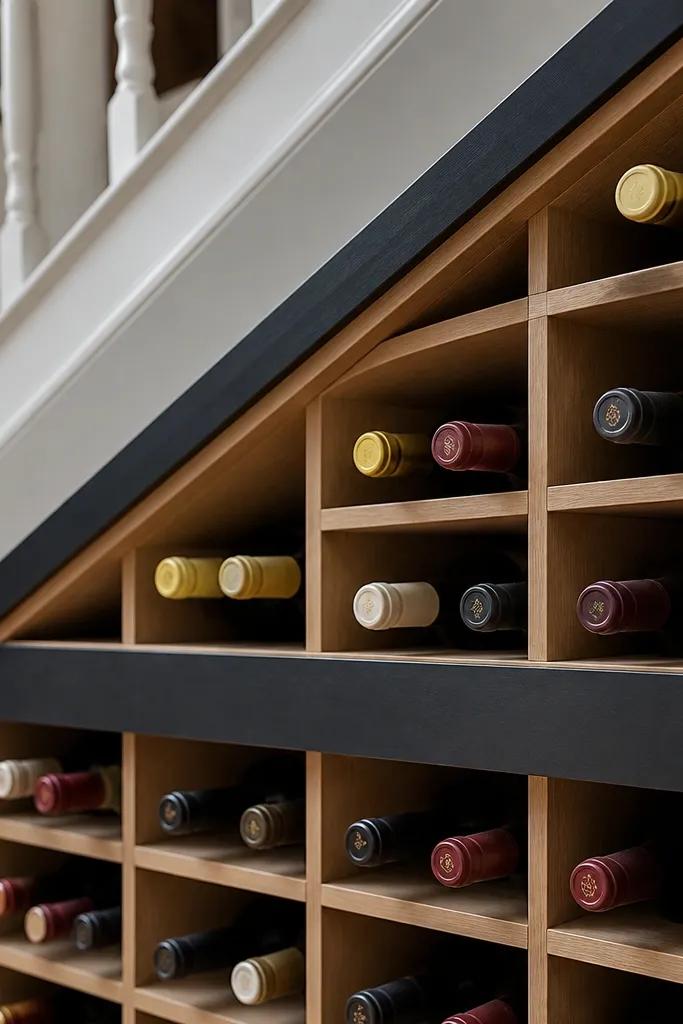
This is the practical-aesthetic combo: the rack looks clean, and you can label bottles in a way that stays readable. Instead of messy paper labels, add chalkboard trim on the front frame so you can write wine names or dates. The rack itself stays minimal with a tidy grid, and the chalk front makes it interactive without looking cluttered. It’s a great fit for families who rotate bottles often or for people who want the storage to function like a small wine station. It also photographs well because the chalk writing adds texture.
Step 1: Build a simple bottle rack frame from 3/4 in plywood and mount it inside the under-stair opening, keeping slot spacing consistent for bottle width. Step 2: Install a front trim strip and paint it with chalkboard paint, then add a clear topcoat only on the non-chalk areas. Step 3: Add a small lip or back panel so bottles stop sliding forward. Finally, seal the rack wood with a wipeable clear coat so chalk dust doesn’t get into the rack.
Use painter’s tape to mask chalkboard edges before painting the rack so lines stay crisp.
Don’t use glossy paint on the chalk area — it makes writing look dull and smudges faster.
20. Bamboo Roll-Up Shade Wine Storage with Hidden Rack
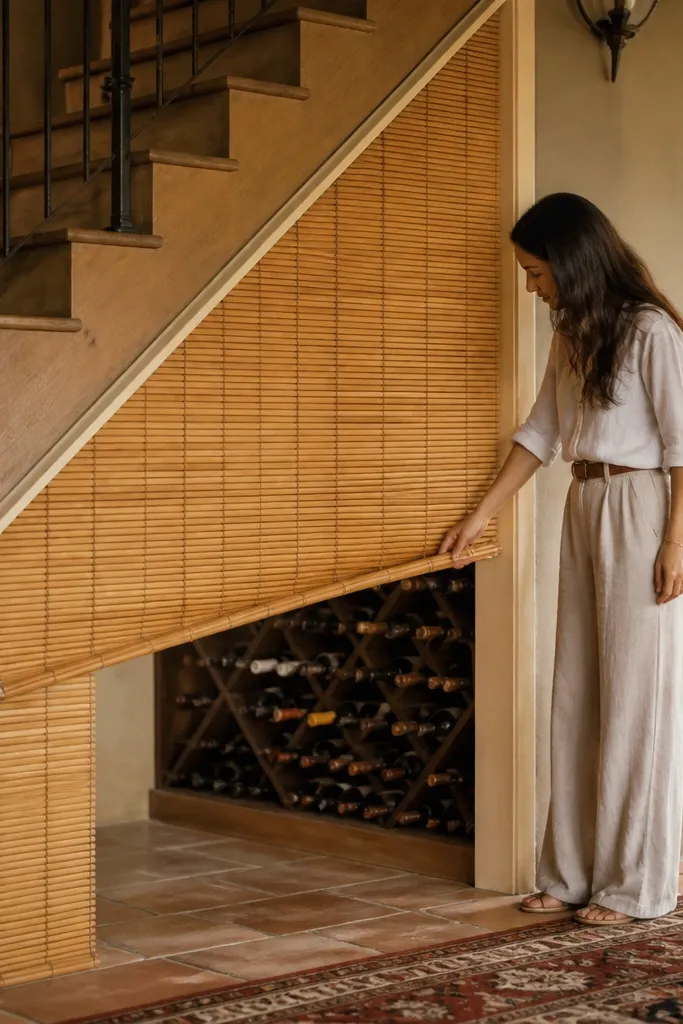
A roll-up shade keeps the under-stair area looking sleek until you want the bottles. This works because the storage stays protected from dust and visual clutter, while the bamboo shade adds a warm texture that looks intentional. Inside, use a fixed rack with cradles so bottles don’t shift when you pull the shade up and down. The look is photogenic from the doorway because you see a clean, natural front rather than an open shelf full of bottles. It’s especially good for renters or anyone who doesn’t want big doors hinged on awkward angles.
Step 1: Install a fixed rack frame inside the under-stair opening using 3/4 in plywood and angled bottle cradles. Step 2: Mount a roll-up shade track above the opening and make sure the shade clears the bottle rack when fully opened. Step 3: Add small side guides so the shade doesn’t swing and expose uneven gaps. Finish by sealing the rack interior and using a shade that matches your room textures.
Editor's noteMount the shade track level using a laser or long spirit level so the shade rolls straight.
Skip thisDon’t choose a shade that sags — drooping shade makes the whole storage look unfinished.



