
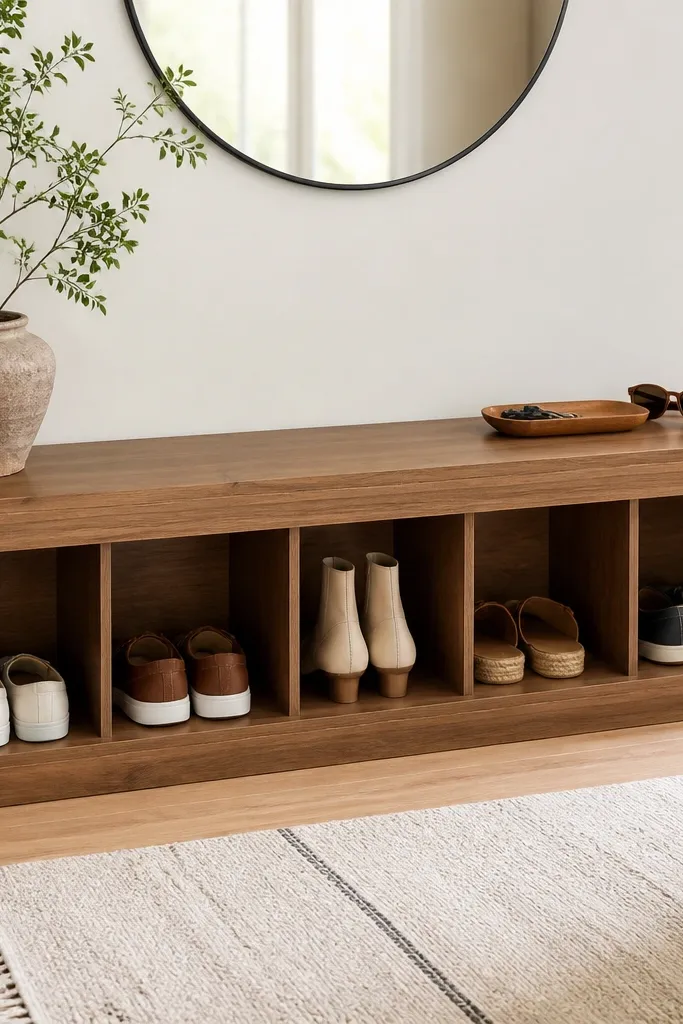
1. 12-inch-deep plywood cubby row with a front lip
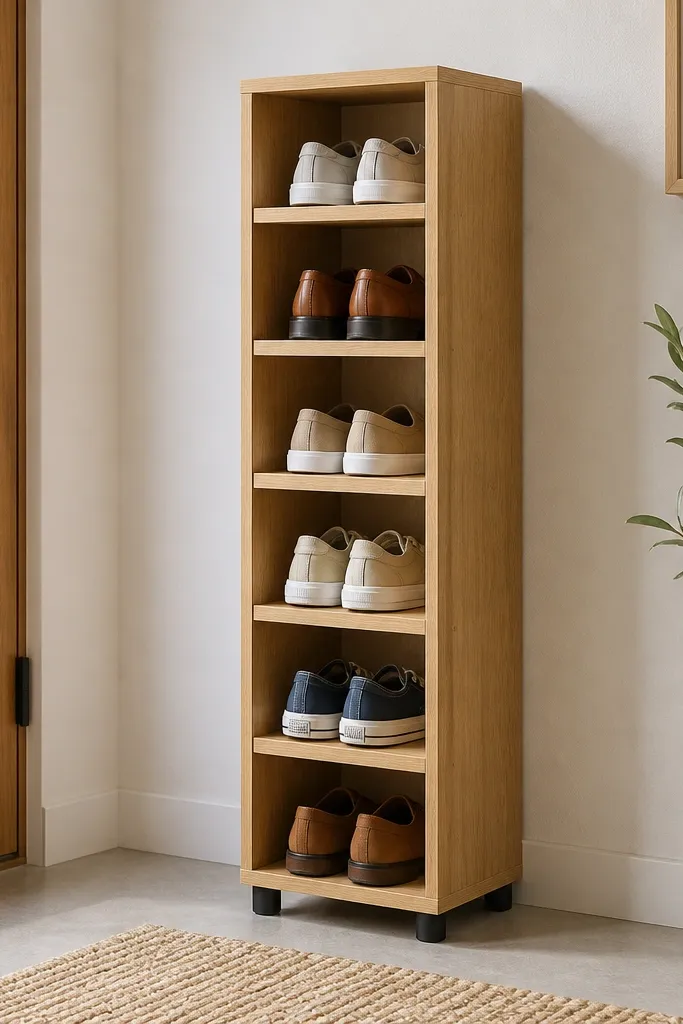
This design is the one I build when someone says "small entryway" and "I want it to look clean." The 12-inch depth holds most sneakers and slip-ons without turning into a clutter shelf. The front lip is the detail that makes it look finished - shoes stop at the lip instead of tipping out or looking messy. Use a single wood tone so the grid looks sharp.
Cut a base panel and side panels from 3/4-inch plywood. Make cubbies 7.5 inches wide and 8 inches tall (adjust height if you store taller boots). Add a 3/4-inch-wide front lip strip along the front edge of each cubby so the shoe toe hits wood instead of open air. Finish with a satin poly topcoat in a clear or warm tone.
Pro tipDry-fit one cubby with your most common shoe before you cut the dividers - measure toe width, not shoe size.
AvoidDon't skip the lip; without it, shoes creep forward and the rack looks sloppy fast.
2. Corner L-frame shoe rack with diagonal brace
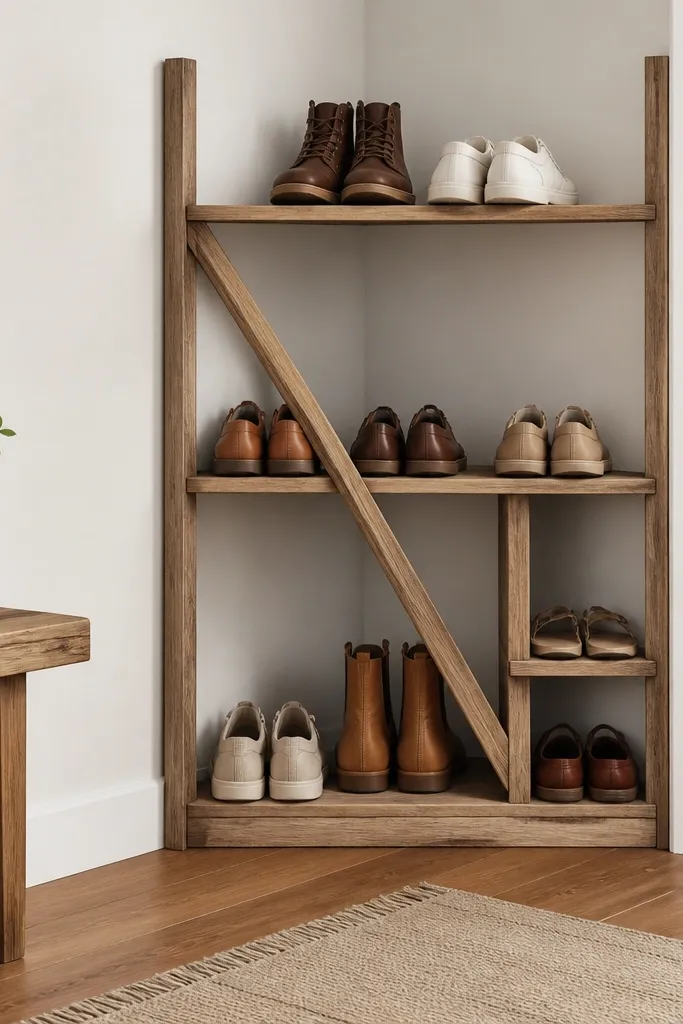
Corners waste space, so I love this layout for apartments and hallways where straight walls are too narrow. The L-frame lets you store shoes on two faces while still keeping one consistent depth. The diagonal brace stops wobble when you load heavier boots, and it also gives the piece a "designed" look. Leave the cubbies open so airflow keeps the entry from smelling musty.
Build two side frames with 1x3 or 1x4 boards, then connect them with a corner panel. Use 3/4-inch plywood for the shelf surfaces. Make the corner section 10 inches deep on one side and 10 inches deep on the other, then set cubbies at 8 inches tall for sneakers and 10 inches for higher shoes. Screw through the brace ends with pilot holes so the brace stays straight.
Pro tipAngle the diagonal brace so it lines up visually with one corner cubby edge - it makes the rack look intentional from across the hall.
AvoidDon't make the shelves thin; 1/2-inch ply flexes and makes the whole rack feel flimsy.
3. Pipe-and-wood shoe rack with removable baskets
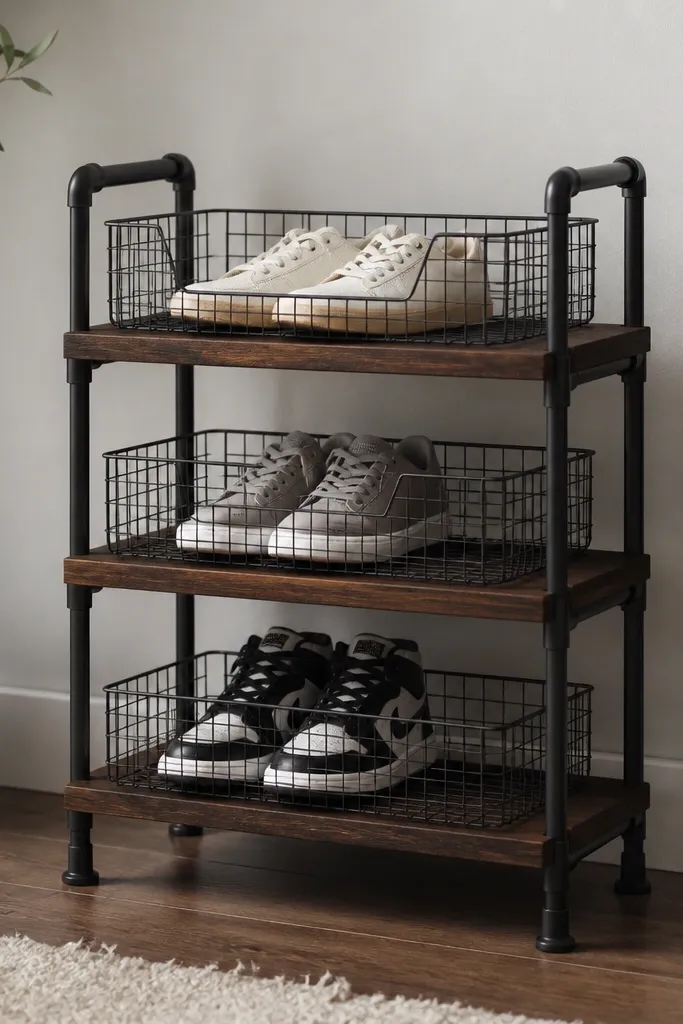
This one looks airy because the baskets show airflow while the pipe frame keeps the structure industrial. I've used it in entryways where shoes collect socks and small clutter - the basket rim keeps everything contained. The wood shelves give you a warm tone that balances the black metal. Remove baskets for cleaning and it stays looking fresh.
Use 1/2-inch black pipe with flanges at the base and two vertical uprights. Cut 2x12 or 1x12 boards into shelves sized to your depth (I do 11-12 inches). Mount shelf brackets at 8-inch intervals so each basket sits with clearance. Attach wire baskets by resting them on the shelf rails or using small corner brackets.
Pro tipUse felt pads under basket corners so metal doesn't rattle against wood.
AvoidDon't leave shelves bare; wire baskets slide when you pull a shoe out unless there's a stop or rim.
4. DIY pallet-wood shoe rack with slat spacing

Pallet slats make a shoe rack that looks rustic but still tidy when you control the spacing. I like this for flip-flops, sandals, and sneakers with flexible soles because the slats cradle them. The back panel is what keeps it from looking like a pile of wood - it gives the rack a front boundary. You also get that "entry bench" vibe without building a bench.
Disassemble a pallet carefully and select boards with straight edges. Sand to 180 grit and remove splinters. Space slats 3 to 3.5 inches apart for average sneakers; add a back panel from 1/4-inch plywood or thin hardboard. Seal with a stain plus a satin polyurethane so the wood doesn't get tacky in humid weather.
Pro tipMark slat spacing with a jig made from scrap plywood so every gap stays even.
AvoidDon't use pallet boards that are warped - they create uneven gaps and shoes sit at weird angles.
5. Floating shelf shoe rack with angled dividers
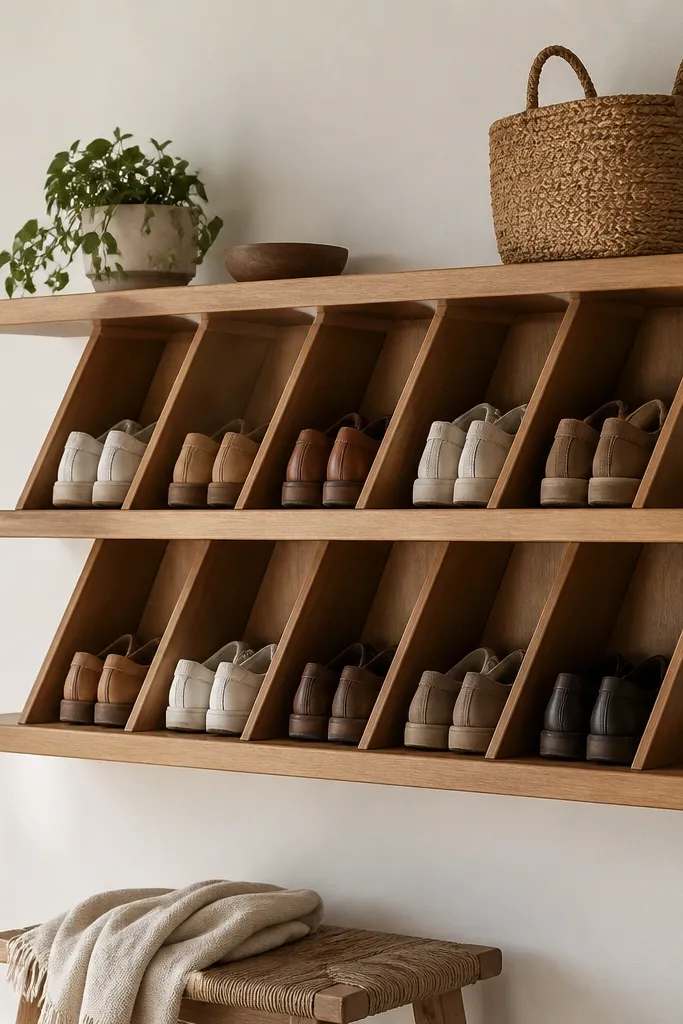
Floating shelves are great when you want the entry to feel open. Angled dividers stop shoes from sliding forward and make the cubbies look like a designed pattern. This is also beginner-friendly because you're mostly cutting dividers and anchoring shelves securely. If you use a darker stain, the rack looks like built-in millwork even though it's DIY.
Mount shelves using proper wall anchors into studs. Use 3/4-inch plywood shelves, 10-12 inches deep. Cut angled dividers from 3/4-inch plywood so each divider creates a 7-inch wide bay at the front and 6-inch at the back. Space the divider heights so the shoe toe rests above the shelf lip.
Pro tipTest the angle with one shoe: aim for the toe to touch the divider, not hang in midair.
AvoidDon't rely on drywall anchors alone for shelves loaded with boots; use studs or heavy-duty toggles.
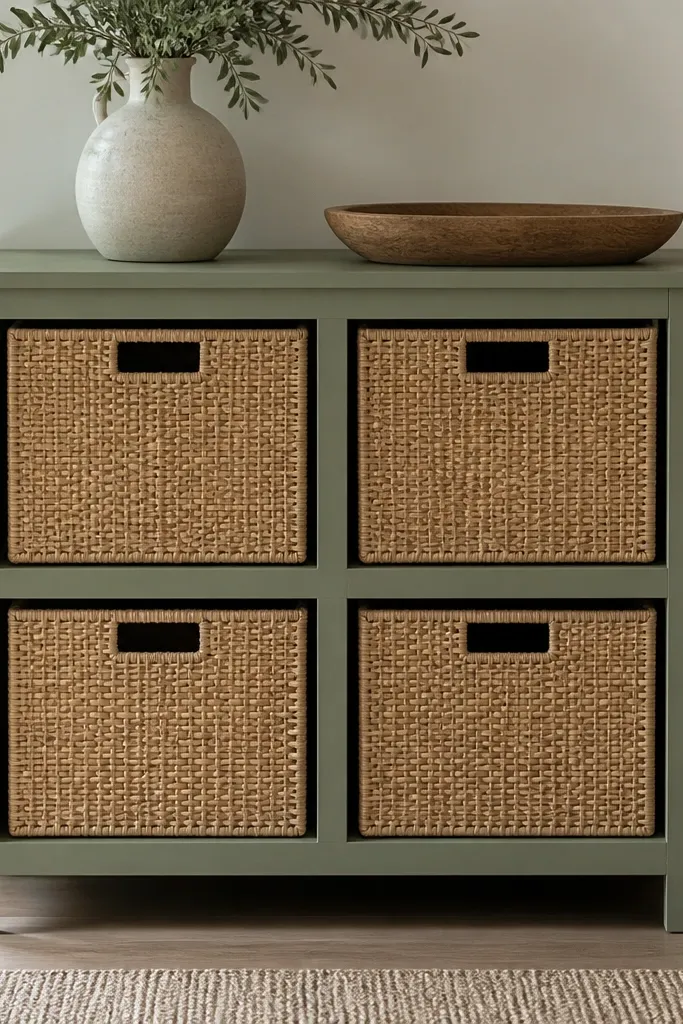
6. Fabric-covered cubby shoe rack with removable bins
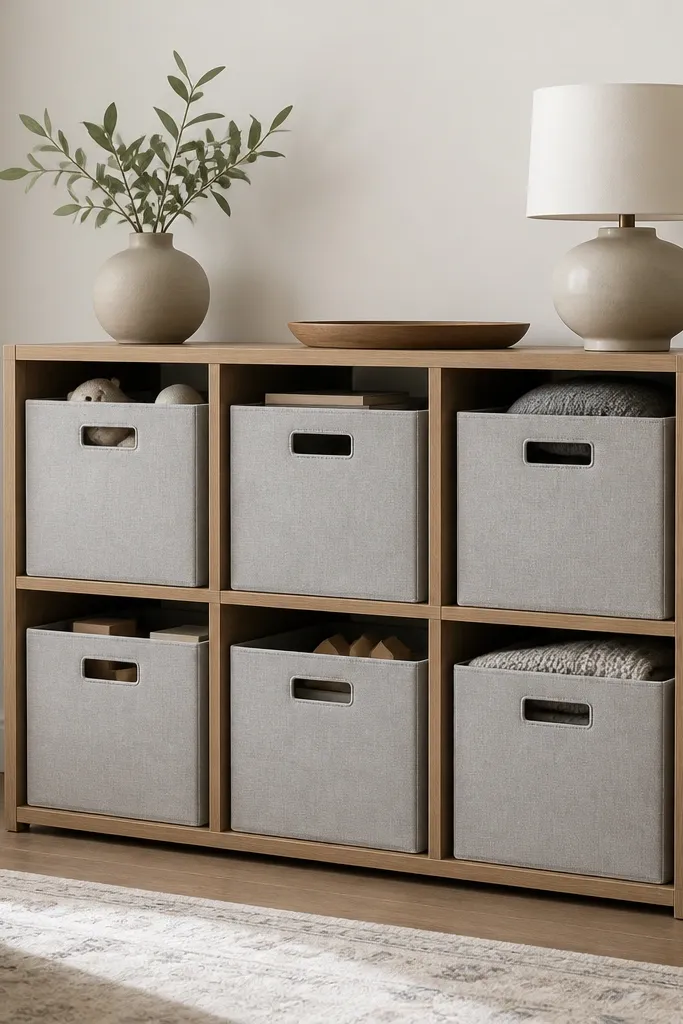
This is the best option when you want shoes to look less visible and you don't want to build doors. The fabric insert hides the "top of shoe" view and softens the look in a small hallway. Removable bins make cleanup easy, and you can wash the fabric inserts. I've used this style in entryways where kids' shoes are scattered daily.
Build a basic frame from 2x2 lumber or 1x2 trim boards, then add a backer panel from thin plywood. Create 6 cubbies with 7.5-inch widths and 9-inch heights. Sew or buy fabric bins sized to the cubbies with 1-inch clearance so they slide in/out. Use a simple snap or Velcro strip at the top edge so inserts stay put.
Pro tipChoose fabric with a tight weave like canvas so it doesn't sag after a few months.
AvoidDon't make bins too tight; forcing them in twists the fabric and tears seams.
7. Repurposed TV stand shoe rack conversion
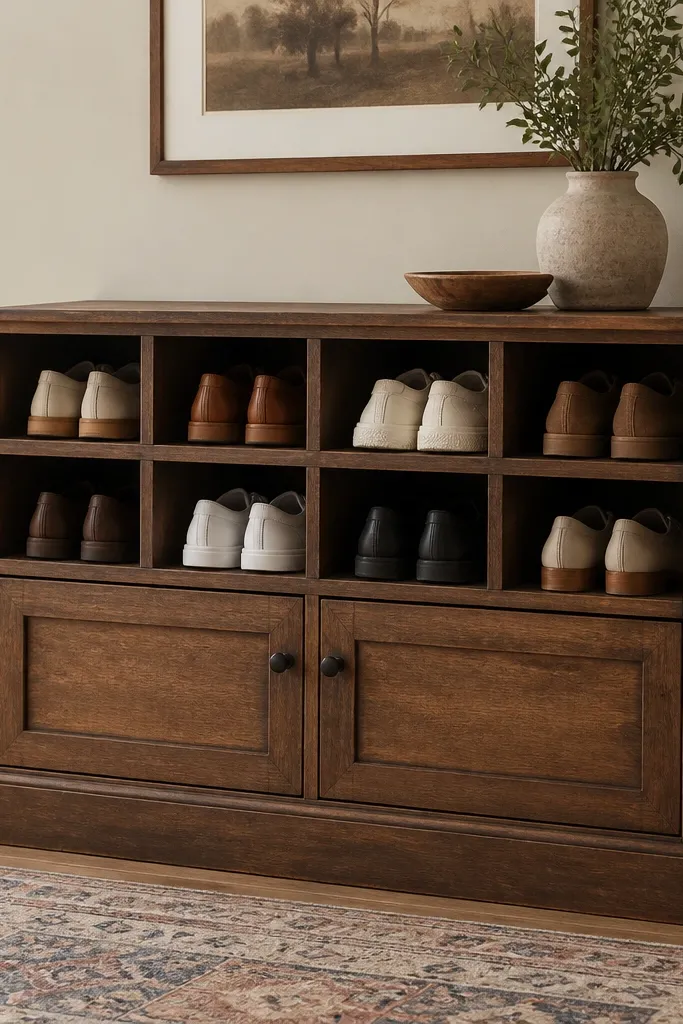
If you already have furniture that's the right width, conversion saves money and time. A TV stand often has the exact depth that works for shoes, and it already looks like "furniture" instead of a DIY project. Removing a drawer or adding dividers makes it far more practical than a flat shelf. Doors help keep the entry tidy when guests arrive.
Remove drawers or shelves and add dividers from 3/4-inch scrap plywood. Aim for cubby heights of 8 inches for sneakers and 10 inches for mid-height shoes. Sand any rough edges and paint or stain to match the existing finish. If the original stand has a back panel, keep it - it prevents shoes from falling behind.
Pro tipUse cabinet shelf pins for at least two levels so you can reconfigure when shoe sizes change.
AvoidDon't leave an empty cabinet with one big shelf; shoes slide and the whole thing looks like a storage box.
8. Stair-step shoe rack made from 1x boards
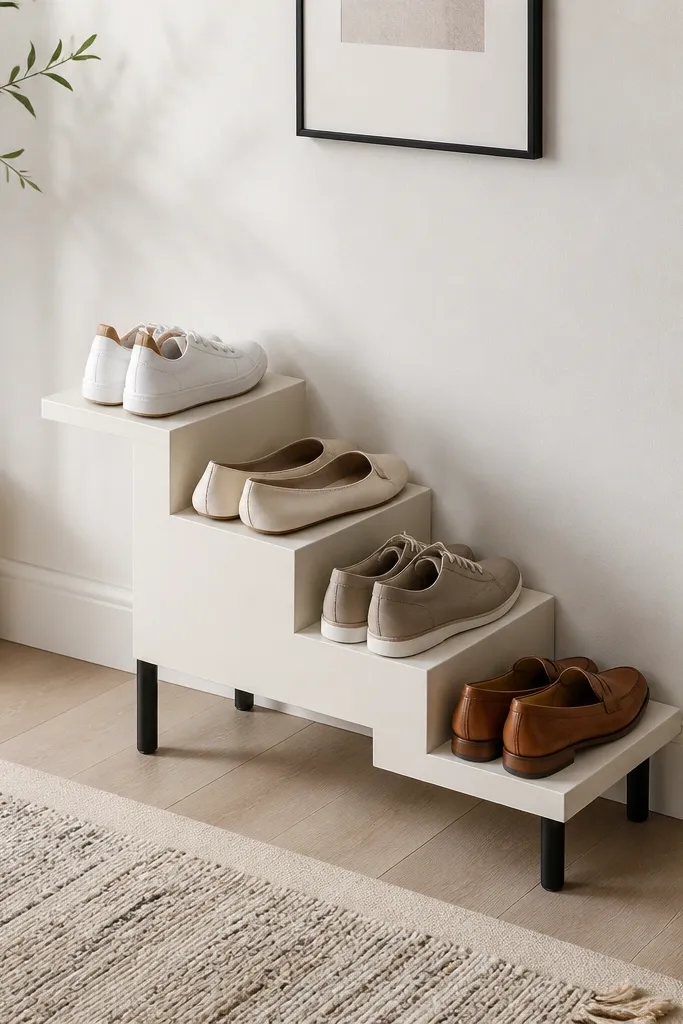
Stair-step racks look good because the height changes create a clean rhythm. They're also great for smaller entries because you can place the rack along the wall and still have a narrow footprint. This design is forgiving - if your measurements are a bit off, the stepped silhouette hides it. Use it for everyday shoes you grab daily.
Cut 1x boards into step platforms and side supports. Build a base frame and then attach platforms at 7-inch increments, leaving 2 inches between steps so shoes don't collide. Keep the depth at 10-12 inches. Paint the frame off-white, then seal the top platforms with a clear coat to protect from scuffs.
Pro tipPre-drill and countersink screws so you don't see screw heads on the front edges.
AvoidDon't make each step the same height; the magic is in the stagger.
9. Slim shoe rack bench top with internal cubbies
When your entry needs seating and shoe storage, this is the format that feels "built-in" without building a whole bench. The top gives you a place for mail and a basket for gloves, and the cubbies keep shoes contained. I like this for families because it reduces the "shoes by the door" habit instantly. The front looks tidy because every cubby has a matching opening.
Build a box frame with 2x2 legs or a simple toe-kick and side panels. Make the top from 3/4-inch plywood sized to the full width, then attach a foam pad if you want a cushioned surface. Use 7.5-inch cubby widths and about 9 inches height for sneakers. Add a back panel so tall shoes don't fall behind.
Pro tipAdd a removable tray on top for small items - it stops the bench from turning into a junk shelf.
AvoidDon't skip a backer panel; shoes will lean and scrape the wall.
10. Vertical slat rack with 2-inch spacing for flats
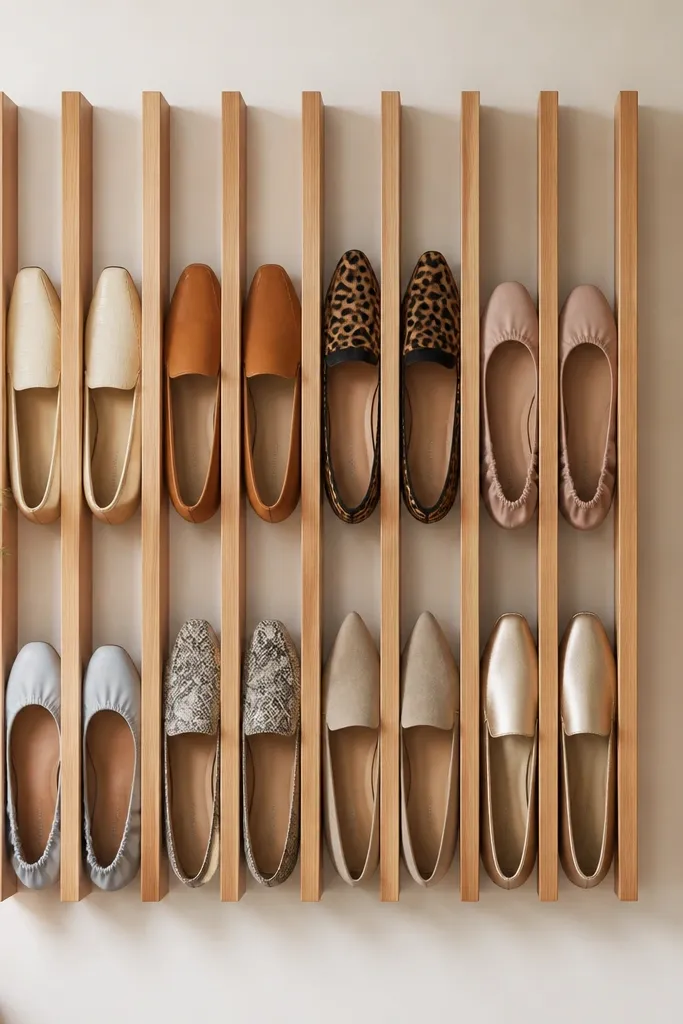
This one is for people who store flats, flip-flops, and lightweight slip-ons. The vertical channels keep pairs from stacking messily, and the rack doesn't look bulky because the slats take up less visual space than cubbies. I also like it for small entries because it uses wall space. If you keep one season's shoes here, it stays tidy.
Use 1x2 boards for slats and space them 2 inches apart measured center-to-center. Mount the back frame to studs and add a top rail so slats stay aligned. Keep the rack about 36 inches tall and 10 inches wide for a narrow spot. Sand smooth and finish with satin clear so the slats don't catch dirt.
Pro tipUse a template block to set each slat gap - your spacing will look intentional instead of "close enough."
AvoidDon't use wide gaps if you store sneakers; they'll tip and fall out.
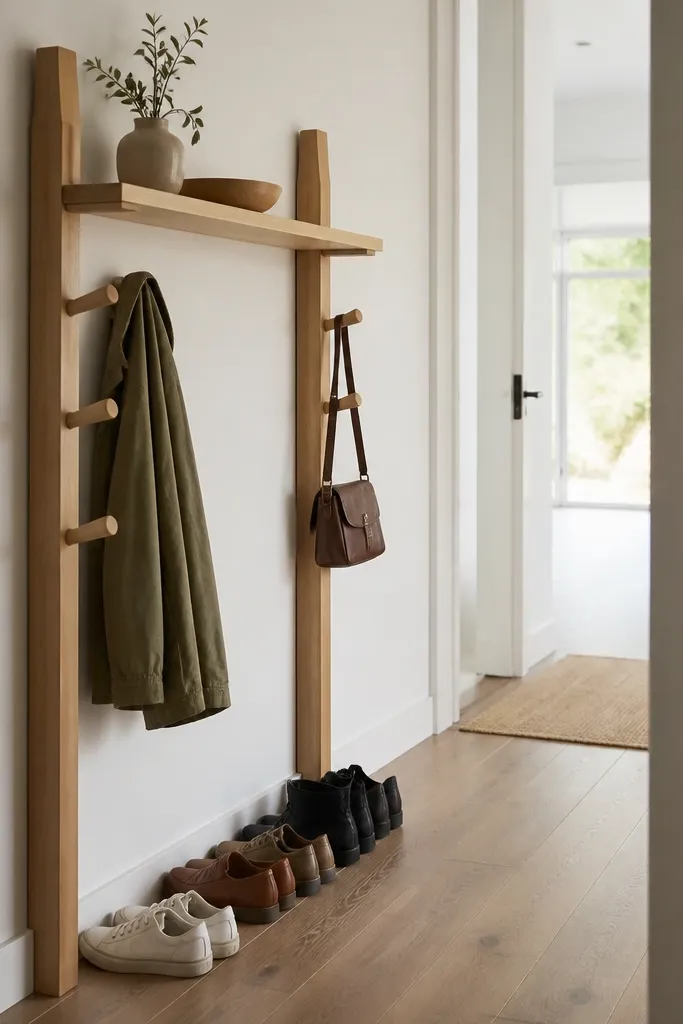
11. Ladder-style shoe rack with removable tiers
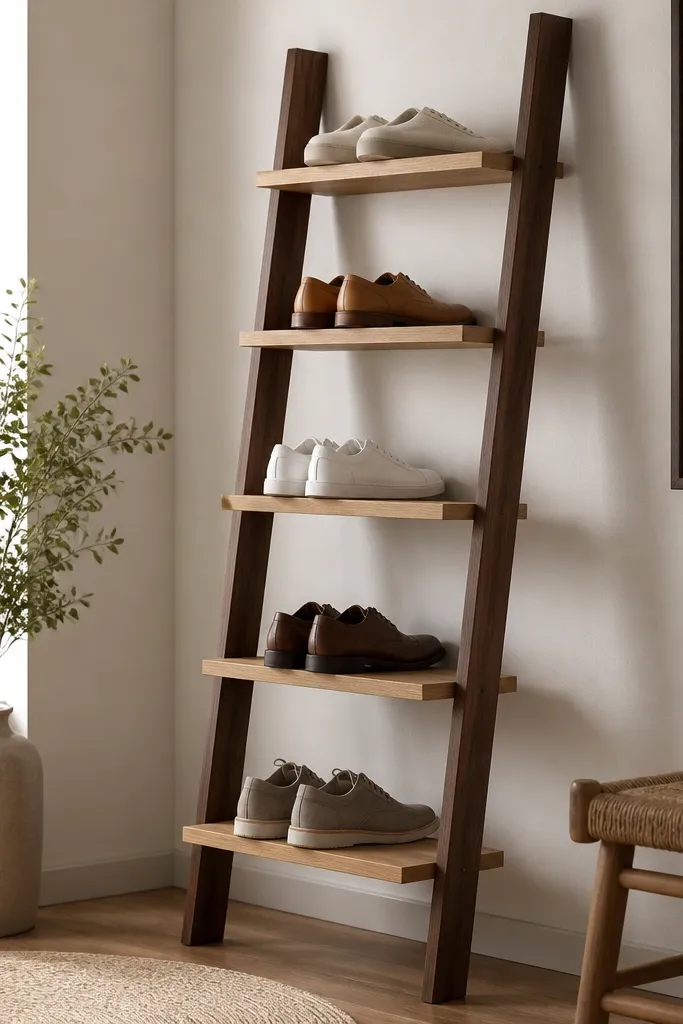
A ladder rack solves the "where do I put shoes without a big cabinet" problem. It visually reads tall and narrow, so it's great for hallways where floor space is tight. Removable tiers let you take it apart for moving or change spacing when you switch seasons. I like the contrast between dark rails and lighter shelves - it makes the tiers pop.
Build ladder rails from 1x3 boards and connect with rungs at 10-inch intervals. Attach shelf planks at each rung, leaving a slight overhang on the front. Make shelves 10-12 inches deep. Finish rails with a dark stain and seal; leave shelves in a lighter stain or paint to create the two-tone look.
Pro tipAdd wall anti-tip brackets at the top so it doesn't shift when you pull shoes from the middle tier.
AvoidDon't skip the anti-tip - ladder racks slide if you bump them.
12. Acrylic-clear shoe rack with wood base (for a clean look)
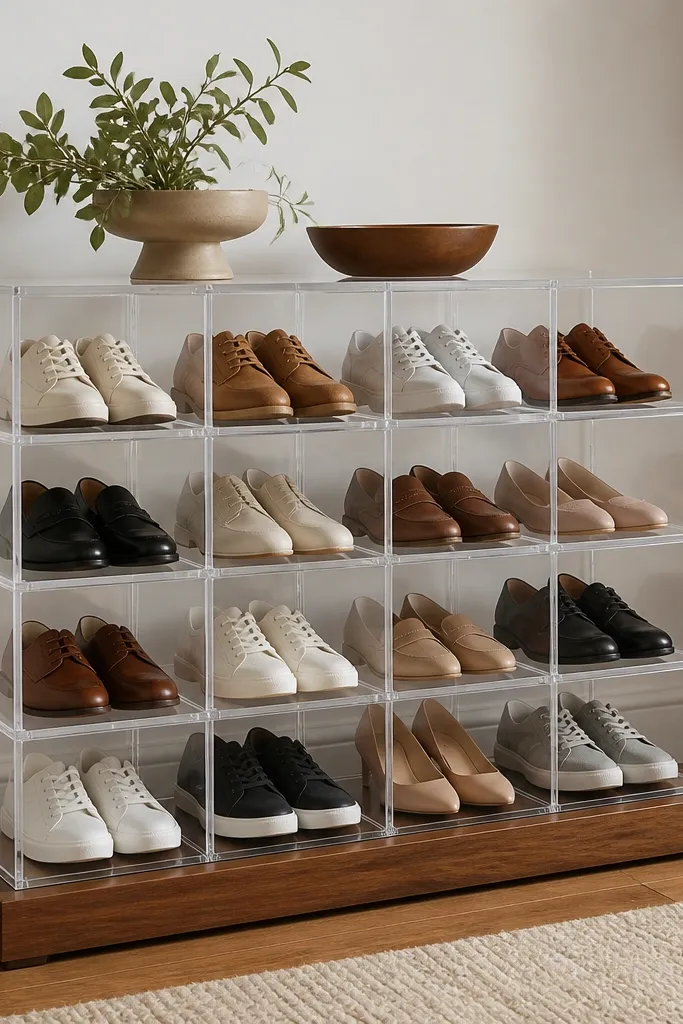
Clear dividers make shoes look organized instead of "stuffed." This works best when you're okay with shoes being visible and you keep pairs matched and clean. The wood base keeps it from looking like cheap plastic - it anchors the piece visually. I've used this in entries where the rack is visible from the living room and you want it to look light.
Build a wood base from 3/4-inch plywood with a 10-12 inch depth. Cut acrylic sheets into dividers using a proper acrylic blade or have them cut at a shop. Space dividers 7-8 inches apart depending on your shoe toe widths. Secure acrylic with small countersunk screws and plastic washers to prevent cracking.
Pro tipPolish acrylic edges lightly with fine sandpaper so the cut lines don't look rough.
AvoidDon't use thick dividers without planning; they can block airflow and make shoes look crowded.
13. Woven basket shoe rack on a DIY wood frame
Woven baskets soften the look and make a shoe rack feel like decor instead of storage. The baskets hide the messy parts of shoes while still letting air move through. Natural tan baskets against a muted paint color looks good in small spaces because it adds warmth without bulk. This design also works when you want to store "in-between" items like shoe polish or insoles.
Build a simple rectangular frame and add a divider in the middle for 4 compartments. Use 3/4-inch plywood for the back and 1x2 boards for the front rails. Choose baskets that fit with a 1-inch gap on each side. Paint the frame in a muted color like sage or warm gray, then seal it with satin poly.
Pro tipAttach small wood cleats inside each compartment so baskets can't slide when you pull them out.
AvoidDon't choose baskets with floppy bottoms; they sag and the front looks uneven.
14. Pegboard shoe rack with wooden hooks and shelf
Pegboard is the "I need flexible storage" option. You can move hooks as shoe styles change - sandals one month, sneakers the next. The ledge shelf gives you a place for keys or a small tray, and the baskets catch small stuff like shoe horns. In a small entry, pegboard reads lighter because it's mostly holes and lines.
Mount pegboard to studs using screws and add a top rail for stability. Use wooden hooks sized for your shoe straps or hang loops. Add a 10-12 inch wide shelf at about 16 inches from the floor. Use baskets with flat backs so they sit flush on the pegboard.
Pro tipPaint pegboard white and use a satin clear - it wipes clean when kids drag in dirt.
AvoidDon't leave hooks in random heights; keep them aligned so hanging shoes look intentional.
15. Sliding barn-door style shoe cabinet (open when needed)
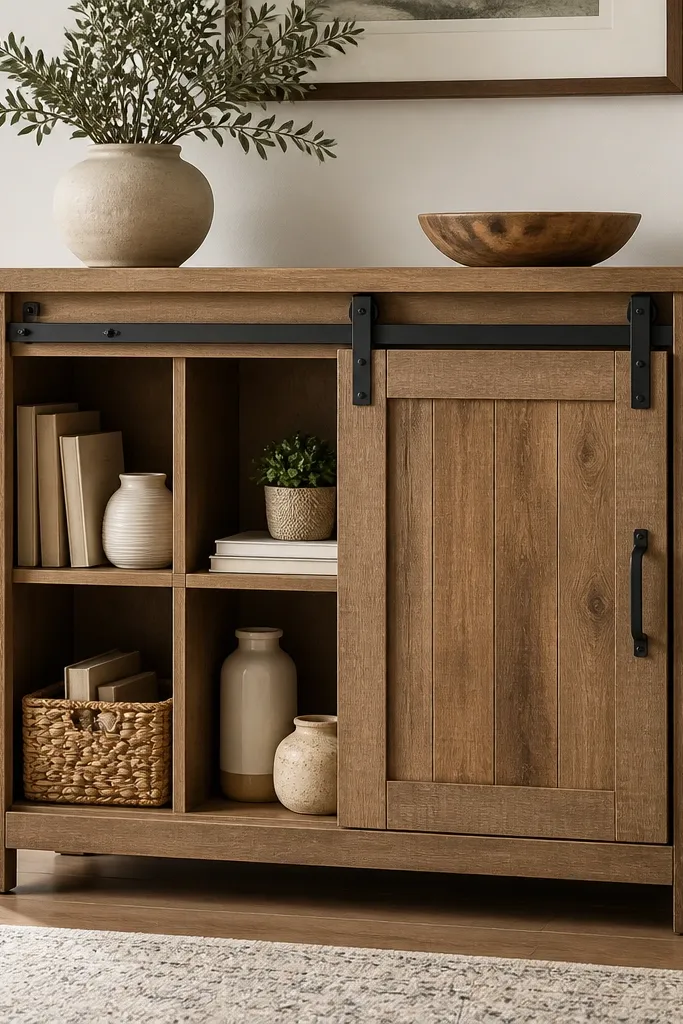
If your biggest complaint is visual clutter, a cabinet door solves it fast. You get hidden storage for shoes that are not daily wear, and you can open it for quick access. The sliding door saves space compared to a hinged door in tight hallways. I like this design with open cubbies inside because shoes still dry.
Build a box cabinet from 3/4-inch plywood sized to your depth (I keep it 14 inches max). Install interior shelves as a grid: 7.5-inch cubbies and 9-10 inches height. Use a barn door track kit and mount the door so it clears the cabinet edge by 1/2 inch. Add a back vent gap or leave the back open if possible for airflow.
Pro tipAdd a small rubber door stop so the barn door doesn't slam and chip the finish.
AvoidDon't seal the back completely; shoes need airflow or the cabinet smells.
16. Vintage door shoe rack with angled shelf and hooks
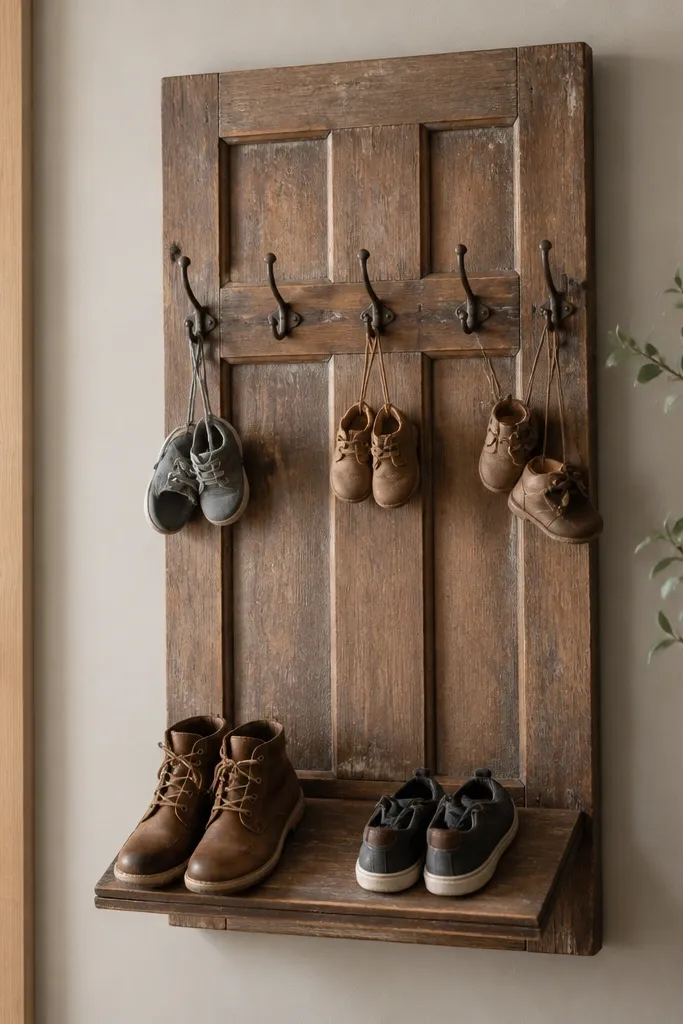
This is the "I want character but it still works" option. Door panels already have visual interest, and the angled shelf keeps shoes from sliding forward. Hooks are perfect for shoe care items or for hanging lightweight sandals. It also fills an empty wall without taking floor space.
Mount the door panel to wall studs with a backing frame so it stays flat. Add an angled shelf made from 3/4-inch plywood with a 10-15 degree slope so shoes settle back. Place hooks 12-14 inches apart horizontally for spacing. Seal the door with a clear coat so cleaning doesn't damage the finish.
Pro tipUse a level and mark hook positions with painter's tape so the hardware lines up with the door's existing lines.
AvoidDon't mount the shelf too flat; shoes will slide and the bottom edge will get scuffed.
17. Stacked drawer shoe rack using repurposed dresser drawers
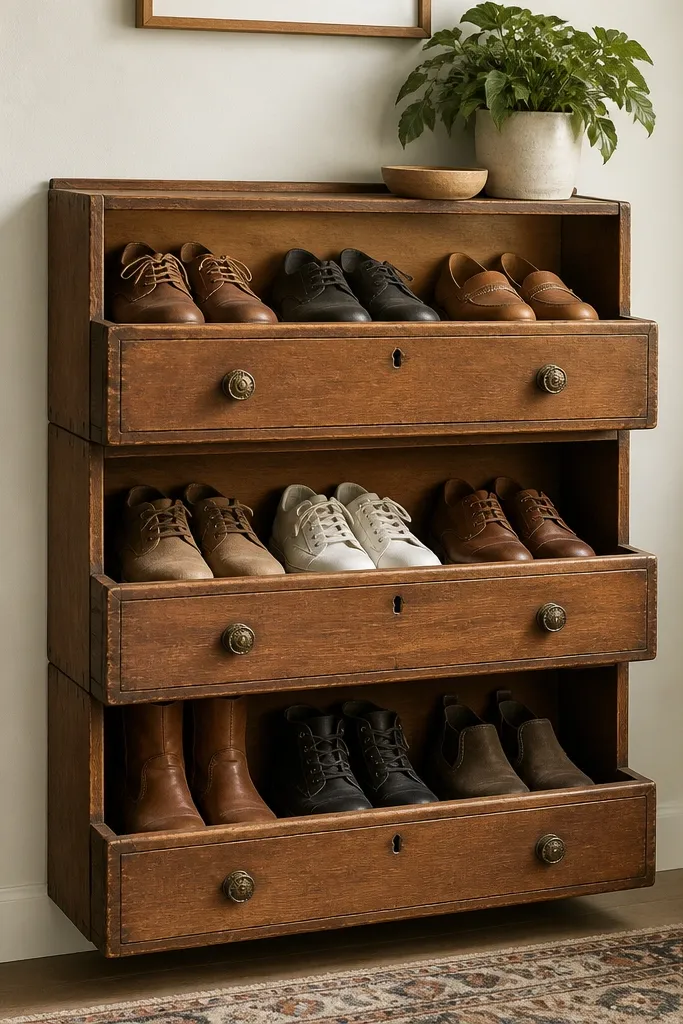
Drawer fronts add instant style and hide the fact that you're doing DIY. Removing drawer bottoms turns them into open cubbies that still look tidy. This works well for small entries because you can stack drawers vertically and keep the footprint narrow. I like using one paint color and sanding the drawer fronts so the finish looks consistent across each level.
Use three drawers with the same width. Remove the drawer bottoms and add a thin back panel from hardboard so shoes can't slide backward. Mount drawers to a frame or stack them on a base with spacers between for airflow. Keep cubby heights around 8-10 inches for sneakers and 10-12 for tall shoes.
Pro tipPaint all drawer fronts, then seal the interior hardboard with a wipeable finish.
AvoidDon't leave raw wood inside; shoes scuff it and it gets dirty fast.
18. Peg + shelf shoe rack for narrow hallways (no full wall build)
This is the solution for hallways where you can't commit to a full built-in look. Two side boards and a peg line keep it compact, while the top shelf gives you a place for a small plant or key tray. Shoes sit in line and you get quick access. It also looks clean because the structure stays narrow from floor to top.
Build two side panels from 1x4 boards and connect with a top shelf from 3/4-inch plywood. Add pegs or dowels spaced 5-6 inches apart to support shoe heels or straps. Keep the rack width around 18-20 inches so it works in tight entries. Finish with satin paint or stain and seal the shelf.
Pro tipDrill pegs with a jig so holes are straight; crooked holes make the rack look off even if the wood is pretty.
AvoidDon't add too many pegs; it turns into clutter instead of storage.
19. Hanging shoe rack on a curtain-rod frame with rigid base
Hanging organizers are great, but the cheap ones sag and make shoes look messy. This version uses a curtain-rod frame plus a rigid backing so the pockets stay flat. The rigid base keeps the organizer from bowing, and it makes the whole thing look intentional. It's best for flats, sandals, and lightweight sneakers.
Mount two brackets for a curtain rod to studs at about 20 inches from the floor. Add a rigid backing panel from thin plywood or hardboard behind the pockets. Hang a shoe organizer with 6-10 pockets, then adjust the rod height so the bottom pocket sits 2 inches above the floor. Secure the organizer top edge to the rod with clips so it doesn't slide.
Pro tipUse binder clips to hold the organizer in place while you adjust pocket alignment.
AvoidDon't mount on drywall only; heavy shoes pull the rod down over time.
20. Under-stair shoe rack with removable front trays
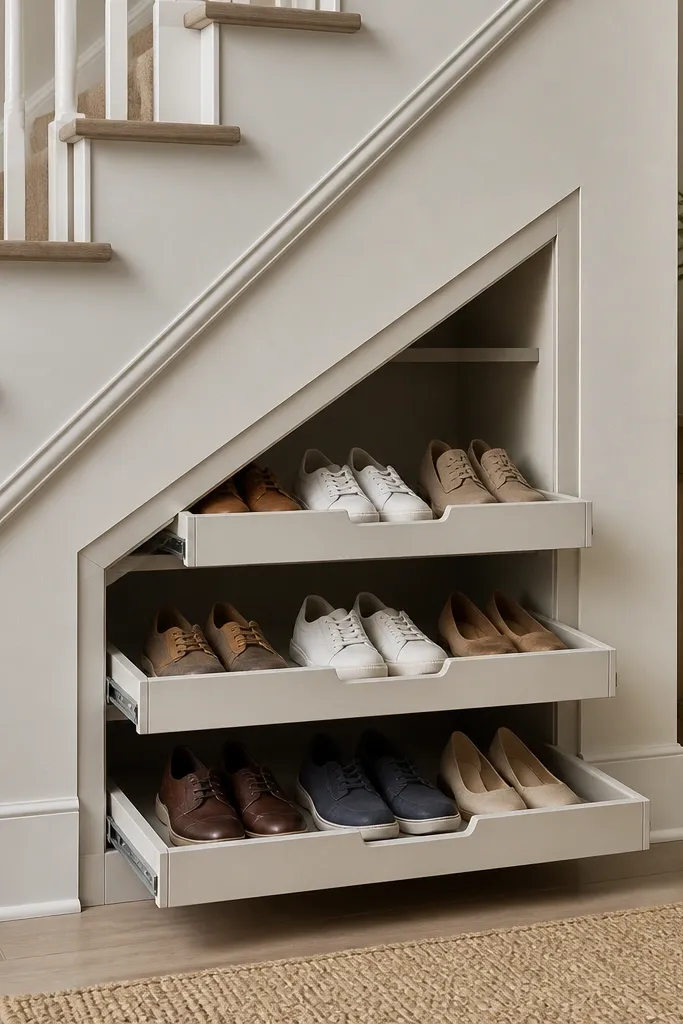
Under-stair storage is awkward unless you make access easy. Removable trays let you pull shoes out without kneeling in the dust pile, and they keep the inside from turning into a dark cave. I like this with shallow trays because it keeps the front clean and prevents shoes from stacking too deep. Paint the interior a light neutral so you can actually find things.
Build a frame to match the underside slope and create tray openings. Use 3/8-inch plywood or thin boards for tray bottoms, with 3/4-inch lips on the front edge. Add dividers inside trays if you store different shoe types. Install full extension sliders if you want it to glide; otherwise use simple rails made from scrap wood.
Pro tipLabel the trays with small removable tags on the inside so you don't ruin the look on the outside.
AvoidDon't leave trays without lips; shoes spill forward and the under-stair area looks messy.