
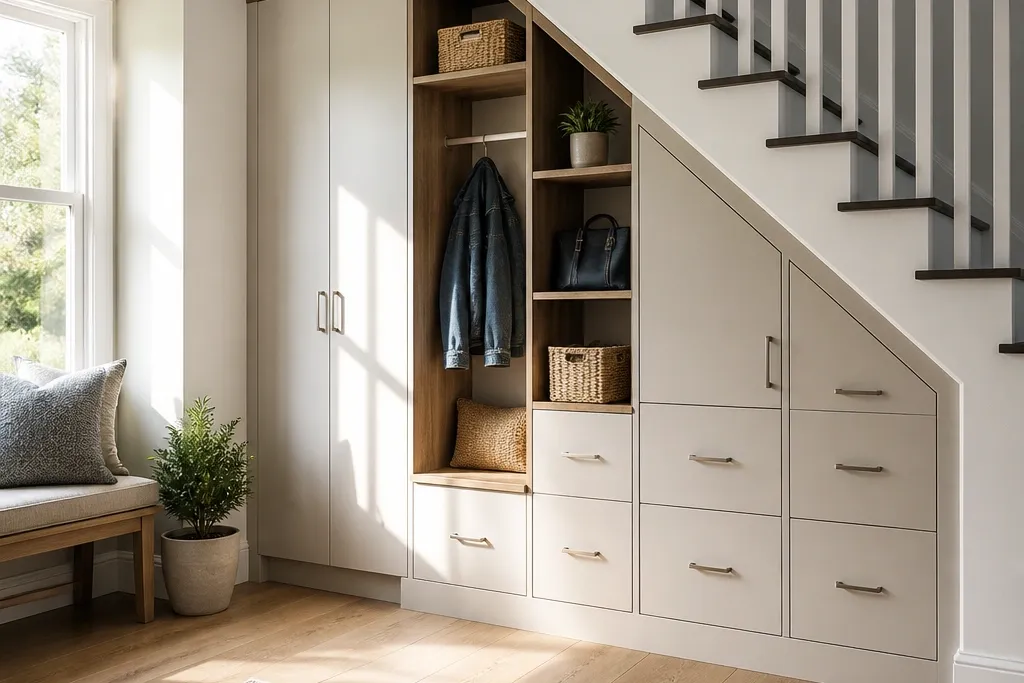
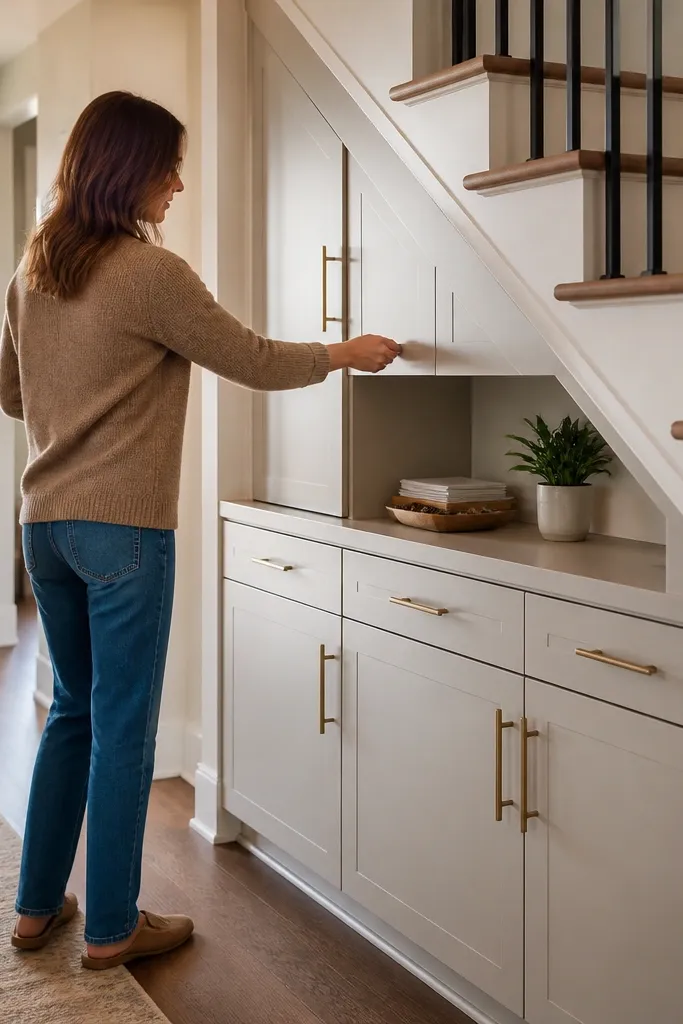
1. Painted Plywood Drawer Bank with Flat Panel Doors
Start by cutting primed plywood boxes to fit the void depth, then add a 3/4 in face frame or trim line so the whole unit sits flush with the surrounding wall. Build drawer boxes from 1/2 in plywood and mount full-extension slides aligned to your drawer fronts. Then install flat panel door frames on the remaining sections, using 1/4 in reveal gaps for even spacing. Finish by sanding smooth, painting with cabinet-grade enamel, and adding matching black pulls or knobs centered on each drawer.
This is the cleanest option for small homes because the front reads like built-in cabinetry, not a storage corner. A drawer bank gives you fast access to daily items like shoes, gloves, or mail without pulling everything out. Flat panel doors keep the look calm even if the inside has mixed bins. Use a smooth, matte finish so the face doesn’t glare in daylight. It’s best when your under-stairs void has enough height to stack drawers and still leave room for a couple of doors above or below.
Skip thisAvoid MDF for the front panels if you want crisp edges; it dents and chips around hardware faster.
Editor's noteUse a scrap spacer to keep all drawer and door reveals identical while you screw everything in.
2. Warm Oak Open Shelf Stack with Fabric Bins
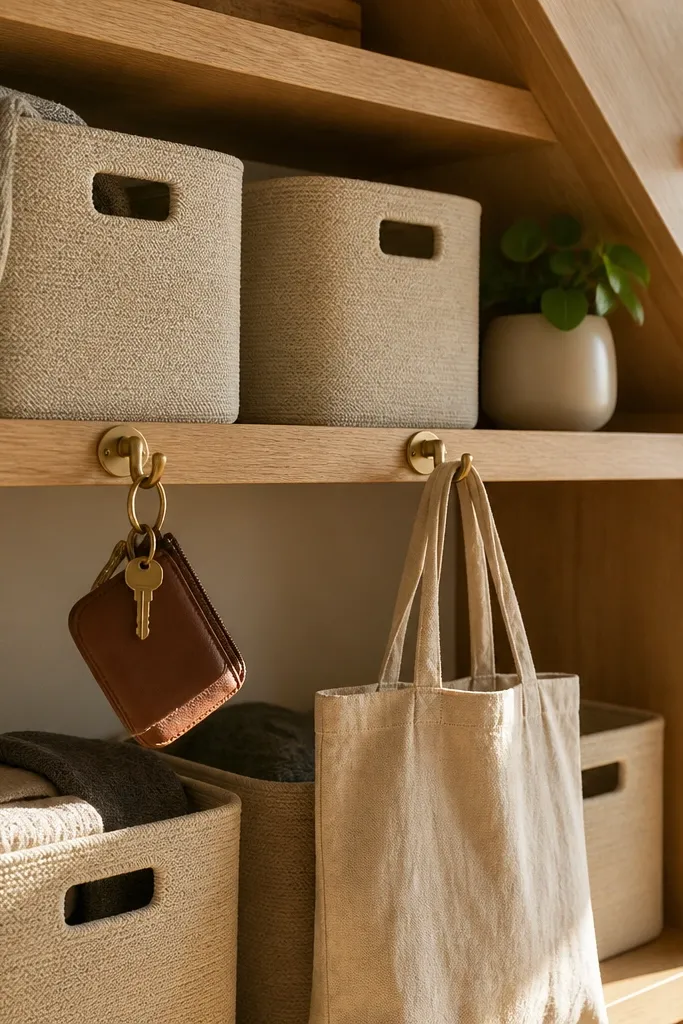
Start by staining or finishing oak veneer plywood shelves, then cut them to span the void depth with a consistent overhang of about 1 in. Install a simple ledger board along the wall, level it, and screw cleats into the side panels so shelf heights stay repeatable. Place fabric bins on the shelves and leave at least 1 in of clearance around bin edges so they slide in without snagging. Finally, mount hooks on the underside of the top shelf and wipe the finish with a protective clear coat.
Open shelving looks great in photos because you can style it intentionally, but it only works if you hide the clutter. This setup uses warm oak shelves paired with fabric bins that match in color and texture. The oak tone warms up the space, and the bins keep randomness from showing through. Add small brass hooks under the shelves for keys or bags so the whole void becomes a drop zone. This is a smart choice when your ceiling height under the stairs is uneven and you want flexible shelf spacing.
Skip thisDon’t leave random cardboard boxes on open shelves; they ruin the look fast.
Editor's notePick one fabric color family (cream, sand, oat) so the open shelves still look cohesive.
3. Shiplap Lined Closet Doors with Slim Shoe Pull-Outs
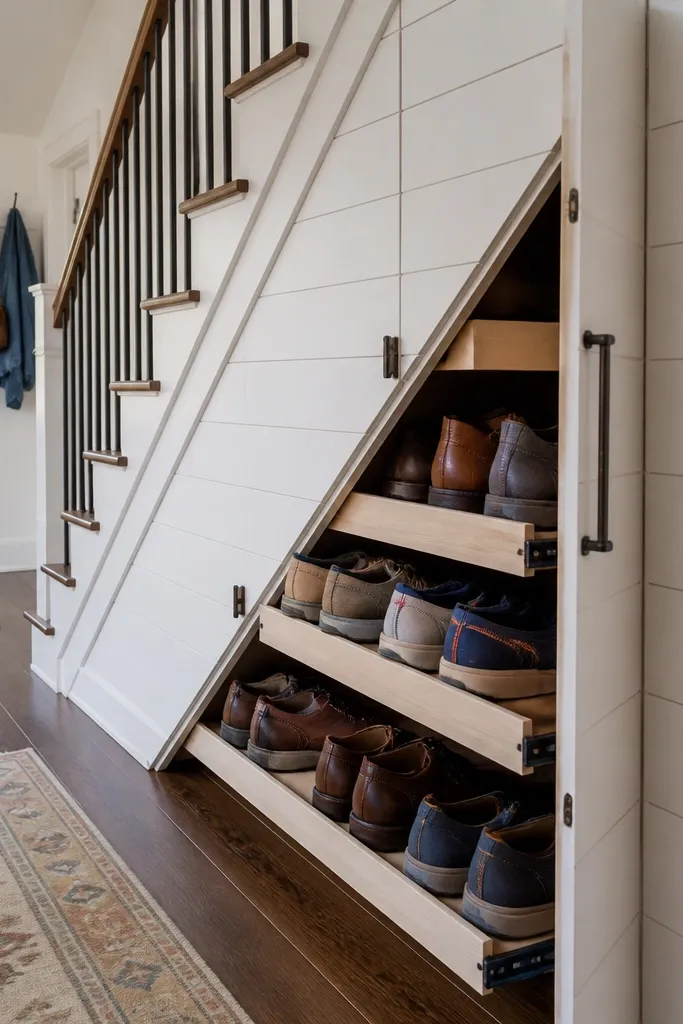
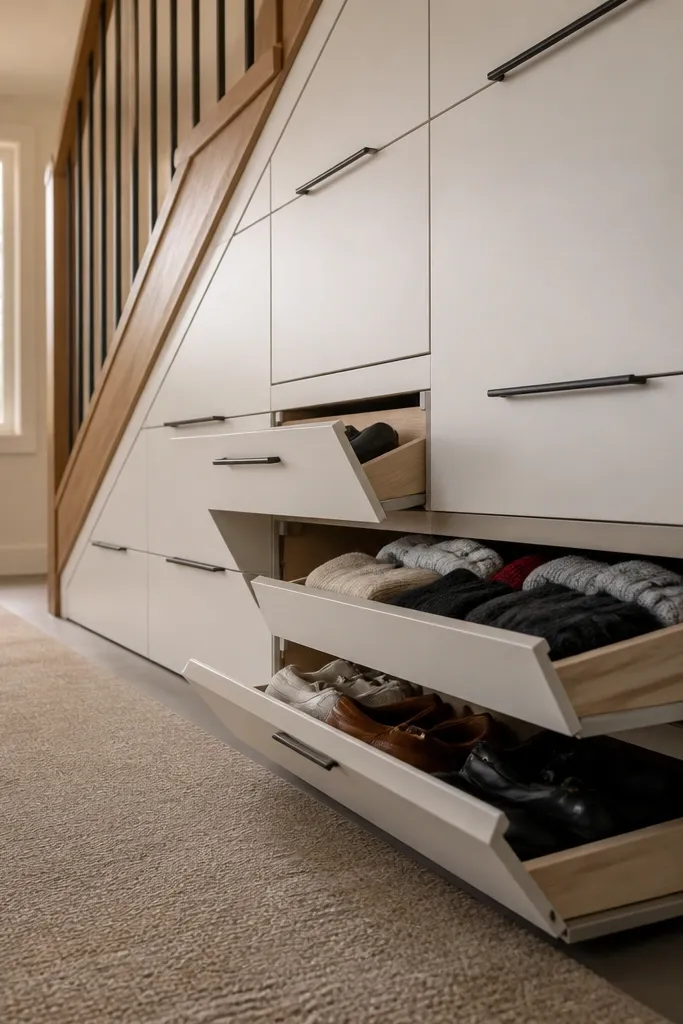
If you want good-looking under-stairs storage that also feels cozy, shiplap on the front instantly makes it look like it belongs. This version pairs hinged closet doors with slim pull-out shoe trays that slide out without you crawling. The shiplap texture hides minor imperfections and makes the storage feel like a feature, not a utilitarian box. This works best when the void is narrow enough that shoe trays can be the main function. Keep the trays uniform and the doors aligned so the front looks crisp.
Frame the under-stairs opening with a plywood face and add hinge plates on the sides so the doors swing cleanly. Cut shiplap boards to fit the door faces, leaving small expansion gaps and nailing into backing rails. Install slim pull-out trays made from 1x2 rails and plywood bottoms, then mount full-extension slides to the side frame. Paint the shiplap doors in a satin white, then add simple black knobs at consistent height.
Sand shiplap lightly before paint so the texture stays smooth, not rough.
Avoid oversized shoe tray depths that hit the stair stringer; measure the usable depth at the lowest point.
4. Corner-to-Wall Pantry-Look Cabinets with Glass Insert Panel
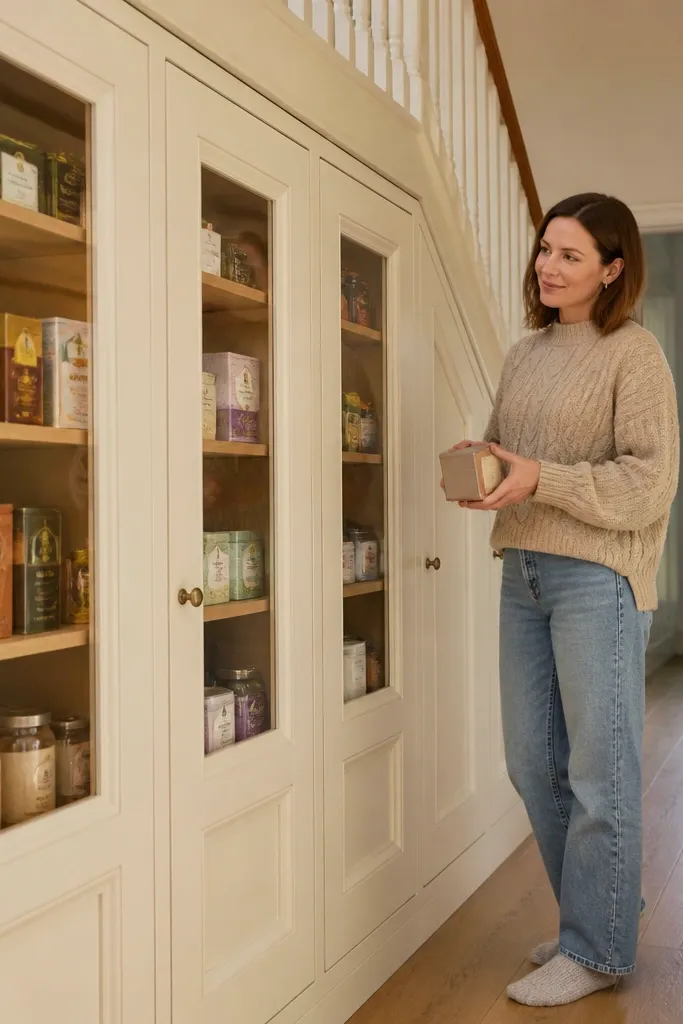
This is for the “I want it to look like a real built-in pantry” crowd. You get solid storage behind doors, plus one glass insert so you can visually pick what you need. The mix of wood shelves and a glass panel makes the whole void feel designed. It also helps you store things that look good — tea, snacks, small jars — without turning the space into clutter. Use this when your under-stairs void has enough width for cabinet doors and a shelf you can rest items on securely.
Build a carcass from 3/4 in plywood with a back panel so it stays square under the stair slope. Add a shelf system using adjustable shelf pins or fixed shelves spaced 10 to 12 in apart for jar-friendly storage. Install a glass insert panel in one door section using a thin wood frame and glazing clips. Finish with a warm stain, then seal with matte polyurethane so the glass doesn’t reflect harshly.
Use smoked or clear glass with a slight tint so fingerprints don’t show as much.
Don’t use shiny lacquer on the shelves; it looks slick in person but glare ruins photos.
5. Two-Tier Bench Seat with Lift-Up Storage Under the Stairs
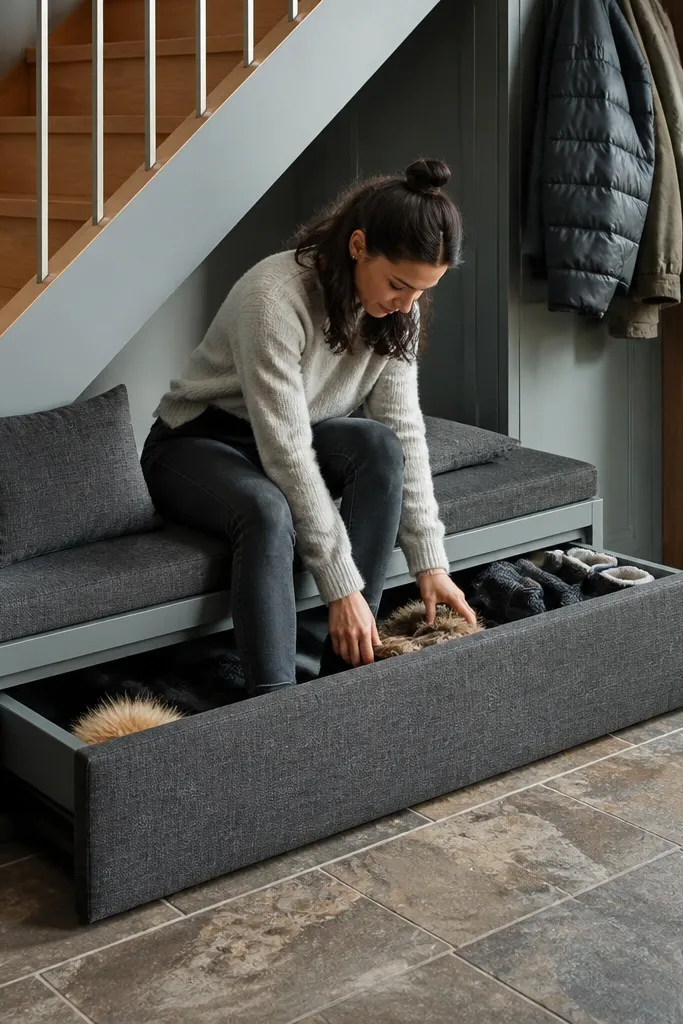
Build a box carcass from plywood sized to the void, then add a hinged lid frame using 1x2 cleats around the opening. Add a second lid panel if your void height allows it, keeping each lid under about 36 in wide so it doesn’t sag. Attach lift supports or strong piano hinges, then add a plywood seat top with foam and fabric or a simple laminate top. Finish the front trim in a matching paint or stain and add a soft-close latch on each lid.
A bench turns under-stairs storage into usable seating, which makes the space feel bigger and more intentional. The lift-up lids hide the contents and keep the face clean, even if you store bulky items like winter gear or board games. A two-tier bench design also helps uneven heights: the lower section can be deeper while the upper lid is shorter. This is a great fit for entryways where you need a place to sit while putting on shoes. Make the seat comfortable and the lid hardware smooth so it doesn’t feel like a chore.
Skip thisAvoid hinges alone for heavy lids; without supports, the lid weight will wear the hardware.
Editor's noteUse lift supports rated for your lid weight so the lids don’t slam or drift down.
6. Louvered Fronts with Linen Closet Bins
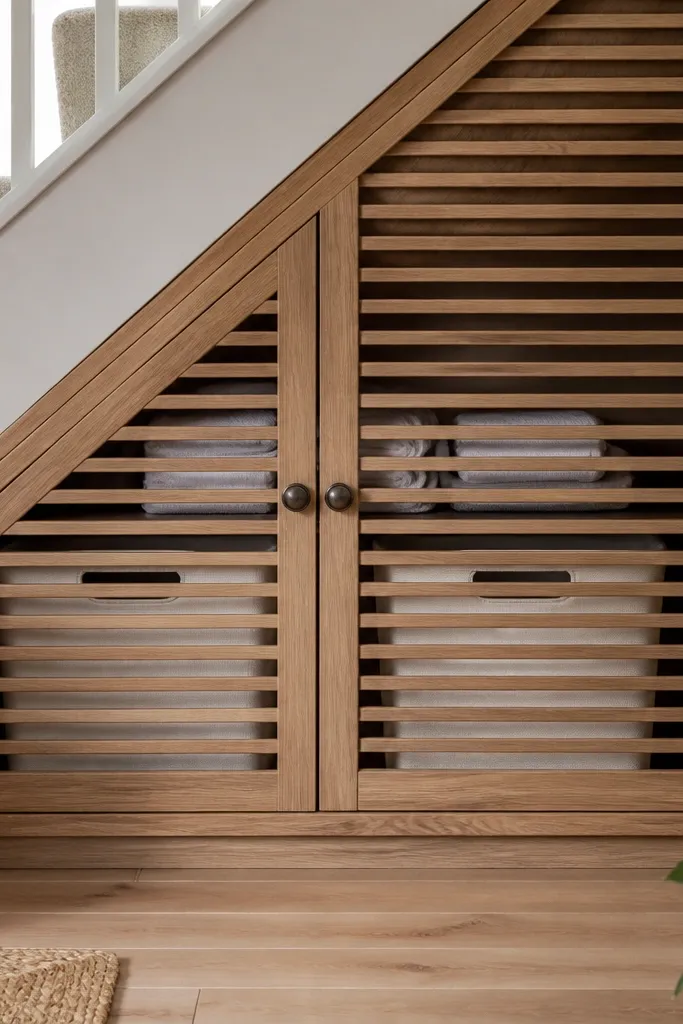
Frame the opening with a plywood cabinet shell, then cut louvered door panels sized to each bay. Install the louvers to a backing frame so they stay flat and don’t warp. Place pull-out linen bins inside and mount the bins on small runners so they glide out smoothly. Finish by painting the louvers and frame in one color and adding minimal hardware like a single recessed pull.
Louvered fronts make under-stairs storage look airy and intentional, which is the whole point when your storage sits in a small home’s main sight line. The slats hide the mess but let you see enough to grab what you need. This is perfect for linens, extra towels, and bedding that you want to keep dry and breathable. It also looks great in modern homes because the texture adds visual rhythm. Use when your void is deep enough to fit bins and when you want airflow behind the doors.
Skip thisDon’t use flimsy thin louvers; they warp and the door face starts to look uneven.
Editor's notePaint the louvered doors in a semi-matte finish so the slats don’t look chalky.
7. Stair-Slope Shelving with Adjustable Pegboard Panels
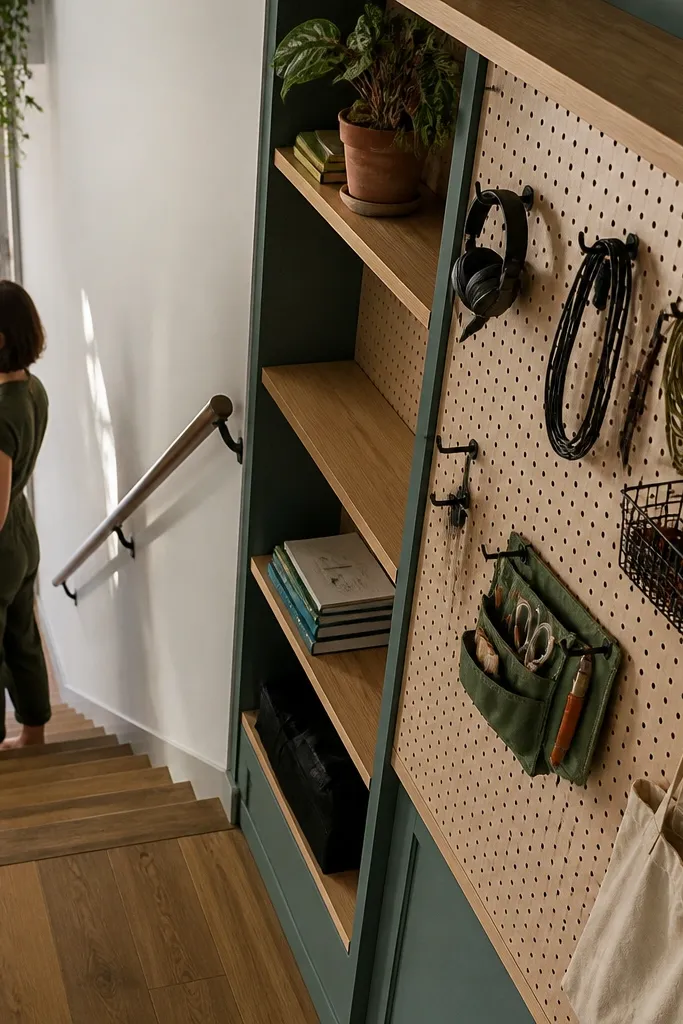
Build a back frame from 3/4 in plywood and attach pegboard panels to the vertical sections, not across the slope. Install a side rail system so peg holes align with your shelf bracket positions. Use metal shelf brackets that lock into the pegboard holes and add baskets on top. Paint the frame and pegboard, then seal with a durable clear coat before loading items.
If your under-stairs space is a weird slope and you want it to stay useful as your needs change, adjustable pegboard panels are the answer. You get a good-looking face because the pegboard grid looks intentional, especially when matched to a painted frame. Store small items in baskets and use hooks for bags, cords, and seasonal accessories. The adjustability means you can reconfigure shelf heights without rebuilding. It’s a strong choice for craft supplies, kids' gear, or a laundry-adjacent nook.
Skip thisSkip the “one shelf fits all” plan; the slope will force you into awkward heights unless you can adjust.
Editor's noteUse a laser level or long straightedge to keep the pegboard grid level across the whole void.
8. Two-Color Glass-and-Wood Door Mix
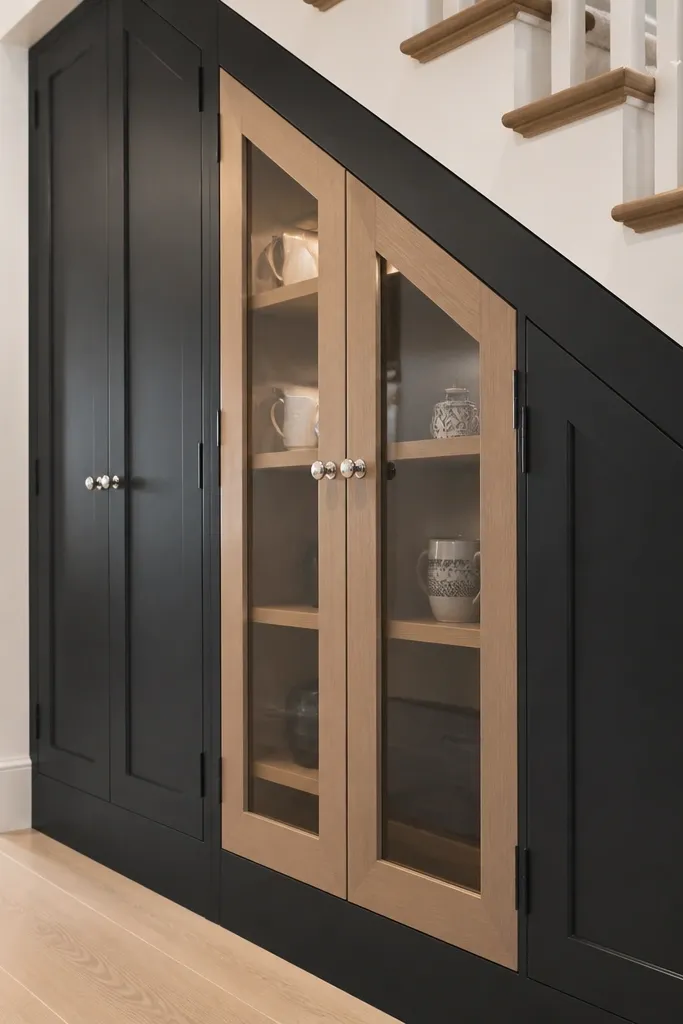
Build a cabinet carcass and separate door panels into two zones: a solid base for hiding and a glass insert zone on top or one side. Frame the glass with thin wood trim, then install tempered glass using glazing strips. Paint the solid zones in a deep color like charcoal or navy, and stain or paint the trim in a warm neutral. Add slim bar pulls in a matching metal finish, then install doors with concealed hinges for a flat face.
This looks designer because it breaks up the space with contrast. Dark painted doors hide daily clutter, while a small glass panel lets you show selected items like mugs, candles, or decorative storage jars. The key is keeping the glass panel size consistent and the trim clean so it doesn’t look like random inserts. This is ideal when your under-stairs void is visible from the hallway and you want it to look like furniture. It’s also a good route if you’re worried open shelves will look messy.
Skip thisDon’t use large glass panes if you store clutter; it defeats the “hidden mess” look.
Editor's noteUse the same glass shape across every door so the grid looks intentional.
9. Fabric-Faced Drawer Fronts in a Neutral Palette
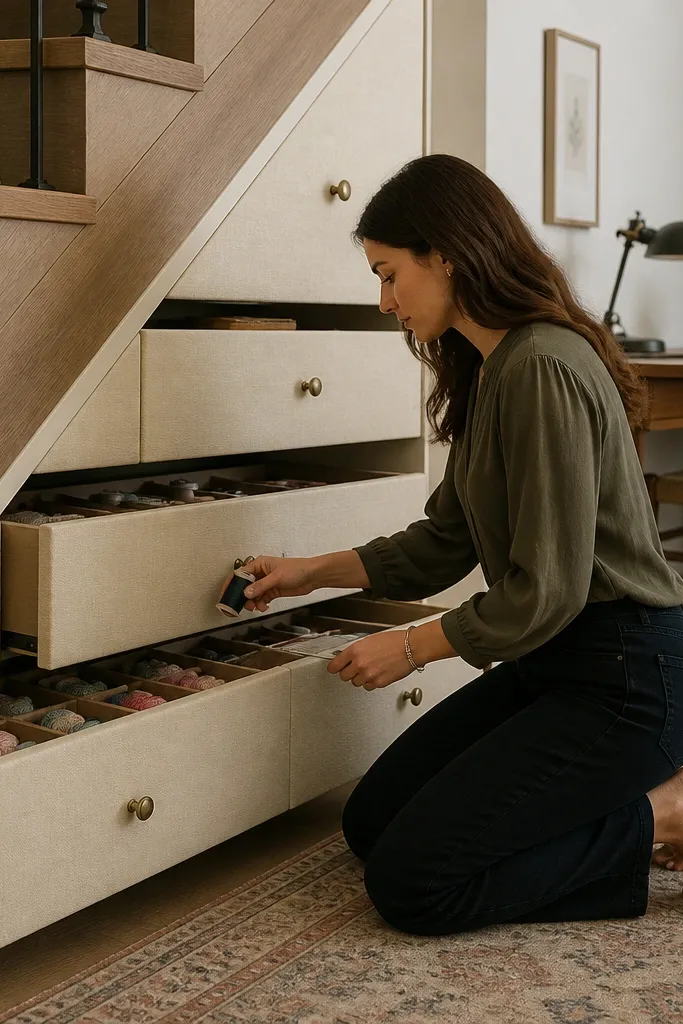
Start with a plywood drawer box and add a rigid backing panel for the fabric face. Stretch fabric over the panel and staple to the back, keeping tension even so corners don’t pucker. Trim the edges with thin wooden strips so the fabric looks framed, not raw. Install the drawer slides and attach the fabric-faced fronts, then seal the fabric with a fabric-safe matte coating to reduce staining.
Fabric drawer fronts make under-stairs storage feel soft and homey instead of boxy. This works well for small items like kids' art supplies, craft threads, or pet accessories because fabric hides the visual mess inside. The look stays cohesive if you use one fabric color family and repeat the pattern across all drawers. You also get less “hard” glare from painted surfaces, which helps in bright rooms. Choose this when your void is mostly drawers and you want the face to feel less industrial.
Skip thisAvoid thin upholstery fabric; it shows wrinkles and looks sloppy after a few months.
Editor's noteUse a medium-weight cotton canvas so it stays taut and doesn’t sag over time.
10. Shallow Sliding Baskets with a Matching Front Rail
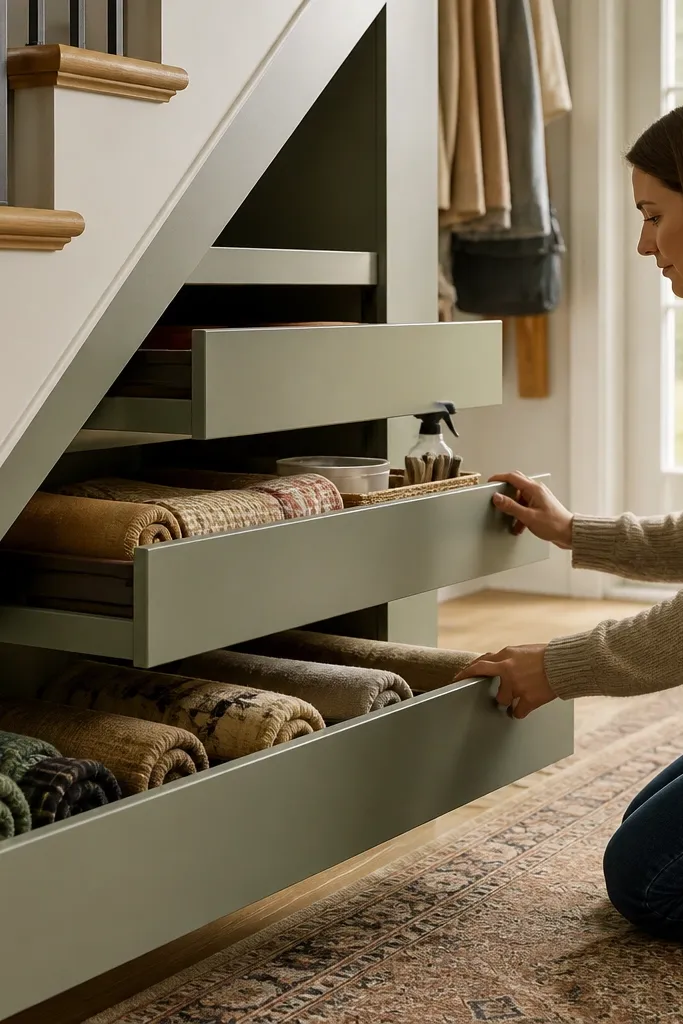
Build a simple frame with two side rails and a bottom shelf, then install basket slide tracks mounted on the sides. Choose baskets that match in size and wire pattern, then test-fit each basket for smooth movement. Add a front rail panel across the opening to cover the track line and create a consistent visual edge. Paint or stain the frame, then mount the baskets and add small labels on the inside lip if you want fast sorting.
This is the “quick grab” storage that still looks neat. Shallow sliding baskets let you see what’s inside while keeping everything aligned behind a clean front rail. It’s great for backpacks, scarves, and cleaning tools, because you can slide one basket out without dumping the whole area. The front rail makes the construction look intentional and hides the gaps that happen in small voids. Pick this when your under-stairs depth is at least 16 in so baskets don’t feel cramped.
Skip thisSkip mismatched basket sizes; the face will look uneven even if the storage is functional.
Editor's noteLeave a 1/2 in gap above basket height so they slide out without rubbing the front rail.
11. Built-In Wine Rack and Glass Storage with Side Lighting
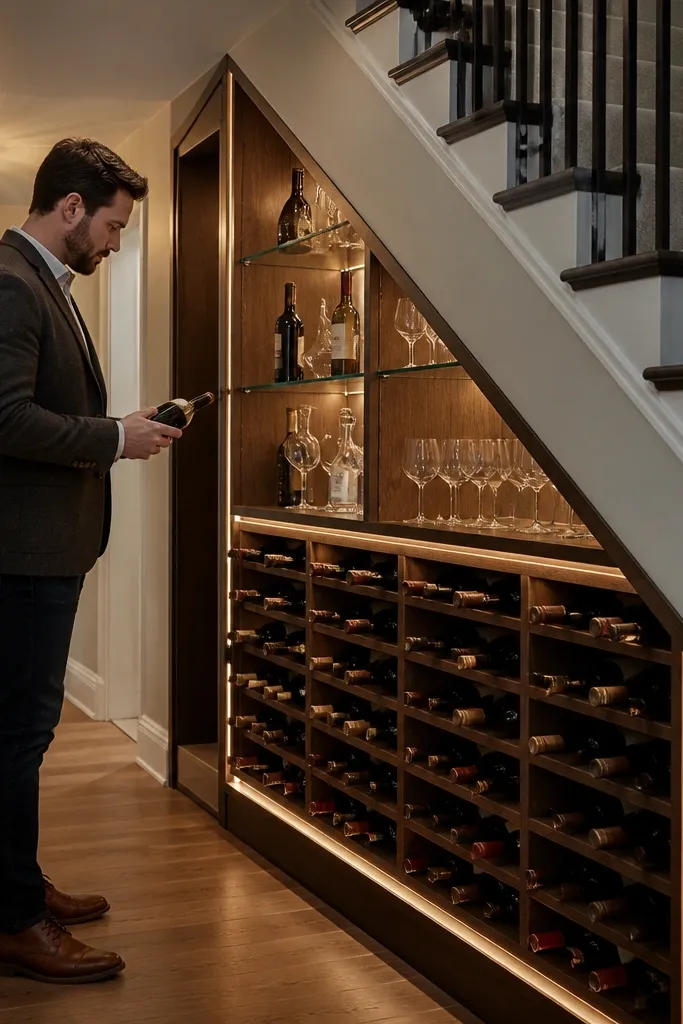
Build a framed compartment with a back panel and install a wine rack board system using bottle slot spacing sized for standard 750ml bottles. Add two glass racks or stemware rails mounted under a shelf line, spaced to prevent clinking. Install LED strip lights along the side walls behind a diffuser strip so the light doesn’t glare. Finish with a clear coat on wood or a warm stain, then add a door for the lower accessories area.
This is where under-stairs storage becomes a photo-worthy feature. Bottle racks look structured and clean, and glass shelves add a sleek, airy layer. Side lighting makes the wood look warm and gives the space depth, especially in hallways with low ceiling light. It’s best when your void is wide enough for bottles laid at an angle or standing upright in secure slots. Keep it tidy by using a closed cabinet on one side for spare bottles or accessories.
Skip thisAvoid placing lighting directly in the line of sight; you want glow, not glare.
Editor's noteUse a diffuser cover on LED strips; bare LEDs look harsh and cheap fast.
12. Pegboard + Countertop for a Mini Mail and Keys Station
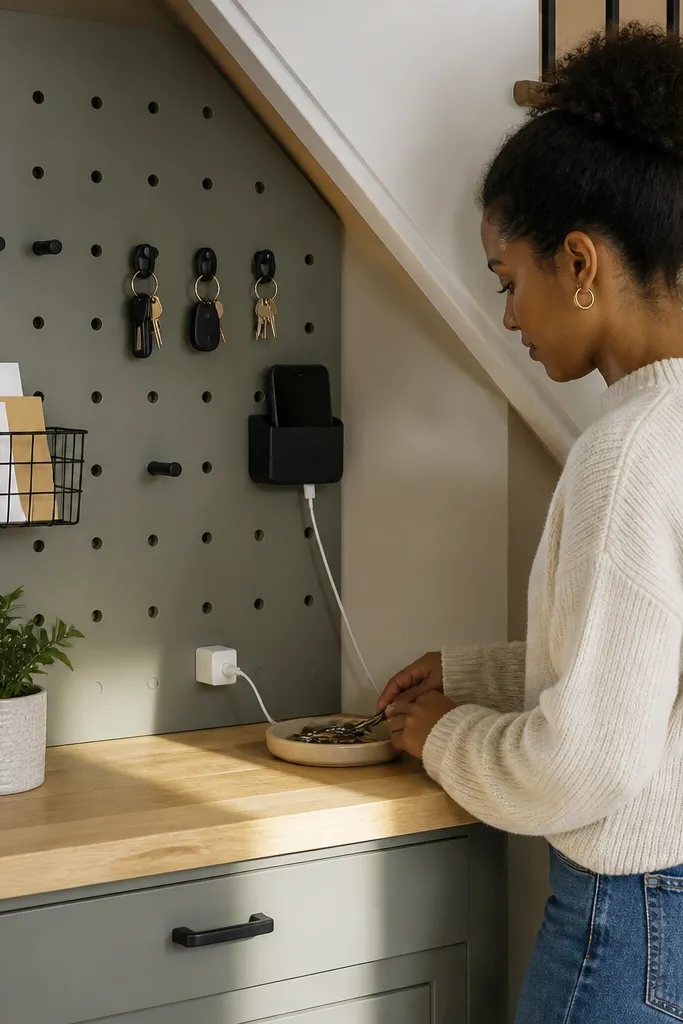
Mount a pegboard panel on a back frame, then install a countertop shelf using 2x2 cleats or a plywood top supported on brackets. Add hooks at eye level and small ledges below for mail trays. Install a hidden cabinet below the countertop if you want to store chargers and supplies out of sight. Finish the pegboard and frame in one paint color, then add a cable pass-through hole if you’re charging anything.
A mail station under the stairs turns storage into a daily habit zone. The pegboard keeps hooks and small shelves flexible, while a small countertop gives you a landing spot for keys, letters, and charging cables. This setup looks good because the pegboard grid and clean countertop create a strong visual block. It’s ideal for narrow voids where full cabinets feel too bulky. Build it with a tidy front face and consistent hardware finishes so it looks like a designed corner.
Skip thisAvoid placing the countertop too high; if you can’t comfortably drop mail, the station becomes unused.
Editor's noteUse magnetic cable clips on the underside so cords don’t hang in front.
13. Corner Tall Cabinet with Lattice Door Panels
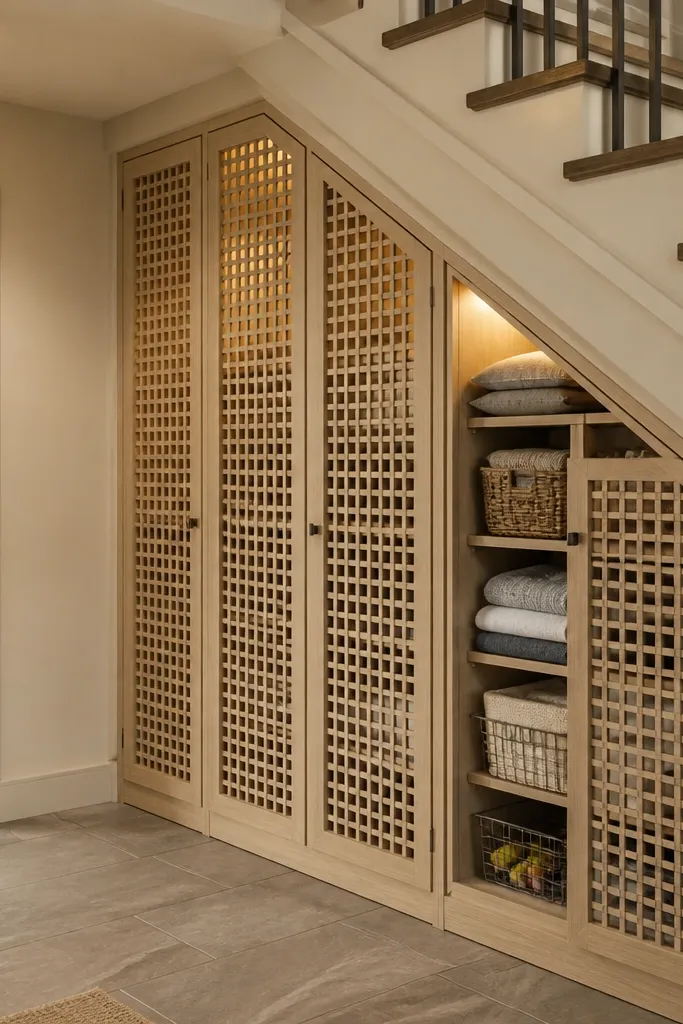
Tall cabinets under stairs solve the “I need storage but I don’t want more clutter” problem. Lattice door panels add a decorative look without letting everything spill visually. You can store brooms, vacuum attachments, pet supplies, or folded linens behind a front that still looks light. Lattice also hides minor gaps and makes the cabinet feel custom even if your void shape is irregular. This works when you can dedicate most of the void height to one tall unit.
Frame a tall cabinet carcass, then add a lattice door panel in a removable frame so you can access the interior. Cut lattice strips, then glue and nail them into a door frame with consistent spacing. Install the cabinet with shims so it stands straight, then mount the doors using concealed hinges. Paint the cabinet and lattice in a bright white or soft cream, and add a tall pull handle that aligns with the door center.
Shim behind hinge points first so doors sit flush without forcing the frame.
Don’t use big irregular lattice patterns; small grids look cleaner and more modern.
14. Matte Black Metal Frame with Wood Shelves
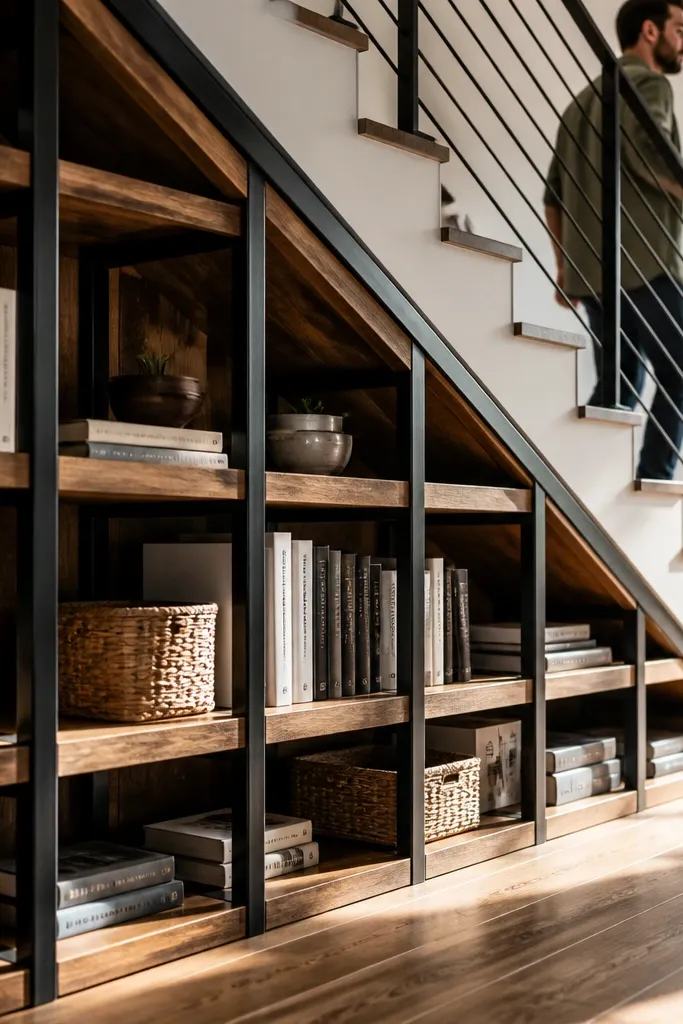
Build a frame from powder-coated metal angle or square tubing, sized to the void width and depth. Anchor the frame to studs using metal brackets, then install wood shelves on shelf supports spaced evenly. Sand and seal the wood with a matte clear coat to avoid glare. Add a thin base trim to hide the bottom gaps and mount the shelves so the front edge stays aligned.
If you want a modern, industrial look that still reads “clean,” metal framing with wood shelves is a strong move. The matte black frame creates crisp lines and makes the shelves look intentional even when the space is an awkward wedge. It’s photogenic because the contrast makes shadows and edges pop. Use it for books, small bins, or decorative storage boxes. This is a good choice when your void has a strong straight edge and you want the storage to look like a built-in shelf wall.
Skip thisAvoid glossy metal paint; it reflects light and makes the storage look less refined.
Editor's noteUse a level plus a string line when installing the frame; small tilts show up immediately on metal.
15. Hidden Pantry Doors with Magnetic Catch and No-Handle Face
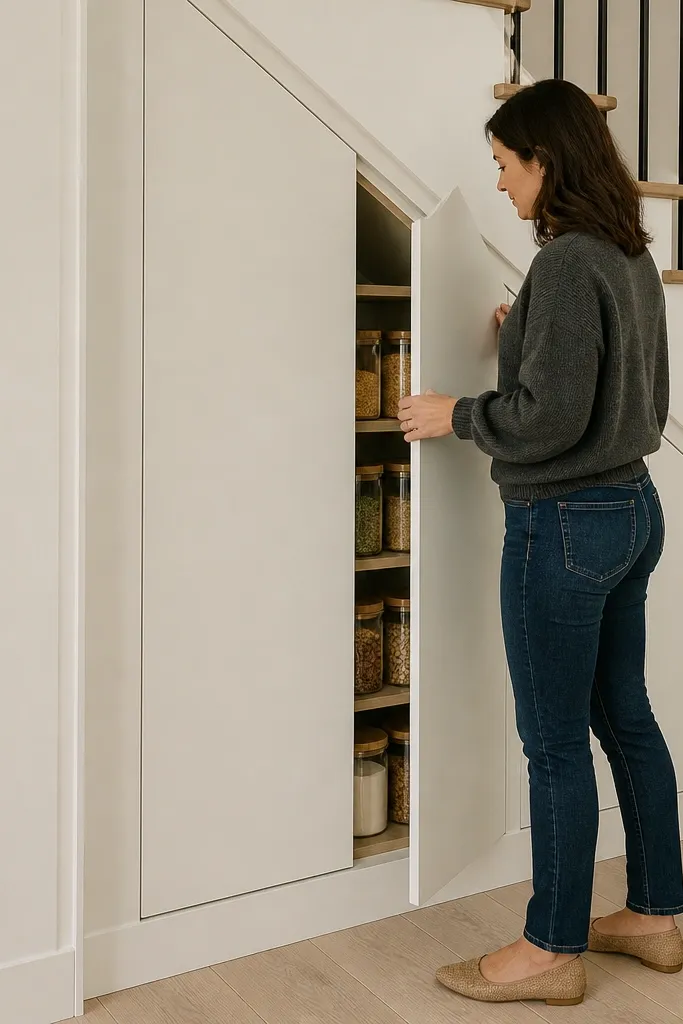
Build a carcass and install doors with consistent reveals, aiming for about 1/8 in gaps. Use magnetic catches or push-to-open latches mounted behind the door so the face has no hardware. Add recessed finger pulls on the inside edge if you don’t want to push the door. Paint the doors and frame in cabinet-grade enamel, then install the unit and adjust hinges until the doors sit perfectly flush.
Handleless doors make under-stairs storage look built-in and furniture-grade. The face stays clean, which matters in small homes where everything is in your sight line. Use this approach when you want a seamless front and you don’t mind using finger pulls or push-to-open mechanisms. It also helps if you’re storing items you don’t want to see, like cleaning supplies or extra toiletries. This works best when your doors are narrow enough that you can add a consistent recessed pull or push latch.
Skip thisSkip mismatched reveals; handleless doors make every gap obvious.
Editor's noteTest the door alignment with a thin ruler along the reveal before paint sets up.
16. Stair-Riser Drawer Inserts for the Lower Gap
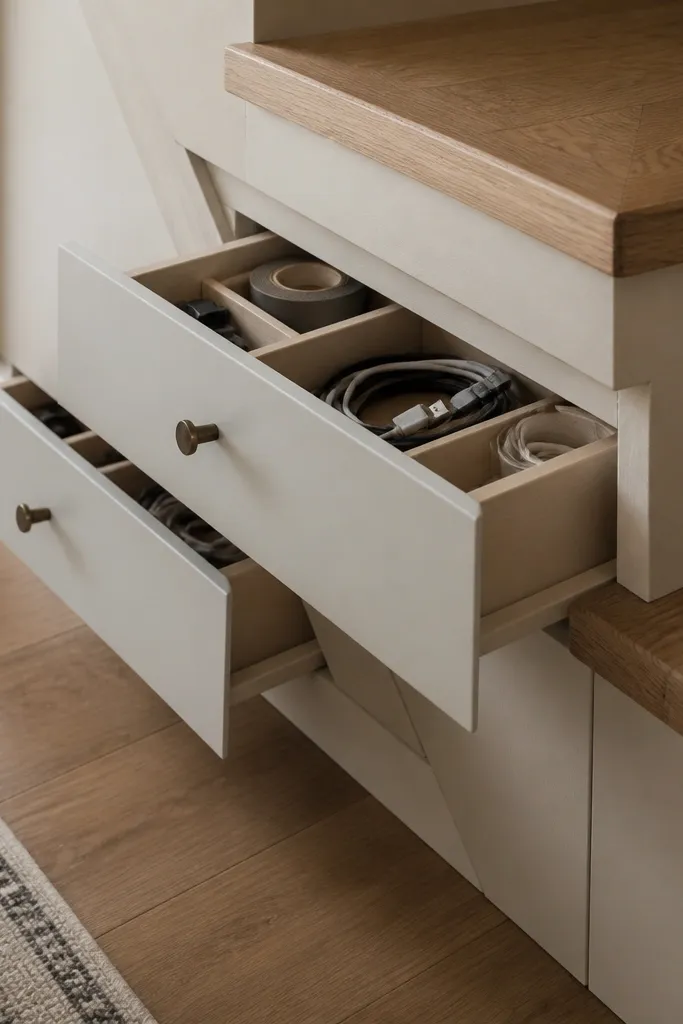
Identify the straight sections of the stair risers where you can frame drawer openings. Build drawer boxes from 1/2 in plywood and mount them using compact drawer slides rated for small drawers. Add a face trim that matches the stair trim and set the drawer fronts flush. Sand, prime, and paint the drawer fronts to match the stair color, then add small knobs aligned vertically for a neat grid.
This idea uses the lower part of the stair structure for storage instead of fighting the slope. Small drawer inserts look tidy because they follow the stair’s geometry, and they’re easy to open for tiny items like charging cords, tape, or kid snacks. The best part is how integrated it looks — the drawers feel like part of the stairs. It’s a strong pick for narrow under-stairs spaces where full cabinet doors would be awkward. Keep the drawer fronts consistent in color and trim so the face reads as intentional.
Skip thisDon’t make drawers too shallow; if you can’t fit a standard shoebox or flat pack, the storage becomes useless.
Editor's noteUse a template block for drawer front spacing so every drawer line looks even.
17. Wallpapered Back Panel with Open Shelves and Closed Bottom
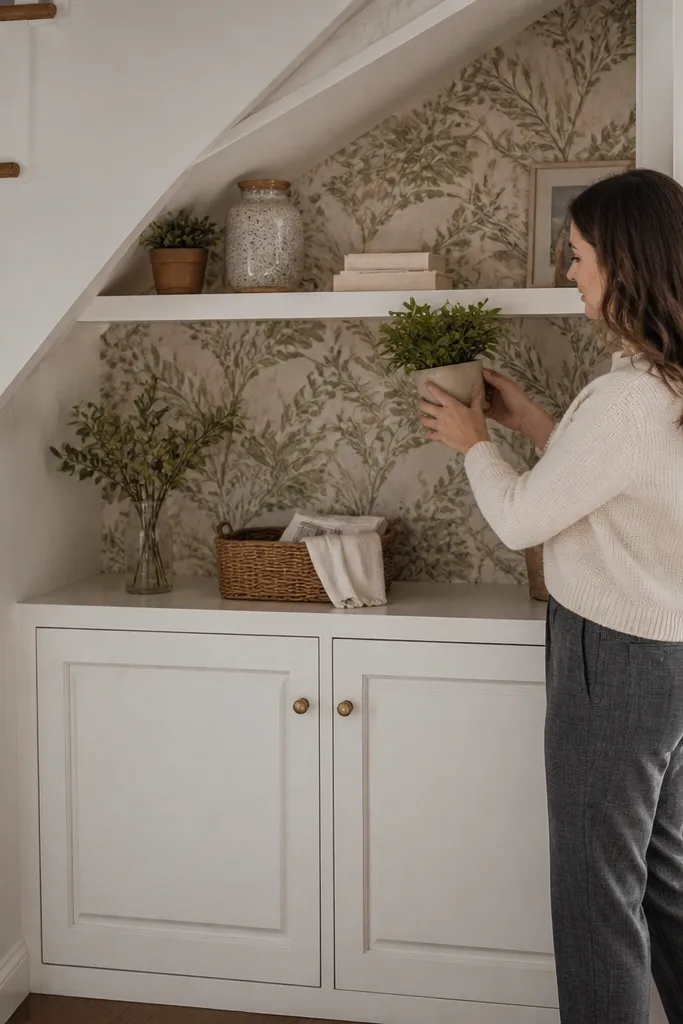
Install a closed bottom cabinet first using plywood and a painted face. For the open top shelves, add a back panel of thin plywood or MDF, then apply removable wallpaper or paste the wallpaper onto sealed board. Seal the wallpaper with a matte clear coat so it’s wipeable. Mount shelves with equal spacing and style with matching containers so the open area stays photogenic.
This is how you make under-stairs storage look like decor. The open shelves are styled with a few neat objects, but the back panel does the heavy lifting visually through a wallpaper pattern. A closed bottom cabinet hides bulky cleaning supplies or extra bags, so the whole area stays tidy. The wallpaper adds depth and makes the storage feel designed even when the void is small. Use this when the void has a flat back wall you can prep and when you want the storage to look good even with a few items on the shelves.
Skip thisAvoid glossy wallpaper finishes; they reflect light and ruin the look.
Editor's notePick a wallpaper with a small repeating pattern; big motifs crowd small shelf spaces.
18. Cedar-Lined Storage with Mesh Vent Doors
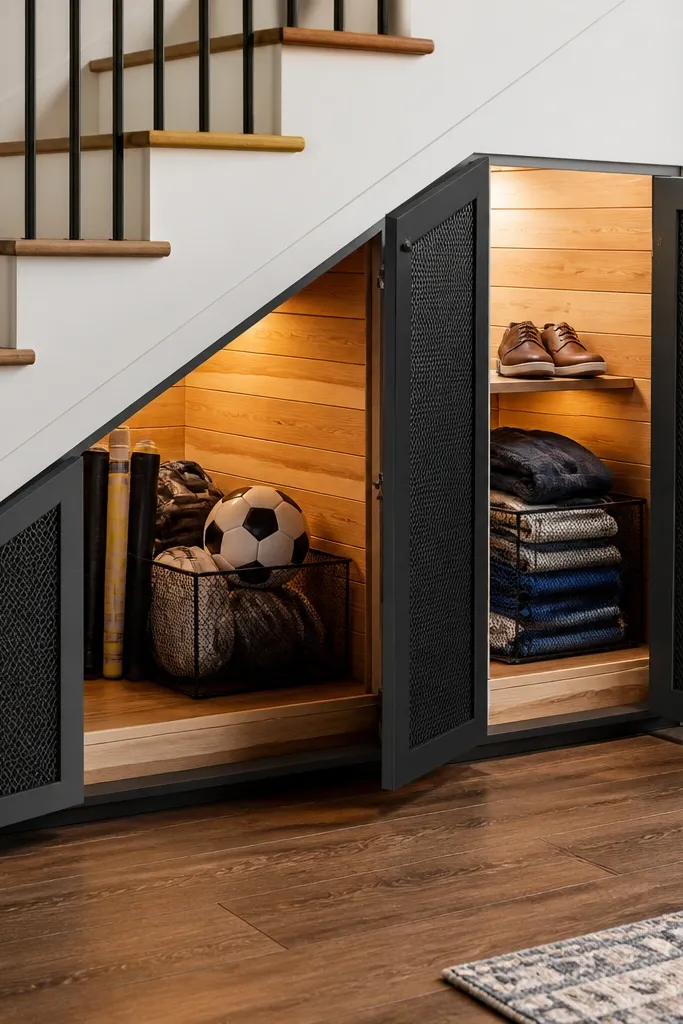
Build the cabinet shell from plywood and line the interior with cedar boards cut to fit the side walls and back. Add a bottom base and leave a small air gap at the base for circulation. Install mesh vent doors using a metal mesh panel in a wood frame, then mount with concealed hinges. Finish the exterior with a durable paint and add brass pulls that match other hardware in the room.
Cedar lining makes storage feel fresher and it looks good when you open it. Mesh vent doors keep airflow so you can store items like shoes, sports gear, or folded blankets without that stale cabinet smell. The look is modern because mesh reads clean and the cedar tone adds warmth. This is a practical option that still looks intentional, especially if your under-stairs void is near an entry or mudroom. Keep the mesh frame neat and the cedar boards consistent in color.
Skip thisAvoid sealing cedar with a high-gloss finish; it blocks the smell and looks off.
Editor's noteUse cedar boards that are 1/2 in thick so they don’t shrink away from the walls after a few seasons.
19. Blackboard Front Panel with Hidden Chalk Tray Storage
Frame a cabinet opening with plywood and install a hinged front panel made from blackboard material or black paint on a sealed panel. Add a small internal tray for chalk and an eraser, mounted under the opening. Mount a door with a magnetic latch so it closes flush. Finish the frame in matte black or paint it white for contrast, then apply a thin clear coat on the rest of the cabinet to protect from scuffs.
A blackboard front is the easiest way to make under-stairs storage look like it belongs in a small home. You get a functional message board and a storage face that doesn’t look like plain cabinetry. Keep the storage behind a door or lift panel, then add a small chalk and eraser tray so it stays tidy. This works best in entryways or kitchens where you need a quick note spot. Use matte black and a clean frame so it looks crisp, not messy.
Skip thisDon’t place chalk storage loosely inside; loose dust makes the whole unit look dirty.
Editor's noteUse a chalk holder with a lip so chalk dust doesn’t fall onto the cabinet face.
20. Two-Section Rolling Pantry on Tracks with Wood Slat Front
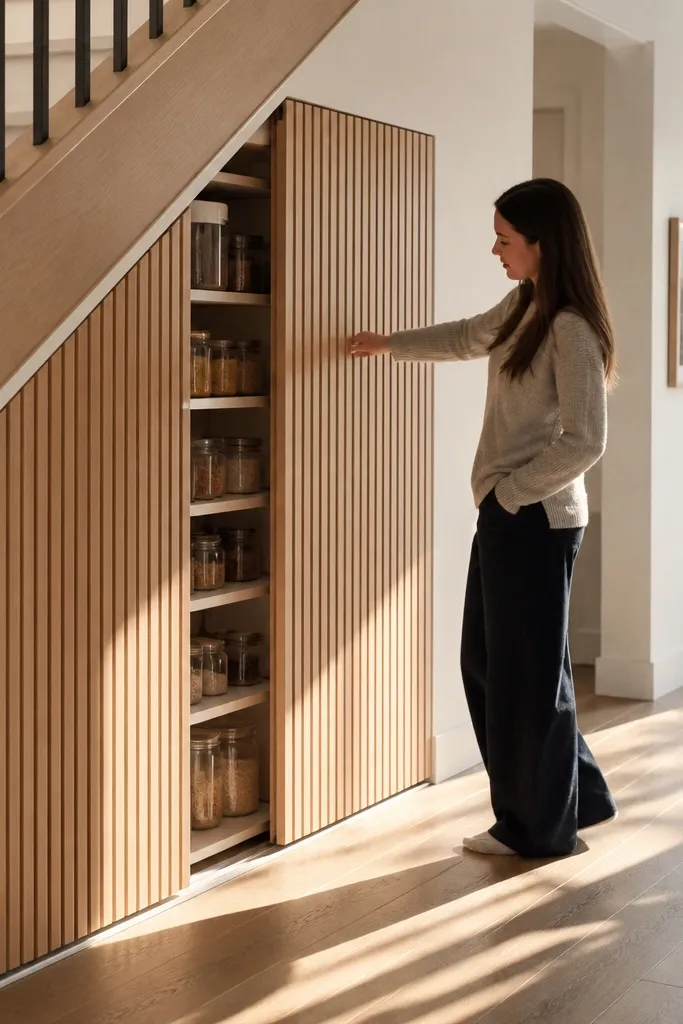
Rolling pantry storage keeps the front looking sleek while giving you full access to the back. Wood slat front panels add texture and hide minor gaps around the tracks, which is common in under-stairs builds. This is a great option for narrow voids because you can open one section at a time. It also keeps the storage clean when closed, since the slats act like a visual screen. Build this when you have a straight path to pull the pantry out and you can anchor the tracks securely.
Install two steel or heavy-duty wood guide tracks anchored to studs if possible. Build two rolling carcasses from plywood with matching wood slat fronts and add wheels rated for cabinet weight. Ensure each rolling section is slightly narrower than the opening so it moves without rubbing. Add stops at the end of the tracks so the pantry doesn’t roll out too far, then finish the wood slats with stain and a matte seal.
Use felt or rubber bumpers at the track ends to prevent metal-on-wood clatter.
Skip light-duty wheels; under-stairs storage gets pulled constantly and cheap casters wobble.
21. Rounded Bottom Shelves with Storage Baskets and a Curved Trim Face
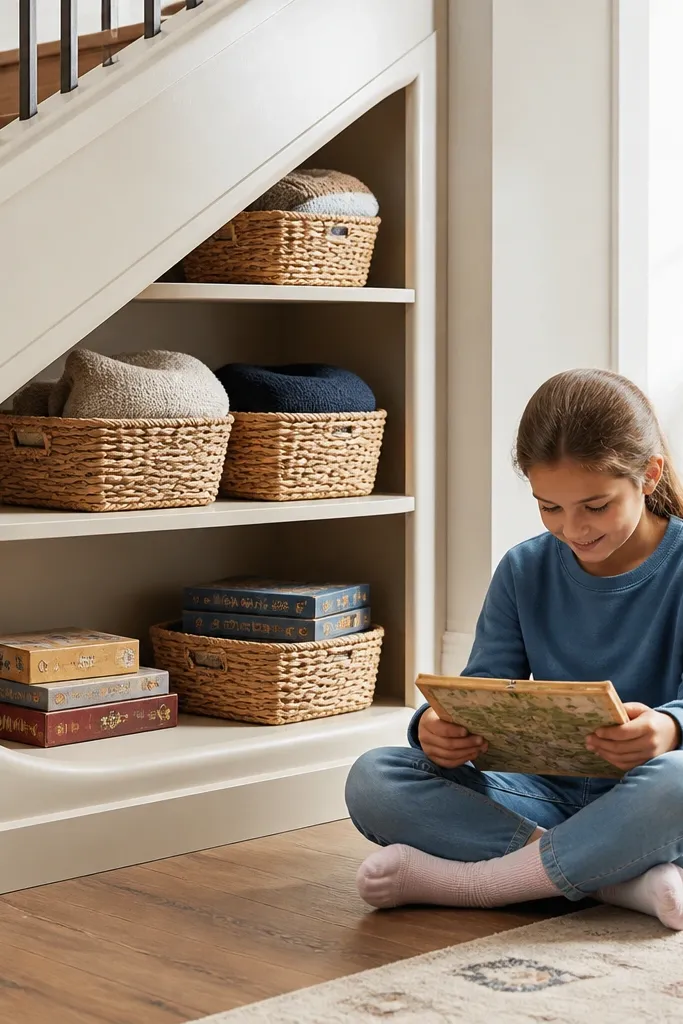
Soft curves make under-stairs storage feel custom and more “designed” than sharp corners. Rounded bottom shelves paired with woven baskets look warm and are easy to style without looking cluttered. The curved trim face hides the mess line and makes the storage look like furniture. This option is best when the void has enough width to fit baskets and you want a friendlier look in a small home. Keep basket sizes consistent so the curves read clean instead of chaotic.
Cut curved trim pieces from plywood using a template and sand smooth so the curve is even. Build shelves with a slight rounded front edge and install them on side supports anchored to studs. Insert woven baskets sized to the shelf bays so the basket rim sits just below the trim line. Paint or stain the trim and seal it, then add a small top rail to keep everything aligned.
Make one cardboard template for the curve and trace it onto plywood twice so both sides match.
Don’t over-radius the curve; if it’s too tight, baskets won’t sit flat and it looks awkward.
22. Cabinet with Lift-Out Step Shelf for Emergency Supplies
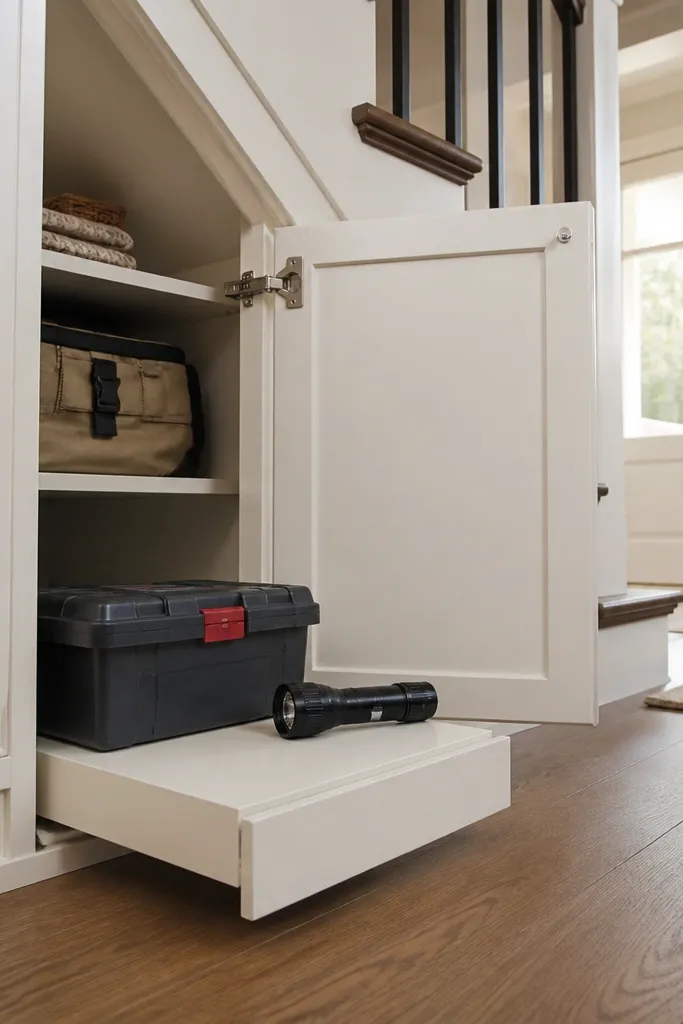
This is a smart-looking solution when you want storage but also want a practical “access platform” for reaching higher shelves or grabbing emergency supplies. The lift-out step shelf keeps the face clean and gives you a stable surface when needed. It looks good if the step matches the cabinet trim and closes flush. Use it for first-aid supplies, spare light bulbs, or seasonal items you don’t touch weekly. This is best for under-stairs voids with a solid front face and enough height to store the step mechanism.
Build the cabinet shell and install a hinged lift shelf using heavy-duty hinges and a latch that locks the shelf in place. Reinforce the shelf with a plywood frame so it doesn’t flex under a foot. Add hidden storage behind the shelf using drawers or bins sized to the remaining compartment. Finish the cabinet exterior with paint and add a discreet pull handle for the door.
Test the lift shelf with gentle body weight once installed; adjust latch tension so it locks positively.
Avoid flimsy hinges; if the shelf wobbles, the whole unit feels unsafe.
23. Painted Stair-Niche Desk with Drawer Storage and Cable Grommets
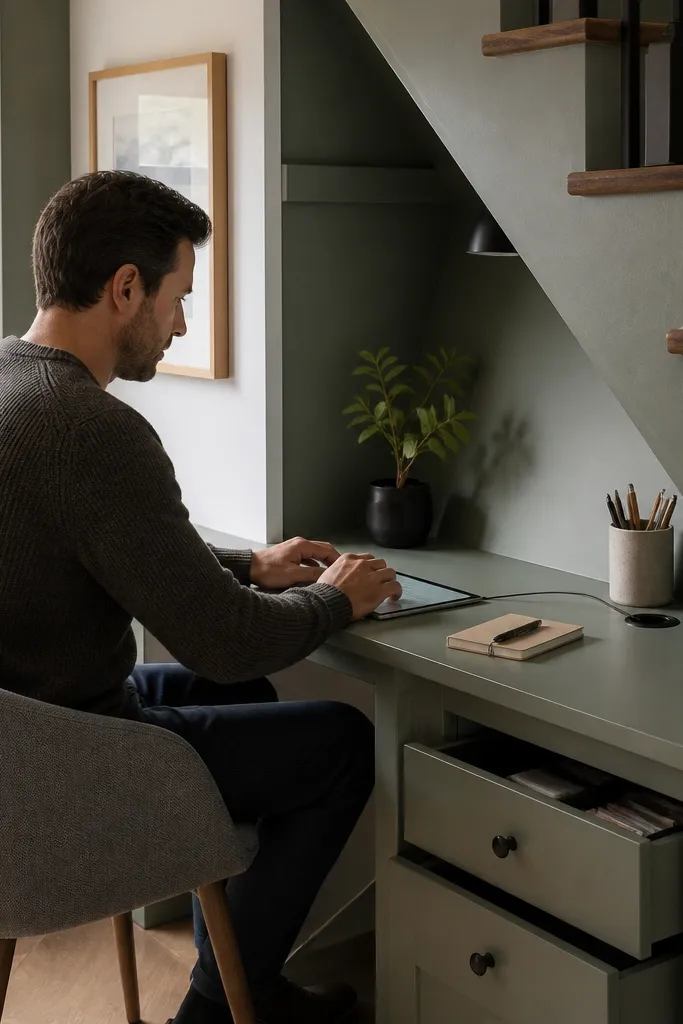
Build a compact desk top from 3/4 in plywood and frame it with a front panel that matches your wall trim. Install 2 to 3 drawers below using full-extension slides, leaving space for one open niche for a small organizer. Cut cable grommet holes in the desk top and line them with plastic grommet rings to prevent fraying. Paint everything with cabinet enamel, then add a slim backsplash strip behind the desk top to hide cable runs.
When your under-stairs space is narrow and you want storage that looks intentional, a mini desk with drawers is a strong move. The drawers keep small items hidden, while the desk surface makes the whole void look like a purpose-built workstation. Cable grommets keep chargers and cords from turning into a visible mess. This design is especially photogenic because the desk surface reads clean and organized. Use it when you want storage plus a functional surface for homework, bills, or charging devices.
Skip thisDon’t skip grommets; visible cords make the storage look chaotic even with tidy drawers.
Editor's noteUse drawer fronts sized to a standard cabinet aesthetic — keep them aligned and centered so the desk looks built-in.
24. Reclaimed-Deck Slat Drawer Tower with Cabinet Face
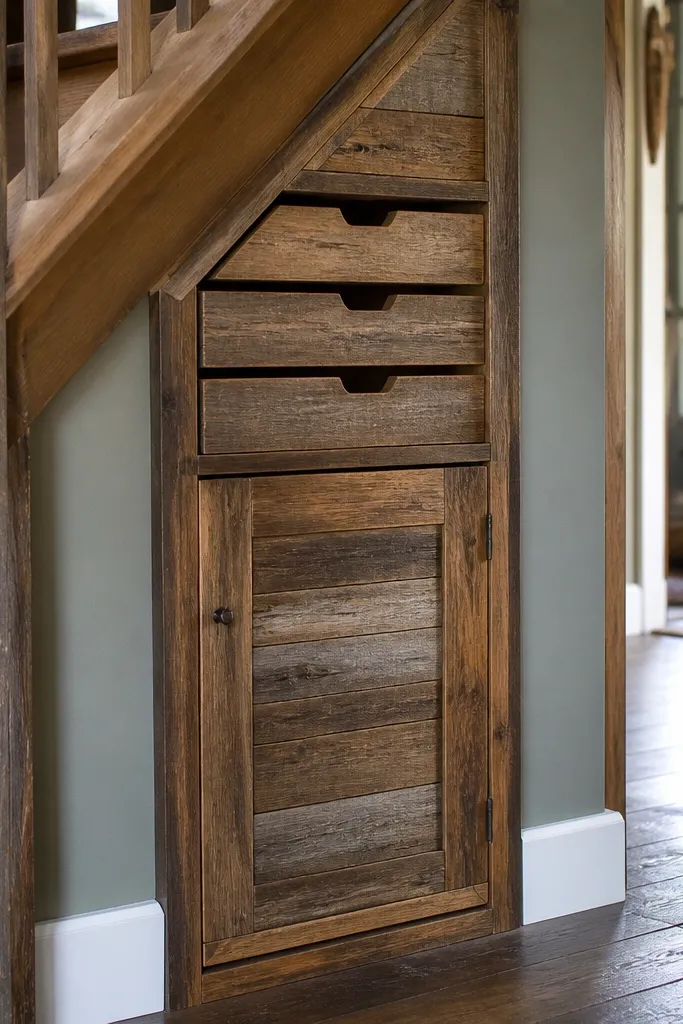
Measure the under-stairs footprint and decide your layout: for a typical tight run, use 3 shallow drawers (about 6 in tall each) over a cabinet opening (about 18-22 in tall). Build a simple carcass from 3/4 in plywood, with a center stile if the opening is wider than 36 in, and add 1/2 in back paneling so the slat face stays square. Install drawer slides first, then make drawer boxes from 1/2 in plywood with 1/4 in bottom panels; align the drawer fronts to leave a uniform 1/16 in reveal around each one. For the face, cut slats from deck boards or deck-board-look lumber and space them with 1/2 in gaps; screw them to a backing panel so the slats stay straight. Finish with a clear satin topcoat over a light stain (warm walnut or teak), then add a magnetic catch or soft-close hinge hardware for the cabinet door.
This is storage that looks like built-in furniture, not a jumble of bins. The trick is using reclaimed-deck style slats as the “front language” so every compartment matches visually, even when sizes differ. Put shallow drawers on top for small stuff, then add a taller cabinet section with a simple hinged door for the bulky items you do not want in drawers. It gives you Good-Looking Under Stairs Storage because the slats create consistent lines that photograph cleanly from the hallway. Skill level is basic carpentry plus drawer assembly; plan on one full weekend for framing and faces, and another evening for finishing. It fits small homes where you want more storage without making the under-stairs space look crowded.
Skip thisDo not attach slats directly to the carcass without a backing panel — they warp and your reveals will drift.
Editor's notePre-drill slats and clamp a spacer block to keep every gap identical — it makes the whole piece look custom.
25. Laminated Map-Grid Pullout Pantry with Clear Front Rail
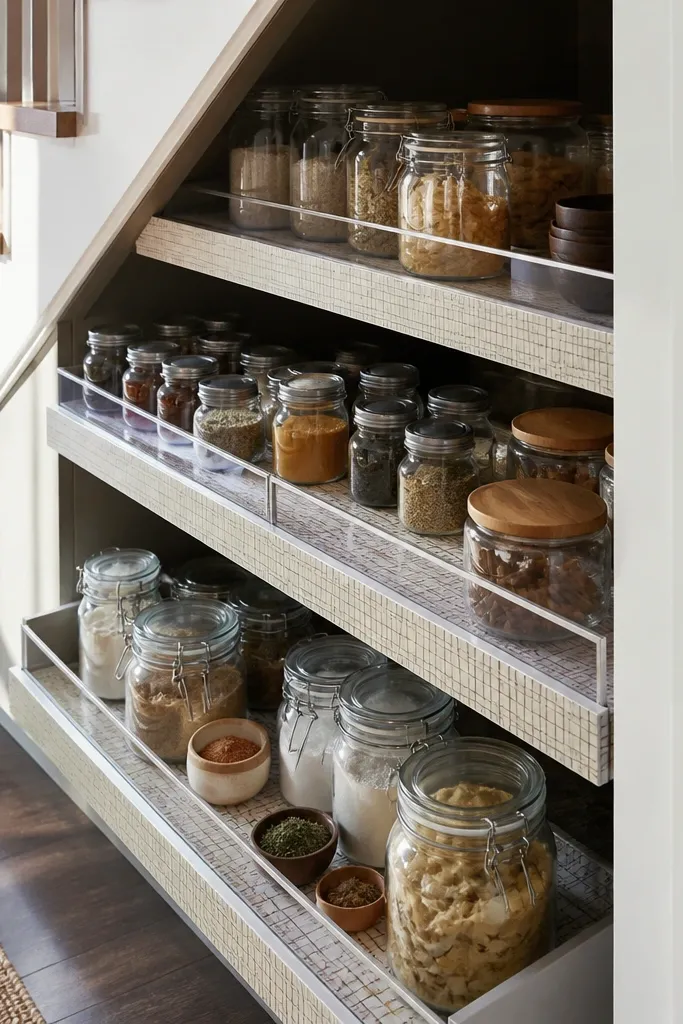
Start by building a pullout frame from 3/4 in plywood sized to fit the under-stairs opening with 1/2 in total clearance for smooth movement. Install full-extension drawer slides on both sides of the frame, then add two fixed shelf platforms from 3/4 in plywood at heights that match your containers (commonly 8 in and 14 in clear space). For the grid, cut thin strips of 1/2 in plywood or hardwood (about 3/4 in wide) and laminate or paint them in a crisp off-white; glue and pin them to the shelf tops to create square cells around 4 in x 4 in for jars. Add a clear front rail made from polycarbonate strip (1/8 in thick) with a simple U-shaped frame of 1/2 in plywood so it looks like a modern display case. Finish the unit with a durable matte paint on the grid and a clear coat on any wood edges that will get wiped often.
This one solves the “under-stairs is dark and messy” problem by turning the space into a bright, structured pullout. The laminated map-grid look is not just decoration — it gives you a visual system for jars, spices, and small pantry boxes, so you can find things without digging. Use a clear polycarbonate front rail so the shelves stay visible, but the contents still look tidy behind a framed edge. It delivers Good-Looking Under Stairs Storage because the grid lines make the whole unit read as one clean design, even when you change what you store. It is a mid-level project: you need careful cutouts and smooth slides, but the build is straightforward with plywood and shelf stock. Perfect for narrow under-stairs areas where you want pantry storage without doors that block sightlines.
Skip thisDo not make the cells too small for your real jars — measure one container you actually use and build the grid around it.
Editor's noteLightly sand and wipe with a tack cloth before painting the grid strips — it prevents that rough “brush bite” that ruins the clean look.



