
1. Powder-coated black MS frame with vertical slat rhythm
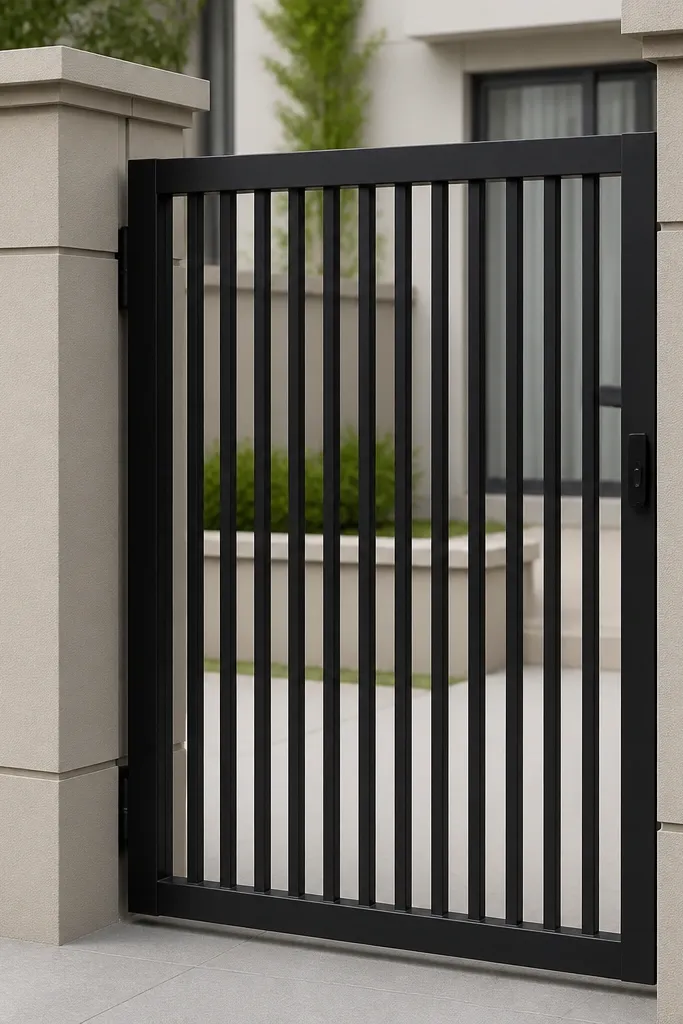
This is the clean, modern look that photographs well because the vertical bars create a steady grid. A powder-coated black MS frame keeps the gate crisp against most wall colors, and the infill spacing makes the gate feel taller and more organized. Go for straight, identical bar lengths and uniform gaps so the “pattern” is the main visual. It also works for medium-security needs without making the gate look bulky. Skill level is beginner to intermediate if you can weld or get a frame welded, and the build time is mostly in cutting and aligning the bars.
First, measure the opening and build an MS frame with a 50x50x3 mm perimeter for the outer rectangle, keeping 10-15 mm total clearance for movement. Second, weld or bolt vertical bars sized 20x10 mm or 16 mm round at a consistent spacing (pick a gap like 90-110 mm and stick to it), then add a diagonal brace inside each leaf. Finally, sand the welds, apply rust-inhibiting primer, and finish with powder coating or spray paint made for metal; mount hinges and a latch after the finish cures.
Mark bar spacing with a jig made from scrap steel flat — it stops your gaps from drifting.
Don’t weld bars randomly onto a frame that isn’t square; the pattern will look crooked even if your bars are straight.
2. Bronze-brown wrought iron crown top with two-tone panel
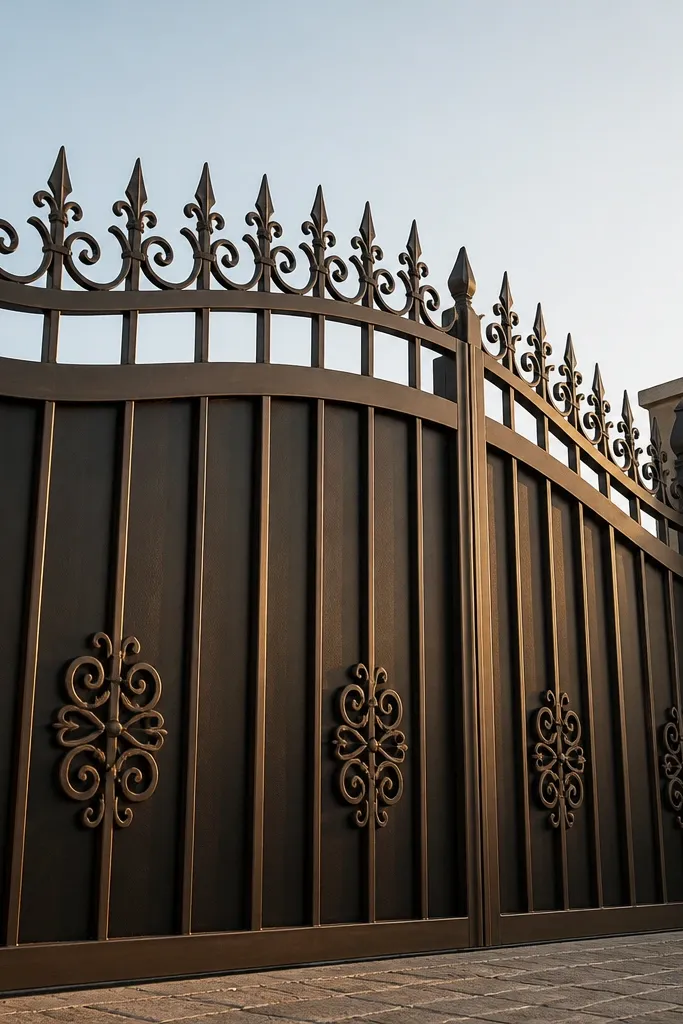
If you want a gate that looks “designed” without going overboard, a crown-style top rail does it. The curved crown softens the hard lines of the iron, while a two-tone finish makes the gate look intentional: bronze for the structure and a darker shade for the infill. This style works especially well on compound walls painted off-white, sand, or light gray, because the warm iron color pops. It’s also a good choice when you want privacy but not a solid door — use smaller bars at the bottom and slightly wider spacing higher up. Expect intermediate effort because the top curve needs accurate bending and consistent spacing.
First, build an MS frame and then weld wrought iron curls or a crown strip across the top, keeping the crown centered over the frame. Second, set your infill in two zones: a dense bar section near the bottom for privacy and a slightly more open pattern above; keep spacing consistent within each zone. Finally, clean and sand, then prime metal and spray two colors: bronze for the frame and a near-black or deep brown for the infill; install hinges and a center latch aligned to the split line.
Editor's notePaint in thin coats and let each coat dry fully so the iron doesn’t get a patchy, dull finish.
Skip thisSkip heavy rust removal shortcuts; pitted metal makes paint fail early and the gate looks tired fast.
3. Cement-infill frame with white tile border and shadow gap
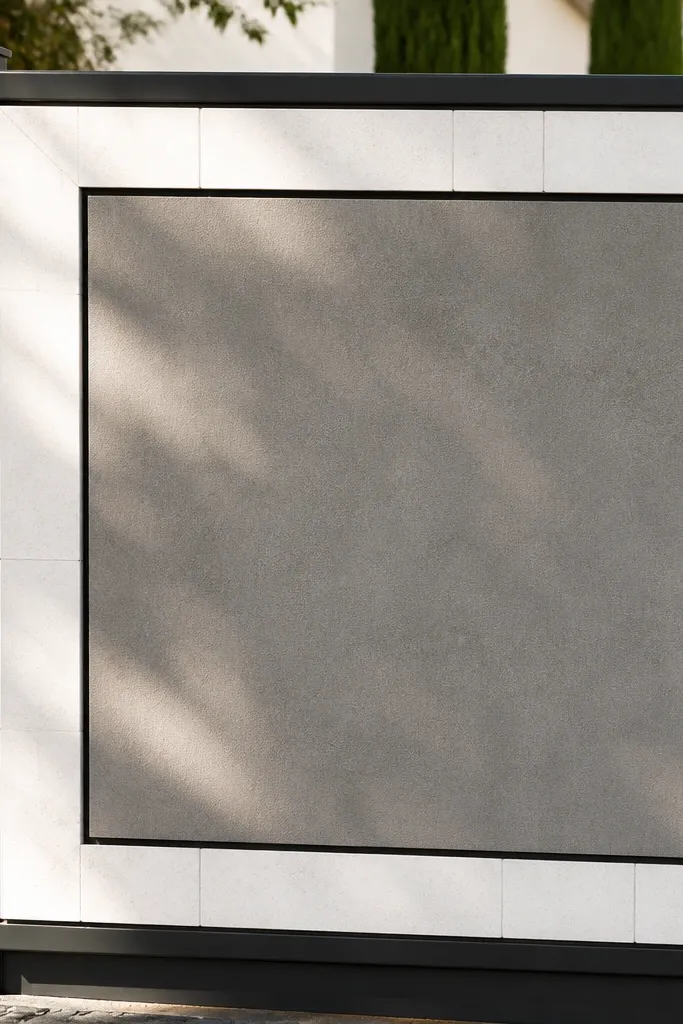
This look turns a basic gate into something architectural. A cement-infill panel inside a dark frame reads clean and solid, while a white tile border line creates a crisp edge that makes the gate look finished even from a distance. The shadow gap matters: if you leave a thin reveal (like 8-12 mm) between the frame and the infill border, the gate looks layered, not flat. Use it on walls that are painted or have a smooth plaster finish; the contrast is what makes it photogenic. Skill level is intermediate because you’re building formwork and getting straight edges in cement.
First, weld a dark MS frame (like 40x40x3 mm) and attach internal stoppers so your cement infill forms to a consistent thickness, leaving a 8-12 mm border reveal for the tile. Second, create a shallow form inside the frame, pour cement with a fine mix (cement + sand in a workable ratio), and trowel it flat; embed a thin mesh if you want extra crack resistance. Finally, after curing, apply primer and grout/adhesive for the white tile strip, then seal the cement with a clear waterproofing coat.
Use a straight metal screed to level the cement surface — it’s the difference between “DIY” and “clean.”
Don’t skip waterproofing on the cement infill; rain stains will ruin the white border quickly.
4. Diagonal diamond grill with matte charcoal finish

Diamond grills look sharp because the diagonal lines create motion and depth. A matte charcoal finish hides minor imperfections and makes the metal look more premium than glossy paint. This design is also practical: the grill pattern gives airflow and visibility while still providing security. It pairs well with compound walls in warm whites, cream, and light beige because the charcoal doesn’t clash. Intermediate skill is enough since the key is cutting and welding consistent diagonals.
First, build your MS frame and add inner rails that hold the diamond grid; keep the frame square. Second, cut and weld diagonal bars (for example 12-16 mm round or 20x10 mm flat) so they intersect at consistent points; start by locking the center lines, then work outward. Finally, grind welds smooth, prime, and spray matte charcoal paint; mount hinges and add a keeper plate for the latch.
Editor's noteUse masking tape lines on a flat surface to check diagonal spacing before welding the whole leaf.
Skip thisDon’t make the diamonds uneven in size — the pattern breaks and the gate looks cheap fast.
5. Wood-look slat cladding on a black metal frame
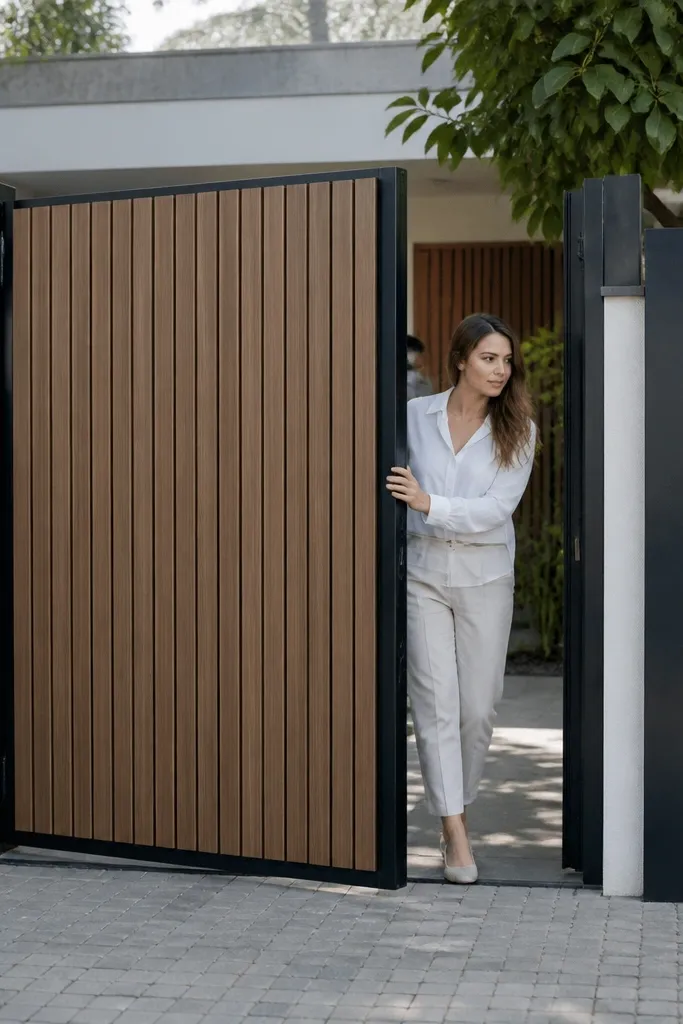
This style gives you a warm, modern look without committing to solid wood that warps. Use a black metal frame for rigidity and then attach wood-look slats like UV-stable composite or treated timber with a clear protective finish. The vertical slats make the gate feel taller and more refined, while the dark frame keeps it from looking “cabin-like.” It’s a great option if your wall is painted and you want the gate to feel like part of the architecture. Skill level is intermediate due to alignment and weatherproofing details.
First, weld a sturdy black MS frame and add internal rails so slats have support at three points across the height. Second, attach slats using stainless screws with rubber washers to prevent water tracking; keep a consistent 10-15 mm gap between slats for drainage and even shadow lines. Finally, sand edges, apply primer and a UV-resistant topcoat or use composite slats that come pre-finished; seal screw heads and install the latch and handle.
Editor's noteStagger slat ends by a few millimeters on each leaf so the joint line doesn’t look like a single weak seam.
Skip thisDon’t use untreated timber; water will swell it and your gate will start rubbing within a season.
6. Glass panel insert with black grid mullions
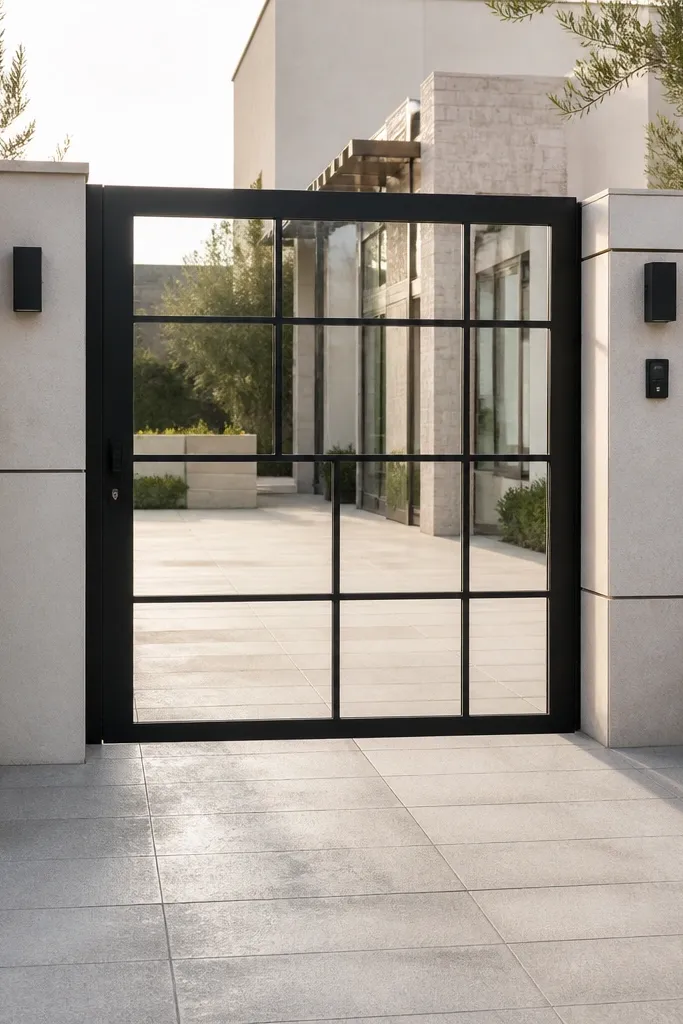
A glass insert can look expensive when the grid is clean and the frame is thin enough to feel light. Use toughened glass for safety and keep the mullions straight so the gate reads as a modern facade. This design works best when your compound wall is smooth and the surrounding area is clean; messy walls make glass look out of place. It’s a photogenic option for front gates where you want a view while still controlling entry. Skill level is intermediate because glass mounting needs careful spacing and proper gaskets.
First, build a black MS frame and add internal mullions (for example 25x25 mm) to create a rectangle or two stacked rectangles; keep the grid symmetric. Second, install glass using rubber gaskets and mechanical glazing clips so the glass doesn’t contact metal directly; set a small 3-5 mm gap around the glass. Finally, prime and paint the frame, then mount hinges and a lock; test the swing with the glass installed to confirm no rubbing.
Editor's noteUse a spacer strip to keep the glass perfectly centered while you tighten clips.
Skip thisDon’t mount glass directly to metal without gasket spacing; it will crack from vibration and temperature changes.
7. Stone-look cement panel with arched top frame
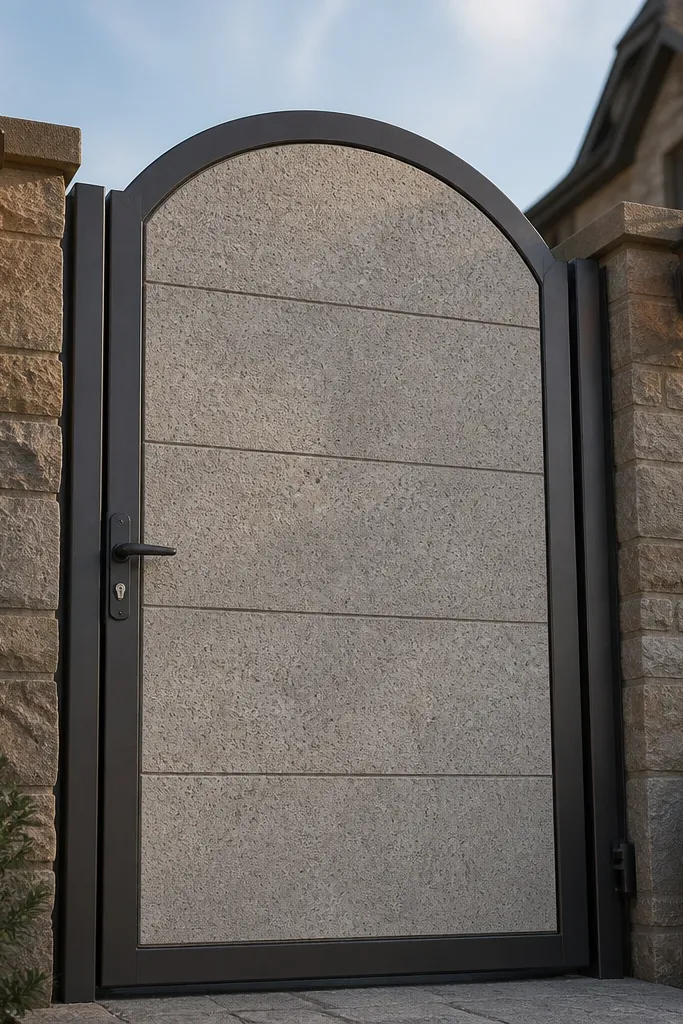
An arched top makes the gate look classic, but you keep it modern by using a stone-look cement finish instead of ornate iron. The stone-look panel gives texture without the heavy maintenance of natural stone, and the arch frames the entrance in photos. This works when your compound wall has a traditional vibe or when you want a softer look for a residential entrance. Skill level is intermediate because you’re shaping the top curve and getting the cement texture consistent.
First, weld an MS frame with an arched top profile, using a template to keep both leaves identical; keep the perimeter thick enough (40x40x3 mm). Second, form a cement infill panel inside the frame and trowel it smooth, then apply a stone-look texture using a textured stencil or sponge technique after the surface firms up. Finally, seal the panel with a clear exterior sealer, then paint or powder coat the frame; install hardware after full cure.
Make a cardboard template for the arch curve and trace it on steel before you cut — it keeps symmetry.
Don’t rush the cement cure; sealing too early traps moisture and causes peeling.
8. Half-height slat bottom with solid top panel
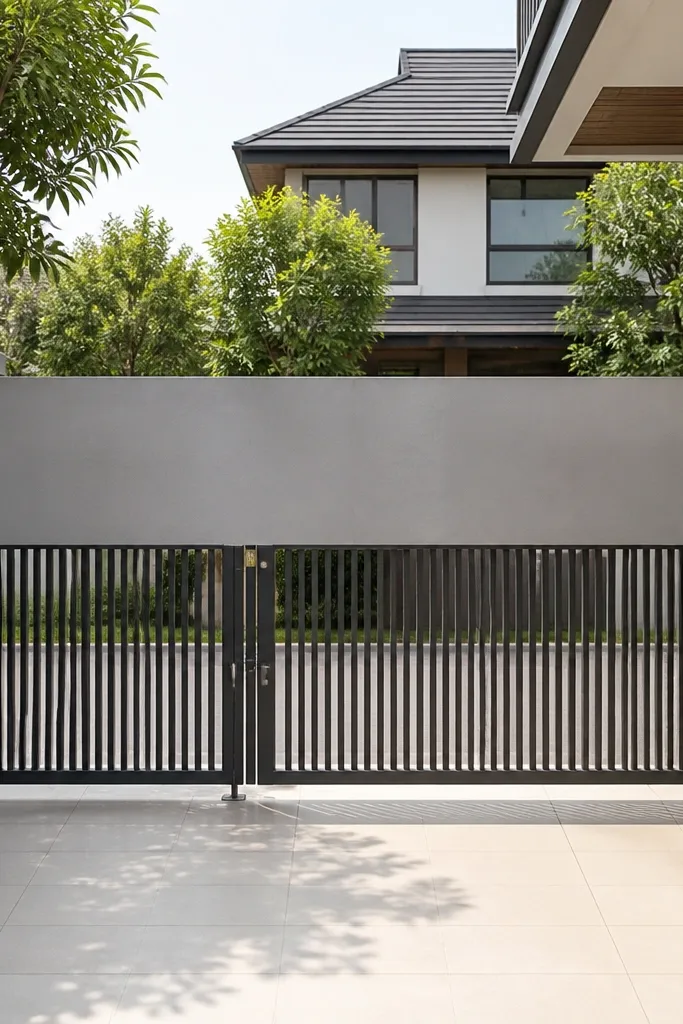
This design balances privacy and visibility. The solid top panel blocks attention from above, while the slat bottom keeps airflow and makes the gate look lighter. It’s a smart aesthetic choice if your wall already has a lot going on; you don’t want the gate to fight the wall. Use a solid panel material like cement board or plywood with exterior finish, then line the frame in dark metal for crisp edges. Skill level is beginner to intermediate.
First, build a rectangular MS frame and add a mid-rail at the exact height where you want the pattern split; measure from the ground so both leaves match. Second, install slats on the bottom section with consistent gaps, and fix the top solid panel using screws and corner brackets; leave drainage gaps so water doesn’t pool. Finally, finish the solid panel with exterior paint and sealant, coat the metal frame, and mount latch and handle centered on the solid section.
Editor's noteAdd a small vent gap at the bottom edge of the solid panel so rainwater can drain.
Skip thisDon’t let the solid panel touch the ground; it will wick moisture and start swelling.
9. Recessed panel gate with perimeter bead trim
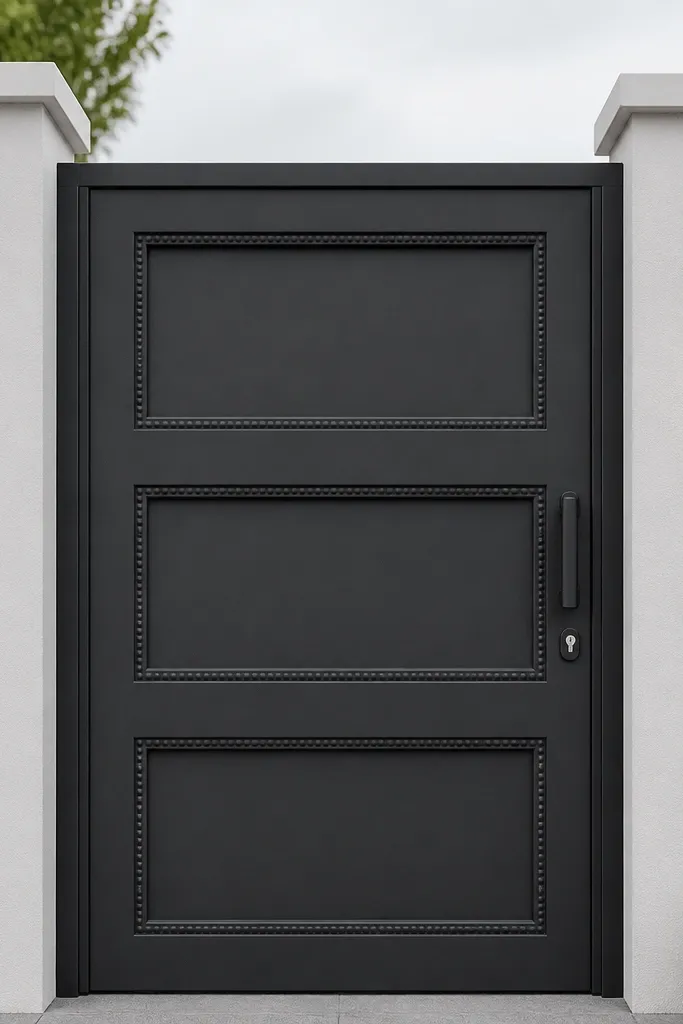
Recessed panels instantly make a gate look more expensive because they create depth. The perimeter bead trim acts like a frame-within-a-frame, turning a flat gate into a layered one. This works especially well for modern walls because the geometry stays clean and doesn’t rely on heavy ornament. Materials can be MS with MDF/ply infill or cement board; keep the edges crisp and the reveal lines consistent. Skill level is intermediate due to carpentry precision or panel cutting.
First, weld an outer MS frame and then weld inner perimeter rails to create a recessed cavity; aim for a 15-20 mm depth so the reveal is visible. Second, cut panel boards to fit the cavity with a 3-5 mm expansion gap, then attach using screws and corner supports. Finally, install perimeter bead trim (thin metal strip) to hide edges, prime everything, and paint in a matte finish; mount hinges and a lock after all panels are secured.
Use the same board thickness across the whole gate so the reveal line stays consistent from leaf to leaf.
Don’t over-tighten panel screws; boards expand and contraction will warp the panel if it’s clamped.
10. Ribbed vertical panel with horizontal accent strip
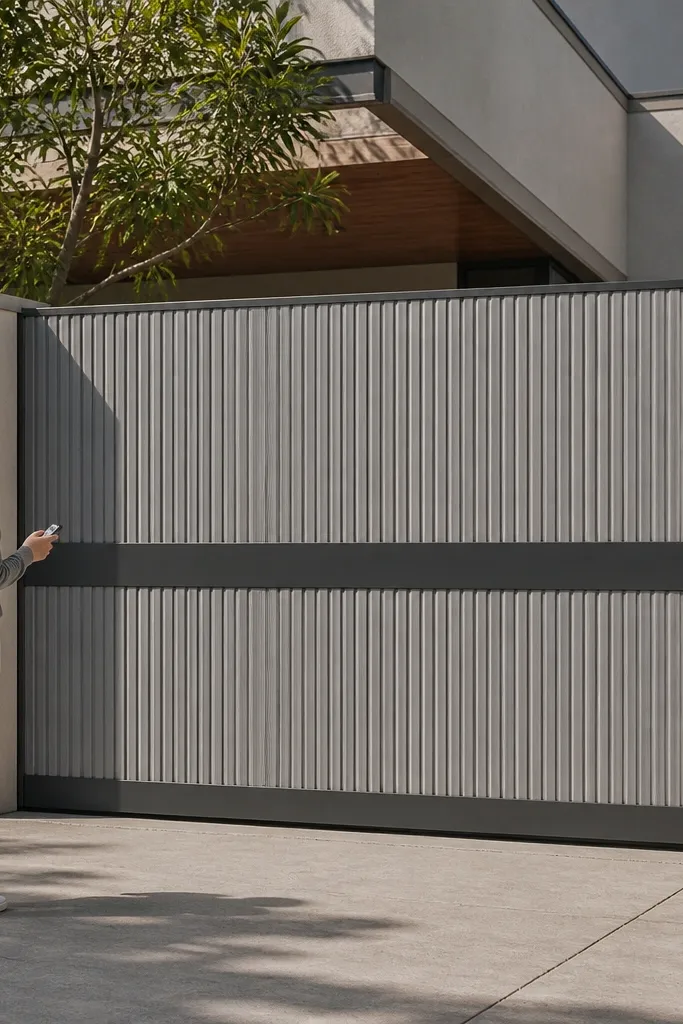
This gate looks modern because the ribbing creates a repeating texture, and the horizontal strip gives you a “designer line” that breaks the monotony. If you want a gate that looks good even when it’s closed and you’re standing a few meters away, this pattern reads clearly. It also hides minor surface imperfections better than flat panels. Use ribbed metal sheet or ribbed composite cladding inside a metal frame. Skill level is intermediate since the strip alignment has to be straight.
First, weld an MS frame and add a strong mid-rail where the horizontal accent strip will sit; set the strip height with a level so it lines up across leaves. Second, attach ribbed cladding vertically, keeping consistent spacing from the frame edges; use stainless fasteners and seal around screw heads. Finally, paint or powder coat the frame and cladding; install hinges and then add the latch hardware aligned to the accent strip line.
Lay out the accent strip with a laser line or chalk line before you drill anything.
Don’t mix rib directions between leaves; the visual rhythm will look wrong immediately.
11. Trellis-style iron with center medallion
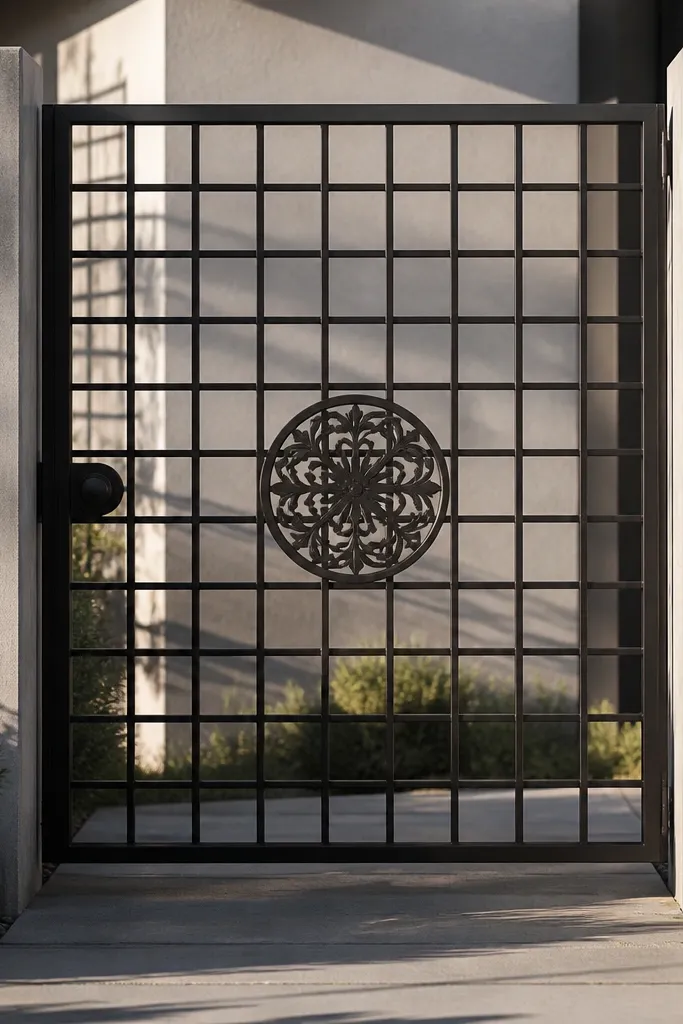
A trellis grid looks airy, and a single center medallion makes it feel intentional instead of generic. This is a good pick if you want decorative style but don’t want the heavy weight of full scrollwork. It works on walls in white, beige, and warm gray because the iron pattern becomes the focal point. Keep the medallion small and centered so the gate doesn’t look busy. Skill level is intermediate because the trellis intersections need accurate welding.
First, weld an MS frame and then add cross bars to form a consistent trellis grid; pick a spacing like 100 mm and keep it uniform. Second, weld or fix a medallion element at the center of each leaf; align it with the vertical centerline using measurements, not eyeballing. Finally, grind and prime the full gate, then paint in a single matte color so the medallion doesn’t look like it was stuck on later.
Use a scrap steel square to check each intersection — trellis patterns show every mistake.
Skip multiple different decorative bits; one medallion reads cleaner than three.
12. Cement frame with embedded LED strip channel
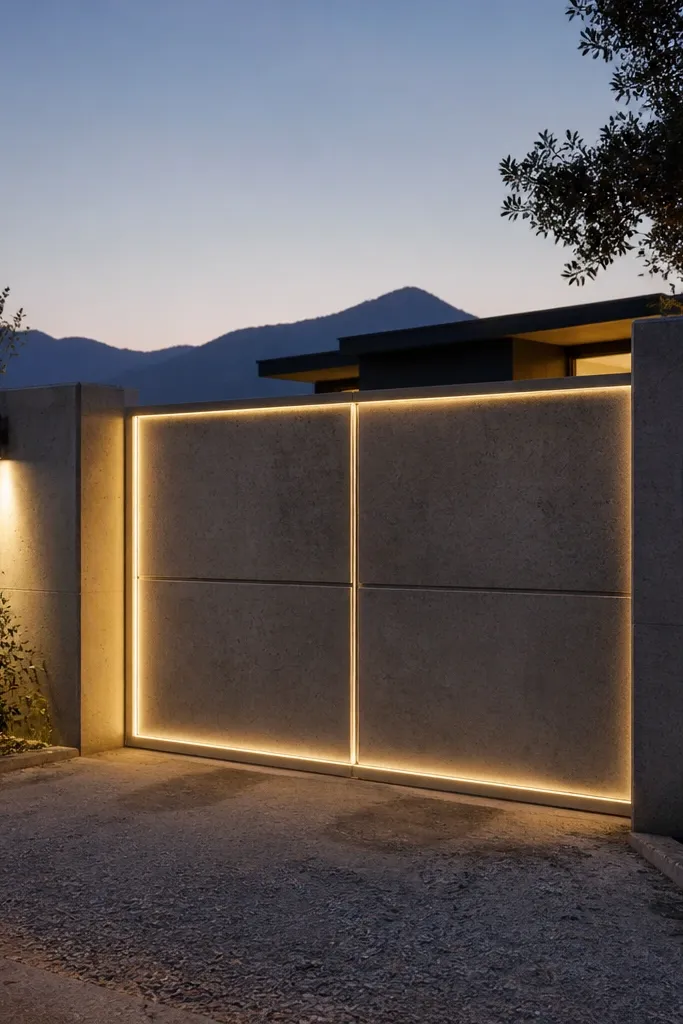
If you want the gate to look good at night too, this border LED channel makes a huge difference. The gate looks like it has a glowing outline, and photos at dusk show the design clearly. You keep the gate daytime style simple with cement panels, then add the lighting line along the perimeter for that “finished” feel. Choose warm white LEDs (around 3000K) so the glow matches exterior paint tones. Skill level is intermediate due to electrical planning and waterproofing.
First, weld a steel frame and plan a recessed channel along the perimeter where the LED strip will sit; keep the channel depth about 10-15 mm for cover. Second, build cement-infill panels inside the frame, then route cable through a protected conduit so it doesn’t rub on moving hinges. Finally, install IP65-rated LED strip, seal the channel with exterior silicone, and connect to a driver inside a weatherproof junction box; test lighting before closing panels.
Use a flexible cable loop at the hinge side so movement doesn’t stress the wiring.
Don’t skip a proper junction box; water intrusion kills LED drivers fast.
13. White plaster gate with dark MS outline and geometric cutouts
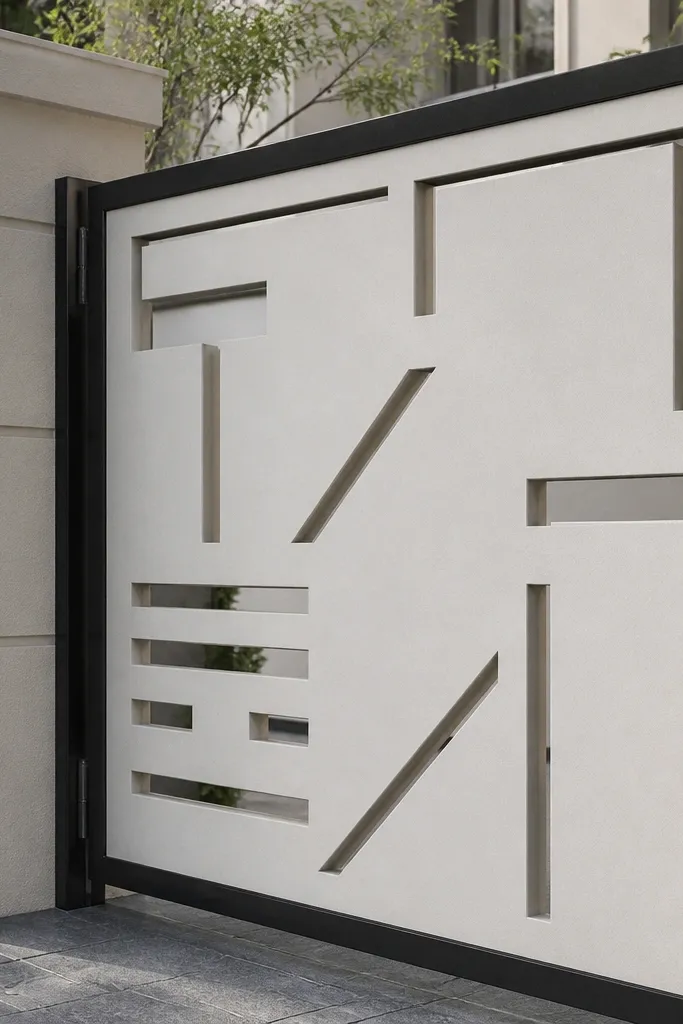
This is a photogenic, modern look: smooth white plaster or cement board panels outlined in dark metal, with geometric cutouts that create shadow play. The cutouts make the gate feel lighter and more architectural than a fully solid door. It also looks great when your wall is white or light cream because the dark outline becomes the contrast anchor. Skill level is intermediate because cutouts need clean framing so edges stay straight over time.
First, weld a dark MS outer frame and add internal rails to hold cement board or plaster panels; plan your cutout sizes like 200x200 mm squares or 150x300 mm rectangles. Second, mark and cut the panel openings, then frame each opening with thin metal strips so the edges don’t crack. Finally, prime and apply exterior paint on the white surfaces, seal all cut edges, and install the gate after dry fit checks for clearance.
Editor's noteSeal cut edges with primer plus a waterproofing layer before final paint.
Skip thisDon’t rely on paint to seal raw cut edges; cement board edges wick moisture.
14. All-black scroll-free gate with square bar lattice
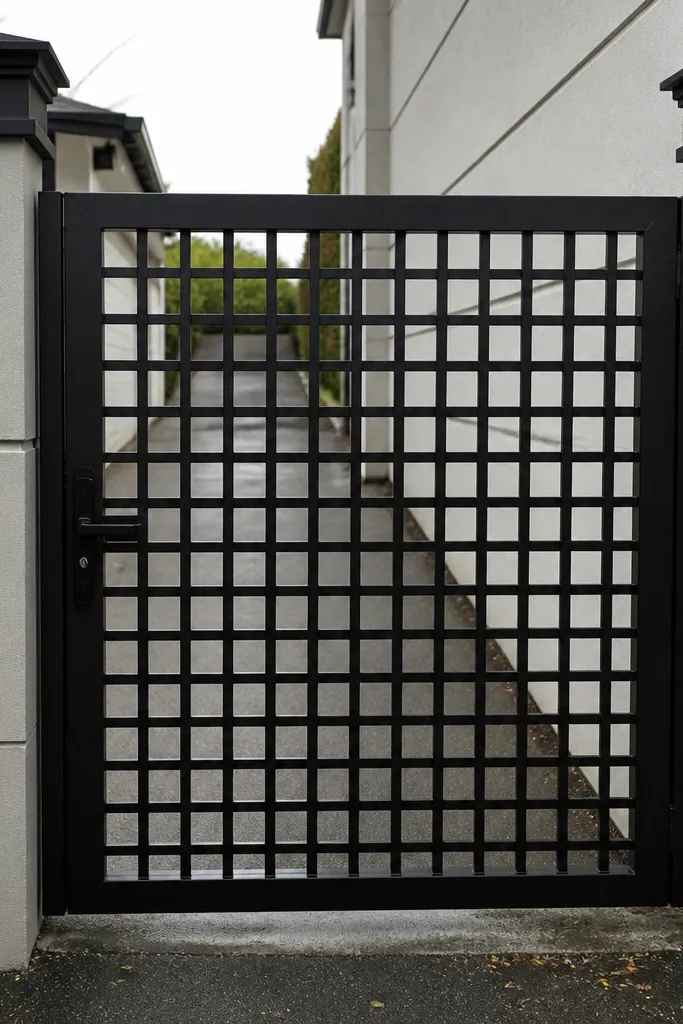
If you hate scrollwork but still want decoration, a square bar lattice gives you the same “designed” look with cleaner lines. The all-black finish makes it feel cohesive and modern, and the lattice pattern reads well from both angles. This is a strong option for narrow front entrances because the grid adds structure without making the gate look wide. Skill level is intermediate because the lattice needs consistent spacing and alignment.
First, weld a solid MS frame and add internal square bars (for example 12-16 mm) in a grid; keep spacing consistent like 80-100 mm. Second, weld the grid in a controlled sequence: tack the corners, then tack the center lines, then fill the rest. Finally, grind, prime, and apply matte black finish; mount hinges and a latch that align with the grid so hardware doesn’t break the pattern.
Tack everything first, then measure diagonals before you finish weld.
Don’t fully weld one side at a time; uneven heat can twist the leaf.
15. Brass-gold accents with black vertical bars
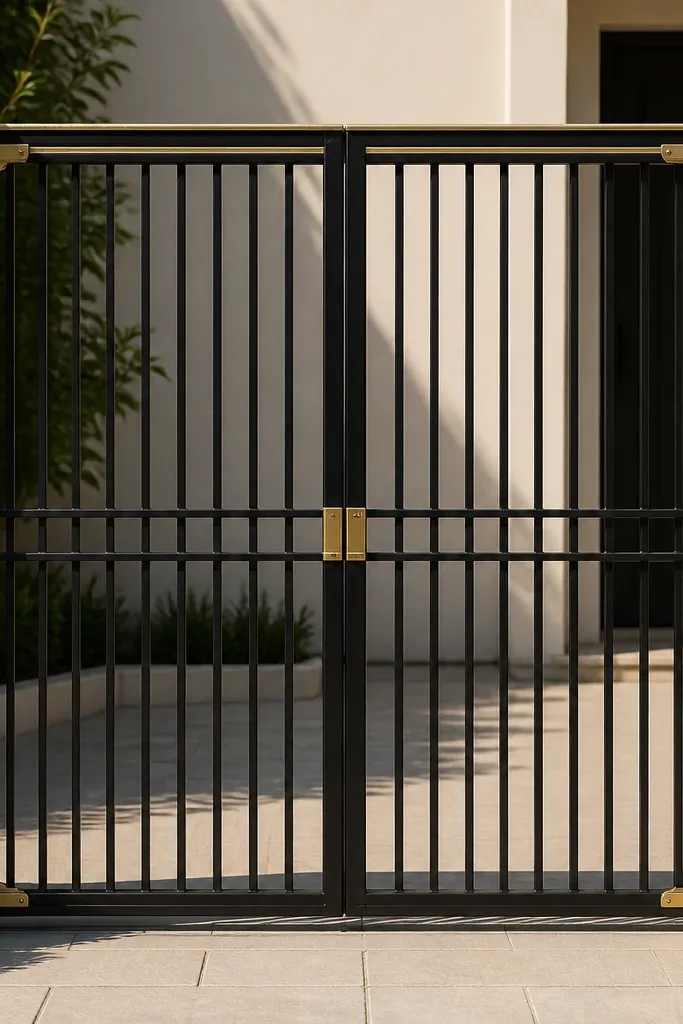
Small brass-gold accents make a simple black gate look premium. The trick is restraint: use gold only on corners, a thin top rail accent, and maybe a small center strip. The rest stays black so the gate looks designed instead of busy. This style works on most wall colors, but it’s strongest on gray, off-white, and warm beige. Skill level is beginner to intermediate because you’re mostly assembling and painting, not building complex shapes.
First, build the black MS frame and vertical bars, keeping bar spacing uniform. Second, add gold accents by welding or bolting thin metal strips (like 10-15 mm wide) at corners and along the top edge; keep the accent strip thickness consistent. Finally, prime and paint black, then paint the gold accents with metal gold paint or powder coating; install hinges and a matching gold latch plate.
Mask the gold areas carefully before black paint so you get sharp edges.
Don’t paint gold over rusty steel; it flakes and ruins the look.
16. Two-leaf gate with staggered vertical panels
Staggered vertical panels create depth without using heavy ornament. One leaf’s vertical members line up slightly offset from the other leaf, so when the gate is closed, the eye sees a layered pattern instead of two identical slabs. This is a great choice if your compound wall is plain and you want the gate to carry the design. Keep the offset small (around 20-30 mm) so it looks intentional, not crooked. Skill level is intermediate because you must plan the offset during frame build.
First, weld two matching frames, then add vertical rails so you can attach panels at a controlled offset relative to each leaf. Second, attach vertical slats or bars with a fixed 10-15 mm gap and set the offset between leaves by measuring from a common reference line on the opening. Finally, paint/powder coat and install hinges; adjust the latch so the meeting seam stays straight and the stagger effect stays visible.
Editor's noteUse a temporary spacer board at the meeting seam while you align the leaves.
Skip thisDon’t rely on eyeballing the offset; the seam will look messy in photos.
17. Split-level panel gate with stepped horizontal lines
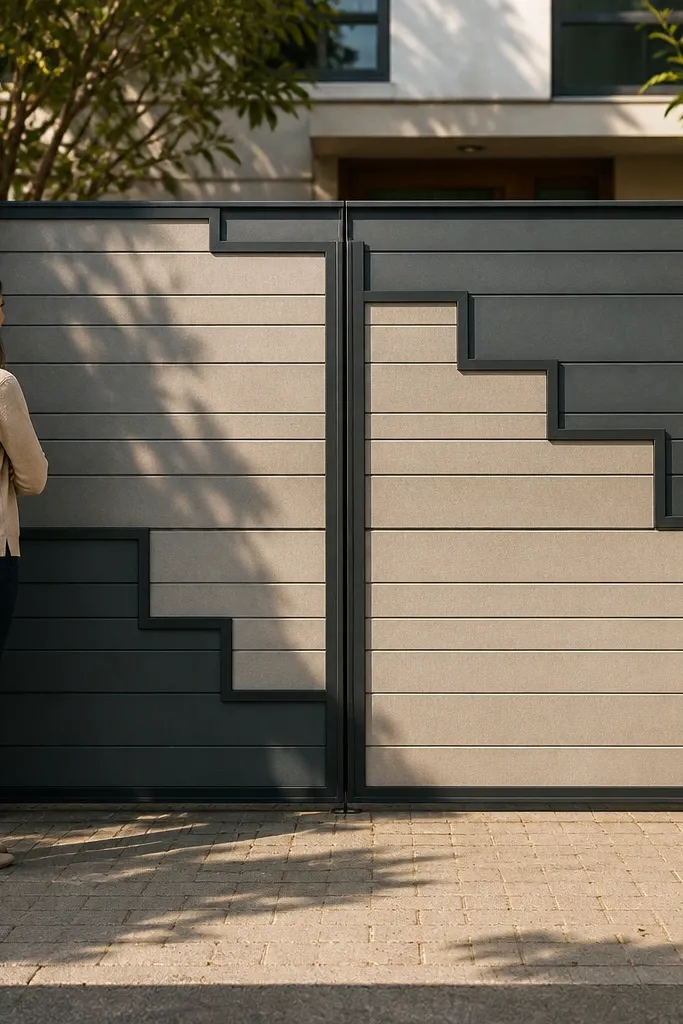
Stepped horizontal lines make the gate look like it belongs to a modern building, not a basic boundary wall. The split-level panel design adds rhythm across the height and breaks up the vertical monotony of many gates. It also hides minor wall height inconsistencies around the opening because the steps visually guide the eye. Use this with cement board panels inside a metal frame for a crisp finish. Skill level is intermediate due to panel cutting and alignment.
First, weld an MS frame and install two horizontal rails to create three panel height zones; measure from the ground so the steps match between leaves. Second, cut cement board or exterior plywood panels to fit each zone, leaving a 3-5 mm expansion gap, then fix with screws and corner brackets. Finally, seal edges, prime, paint in matte finish, and install hardware aligned to the step line so the latch doesn’t look random.
Editor's noteCut panel corners cleanly and sand edges before priming; rough edges show through paint.
Skip thisDon’t make the step heights inconsistent; uneven steps make the whole gate look unfinished.
18. Corten-style rust metal gate with smooth frame edges
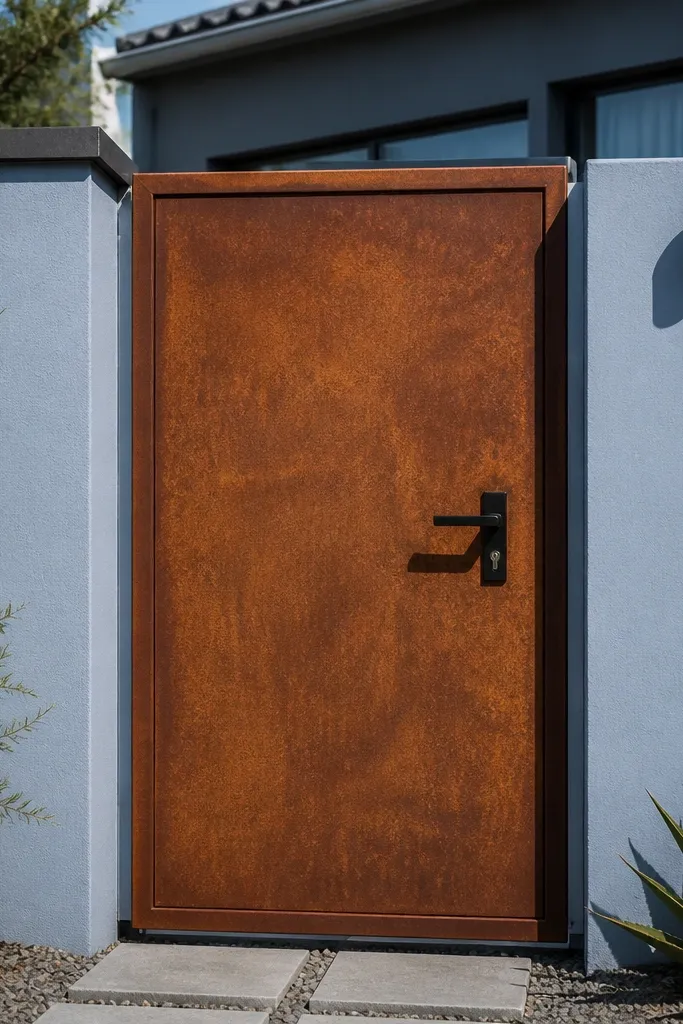
Corten-style finishes look great when you keep the design simple. The warm rust color adds texture and makes the gate stand out without needing elaborate patterns. Pair it with a smooth, clean frame — sharp corners and neat welds keep the rust look intentional. This works best if your wall is painted cool colors like light gray or white, so the warm rust pops. Skill level is intermediate because finish prep matters and the metal needs clean surfaces.
First, build a simple MS frame and add vertical bars or a minimal lattice pattern; keep bar spacing consistent. Second, sand and prime lightly according to the chosen rust finish method, then apply corten-style coating or controlled rusting product; follow the manufacturer dwell times. Finally, seal the surface with a clear exterior topcoat if you want slower fading and less staining; install hinges and latch after coating cures.
Editor's noteMask the hinge areas so moving parts stay smooth and don’t bind with coating thickness.
Skip thisDon’t let rust finish spill onto the wall; it stains and looks messy fast.
19. Matte white gate with black border and corner lattice squares
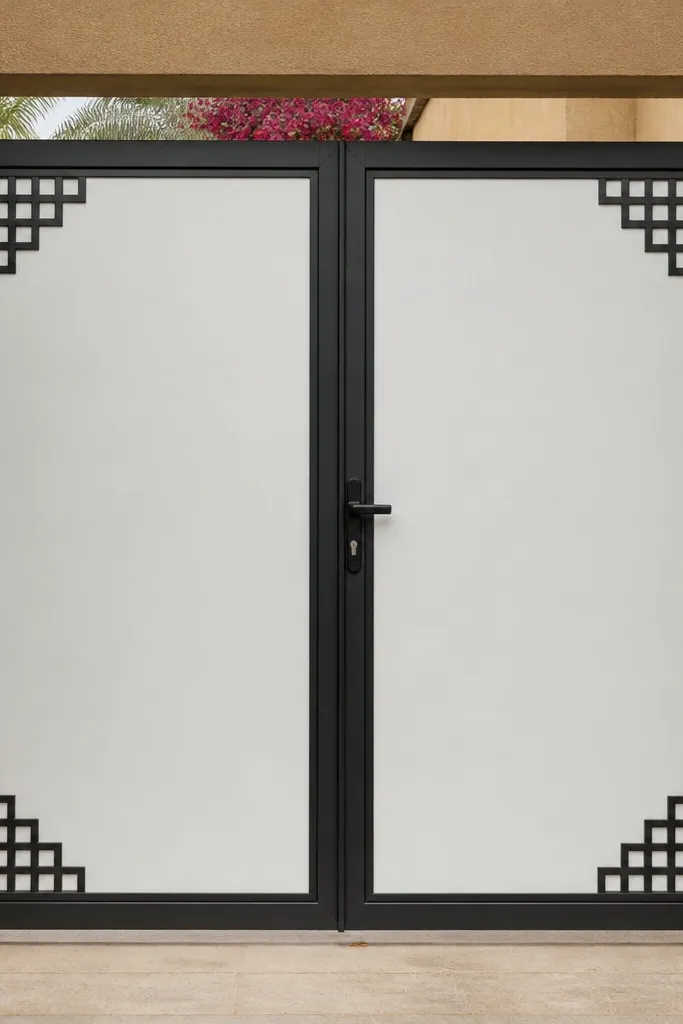
This design is clean and graphic: matte white panels with a black border and small lattice squares that add detail near corners. It looks modern, not ornate, and it photographs well because the contrast is strong. The corner lattice keeps the middle calm, so the gate looks balanced even if your compound wall has design elements. Use it when you want a gate that looks neat and bright in daylight. Skill level is beginner to intermediate because the structure is simple, and the detail is limited.
First, build an MS frame with a black finish, then attach matte white panel material like cement board or exterior plywood cladding. Second, add small lattice squares at the corners using thin black metal strips; keep the square size consistent like 120x120 mm. Finally, seal edges, prime seams, and paint touch-ups; mount hinges and a lock centered so it doesn’t break the symmetry.
Use painter’s tape to outline the black border thickness before painting for crisp lines.
Don’t use glossy white; it shows dust and streaks and looks dirty quickly.
20. Horizontal slat gate with raised center badge
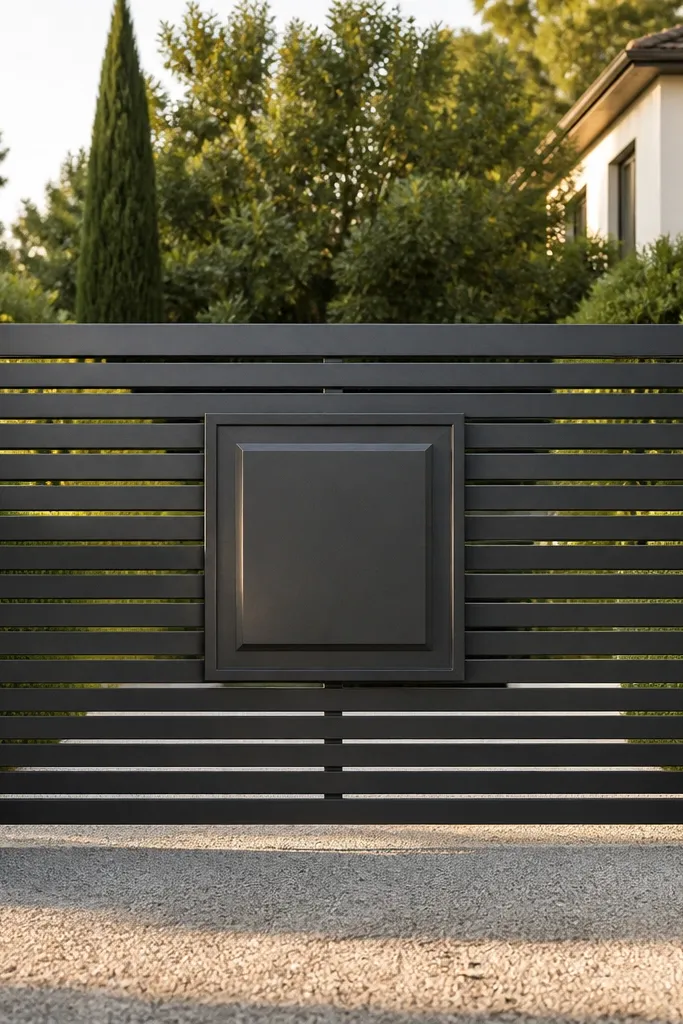
Horizontal slats make a gate feel wider and more grounded, especially on tall compound walls. A raised center badge gives you a focal point so the gate doesn’t look flat. This works well for properties where you want a modern, minimal look with one clear design element. Use matte paint in charcoal or black, and choose a badge shape like a simple circle or hex that matches your hardware. Skill level is intermediate because you’re cutting slats evenly and aligning the badge.
First, weld an MS frame and add horizontal rails; then install horizontal slats with equal spacing and slight overhang or flush edge — decide and keep it consistent. Second, create a raised badge using a metal plate or cement board shape fixed to a backing plate so it sits above the panel plane. Finally, prime and paint in matte finish, then attach hinges and a latch; seal the badge edges so water doesn’t get under it.
Editor's noteMake a slat spacing spacer from scrap so every gap matches from top to bottom.
Skip thisDon’t put the badge too high; center it based on the gate’s visual height, not the latch height.
21. Stone-aggregate cement panel with black MS edge frame
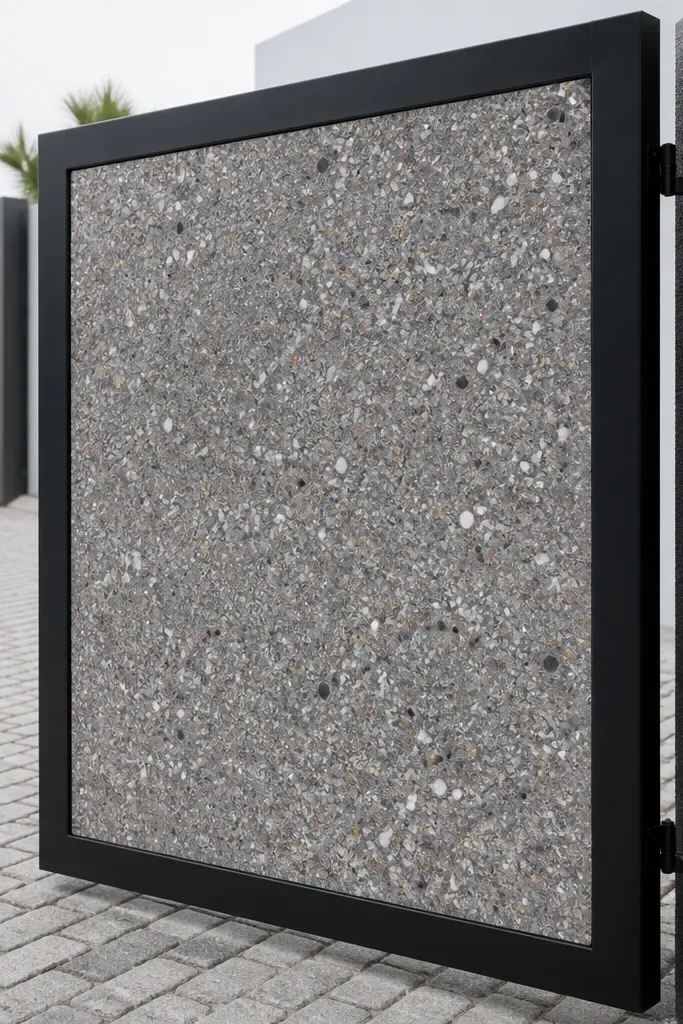
This gate looks expensive because the aggregate gives natural texture without needing imported stone. A black MS edge frame keeps the look crisp and modern, while the cement panel stays photogenic from close and far distances. It also hides small surface flaws better than smooth plaster, which is helpful for DIY builds. This style suits walls in light colors and works for both single and double leaf gates. Skill level is intermediate because mixing and troweling cement aggregate takes patience.
First, weld a black MS perimeter frame and build formwork inside to set the cement panel thickness (around 25-35 mm). Second, mix cement with fine aggregate and pour into the form, then trowel to a consistent thickness and cure properly; avoid over-watering. Finally, after cure, wash and seal the panel with exterior sealer, then paint the metal frame and install hinges and latch.
Editor's noteDry-brush a thin cement slurry on the surface before final trowel so the aggregate looks even, not patchy.
Skip thisDon’t seal before full curing; trapped moisture causes surface whitening and peeling.
22. Slim vertical bar gate with top half decorative wave line
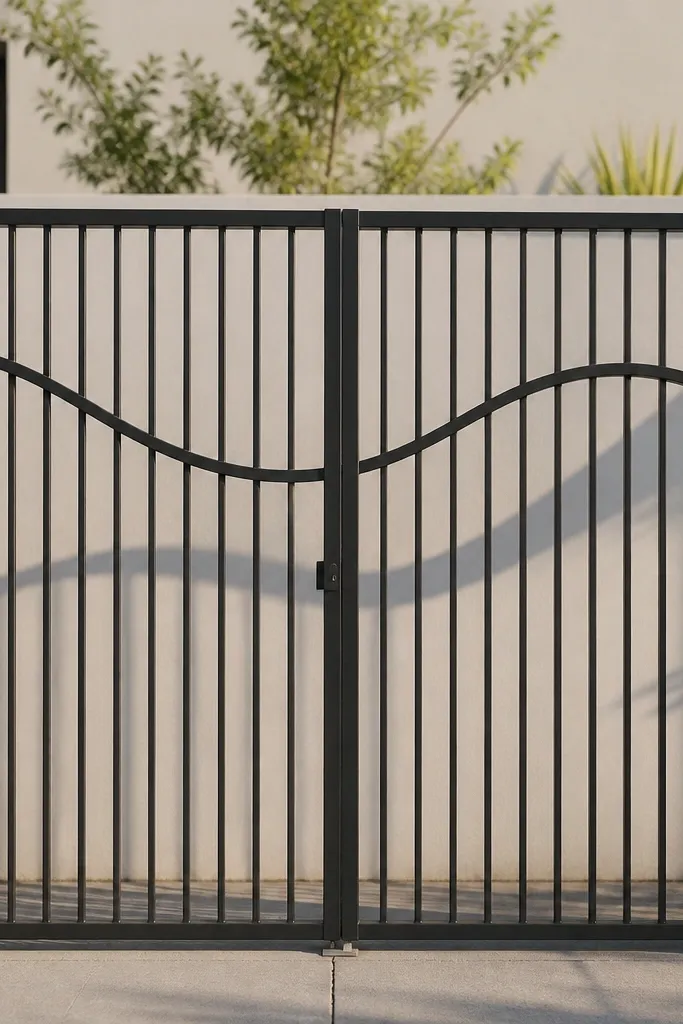
A wave line gives you motion without turning the gate into scrollwork. Combine it with slim vertical bars and the result looks light, modern, and clean. Keep the wave line only in the top half so it doesn’t clutter the entry area. This style fits contemporary houses with smooth walls and also looks good with minimal fencing. Skill level is intermediate because the wave line needs consistent bending or a welded pre-made strip.
First, weld a slim MS frame and install vertical bars using a spacing jig, leaving the bottom half straight. Second, create a wave strip using pre-bent metal or by marking and welding small segments to form a smooth curve; position it at a fixed height and center it. Finally, grind and paint in matte black or deep gray, then mount hinges and a latch; seal all metal-to-panel joints.
Use a cardboard template for the wave — it helps you keep the curve identical on both leaves.
Skip thick bars if you want the light look; chunky bars make the wave feel heavy.
23. All-cement gate with embedded metal vertical ribs
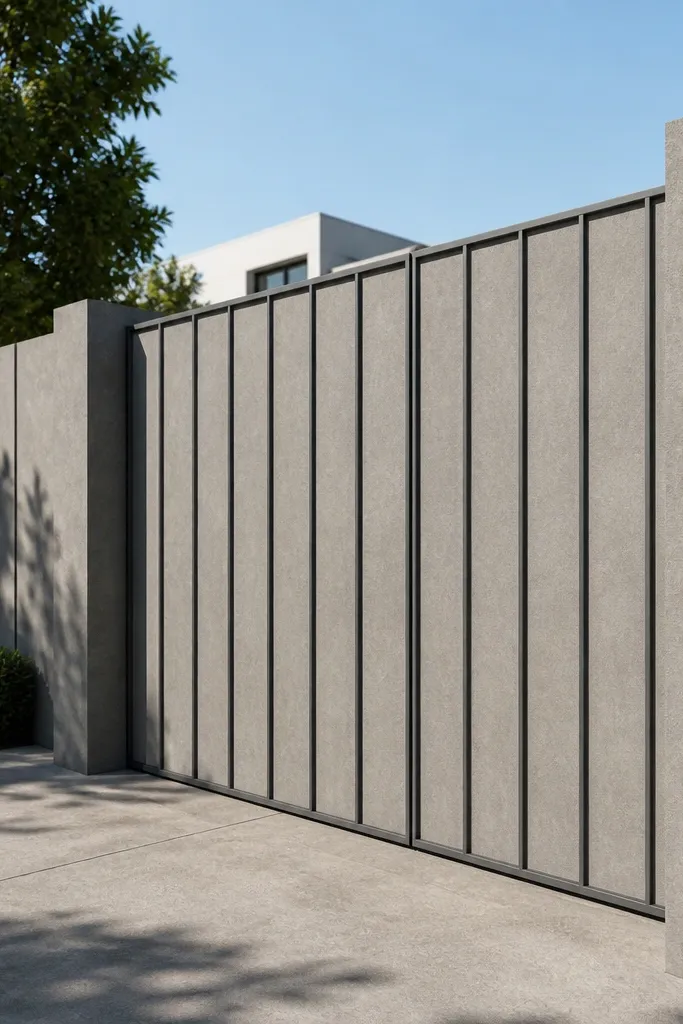
If you want the gate to match a compound wall that’s heavily cemented, go all-cement with a metal rib grid. The metal ribs stop the cement from looking flat and give you straight lines that hold up in photos. You also get a stronger sense of mass, which helps the gate look like it belongs to the property, not like an added accessory. Skill level is intermediate because you’re building a cement structure with internal reinforcement.
First, weld a perimeter MS frame and add internal reinforcement bars (rebar or mesh) tied to the frame; create ribs by welding thin metal strips vertically at consistent spacing. Second, build a mold and pour a cement mix with proper reinforcement coverage; trowel smooth and keep rib edges sharp. Finally, cure fully, sand any roughness, apply exterior primer and paint, and seal the entire gate; install hinges with anchors into the frame.
Editor's noteAdd a thin water-resistant coating to the cement surface before painting for fewer stains.
Skip thisDon’t make the cement too thin; thin cement cracks around anchors and looks messy quickly.
24. Black frame with mirrored acrylic panel for a reflective look
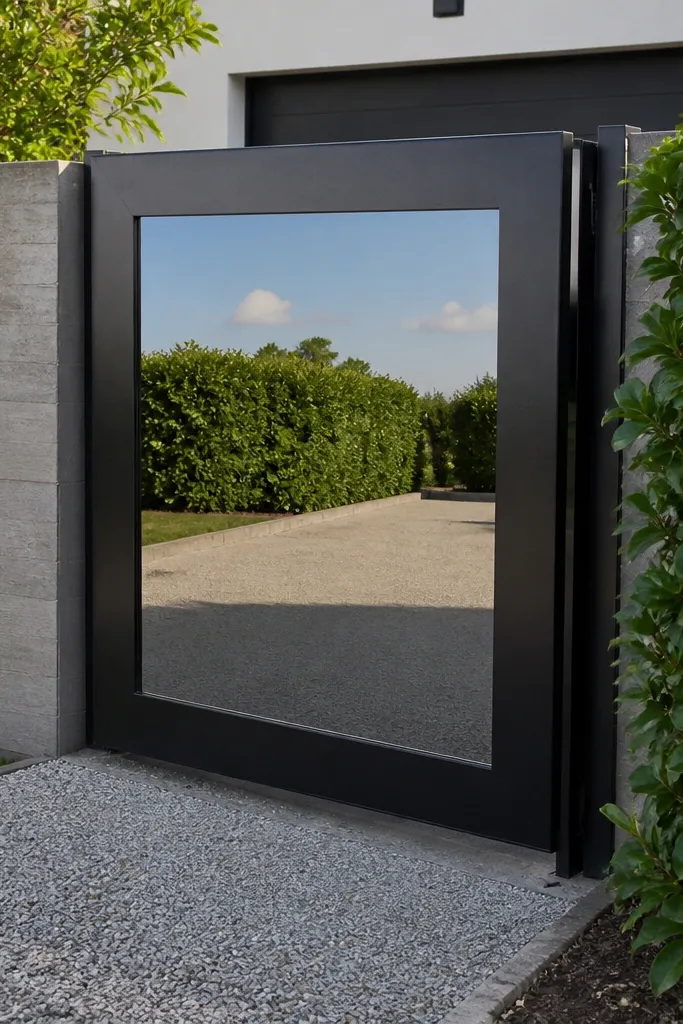
Reflective panels catch daylight and make the gate look high-end, especially when the frame is clean and the panel is centered. Use acrylic or polycarbonate mirror-like sheet for safer break resistance than glass, but keep it properly mounted with flexible fasteners. This style looks best on gates where you want the entrance to feel brighter. It’s also visually strong in photos because the panel reflects the sky and surroundings. Skill level is beginner to intermediate if you’re careful with cutting and mounting.
First, weld a black MS frame and add internal rails to support the reflective panel; set a 3-5 mm gap for expansion. Second, mount the acrylic panel with rubber gaskets and screws that don’t over-tighten; avoid direct metal contact. Finally, paint the frame matte, install hinges, and seal the panel edges with clear exterior silicone to keep water out.
Editor's noteCut acrylic with fine-tooth blades and sand edges lightly so it doesn’t chip at the corners.
Skip thisDon’t tighten screws until the panel is crushed; cracking starts at the mounting points.
25. Vertical slats with inset metal mesh strip for privacy

This design gives you a layered look: vertical bars for the main style and a mesh strip inset for privacy where you need it. The mesh area breaks the monotone and adds texture, so the gate looks more “built” than a basic grill. It’s ideal for homes where you want to block direct sightlines from the street without making the gate fully solid. Skill level is intermediate because mesh must be cut and framed cleanly.
First, weld the MS frame and vertical bars with uniform spacing, then decide a mesh strip height like 600-900 mm from the bottom. Second, weld a thin inner border frame around the mesh area and fix galvanized mesh using metal clips or screws; keep mesh taut so it doesn’t sag. Finally, prime and paint the entire gate, then install hinges and a latch; seal screw holes on the mesh frame.
Editor's noteUse galvanized mesh with a tight weave; loose mesh looks saggy and cheap over time.
Skip thisDon’t skip a border frame around the mesh; fixing mesh directly to flat bars makes it twist.
26. Stainless steel vertical rods with brushed finish
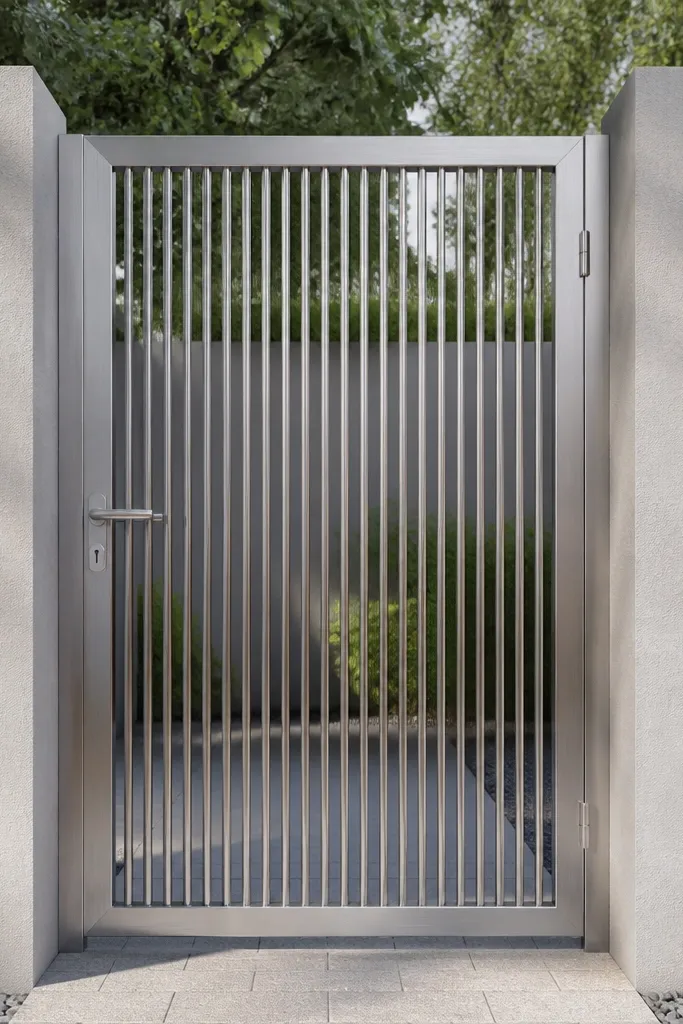
Brushed stainless rods look clean and modern, and they stay looking new longer than painted metal in many climates. The look is minimal, but it still reads as high-end because the rods are uniform and the frame is neat. This is a great choice when your wall color is plain and you want the gate to be the main visual element. Skill level is intermediate because you need accurate spacing and careful drilling for stainless assembly.
First, weld a stainless-compatible frame or use MS frame with a stainless finish system, then set vertical rods through drilled holes or using stainless clamps. Second, space rods evenly using a jig and ensure both leaves match; use a consistent rod diameter like 10-12 mm. Finally, deburr holes, clean, and finish with a brushed stainless technique or protective coating; mount hinges and latch plates designed for stainless.
Use nylon or rubber washers between rods and clamps to prevent metal-to-metal rattling.
Don’t use random rod diameters; the uniform look is the whole point.
27. Green powder-coated gate with white cement tile insets

A green gate with white cement tile insets looks lively and still structured, because the tile shapes are repeatable. The key is keeping the tiles in a grid or consistent motif so it doesn’t turn into visual noise. This style is especially good if your compound wall has warm tones and you want a color pop that still looks classy. Skill level is intermediate since tile mounting needs proper adhesive and sealing for outdoor weather.
First, build a powder-coated green MS frame and add internal rails to create inset boxes; keep inset openings identical in size. Second, cut cement tile or outdoor ceramic tiles to fit each inset, then fix using exterior tile adhesive and grout; leave expansion gaps at edges. Finally, seal grout, then seal the frame-tile junction with exterior waterproof sealant; mount hinges and install a matching latch.
Dry-lay tiles on a flat board first so you can confirm spacing before you glue.
Don’t skip sealing grout; outdoor grout absorbs water and stains the white tiles.
28. Black frame with vertical slats and a patterned base kickplate
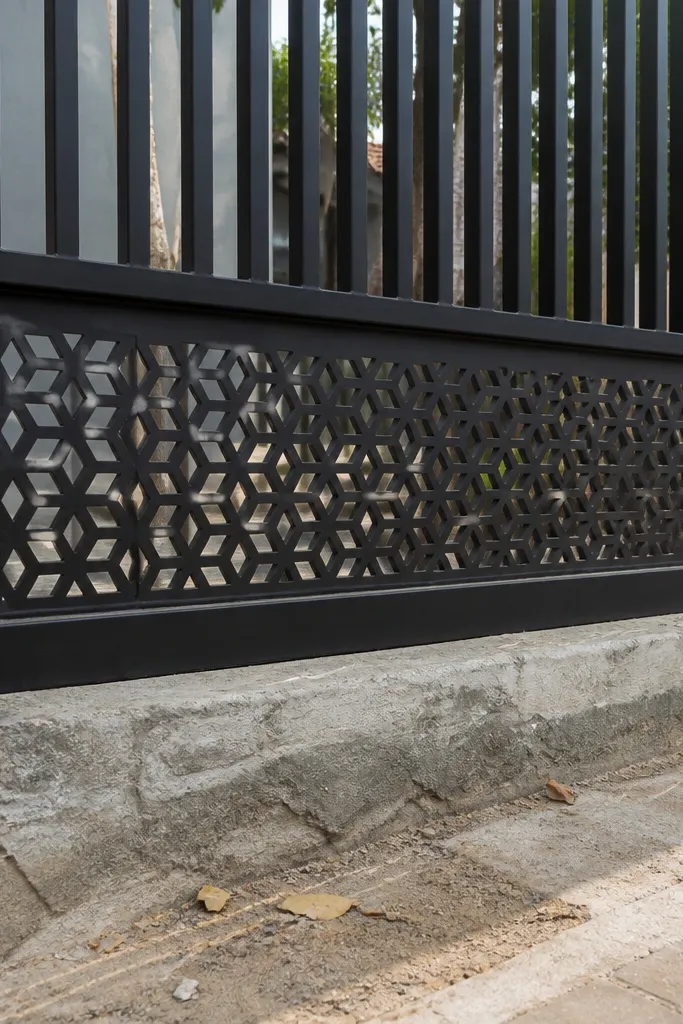
A kickplate makes the gate look finished and stronger visually, especially if the lower wall area is uneven. Use a patterned kickplate like perforated metal or a simple geometric sheet cut-out, then keep the rest of the gate as clean vertical slats. The base pattern hides scuffs and gives texture where dirt collects. This style is practical and looks sharp in daylight because the contrast sits low and anchors the gate. Skill level is beginner to intermediate.
First, weld the MS frame and install vertical slats with uniform gaps, leaving a bottom zone for the kickplate. Second, cut a kickplate panel to the exact width and install it using steel brackets or screws; keep it sealed with paint or sealant at edges. Finally, prime and paint the whole gate, then install hinges and latch; test swing with the kickplate clearance checked against the ground.
Editor's noteUse a small gap of 5-8 mm above the ground so the kickplate doesn’t catch water and grime buildup.
Skip thisDon’t make the kickplate too glossy; it shows scratches and fingerprints quickly.
29. Solid panel gate with narrow vertical glass strip for entry light
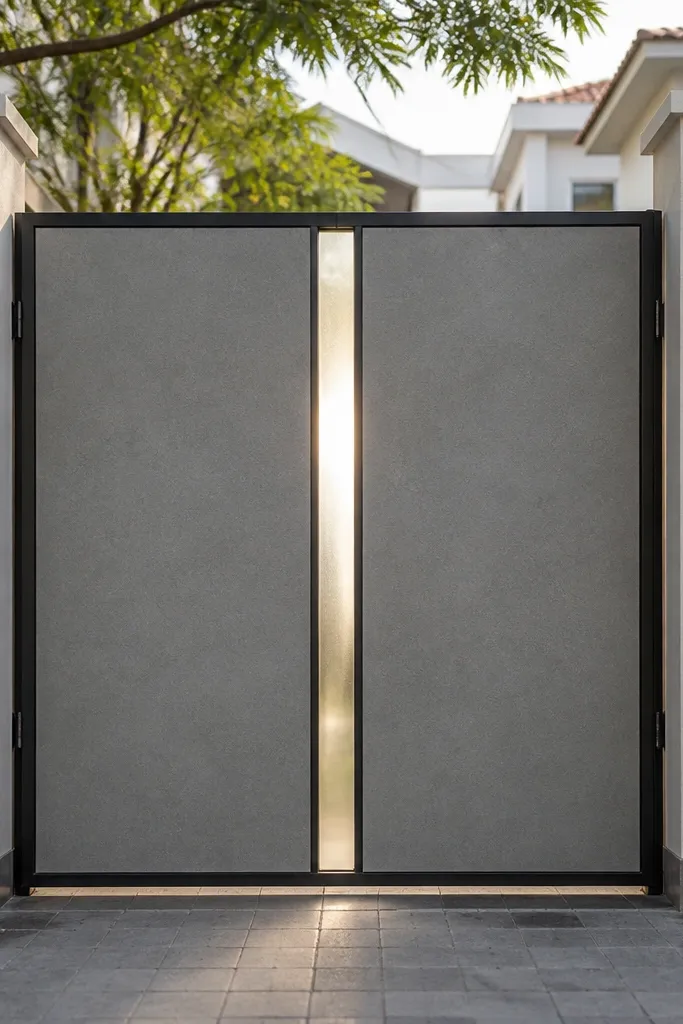
This gate looks sleek because it’s mostly solid, but the narrow glass strip adds light and makes the design feel modern. The glass strip also gives a vertical line that complements compound walls with columns or pilasters. Use toughened glass for safety and mount with gaskets for clean edges. This is a good choice when you want privacy from street view but still want the entrance to feel open. Skill level is intermediate due to glass mounting and panel finishing.
First, build an MS frame and panel it with exterior plywood or cement board, leaving a vertical opening for the glass strip; keep the opening edges framed with metal. Second, install toughened glass using rubber gaskets and glazing clips, with a 3-5 mm perimeter gap. Finally, prime and paint the frame and panel, seal all edges, then install hinges and latch aligned to the glass strip centerline.
Editor's noteKeep the glass strip height around 60-70% of leaf height so it looks balanced, not like an afterthought.
Skip thisDon’t use thin glass; it looks flimsy and mounting becomes harder.
30. Multi-panel gate with three repeating cement tile blocks
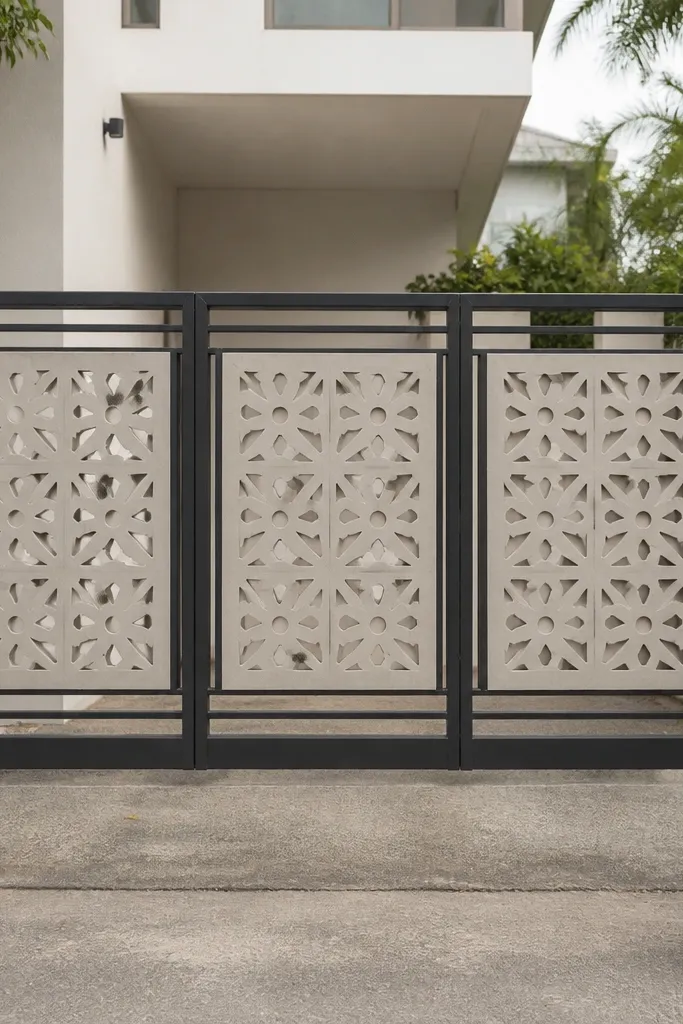
Repeating tile blocks make the gate look designed because the pattern repeats predictably. Dark frame + light tile is a strong visual combo that reads clean from far away. This style works when you want a decorative element but you don’t want full-wall ornate grills. Keep the tile blocks consistent in size and spacing so it looks like a planned installation, not random decoration. Skill level is intermediate because you’re cutting and aligning tile blocks on outdoor surfaces.
First, weld a dark MS frame and divide each leaf into three horizontal sections with internal rails. Second, create three inset boxes per leaf (or two per leaf depending on your opening) and mount cement tiles using exterior tile adhesive; use spacers to keep grout lines uniform. Finally, grout and seal the tile, then seal the metal-to-tile junction with exterior waterproof sealant; paint the metal frame after tile work.
Editor's noteUse identical tile batches for all blocks so color variation doesn’t show as patchy.
Skip thisDon’t glue tiles directly onto unprimed cement board; adhesive failure shows as lifting and cracks.



