


1. Arm-Height Daily Tray with 3 Clear Zones

This is the fastest way to make a vanity look intentional. A divided clear tray creates visible order without hiding your products in a dark drawer. Put skincare on one side, makeup on another, and tools like cotton pads or a small lash applicator in the third. The clear plastic reads clean and modern, and the dividers stop everything from drifting into one messy mound. It’s also realistic for time — you can do your routine without hunting for the next thing.
Start by clearing only the desk top, not the whole vanity. Measure your available space and pick a tray that fits with at least 1 inch of breathing room on each side. Add three containers inside the tray if your tray has no dividers, using small clear cups or a silicone organizer with compartments. Place the daily items where your hand naturally lands: skincare closest to the mirror side, makeup in the middle, tools at the far edge you reach last. Finish by wiping the tray so fingerprints don’t show and so the clear parts look crisp.
Editor's noteUse a tray with smooth edges so powders and creams wipe off without catching in seams.
Skip thisAvoid one big “everything tray” — it turns into a pile the second you set something down.
2. Drawer Insert with Vertical Product Line-Up

Vertical storage makes drawers look tidy and makes products easier to grab without tipping bottles. When you lay everything flat, you end up with a stack that collapses and looks messy fast. Vertical inserts also create a clean visual rhythm, which is what makes the vanity feel styled. Use this for anything you don’t need daily on the surface — backups, travel sizes, and anything you only grab once or twice a week. The best part is it saves time because you can scan labels at a glance.
Remove everything from one drawer and sort into keep, backup, and trash or donate piles. Measure the drawer depth and choose inserts that let bottles stand without bending labels. Stand taller items in one section and group shorter items in a second section so the drawer stays level. Put backups behind the front row so you don’t mix old and new. Wipe the drawer bottom, then slide in the inserts and set items by height and shape.
Editor's noteLine the drawer with a thin non-slip liner so bottles don’t slide when you open the drawer quickly.
Skip thisAvoid mixing wide and narrow containers in the same drawer space — the gaps become dust traps and visual clutter.
3. Magnetic Tool Strip for Scissors, Tweezers, and Curlers
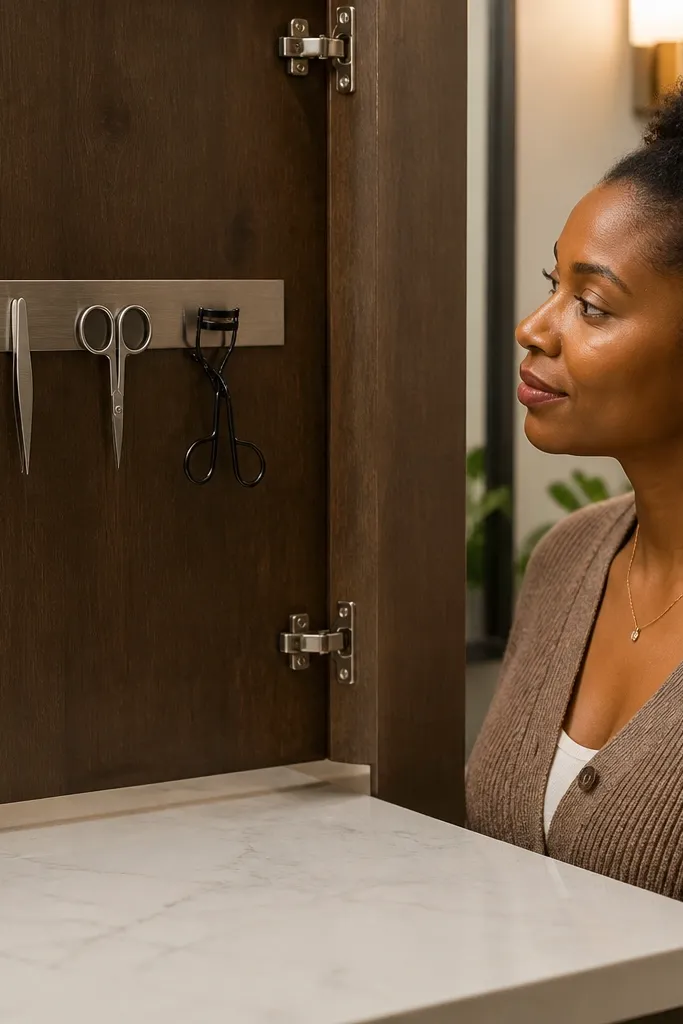
Small tools are the biggest source of desk chaos because they’re easy to grab and easy to leave behind. A magnetic strip inside a cabinet door keeps tweezers, scissors, and a lash curler off the counter but still within reach. It also looks sharp because the tools hang in a straight line instead of living in a cup. For aesthetics, this is one of the cleanest solutions because you remove random objects from the surface entirely. It also protects tools — less knocking around means fewer bent edges.
Clean the inside cabinet door and wipe it dry so the mounting surface sticks. Use a magnetic strip sized to the door width and place it where you can reach tools without digging. Mark placement lightly with a pencil, then mount with the method included by the strip (adhesive or screws). Test with the tools before final press-down or tightening. Add a small felt pad at the bottom edge if the tools clack loudly when you close the door.
Editor's noteKeep tweezers and scissors on separate sections so you don’t scrape blades when you remove them.
Skip thisAvoid storing sharp tools in open cups — they tip, collect dust, and ruin the clean look.
4. Cable + Charger Stack Tray Under the Mirror

Hair tools and charging cords turn vanity desks into a visual mess because they sprawl. A dedicated under-mirror tray creates one hidden home for chargers, cord wraps, and the stand for a hot tool. The desk stays clear, and the setup looks intentional because cords are contained and not creeping across the surface. This matters for the “one hour” promise: fixing cables reduces the amount of rearranging you do later. It also makes the vanity safer because you control where cords sit when you’re not using them.
Unplug everything and clear the area under the mirror first. Choose a shallow tray with a lip so cords can’t slide out, and make sure it fits without blocking drawer movement. Wrap cords with a hook-and-loop tie or a simple Velcro strap, then store the wrapped bundle inside the tray. Put the charger brick in a corner so it doesn’t sit in the open where it can get knocked. If you have a hair tool stand, keep it in the same tray so the cord and tool feel like one unit.
Label the cord ties with a tiny piece of painter’s tape so you know which charger belongs to what.
Avoid running cords along the edge of the desk — they snag, tangle, and keep the surface looking messy.
5. Label System by Routine Step, Not Brand

Bad labels create bad habits. If you label by brand, you still have to think every time you return something, and your vanity drifts back into piles. Label by routine step so the “put it back” motion is automatic. Use short words that match how you talk to yourself while doing your face. This looks clean because labels are consistent in font size and placement, and it keeps the vanity from turning into a jumbled storage shelf. It also helps when you share the space or switch between daily and weekend products.
Pick one label style and stick with it — either white vinyl with black text or clear label tape with a dark marker. Clean container lids and bottoms so labels stick without peeling. Create labels for the actions you actually do: Cleanser, Moisturizer, Primer, Foundation, Concealer, Powder, Lashes, and Setting spray. Apply labels to the front of bins or the top of drawer inserts so you can see them without opening. After labeling, do one dry run: grab each item and put it back in the same labeled spot.
Write labels with a consistent width using a label template or a ruler so the text lines up and looks neat.
Avoid tiny labels on the side of bins — you’ll stop checking them and everything creeps back to the desk.
6. Vertical Cup for Brushes with Drying Lip

Brush clutter looks messy even when it’s “organized.” A vertical brush cup keeps handles aligned and prevents bristles from getting crushed or splayed. Add a second cup for dirty brushes or a quick-clean spot so you’re not tempted to set brushes down on the desk between uses. For aesthetics, two matching cups look intentional and clean, especially when both are the same color and shape. This also speeds up routine cleanup because you always know where a brush goes. It’s a small change that makes the vanity look put together instantly.
Choose cups that are tall enough for your longest brush handle and have a stable base. Place one cup near your makeup zone and the second cup slightly to the side so your hand doesn’t bump the first. Add a simple rule: clean brushes stay in Cup 1, used brushes go in Cup 2. If you wash brushes, keep a microfiber cloth nearby for quick dry-wipe of handles so drips don’t stain the desk. Wipe the cups and let them fully dry before placing brushes back in.
Editor's noteUse a cup with a slightly weighted bottom so it doesn’t slide when you pull a brush quickly.
Skip thisAvoid setting brushes flat on paper towels — it looks sloppy and spreads moisture onto the surface.
7. Makeup Palette Backing Board for Flat Items

Flat items like palettes, compacts, and lip sets create visual clutter because they stack unevenly. A backing board gives you a clean surface to stage them in rows, which makes the vanity look styled instead of stuffed. It also keeps items from sliding around when you open drawers or bump the desk. Pick a board that matches your vanity finish — matte wood for warm tones or a solid light laminate for a crisp look. This setup works best for items you use every few days, since they stay visible without taking over the entire counter.
Lay a backing board on the desk where you normally set makeup down. Arrange flat items in a single layer, leaving a small gap between each so labels stay readable. If you have magnets or metal cases, use a thin magnetic strip on the board to hold palettes in place. For non-magnetic cases, use a slim non-slip liner under each item or small foam dots. Once the layout looks right, remove everything, wipe the board, then place items back in the same order.
Editor's noteKeep the biggest palette in the center and smaller items on the sides so the layout feels balanced.
Skip thisAvoid stacking palettes on top of each other — the edges look messy and the top one always gets smudged.
8. One-Wipe Surface Rule with Small Lidded Bin

A vanity looks messy when you have random cotton pads, wipes, and backup products floating around. A small lidded bin keeps cotton pads, wipes, and backups contained, and the lid keeps the surface looking calm when you step away. This also solves a common “mystery clutter” problem: items that belong to skincare routines end up on the desk because there’s nowhere to put them. Choose a bin that fits the width of your daily tray so everything stays within one visual zone. Lidded storage is one of the quickest ways to make your desk look photo-ready without changing your whole collection.
Pick a bin that fits in a corner of your desk or inside a drawer, then dedicate it to one category only — wipes and cotton pads. Fold a small stack of wipes so they sit flat and don’t puff up. Place cotton pads in the bin, wipes beside it or in the same bin if there’s room. Add a second small container inside the lid area for cotton swabs if you use them. After you set it up, wipe the desk around the bin once so the area looks intentionally clean.
Editor's noteUse a bin that opens smoothly with one hand so you don’t leave it ajar and mess up the look.
Skip thisAvoid leaving cotton pads in open piles — they look gray, collect dust, and kill the clean aesthetic.



