
1. Cedar-slat bench with two flip-down shoe doors
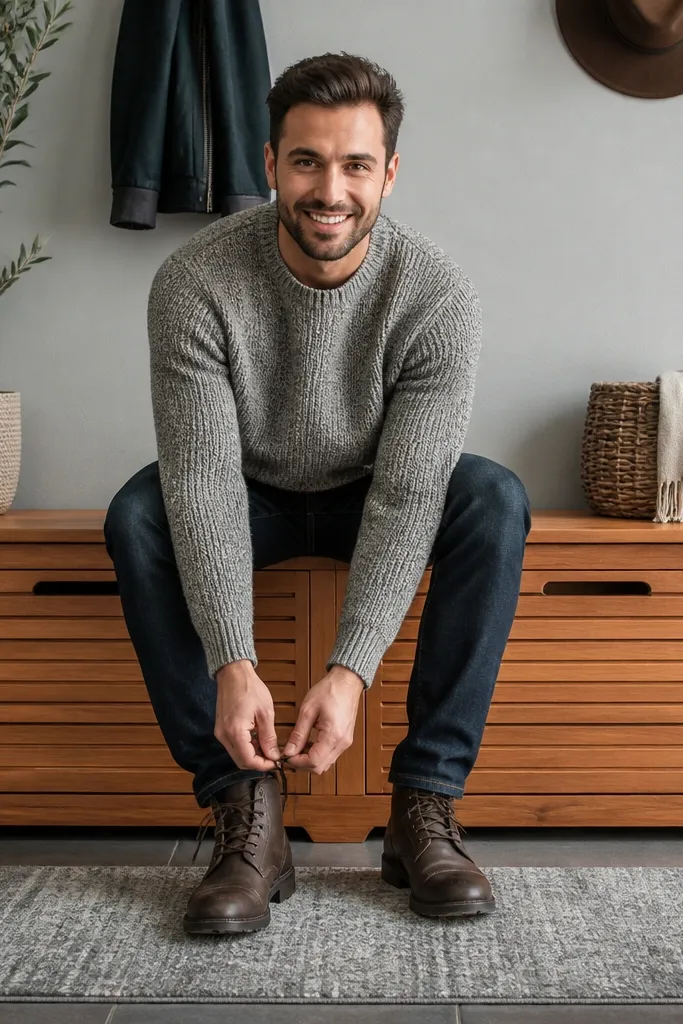
This is the entryway “clean look” move because it turns shoe storage into furniture. Cedar-slat fronts look warm and intentional, and the flip-down doors hide clutter at eye level. The bench top gives you a place to sit while you put on boots, which reduces the “shoes kicked off anywhere” habit. Build it with a ventilated interior so damp shoes don’t sit in a sealed box.
Editor's noteUse soft-close hinges or a door stop with felt so the doors don’t slam and rattle.
Cut a bench frame from 1x3 or 2x3 lumber, then set a seat height of about 18 inches from the floor. Install two hinged flip-down doors sized to cover your shoe area, and add cedar slats on the outside for that clean, textured look. Inside, add a back panel with 1-inch spacing or slats so air can move; then add a simple stop block behind the door opening so pairs don’t get jammed. Finish with a matte clear coat that won’t look glossy in daylight.
Skip thisSkip fully sealed interiors if you store wet boots — you’ll earn odor fast.
2. Two-row wire rack with a full-height shoe stop rail
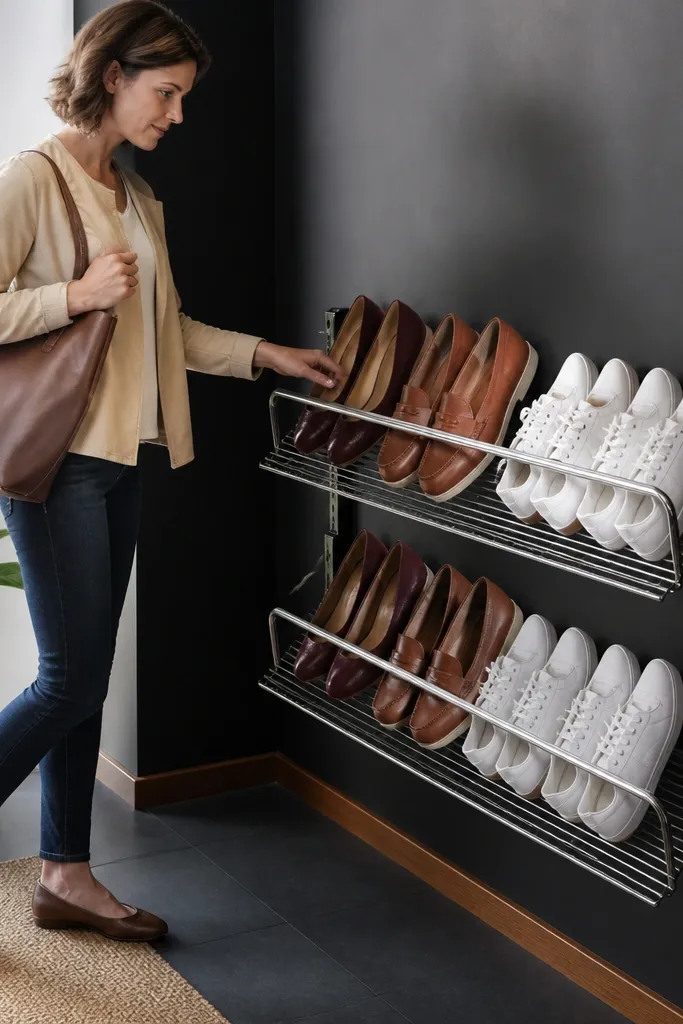
Wire racks look light and modern, and they photograph well because you can see the shape of each pair. The part that makes this idea succeed is the full-height shoe stop rail, which keeps every toe aligned and prevents that “slanted pile” look. With two rows, you get daily access without stacking chaos. The open wire also keeps airflow strong for sneakers, flats, and cleats.
Editor's noteAdd one label strip under the rail for each household member so placement stays consistent.
Mount a wire shoe rack set to about 12 inches from the floor for the top row and 2 inches above it for the second row. Add a straight rail at the front — a 1x2 wood strip or metal angle — and secure it with screws into wall studs or heavy anchors. Use rubber edge trim on the rail so shoes don’t scuff. Finally, paint or finish the rail to match the rack so the whole thing reads as one piece.
Skip thisDon’t rely on friction alone; without a stop rail, shoes always creep forward.
3. Angled cubby wall with "sole-forward" placement
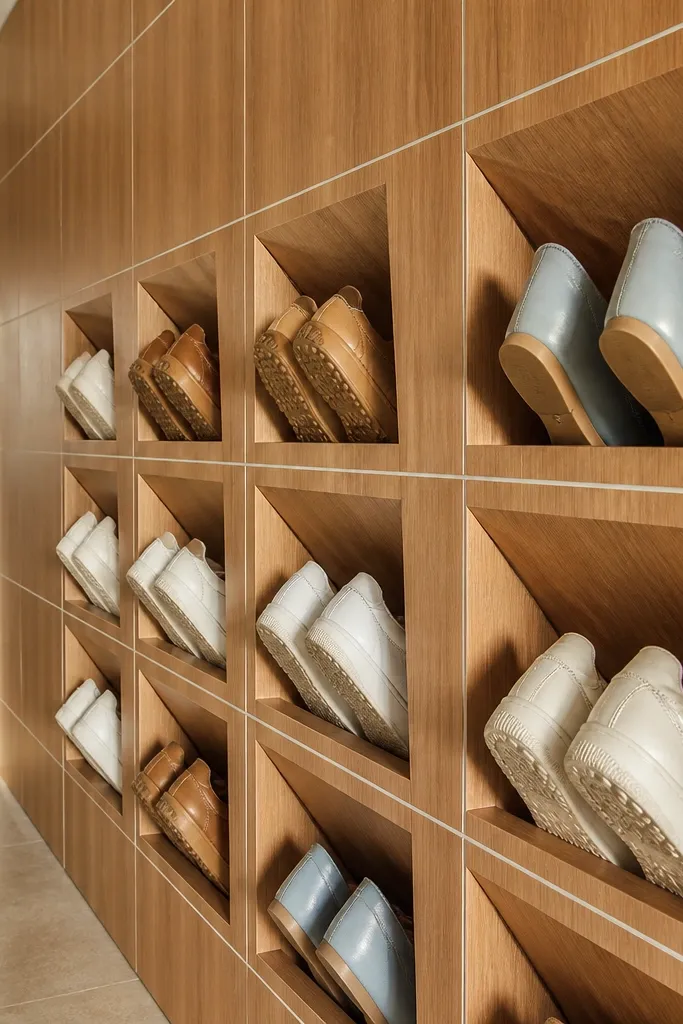
Angled cubbies make shoes look styled instead of stored. When the openings tilt slightly, shoes settle back into the cubby and don’t topple forward, so the wall stays tidy from across the room. This works especially well for sneakers, flats, and loafers because they sit neatly and show off color. The angled face also hides the mess of laces when you toss shoes in quickly.
Editor's notePut a thin felt pad at the back of each cubby so heels and soles don’t clack.
Build a grid of cubbies with 10-12 inch wide bays, then tilt each front opening back about 10 degrees. Use plywood for the back and angled dividers so each bay holds one pair. Add vent slots or slats along the back panel to keep airflow. Finish the face frame in a matte stain, and keep the interior lighter so the wall doesn’t look heavy.
Skip thisDon’t make cubbies too deep; deep cubbies force shoes to slouch and look messy.
4. Boot tower with vertical dividers and a base drain tray
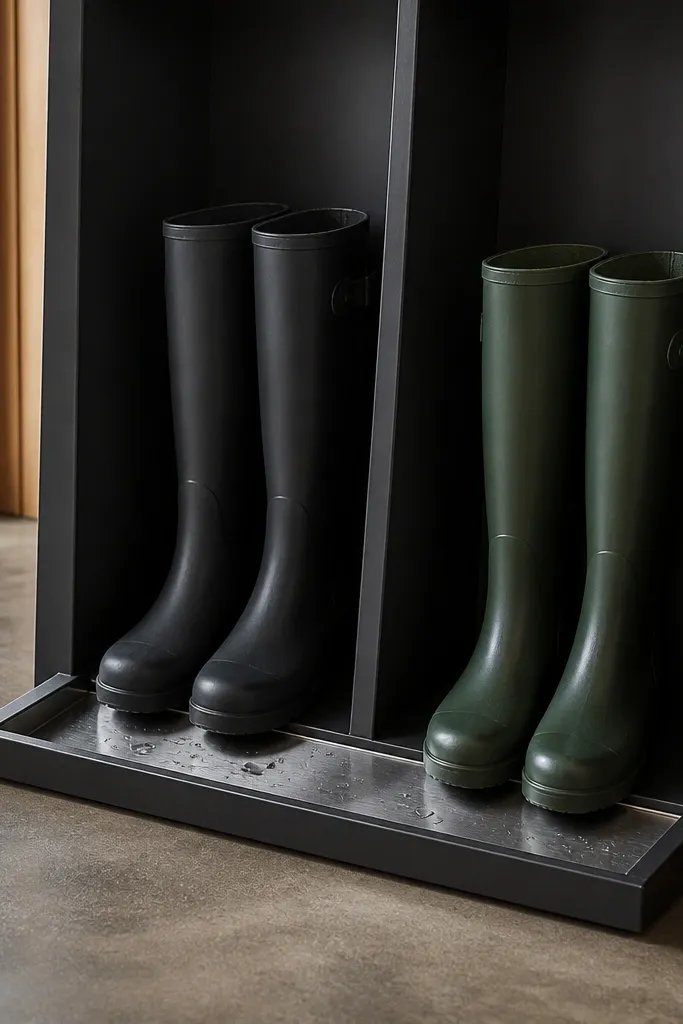
Boots ruin most entryway storage because they collapse when the shaft has nowhere to sit. A boot tower fixes that with vertical dividers that hold each pair upright and prevent the “one big pile” look. Add a low drain tray area so wet rubber boots don’t stain the floor or the bottom shelf. It’s one of the few designs that stays neat even when you’re coming in muddy.
Editor's noteAdd a simple hook inside each bay for boot tongues or shoelaces so everything stays contained.
Design the tower with compartments about 10-12 inches wide and 24-30 inches tall depending on boot height. Install vertical dividers from 3/4-inch plywood and leave a 1-inch gap behind for airflow. Create a bottom tray from a shallow plastic pan or waterproofed wood liner with a removable insert so you can wipe it clean. Secure the unit to studs or use heavy anchors because boot weight adds up.
Skip thisSkip fabric bins for boots — they sag and trap moisture.
5. Pegboard + shelf system for quick-grab daily shoes
This looks airy and intentional because pegboard has a built-in grid. You can create a clean “daily row” at mid-height for the shoes you grab every morning, while longer boots hang separately. Floating shelves keep the entryway visually light, and the hooks hold laces and boot shafts in a way that looks neat. It’s also flexible: move pegs as your shoe sizes change.
Editor's noteUse two shelf depths: 6 inches for flats and 8-9 inches for sneakers so everything sits correctly.
Mount a steel pegboard to studs, then add two floating shelves: one at about 28 inches high and one at 36 inches for taller items. Use peg hooks sized for shoe straps or boot tongues, and add small shelf stops so shoes don’t slide off. For the bottom, add a slatted basket or wire tray so you still get airflow. Paint the pegboard a crisp matte white so the shoes stand out.
Skip thisDon’t overload the shelves; if they’re too full, shoes lean and the grid stops looking clean.
6. Shallow sliding doors over a ventilated shoe drawer box
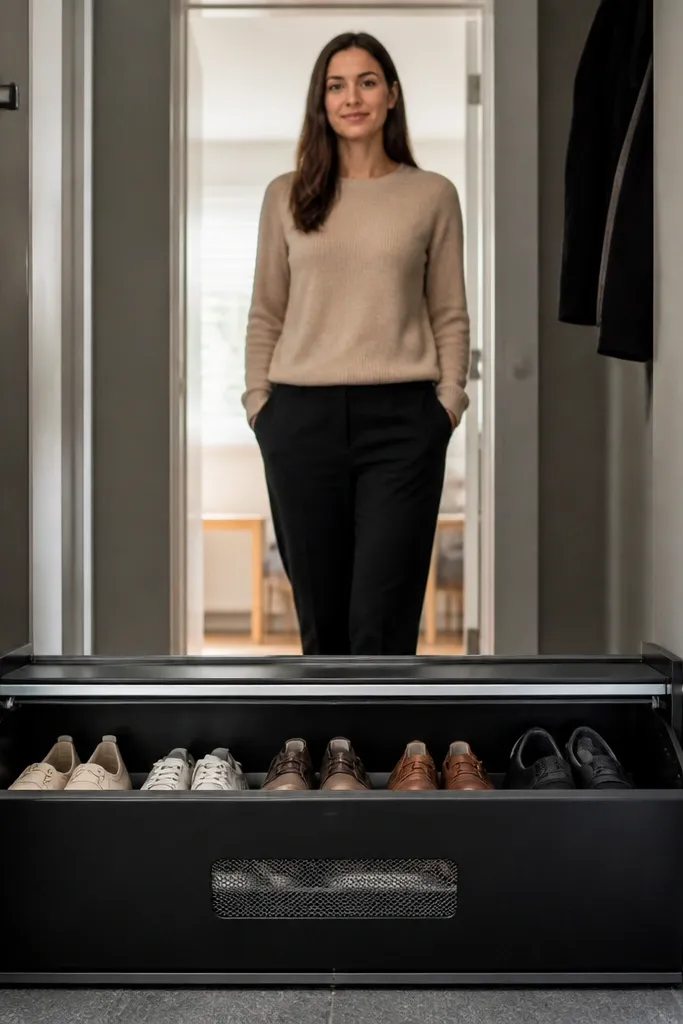
Sliding doors hide shoes instantly, which is the fastest way to make an entryway look finished. The key is that the inside is ventilated, so the drawer box doesn’t trap odor. This design works when you want a sleek front that matches your hallway furniture. It’s also great for small spaces because swing doors steal floor area.
Build a shallow cabinet box with interior shelves 10-12 inches deep, using 3/4-inch plywood. Install slats or perforated backing so air moves through; then fit the shelves with a small lip so shoes don’t fall forward. Add a track for two sliding panels and keep the panels slightly thicker for a higher-end look. Use magnetic catches to keep the doors closed while still letting you crack them open for drying when needed.
Make the shelves removable so you can clean hair and grit that falls behind shoes.
Skip solid backing; closed backs make the cabinet smell and you’ll avoid using it.
7. Staggered floor cubbies with removable trays
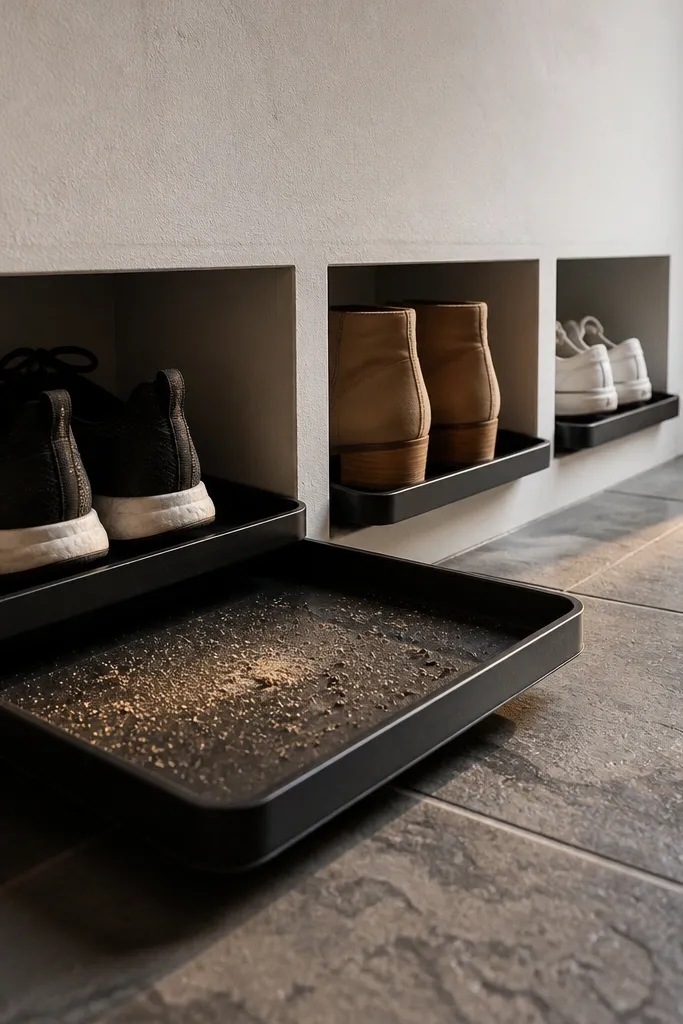
Floor-level cubbies look modern and keep shoes from becoming a wall of clutter. The staggered layout means you can fit more pairs in a narrow entryway while still keeping toe lines neat. Removable trays make this practical because you can pull them out to wipe sand and lint. This is a strong choice for families with kids' sneakers that track dirt.
Frame cubbies using 2x2 or 1x3 rails, then set each cubby depth to around 9 inches. Stagger the openings by offsetting rows so shoes don’t overlap visually. Make the bottom tray from a waterproof material like thin plastic or sealed plywood with a removable insert. Add a slatted or perforated back so air moves up through the cubbies. Finish the outer face with a durable paint for scuffs.
Use a slightly textured paint on the outer face so boot marks don’t show as much.
Don’t make cubbies too tight; cram shoes together and they won’t dry, and they won’t look aligned.
8. Neutral fabric shoe bins inside a framed grid
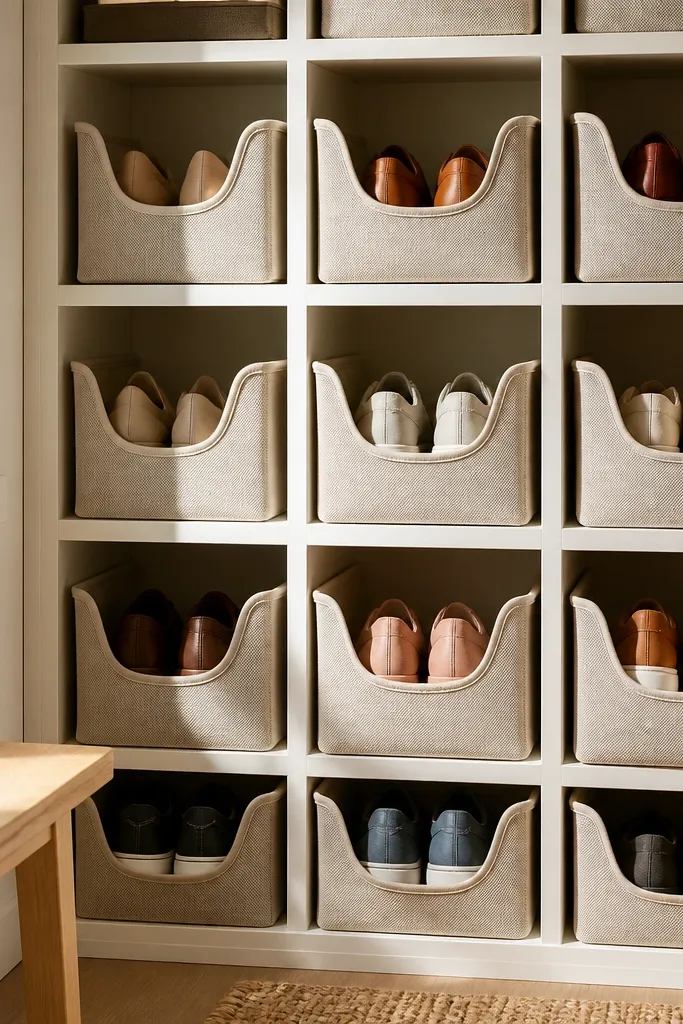
If you want the soft look without the messy pile, framed bins are the answer. The frame keeps everything straight and photos clean; the bins hide the ugly parts like scuffed soles and loose laces. Choose bins with breathable sides, not thick fleece that traps moisture. This is best for flats, sneakers, and seasonal rotation when you don’t need instant access to every pair.
Editor's noteAdd a removable dust cover panel at the top if your entryway gets lint from an open door.
Build a rectangular grid frame with 1x3 lumber and square it so each bay is consistent. Install breathable fabric bins sized to the bays, and add a label tag at the top front so placement stays predictable. Add a thin slat shelf behind the bins or a ventilated backing panel. Use a matte stain or paint on the frame so it matches your entryway trim. Keep bin colors neutral — cream, sand, or light gray — so the whole wall looks calm.
Skip thisSkip bins with solid bottoms; moisture collects and you’ll see it.
9. Clear acrylic fronts over a ventilated shoe rack
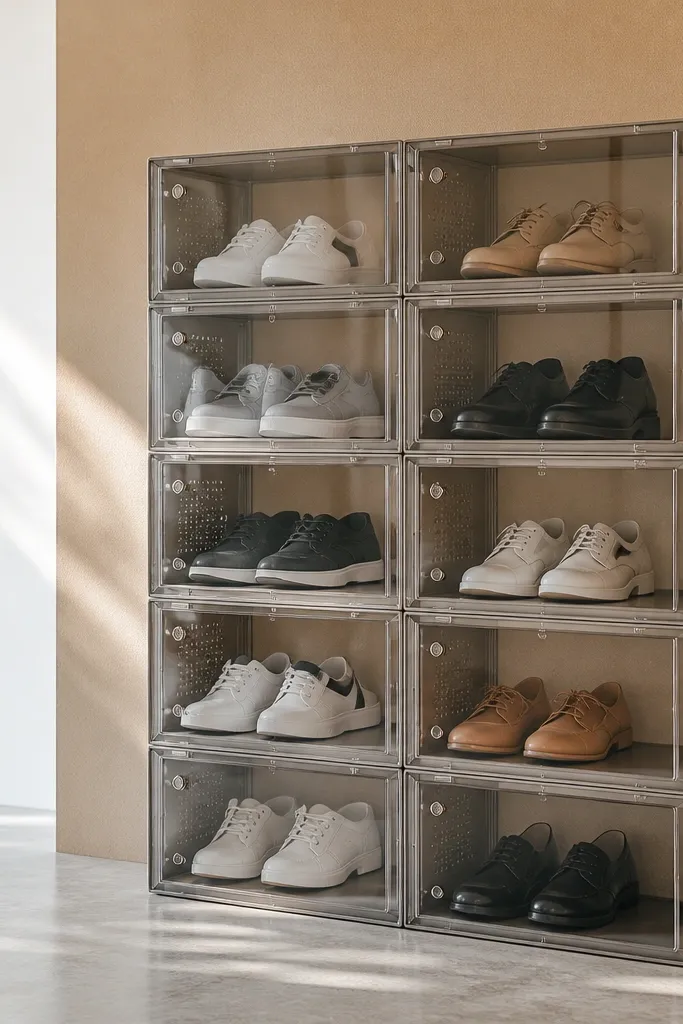
Clear fronts give you the organized look of closed storage without hiding the shoes completely. It reads like a mini retail wall, but it still works at home because shoes stay visible and you can see what’s missing. For the “best shoe storage ideas vs fail” angle, clear fronts stop the “random pile” problem because you can’t jam shoes in randomly when they have to sit behind panels. Use this when you have a curated shoe color mix and want it to look intentional.
Editor's noteUse smoked acrylic for a softer look that hides scuffs better than fully clear.
Start with a wire or slatted rack sized to your space, then build a shallow clear-front frame using acrylic sheets. Leave airflow gaps around the edges and avoid sealing the sides completely. Install clear panels on the front only, keeping the sides open for ventilation. Add a toe stop rail inside so shoes align consistently behind the front. Secure acrylic with proper stand-offs and avoid drilling too close to edges.
Skip thisDon’t fully enclose — trapped moisture means odor and warped materials.
10. Ladder-style wall rack with drop-in shoe baskets
A ladder-style rack looks sculptural, and it makes shoe storage look like decor. The baskets drop in, so you can remove them for cleaning and drying. This setup is great for entryways where coats and bags already live on the wall; the ladder matches that “vertical organization” vibe. Because baskets have open sides, airflow stays strong for everyday shoes.
Editor's noteHang the lowest basket so the floor stays mostly clear — aim for the bottom basket opening around 8-10 inches above the floor.
Mount two vertical rails like a narrow ladder using 2x2 lumber or metal strips, with rungs every 10-12 inches. Attach basket supports at each rung so baskets sit level and don’t tilt. Choose baskets with wire or perforated sides, sized for your largest daily sneakers. Add a bottom basket for smaller shoes and a higher one for flats so you don’t have to bend as much. Finish the ladder in matte black or warm walnut stain.
Skip thisSkip fabric-lined baskets; they look good until they trap wet sports shoes.
11. Peg-and-basket corner with a tall vertical boot strap
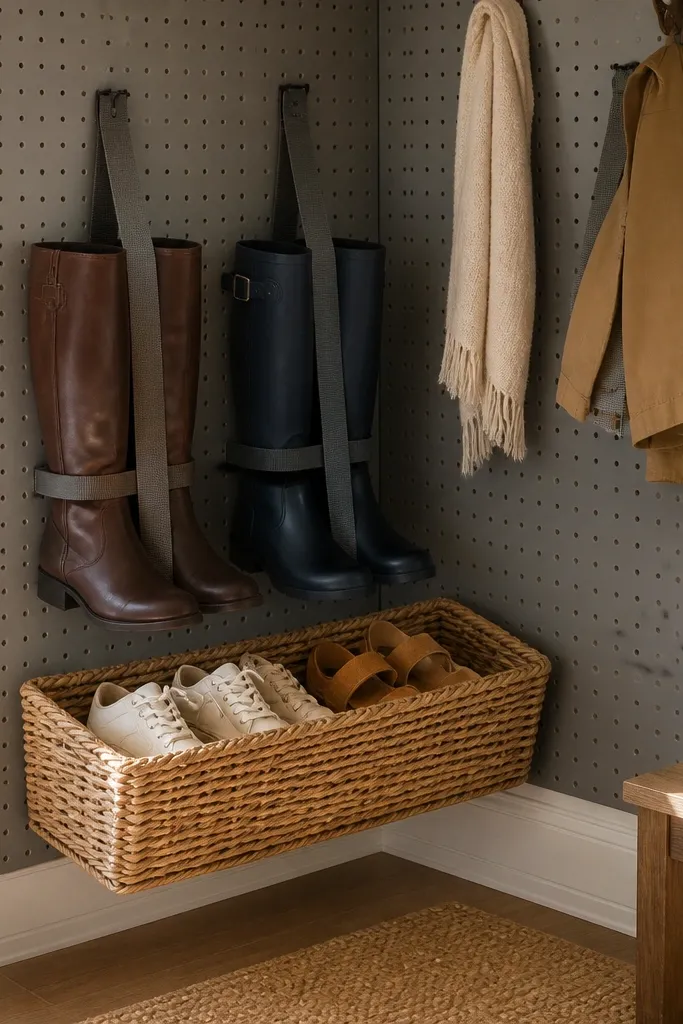
Corners are where shoe clutter becomes unavoidable, because everything sits at angles. A corner peg-and-basket system fixes that by turning the corner into a vertical organizing zone. Use a tall strap or rail for boot shafts so they hang upright instead of folding. The baskets catch sneakers and flats, and the pegboard grid keeps everything visually aligned.
Mount pegboard to both walls in the corner if you have studs, or anchor into a single structural strip. Add a tall vertical strap rail with spaced hooks for boot shafts — about 2-3 inches apart so leather and rubber don’t rub. Install two wire baskets at staggered heights: one around 18 inches and another around 30 inches. Add a small shelf at the top for a brush or shoe spray so the corner looks intentional. Use corner-friendly brackets so everything sits flat.
Add a small drip mat behind the boot strap so wet soles don’t stain the wall.
Don’t store boots folded in a basket; the shaft creases and the entryway looks messy.
12. Bench-side pull-out shoe drawers with mesh fronts
Pull-out drawers make shoes feel hidden but still organized, and mesh fronts keep airflow moving. This is the best option for an entryway bench where you want the bench to look clean from the front. Mesh also looks light and modern, so the storage doesn’t visually crowd the room. Use this for sneakers, slides, and dress shoes that you want to access quickly without opening doors.
Editor's noteUse drawer stops so the drawer doesn’t slam and bounce shoes into a pile.
Build a bench base with a compartment sized for two drawer units, each about 12-14 inches deep and 8-10 inches tall. Install drawer slides rated for the weight of shoes. Make each drawer front from mesh or wire paneling framed in wood, and add a simple stop lip inside to keep pairs aligned. Wire the drawer so it pulls smoothly, then finish the bench in a durable topcoat. Add a removable tray at the bottom of each drawer for grit.
Skip thisSkip solid drawer bottoms; grit and moisture collect and the drawer starts to smell.
13. Slim vertical wall cabinets with louvered panels
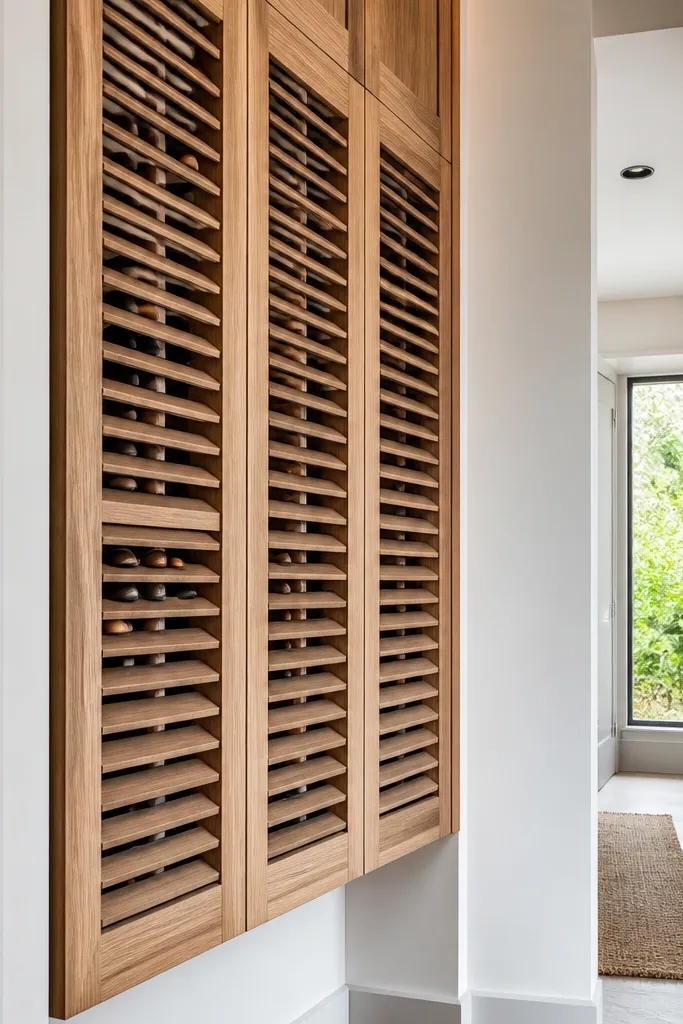
Slim vertical cabinets make an entryway look taller and cleaner, especially in narrow hallways. Louvered panels give you ventilation without needing open shelves, so the storage stays neat even when shoes are still drying. This is a strong choice for dress shoes and flats because they look crisp when stored upright and separated. The look is sleek, and you don’t get the “open rack clutter” effect.
Editor's noteUse soft-close hinges so the louvered doors don’t rattle and draw attention to storage every day.
Build two slim cabinets with internal compartments around 9-10 inches wide each. Use louvered doors on the front and add a back panel with ventilation gaps. Install a fixed shelf at the top and a second shelf lower down, leaving enough vertical room for boot shafts if needed. Add a toe kick gap for airflow and to prevent the cabinet from sitting in dust. Paint or veneer the cabinet exterior to match your entryway trim.
Skip thisDon’t use fully solid doors; you’ll trap moisture and the cabinet will smell.
14. Color-coded drawer labels with "pair pockets"
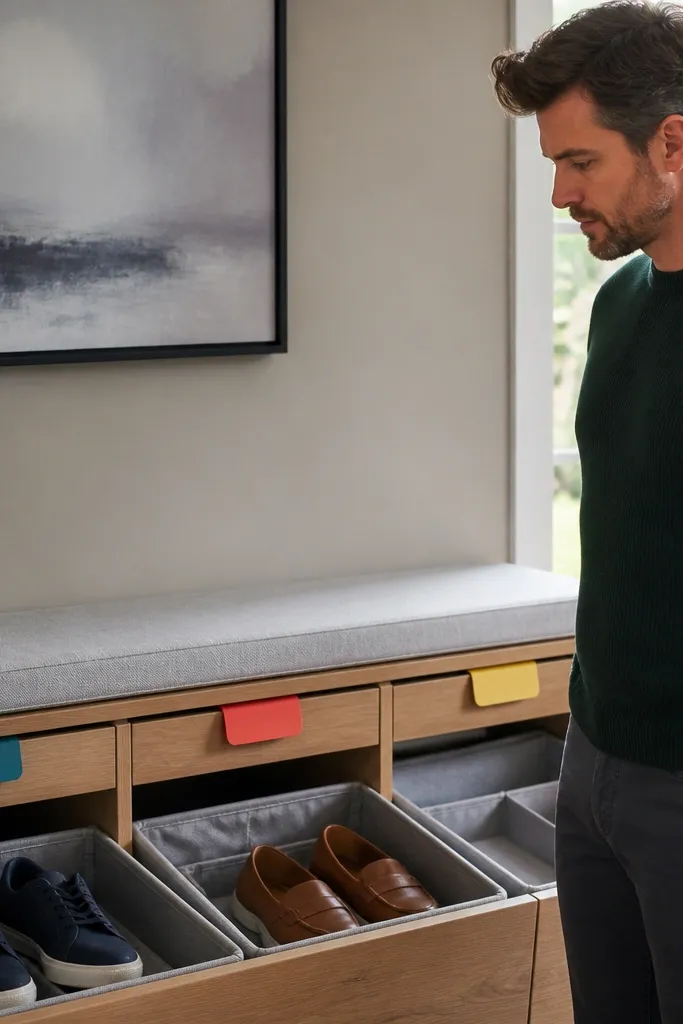
This is the unglamorous idea that makes the entryway look glam because it stops the chaos. Pair pockets inside shallow drawers separate shoes so straps, laces, and heels don’t tangle. Color-coded labels keep placement fast for kids and guests, which is where most entryways fail. The drawer front can be plain and still look good because the inside system reduces the visual mess.
Use drawer organizers or build shallow compartments with 3/4-inch dividers. Keep each pocket sized to one pair: about 10-11 inches long for flats and 12-13 for sneakers. Add a breathable back panel made from slats or perforated board so shoes dry. Label each drawer with a simple color dot system on the inside edge of the drawer front. Finish the drawer fronts with matte paint so the entryway stays calm.
Make one drawer “emergency pairs” for shoes you’re waiting to dry. It prevents damp shoes from mixing with dry ones.
Skip deep drawers; deep storage turns into a jumble and the label system stops working.
15. Wall-mounted flip baskets with angled base
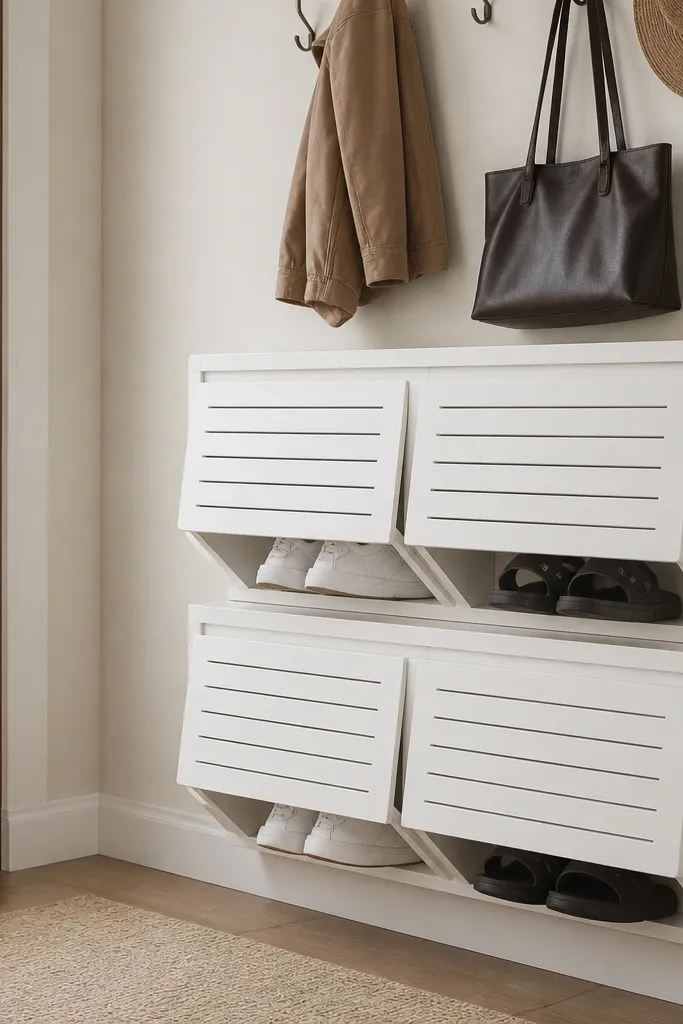
Flip baskets are the best middle ground between open racks and fully enclosed cabinets. You get visibility for quick grabs, but you also get a lid-like front that keeps the entryway looking clean when shoes are in use. The angled base is what makes it aesthetic: shoes settle and line up instead of sliding around. This is a great fit for small entries where you need vertical organization without taking up floor space.
Editor's noteKeep baskets shallow and repeat the same shoe type per basket so the look stays consistent.
Mount a set of flip baskets to a wall using a rail system so all baskets sit at the same height. Set the basket base at a slight angle by adding a wedge spacer behind the mount — around 5-8 degrees. Choose baskets with wire sides or perforations so air moves. Install a toe stop inside each basket using a small strip so shoes don’t drift forward. Paint the rail and basket frames to match your wall trim for a cohesive look.
Skip thisDon’t mount them too high; if you can’t grab comfortably, shoes end up on the floor.



