
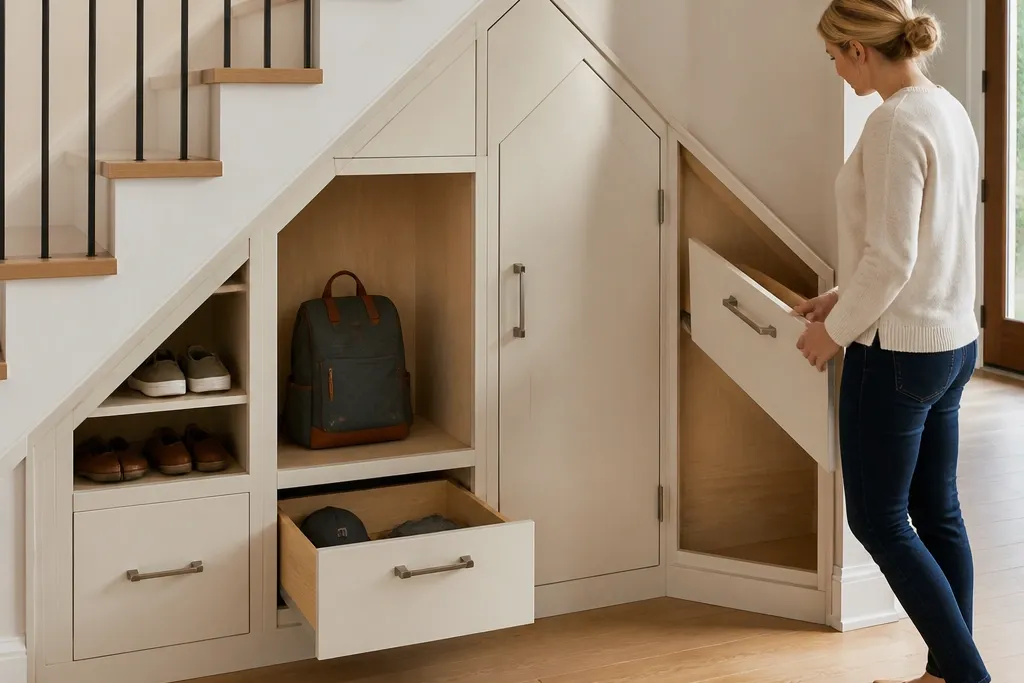
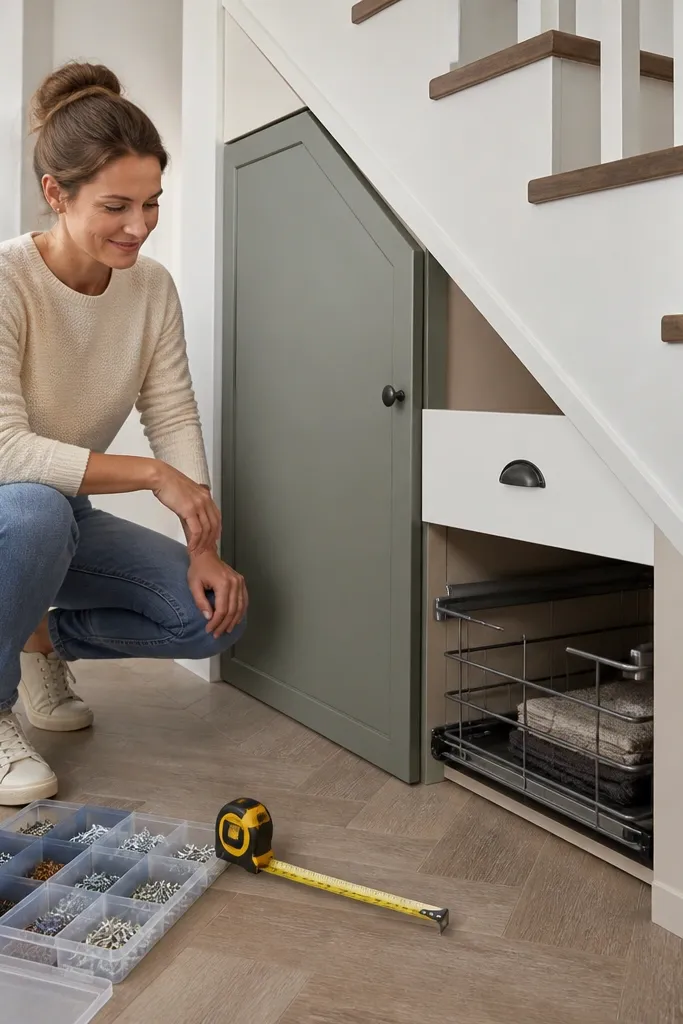
1. Painted Face-Frame Shoe Cubbies With Flip-Front Vents
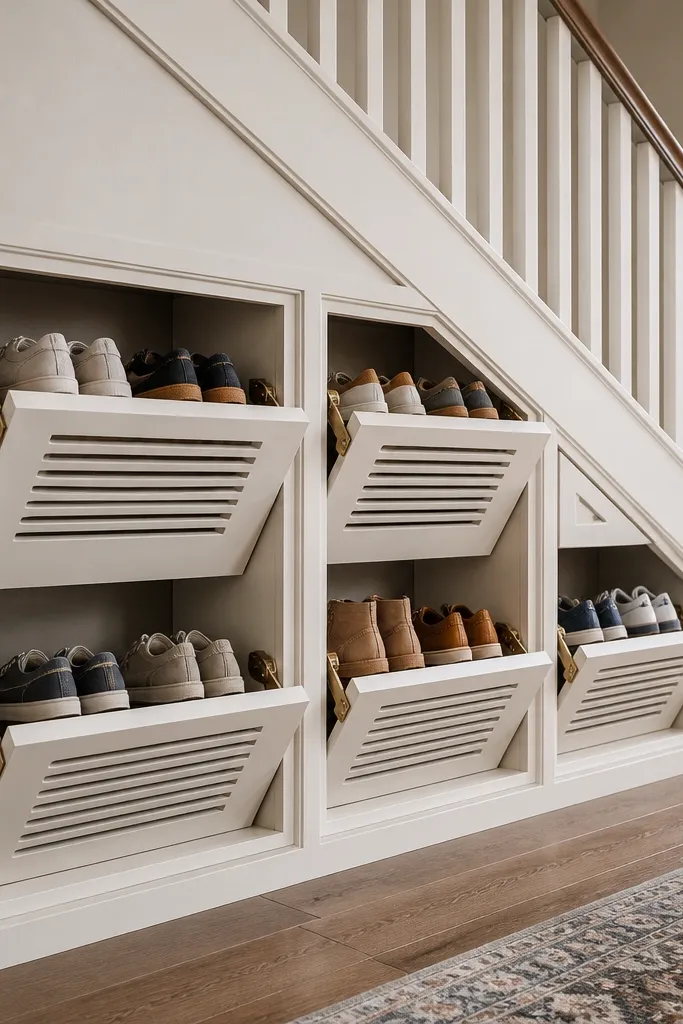
This is the under-stairs shoe storage that looks like it belongs in a showroom. You get a neat row of cubbies under the slope, and you keep the fronts closed so the hallway doesn’t turn into a boot pile. The flip-front vents are the difference between “cute” and “actually works,” because shoes dry without you leaving everything open. Use a face frame and consistent vertical lines so the whole thing reads built-in, even if the void is irregular. It’s beginner-friendly because the box is simple and the only hardware complexity is the hinge for the vent panel.
Editor's noteBuy hinges with a soft-close feel for the cubby doors; the whole unit looks more polished when it shuts quietly.
Start by measuring each cubby opening width and choosing a consistent cubby depth of about 10-12 in so boots don’t jam at the back. Build carcasses from 3/4 in plywood, then add a face frame with 1x2 trim strips so the fronts align with your hallway wall. Install cubby doors or flip vent panels on small hinges, then paint the exterior with a cabinet-grade finish (primer + satin topcoat). Finally, add a removable wire or plastic shoe tray inside each cubby and drill small vent holes behind the vent panel for airflow.
Skip thisDon’t make cubbies different depths — the uneven back edges show every time you open a door.
2. Shiplap-Panel Coat Closet Under the Stairs With Hidden Hanging Rail
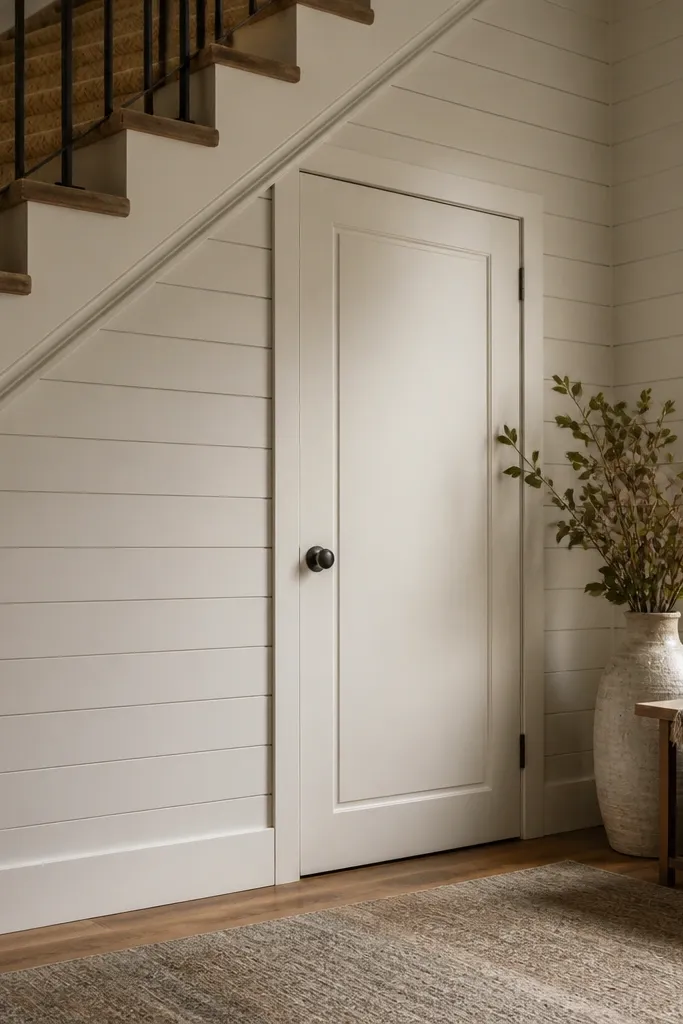
If your under-stairs area feels like dead space, this turns it into a real coat closet without the clutter. Shiplap panels give you texture that looks expensive, and a hidden hanging rail keeps coats from slumping out of view. The closed door matters because it stops scarf and hanger chaos from becoming part of your hallway decor. You also get a cleaner silhouette because the door lines up with the sloped ceiling line. Beginners like this build because you can pre-cut panels and keep the interior layout straightforward: one rail, one shelf above, and a closed base for shoes or baskets.
Build a simple rectangular cabinet carcass using 3/4 in plywood, sized to the widest part of the void. Install a hanging rail about 66 in from the floor to the top of the rail, then add a fixed shelf 12-14 in above it for folded items. Apply shiplap boards to the door panels and optional interior face using construction adhesive plus brad nails. Finish by installing a solid door with concealed hinges and a magnetic latch, then seal the shiplap with paint or clear coat so it resists scuffs.
Use a template scrap of your door to mark hinge positions; it keeps the door gap even across the slope.
Don’t mount the rail too low — long coats drag on the shelf edge and you’ll stop using the closet.
3. Drawer Stack for Cleaning Supplies With Pull-Out Waste Bin
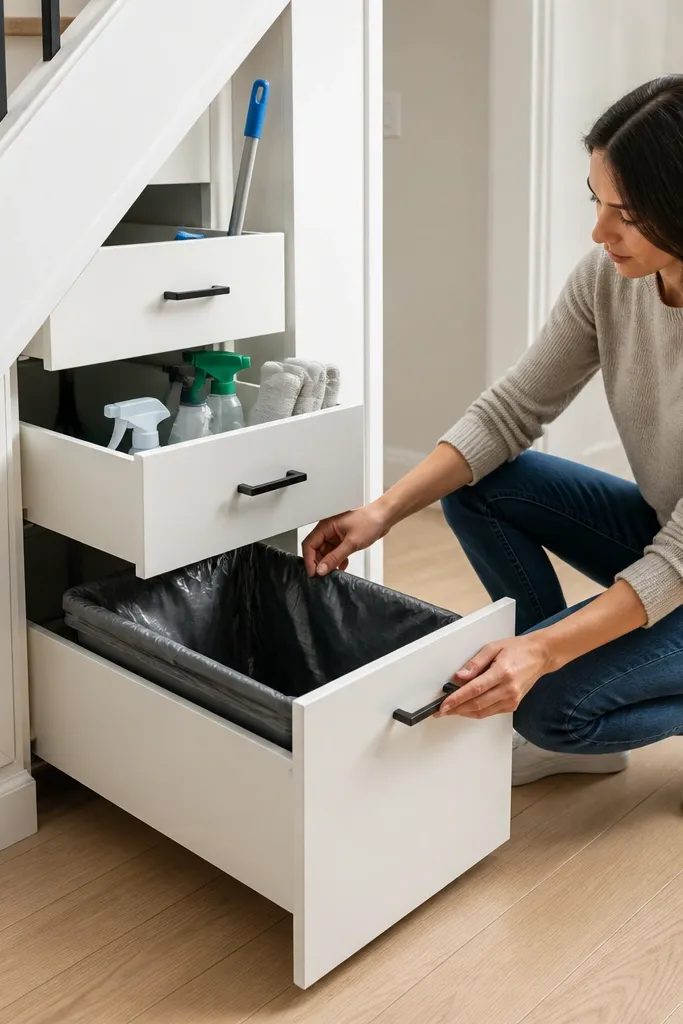
This is the under-stairs storage that keeps mops, sprays, and refills out of sight while still staying organized. A drawer stack looks crisp in a hallway and it prevents the “everything gets thrown in a bin” spiral. The pull-out waste bin is the practical win: you can toss packaging, wipes, or trash without opening a big door every time. It also makes the space feel intentional because the drawer fronts line up and the hardware becomes part of the design. This is beginner-friendly if you stick to two drawers instead of three and use full-extension slides.
Editor's noteUse a drawer front spacer strip during installation so every gap matches from top to bottom.
Measure the tallest clear space under the stairs and plan for two drawers with equal front heights (around 10-12 in each). Build drawer boxes from 1/2 in plywood and mount full-extension slides to the carcass using a level so they stay aligned. Install an inner pull-out waste bin on the bottom compartment with a slide or bin bracket meant for cabinets. Finish by adding drawer fronts with a consistent reveal and sealing the drawer edges with paint or a coat of clear topcoat.
Skip thisDon’t skip a stop block — slides can overtravel and you’ll end up with drawer fronts hitting the frame.
4. Open Shelf + Closed Cabinet Combo for Entryway Odds and Ends
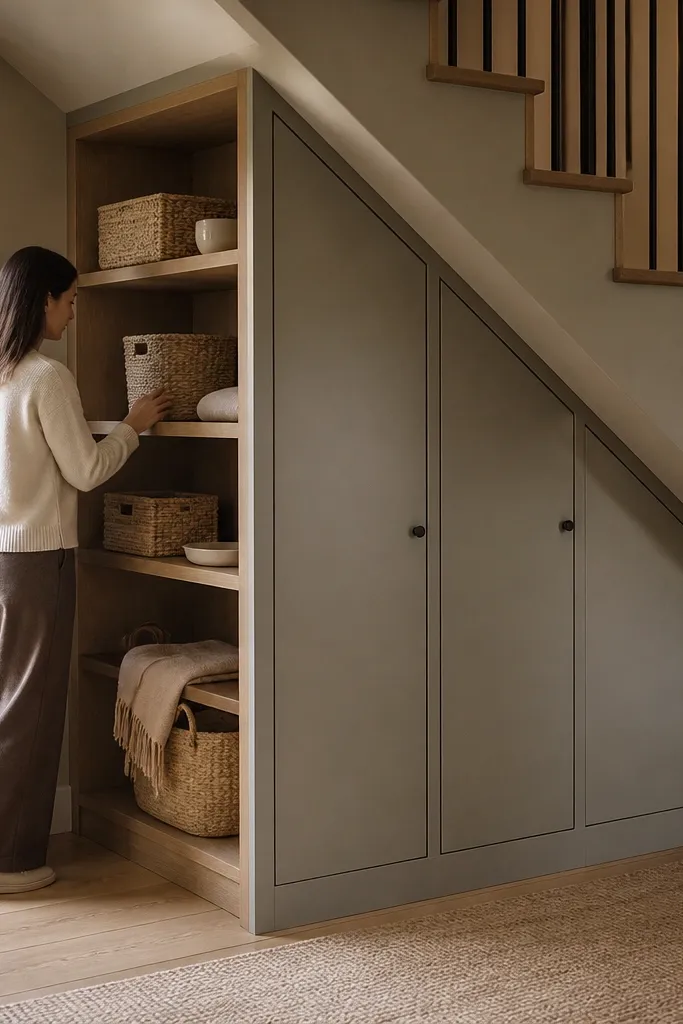
This one looks great because it gives you visual rhythm: open shelves for the things you want to see and a closed cabinet for clutter. It’s also practical because you don’t have to find a home for everything — the closed section absorbs the random stuff. The slope under stairs usually creates awkward heights, so the trick is to keep open shelves at one consistent height band and hide irregular items behind doors. This build is ideal for entryways where you need a spot for keys, gloves, mail, and small bags. Beginners can handle it because the carcass is simple and the styling is controlled by your shelf spacing.
Frame the carcass with a face frame so the door and shelves align with the hallway trim. Set open shelf tiers at about 12 in tall openings, then use a fixed shelf behind the open section to create a consistent look. Build a single door cabinet on the remaining side and add soft-close hinges. Finish the shelves with a paint-matched top coat and install a slim toe-kick strip so the base looks built-in rather than like a box dropped in.
Style with two heights only: small decor and flat baskets. Too many heights makes the slope look messy.
Don’t use open shelves for items that spill or smell — open storage turns into a daily cleaning job.
5. Angled Pantry Shelves With Door-Front Storage Under the Slope
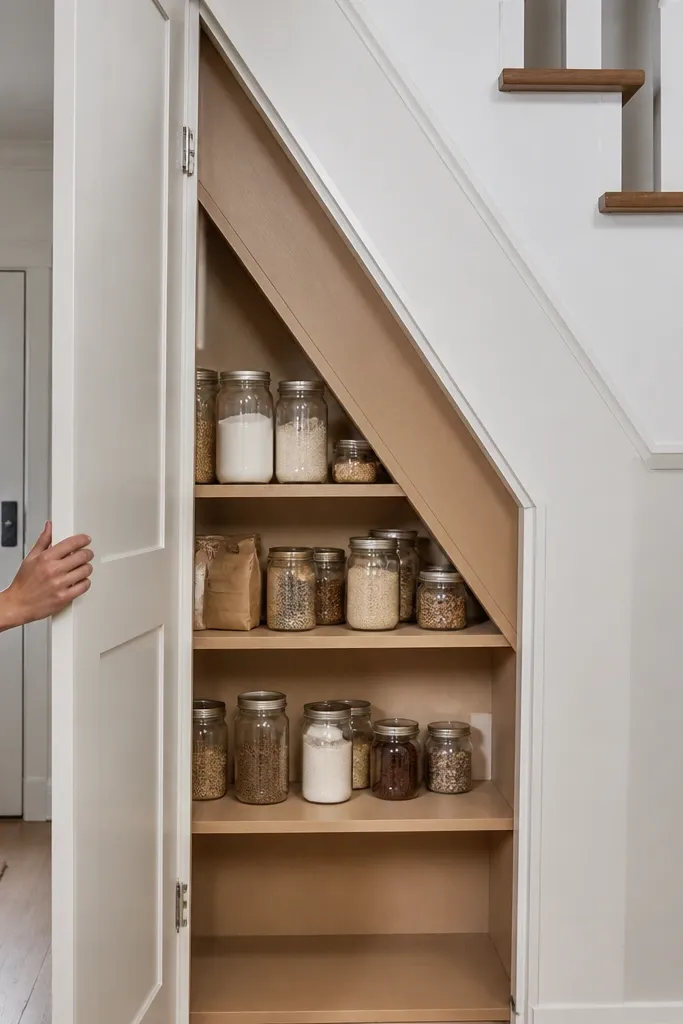
If your under-stairs space has a strong slope, angled pantry shelves make it look custom instead of awkward. The door hides the angle from the hallway view, and inside you get shelves that actually use the full depth. This is especially good for food storage, baking tools, or bulk pantry items that you don’t want in the main kitchen. The visual payoff is clean: flat door front, consistent vertical lines, and a neat interior that doesn’t waste the triangular space. Beginners should choose this if they’re comfortable cutting a few angled shelf panels with a miter saw.
Editor's noteUse a sacrificial test shelf panel first to confirm the angle before you cut the real shelves.
Measure the slope rise and calculate shelf angles so each shelf front stays parallel to your door opening. Cut shelf supports from 3/4 in plywood or solid wood strips, then install them with screws and glue so the shelf surfaces sit level. Build a door front using the same face frame lines as your hallway trim. Add adjustable shelf pins if you want flexibility, then paint everything with a smooth finish so the angles don’t look rough.
Skip thisDon’t rely on “eyeballing” shelf angles — one shelf that’s off by even a little makes doors look crooked.
6. Cat Litter and Supplies Cabinet With Vent Grille and Removable Tray
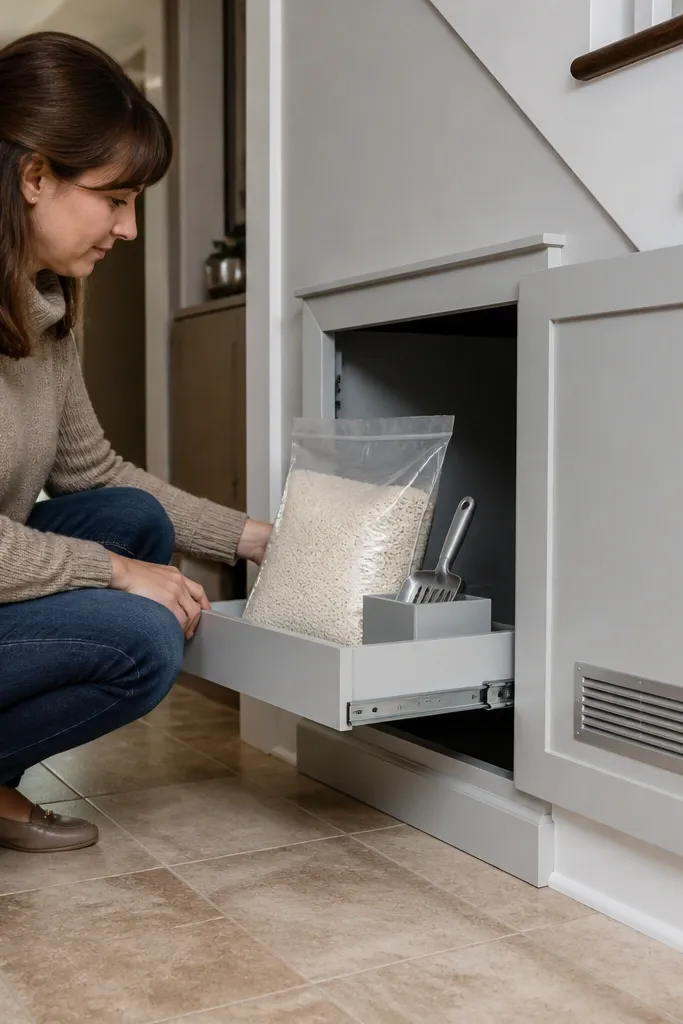
This turns a smelly chore into a closed, tidy space that still stays usable. You build a cabinet under the stairs with a vent grille and a removable tray so cleaning is simple and the hallway doesn’t smell like a bathroom. The look is the key: a clean door front, matching trim, and a discreet vent that looks intentional rather than like a random hole. It’s beginner-friendly because you’re building one box and adding one vent and one tray system. If you already have a litter box footprint, you can size the cabinet around it for a perfect fit.
Editor's noteLine the bottom shelf with a waterproof shelf liner so the cabinet survives drips and scooping accidents.
Measure the exact litter box footprint and add 1-2 in clearance on each side for easy access. Build a cabinet carcass from 3/4 in plywood, then install a fixed base shelf that sits above the floor by about 2-3 in to catch spills. Cut and mount a vent grille on the upper door panel for airflow, and install a magnetic latch for quick access. Place a removable plastic tray or litter mat inside so you can pull it out without lifting the whole unit.
Skip thisDon’t put the vent too low — odor escapes upward, and low vents don’t pull air across the litter.
7. Slim Pull-Out Shoe Shelf With Vertical Dividers
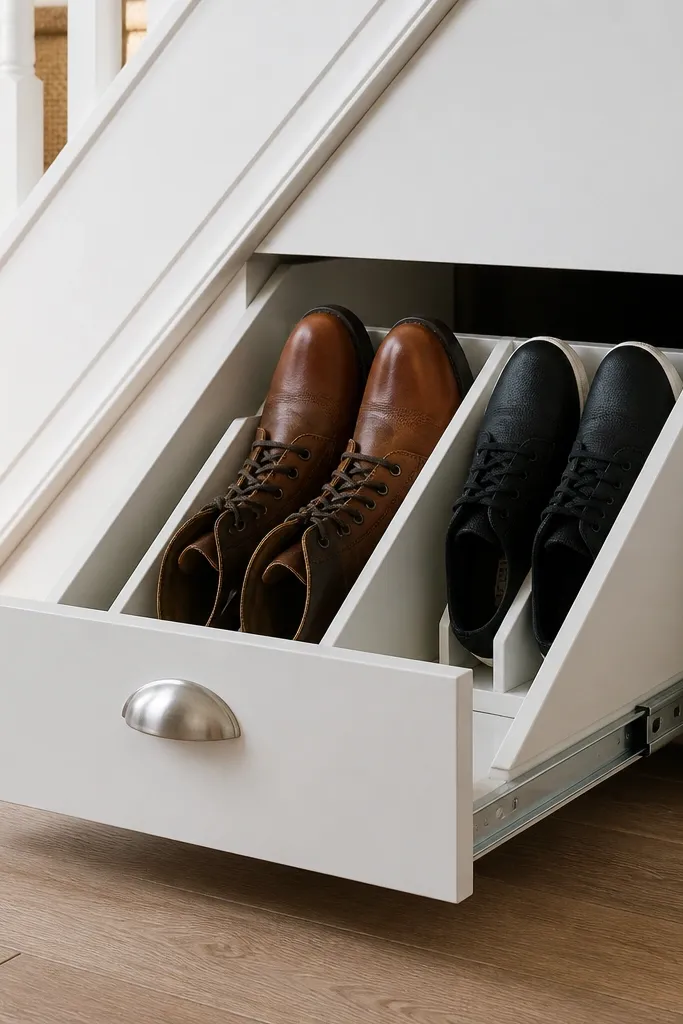
For narrow under-stairs voids, a slim pull-out shoe shelf looks sleek and keeps shoes from sliding into a pile. Vertical dividers stop boots from leaning and they make it easy to find pairs fast. The aesthetic is clean because the shelf is mostly hidden — you only see the front when you open the pull-out. This works best when your hallway has a tight walkway and you don’t want doors swinging out. Beginners can do it with simple cabinet slides and pre-built divider strips cut to fit.
Editor's noteRound the leading edge of the shelf front so shoes don’t catch on sharp corners.
Measure the narrowest width and aim for a shelf depth of 8-10 in so the pull-out clears the slope. Cut a shelf base from 3/4 in plywood, then add vertical dividers spaced to match your shoe sizes (4-5 in for sneakers, 6-7 in for boots). Install heavy-duty drawer slides rated for at least 75 lbs and mount them square. Finish with a matching face frame front and add a finger pull or small handle on the pull-out face.
Skip thisDon’t use light-duty slides — a partially loaded shoe shelf still pulls forward hard over time.
8. Cabinet Door With Glass Inserts for Display-Only Collections
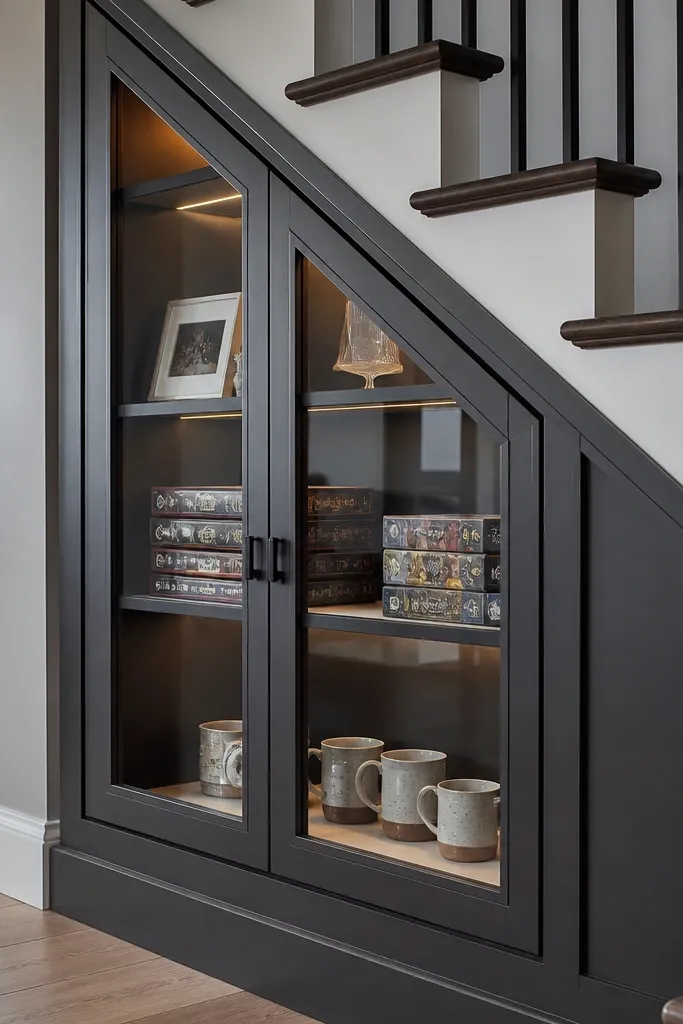
This is for the under-stairs space you want to look good, not hide. Glass inserts make the storage feel lighter and they give your hallway a design moment. Use it for mugs, board games, holiday decor, or framed photos you want visible but protected from dust. The look stays polished because you’re keeping the “display” behind a door — no open shelves collecting clutter. Beginner-friendly builders can manage this with a single door and a simple frame around the glass.
Editor's noteUse acrylic inserts if you’re nervous about glass cutting; it still looks clear and is safer.
Build a cabinet frame using 3/4 in plywood and add a face frame so the door sits flush. Create a door panel with a wood muntin grid and leave openings sized for glass inserts (use pre-cut glass or acrylic sheets sized by a hardware store). Install the glass with glazing beads or small blocks, then use a clear finish on the glass frame. Add soft-close hinges and a magnetic latch, then paint the door and trim to match nearby millwork.
Skip thisDon’t skip a door gasket or felt strip — glass rattles and looks sloppy fast.
9. Bench-Style Storage Under Stairs With Lift-Up Top
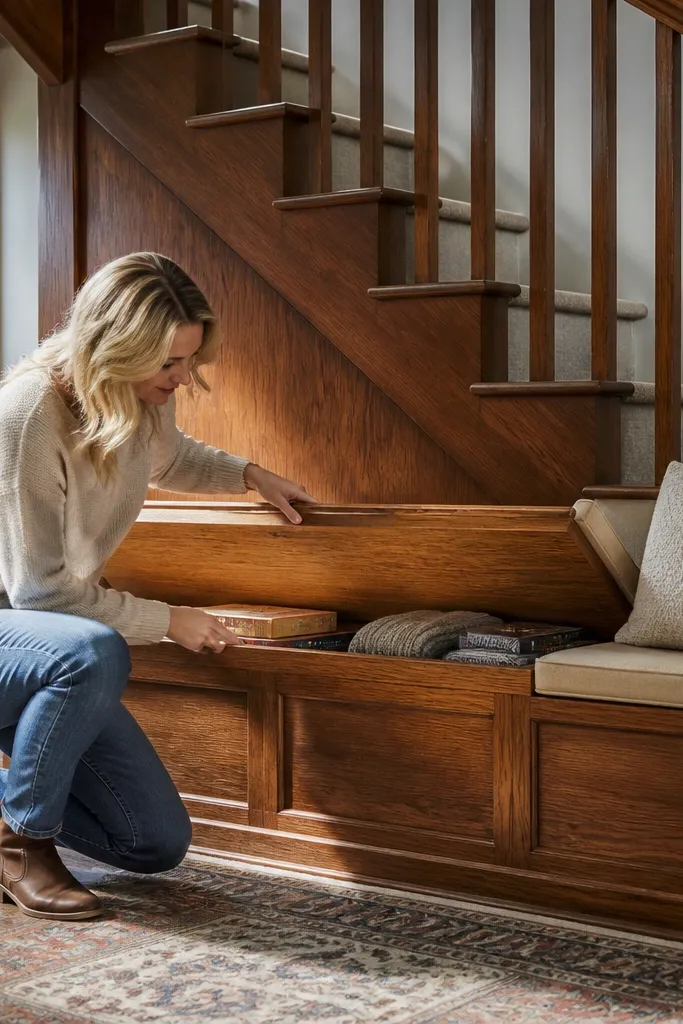
A lift-up bench gives you a clean, furniture-like look and huge storage capacity in a compact footprint. You can store blankets, board games, or sports gear without seeing it every day. The aesthetic works because the top reads like a built-in bench, not a random cabinet. It’s also comfortable to sit and put on shoes — even if you don’t plan for daily seating, it makes the space feel intentional. Beginners can build this by focusing on a strong box and using gas struts or simple hinge hardware.
Editor's noteAdd a soft-close hinge on the lift system if you’re using traditional hinges; it keeps the top from slamming.
Build a rectangular base carcass from 3/4 in plywood and add a plywood top panel sized to overhang by about 1 in on all sides. Install gas struts rated for the top weight or use sturdy lift hinges, then add a latch so the top doesn’t drift open. Line the inside with a simple shelf liner for scuffs and easy wipe-down. Finish the exterior top with a durable paint or sheet of thin plywood covered with vinyl or laminate for a wipe-clean surface.
Skip thisDon’t make the top too light — a flimsy lid flexes and feels cheap when you lift it.
10. Pegboard Back Under Stairs for Tools and Craft Supplies
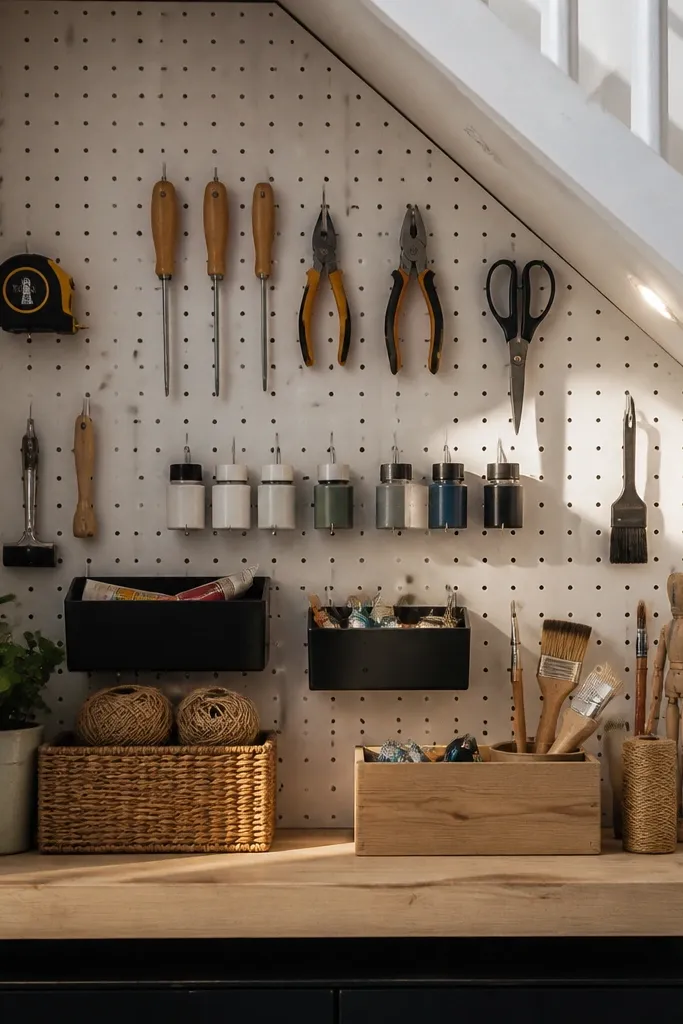
Pegboard inside the under-stairs storage makes your supplies look organized even when you’re not actively tidying. It’s photogenic because hooks and lines create a clean pattern, and it’s functional because you can rearrange without rebuilding shelves. This setup is great for small home tools, painting supplies, or craft items that need vertical storage. The key is to keep the front closed with doors, then let the pegboard do the visual work inside. Beginners like it because pegboard cutting is easy and you can start with a smaller tool set.
Cut a pegboard panel to fit the interior back wall and mount it using spacers so the pegboard sits flat and doesn’t bow. Install a fixed shelf at about 18 in above the floor for frequently used items. Add a door front with a simple frame and concealed hinges, and paint the interior back panel a matte color so the tools pop. Hang hooks and bins on the pegboard, then label bins with a label maker for a clean look.
Use a mix of hook types: straight hooks for cords and double hooks for long-handled tools.
Don’t hang heavy tools directly on small plastic hooks — use metal pegboard hooks rated for weight.
11. Roll-Out Pantry for Spices and Dry Goods With Front Cradle Stop
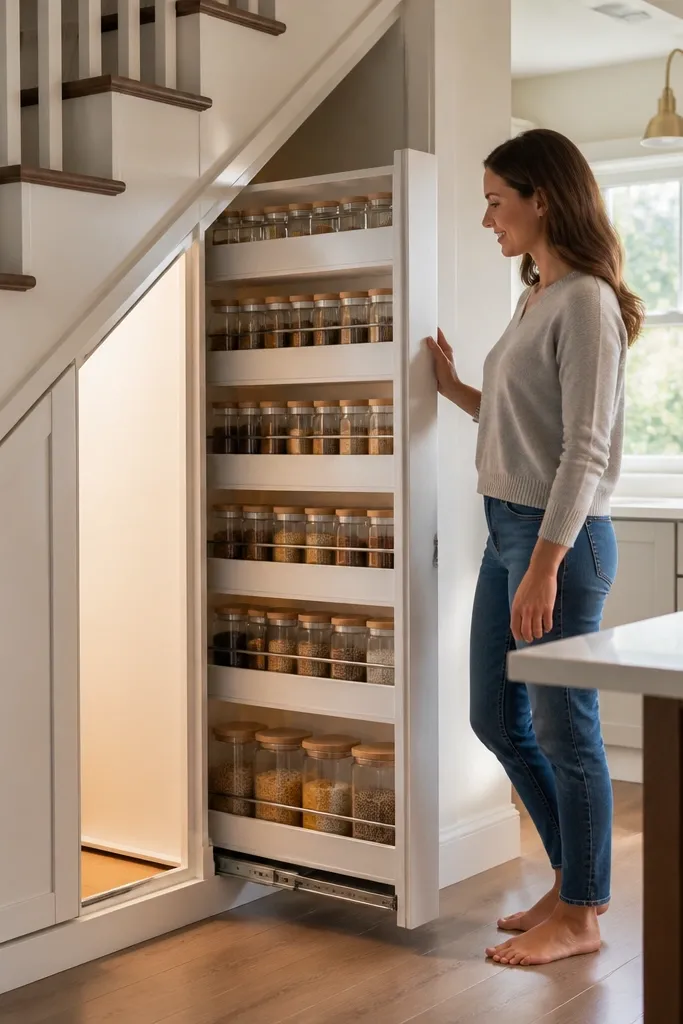
A roll-out pantry makes a cramped under-stairs void feel like a real kitchen system. It also looks clean because you’re using identical containers and a consistent shelf front. The front cradle stop prevents shelves from falling forward when you pull them out, which keeps the look tidy and the jars upright. This is beginner-friendly if you keep the unit to one or two pull-out levels. It’s perfect for spices, baking mixes, or kids' snack bins you want accessible but contained.
Build a cabinet carcass and install two pull-out shelves using slide rails or rolling pantry hardware rated for the shelf weight. Make shelf fronts with a 1x2 wood cradle stop that catches the shelf when fully extended. Use identical jar sizes or stackable bins so the visual stays uniform. Finish by installing a door front or partial closure so the pantry looks like millwork, not a freestanding rack.
Add a small lip on each shelf edge so jars don’t shift when you open the door.
Don’t use random jar sizes — the visual becomes messy in a narrow space.
12. Built-In Rolling Bin Tower for Recycling and Trash
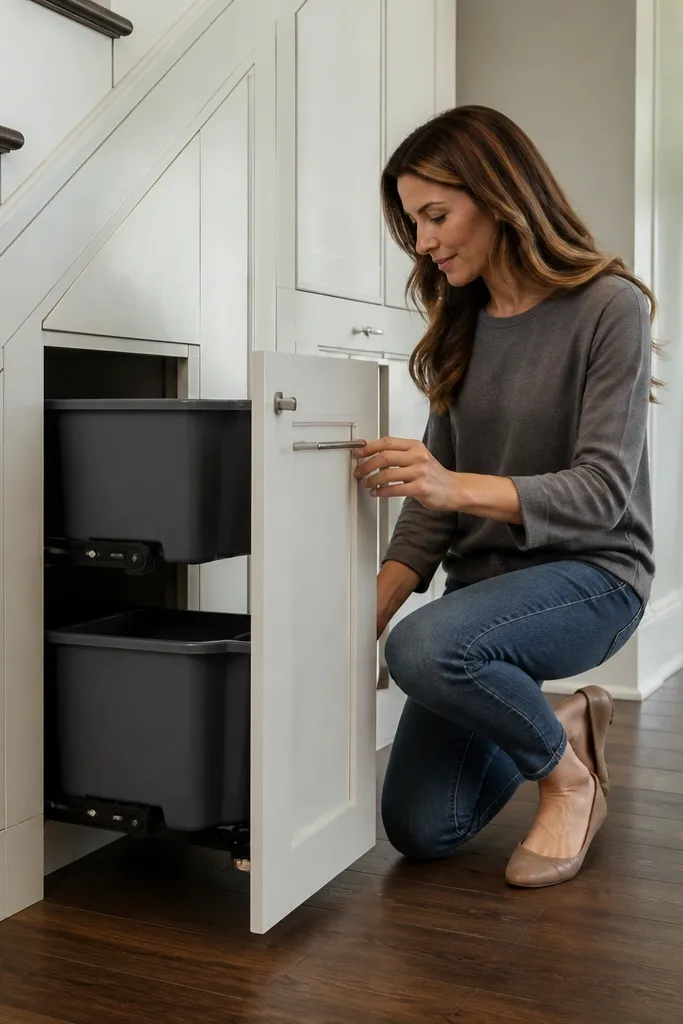
A bin tower keeps recycling and trash hidden while still making it easy to roll out and empty. It’s one of the most satisfying under-stairs projects because the function is obvious and the hallway stays clean. Use doors with paneling so it looks like cabinetry, not a storage closet. The rolling bins are the photogenic part if you choose a consistent bin style and align the handles. Beginners can do it with off-the-shelf bins and cabinet slides or bin track systems.
Editor's noteKeep the bin front height consistent with the door handle height; it looks designed and feels easier to open.
Measure the bins you plan to use and build the cabinet interior to those exact dimensions with 1/2-3/4 in clearance for smooth roll-out. Install a bottom platform and then add side rails or track brackets for each bin level. Add a door front for the whole unit or separate doors per level, then align hinges so doors sit evenly. Finish with painted trim and add a small door pull so the handles look intentional.
Skip thisDon’t leave the bin tower without a stop — bins slam into the back and chips the cabinet finish.
13. Wallpapered Back Panel Storage Niche With Sliding Door
This is how you make under-stairs storage look like decor. Put a wallpapered back panel inside a small niche and cover it with a sliding door so the pattern only shows when you open it. It’s especially good for kids' art supplies, holiday items, or a mini home library. The sliding door keeps the hallway clear and it gives you a smooth, modern look. Beginners can handle this because the build is a basic carcass plus a door track system.
Editor's noteSeal the wallpaper with a brush-on matte medium; it prevents peeling from humidity near stairs.
Build a shallow cabinet niche with 3/4 in plywood sides and a fixed shelf at the height you want. Cut the wallpaper panel to fit the back wall and seal it with a clear matte topcoat so it’s wipeable. Install a sliding door panel using a track kit and add stops so the door doesn’t derail. Frame the niche with trim to hide edges, then paint the exterior in a satin finish so it looks like furniture.
Skip thisDon’t use thin wallpaper without sealing — it scratches and curls at the edges.
14. Fabric Lined Pull-Out Baskets for Laundry Detergent and Towels
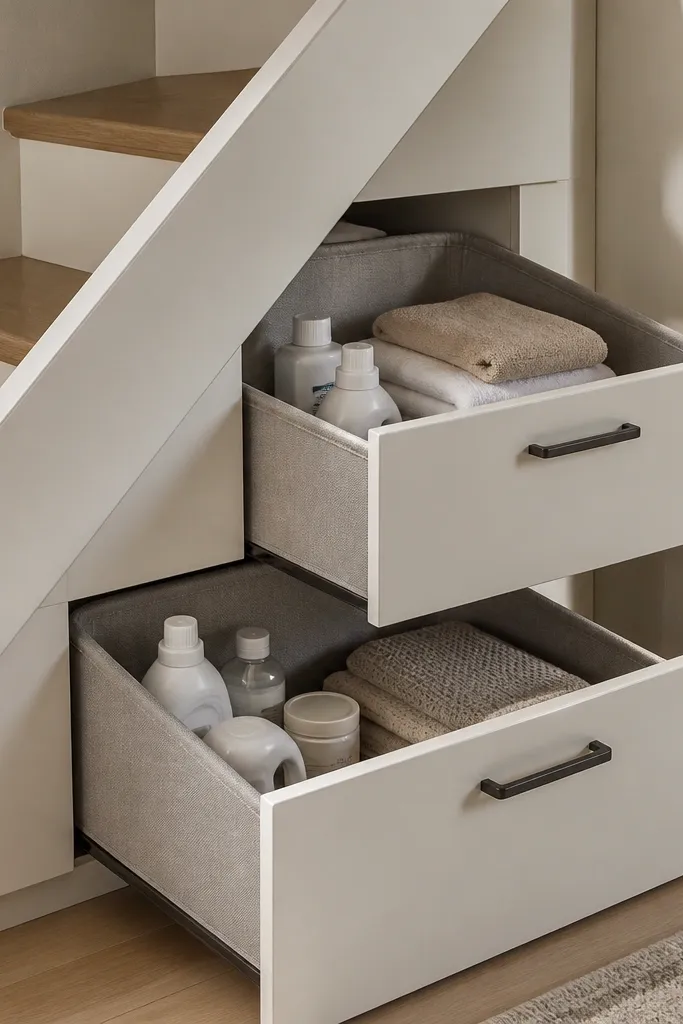
Pull-out baskets look soft and intentional, and fabric lining makes them look finished instead of utilitarian. This setup is great for laundry detergent, stain spray, and folded towels — things you want easy access to but don’t want sitting out. The baskets hide clutter while the front face stays clean and aligned. It’s beginner-friendly because you’re not building complicated drawer joinery; you’re building a cabinet and fitting basket slides. The look is photogenic because of the matching fabric tone and the tidy stack arrangement.
Editor's noteUse non-slip shelf liner under fabric baskets so they don’t slide when you pull them out.
Choose baskets that fit your available depth and width, then build a cabinet carcass to hold them with 1 in clearance for smooth pull-out. Install drawer slides or basket rails at the correct height so baskets sit level when extended. Line baskets with removable fabric panels or a washable liner, then add a small divider for detergent bottles. Finish the cabinet exterior with matching trim and a door or open face depending on your hallway clutter level.
Skip thisDon’t line baskets with fabric that frays easily — it looks messy fast.
15. Modular Stackable Shelf Units Under Stairs With Adjustable Feet
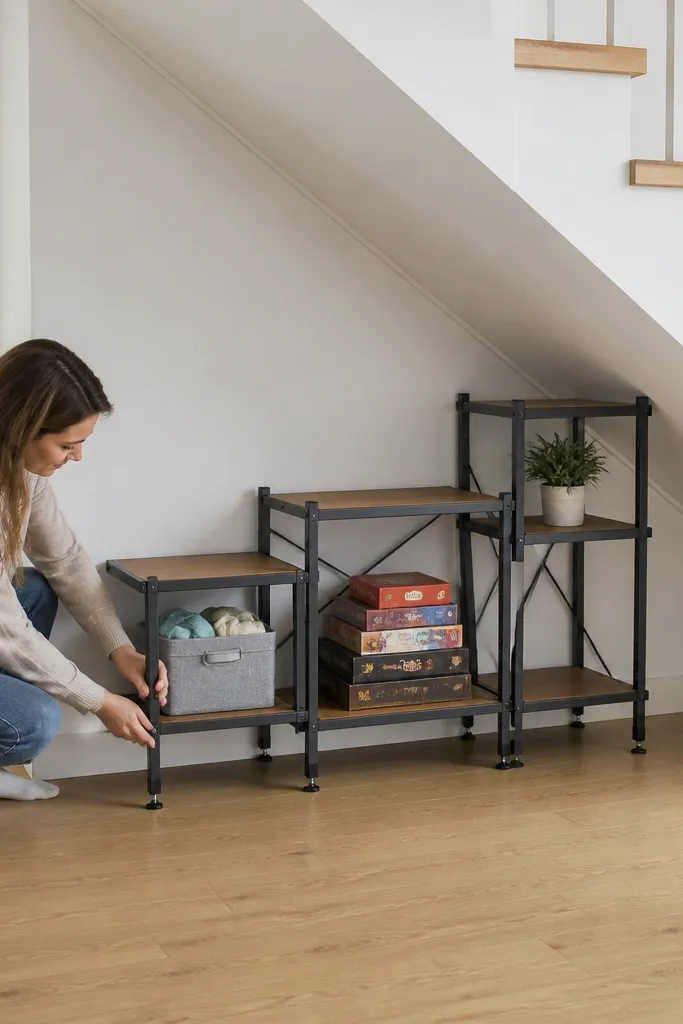
This is the fastest way to get good-looking storage when you don’t want to build one giant custom cabinet. Stackable shelf units let you start with one row, then add more as you figure out what you actually store. Adjustable feet matter under stairs because floors are rarely perfectly level and the slope can throw off alignment. Visually, matching shelf sizes and identical edge trim make the whole area look designed. Beginners can do this with basic tools and a careful plan, and it’s a great option if you rent or don’t want permanent millwork.
Measure the available width and choose shelf modules with matching depths that fit the narrowest spot. Level each unit using adjustable feet, then secure the modules to wall studs or a ledger board so they don’t tip. Add face trim or edge banding so the shelves look like one built-in system. If you want it more finished, add a door front over the modules using a simple frame and concealed hinges.
Use a laser level or long straightedge to align shelf tops; it makes the whole project look intentional.
Don’t skip anchoring — stackable units tip easily in high-traffic hallways.
16. Under-Stairs Book Storage With Ladder-Style Side Frames and Closed Back
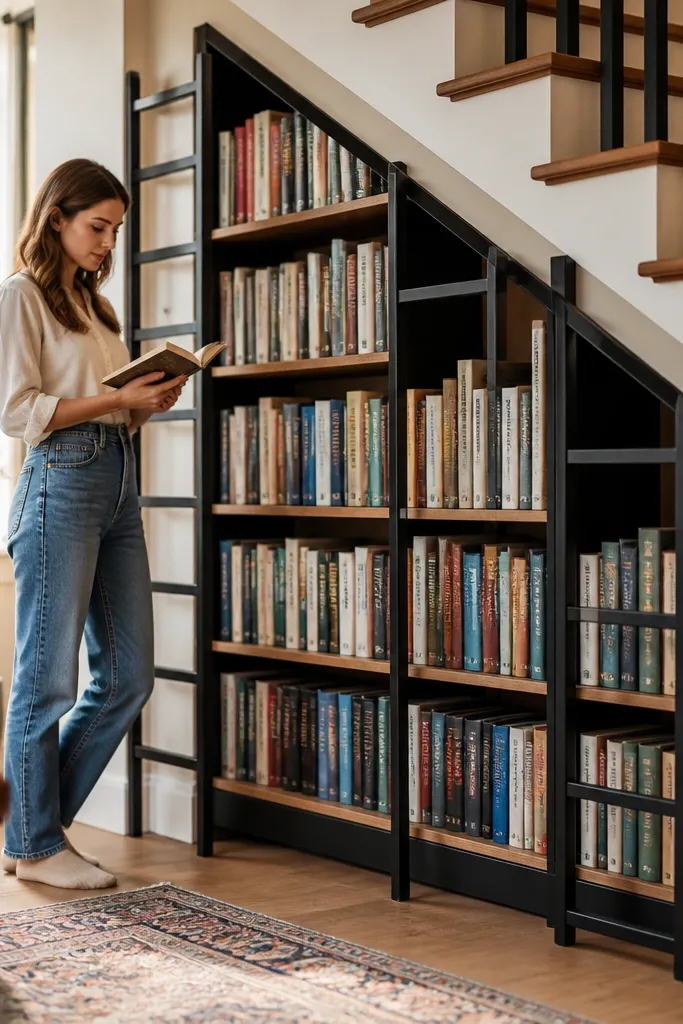
If you want under-stairs storage that looks like furniture, ladder-style side frames are the move. They create a strong visual structure that hides the fact that the space is sloped. Use closed backs to keep the inside clean and to prevent dust from collecting behind books. The aesthetic is modern and tidy, especially when you use bookends and consistent spacing. Beginners can do it because you’re cutting two main side frames and then adding shelves; the joinery is straightforward.
Cut two side frames from 3/4 in plywood with evenly spaced rungs, sized to your void height. Install the frames to the wall and a base ledger, keeping them plumb and parallel. Add shelves using shelf pins or fixed cleats, then install a closed back panel to finish the “built-in” look. Paint or stain the frames to match your hallway trim and add a small toe-kick for a clean bottom line.
Use shelf pins only if you can keep the pitch consistent; otherwise fixed shelves look cleaner under a slope.
Don’t leave the back open — it looks unfinished and books get dusty fast.
17. Hidden Pantry Door With Magnetic Latch and False Front Trim
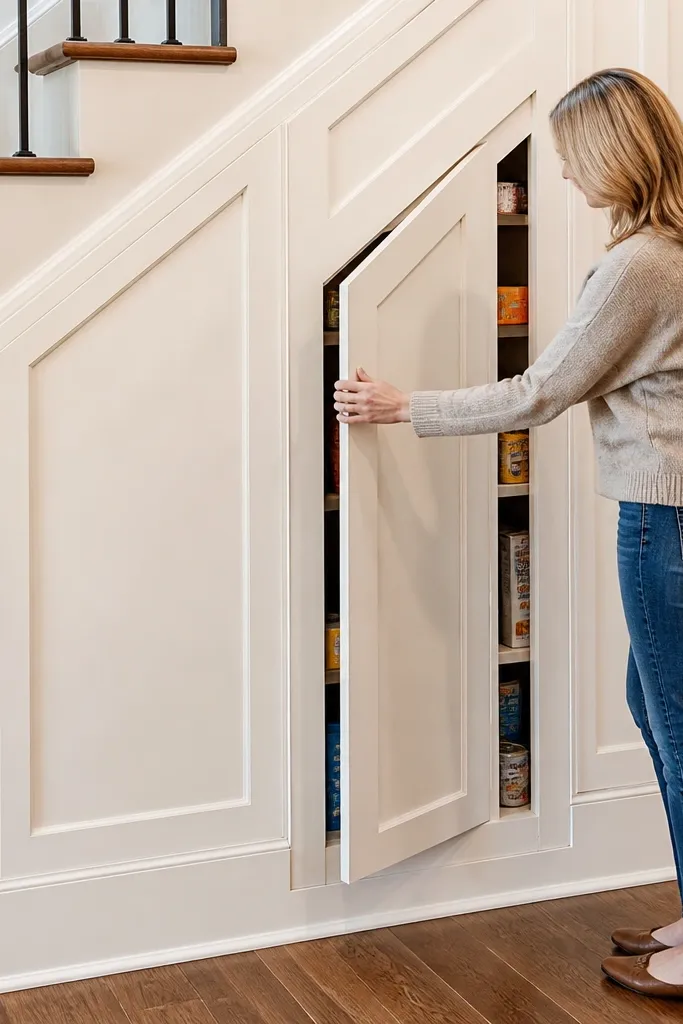
This one looks like plain wall trim until you open it. A hidden pantry door with a magnetic latch makes the under-stairs storage disappear, which is perfect if your hallway already has a lot going on. The false front trim makes the door seam line up with the surrounding paneling or wall lines. Inside, you can store snacks, vacuum attachments, or extra paper supplies. Beginners can build this by focusing on alignment and using a consistent trim profile around the door.
Build the cabinet carcass first and leave a door opening that matches your trim width exactly. Create a false front trim frame around the door so the seam sits where your eye expects it. Install a magnetic latch plus a concealed pull tab behind a small cutout so you can open it without a visible handle. Add shelves inside at 12-14 in spacing, then paint everything with the same sheen as the wall trim.
Dry fit the false front trim three times before screwing it — alignment is everything for a hidden door.
Don’t use a weak magnet — the door will pop open with vibration from foot traffic.
18. Rolling Library Cart Drawer Under Stairs With Pull Handle Front
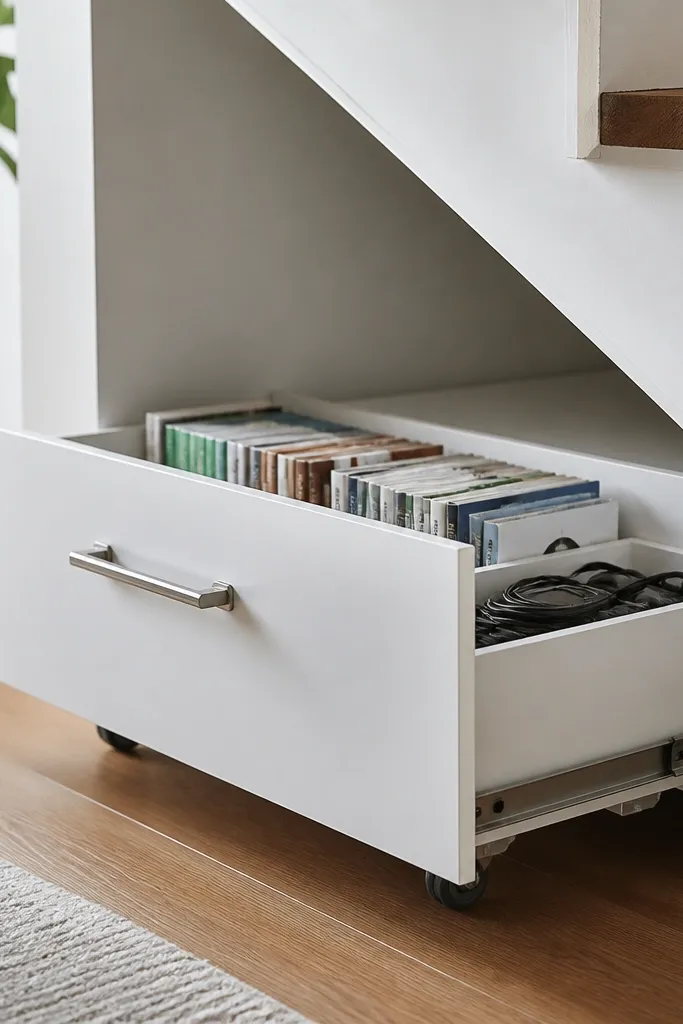
This idea gives you drawer-style access with the flexibility of a cart. A rolling library cart drawer slides out, so you can grab books, cables, or craft kits without digging around. It looks modern because the front is a clean drawer face with one handle and consistent reveals. This is great for tech storage, board game pieces, or kids' reading bins. Beginners can do it with cabinet slides and a simple rolling base.
Editor's noteUse a caster with a flat top plate so it mounts cleanly under the platform.
Build a cabinet opening and install full-extension drawer slides on the sides. Construct a rolling inner platform using a cart base and small caster wheels, then fasten the platform to the slide rails so it moves straight. Add a drawer front panel with a single centered pull handle. Finish by adding dividers inside the cart for categories and sealing the cart surface so it’s wipeable.
Skip thisDon’t attach the cart to the slides without checking square — a skewed platform jams quickly.
19. Under-Stairs Window-Seat Style Storage With Lift Trays
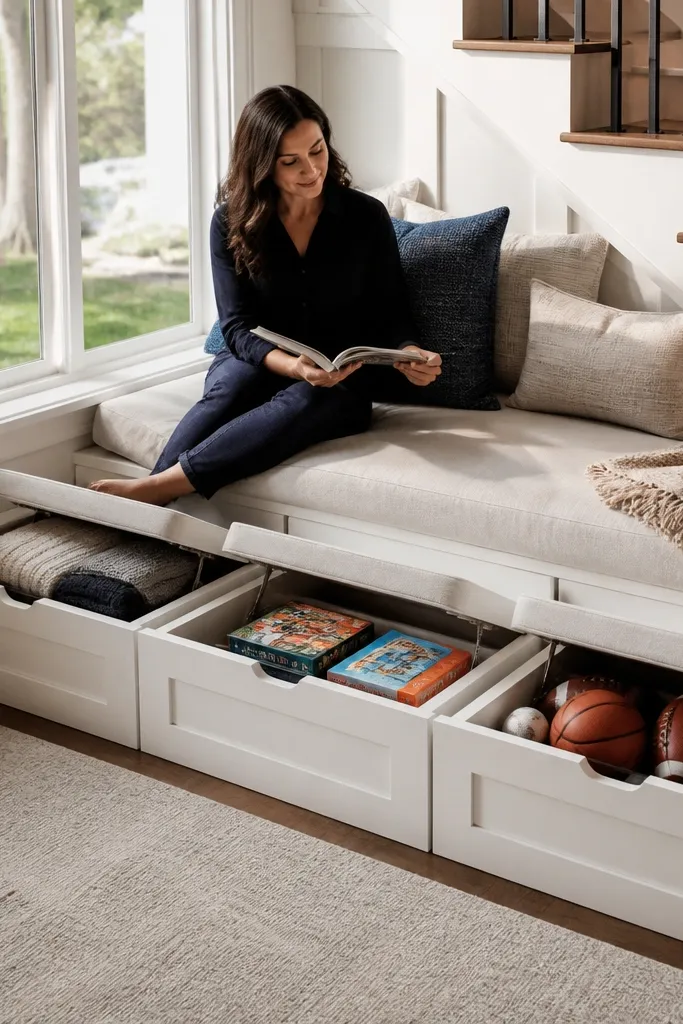
When the void sits near a window or you want a cozy look, lift trays on a seat-style base give you that furniture vibe. You get multiple compartments that stay organized because each tray lifts separately. It’s photogenic because the top looks like a bench, while the inside reveals neat compartments. This is good for blankets, seasonal decor, or kids' toys you want hidden. Beginners can build it by designing a sturdy base and using simple lift hardware on each tray.
Editor's noteAdd a stop rod or chain so trays don’t swing too far and hit the back wall.
Build the seat base carcass from 3/4 in plywood and add a top panel with a fixed trim frame. Cut tray compartments to fit between internal rails, then install lift hardware (small lift supports) so each tray opens smoothly. Add a soft liner to each tray and keep tray fronts consistent with the same reveal depth. Finish the exterior top with a durable surface like laminate or a thick painted panel.
Skip thisDon’t make trays too shallow — items spill out and you’ll stop using the compartments.
20. Glass-Front Upper Cabinet With Lower Shoe Drawer
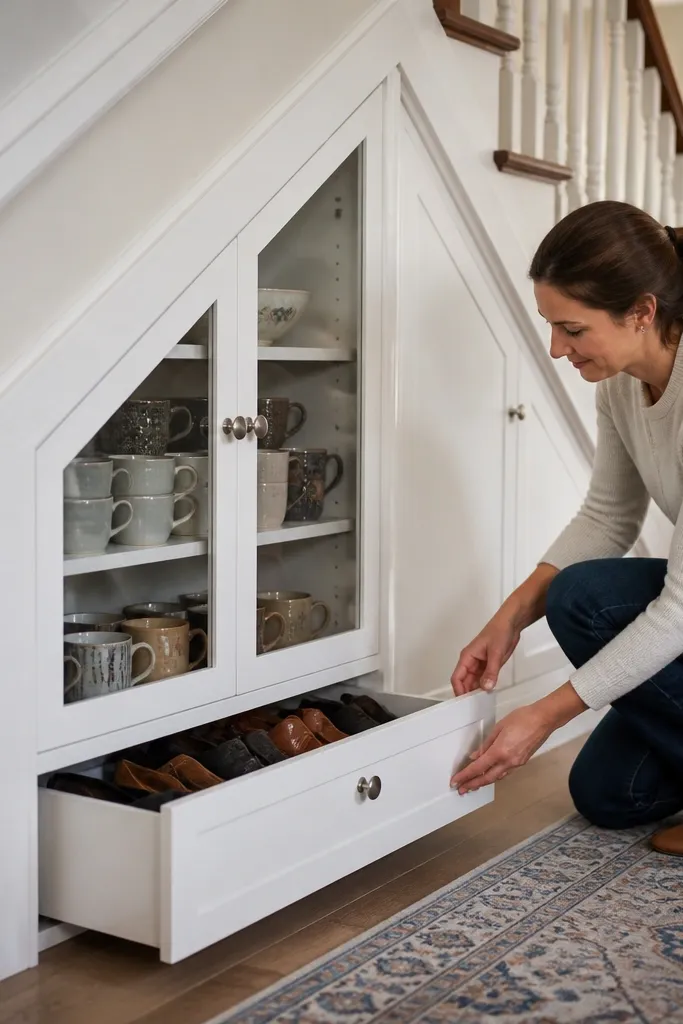
This is a high-looks combo: glass on top for display and a drawer below for shoes. The glass front makes the unit feel lighter and the hallway looks more intentional. The shoe drawer keeps daily mess contained, and the drawer front hides scuffed soles. It’s also practical because you can store shoe care products in small bins inside the drawer. Beginners can build it by keeping the structure simple and using standard drawer slides plus a glass insert door frame.
Editor's noteUse frosted glass or clear glass with a subtle film if you want it to look tidy even when items inside shift.
Build a two-zone carcass: a lower drawer opening and an upper cabinet bay. Install full-extension slides for the bottom drawer and build a drawer box from 1/2 in plywood. For the upper door, build a framed door panel with glass insert and add soft-close hinges. Paint everything with cabinet paint and add a matching trim border so the glass and drawer fronts line up cleanly.
Skip thisDon’t store random tall items behind clear glass — it turns into visual clutter.
21. Slim Under-Stairs Charging Station With Cable Clips and Door-Close Panel
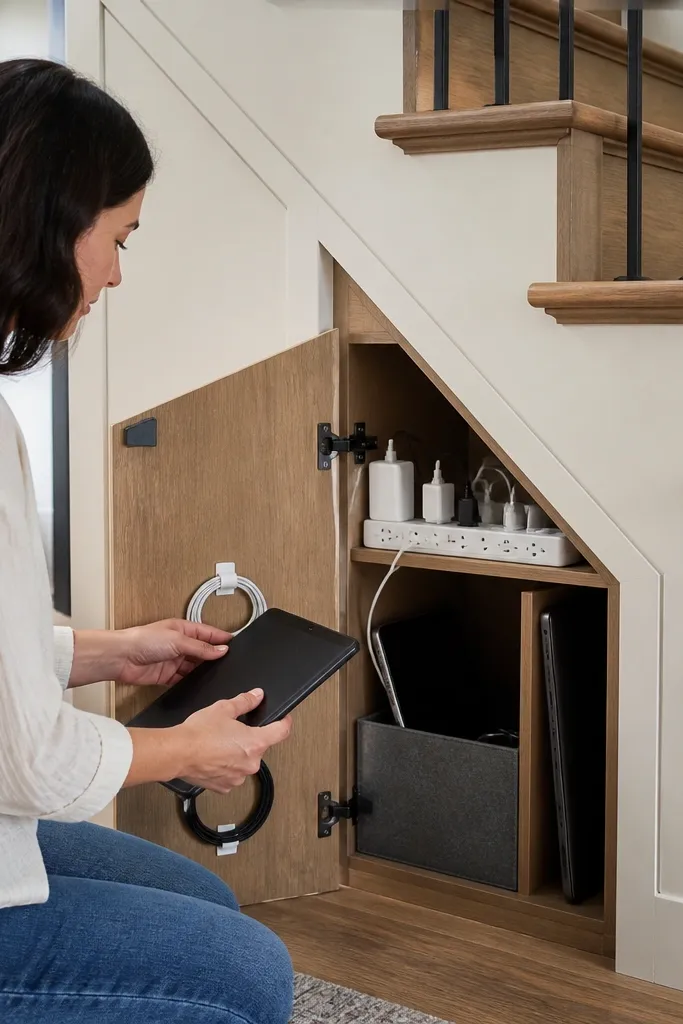
A charging station under stairs is one of those storage projects that looks clean and solves a real everyday problem. The trick is cable management: clips, a power strip mounted high, and a door that closes so the wall doesn’t look like a tangle. This works great for cordless vacuums, phone chargers, and small devices. It also looks good because the exterior stays flat and the inside has neat vertical lines from cable clips. Beginners can do it safely if they follow basic wiring rules and use a pre-made power strip setup.
Editor's noteRoute cords through a grommeted hole in the back panel so you don’t wear through insulation over time.
Choose a slim cabinet depth that fits your void and mount a pre-wired power strip on the back panel using screws and a cable strain relief. Install cable clips along one side at 6-8 in intervals so cords follow a straight path. Add a removable tray or shelf for chargers and labels, then wire a switch or use a power strip with an inline switch if you’re not adding a dedicated outlet. Finish with a door that closes fully and a small ventilation gap if the devices run warm.
Skip thisDon’t stuff power strips at the bottom where cords tug — you’ll get loose connections.
22. Under-Stairs Toy Storage With Numbered Drawer Faces and Clear Labels
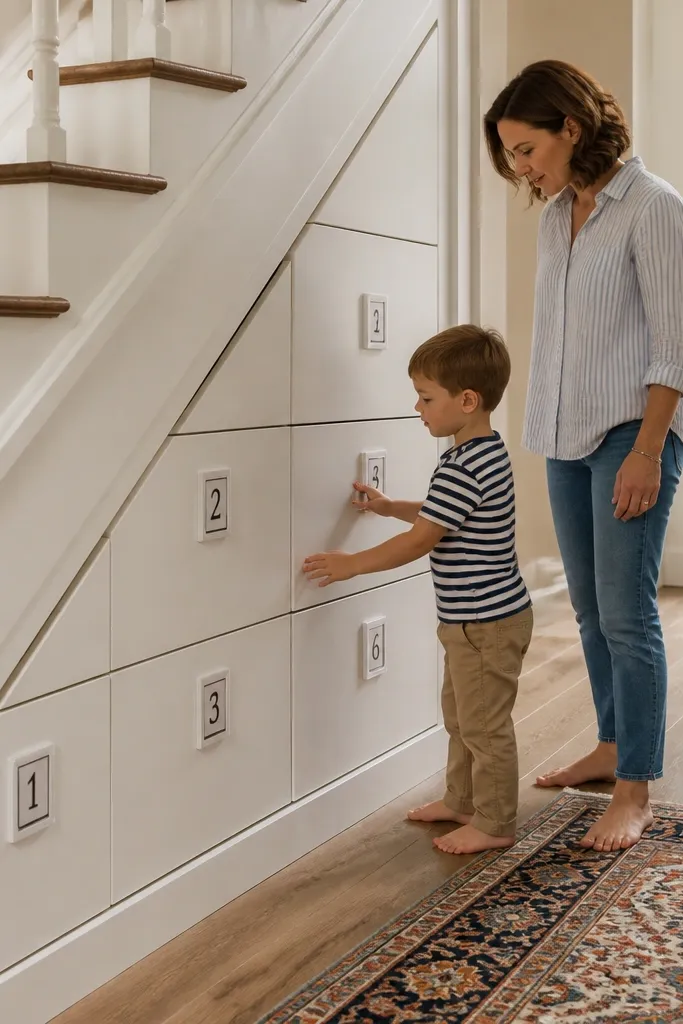
Kids' toy storage looks good when the system is obvious. Numbered drawer faces plus clear labels make it easy for anyone to put things back, and it keeps the hallway visually calm because toys are inside closed drawers. This is beginner-friendly because drawers are modular and you can start with fewer compartments. The look is photogenic because the drawer fronts create clean lines and the labels add a designed feel instead of a random sticker mess. Use this under stairs when the void is deep enough for 10-12 in drawer fronts.
Editor's noteUse removable labels inside the bins and keep the drawer face label as the “always correct” reference.
Plan for two drawer widths and one narrower drawer based on what fits under the slope. Build drawer boxes from 1/2 in plywood and use full-extension slides so kids can reach the back. Install drawer fronts with consistent reveals and paint them in a satin finish. Add label holders under each number and use matching bins inside so you can lift and sort without dumping everything.
Skip thisDon’t use open bins without lids — toys migrate into the hallway fast.
23. Under-Stairs Linen Closet With Tall Door and Adjustable Shelf Levels
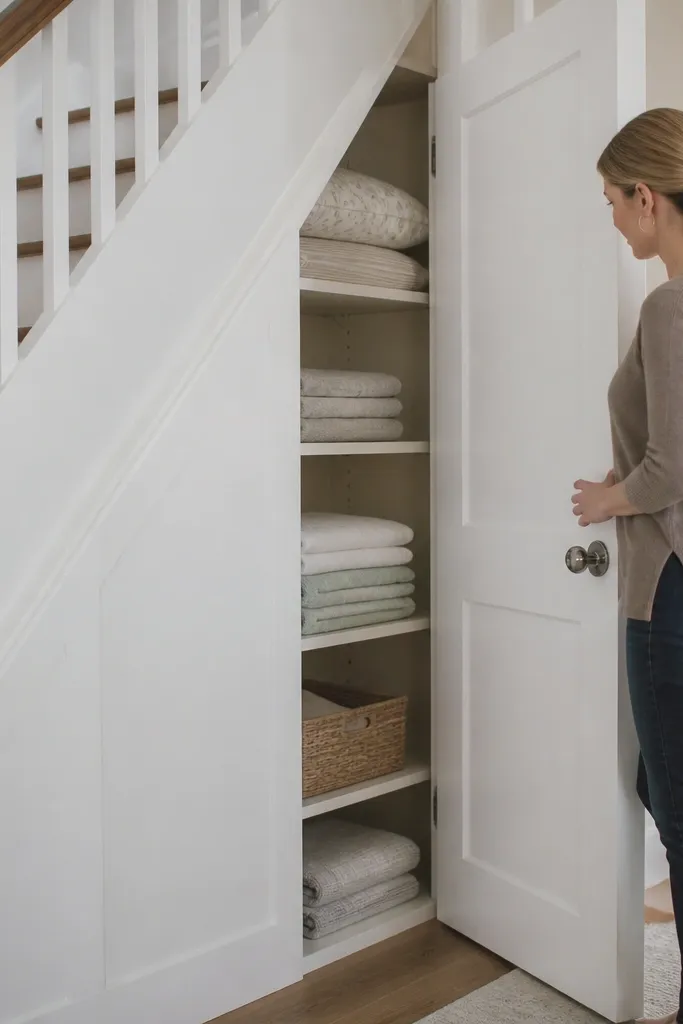
A linen closet under stairs gives you a clean place for towels, extra bedding, and bathroom backups without dedicating another room. The tall door makes it look like real cabinetry, and adjustable shelves let you change spacing when you switch from towels to folded blankets. The visual payoff is a smooth door front and evenly spaced shelves inside. Beginners can build it by using shelf standards and pins so you don’t have to commit to one fixed layout. It’s also practical because the storage stays dust-free and easy to access.
Editor's noteUse a level and mark shelf pin locations with a square so every shelf sits even across the sloped void.
Build a tall cabinet carcass from 3/4 in plywood and install a door sized to the full opening. Add shelf standards on the side walls and place adjustable shelves at 12-14 in spacing for towels and 16-18 in for blankets. Use a back panel to seal the interior and add a small toe-kick strip for a finished bottom line. Finish with satin paint and a soft-close hinge system so it closes quietly.
Skip thisDon’t set shelves too close for towels — you’ll jam folds and the door won’t open smoothly.
24. Under-Stairs Storage With Recessed Lighting and Glass Door
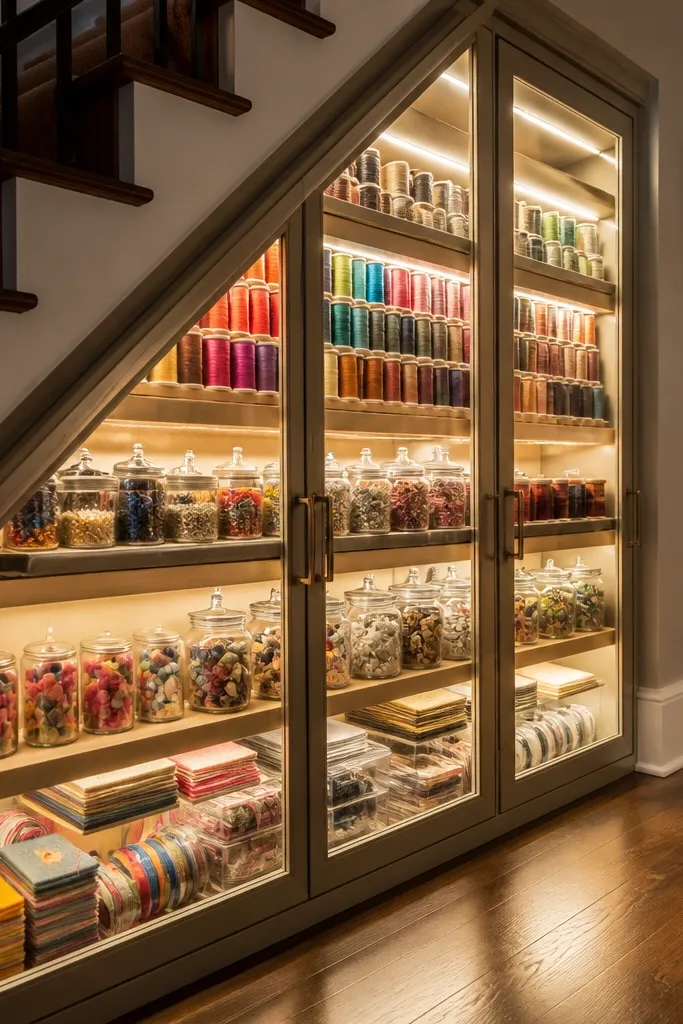
Lighting is what makes storage look premium, and it also makes the space usable. A glass door plus a small recessed LED strip turns the under-stairs cavity into a display-like cabinet. It’s especially good for craft supplies, board games, or pantry jars where you want to see inventory at a glance. The key is to keep the light controlled and the wiring hidden so the cabinet stays clean. Beginners can do this with low-voltage LED strips and a simple switch, focusing on safe mounting and tidy cable routing.
Editor's noteUse a diffuser cover on the LED strip so you don’t get harsh hot spots on the shelves.
Install a glass door cabinet carcass and mount a low-voltage LED strip along the top inside, using clips so it doesn’t sag. Route the wire through a grommeted hole and connect it to a small driver placed in an accessible compartment. Add a simple switch mounted on the inside edge or use a plug-in LED kit if you don’t want to run wiring. Finish by adding shelves with consistent spacing and a back panel that reflects light, like matte white or light gray.
Skip thisDon’t mount LEDs directly to raw wood — glue and heat can discolor the surface.
25. Corner-Perfect Under-Stairs Storage With Angled Pull-Out Trays
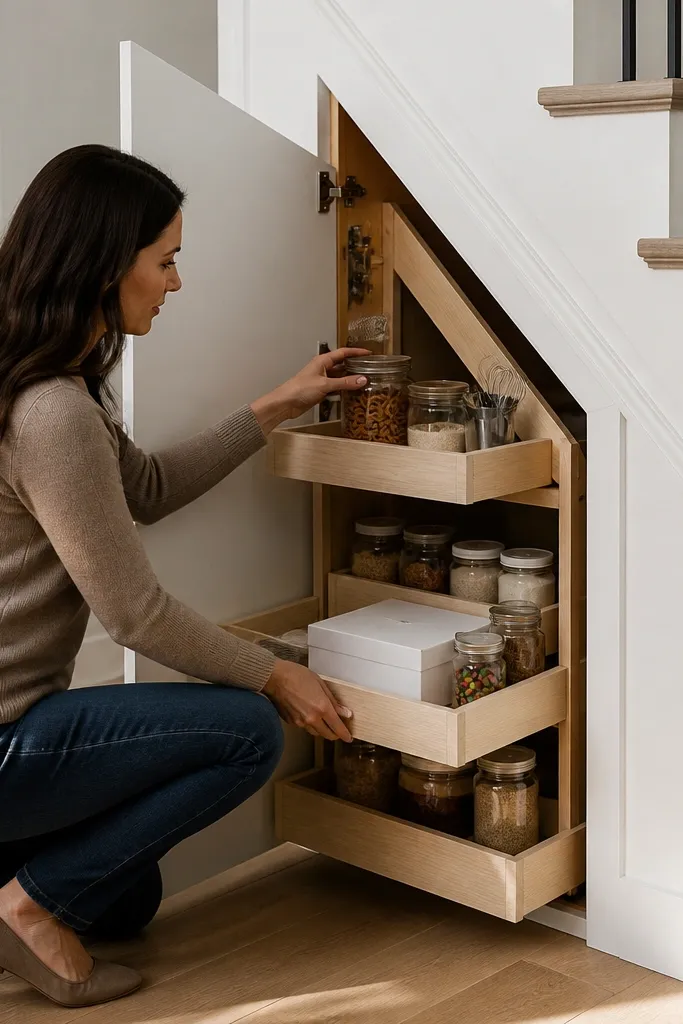
Corner voids under stairs are where storage usually fails because straight shelves waste space. Angled pull-out trays solve that by using the diagonal area and keeping items visible when you open the door. The look is sleek because the front door stays flat and the angled trays sit inside like a custom insert. This is great for cleaning tools, small seasonal gear, or kids' school supplies. Beginners can build it with a simple door and angled tray frames plus standard slides.
Editor's noteMark slide mounting points with a story stick cut from cardboard; it keeps both sides aligned.
Measure the corner triangle and decide on a consistent tray width, then cut tray side frames at the angle that matches the void. Build each tray with a plywood base and attach it to drawer slides mounted to the cabinet sides. Install a door front with a face frame so the door edges line up with hallway trim. Finish the trays with a durable paint or shelf liner so they wipe clean after spills.
Skip thisDon’t make tray angles too steep — items slide forward and get messy fast.



