
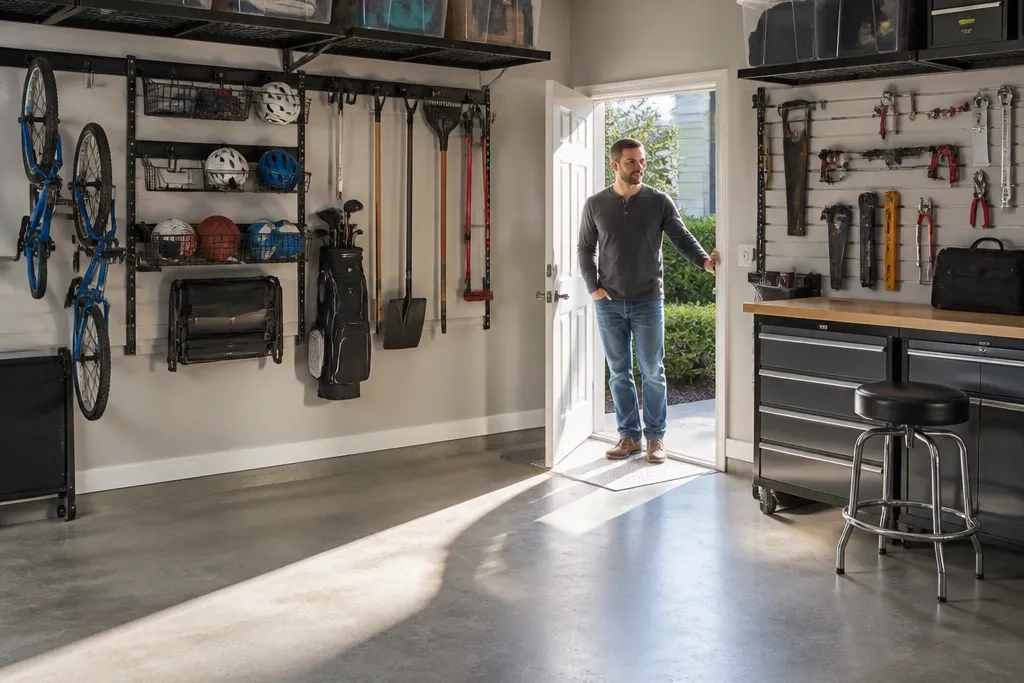
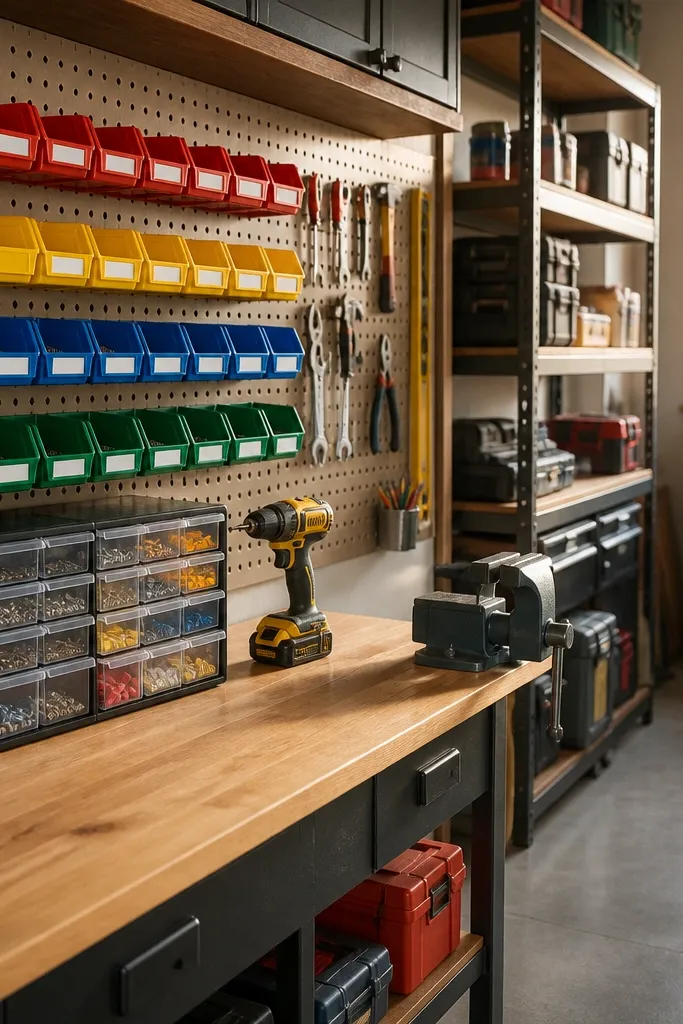
1. Stud-Locked Rail System for Tool Zones
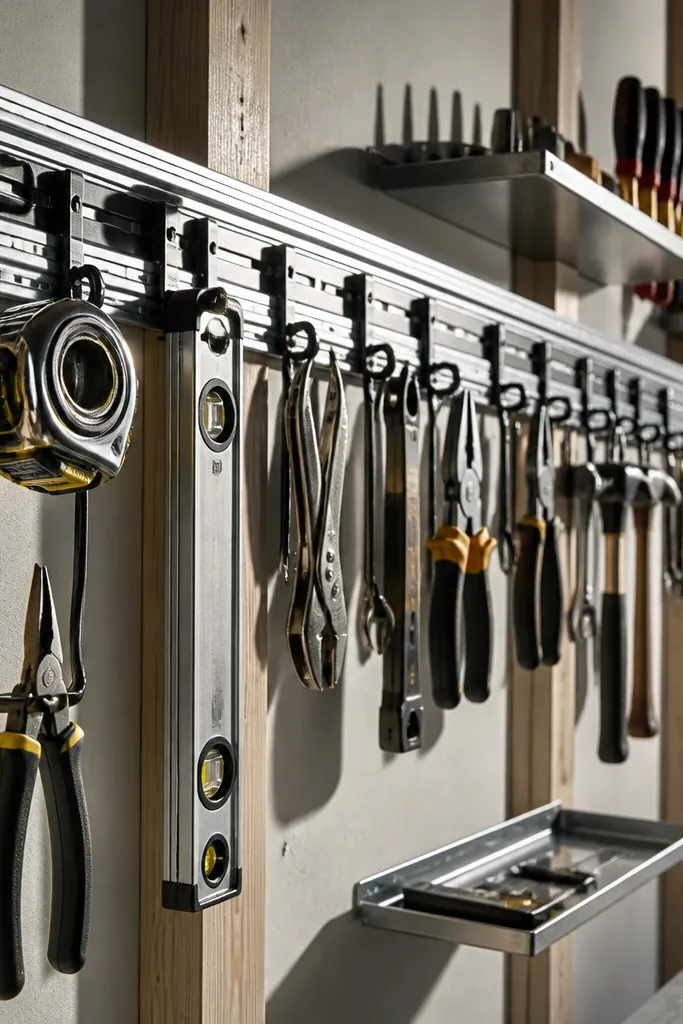
Start by locating studs with a stud finder and marking a level line where the top rail will sit. Use a level to install the rail with lag screws into studs every 16-24 inches, then add a second rail if you want two height bands. Hang tools by weight — heavy tools on lower hooks, light tools on higher hooks — and add small trays for bits and accessories. Finish by placing a small bin under the rail for grab-and-return items like tape measures and marker pens, then label the tray fronts.
This is the cleanest way to turn “loose tools” into a wall display that still works. You mount a continuous rail to studs, then hang hooks, trays, and small shelves in consistent rows. The look is sharp because everything shares the same vertical alignment and shadow lines. It also sticks because you can expand the system without redoing the whole wall. Beginner-friendly means fewer decisions once the rail is in — add the right attachment and you’re done.
Skip thisDon’t mount to drywall anchors for anything heavier than hand tools.
Editor's noteUse a strip of painter’s tape at each hook height to plan spacing before you drill.
2. Wall-Mounted Pegboard with Color-Coordinated Bins
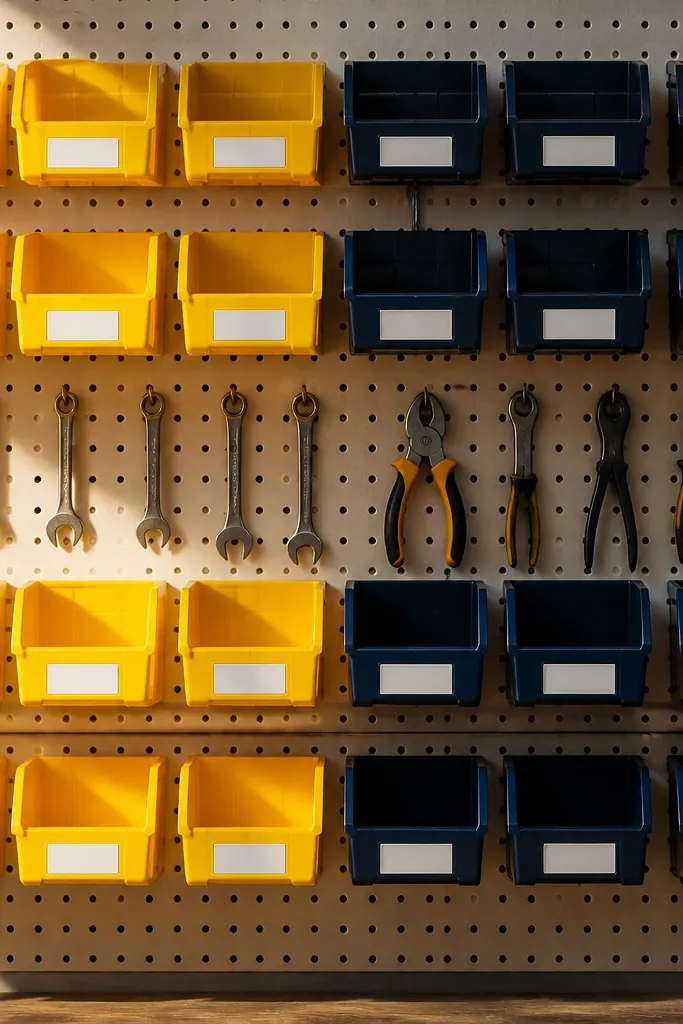
Measure your wall and cut pegboard panels if needed, then mount to studs with wood screws and a level line for the first panel. Install hooks and add small, matching plastic bins that clip onto the pegboard grid. Add a labeled bin for each category like fasteners, electrical tape, and shop rags. Finally, set the pegboard height so the most-used tools are around chest level and the bins above are for less-frequent items.
Pegboard looks good when it’s organized by category and visually uniform. The key is not the pegboard itself — it’s the bin system: matching bins, same label style, and a consistent grid. You get fast access, because tools and small parts hang where you need them. It sticks because bin fronts hide dust and reduce the “random pile” problem. This is a great pick for beginners because pegboard tolerates minor changes without wrecking the entire layout.
Skip thisAvoid mixing bin sizes — it makes the wall look cluttered even when it’s “organized.”
Editor's noteStick labels on the inside of bin fronts too so you can still read them when the bin is pulled out.
3. Overhead Ceiling Storage with Clear, Stackable Totes
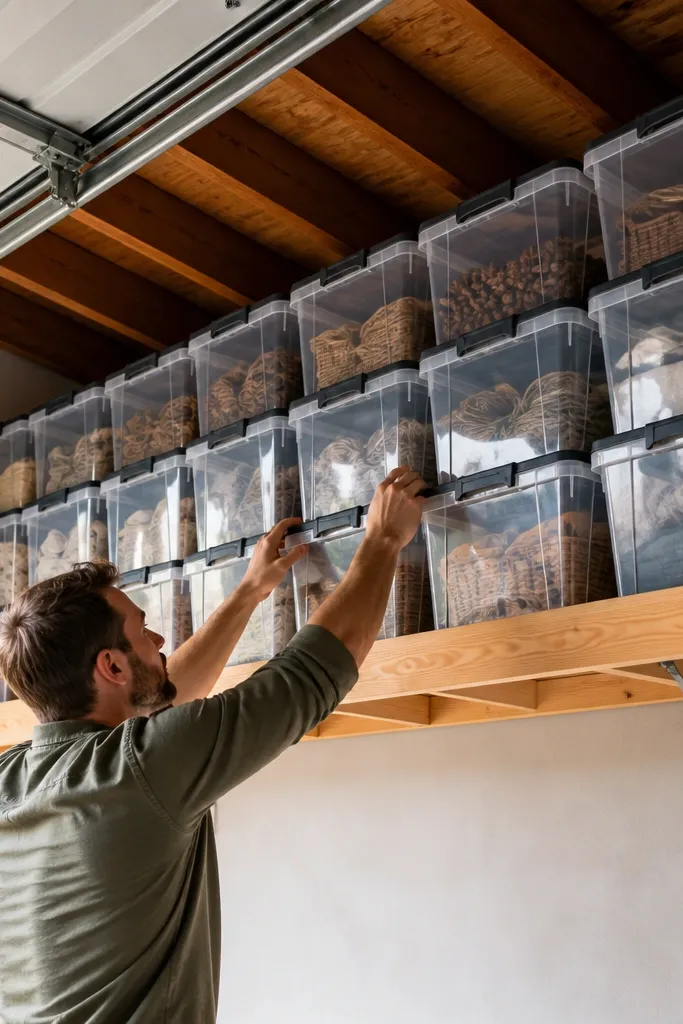
Pick a ceiling rack rated for your tote weight and mount the rails into ceiling joists using the manufacturer’s hardware. Hang the tote storage units so the bottom of the bins sits well above your tallest stored item, usually 6-8 feet depending on your garage. Use clear, stackable totes with locking lids, then label each tote with a thick marker and a clear tape cover. Store seasonal items like holiday decor, camping gear, and spare bedding, and keep heavy items out of the overhead zone.
Ceiling storage is the easiest way to remove seasonal clutter from your sightline without touching your wall layout. Clear totes make the garage feel calmer because you can see what’s inside without digging. The “stick” part comes from using stackable bins with matching lids and a labeling system that stays readable. This looks especially good when tote colors are consistent and the rack lines up parallel to the garage door. It’s beginner-friendly as long as you keep it light and secure.
Skip thisDon’t store anything you might need in a hurry up there.
Editor's noteAdd a small handle strap to the tote so pulling it down is smooth and you don’t snag the rack.
4. Floor-to-Ceiling Pantry-Style Storage Cabinet for Paint and Chemicals
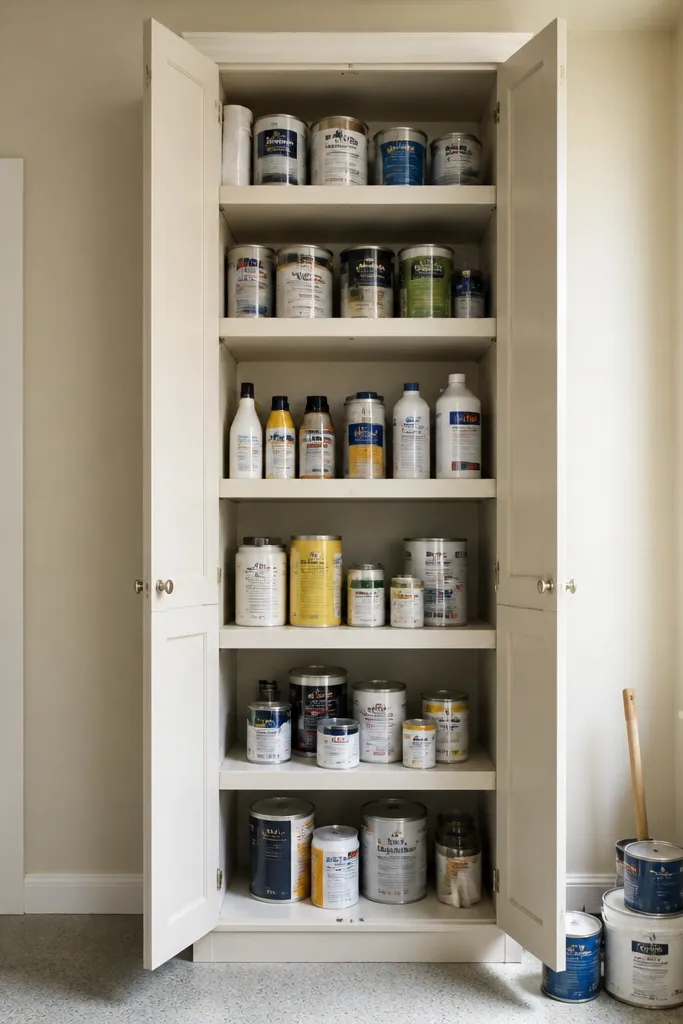
Measure the wall space and choose a cabinet that reaches near the ceiling without blocking garage door tracks. Anchor the cabinet to studs or use anti-tip hardware so it doesn’t tip when you pull out a heavy bottle. Install small tray inserts for spray bottles and use a bin for rags and gloves. Label shelf zones with durable labels covered in clear tape, then add a simple inventory list on the inside door.
A tall cabinet makes messy, high-rotation garage liquids look intentional. Paints, stains, solvents, and cleaners have a way of turning into a scattered mess because people can’t see what they have. With shelves and doors, you control the visual noise and keep dust off everything. It sticks because the cabinet gives you a single “home” for chemicals and you can add bins for categories. Choose a cabinet with adjustable shelves so you can fit tall spray cans and irregular bottles.
Skip thisSkip open shelving for chemicals; it looks messy fast and collects dust.
Editor's noteUse a drip tray under the heaviest liquids so a small spill doesn’t turn into a long-term mess.
5. Magnetic Strip for Metal Hand Tools and Bits
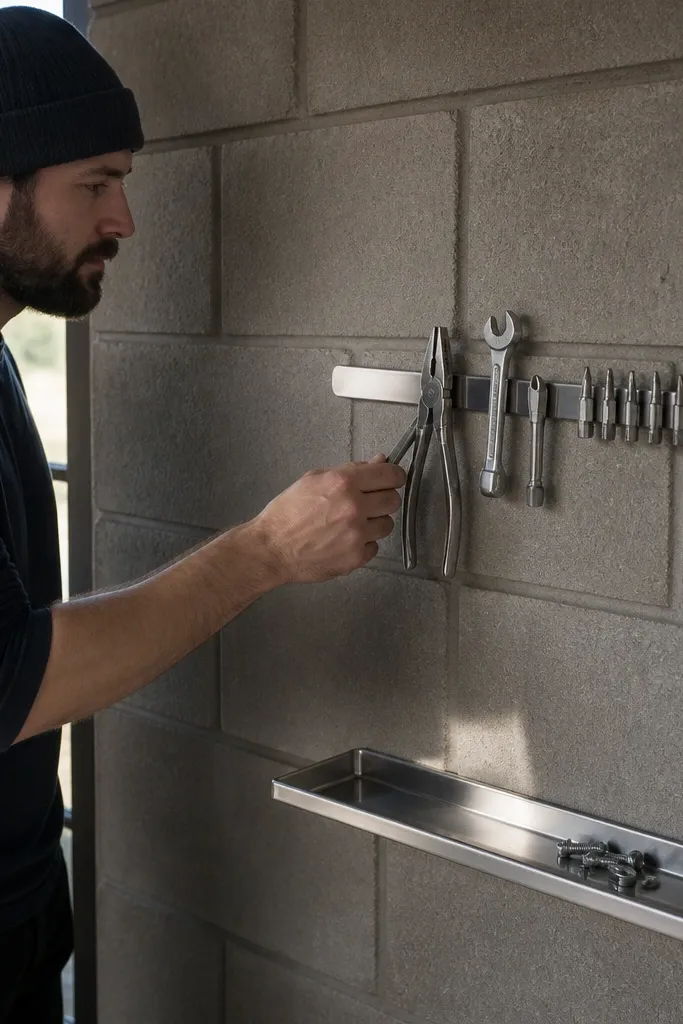
Choose a magnetic strip long enough for your most-used tools and mount it to studs with screws through the rail. Keep the strip at a comfortable height, usually 40-55 inches from the floor for frequent grabs. Add small magnetic cups or holders at the ends for bits and tiny accessories. Sort tools by size and keep similar widths together so the layout stays tidy.
A magnetic strip looks clean and modern, especially when you mount it in a straight line. It’s great for metal hand tools and small steel parts like bits, chisels, and wrenches that you want to grab quickly. The visual payoff is immediate: no hooks cluttering the wall, just a smooth line of tools. It sticks because you can see everything at a glance and you don’t have to re-dock tools into fiddly holders. This works best for tools with metal bodies that sit flat against the magnet.
Skip thisDon’t mount over paint that’s flaking — the strip will loosen over time.
Editor's noteUse painter’s tape to mark tool positions before you drill so the spacing looks intentional.
6. Pegboard Tool Shadow Box for Small Specialty Tools
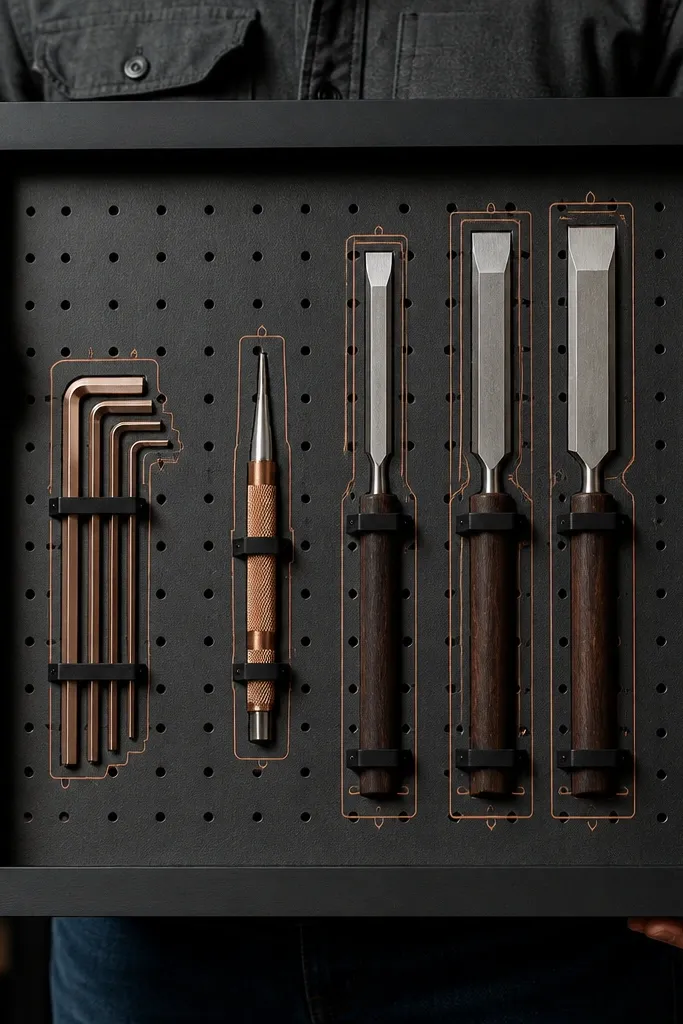
Shadow-box style pegboard turns “small specialty tools” into a crisp, gallery-like wall. You get a photo-ready look because each tool has a marked place, and the wall doesn’t become a random pinboard. This is beginner-friendly because you only need a few tools to start — once you like the layout, you can expand. It sticks because the outlines act like a checklist. When something is missing, you notice immediately.
Mount a smaller pegboard panel to studs and keep it centered on a wall section you can see from inside the garage. Install hooks or small holders for each specialty tool, then trace the tool silhouette on paper or thin plastic and attach it behind the pegboard using a clear overlay sheet. Label each placement with a short name like “spare blades” or “awl.” Keep the tools that you actually use often in the bottom half and less-used items in the top half.
Use a matte label background so dust doesn’t make the text look shiny and hard to read.
Don’t include tools you rarely use — the wall becomes cluttered and you stop checking it.
7. Clear Door Cabinet for Seasonal Decor and Craft Supplies
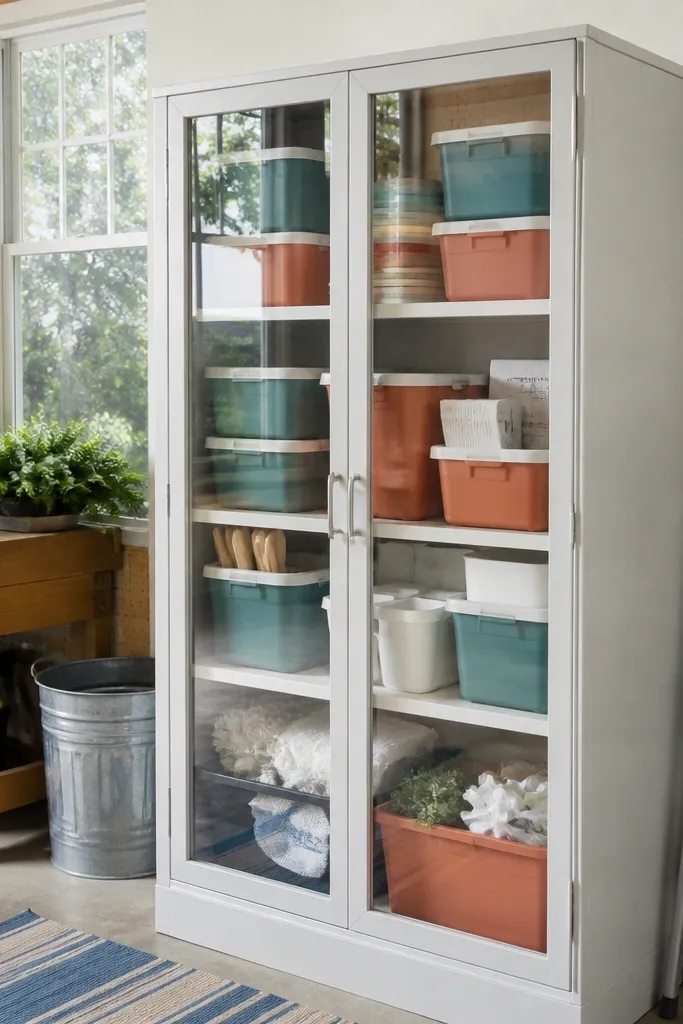
Choose a cabinet with shelves and a clear door, then measure bin sizes so they fit without gaps. Place opaque bins on the shelves and label each bin front so the cabinet looks uniform even when it’s full. Add two “do not mix” categories: decor and supplies, so you don’t end up with a chaotic re-boxing job later. Anchor the cabinet if it’s tall, then place it near your garage door entrance for easy seasonal access.
A clear-door cabinet makes seasonal stuff look tidy instead of buried. The visual win is that you can scan for what you need without opening and closing piles. Use it for decor, craft supplies, and reusable party items that you pull out a few times a year. It sticks because bins inside keep the cabinet from becoming a junk drawer. This is one of the best “aesthetic storage” options because the cabinet creates a clean frame for everything.
Skip thisAvoid mixing open items like loose cords on top shelves.
Editor's noteKeep the labels the same font and color across all bins so the cabinet reads as one design.
8. Tool Drawer Wall Unit for Fast-Grab Maintenance Items
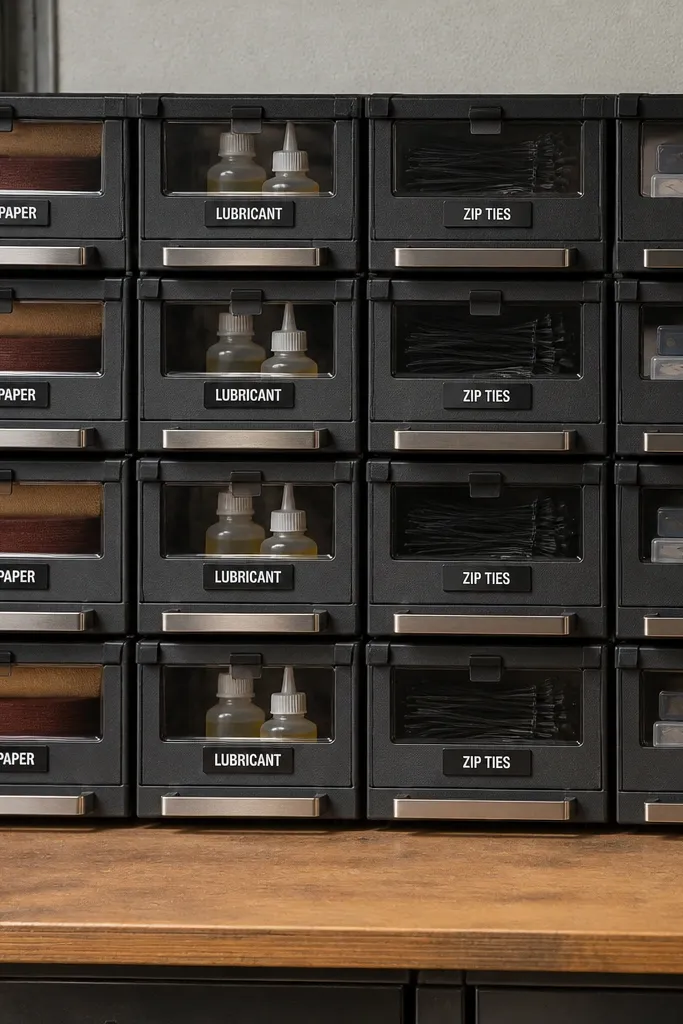
Pick a wall-mounted drawer system and confirm it can be anchored to studs. Install the unit so the top drawer is reachable without a step stool, usually around 54-60 inches. Add drawer inserts or small bins to separate categories and keep items from sliding. Label each drawer with a category and add a simple checklist card for “what belongs here” inside the drawer cover.
A drawer wall unit gives you the “clean front” look while keeping tools easy to reach. You can organize small maintenance items like sandpaper, lubricant, zip ties, and spare blades into labeled compartments. The aesthetic comes from repetition: same drawer sizes, consistent label placement, and clean metal handles. It sticks because drawers prevent dust and stop the “pile on shelf” problem. This is a smart beginner project because you can start with only one wall section and build from there.
Skip thisDon’t overfill drawers; if lids and bins can’t close cleanly, the system fails.
Editor's noteUse clear shelf liner or drawer liner so metal tools don’t scrape and drawers stay quiet.
9. Corner Overhead Ladder and Long-Item Rack with Rubber Cradles
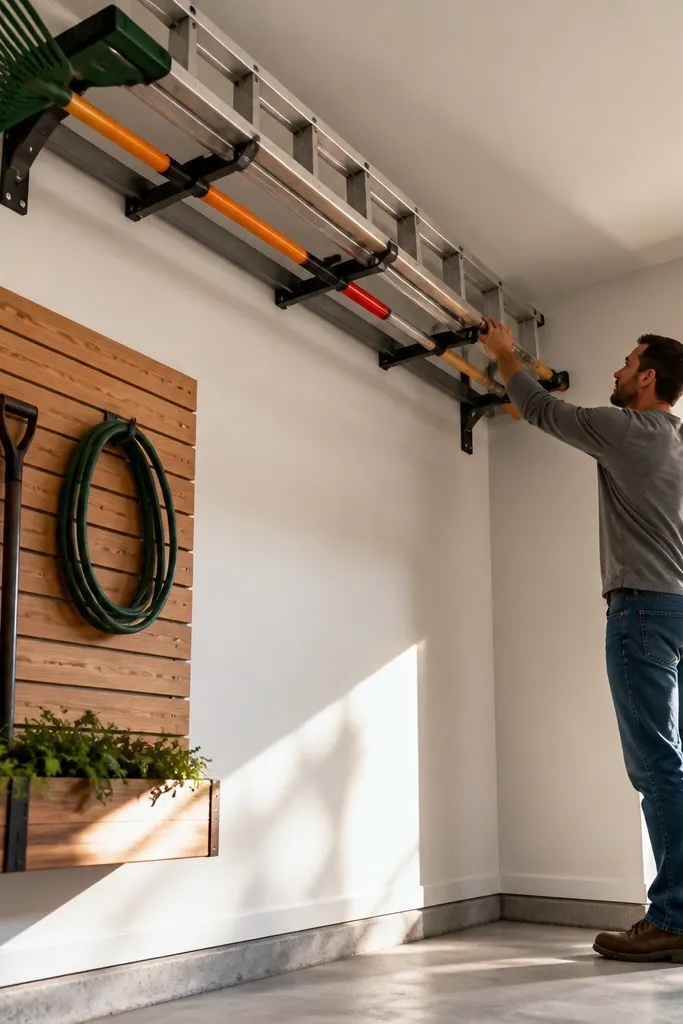
Measure the longest item you store and choose a rack designed for that length with adjustable cradle spacing. Mount the rack to studs or a structural anchor point, then add rubber cradle pads so metal doesn’t scratch. Position the rack so the items hang or rest without touching the door tracks. Store ladders and poles in the same order every time, then add a small label strip on the wall that says “Place ladder here.”
Long items make garages look messy because they spill into every walkway. A corner rack with rubber cradles keeps ladders, poles, and extension tools aligned and off the floor. The look is neat because long lines stay parallel to each other instead of crossing. It sticks because you’re not asking yourself to “figure out where this goes” each time — the corner rack has a single purpose. It’s beginner-friendly if you keep the rack anchored and the load within its rating.
Skip thisDon’t store long items on wall surfaces that aren’t anchored into studs.
Editor's noteUse a strap or bungee retention tie on the ends of the longest poles so they don’t shift.
10. Pegboard Cable Management Board for Power Tools and Chargers
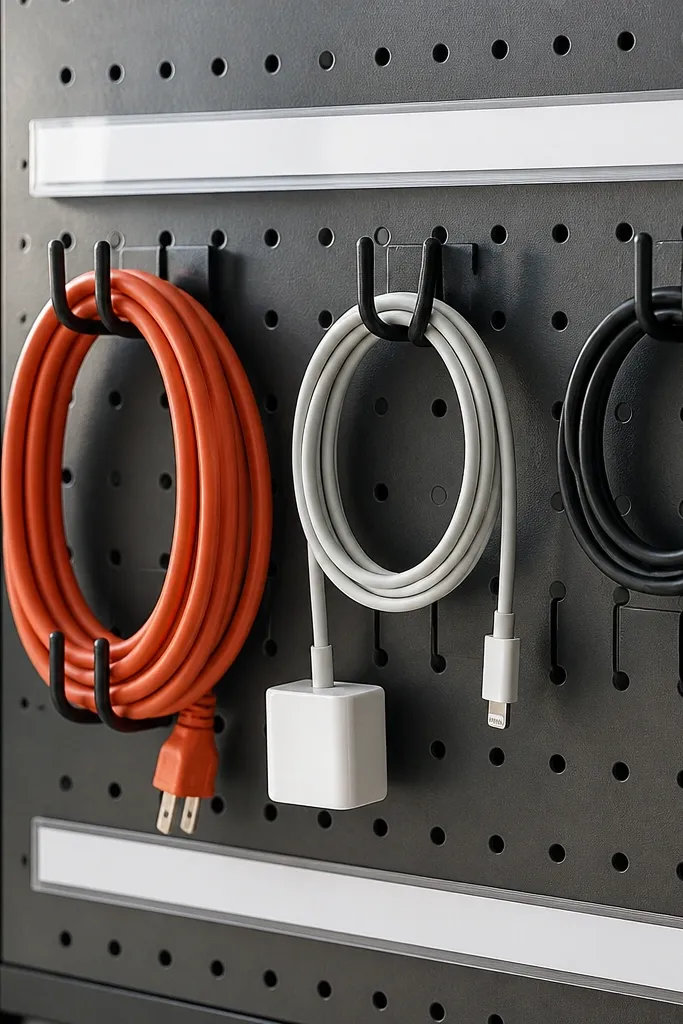
Cords are the fastest way to make a garage look chaotic. A cable management board turns chargers, extension cords, and tool cords into a clean grid. The aesthetic is the key: hooks in straight rows, cords routed neatly, and labels that match the rest of your wall system. It sticks because you can coil a cord in the same pattern every time and hang it back in the same spot. This is beginner-friendly because you don’t need complex carpentry — just good mounting and tidy routing.
Mount a pegboard panel to studs and add a few long cable hooks along the top row for extension cords. Install smaller holders for chargers and use binder clips or cable ties to keep cords in a consistent coil. Label each spot with a charger/tool name and add a small bin for spare adapters. Route cords so they hang straight down and don’t loop across hooks.
Coil cords using the same over-under pattern so they fit the same hook every time.
Avoid letting cords hang loose — they twist and look messy even when “organized.”
11. Bench Pegboard Backer with Tool Roll Storage
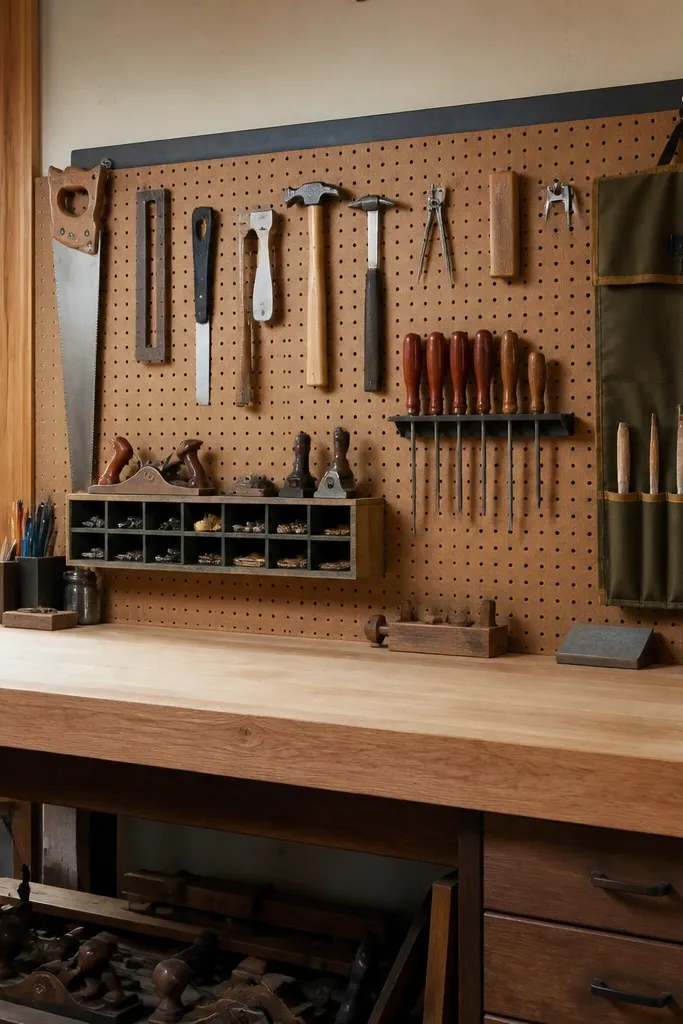
Install pegboard on the wall behind the bench, using studs and a level line so the grid stays straight. Place the pegboard center at the height where you can grab tools without leaning too far. Hang a tool roll organizer on a top rail hook and add a few heavy-duty hooks for hammers and pliers. Add two bins on the lower section for rags and small consumables, then label them.
If you have a workbench, the back wall is prime real estate. A pegboard backer behind the bench keeps your daily tools within reach and makes the bench area look styled instead of improvised. Add a tool roll or hanging organizer so small tools don’t end up in drawers that overflow. This delivers the “stick” factor because your most-used setup has one visual home. It’s beginner-friendly because you can keep it simple: hooks for big tools, roll for small ones.
Skip thisDon’t mount the pegboard too high — you’ll stop using it.
Editor's noteUse heavy-duty hooks rated for the tool weight so they don’t sag and ruin the clean look.
12. Stacked Bin System for Screws, Bolts, and Fasteners (Labeled by Size)
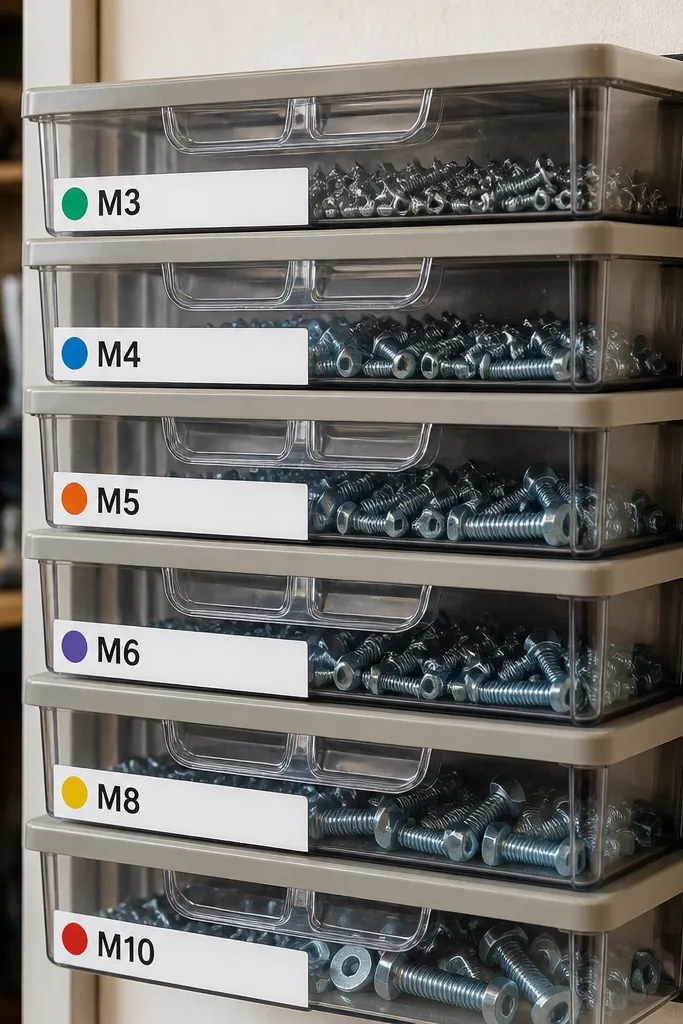
Use a shelf with enough depth for bins and choose uniform clear bins with snap lids if possible. Label each bin with size and head type using a label maker, then cover labels with clear tape so dust doesn’t blur them. Arrange bins by size order left to right, and keep the most-used sizes at eye level. Put a small “misc fallback” bin at the end so you don’t create new piles when you’re missing a perfect match.
Fasteners are small, but they create huge visual mess when they’re dumped into one container. A stacked bin system keeps each size visible and reduces the rummaging that leads to piles. The look is clean when bins are uniform and labels are consistent. It sticks because you can reorder quickly and you always put the right bin back. This is beginner-friendly because you’re not building a complicated rack — you’re building a repeatable storage pattern.
Skip thisAvoid mixing loose fasteners in bags on open shelves.
Editor's noteStore bins in the same orientation every time so the label faces forward.
13. DIY Hanging Trash and Recycling Station for the Garage Door Side
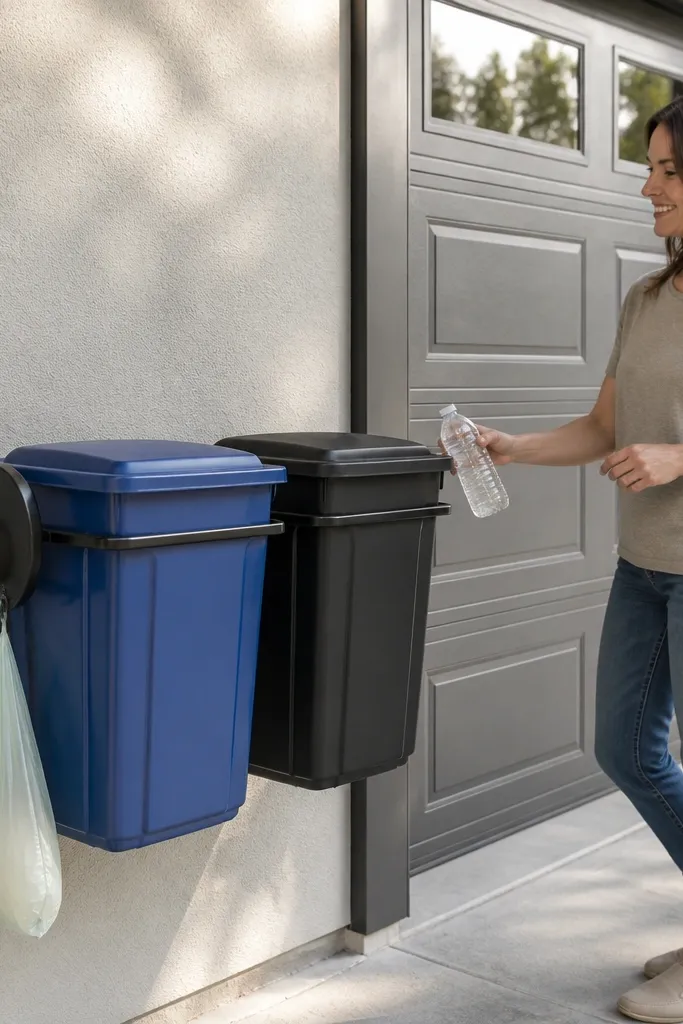
Choose two lidded bins that match in color and size, then mount a simple backboard to studs at a reachable height. Attach a hanging bracket or rail system so the bins mount securely and don’t swing. Label each bin with large vinyl labels, then add a small hook on the side for a roll of trash bags. Test the clearance when the garage door opens so nothing hits the tracks.
Waste stations sound boring, but they change the whole garage look because they stop trash from sitting on shelves. A hanging station near the garage entry keeps wrappers, tape scraps, and broken packaging from spreading across the floor. The aesthetic stays clean because bins have lids and the station has a consistent, framed layout. It sticks because you always know where the waste goes, and the bins don’t take up floor space. Beginner-friendly means you can do it with simple hardware and clean mounting.
Skip thisSkip open-top bins — they look messy the moment they fill.
Editor's noteUse a magnetic or clip-on lid organizer if you want the lids to stay aligned and quiet.
14. Magnetic Knife-Edge Tool Holders for Utility Blades and Hook Knives
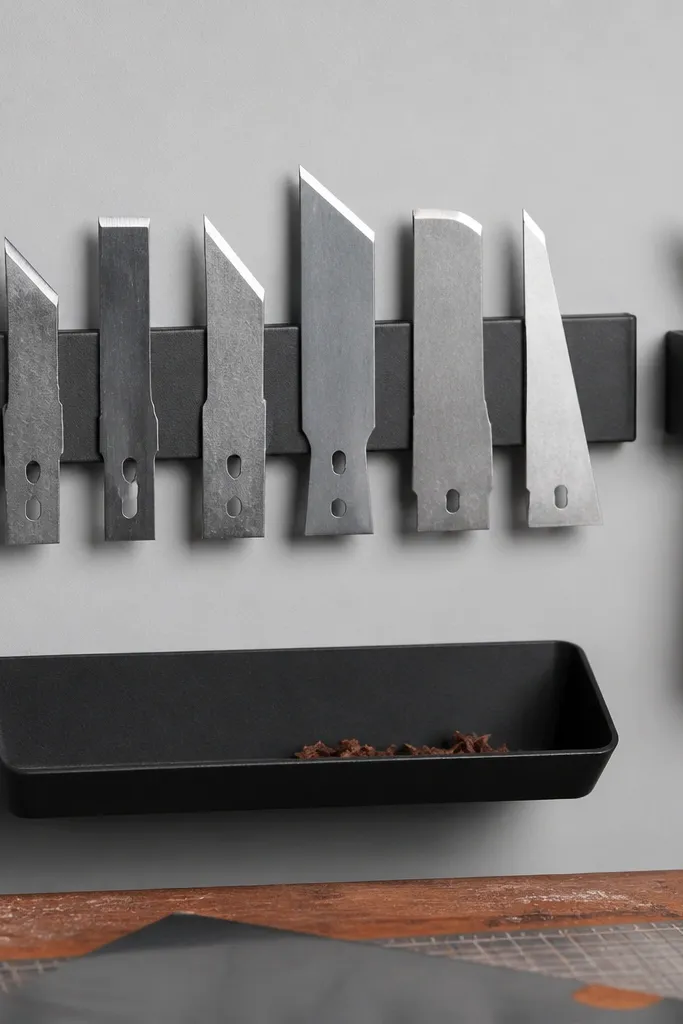
Mount a magnetic strip to studs near your workbench height, then add small magnetic cups or holders for cutting blades and hook knives. Keep the tools arranged by type and size so the layout stays consistent. Add a small labeled container for used blades and a separate container for new blades. Finally, add a safety reminder label on the used-blade container so it doesn’t become a random pile.
Sharp tools create clutter because they’re easy to misplace and risky when tossed into bins. Magnetic holders for blade-style tools keep them flat and visible while also reducing the “where did the blade go?” problem. The look is sleek because everything lines up on the same magnetic bar. It sticks because you can put tools back in one motion. This is beginner-friendly if you keep the setup for small tools only and mount to studs.
Skip thisDon’t store loose blades in open drawers without a labeled container.
Editor's noteUse a strip with a stronger magnet so thin tools don’t slide when you bump the wall.
15. Recessed Wall Shelf for Frequently Used Spray Bottles

Build a shallow shelf box from plywood or hardwood, keeping it about 4-6 inches deep so bottles don’t protrude. Frame it with simple cleats, then mount to studs at a height that puts the labels at eye level. Add a lip or side rails so bottles can’t roll forward. Finish by adding a wipeable finish to the wood and install matching label fronts on the bottles.
A small recessed shelf makes a garage look designed because it creates a clean horizontal line. Spray bottles, glass cleaner, degreaser, and weed spray get used constantly, and they end up everywhere if they don’t have a dedicated spot. Recessing the shelf into a shallow frame keeps bottles from sticking out and catching the eye. It sticks because you can align bottles with a simple row guide. Beginner-friendly means you build a small, shallow unit instead of a full cabinet.
Skip thisAvoid placing the shelf too low — bottles get kicked and the system stops working.
Editor's noteUse a matte clear coat so labels don’t glare under garage lights.
16. Garage Door Rail Storage for Paint Rollers and Brushes
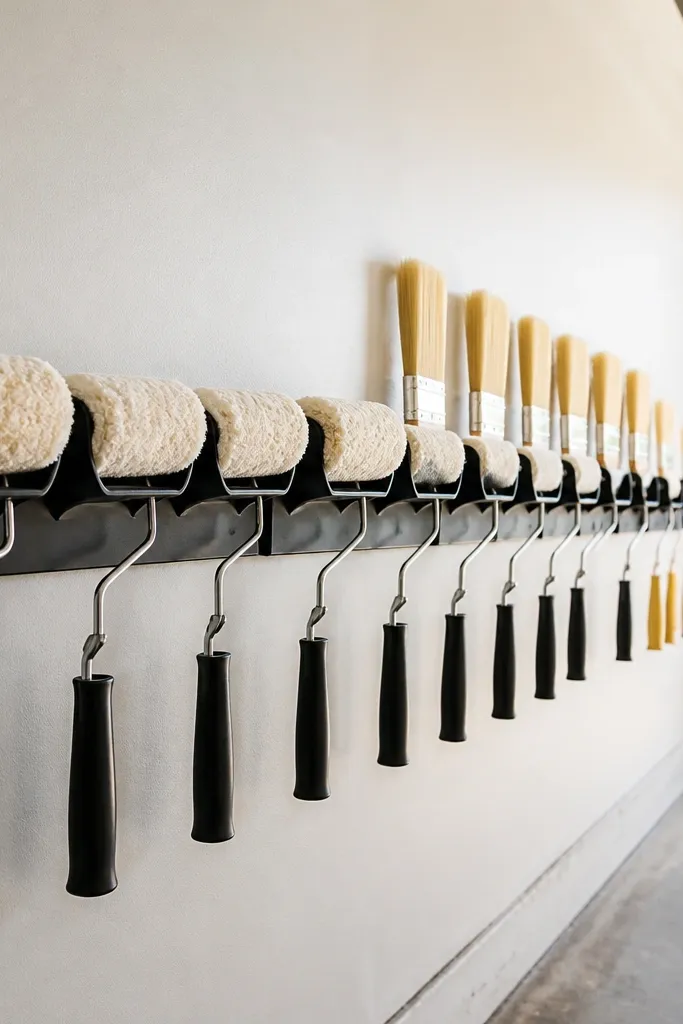
Choose holders sized for your roller frame and brush types, then mount a rail to studs at a comfortable height. Hang roller covers or store roller frames horizontally in a dedicated holder so bristles don’t get crushed. Use small bins below the rail for extra roller sleeves and brush caps. Label each slot with a short tool name and keep the paint tool zone away from chemical splash areas.
Paint tools look messy when they’re stored in cups and buckets, and dried drips make it worse. A wall-mounted rail system for rollers and brushes keeps them separated, clean-looking, and easy to grab. The aesthetic stays sharp because each tool has its own slot and the wall becomes a neat row. It sticks because you don’t have to “sort” paint tools each time you paint. Beginner-friendly means using off-the-shelf holders and mounting them consistently.
Skip thisSkip buckets — they look cluttered and they hide dried mess.
Editor's noteAdd a drip tray shelf under the holders so minor drips don’t stain the wall.
17. Coat Hook Wall for Gloves, Masks, and Shop Aprons with Color Bands
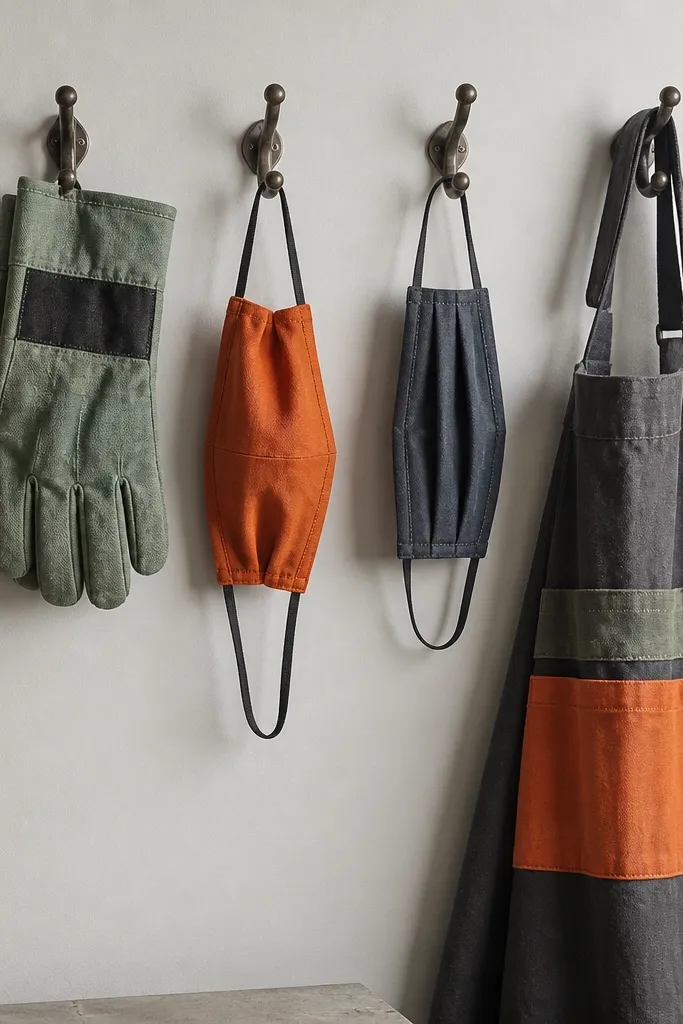
Mount a row of heavy-duty hooks on studs, then add a second row if you have long aprons. Use simple fabric bands or matching ribbon ties to group items by category, then attach small labels to the bands. Hang gloves in pairs on the same hook and store masks in a small labeled pouch on the hook. Keep the hook zone near your workbench so you grab protective gear before you start.
Soft goods are a garage eyesore because they end up in piles. A hook wall with color bands makes gloves, masks, and aprons look organized and consistent. The look is photogenic because you see a tidy vertical arrangement, not a heap. It sticks because those items have a natural “hang spot” and you can add a label for each person or category. Beginner-friendly means you can complete it with a drill, a level, and a handful of hooks.
Skip thisDon’t mix hook heights randomly — it turns into a visual mess fast.
Editor's noteUse S-hooks that let items hang without twisting so it always looks neat.
18. Wall-Mounted Folding Step Stool Niche with Rubber Stop
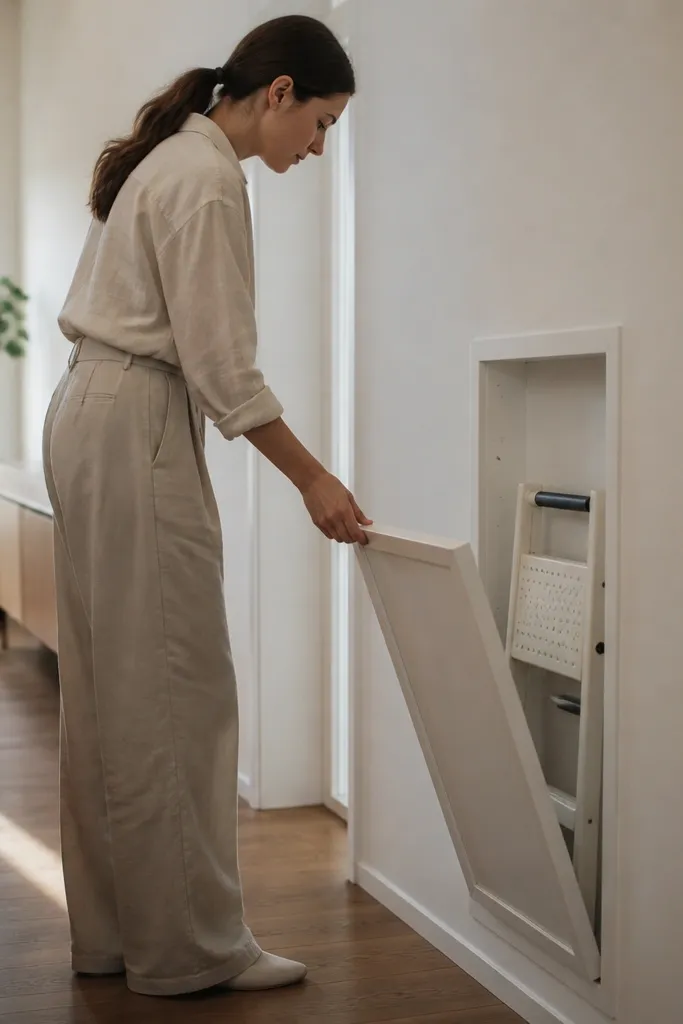
A folding step stool is functional, but it destroys the look when it’s leaning in a corner. A wall niche with a door or panel keeps it hidden until you need it. This makes the garage feel cleaner because you remove the “random leaning object” that breaks visual order. It sticks because the stool has one exact storage spot and you can add a rubber stop so it closes cleanly. Beginner-friendly works because it’s a small build and you can use scrap lumber.
Build a simple niche frame that matches the stool footprint and install it between studs if possible. Add a hinged door or a removable panel so you can access the stool quickly. Set a rubber stop inside the niche so the stool rests at the same position each time. Finish the wood with a durable coat and add a small label on the door like “Step stool.”
Paint the inside panel the same color as the door for a clean, uniform look.
Don’t store the stool in a spot that blocks a walkway or door clearance.
19. DIY Shelf Inserts for Bundled Extension Cords and Hoses
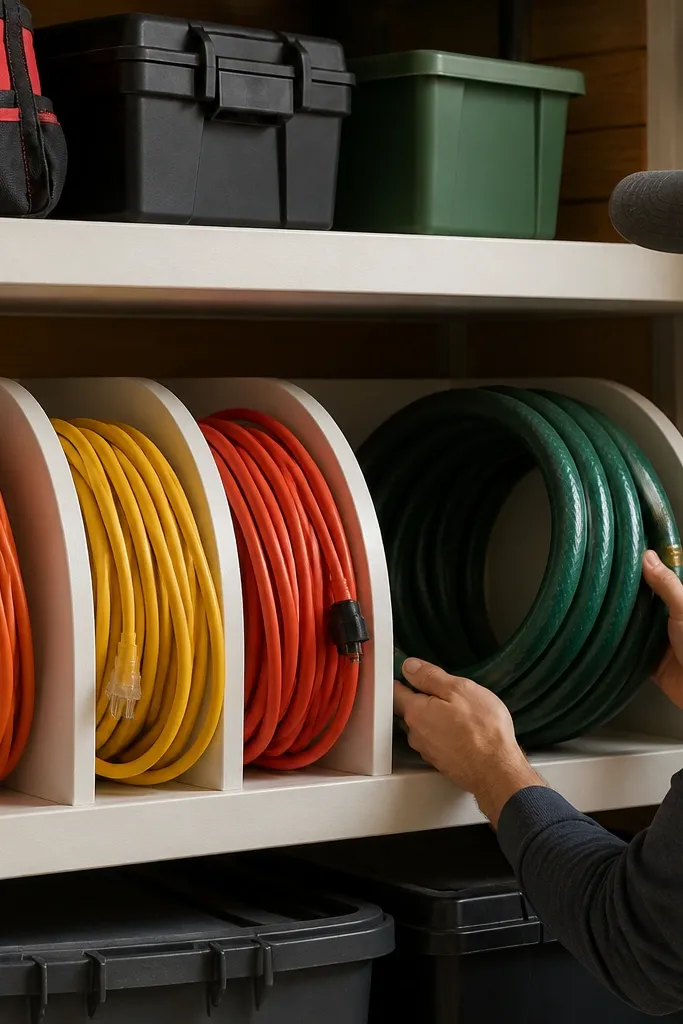
Coiled cords and hoses look messy when they’re stored in loose piles. Shelf inserts create a visual boundary so each coil stays in its lane. This is a beginner-friendly Garage Organization Idea because you can build it from simple materials and it upgrades the look of existing shelves. It sticks because coils don’t unravel and you don’t have to re-tangle cords. The aesthetic win is strong: clean rows, consistent sizes, and labels.
Measure your shelf depth and cut two insert strips from plywood or medium-density fiberboard to create a curved cradle shape. Install the inserts so they hold each coil snugly and keep the coil from sliding. Use tie bands to secure cords and hoses in consistent coil sizes. Label the shelf front with cord length or hose type, then store the most-used sizes at eye level.
Use a rubberized shelf liner under the inserts to reduce slipping and squeaks.
Avoid storing cords loose — they unravel and the shelf looks messy within a week.
20. Closed-Shelf Kit for Small Parts with Matching Opaque Lids
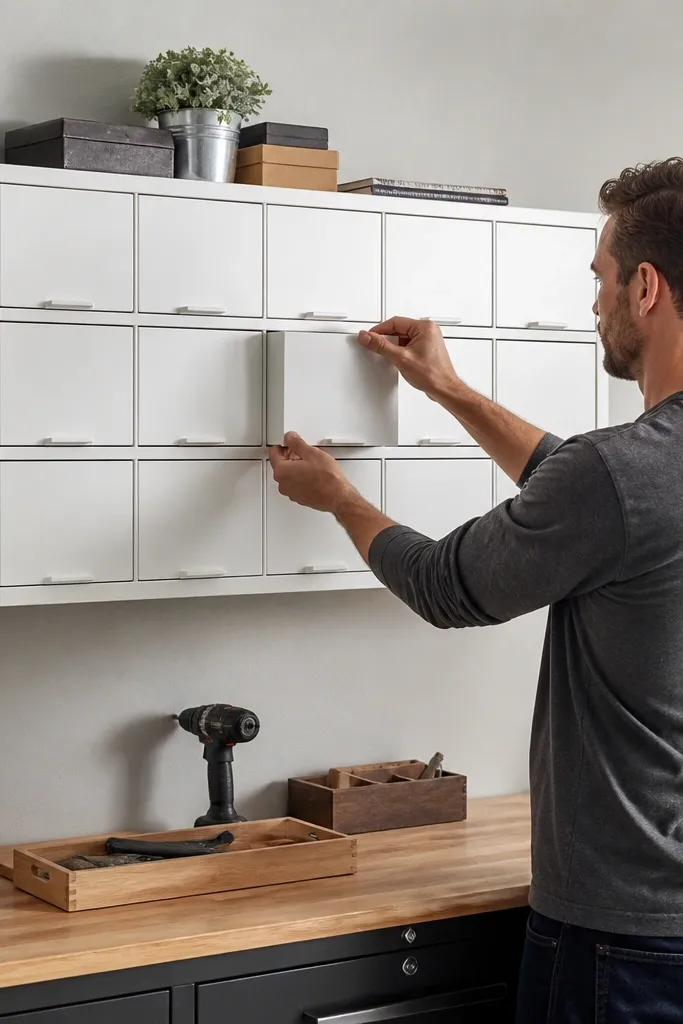
Open shelves with mixed bins look organized only until dust and clutter build up. Closed shelves with matching opaque lids keep the garage looking clean even when you’re mid-project. This idea is perfect for beginners because it’s forgiving — you don’t need perfect sorting to make it look good. It sticks because lids reduce the “dump and forget” behavior. The aesthetic is a uniform wall of shapes, not scattered plastic containers.
Install a set of upper cabinets or closed shelving with doors, anchored to studs. Inside, use matching opaque bins with labels on the front and an optional color dot system for categories. Group by project type like automotive, yard, and home repair. Add a small bin for “new finds” so you don’t create random piles while you decide where items belong.
Label the inside of the cabinet door too so you can find items even when the shelf is hidden.
Skip mixed bin colors — it kills the clean look.
21. Wall-Mounted Lawn Care Tool Rack with Vertical Spacing
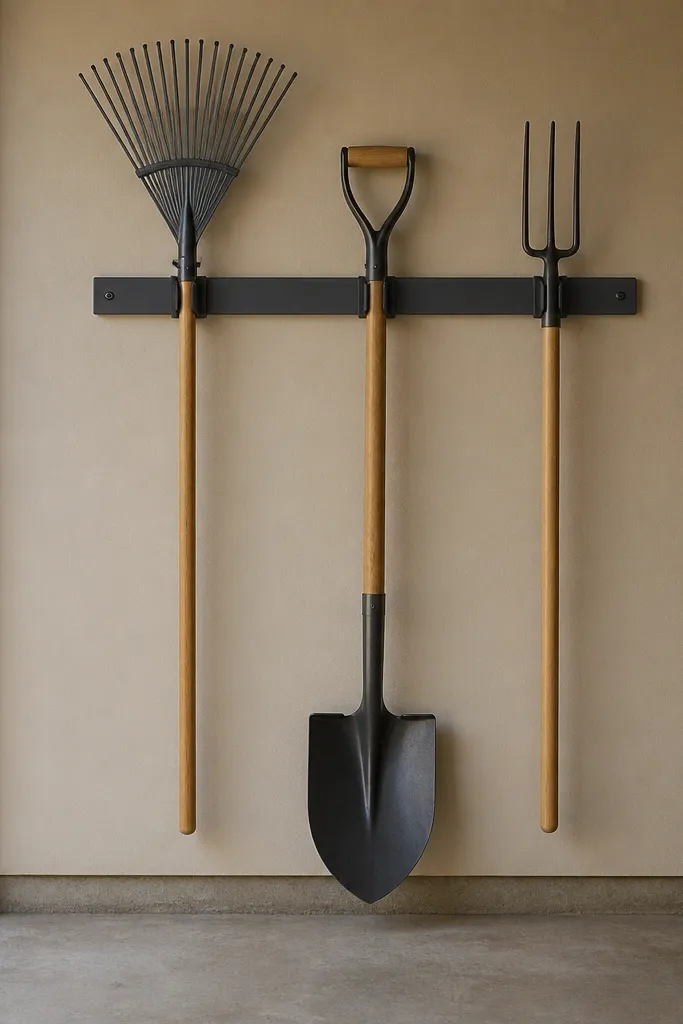
Pick a wall rack or build a frame that holds tool handles upright, then mount it into studs with brackets spaced every 16 inches. Arrange tools by length so the tallest tools are at the top and shorter ones are below. Add rubber or foam pads where tools touch the rack to prevent scratches. Label each slot with the tool name and store blades and small accessories in bins near the bottom of the rack.
Yard tools are long and awkward, and they make the garage look unkempt when they’re stored without a plan. A vertical spacing rack keeps rakes, shovels, and hand tools aligned and stops the “tool pile” look. The aesthetic is strong when tools hang in parallel lines with consistent spacing. It sticks because each tool has a dedicated slot and you don’t have to shove them into a corner. Beginner-friendly means using a simple rack frame and sturdy mounting.
Skip thisDon’t store yard tools on hooks that wobble — they end up in piles.
Editor's noteLeave 1-2 inches of clearance between tools so they don’t clatter and shift.
22. Garage-Friendly Label System with Protected Vinyl and Color Dots

Labeling is what makes organization stick after the first messy weekend. The reason most DIY systems fail is labels fade, peel, or get covered in dust and then people stop putting things back. A protected vinyl label system keeps text readable and makes the garage look polished. Add color dots for quick visual scanning so you can find items in seconds. This is beginner-friendly because you can implement it without building new storage, and it upgrades every other project on this list.
Choose vinyl labels and cover them with clear tape or a label laminate so dust and moisture don’t ruin them. Apply consistent label placement on every bin and shelf front, using the same font style and size. Add a small color dot on each label to represent categories like yard, automotive, home repair. Put a master label key on the inside of the cabinet door so you can match colors later.
Write labels with short nouns, not sentences, so they stay readable at a glance.
Avoid cheap paper labels — they curl and look messy quickly.
23. Magnetic Screw Tray Under Workbench with Drop-In Cups
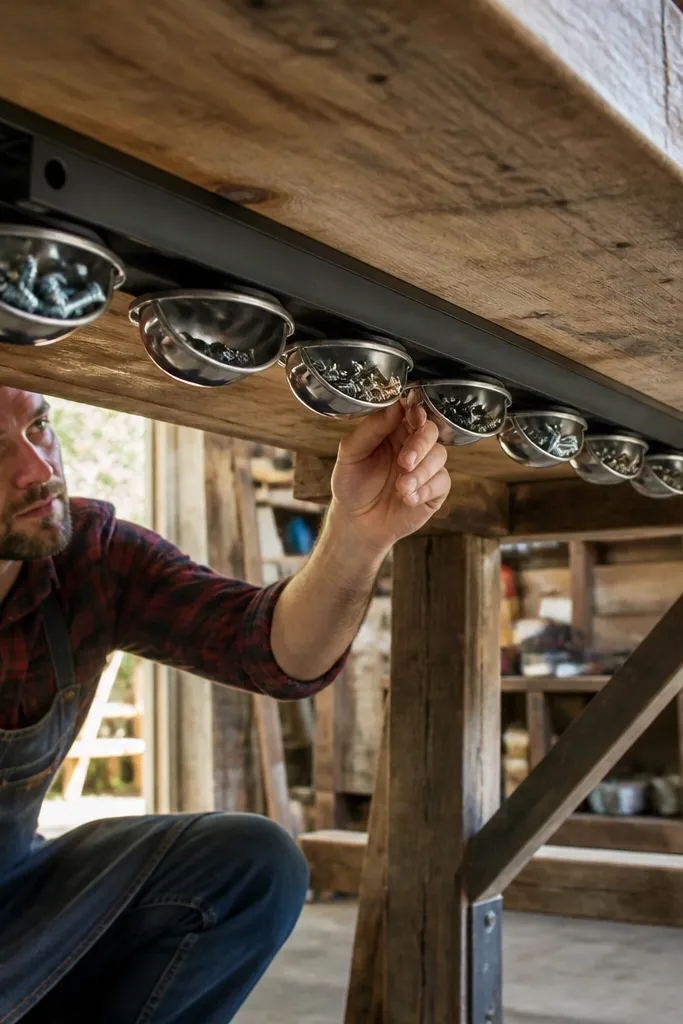
Small metal parts vanish fast. A magnetic screw tray under the workbench keeps screws, bolts, and washers from hitting the floor and turning into a scattered mess. The look is tidy because everything is contained in cups lined up in one row. It sticks because it’s right where you drop parts while working. Beginner-friendly means minimal building and a high payoff in cleanliness and visual order.
Attach a magnetic strip or magnetic sheet to a clean underside surface of the workbench, secured with screws or strong adhesive approved for your surface. Add small magnetic cups or removable containers in a straight line so you can drop parts quickly. Place a larger cup for mixed small parts and separate cups for matched sizes. Add a labeled “trash fasteners” cup for worn screws so you don’t mix them back into good bins.
Use shallow cups so they don’t tip when you bump the bench.
Don’t place the tray where it blocks your knees or where you’ll kick it.
24. Corner Shelf Stack for Paint Cans with Front-Facing Labels

Paint cans look messy when stacked randomly because labels disappear and cans get knocked. A corner shelf stack fixes that by keeping cans facing forward in neat rows. The aesthetic is clean because you create a consistent line of can fronts and a matching shelf height. It sticks because you can quickly scan for color and you don’t have to dig. Beginner-friendly means you can build a simple shelf stack using scrap lumber and a basic finish.
Measure your paint can height and diameter, then build shelves with spacing that fits the cans without wobble. Mount the shelf stack into studs with brackets so it stays stable. Place a small lip on each shelf edge so cans can’t slide forward. Label the front of each can with a large, durable sticker and add a small note for sheen type if you use multiple finishes.
Paint the shelf edges the same color as your bins so the whole corner looks intentional.
Avoid storing paint on a single narrow shelf — it tips and looks chaotic.
25. Fold-Down Workbench Wall Shelf for Daily Projects
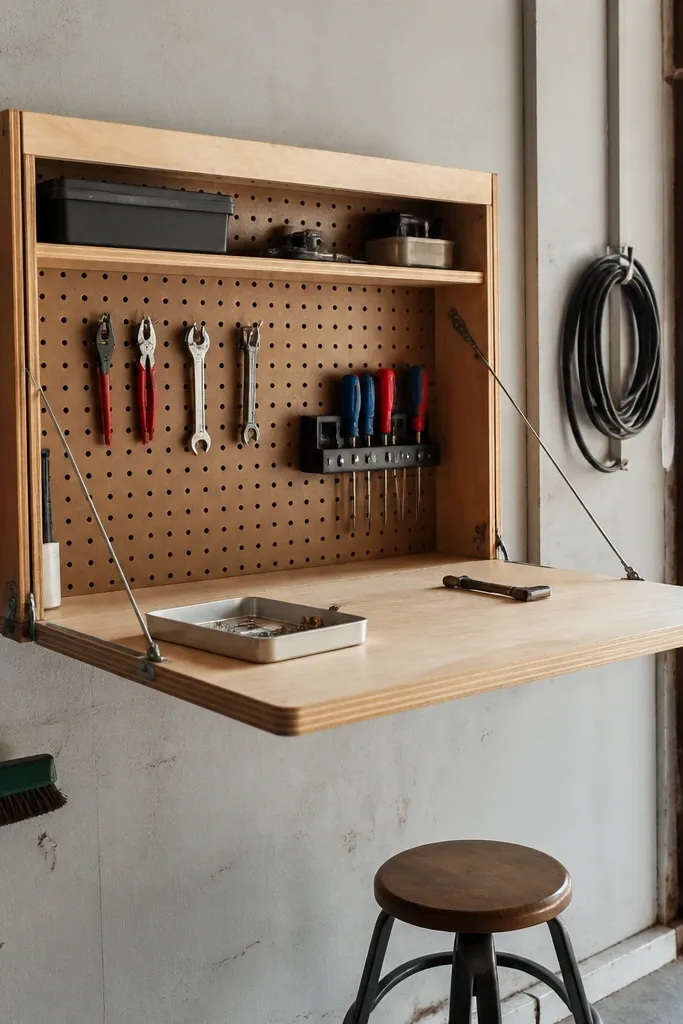
A fold-down wall shelf changes how your garage looks because it creates a dedicated “working zone” that disappears when you’re done. Tools and parts don’t end up on the floor because you have a surface that’s ready and contained. The aesthetic is clean because you can keep the shelf surface minimal and store items in bins below. It sticks because the system has a clear start and finish — fold it down, work, fold it up. Beginner-friendly because it’s straightforward hardware and simple storage below.
Install a fold-down wall shelf into studs at a comfortable working height, typically 30-36 inches when folded down. Add two shallow bins below the shelf for frequently used items like sandpaper, rags, and small hardware. Use a small tray on top for tools so nothing spreads. Finish by adding a rubber mat under the tray so tools don’t slide and scratch the surface.
Keep the bins below the shelf shallow so you can see what’s inside without rummaging.
Don’t store heavy items on the folded shelf — it’s for working, not storage.
26. Wall Shelf + Clear Lidded Drawer Bins for Auto Supplies
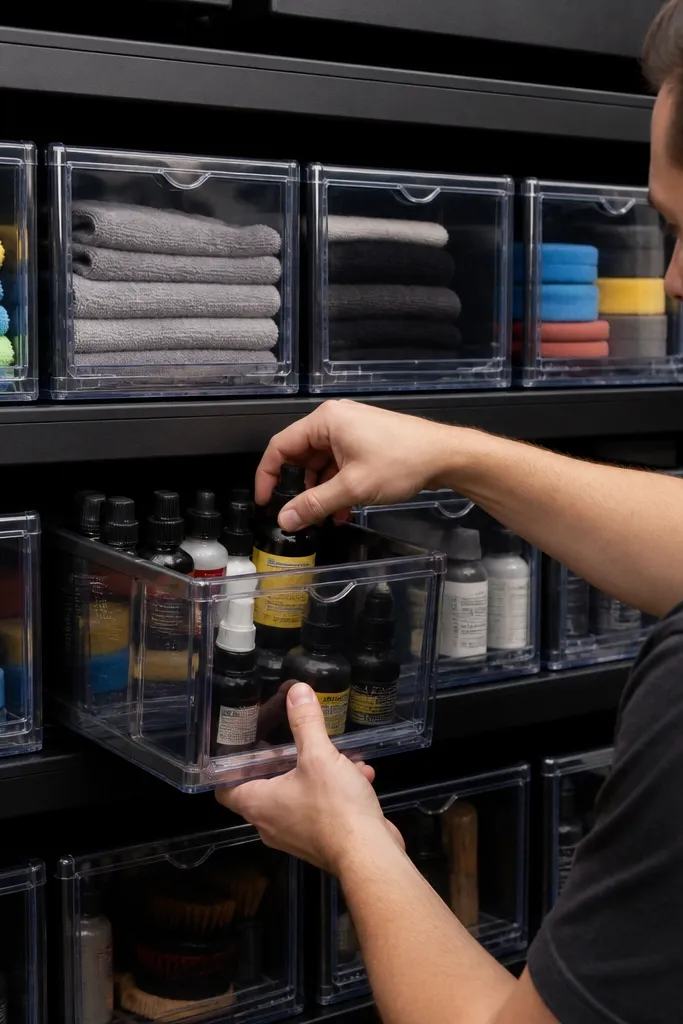
Mount a wall shelf at eye level into studs, then slide in clear-lidded drawer bins that match the shelf dimensions. Label each bin front and keep the bottles inside upright with a small tray so they don’t tip. Put the most-used items like oil drain plugs, brake cleaner, and shop towels at the top row. Add a small bin for disposable gloves and a separate bin for rags so they don’t mix.
Auto supplies create a lot of visual noise: bottles, rags, and small parts. Clear-lidded drawer bins on a wall shelf keep the look consistent while making it easy to find the right bottle. The aesthetic is clean because the drawers line up and the labels face forward. It sticks because drawer bins reduce the “grab a bottle and leave it on the bench” habit. Beginner-friendly because you can buy the bins and focus on mounting and labeling.
Skip thisAvoid open bins for auto chemicals — the garage looks messy after one project.
Editor's noteUse a small absorbent mat in the bottom of each drawer for leak-prone bottles.
27. Garage Shelf with Sliding Bin Panel for Seasonal Bulk
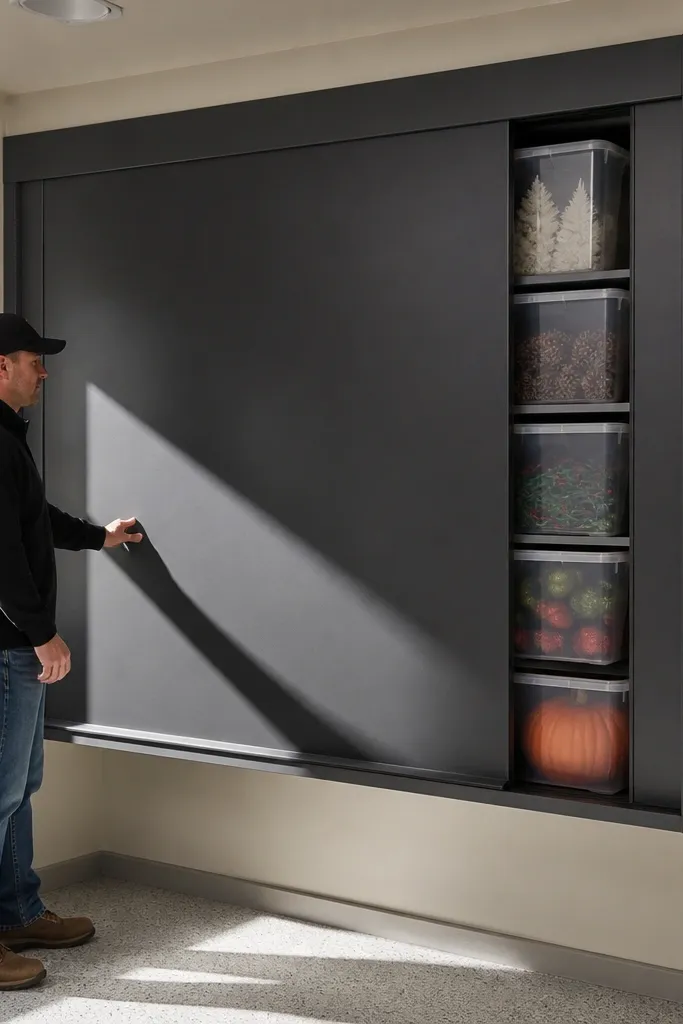
Build a shelf frame anchored into studs, then mount a sliding panel that covers the face of the shelf. Use standard lidded bins behind the panel so you can move them without fighting complicated compartments. Install a simple track or glide system and test smooth operation before loading. Label the bins on the front and add a small handle pull so you can open the panel quickly.
Bulk storage is where garages look worst because it’s bulky and messy. A sliding bin panel hides the chaos while keeping the bins easy to access. The aesthetic win is the clean front — you don’t see the bins unless the panel slides open. It sticks because you’re not tempted to leave bins half-open or piled beside the shelf. Beginner-friendly means building a simple sliding cover and using standard bins behind it.
Skip thisAvoid loose sliding panels — if it binds, you’ll stop using it.
Editor's noteUse low-friction drawer sliders so the panel doesn’t stick when dusty.
28. Oversized Bin Bench for Foam Pads, Rags, and Cleaning Supplies
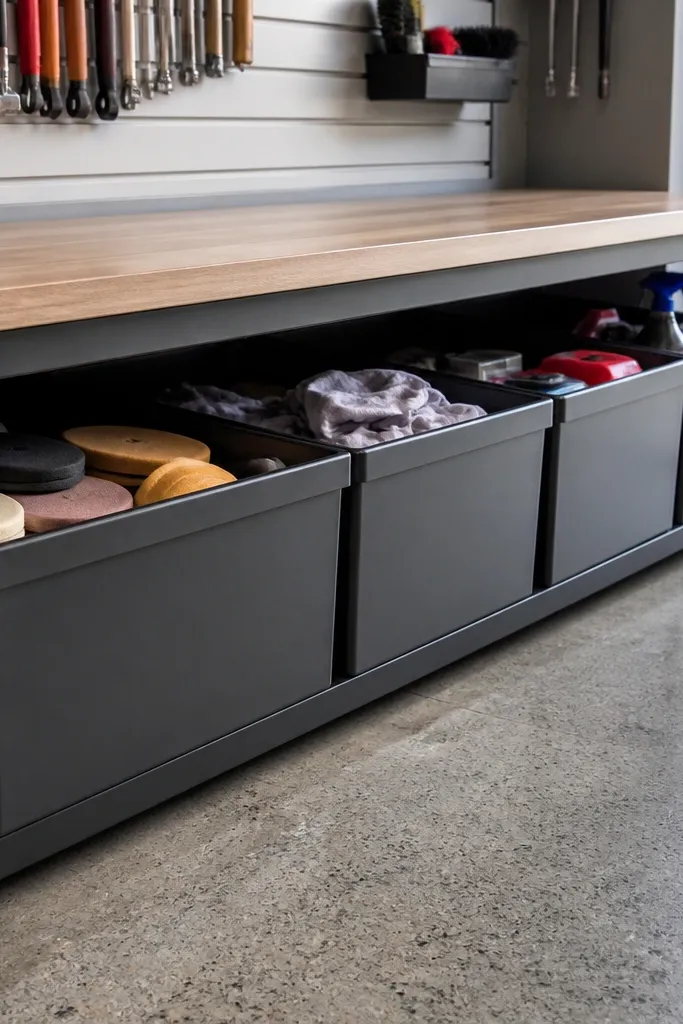
Build a bench frame or repurpose a sturdy base, then install a bin-friendly top and open storage area. Use bins with matching sizes and add a front label strip on each bin for category. Add a hinged bench top if you want extra dust control, or use a lid system if your garage gets heavy debris. Anchor the bench if it’s tall and add a non-slip mat on top so rags and pads don’t slide.
A bench with oversized bins keeps cleaning supplies contained and makes the garage look like a real workspace. The look is strong when the bench face is clean and the bins are labeled and aligned. It sticks because you can throw cleaning rags and pads in one place without it becoming a floor pile. Beginner-friendly because it’s mostly basic framing or a repurposed bench and standard bins. This also makes your garage feel calmer because the bench becomes the landing zone for quick resets.
Skip thisAvoid leaving the bin area open without a top — dust makes it look dirty fast.
Editor's noteUse bins with handles so you can carry them inside without dumping.
29. Ceiling-Mounted Bike and Tool Hover Rack with Soft Cradles
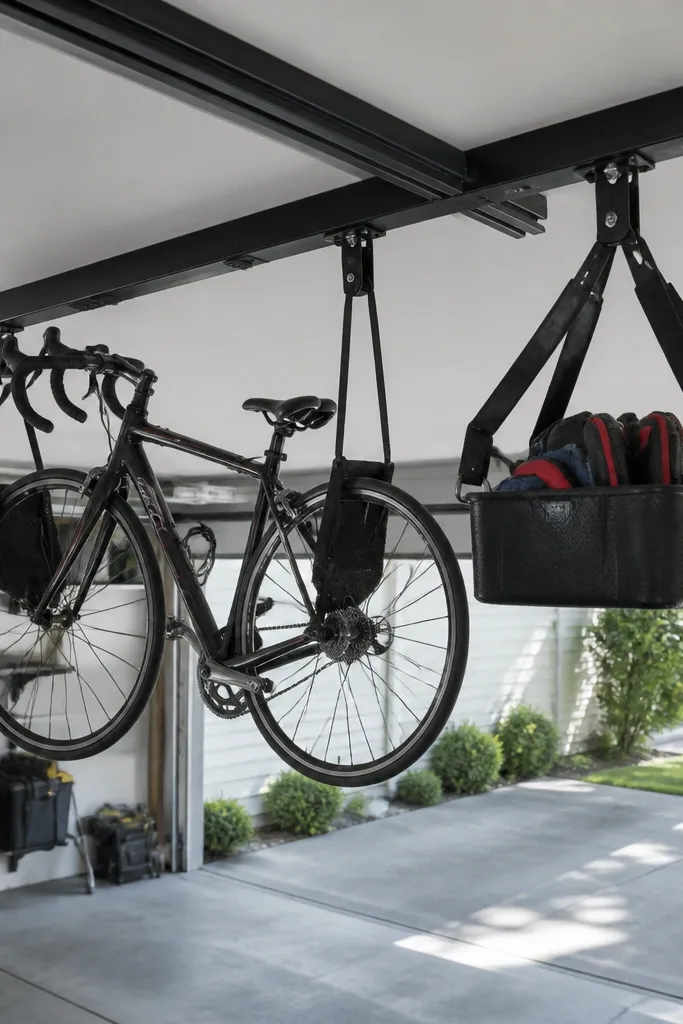
Hover-style ceiling racks are a great way to get bikes, tool totes, and long gear out of the way while keeping the garage visually clean. Soft cradles prevent scratches and help the rack look intentional instead of like a rough hoist. The look is best when the rack is centered and the straps are neat and identical. It sticks because everything hangs in a consistent spot and doesn’t drift into corners. Beginner-friendly if you choose a rack with clear mounting instructions and rated hardware.
Choose a ceiling rack designed for the weight of your bike or heavy gear and mount into ceiling joists with the included bolts. Use soft cradle attachments and space straps so the load sits centered. Label the cradle areas so you always place the same items in the same position. Keep the hanging items away from the garage door track and test clearance by opening the door fully.
Wrap strap ends with fabric tape so loose ends don’t look messy hanging down.
Don’t hang heavy items on a rack mounted into drywall.
30. Roll-Up Hose Reel Wall Station with Quick-Connect Dock

Pick a wall location next to the spigot so the hose doesn’t need a long run across the floor. Install a 2x4 mounting backer through studs using 3-inch wood screws, then mount the roll-up hose reel bracket to that backer at about 48 inches from the floor to the reel center. Use a short length of 3/4-inch garden hose or a manufacturer-recommended hose length so it rolls without over-stressing the spring. Mount the quick-connect dock plate next to the reel using two screws into the same stud line, and attach your spray gun holder so the nozzle points slightly downward. Finish by adding vinyl label strips to the dock for “Spray Gun” and “Quick Connect,” and wipe the whole unit with a rag dampened with isopropyl alcohol before sticking labels so they don’t peel.
A hose that lives on the floor gets stepped on, tangled, and slowly turns into a moldy mess. This wall station keeps the hose off the ground and makes it grab-and-go when you need it. The roll-up reel looks clean and gym-like on the wall, especially with a matte, single-color mount and a clear label strip for the fittings. Add a quick-connect dock for the spray nozzle and you stop hunting through bins for the right adapter. It is beginner-friendly if you can use a drill and a stud finder, and it takes about 2 to 4 hours including mounting and labeling. Best fit is a garage with a side door, driveway access, or a wall near the water spigot where you want the hose to live permanently.
Skip thisAvoid mounting the reel only to drywall or thin paneling — the spring load will loosen it fast.
Editor's noteUse stainless or exterior-rated screws and a strip of rubber between the dock and nozzle body if it rattles — it keeps the garage quiet.



