
1. Black powder-coated frame with vertical slat gate and light plaster pillars
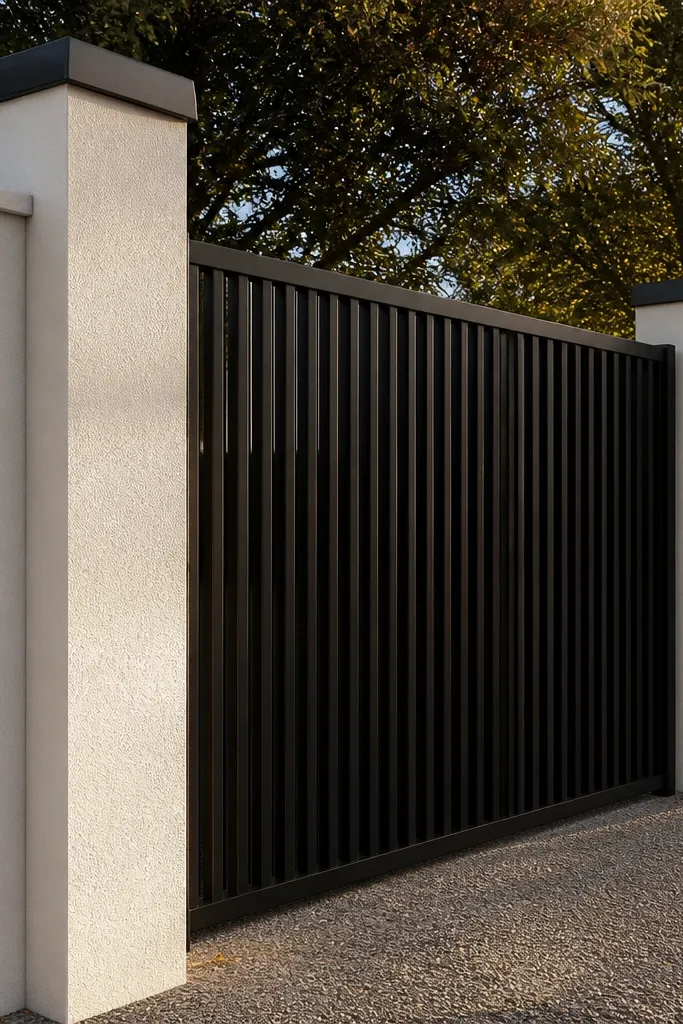
This combo looks sharp because the gate frame color repeats on the vertical slats, while the wall stays light and clean. The vertical pattern makes the gate feel taller without needing extra height, and it keeps the front from looking heavy. Use smooth plaster on the wall with slightly textured pillar faces so the gate doesn’t blend into the background. The result is modern and photo-friendly even with a simple wall build. It’s beginner-friendly because you can fabricate the gate using standard steel sections and mount it to strong pillar openings.
Start by marking two pillar centers and set the gate opening width with swing clearance. Build or cast pillars to a consistent face line, then add a coping cap across the top so the wall has a crisp edge. Install the gate frame anchors inside the pillars, keeping the frame level and plumb before you tack it in place. After the frame is fixed, weld or bolt the vertical slats, then finish with powder-coating. Finish the wall plaster and paint only after the gate hardware is in so you don’t get paint on hinges and latch points.
Editor's noteAsk your fabricator to provide the gate with adjustable hinge plates — it saves you when your pillars aren’t perfectly aligned.
Skip thisDon’t paint the gate frame before powder-coating, or the coating won’t bond cleanly around welds.
2. Brown brick compound wall with arched top gate grill
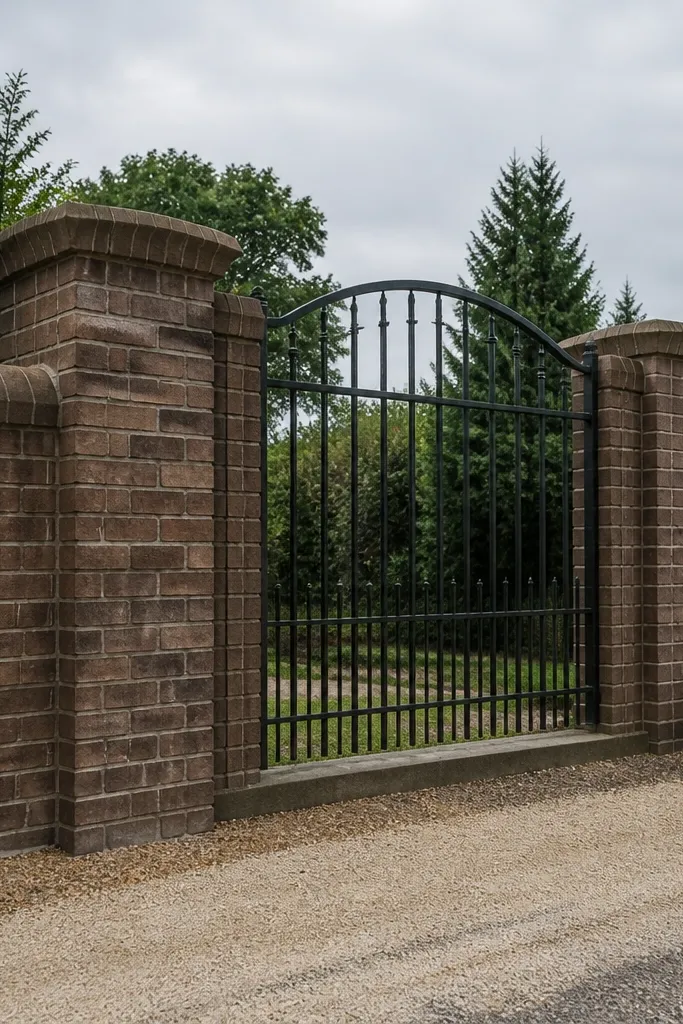
Brick gives you a built-in texture, so you don’t have to do fancy finishes to make the combo look good. This design works because the arched top line on the gate mirrors a softer, curved visual on the pillars. The gate grill keeps visibility light and prevents the front from looking closed off. It’s a strong aesthetic choice for people who want warmth, not a glossy modern look. For beginners, brickwork is straightforward, and the gate grill can be made with simple bars and a template for the arch.
Lay your brick courses for the wall and align pillar faces with a straightedge so the brick lines look straight from the road. Mark the gate opening and build two thicker pillars at the hinge and latch sides. For the gate, cut and assemble a rectangular frame, then bend or weld the arch pieces at the top using a cardboard template. Add vertical bars inside the frame with equal spacing, then install the gate frame using base plates anchored to the pillar. Finish by adding coping stones to the wall and sealing the brick faces with a breathable masonry sealer.
Use a chalk line to keep the brick course height consistent across pillars and wall spans.
Don’t leave the gate arch slightly off-center — it looks crooked even when the rest is perfect.
3. Stone-effect cladding panels on pillars with slim black grill gate
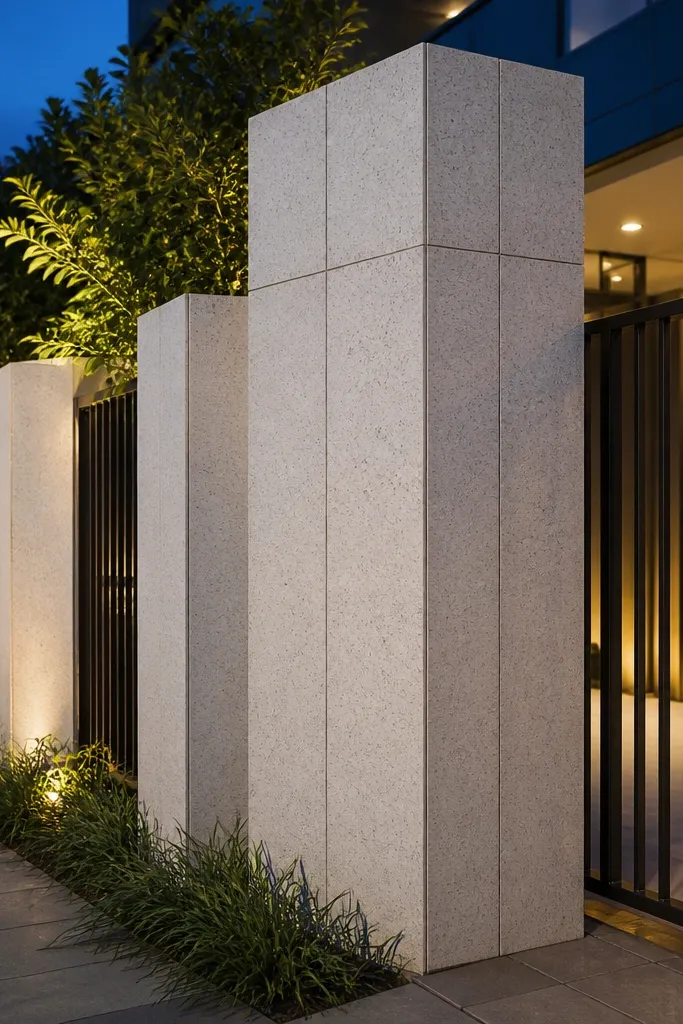
If you want the “expensive” look without complex carving, stone-effect cladding on pillars does the heavy lifting. Pair it with a slim black grill gate so the cladding reads as the hero and the gate stays refined. The contrast — light cladding against dark grill — makes the combo pop in daylight and at dusk. This works well on plots with a brighter driveway or light-colored house facade. Beginners like it because cladding panels are modular and steel grills use repeatable bar spacing.
Start by building a simple wall with evenly spaced pillars and a straight top coping line. Apply cladding panels to the pillar faces only, not the full wall, so you keep costs down and avoid uneven edges. Build the gate with a black powder-coated frame and thin vertical bars, then add a matching top rail line to align with the pillar coping. Anchor hinge and latch plates at the same height on both sides so the gate swings evenly. Finally, grout or seal the cladding joints and touch up any scratches on the gate coating.
Editor's noteDry-fit cladding panels on the pillar before adhesive — check that the panel edges land symmetrically around the pillar center line.
Skip thisDon’t cover the pillar top cap with cladding — keep a clean separation line for a crisp finish.
4. White plaster wall with dark green horizontal slat gate
Horizontal slats feel calm and tidy, and they look especially good against a white or off-white wall. The dark green gate frame adds a natural color accent that doesn’t scream modern or traditional. This combo photographs well because the gate lines run cleanly across the opening, and the wall stays uncluttered. It’s a good choice if your house facade is neutral and you want the gate to be the color anchor. Beginners can build this with basic plaster, simple pillars, and a gate that uses standard rectangular steel with slats.
Plaster the wall in a smooth finish and keep the coping line straight, because horizontal lines show every wobble. Set pillars at the gate hinge and latch points and keep pillar faces aligned to the wall plane. Build the gate with a dark green powder-coated frame and mount horizontal slats at equal spacing, starting with one slat near the top rail and one near the bottom rail. Install the frame with shims so the gate hangs evenly and doesn’t rub the floor. Touch up paint around hinge bolts, then finish the wall with a UV-resistant exterior paint.
Use a laser level to set slat spacing — your eye catches uneven gaps fast.
Don’t choose a green shade that’s too bright — it can look neon next to white plaster.
5. Cement-render wall with exposed aggregate top band and bronze gate
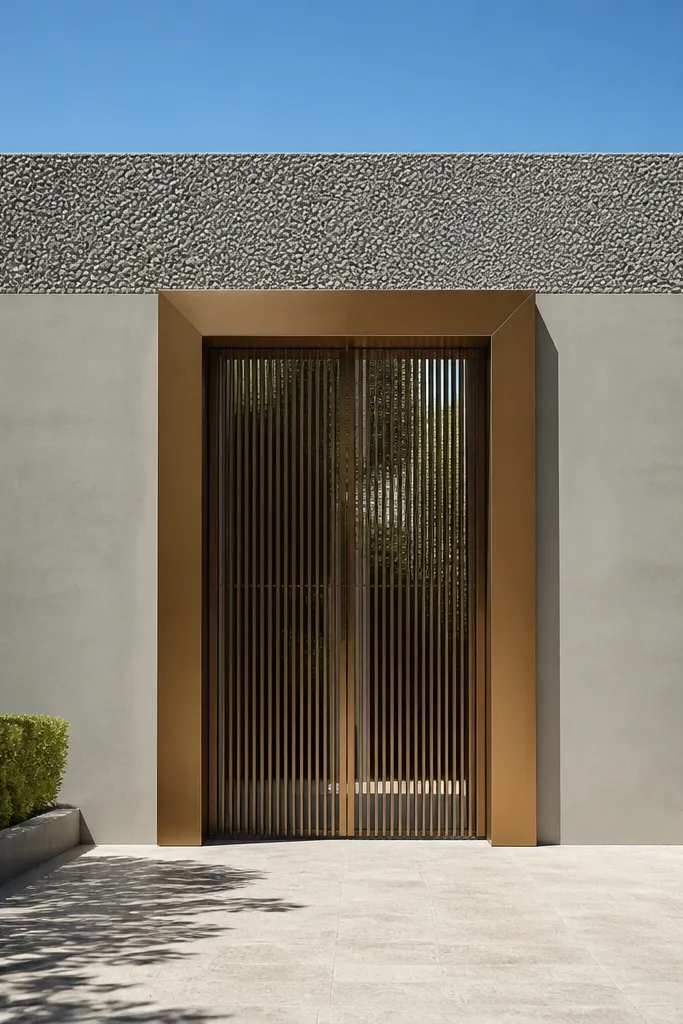
This is a clean trick: keep most of the wall simple, then add one textured band that frames the gate. The exposed aggregate top band adds sparkle and depth, while the bronze gate frame gives a warm, premium look. It works on both modern and classic houses because the texture is the style, not the shape. Beginners can do it without special artistry — you just need a consistent top strip and careful curing. The gate stays the simple part: a rectangular bronze frame with a grill or panel infill.
Render the wall first with cement-sand plaster, then mark a top band height of about 10 to 14 inches. Before the render sets fully, apply a thin layer for aggregate and broadcast small, uniform chips, then compact lightly for even coverage. Cure properly for several days so the texture doesn’t flake. Build a bronze powder-coated gate frame and choose either vertical bars or a simple panel section for the middle. Install the gate after the pillar edges are ready, then seal the aggregate band with a clear masonry sealer.
Editor's noteKeep aggregate size consistent across the band — mixed chip sizes look messy in close photos.
Skip thisDon’t rush curing — a weak top band chips when you clean the gate area.
6. Grey block wall with white coping and a minimal square-grid gate
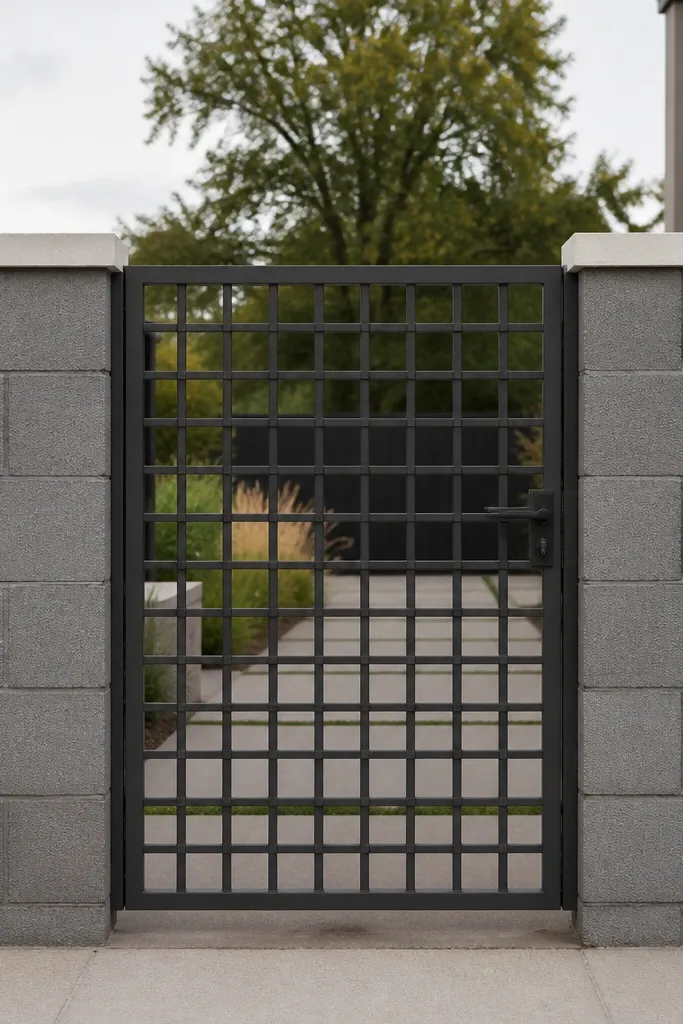
This combo is all about crisp geometry. A grey block wall with white coping creates a strong top line, and a square-grid gate adds a modern pattern without heavy bars. The grid looks neat at multiple distances, so it still looks good from the street. It’s beginner-friendly because the wall can be built with blocks and plastered, and the gate grid uses standard square steel sections. If you want a clean, architectural look without stone or complex designs, this is the simplest option that still looks designed.
Build the wall using blocks and plaster the faces to a smooth finish for straight lines. Add a white coping strip that runs continuously across the wall and caps the pillars. Fabricate the gate frame and weld a square grid inside it using equal spacing, measuring from the frame edges so the grid stays centered. Install the gate frame to the pillars using base plates and keep the bottom clearance consistent for smooth swing. Paint the wall with an exterior primer and finish coat, then touch up the gate coating after installation.
Measure grid spacing with a spacer jig once, then repeat it — don’t eyeball every square.
Don’t skip plaster smoothing — block texture shows through and makes the gate look less precise.
7. Terracotta plaster wall with wrought-style scroll gate and matching pillar bands
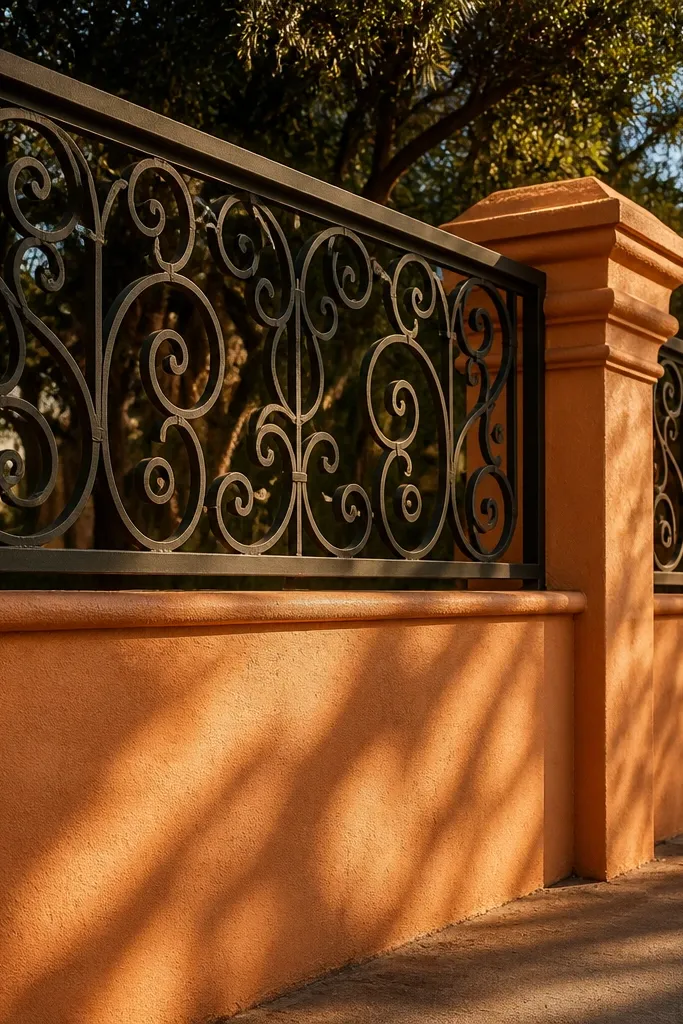
Terracotta plaster adds warmth, and a scroll motif gate gives you a classic feel without going full ornate. The key is to keep the scroll design contained to the upper half, so the gate looks balanced with a mostly solid wall. Matching pillar bands in the same terracotta tone tie the whole system together. This combo is great if your house has warm tones like cream, beige, or wood. Beginners can manage it by using a gate fabricator for the scroll pieces while you handle the wall build and pillar alignment.
Plaster the wall in a terracotta exterior finish and keep the wall top line straight with a coping. Build pillars at hinge and latch points, then add narrow horizontal bands on the pillar faces using cement plaster strips. For the gate, use a powder-coated frame and weld scroll elements only in the top half, with simpler vertical bars in the bottom half. Install hinge and latch hardware at the same height on both sides, then hang the gate and check swing clearance. Seal the plaster finish with an exterior weatherproof coating to keep the color even.
Editor's noteAsk for the scroll pattern on a template so the curls are symmetrical left and right.
Skip thisDon’t put scrolls across the full height — it makes the gate look crowded.
8. Full-height brick pillars with teak-brown panel gate and black hardware
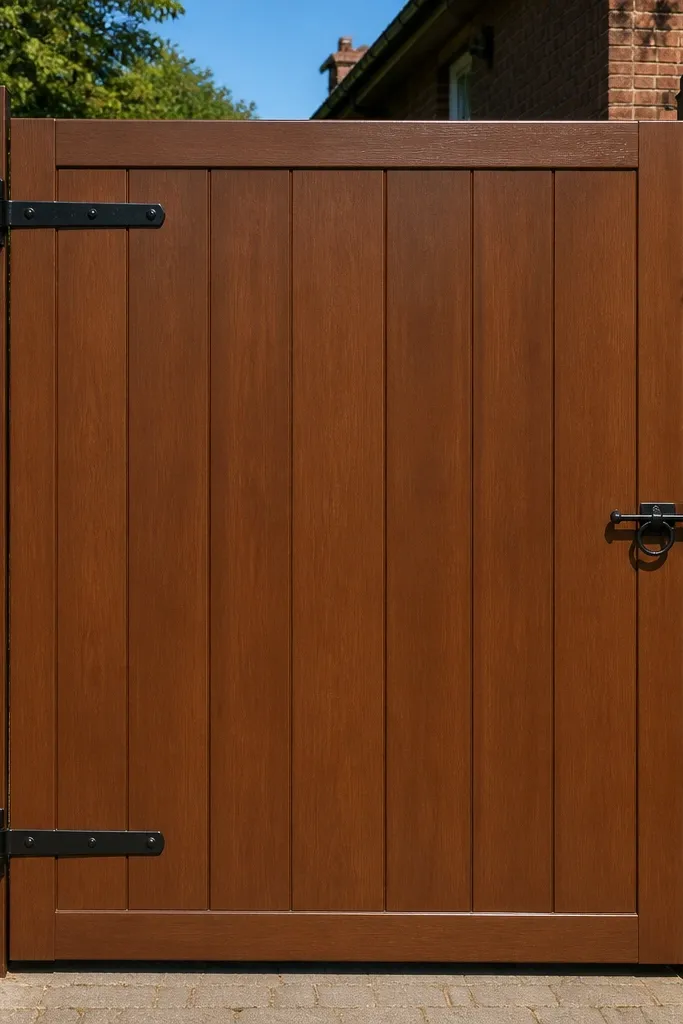
Panel gates look clean and feel private, and the teak-brown finish makes the gate feel warm and modern at the same time. Brick pillars give weight and texture, which balances a solid panel gate so it doesn’t look like a flat door. Black hardware keeps the look grounded and makes the gate read crisp in photos. This combo works well for homes with a gated entry already planned, where you want the wall to look sturdy and the gate to look intentional. Beginners can build it with standard steel framing and a simple panel infill.
Build the compound wall with brick or brick-veneered pillars and keep pillar faces aligned. Add a top coping and ensure the pillar openings are square for the gate frame. Fabricate a gate frame in black powder-coat and install a teak-brown panel infill in the middle section, leaving a small border gap for clean edges. Mount hinges and a magnetic or latch mechanism with proper reinforcement plates on the gate frame. Finish by coating the brick faces and repainting any exposed metal on the gate after installation.
Leave a 5 to 10 mm gap around the panel edges inside the frame so moisture doesn’t warp the panel over time.
Don’t use thin panel sheet without bracing — it will flex and look wavy.
9. Limestone-look cladding wall top with mesh gate
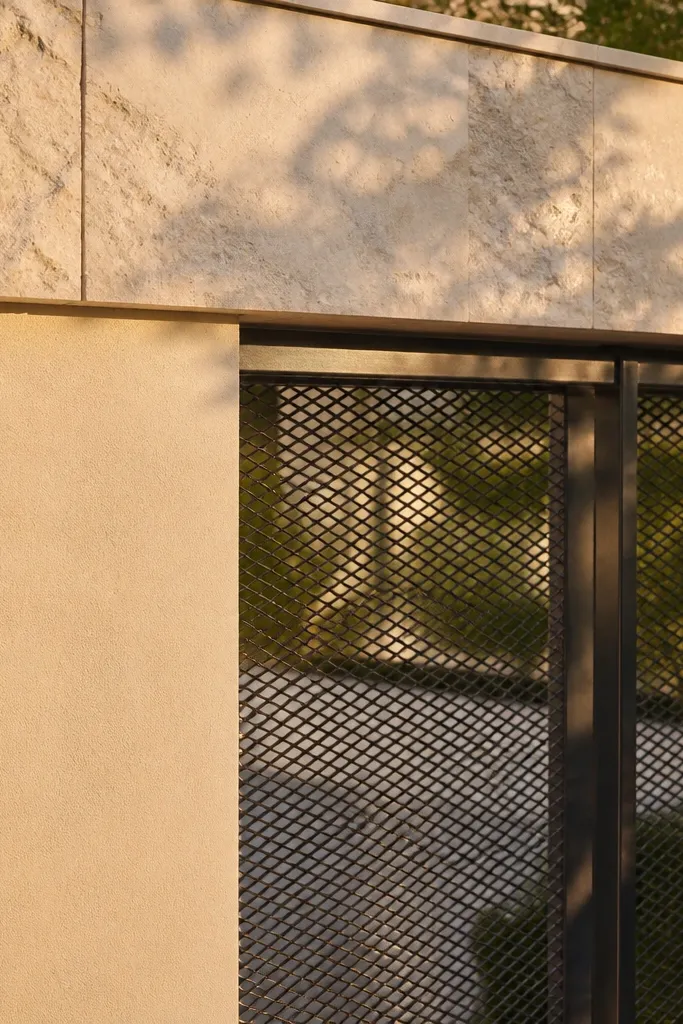
This is a clever mix: keep the wall mostly smooth, then add a limestone-look band that frames the gate area. The mesh gate keeps airflow and visibility while still looking secure. The contrast — stone-like top band and fine mesh texture — creates a premium street view without heavy ornament. It’s a good option for narrow frontages because the mesh pattern doesn’t visually block the entry. Beginners can do this by buying mesh panels and framing them in steel.
Render the wall and build pillars with straight faces, then plan a top cladding band height of about 12 inches. Install limestone-look cladding panels on the band area only, using tile adhesive and level spacers so the pattern stays straight. Build the gate frame and fit a mesh panel inside it, cutting to size and tightening the corners. Install the gate with proper hinge plates and adjust the swing so the mesh doesn’t rub the wall. Seal the cladding band and paint the rest of the wall with a matching exterior finish color.
Editor's noteUse stainless mesh or galvanized mesh behind a powder-coated frame so it doesn’t rust through.
Skip thisDon’t skip sealing cladding joints — water creeping behind panels causes lifting.
10. Chalky beige wall with repeating recessed rectangle gate panels
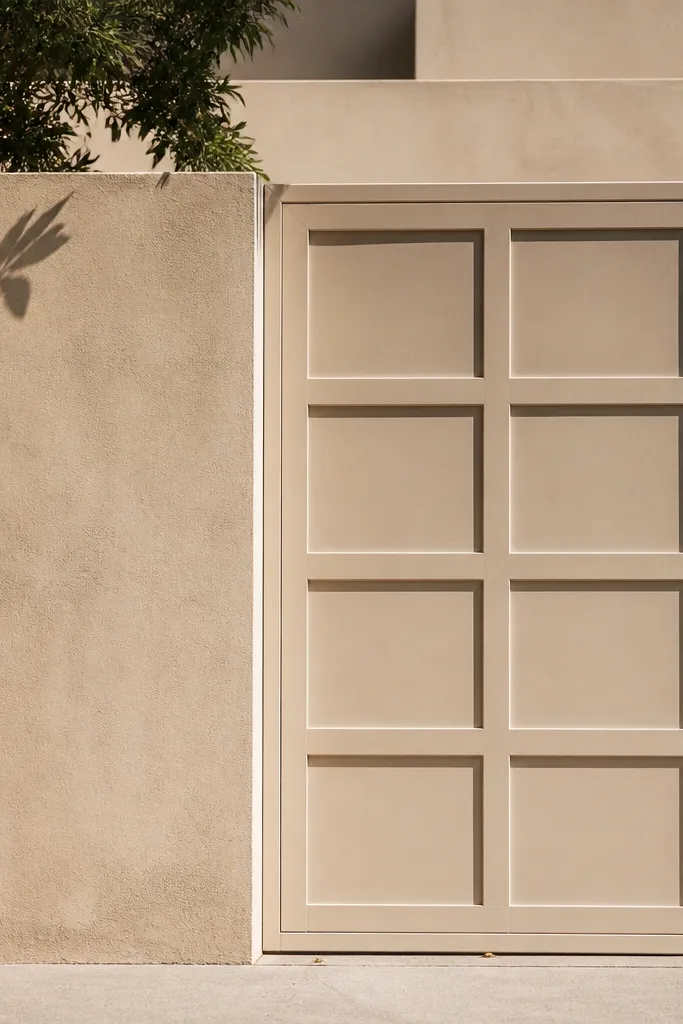
Recessed rectangle panels give a subtle 3D look without complicated scrollwork. Pair chalky beige plaster with a gate that has repeated recessed rectangles and you get a clean, modern aesthetic that still feels warm. The recessed lines catch light differently across the day, which makes this combo look good in both bright and shaded photos. It also works with a simple wall because the gate texture adds depth. Beginners can build it by using a steel frame and welding simple box sections to create the panel recesses.
Plaster the wall in a matte beige finish and keep the coping straight and level. Build pillars and set the hinge and latch openings with square measurement, because recessed patterns look off if the frame is twisted. Fabricate a steel gate frame and weld shallow box frames inside it to form recessed rectangles, keeping spacing equal. Install the gate frame to the pillars with shims and check for even gaps at the sides. Finish by powder-coating the gate and painting the wall after installation so the edges line up cleanly.
Keep recessed depth around 20 to 30 mm; deeper recesses show warping if the frame isn’t rigid.
Don’t use a glossy paint on the gate — matte or satin hides minor weld lines.
11. Smoked grey wall with vertical iron bars and capped pillar tops
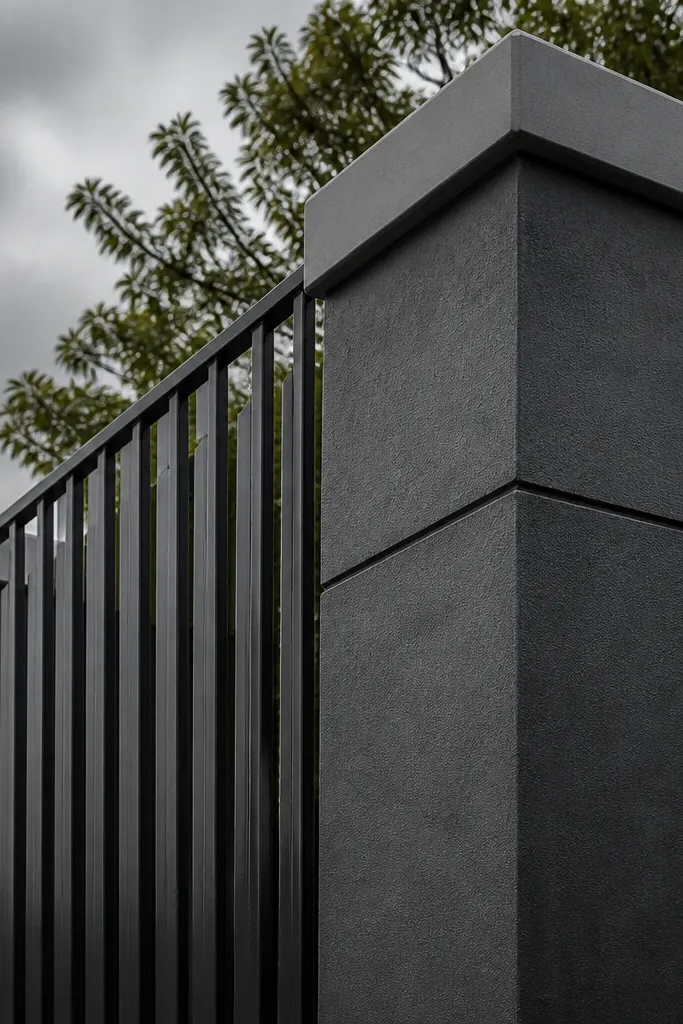
This combo is restrained and strong. A smoked grey wall makes the gate bars stand out, and capped pillar tops add a clean, finished edge. The vertical bar pattern keeps the entry feeling tall and less heavy than a full panel gate. It suits homes with grey, black, or dark wood elements. Beginners can keep it simple: build the wall with cement plaster, then install a gate made from vertical bars welded to a frame.
Render the wall in smoked grey exterior paint, then build pillars with a consistent width at the hinge and latch points. Install coping stones or a cement cap to create a straight top boundary. Fabricate the gate frame and weld vertical bars with equal spacing, then finish with powder-coating in a matching dark grey or black. Anchor hinge and latch plates into the pillars, not just the wall plaster. Finally, paint or seal the wall so it matches the gate tone and resists rain splatter on the bottom line.
Editor's noteUse spacers when welding bars so every gap stays the same — it’s the difference between neat and sloppy.
Skip thisDon’t rely on plaster anchors for hinges — the pillar steel needs a real anchor.
12. White wall with black brick soldier course and arched grill gate
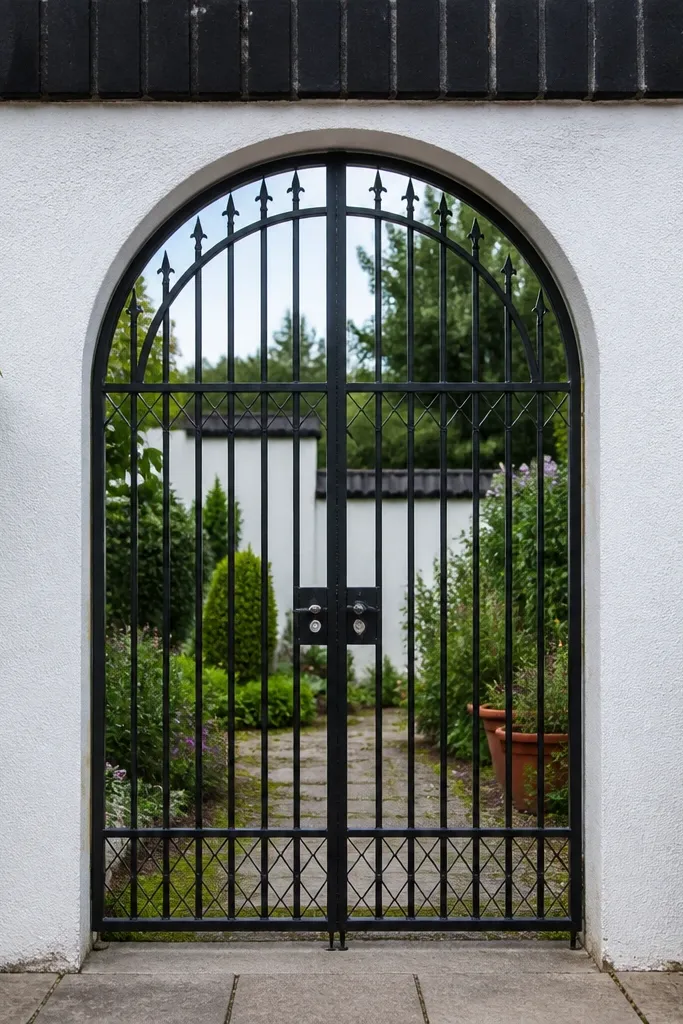
This combo uses a soldier course — a top band of dark bricks laid vertically — to frame everything. On top, an arched grill gate continues the curve and makes the entry look styled rather than plain. The white wall keeps it bright, while the dark band adds contrast right at eye level. It’s a great option if you want something traditional with a cleaner, modern finish. Beginners can build it with normal bricklaying skills and a gate grill that uses a simple arched top rail.
Plaster the wall in white exterior finish and build pillars to a consistent face line. Lay a black brick soldier course across the wall top, keeping the bricks aligned with a string line. For the gate, build a rectangular frame and create an arched top rail using a template, then weld vertical grill bars inside. Install the gate with proper hinge alignment and maintain a consistent clearance from the ground. Finish by sealing the soldier course and applying an exterior topcoat to the plaster.
Use a water-resistant white paint system on the wall so the soldier course doesn’t get stained from splashes.
Don’t make the arched grill too tall — the curve should match the soldier course height, not overpower it.
13. Green tinted plaster wall with matching vertical panel gate
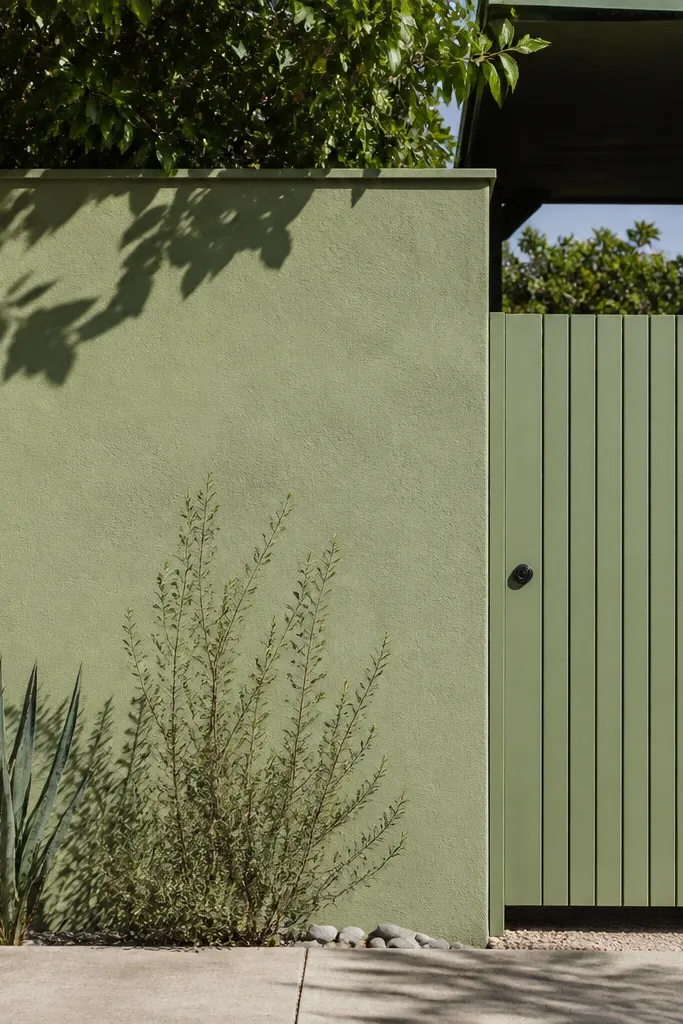
Tinted green plaster is a strong color move that still works with most house palettes. This combo uses a gate with vertical panels or thin slats in the same green family, so the whole front reads cohesive. Because the wall is tinted, you can keep the rest simple — no heavy cladding required. The visual effect is modern and calm, and it hides minor wall imperfections because the color is consistent. Beginners can do it by using exterior tinted plaster paint and a gate with standard panel sections.
Apply green-tinted plaster or exterior paint to the wall, then build pillars and a coping line to keep everything straight. Fabricate a gate frame and install vertical panel sections, leaving narrow gaps so light passes through. Powder-coat the gate in a matching green shade, or paint it with an exterior metal coating if your fabricator already uses that system. Install the gate frame using shims and check vertical alignment with a level. Seal the wall finish so rain doesn’t lighten the bottom area.
Pick a tint with a matte finish — glossy green looks patchy on plaster in sunlight.
Don’t mix green shades between wall and gate — even small differences read as “two projects.”
14. Half-solid gate with glazed tiles inset and brick pillar borders
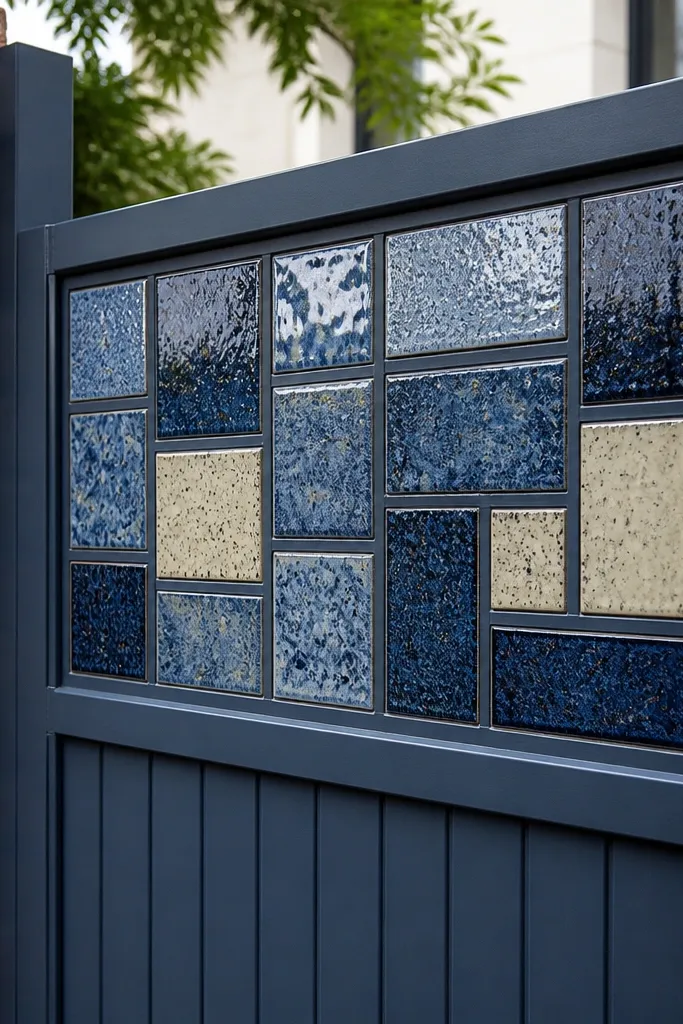
Tile inset panels make the gate look custom without requiring full wall tilework. This combo uses a half-solid gate — sturdy at the bottom, decorative at the top — with glazed tiles set into the frame. Brick pillar borders keep the design grounded and prevent the tile from looking random. It’s especially good for people who want color and pattern but still want a clean, structured look. Beginners can manage this by buying tile sheets or cutting a small tile set and sealing it with proper tile grout and adhesive.
Build brick pillar borders and a simple plaster wall behind them, then add coping stones. Fabricate a gate frame and divide it into a lower solid panel section and an upper tile inset window. Install tile pieces on a cement board or tile backing panel inside the gate frame, leaving a clean grout line, then grout and seal the tile. Paint or powder-coat the frame, and allow full cure before hanging the gate. Anchor the gate frame to the pillars with reinforced plates and check that the tile inset doesn’t hit the wall during swing.
Editor's noteUse exterior-grade grout and a tile sealer — water sits on gates more than you think.
Skip thisDon’t set tiles directly on thin metal without a backing board — they crack from flex.
15. Terracotta pillars with white vertical fence slats and black gate
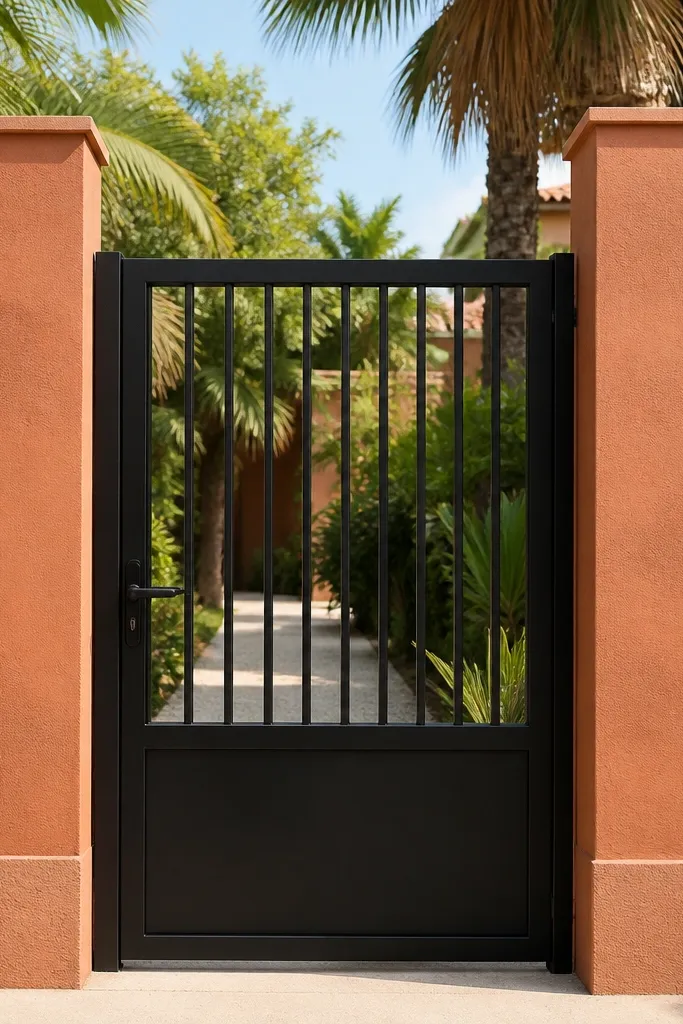
This is a high-contrast combo that stays clean even when the rest of the front is busy. Terracotta pillars look warm and sturdy, while white vertical fence slats add a light, airy texture. The black gate ties the metal look together so nothing feels mismatched. It’s a good choice for houses with neutral facades and a driveway that needs visual separation. Beginners can build the wall with plaster and pillars, then install slats and a gate frame using standard steel.
Construct pillars in terracotta tone using brick or cement render finished to match terracotta paint. Keep the wall plane simple, then add white vertical slats either as cladding panels or as fixed steel slats with a painted finish. Build a black powder-coated gate with a matching slat pattern so it aligns with the wall slats visually. Install gate hinges on reinforced pillar plates and adjust swing clearance so the slats line up at the opening edges. Finish by sealing the terracotta finish and touching up all metal edges after installation.
Align slat spacing across the gate and wall so the pattern continues through the opening.
Don’t alternate slat spacing near the gate — it reads as sloppy workmanship.
16. White plaster wall with thin black border lines and panel gate
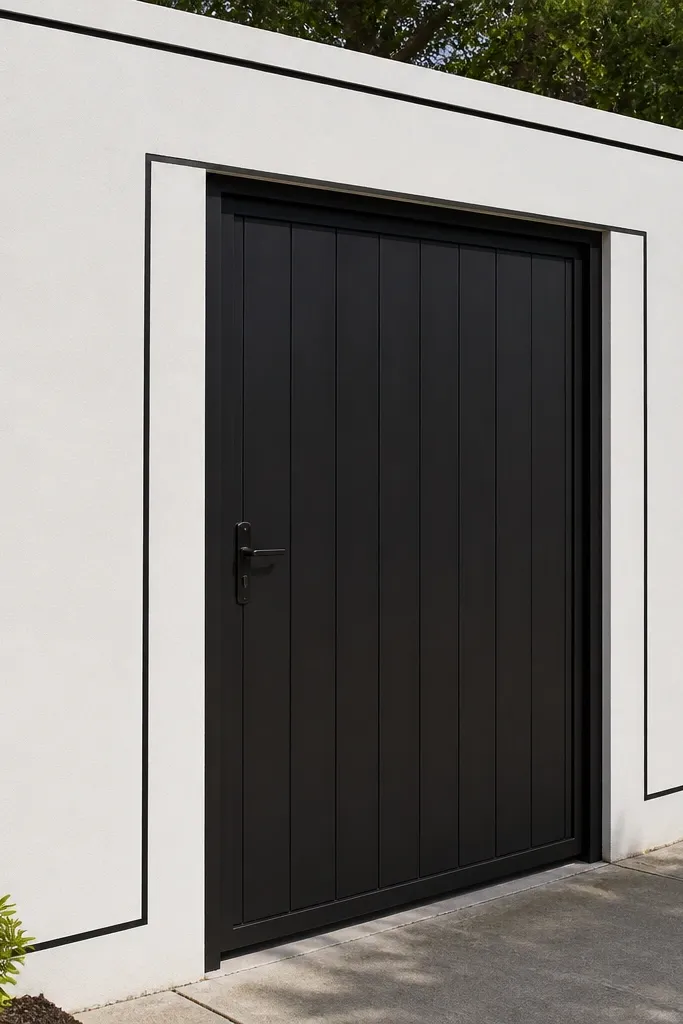
Thin border lines make a plain plaster wall look designed, and a panel gate completes the clean look. The idea is to outline the gate opening area with black trim lines so your eye knows where the entry starts and ends. This combo looks crisp in daylight and looks especially good on houses with white, cream, or light grey facades. It’s beginner-friendly because you can use simple exterior paint lines or thin metal trim strips. The gate itself can be a simple framed panel with a matte finish.
Plaster the wall and paint it white, then mark two thin border lines around the gate opening area using a chalk line. Apply black trim paint or install thin metal trim strips to form a neat rectangle. Build the gate frame with a black powder-coated finish and add a panel infill, keeping edges straight and consistent. Install hinges and latch hardware into the pillar reinforcements and set the frame plumb. Finish by re-checking border lines after any touch-up paint so the gate and trims look aligned.
Editor's noteUse painter’s tape for trim lines and press it firmly to avoid paint bleed under the tape.
Skip thisDon’t make the border lines thick — thick lines make the entry feel heavy.
17. Warm wood-look slat gate with black frame on a light stone wall
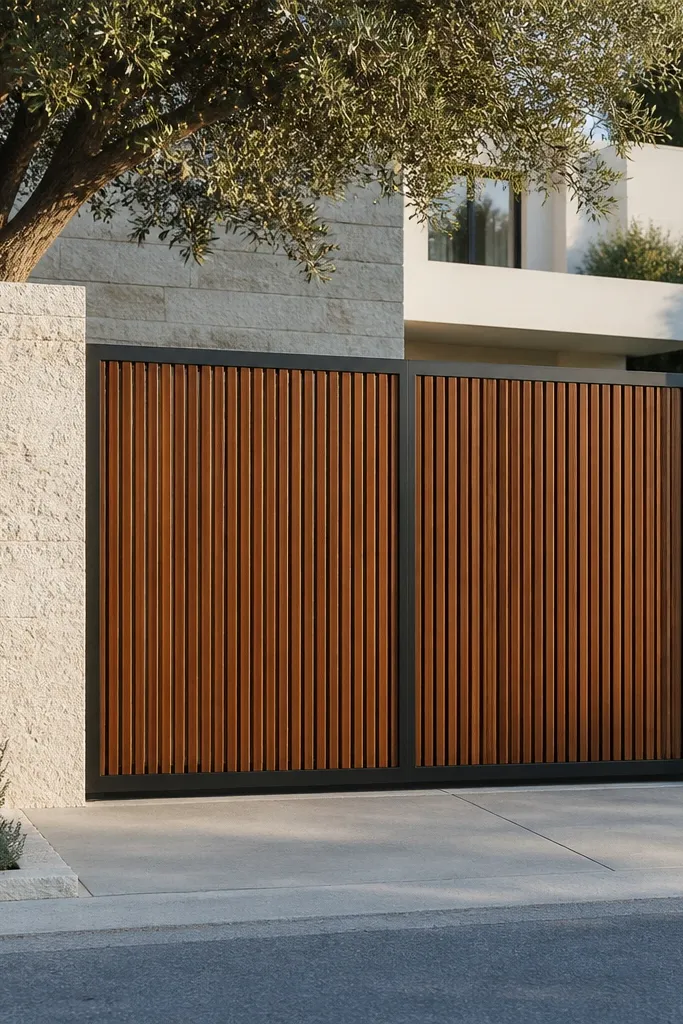
Wood-look slats give warmth while staying durable when they’re powder-coated or laminated on steel. Pair that with a light stone-look wall and you get an inviting entry that still feels secure and modern. The slats are the main visual texture, so keep the wall simple and light. This combo works well for front yards with greenery because the gate blends naturally with plants. Beginners can do it by buying ready-made wood-look slat panels or having a fabricator cut and coat slats to size.
Finish the wall with a light stone-effect cladding or plaster with a stone-texture finish, then install pillars at hinge and latch sides. Build a black powder-coated gate frame and mount wood-look slats vertically, keeping consistent spacing and a straight top rail. Install the frame to the pillars with base plates and adjust alignment before tightening anchors. Add a simple top cap on the gate so water doesn’t sit in the frame. Seal the stone-look wall finish and keep the gate coating touch-ups ready for any scratches after installation.
Editor's noteUse slat lengths that leave a 20 to 30 mm gap above the top rail so water runoff stays clean.
Skip thisDon’t use glossy wood-look coating — it shows streaks and fingerprints more than matte.
18. Black and grey checker tile inset on gate with plain grey wall
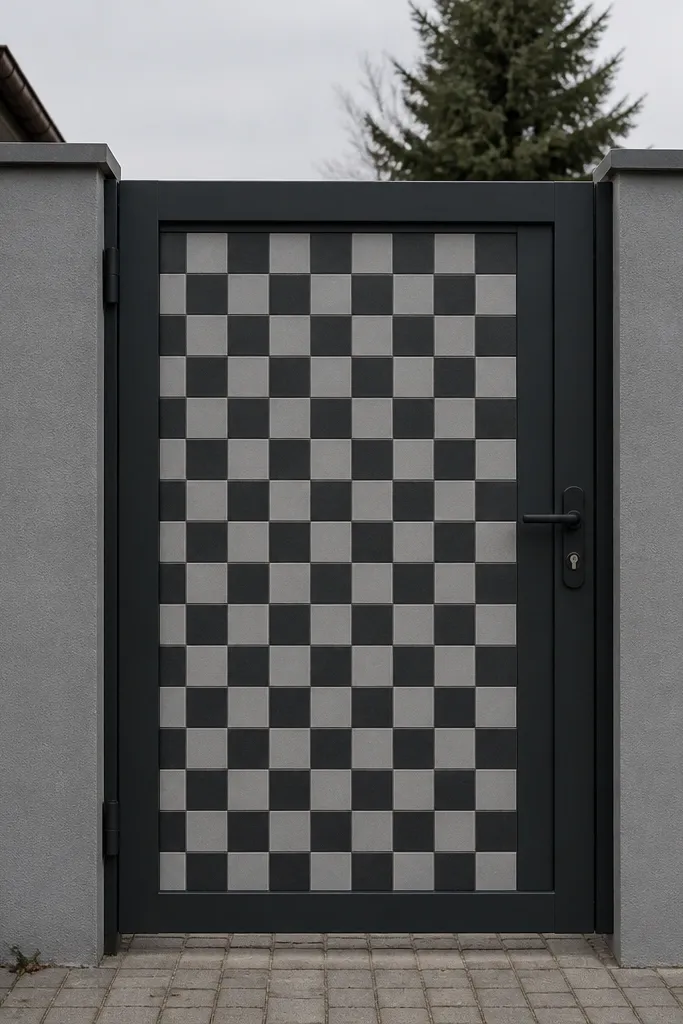
This combo is for people who want a statement without turning the whole wall into a craft project. A checker tile inset on the gate creates a strong focal point, while the plain grey wall keeps the street view clean. The gate needs crisp framing so the tile looks intentional, not like a patch. It photographs well because the tile pattern catches light and creates contrast against the matte wall. Beginners can do this using a small tile panel set inside the gate frame with proper cement board backing.
Render or paint the wall in a matte grey and keep the pillars simple and straight. Fabricate the gate frame with a black powder-coated finish and create a recessed pocket for the tile inset. Install a checker tile panel on a cement board cut to fit, then grout and seal it once cured. Mount the panel back into the gate frame and test the swing clearance before final tightening. Finish by sealing the grout and touching up any exposed metal edges around the tile opening.
Editor's noteUse tile spacers to keep checker squares consistent — a slight mismatch looks obvious in photos.
Skip thisDon’t skip sealing the tile — water in grout lines will discolor the pattern over time.
19. Brick wall with lime-whitewashed pillars and black arched grill gate
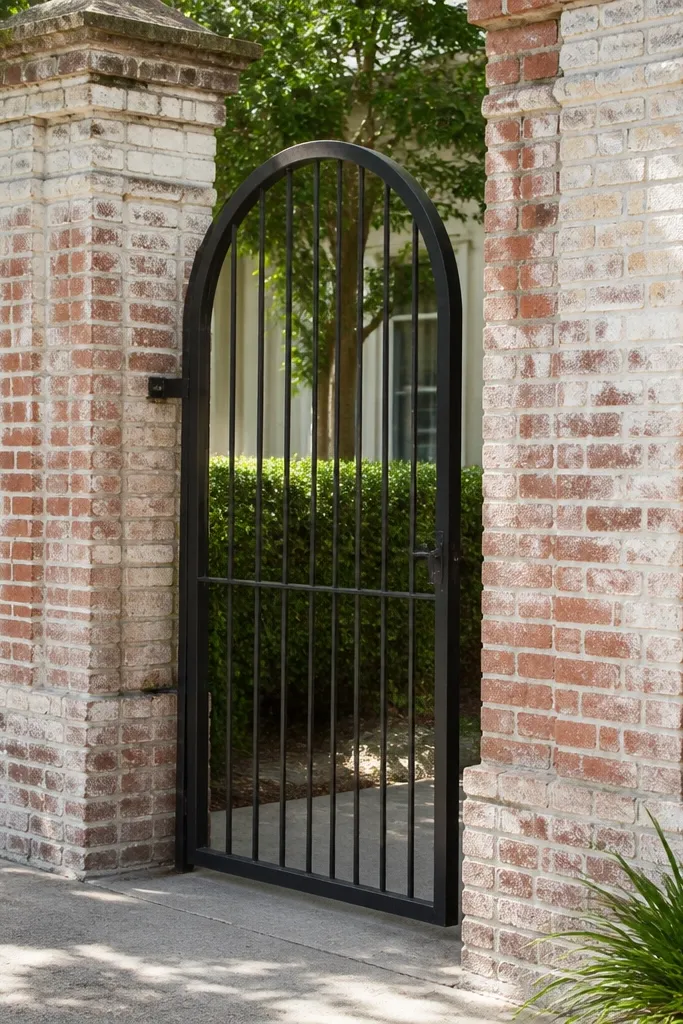
Whitewashed pillars over a brick wall create a classic, sun-worn look that still feels tidy. The black arched grill gate adds structure and keeps the entry from looking rustic in a messy way. This combo is good if you like old-world texture but want the gate to look modern and clean. Beginners can handle it with brickwork and a straightforward whitewash finish, then a gate grill made from welded bars and a curved top rail. The design looks great in warm daylight and looks sharp at night with small lights.
Build your brick wall and keep mortar joints consistent so the base looks even. Whitewash only the pillar faces — use a lime-inspired exterior paint or limewash effect coating made for outdoor use, and apply in thin layers. Install coping stones on the wall top for a clean edge. Fabricate the gate frame in black powder-coat and create an arched top rail, then weld vertical bars inside. Mount the gate to hinge and latch plates anchored into the pillars, then seal any exposed brick edges where splashes hit.
Use painter’s tape to keep the whitewash edge crisp at the pillar edges.
Don’t whitewash the entire wall — the combo loses contrast and looks flat.
20. Grey plaster wall with recessed vertical channel lines and matching gate channels
Channel lines are a subtle design move that makes a plain wall feel architectural. This combo uses recessed vertical grooves on the wall and repeats them on the gate panel area so the entry looks like one system. The grey color keeps it modern, and the recess shadows create depth even without cladding. It’s a good option if you want a monochrome look that still has texture. Beginners can do it by marking grooves and filling them with a thin finishing layer, then building the gate with channel-like panel strips.
Plaster the wall and mark vertical groove lines at equal spacing between pillars, keeping the pattern centered around the gate opening. Use a straight guide and cut thin channels with a grooving tool, then clean dust and fill grooves with finishing compound for crisp edges. Build pillars and add coping so the top line is straight. Fabricate the gate with a frame and install vertical channel strips or recessed panel inserts that match the wall groove spacing. Install the gate frame with shims, then paint the wall and gate in the same grey tone after installation.
Editor's noteMake the groove depth shallow, around 8 to 12 mm, so it doesn’t crack and is easy to maintain.
Skip thisDon’t skip dust cleaning before filling grooves — it causes weak spots and uneven edges.
21. Pale sand wall with dark bronze gate and diagonal cross-brace pattern
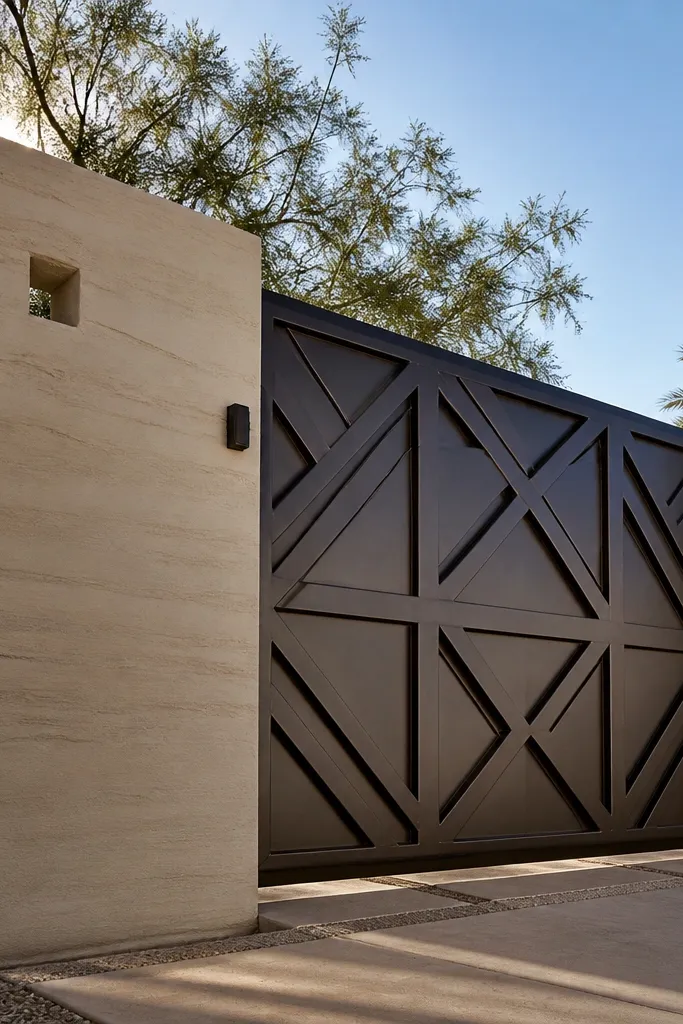
Diagonal cross-bracing adds motion to an entry, and it looks great against a pale sand wall. Dark bronze powder-coating makes the metal look premium without being too flashy. This combo reads secure and structured, and it also adds visual interest without heavy ornament. It’s perfect for beginners who want a strong design feature but still want a gate that’s buildable with standard steel and a template for diagonals. The wall stays soft and light, so the gate becomes the focal point.
Render the wall in a pale sand exterior finish and build pillars with consistent spacing. Install coping stones and keep the gate opening square to avoid diagonal misalignment. Fabricate the gate frame in dark bronze and add diagonal cross braces inside the gate panel area, using a paper or metal template to keep angles identical on both sides. Install hinges and latch plates into pillar reinforcements and hang the gate with even gaps on both edges. Finish by sealing the wall and touching up any coating scratches around weld points.
Editor's noteMark the diagonal angle once on cardboard and hand it to the welder — it reduces “almost” alignment.
Skip thisDon’t use random diagonal spacing — uneven braces make the gate look handmade in a bad way.
22. Two-tone wall: cream base with terracotta pillar caps and black grill gate
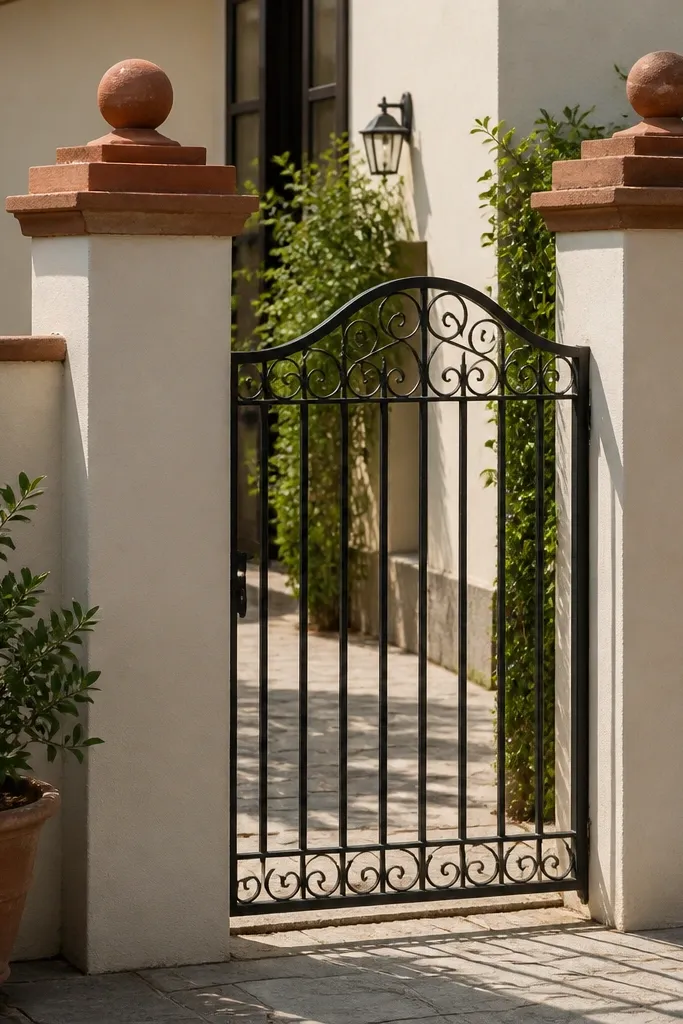
Two-tone walls make the entry look layered, not flat. This design keeps a cream base for cleanliness and adds terracotta caps on the pillars for warmth. A black grill gate ties the metal look together and prevents the terracotta from looking too orange. It’s beginner-friendly because you’re only painting and capping pillars, not building complicated textures across the wall. The grill keeps the gate light visually while still looking secure. This combo also looks good when you add small uplights on the pillars.
Render or plaster the wall in cream and let it dry fully before painting. Build pillars and finish them with terracotta-colored caps — either as cement caps or cladding pieces, aligned across all pillars. Fabricate a black powder-coated gate with vertical grill bars and a simple top rail that matches the pillar cap height. Install the gate frame with base plates and keep the hinge side perfectly plumb. Finally, paint touch-ups on the pillars and seal the terracotta finish to prevent fading.
Editor's noteUse a slightly matte cream paint so it doesn’t glare in photos and hide wall texture.
Skip thisDon’t mix terracotta shades between caps — they look inconsistent even if the wall is neat.
23. Limewashed brick pillars with a dark steel tongue-and-groove gate
This combo looks expensive because the gate has tight, repeated lines like a piece of furniture. Limewashed brick pillars give you soft texture and a slightly irregular, lived-in finish that hides minor construction imperfections. Use a dark steel tongue-and-groove style gate so the whole thing reads solid from the street, not flimsy. It also solves a common problem: narrow openings look awkward, but a thicker, paneled gate face makes the proportions feel intentional. Beginner-friendly if you’re comfortable with basic framing and mounting hinges; you’re mostly building a gate panel and anchoring it cleanly to brick. It suits driveways and side entrances where you want privacy without turning the front yard into a closed-off wall.
Step 1: Build the compound wall to your chosen height, then set two steel base plates into the mortar joints on each pillar side where the gate will hang. Use 100x100mm brick piers or form concrete pier cores inside the brick so you have something solid to fasten to. Step 2: Fabricate the gate frame from 40x40x3mm square steel, then weld an outer face of 16mm wide steel “tongue-and-groove” strips (or cut strips and weld them in alternating spacing) to match the frame perimeter. Make the gate leaf width 30-50mm narrower than the clear opening so it closes without rubbing, and hang it with 2 heavy strap hinges plus a gravity latch. Step 3: Prime and powder-coat the steel, then apply limewash on the brick pillars only after the steel is fully protected from splatter; finish with a clear breathable sealer if your weather is wet.
Before you weld the gate face, clamp a straight 2m level along the frame to keep the panel lines dead straight. It’s the difference between “nice DIY” and “shop-made.”
Don’t mount hinges directly to weak, shallow brick mortar — anchor to steel plates or a concrete core.
24. Terracotta cassette wall with a vertical ribbed privacy gate
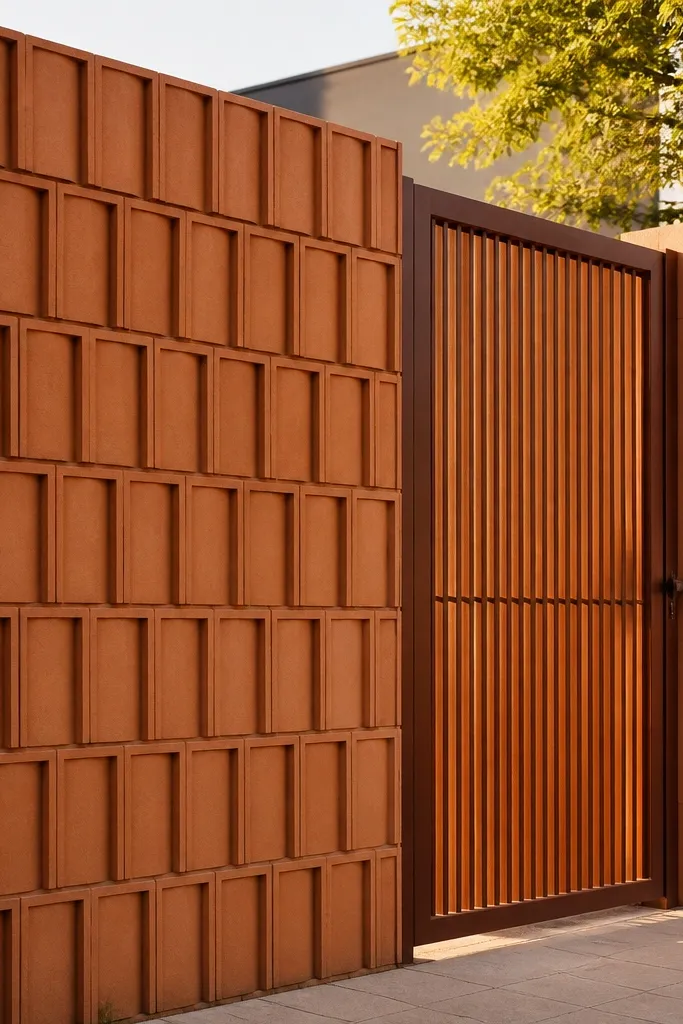
This is a bold, modern look that still feels warm because the wall is built from repeating terracotta cassettes. The gate matches the wall rhythm with vertical ribs, so the whole property reads like one design instead of separate parts. It’s a great choice when you want privacy but still want light and airflow — vertical ribs block views while letting shadows create movement. You also get a clean, beginner-manageable build because you can form the wall texture using simple formwork or pre-made blocks. Time-wise, plan on 2-3 weekends if you’re doing it yourself, mainly because the wall texture takes longer than a flat render. It fits Mediterranean yards, courtyards, and homes with warm exterior paint or wood tones.
Step 1: Lay a straight compound wall using concrete blocks or brick, then create the cassette pattern with thin formwork strips or by using hollow terracotta blocks with square recess faces. Keep the recess grid consistent — a 300mm repeat works well visually and is easy to measure. Step 2: Build the gate frame from 50x50mm steel and weld vertical ribs from 12mm flat bar, spaced 40-60mm apart depending on how much privacy you want. Add a top rail and bottom rail so the ribs don’t flex, then install hinges on a reinforced gate post section (steel inside the pillar or a concrete-filled pier). Step 3: Finish the wall with a terracotta-colored render or grout into the recess edges, then prime the gate and coat it in matte dark bronze or deep charcoal. Install a floor guide or stop block to keep the gate aligned during closing.
Editor's noteMark your rib spacing with a simple jig made from scrap wood — one cut length gives you consistent gaps the whole gate.
Skip thisDon’t eyeball the cassette grid — inconsistent recess sizes make the whole facade look “DIY messy.”
25. Sandstone render wall with a arched-top aluminum mesh gate and black frame
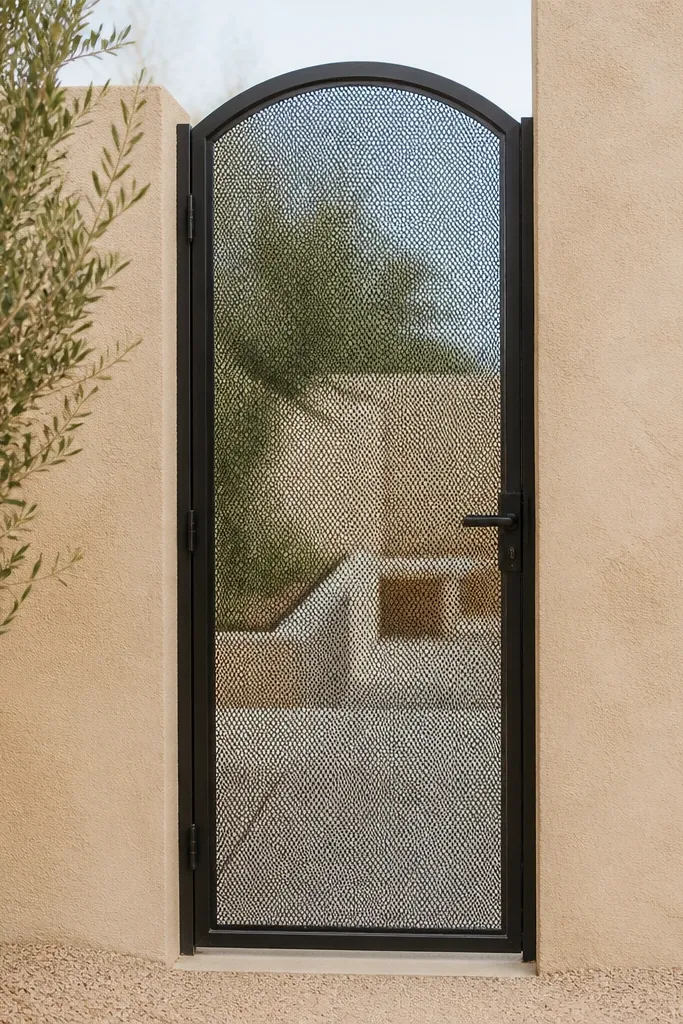
If you like the airy look of a grill gate but want it to feel softer than sharp iron bars, this combo nails it. The sandstone render gives a warm, chalky texture that photographs well, and the arched-top aluminum mesh keeps the silhouette light. You get a clear boundary without turning the entrance into a heavy slab of metal. It also fixes a practical issue: mesh gates resist wind load better than dense slats, so the frame stays straighter over time. This is beginner-friendly if you buy a pre-cut arched frame kit or have a local metal shop cut the frame pieces — your main work is anchoring and lining up. Great for narrow frontages where you want the gate to look refined without blocking light.
Step 1: Finish the compound wall with a sand-textured render (use a base coat, then a sand finish top coat) and add a thin coping band on top so water runs off cleanly. Build the gate opening with straight, plumb sides because mesh frames show uneven gaps. Step 2: Install a black aluminum or steel gate frame with an arched header — use 40x20mm rectangular tubing for the frame, then attach an arched aluminum mesh panel with stainless screws and rubber edging strips. Set the clear opening so the gate leaf overlaps the opening by 15-20mm on both sides for a neat shadow line. Step 3: Hang the gate with adjustable hinges, add a latch at mid-height, and fit a bottom sweep or guide to prevent sagging. Seal the render fully and keep the gate hardware under a protective coat so rain doesn’t dull the finish.
Ask your supplier for mesh panels with a neat edge fold; it makes the gate look clean and prevents sharp trim lines.
Don’t skip a plumb check on the gate opening — mesh frames don’t hide crooked installation.



