
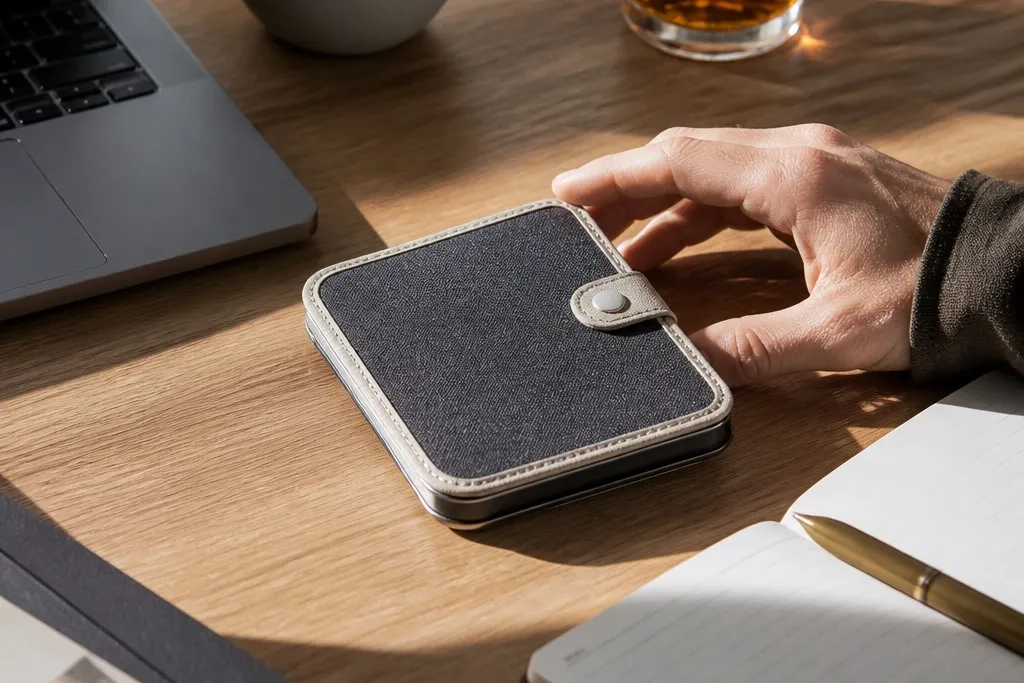
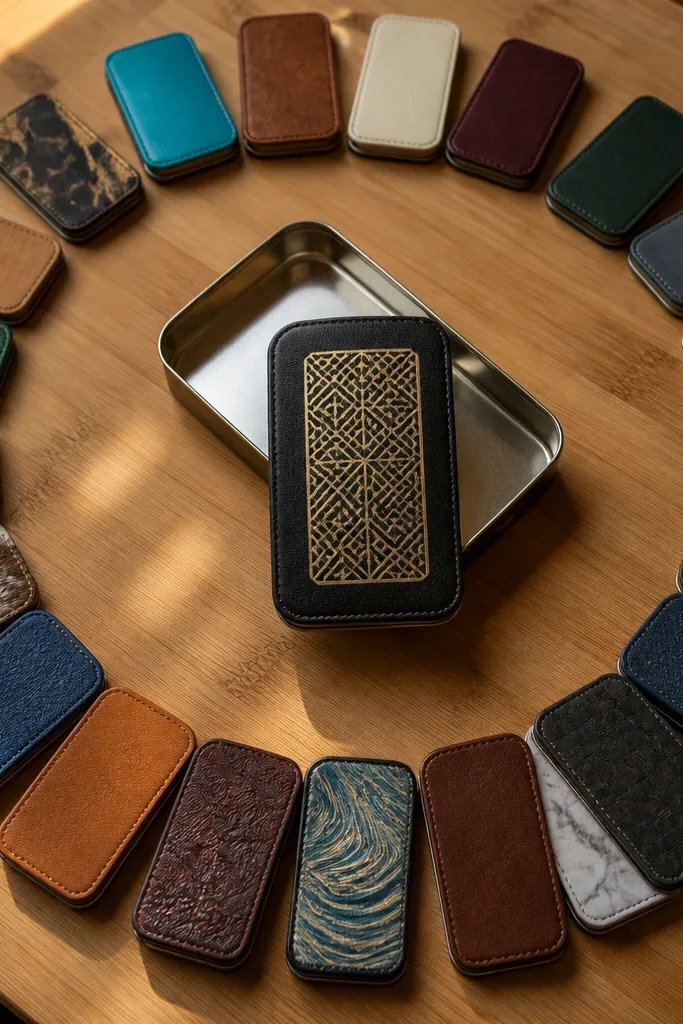
1. Saddle Brown Leather Wrap with Brass Bar Stitching
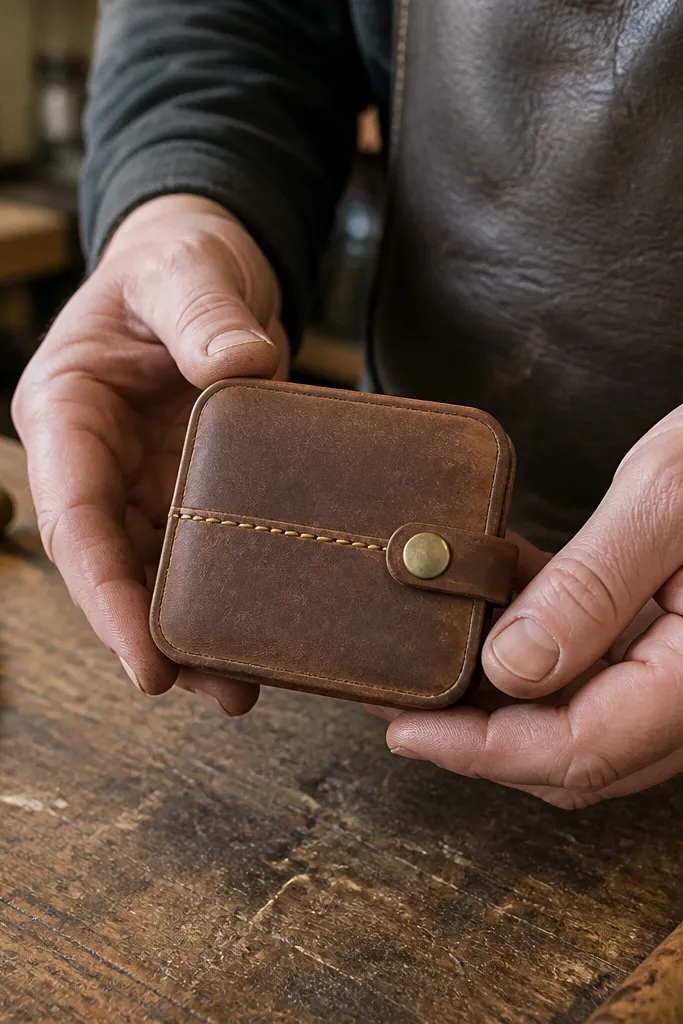
Cut two identical outer panels from leather-look material using the tin outline plus a 3 mm edge lip on all sides. Add a thin layer of 2 mm EVA foam behind the panels so the front stays flat. Apply contact cement to the foam and press the outer skin tight, then fold and glue the edges underneath. Install a single snap button centered on the front panel and a matching snap receiver on the back panel. Finish by using a brass paint pen or metallic fabric paint to create two straight “bar” lines above and below the center snap area.
This look is clean and expensive-looking without needing complicated art. Saddle brown hides scuffs well, and the brass-toned bar stitching gives a straight, graphic line that reads fast in photos. The cover stays structured because leather (or quality faux leather) holds shape better than thin fabric. Add a simple snap closure centered near the top and you get symmetry, which makes the whole wallet feel designed. This is a great choice for everyday carry because it looks good even when it’s slightly worn.
Skip thisDon’t use flexible, thin vinyl for a wrap — it wrinkles around corners and makes the front look uneven.
Editor's noteEdge-paint the folded edges with brown acrylic mixed with a little matte medium so the seam disappears.
2. Black Canvas with White Sailor Stripe Topstitch
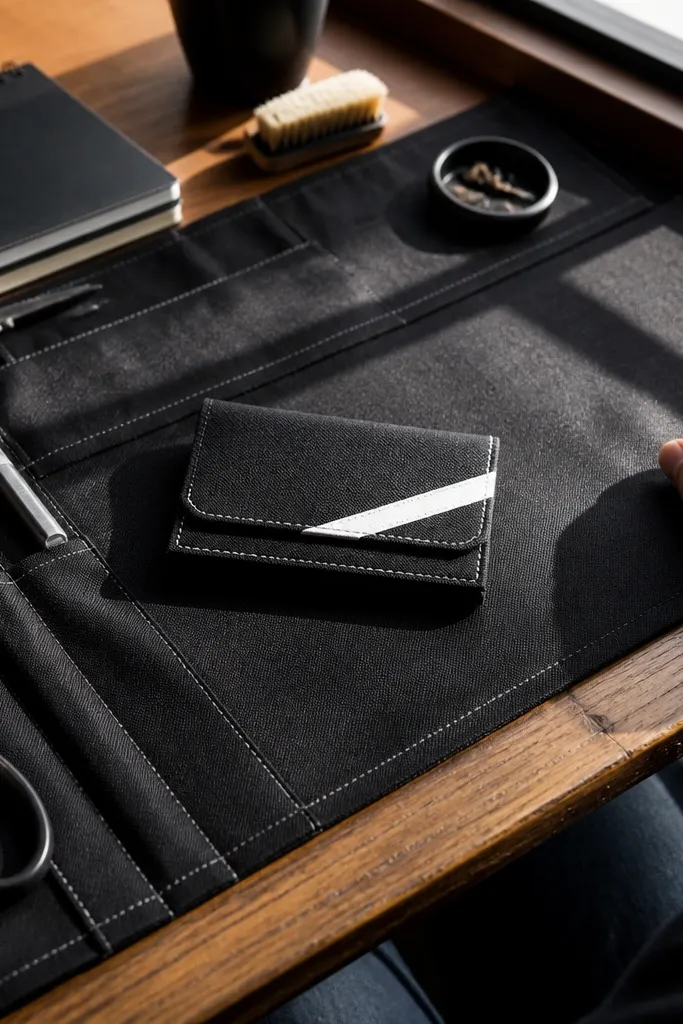
Choose black cotton canvas and cut a front face panel sized to cover the tin plus a 3-4 mm border. Cut a second backing panel from the same canvas to create a stiff sandwich, then stitch them together. Mark a diagonal stripe using chalk — about 18 mm wide — and sew it down with white thread using a straight stitch. Build the wrap and bind the edges with a narrow canvas strip folded over raw edges. Add a magnetic snap closure so the front lies flat.
Canvas gives you that sturdy, matte look that photographs well, especially when you add high-contrast stitching. A white diagonal stripe breaks the monotony of black and makes the cover look graphic instead of plain. Topstitching makes the edges feel engineered, not glued. Use a canvas that has enough body to resist creasing, and you’ll get a cover that holds its shape. This design suits desks, bags, and anyone who likes a nautical, minimal style.
Skip thisAvoid stretchy canvas — it distorts the stripe when you pull the wrap tight.
Editor's noteUse a denim needle and 40-weight white thread for clean lines on canvas.
3. Forest Green Waxed Canvas with Copper Eyelet Lacing
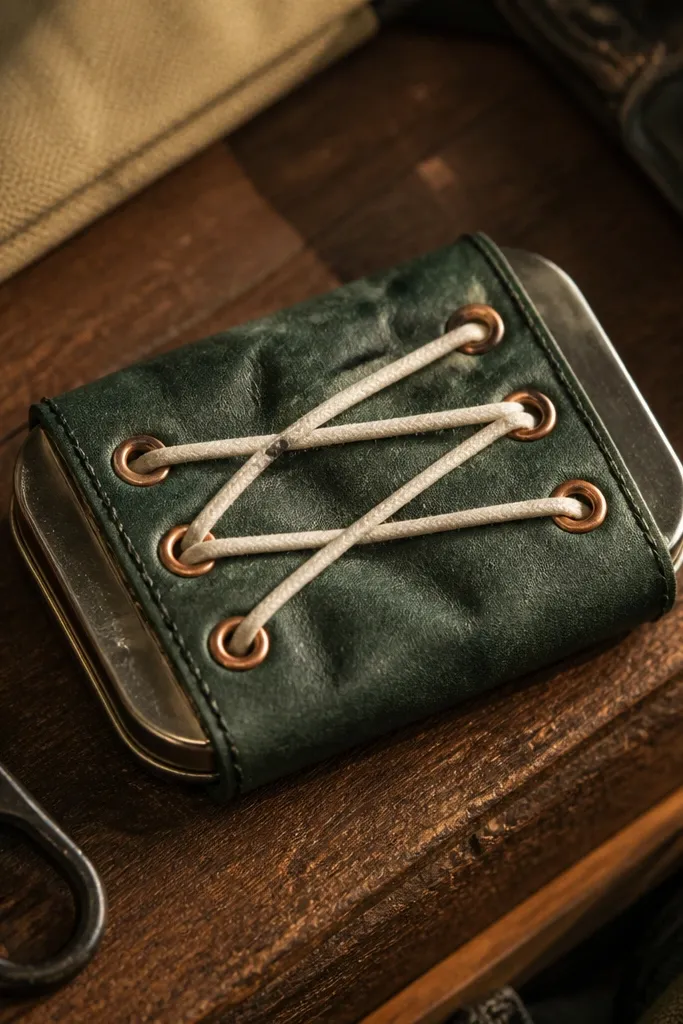
Cut a structured base using 2 mm EVA foam shaped to the tin, then cover it with waxed canvas. Mark and install copper eyelets in a vertical row on the front panel — 5 eyelets spaced about 20 mm apart. Punch corresponding holes on the back panel for the eyelets to seat through or use a top-only eyelet set with a lace path. Thread waxed cotton cord or flat leather lace through the eyelets in a simple crisscross. Seal the edges by folding canvas over the foam and gluing the underside with fabric glue.
Waxed canvas looks rugged and intentional, and it naturally resists wrinkling compared to regular fabric. Copper eyelets add warm metallic contrast against green and make the closure look like gear. The lacing gives you a strong focal point without needing artwork. This is a good choice if you want the cover to feel secure and decorative at the same time. It also hides small alignment issues because the lacing pulls the front into place.
Skip thisDon’t lace too tight on the first pass — waxed canvas stiffens and can buckle if tension is high.
Editor's noteIf the waxed canvas frays, dab a tiny amount of clear glue on punched holes before inserting eyelets.
4. Oxblood Leather with Contrast Stitching and Corner Studs
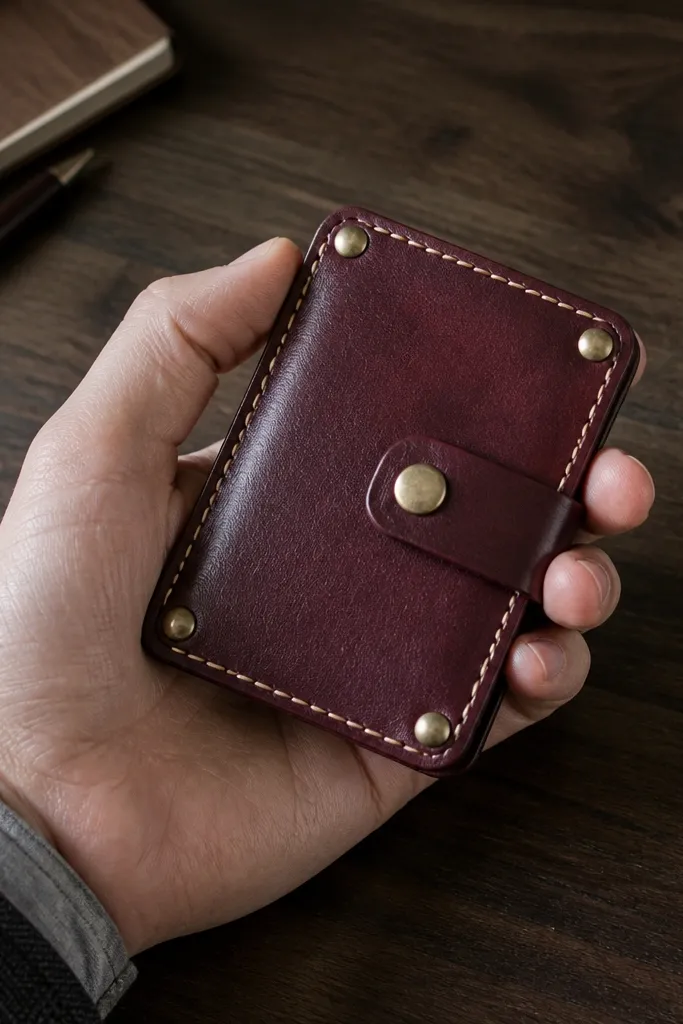
Oxblood leather looks deep and classy, and contrast stitching makes it look handcrafted instead of store-bought. Corner studs turn the corners into design points, which is exactly where most DIY covers look sloppy. This cover style hides minor bulk because studs visually “finish” the corner. It’s also durable: studs protect the highest-wear spots when it’s tossed in a bag. This one is for a clean, dramatic look without busy patterns.
Cut your outer leather-look material and an inner foam layer, leaving a 3 mm edge lip. Use a stitch guide tape to keep parallel lines even — one line about 6 mm from the edge on each side. Mark stitch holes with an awl at 4-5 mm spacing and stitch with cream thread. Install four small corner studs near each corner seam, keeping them symmetrical — about 10 mm from each edge. Finish edges by burnishing with a leather edge slicker or rubbing with a little wax.
Do a test stitch on scrap first and adjust tension so the thread sits flat, not bunched.
Skip the stretchy “leatherette” that tears at stitch holes — it looks puckered in the final photos.
5. Denim Patchwork Panel with Frayed Edge Frame
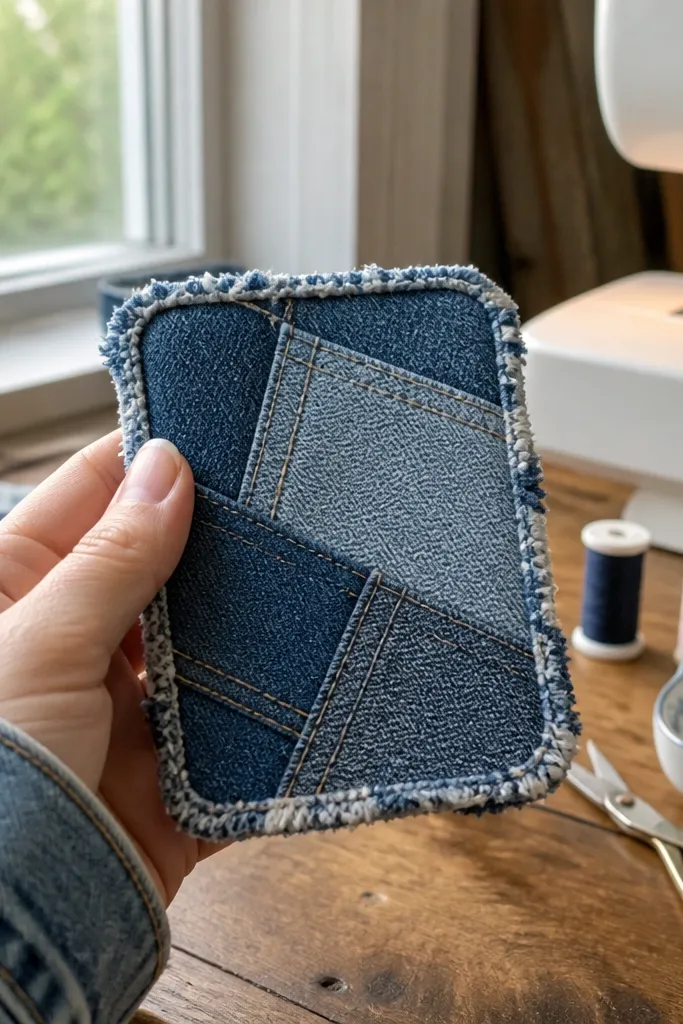
Cut a front face panel from 2 mm EVA foam sized to the tin plus a 3 mm border. Cut 3 denim rectangles for the patchwork, then arrange them on the foam and trace the outlines. Glue the denim pieces down one by one with contact cement, then trim edges so there’s a consistent 6-8 mm denim overlap for the frame. Add a border strip of denim around the entire face and leave a controlled fray — pull two or three warp threads and stop. Seal the back and edges with fabric glue so the foam doesn’t show through.
Patchwork denim gives you texture, color variation, and a handmade vibe that always reads well in photos. The trick is not to overdo the pattern — use 3-4 denim pieces maximum and keep the layout tight. A frayed edge frame makes the cover look intentionally distressed rather than unfinished. This style works great if your goal is “looks like it belongs in a fashion shoot,” not “craft project.” It also ages nicely because denim gets better with scuffs.
Skip thisDon’t use too many washes — it turns into noise and kills the clean outside look.
Editor's noteUse light and medium wash denim together; the contrast makes the patchwork look crisp, not muddy.
6. Minimal Monogram Cover with Faux Leather Lettering
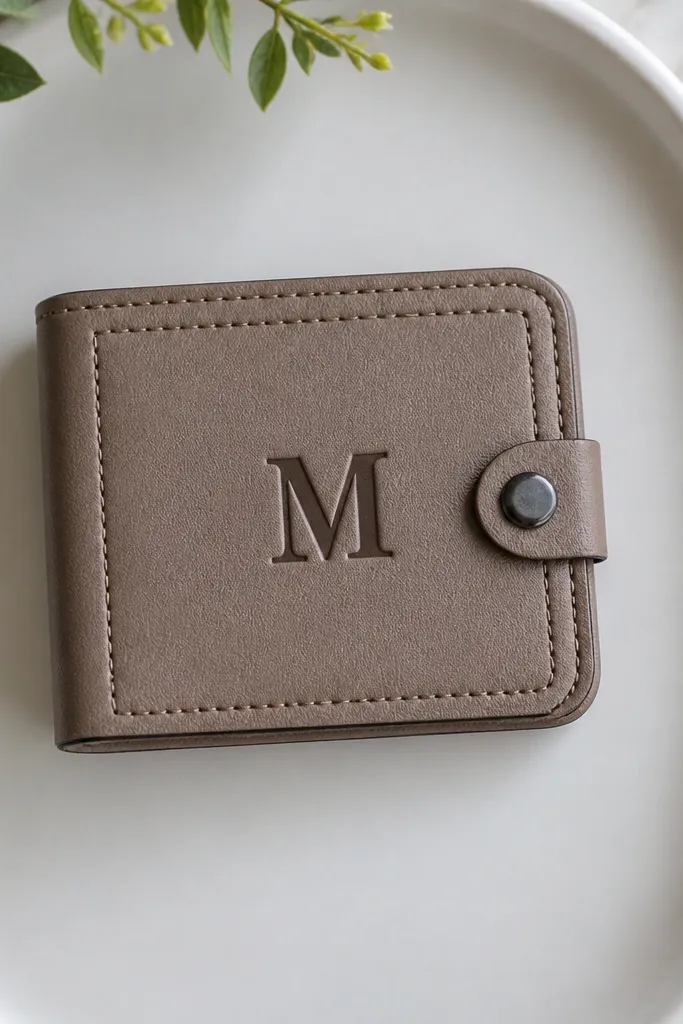
Choose a base color like tan or cream for the cover and cut a front panel with a 3 mm edge lip. Create a monogram using faux leather sheets cut with scissors or a craft knife, then sand the back lightly so glue grabs. Glue the monogram centered on the front panel and press under a book or clamp for 30 minutes. Add a thin border line around the face using fabric paint or a narrow leather strip, keeping it 8-10 mm from the edge. Use a magnetic closure to keep the front flat and avoid bulky hardware.
This is the “quiet but expensive” look. A single monogram gives instant identity and keeps the cover from looking like random scraps. Faux leather lettering is photogenic because it has a smooth surface and sharp edges. Pair it with a simple border seam and you get a finished, graphic front. It suits people who like clean design and want the wallet to match notebooks, bags, and desk accessories.
Skip thisAvoid glitter vinyl — it looks messy up close and sheds on contact.
Editor's noteSeal the faux leather lettering edges with a thin coat of matte Mod Podge so they don’t curl.
7. Marble-Effect Vinyl Cover with Black Edge Binding
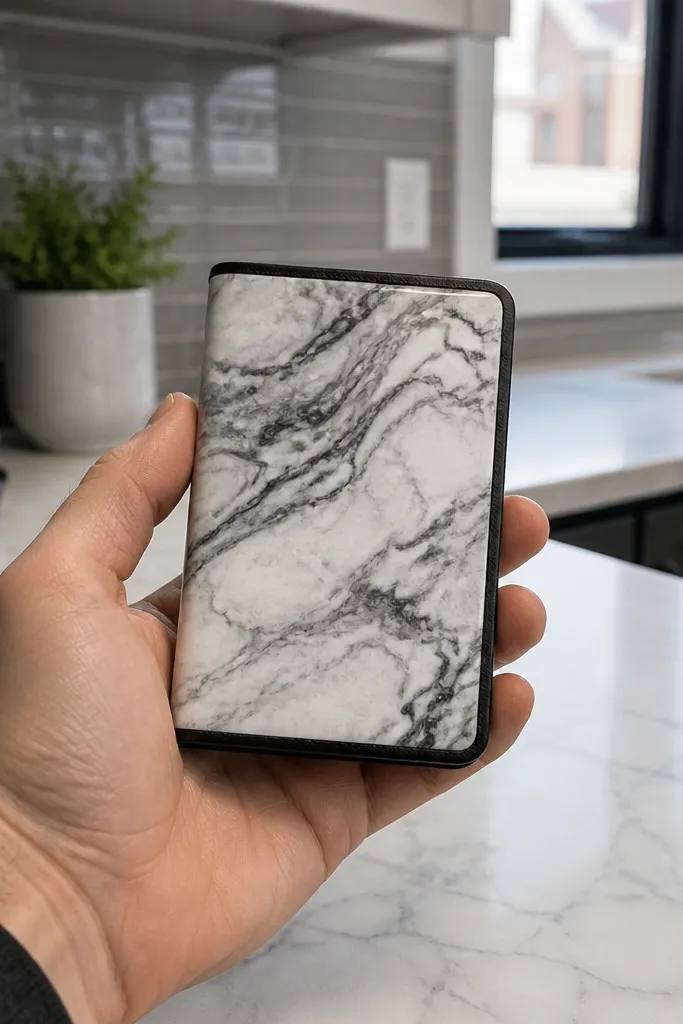
Cut a foam base (2 mm EVA) to the tin size and cover it with marble-effect vinyl using contact cement. Trim vinyl edges cleanly, leaving a 3 mm lip only where you’ll hide it under binding. Cut black bias tape or thin faux leather strips for binding and wrap over the raw edges, gluing the underside. Sew or hand-stitch the binding along the front edge using black thread for a crisp line. Install a small snap magnet closure near the top center to keep the front smooth.
Marble-effect vinyl looks sharp because it creates a high-contrast surface with natural-looking movement. The key is to add black edge binding so the marble pattern doesn’t look like a sticker. Binding makes your corners look intentional and gives a crisp frame. This cover style is great for clean modern aesthetics and looks great on dark desks. It also takes less time than painting, so you get a polished result fast.
Skip thisDon’t skip edge binding — marble vinyl alone looks like a temporary cover.
Editor's noteWarm the vinyl slightly with a hair dryer so it conforms to corners without wrinkling.
8. Concrete Gray Felt with Leather Tab Closure
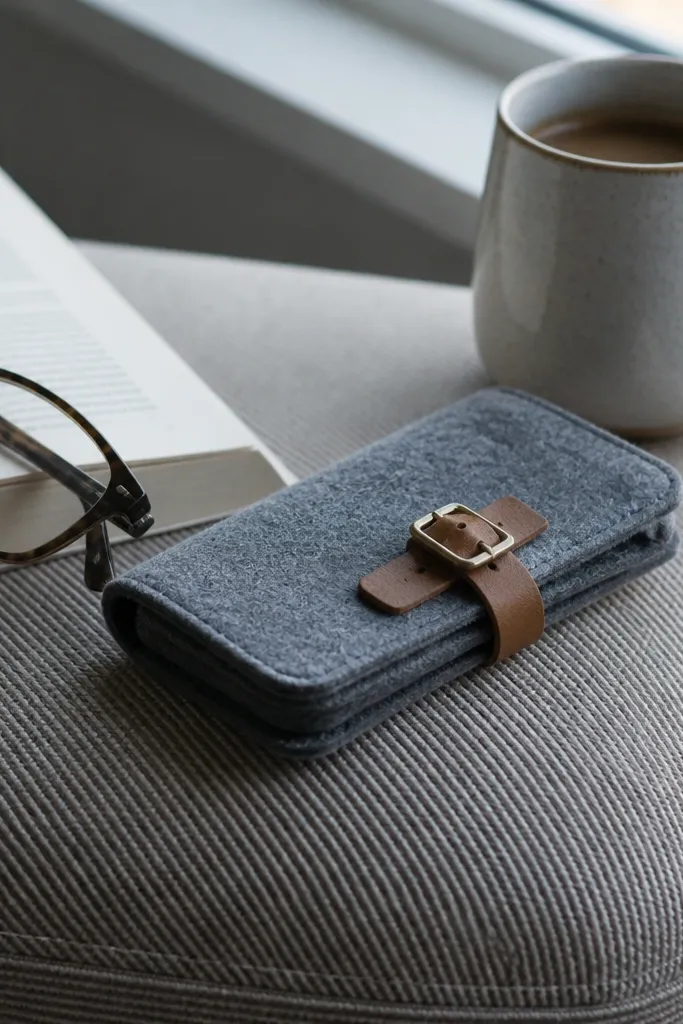
Cut felt panels for the front and back and add a 2 mm EVA layer for structure so it doesn’t flop. Cut a leather tab strip sized about 20 mm wide and glue it to the front panel inside the top area. Mark and punch a series of holes in the tab — 3 holes spaced 6 mm apart. Attach a small brass buckle receiver to the back panel so the tab can loop through. Wrap and glue felt edges under a thin strip of leather or fabric binding for clean corners.
Felt is cozy, matte, and forgiving — it hides glue lines and small cutting mistakes. The concrete gray keeps it modern, and the leather tab adds a structured accent with a warm color break. A tiny brass buckle makes the closure look like a tiny accessory, not a craft afterthought. This design suits slow mornings, reading nooks, and anyone who wants the cover to feel soft but still look designed. It’s also quiet in a bag because felt doesn’t scratch like hard plastic.
Skip thisAvoid thin craft felt — it pills and looks fuzzy where you want crisp edges.
Editor's noteUse a fabric glue that dries flexible, or the felt edges can stiffen and crack at corners.
9. Red Plaid Flannel with Double Welt Pocket Front
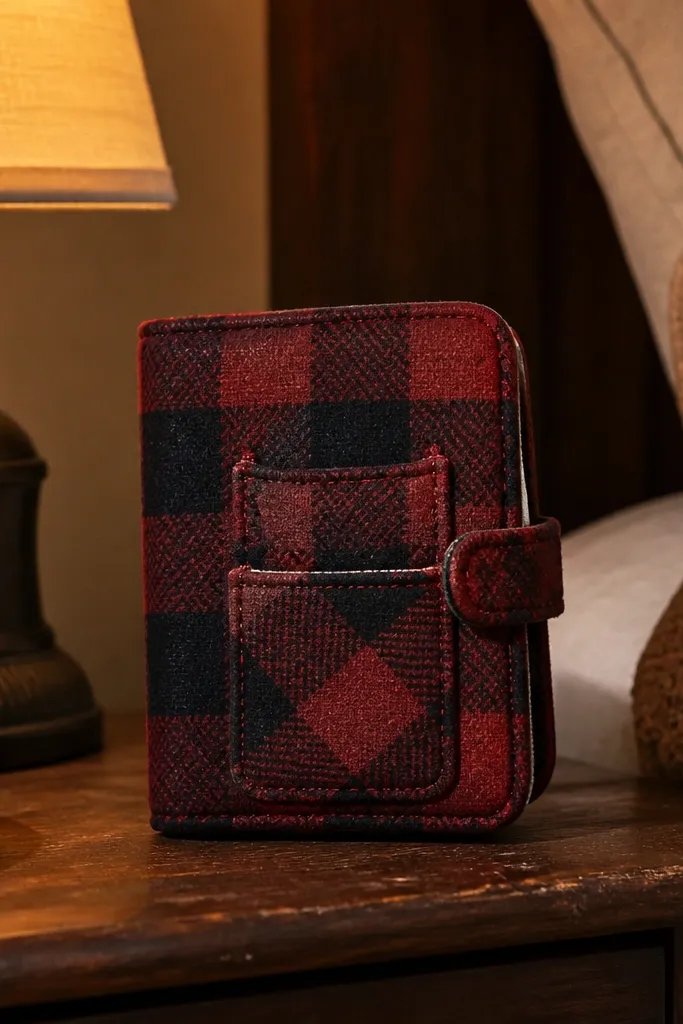
Cut a structured base from 2 mm EVA and cover it with flannel so the pattern stays aligned on the front. Create two welt pocket openings by cutting small rectangles and sewing welt cords along the edges. Stitch pocket flaps or edges so they sit flat, then attach a small button closure centered below the pockets. Use a matching thread color and keep stitch spacing consistent — about 3 mm. Finish edges with a folded flannel binding strip to hide raw seams.
Flannel plaid looks warm and photogenic, and welt pockets make it look like a miniature jacket. The double welt front adds depth without needing complicated sewing patterns. Choose a plaid with big blocks (not tiny micro-plaid) so it’s readable at a glance. This design is great for people who want their Altoids Wallet to look like a character accessory. It also gives you practical organization on the front side.
Skip thisDon’t use a fine, slippery flannel — welt pockets shift and end up crooked.
Editor's notePress the flannel with steam before cutting so plaid lines stay straight across panels.
10. Black-and-Gold Geometric Foil Paper with Clear Top Coat
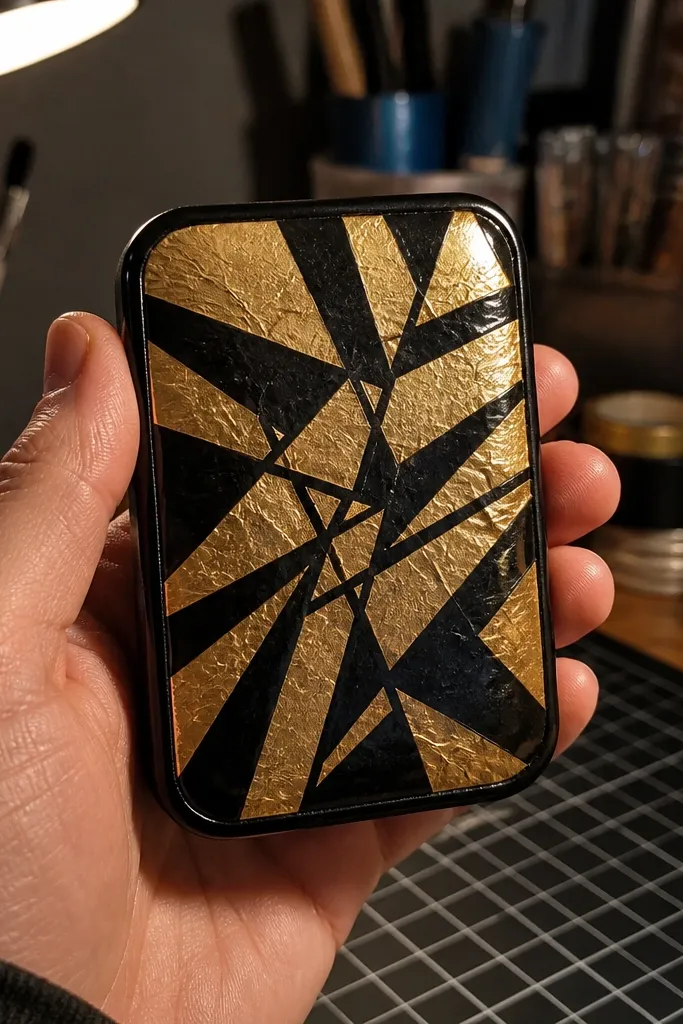
Foil paper makes the cover look like a designer stationery piece. The gold geometry pops hard under light, which is exactly what you want for aesthetic DIY. The real trick is sealing: if you don’t seal it, corners wear fast and the surface scratches. A clear top coat keeps the design crisp and makes the cover feel “finished,” not like paper glued to foam. This suits modern, glam, and giftable styles.
Cut 2 mm EVA to tin size and cover it with your foil paper using thin, even contact cement. Trim the paper flush so it doesn’t buckle at corners. Apply a clear top coat in two thin layers — use a brush and keep strokes light to avoid streaks. Let it cure fully between coats so the surface doesn’t stay tacky. Install a magnetic closure and add a thin black edge binding so the paper edges look clean.
Do a small test on scrap foil paper to check if the top coat dulls the shine before coating the whole cover.
Avoid thick glue layers — they create bumps that show through the foil.
11. Navy Leather with White Nautical Rope Knot Accent
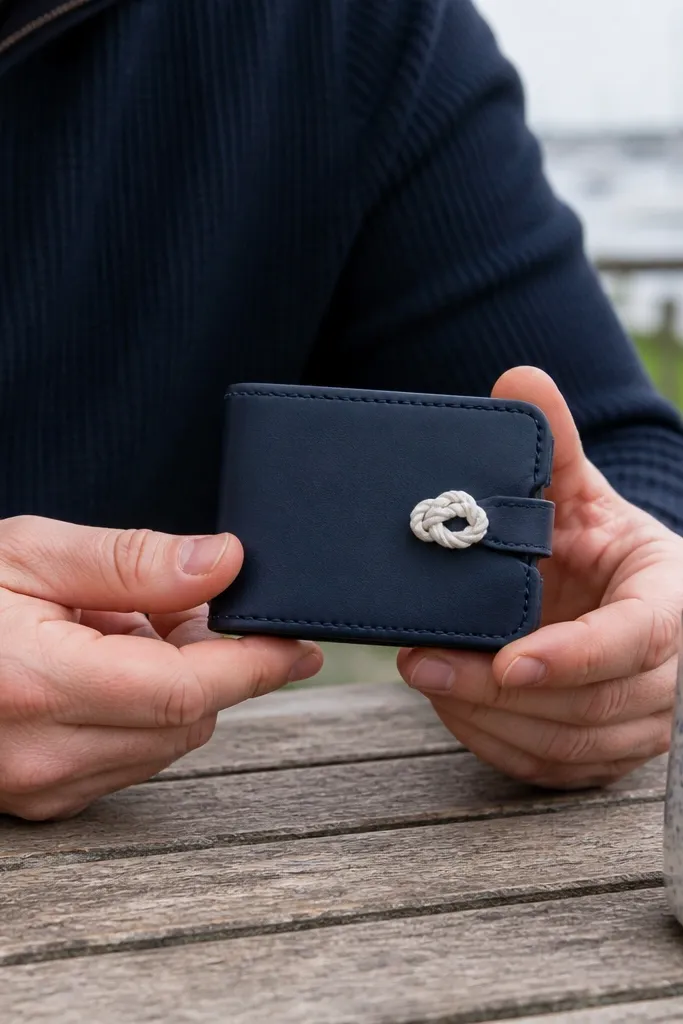
Cut and build the leather cover with a 3 mm edge lip and structured backing using 2 mm EVA. Create a rope knot accent using thick cotton rope or braided cord, then shape it into a bowline-style loop. Glue the knot to the front panel, then stitch through the rope using waxed thread so it holds. Add a small snap closure at the top so the knot doesn’t interfere with opening. Finish edges with edge paint in navy or dark brown.
A single rope knot accent turns a plain leather cover into a focal piece. Navy leather gives a strong base, and the white rope adds high contrast without turning the design into clutter. The knot looks detailed but stays simple — it’s one element you can execute cleanly. This works especially well if you want a “theme” look without covering the whole front in pattern. It also hides minor seam lines because the knot sits over them.
Skip thisDon’t glue the knot only — it will lift at edges after repeated opening.
Editor's noteWax your thread before stitching the rope so it slides through leather without fraying.
12. Pastel Gradient Fabric with Two-Tone Stitch Lines
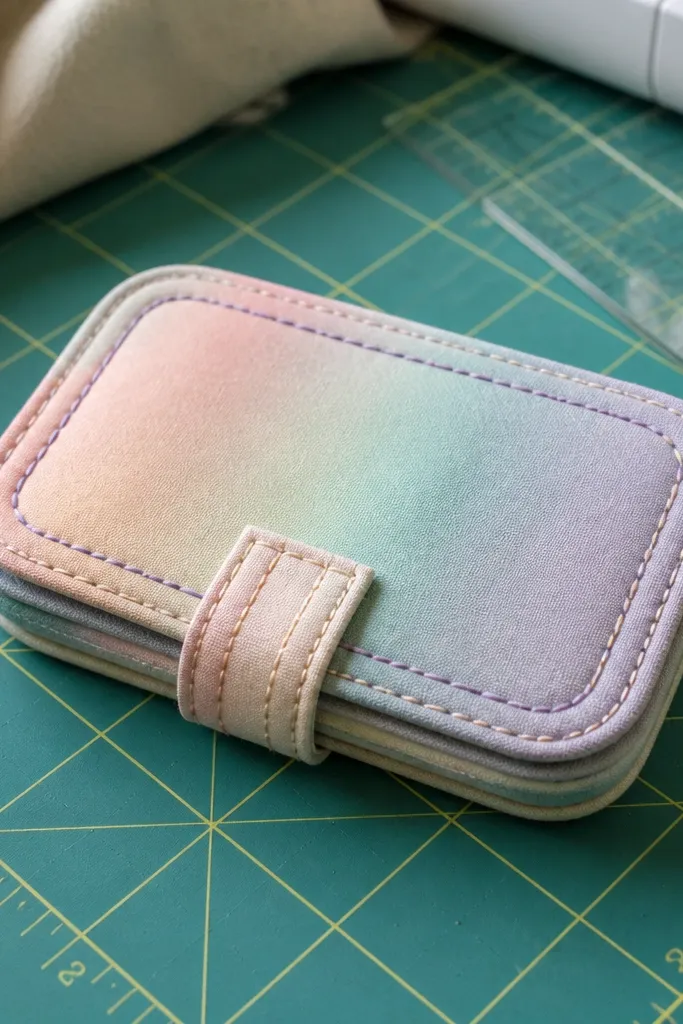
Gradient fabric looks modern and soft, and it makes your cover feel like a piece of art even when the shape is simple. Two-tone stitching gives structure and makes the gradient feel intentional rather than random. Keep the gradient direction consistent across the front so it doesn’t look accidental. This style is perfect for spring colors, gifts, and people who want their wallet cover to stand out without being loud. It also looks great in bright daylight.
Pick a gradient fabric that transitions smoothly and cut a front face panel plus a matching back panel, each with a 3 mm edge lip. Back the fabric with 2 mm EVA so it stays flat. Mark two parallel stitch lines — about 8 mm from the edge — and sew them using two thread colors, switching every 30-40 mm. Install a centered snap closure and keep the fabric taught while stitching. Bind edges with matching fabric strips so the gradient frame stays clean.
Use a walking foot if your fabric shifts — gradient fabric shows crooked stitching fast.
Avoid stretchy knit gradients — they distort as you stitch and look wavy.
13. Black Leatherette with Laser-Cut Star Pattern + Matte Seal
Cut your outer leatherette panel and mark a star grid across the front — keep stars spaced so you don’t weaken edges. Cut the stars cleanly with a sharp craft knife on a cutting mat. Place the cut panel over a backing layer that’s slightly lighter (or use a thin black lining) so the cutouts read clearly. Build the cover with 2 mm EVA for structure and edge lip control. Seal the surface with a matte flexible sealant, then install a magnetic snap closure.
Cutout patterns look premium because they create negative space and catch light. Star cutouts add a playful feel, but keeping the base black keeps it classy. A matte seal prevents glossy glare and hides small glue seams. This design is great if you want something photogenic without adding heavy color. It also feels lighter than fully layered decorations.
Skip thisDon’t use thick, stiff leatherette — it makes cutouts bubble and look uneven.
Editor's noteAfter cutting stars, lightly sand the edges of each cutout so they look smooth instead of sharp-and-scratchy.
14. Tan Linen with Embroidered Border and Brass Button
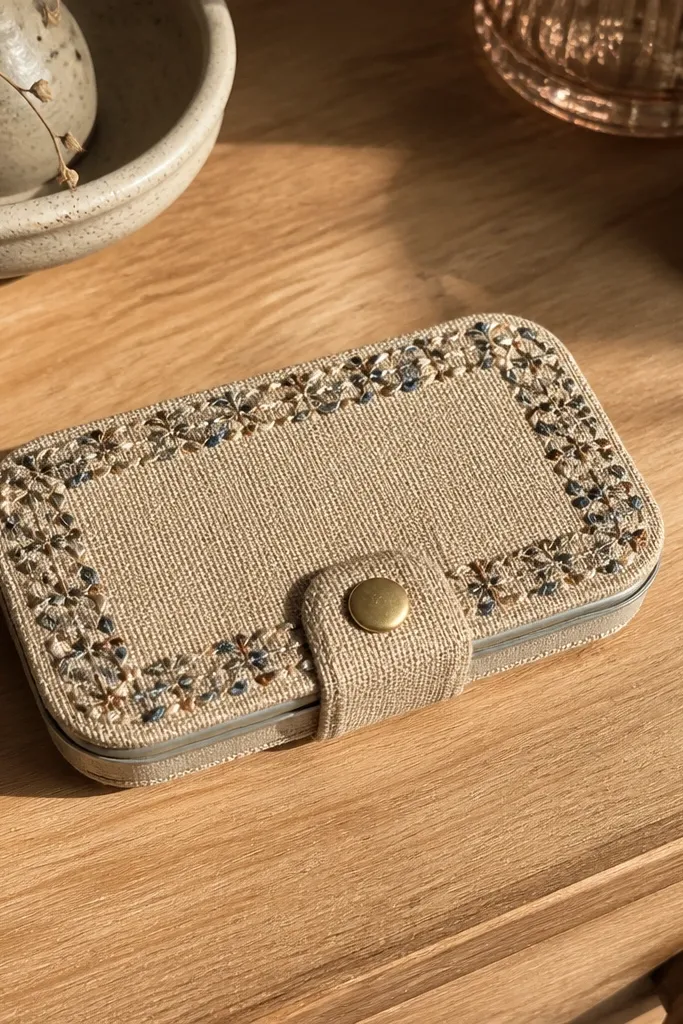
Cut linen panels with a 3 mm edge lip and back with 2 mm EVA. Mark a border rectangle about 12 mm from the outer edge. Embroider the border using a simple running stitch or backstitch in a slightly darker thread (like caramel on tan). Add a brass button closure: glue a button base on the front and attach a small fabric loop or snap receiver on the back. Bind edges with thin linen strips folded over raw edges for clean corners.
Linen looks natural and expensive, especially when you add a simple embroidered border. The border frames the tin and makes the outside look finished even when the center is plain. A small brass button closure adds warmth and a satisfying focal point. This design is for calm, neutral style and for desks where you want something that doesn’t scream. It also hides minor unevenness because linen texture forgives small glue lines.
Skip thisAvoid thick upholstery thread on linen — it makes the border look clumpy.
Editor's noteUse embroidery floss split into 2 strands for a more controlled, less bulky line.
15. Two-Tone Leather Split Panel with Vertical Center Seam
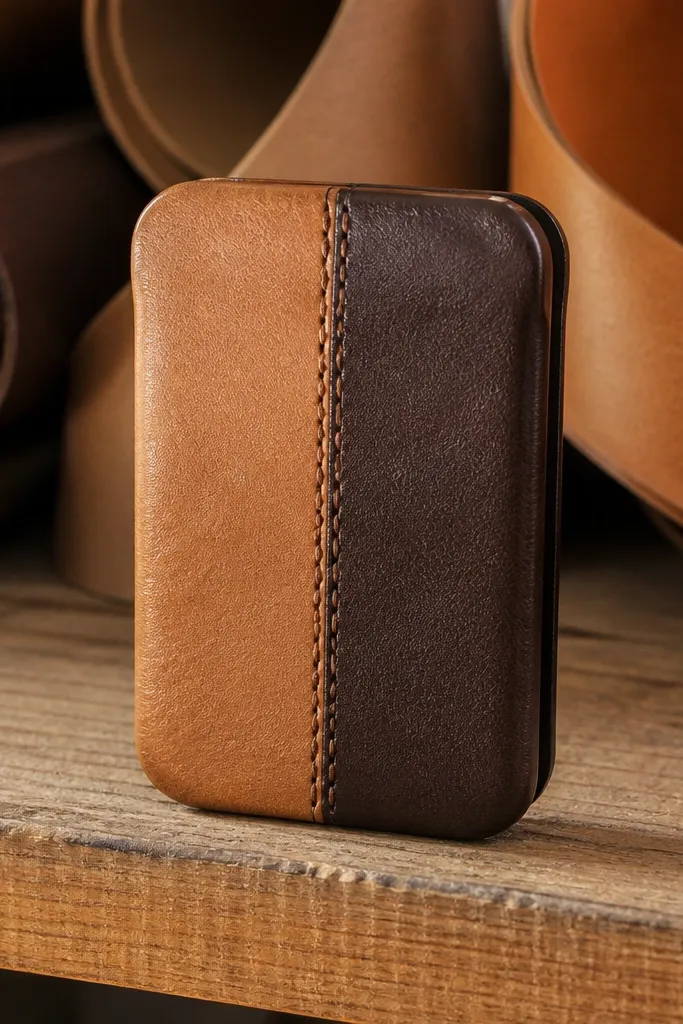
Cut two outer panels from different leather colors, each half-width of the tin plus a 3 mm edge lip. Add 2 mm EVA and glue each half panel onto the foam carefully so the seam line is straight. Trim and fold edges under so the seam stays clean. Stitch along the vertical center seam using contrast thread and a straight stitch or saddle stitch. Install a centered snap closure and keep it aligned with the seam so the front looks symmetrical.
Two-tone leather split down the center looks clean and intentional, like a small accessory from a craft store catalog. The vertical seam is the design — it gives you a strong line and frames the tin shape. Choose one color light and one color dark so the seam reads clearly. This cover style is also durable because the seam lines are reinforced. It fits modern minimal tastes and looks great with neutral bags.
Skip thisDon’t eyeball the seam — a slight tilt makes the whole cover look sloppy.
Editor's noteUse painter’s tape to mark the seam line before gluing so it stays perfectly vertical.
16. Sunburst Paper Cover with Folded Accordion Frame
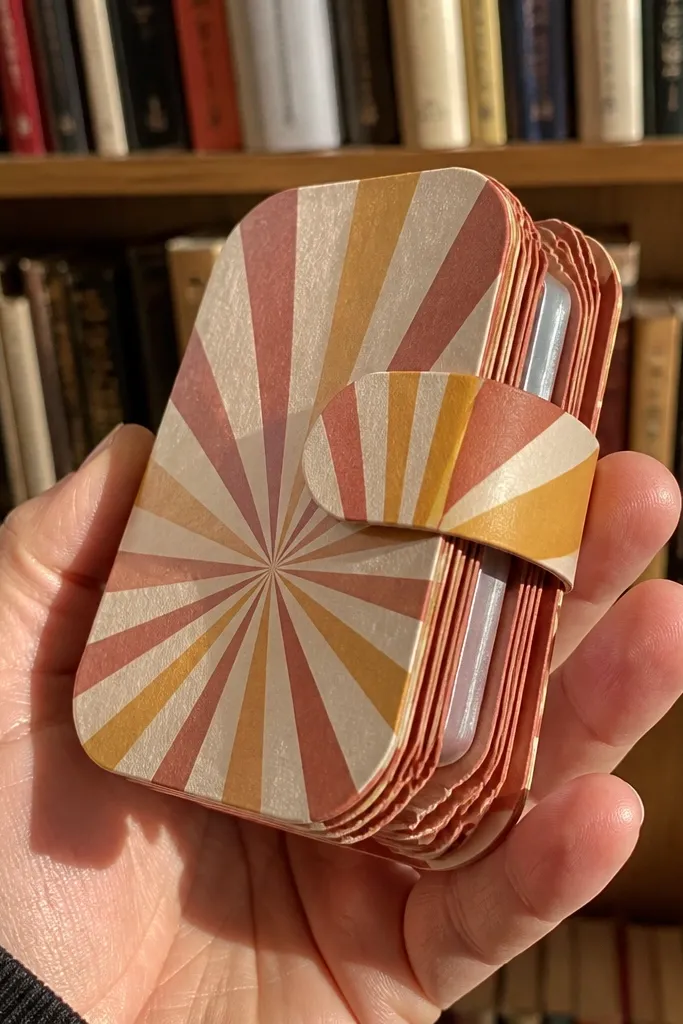
Cut a front face panel from paper or cardstock with a sunburst print sized to the tin front. Build an accordion frame using folded cardstock strips about 10 mm wide and glue them into a ring shape around the face panel. Attach the accordion frame to a foam backing so the face stays supported. Cover the back with paper or fabric to hide glue seams. Install a magnetic closure and add a thin outer border strip so the accordion edges don’t snag.
Sunburst patterns look like retro signage, and the folded accordion frame gives the cover depth without needing heavy materials. The depth is what makes it pop in photos — shadows hit the folds and you get a “3D” look. Keep the color palette tight: 2-3 colors max. This is a great choice if you want a showy cover but still want it to open and close smoothly. It also makes a fun gift because it looks playful and unique.
Skip thisAvoid glossy paper without sealing — fingerprints and smudges show up fast.
Editor's noteSeal the printed face with a clear matte spray so the colors don’t rub off when you handle it.
17. Croc-Emboss Faux Leather with Teal Stitch Accent
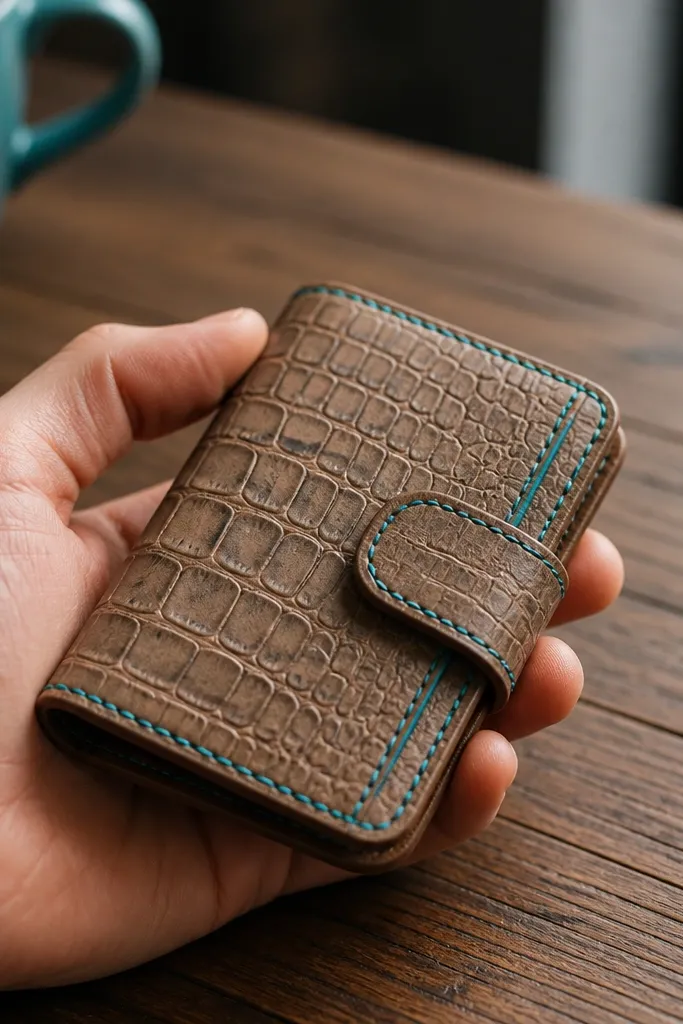
Embossed faux leather gives you texture even when you keep the design simple. Croc emboss looks premium in small objects because the pattern scale matches the tin size. Teal stitching adds a pop that still feels intentional against the neutral base. This style works well if you want the cover to look sleek and modern without drawing anything. It also hides minor edge imperfections because the emboss distracts the eye.
Choose a croc-emboss faux leather sheet and cut a front and back panel with a 3 mm edge lip. Back with 2 mm EVA for structure and glue the faux leather evenly with contact cement. Mark stitch lines using a fabric chalk — one line 8 mm from the edge and a second line 15 mm from the edge. Stitch with teal thread using a straight stitch or hand stitch through the foam-backed layers. Add a centered snap closure and reinforce the snap area with a small patch of thin leather scrap.
Use a leather punch or awl for stitch holes; faux leather tears if you force a needle without clean holes.
Don’t stretch the embossed material while gluing — it distorts the pattern and looks cheap.
18. Monochrome Floral Fabric with Black Velvet Ribbon Tie
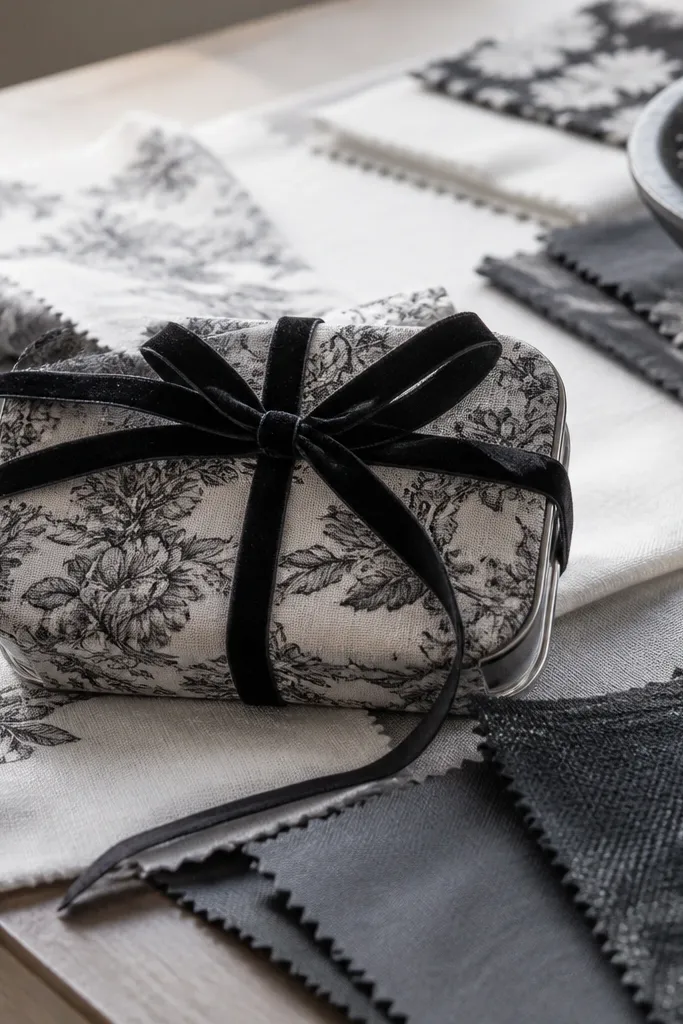
Cut a structured base from 2 mm EVA and cover it with monochrome floral fabric, keeping the pattern centered on the front. Fold and glue edges under using fabric glue so corners don’t fray. Attach two ribbon loops or ribbon tabs on the sides of the back panel with stitching or strong glue. Thread a black velvet ribbon through and tie it across the front. Finish by adding a thin black binding strip around the face so the floral doesn’t look raw.
Monochrome floral keeps the design classy and lets the ribbon closure do the work. Velvet ribbon looks rich in photos because it has a soft sheen that catches light without glare. The tie closure also gives you a satisfying “wrap” look, which makes the cover feel like a gift box. This style suits people who like romantic details but don’t want bright colors. It’s also good for keeping the wallet secure in a bag.
Skip thisAvoid slippery satin ribbon — it slides and looks messy when tied.
Editor's noteUse double-sided tape to hold ribbon positions while you stitch so the tie stays centered.
19. Geometric Wood Veneer Inlay with Clear Hard Coat
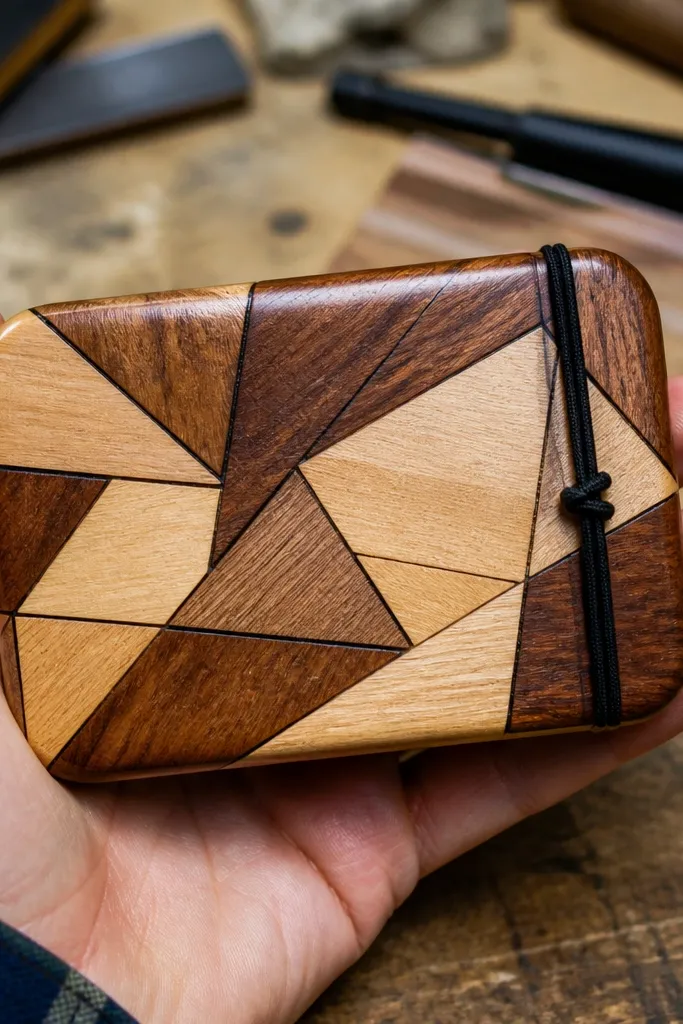
Cut a front face panel from 2 mm EVA and cover it with thin plywood or cardstock backing for stability. Apply wood veneer strips using veneer contact adhesive, then cut geometric shapes with a sharp knife and straightedge. Seal the veneer with a thin layer of clear sanding sealer, then sand lightly with 320 grit after it dries. Apply two more coats of clear hard coat, letting each cure. Add a hidden magnetic closure and edge-bind the perimeter with leather strip or thin fabric binding.
If you want a cover that looks like fine woodworking, veneer inlay is the fastest path. Geometric shapes read cleanly at small scale and make the tin look like a mini keepsake box. A clear hard coat keeps the veneer from getting dull or scratched. This design is perfect for people who like natural materials and want something that looks great on a shelf. It also makes your cover feel weighty and premium.
Skip thisDon’t rush sanding between coats — uneven sanding shows through clear finishes.
Editor's noteCut veneer on a glass or metal mat and use a fresh blade — dull blades splinter edges.
20. Rainbow Striped Fabric with Leather Center Patch
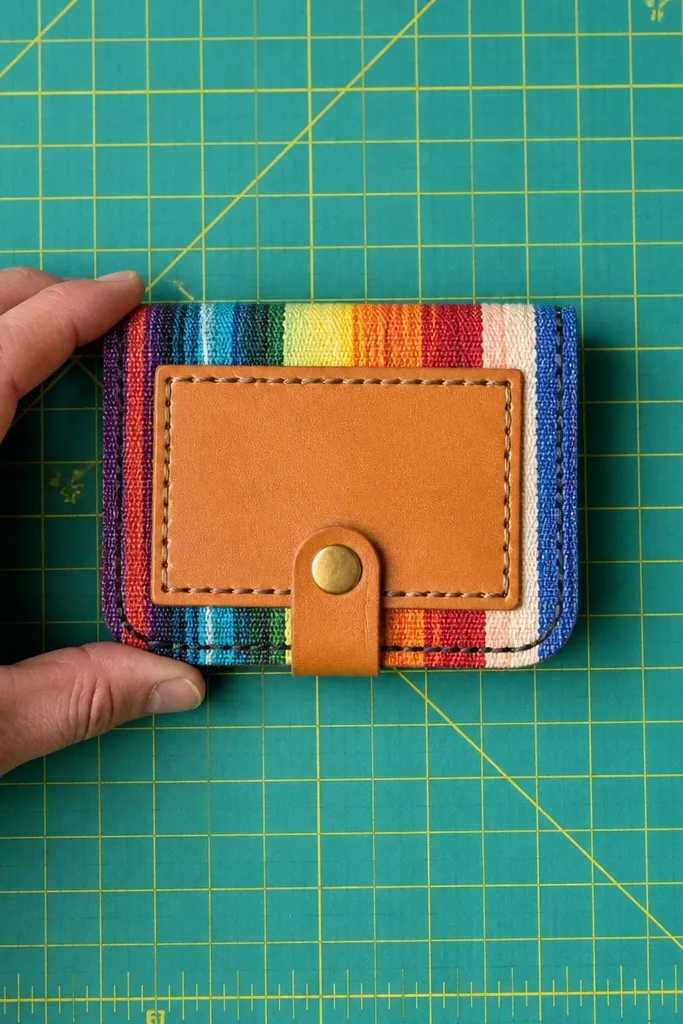
This cover is all about contrast: colorful stripes for fun, then a leather patch to keep it grounded and structured. The centered leather patch creates a clean focal area, and you can add a small stitched emblem or leave it blank. Stripes can go wrong if they’re not aligned, so this design works best when you treat the stripes like a graphic layout. It’s photogenic, but it still looks tidy because the leather patch frames the chaos. Great for gifts and for anyone who likes bright accessories.
Cut your striped fabric panels with the stripe pattern aligned to the front center, leaving a 3 mm edge lip. Cover the foam base with fabric first, then cut a leather patch panel sized about 70% of the tin front. Glue the leather patch centered and stitch around the patch edge with contrasting thread. Install a snap closure underneath the patch so it doesn’t compete with the focal area. Finish edges with a thin leather or fabric binding strip to hide raw seams.
Mark stripe alignment using a pencil line before gluing — once fabric is glued, you can’t un-warp it.
Avoid thin, see-through fabric — stripes can show glue and foam texture.
21. Black Felt with Neon Edge Stitching and Side Button
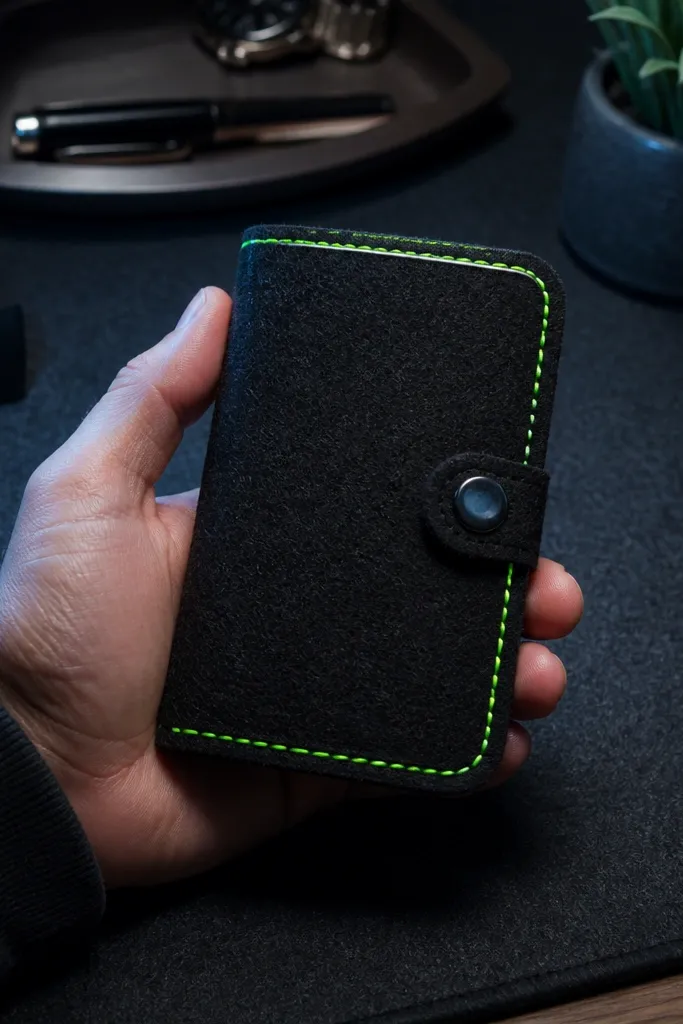
Black felt is a perfect base for neon stitching because the color pops without needing a complicated pattern. The side button closure adds a different visual rhythm than a centered snap, which makes the cover feel more “designed.” Neon edge stitching also hides the seam line, so your edges look clean even if your cuts aren’t perfect. This is a great choice for teens, music merch vibes, and any desk setup that needs a splash of color. It also stays soft to the touch.
Cut black felt panels and back with 2 mm EVA so the cover keeps shape. Bind the edges with a thin felt strip folded over raw edges. Mark a line 6 mm from the outer edge and stitch with neon thread — keep the line consistent around the entire perimeter. Install a small side button: glue the button base to the front and attach a fabric loop or buttonhole reinforcement on the back. Add a magnetic strip inside if you want extra closure security.
Use a hand-sewing needle with a larger eye so neon thread doesn’t fray in the loop.
Don’t use neon thread that’s too thick — it creates bulky ridges on felt.
22. Cream Leather with Gold Leaf Accent Mark
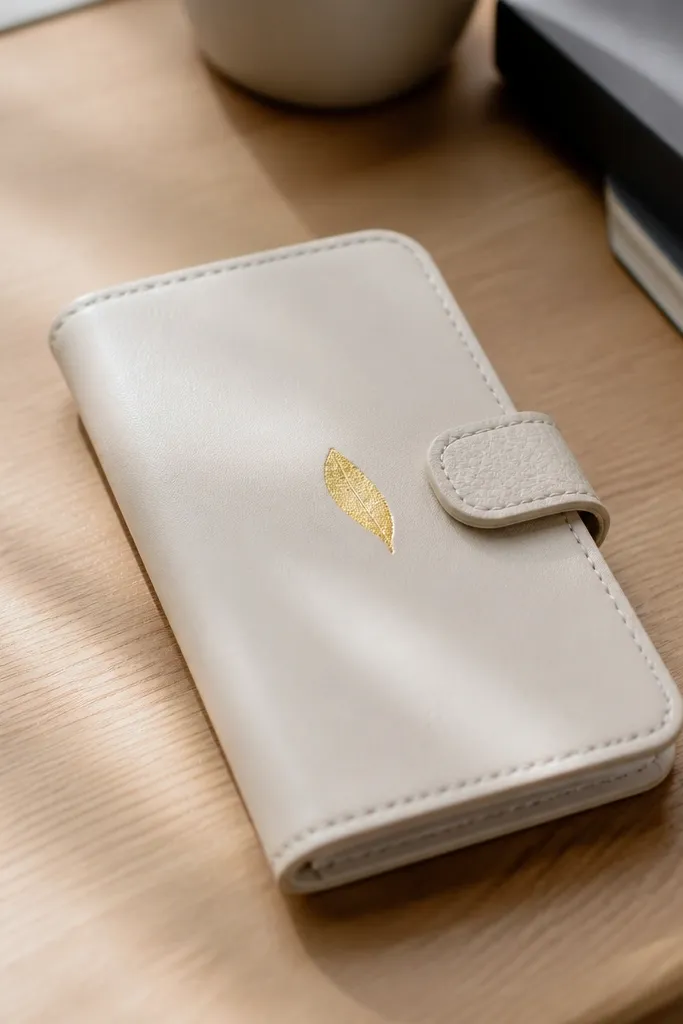
Cut your cream leather cover with a foam backing for structure and a 3 mm edge lip. Create a stencil for a small accent mark — about 25-35 mm wide — and tape it in place on the front. Apply gold leaf adhesive or a thin layer of leaf size, then press gold leaf onto the stencil area. Burnish lightly and remove the stencil so you only keep the gold shape. Seal with a matte or satin protective finish and install a centered snap closure.
Gold leaf on cream leather looks like a luxury label. The trick is to keep the gold accent small — one mark or stamp shape — so it doesn’t turn into messy glitter. This design is minimal, but it’s still striking because the gold catches light differently than paint. If you want the cover to feel like stationery or a premium case, this is the direction. It also works well if you don’t want to sew a lot.
Skip thisAvoid applying gold leaf over wrinkles — it will crack and look uneven.
Editor's noteUse a soft foam brush to apply adhesive thinly — thick adhesive makes gold leaf look blotchy.
23. Two-Layer Fabric Wrap with Contrast Inner Lining

This design looks extra polished because it creates a “reveal.” The outside stays calm, but when you open the wallet, a contrasting inner lining flashes color. That flash is what makes it feel designed instead of plain. Use sturdy outer fabric like canvas or denim, and pair it with a smooth inner like satin, cotton poplin, or a contrasting patterned fabric. It also helps hide the messy edge area because the inner lining covers it. Great for people who want an aesthetic surprise every time they open it.
Cut an outer wrap from sturdy fabric with a 3 mm edge lip and back it with 2 mm EVA. Cut an inner lining panel from contrasting fabric sized to wrap inside the tin edges. Assemble the outer first, then glue the inner lining so it covers raw edges and overlaps slightly. Add a closure that doesn’t interfere with the reveal — magnetic snap or a small strap button works best. Trim lining corners cleanly and stitch the inner fold if you want it to look extra crisp.
Choose inner lining fabric that doesn’t fray — use cotton poplin or tightly woven fabric so edges stay neat.
Don’t use a lining that’s too thick — it makes the wallet feel stiff and the reveal disappears.
24. Black-and-White Checkerboard with Red Snap Tab
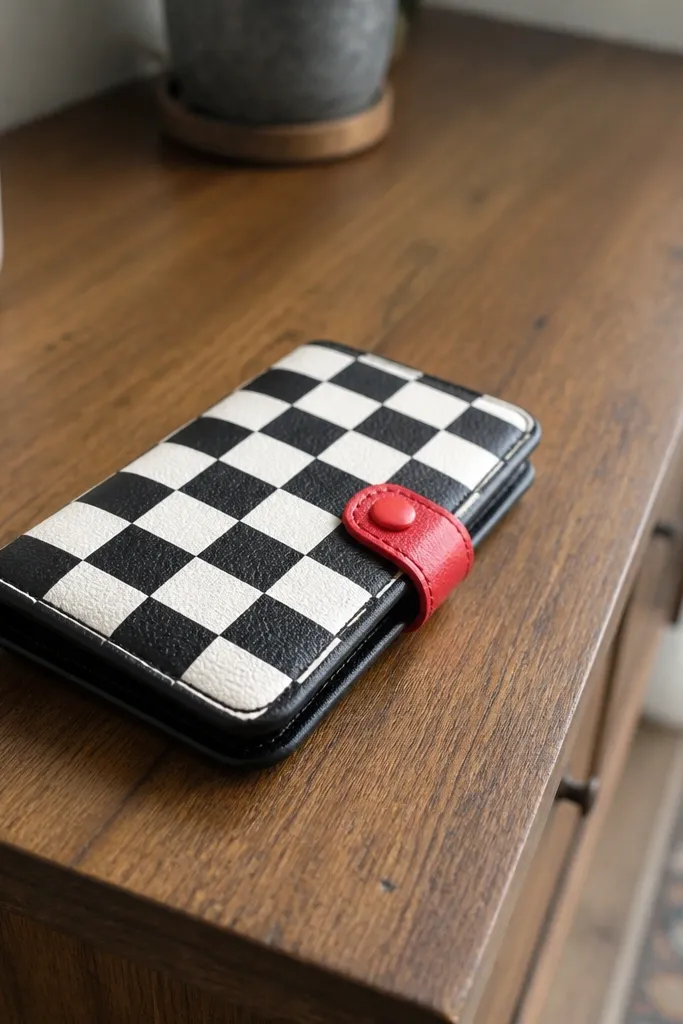
Choose a black-and-white checker fabric or vinyl sheet and cut a front panel with a 3 mm edge lip. Back it with 2 mm EVA and glue evenly so squares stay aligned. Add a black border strip around the perimeter, either stitched or glued, about 6-8 mm wide. Create a red snap tab by cutting a small rectangle of red leather-look material and installing a snap on the tab and a matching receiver on the back. Finish edges with binding so the checker doesn’t show raw layers.
Checkerboard is instant visual energy, and it looks bold on a small object like an Altoids Wallet cover. The red snap tab gives a clean color accent and makes the closure easy to spot. Keep the border black so the pattern doesn’t look like loose wallpaper. This is a fun, graphic style that still looks tidy because the design has strict geometry. It’s also great for photos because the pattern reads even from a distance.
Skip thisDon’t stretch the fabric while gluing — the squares will warp and look off.
Editor's noteIf you’re cutting fabric, pre-wash and iron so the check pattern stays square.
25. Navy Corduroy with Brass Grommet Strap Closure
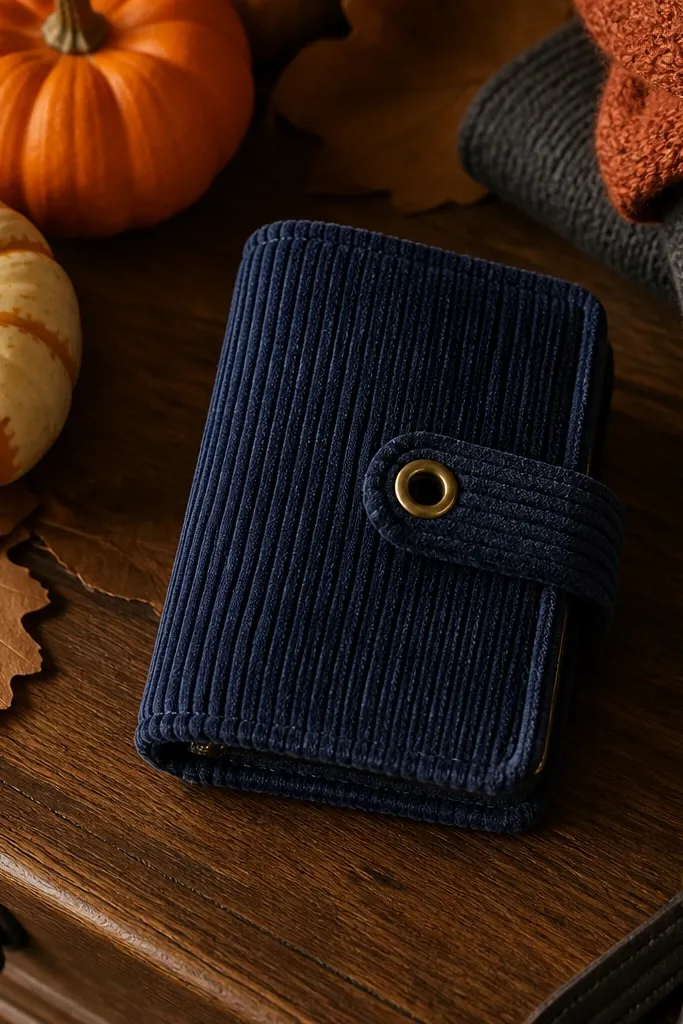
Cut a structured base from 2 mm EVA and cover it with navy corduroy, keeping the nap direction consistent (run it in one direction for the cleanest look). Install two brass grommets on the front and two matching anchor points on the back. Cut a leather strap strip and feed it through the grommets to form a loop closure. Glue and bind edges with thin leather strip or fabric binding to avoid fraying. Add a small magnet inside if you want the strap to hold closed more securely.
Corduroy has a built-in texture that makes even a simple cover look rich. Navy keeps it grounded, and brass grommets add that hardware look you see on real accessories. A leather strap closure makes opening feel deliberate and gives the cover a strong silhouette. This design suits fall and winter aesthetics, and it looks great in indoor lighting because the cord texture catches highlights. It also hides small edge issues because corduroy has visual texture.
Skip thisAvoid cutting corduroy without checking nap direction — the cover will look uneven side to side.
Editor's noteUse a grommet setting tool or a hand punch — corduroy tears if you force grommets without a clean hole.



