
1. Scallop Sundae Bands with Gold Tips
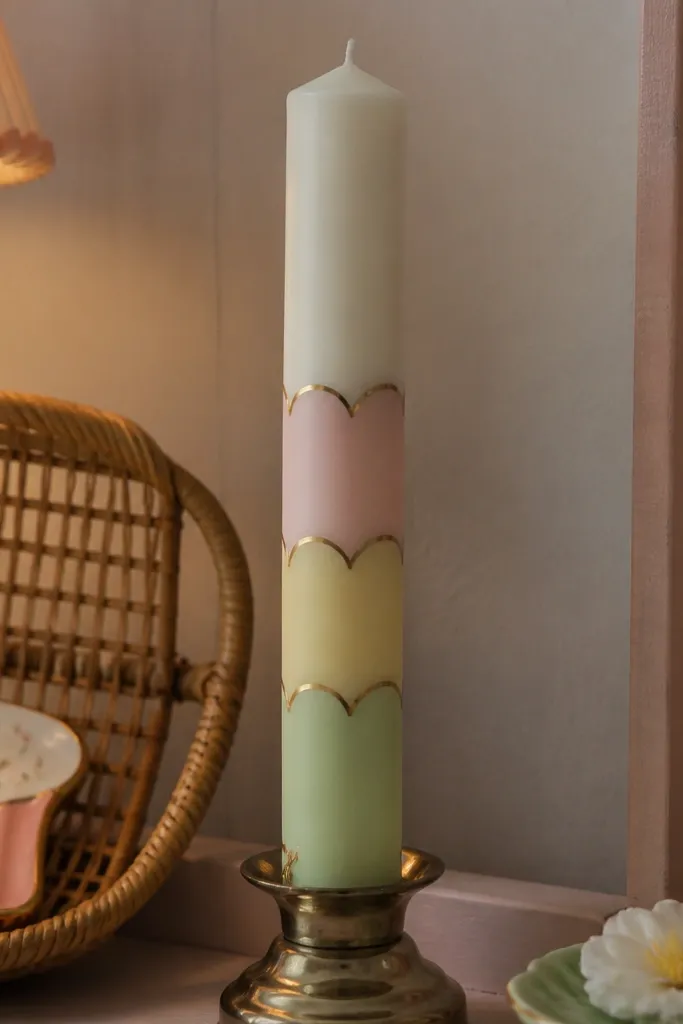
This one makes a plain candle look like it belongs in a dessert-themed decor moment. The scallop bands create soft curves that read cozy instead of sharp, and the gold tips add that clean, finished border effect. Use three pastel tones (like blush, butter yellow, and light sage) so the candle looks warm even under dim room light. It works great for a shelf grouping because each candle can have the same band layout with different colors. Skill level is beginner-friendly, and the whole thing takes about 45-60 minutes including drying time.
Step 1: Mark three horizontal band heights with a pencil — keep them equal spacing (for a standard 10-12 inch candle, aim for bands around 3-4 inches total coverage). Paint each band using a stipple or brush fill, then use a scallop template (a paper strip with semicircles cut out) to draw the scallop edge. Step 2: Let the base colors dry fully, then paint a thin gold line along the top edge of each scallop using a paint pen or liner brush. Step 3: Seal with a clear matte or satin acrylic sealer after everything is dry so the gold doesn’t transfer.
Test your gold pen on scrap paper first; if it blobs, wipe the tip and reload lightly.
Don’t seal before the paint is fully cured — soft paint smears under the clear coat.
2. Cozy Plaid with Brown Wax-Resist Edges
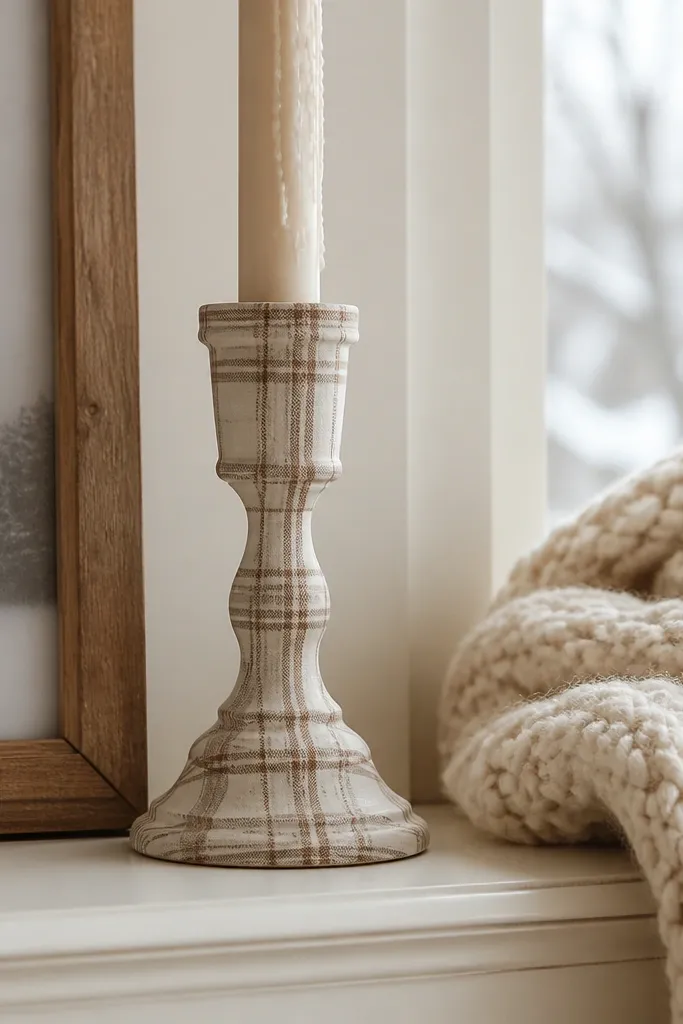
Plaid looks instantly homey, but most painted plaid turns wobbly. This version keeps it crisp by combining tape for straight lines and a subtle wax-resist effect for the edges. The brown lines anchor the palette, while the light base keeps it cozy instead of dark. It looks great in autumn or winter shelves with knit textures and wood trays. This is a medium-skill project because you’re doing multiple line passes, but the result is worth it.
Step 1: Lightly outline your grid using painter’s tape strips — two vertical and two horizontal lines spaced evenly to form blocks. Paint the first set of lines in warm brown, let dry, then remove tape carefully and re-tape for the next direction. Step 2: For a wax-resist look, rub a tiny amount of clear candle wax on the edge areas you want softened, then paint over with a slightly lighter brown or taupe. Step 3: After drying, seal with a clear acrylic topcoat to lock the pattern in place.
Editor's notePress tape down with a fingernail so paint doesn’t creep under the edges.
Skip thisDon’t try to fix shaky lines with extra paint — it makes the plaid look thick and uneven.
3. Tiny Dot Constellations on a Night Blue Base
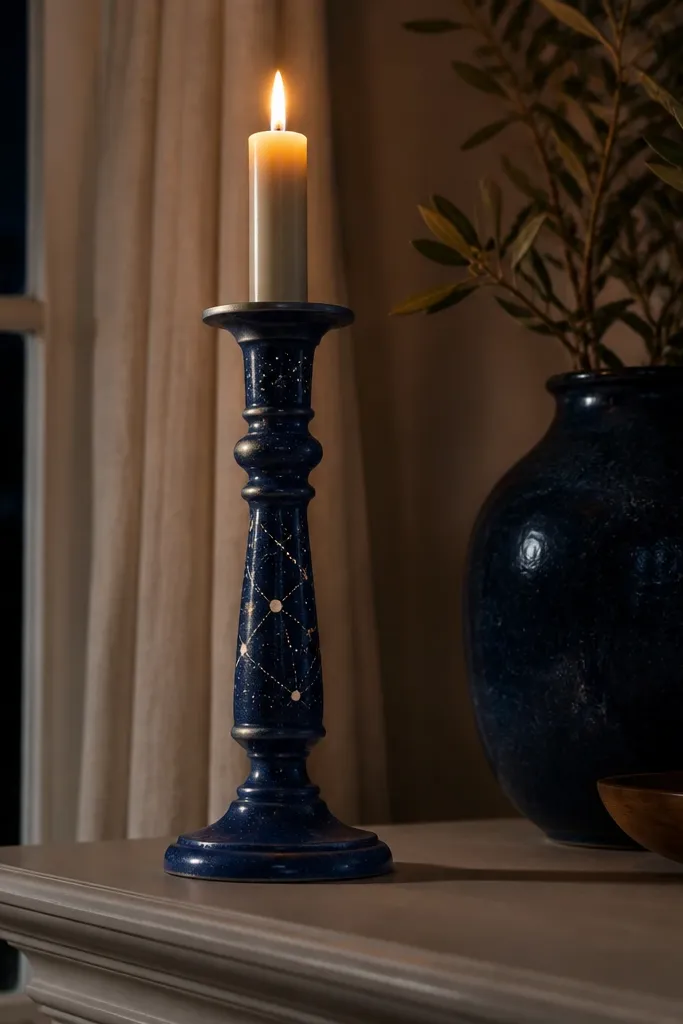
If you want something that looks cozy but still modern, do dot constellations. The trick is scale: tiny dots plus a few slightly larger ones create a starfield effect without needing detailed drawing. Night blue makes the white dots pop, and a little silver paint gives you sparkle when the candle catches light. This works for shelves with black frames, dark ceramics, or winter decor. It takes around an hour and feels relaxing because you’re repeating a dot pattern instead of drawing complex shapes.
Step 1: Paint the whole candle in night blue and let it dry completely. Step 2: Use a paint pen or a toothpick dipped in white acrylic to place small dots in clusters — keep most dots under 2 mm and vary density by band. Step 3: Add 6-10 silver dots and a few tiny connecting lines with a fine liner brush. Step 4: Seal with satin clear coat so the dots stay crisp and don’t dull out.
Editor's noteUse a spare candle or paper towel test to calibrate your dot size before you start.
Skip thisAvoid overdoing the dots — too many makes it look like noise instead of constellations.
4. Marbled Clay-Color Swirl with Matte Finish
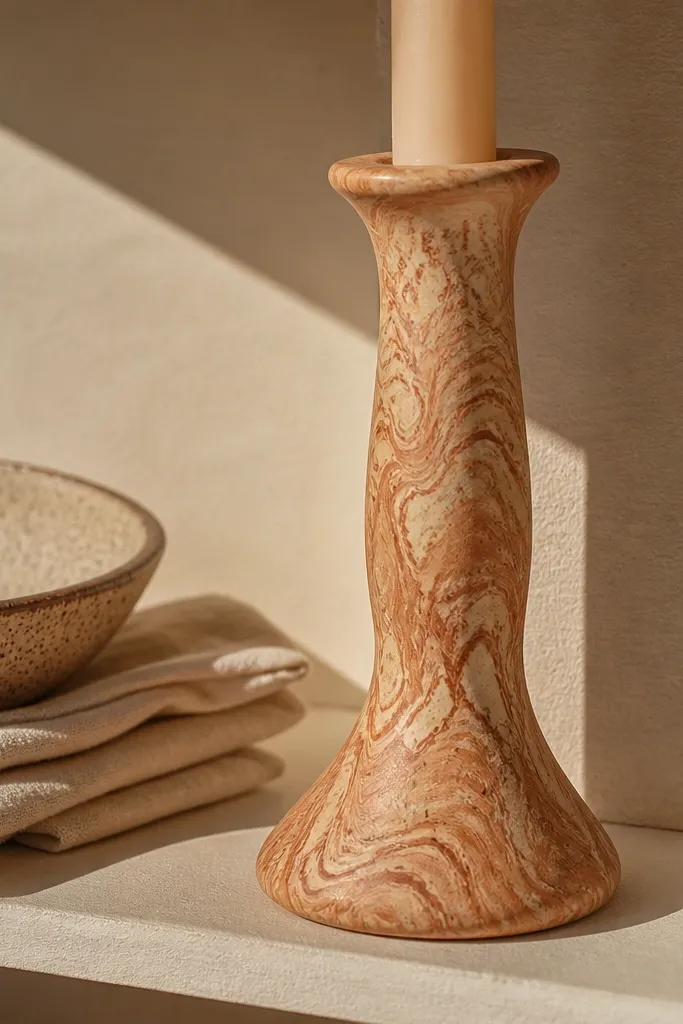
Marbling looks fancy because it creates movement, but this version is approachable and forgiving. Clay colors like terracotta, warm beige, and muted rust look cozy and earthy without being trendy. A matte topcoat keeps it from looking glossy or plastic, so it blends with pottery, linen, and wood. It’s great for a neutral shelf where you want one candle that still catches attention. Plan for about 60-75 minutes with drying time.
Step 1: Paint a base coat in warm beige, then mix two marbling colors (terracotta and muted rust) with a small amount of water or medium for smooth flow. Step 2: Use a sponge or a damp brush to dab in streaks, then drag a thin skewer lightly through the streaks to create swirl lines. Step 3: Add a few random “vein” lines with a liner brush, then let it dry fully. Step 4: Finish with matte clear sealer for a soft, pottery-like look.
Work in small sections and stop dragging before it turns muddy.
Don’t use too much watery paint; it can pool at the bottom and ruin the swirl.
5. Muted Florals with One-Line Stems
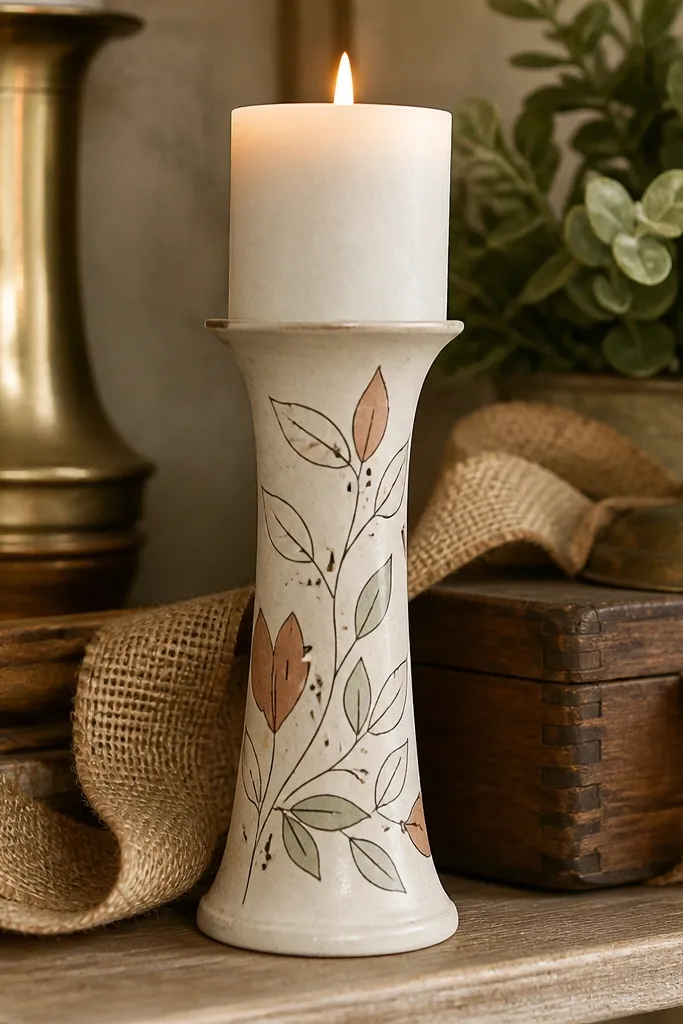
This is the kind of floral that looks calm and expensive because it doesn’t try to be a full painting. One-line stems keep the shapes airy, and muted colors (dusty rose, sage, and soft peach) make it cozy instead of loud. It’s also a smart choice if you’re not confident drawing detailed petals; you can use simple teardrops and tiny dots. It suits spring shelves, but it also works year-round with neutral decor. Expect about 50-70 minutes depending on how many blossoms you add.
Step 1: Paint the candle base in cream or light ivory. Step 2: With a fine liner brush or black-brown paint pen, draw 3-5 stems that rise and curve, then add flowers using small teardrop shapes — one petal at a time. Step 3: Fill flower centers with a tiny dot and add two or three leaf marks per stem. Step 4: Seal with satin clear coat to protect the fine lines.
Editor's noteIf your lines wobble, pull the brush slowly and lift at the end; don’t keep dragging.
Skip thisDon’t use bright neon florals — they look harsh on candle surfaces.
6. Terracotta Waves with White Highlight Dry-Brush
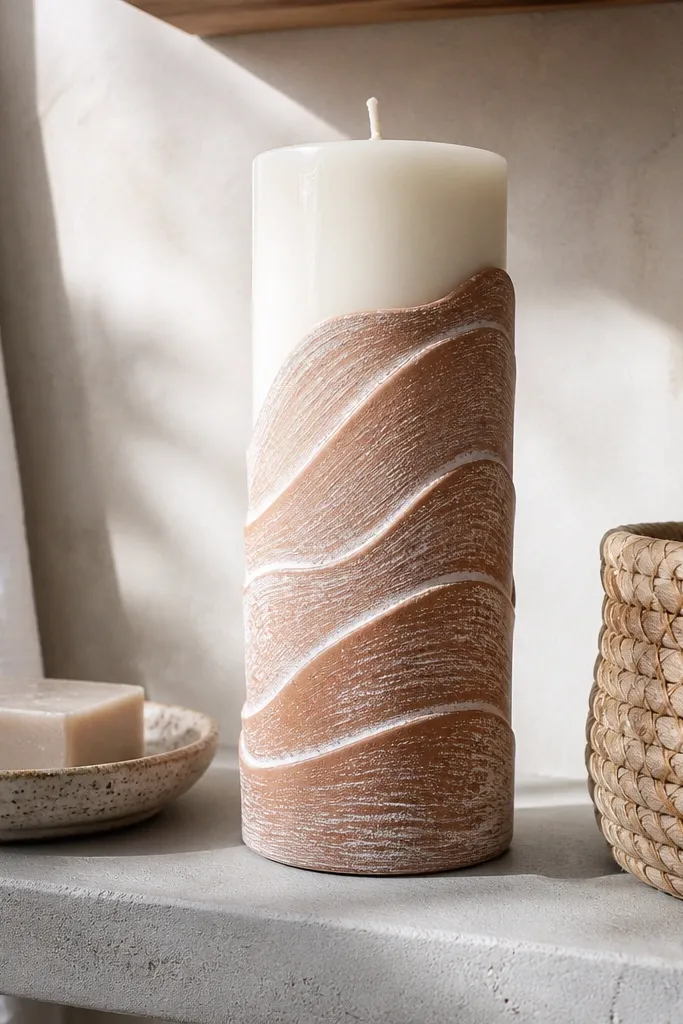
Waves give you instant motion and warmth, and dry-brushing makes it look textured rather than flat. Terracotta is cozy by default, and the white highlights make the waves look like they’re catching light. This style looks especially good on tall candles because the wave bands can wrap upward evenly. It pairs well with woven baskets, neutral throws, and warm-toned shelves. It’s beginner-friendly and fast once you get the wave rhythm.
Step 1: Paint the entire candle terracotta and let it dry. Step 2: For wave bands, use a wide brush to paint horizontal wave shapes in a slightly darker terracotta, leaving small gaps for the highlight effect. Step 3: Load a nearly dry flat brush with white acrylic and lightly drag across the wave crests so the raised parts get the light. Step 4: Seal with matte or satin clear coat after full dry.
Editor's noteWipe most paint off the brush on a paper towel before dry-brushing.
Skip thisDon’t flood the waves with white; dry-brush should feel subtle, not opaque.
7. Candy Stripe Candy-Cane Style with Clean Tape Edges
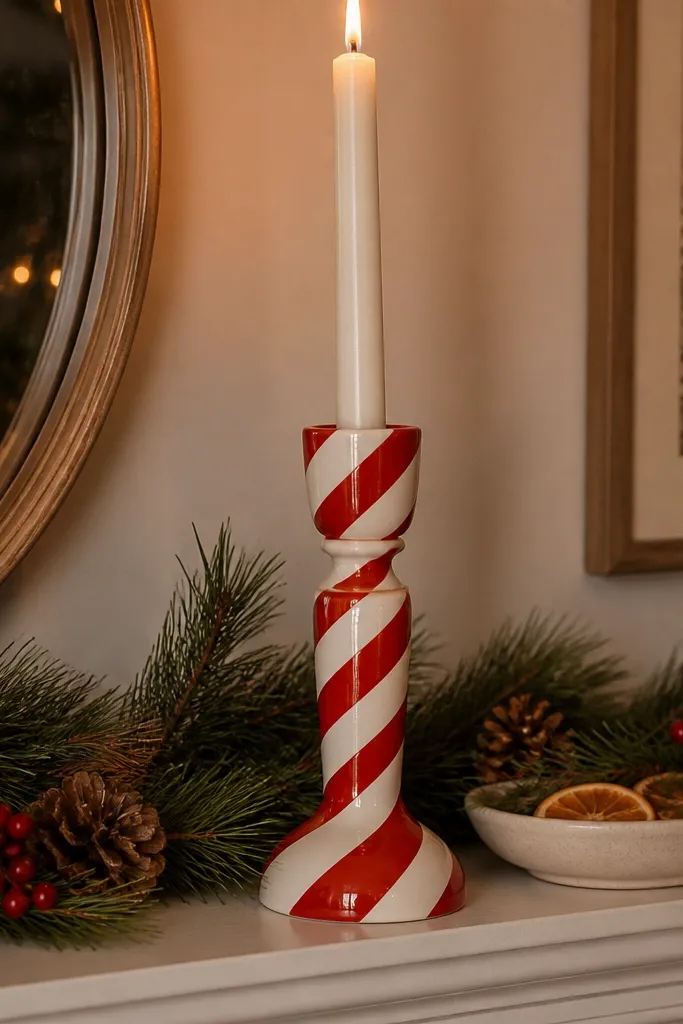
Diagonal candy stripes look festive and very shelf-photogenic, but they only look good when the lines are sharp. Tape is your friend here, and a glossy or satin topcoat makes the stripes pop. This is the fastest project on the list if you prep the tape right. It’s perfect for holiday shelves or any time you want a bold graphic look without complex painting. Budget is low, and time is about 40-60 minutes.
Step 1: Wrap painter’s tape around the candle in diagonal strips at a consistent angle, spacing them evenly. Step 2: Paint the exposed areas red, then remove tape while paint is still slightly tacky for cleaner edges. Step 3: Touch up any micro-bleeds with a small angled brush. Step 4: When fully dry, seal with satin clear coat to smooth the surface and protect the stripes.
Editor's noteUse narrow tape (about 1/8 inch) so your stripes look crisp, not chunky.
Skip thisDon’t skip touching up the tape line; tiny gaps show up instantly in photos.
8. Sage Geometric Triangles with Black Outline
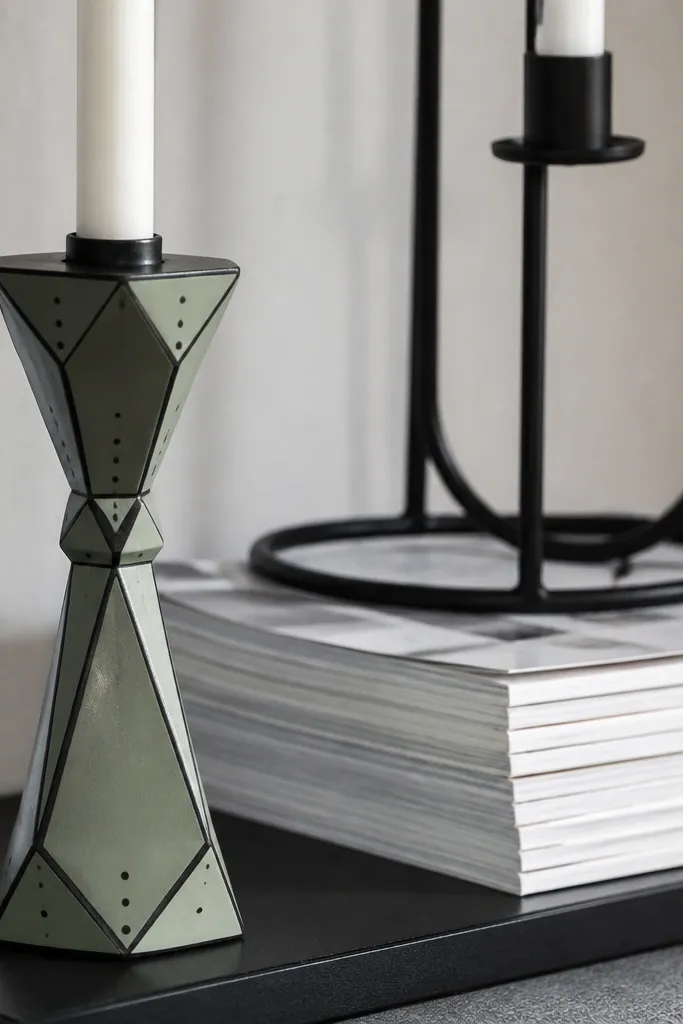
Geometric triangles look modern and cozy when you keep the palette tight. Sage is calming, black outlines make the shapes readable, and tiny dot accents add warmth without clutter. This style works great for minimalist shelves where you still want one candle that feels designed. It’s also forgiving because slight asymmetry feels intentional in geometric art. Plan for about 60 minutes including drying.
Step 1: Paint a sage base and let it dry. Step 2: Use masking tape to form triangle shapes — two or three across the middle band — then paint inside each triangle with either cream or a slightly darker sage. Step 3: Remove tape and outline triangle edges with a fine liner brush and black paint. Step 4: Add a few small dots near triangle corners and seal with satin clear coat.
Editor's noteOutline after filling, not before; filled shapes give you a cleaner line to follow.
Skip thisDon’t use thick black paint — it makes triangles look like cartoon blocks.
9. Cinnamon Roll Swirls in Warm Cream and Spice
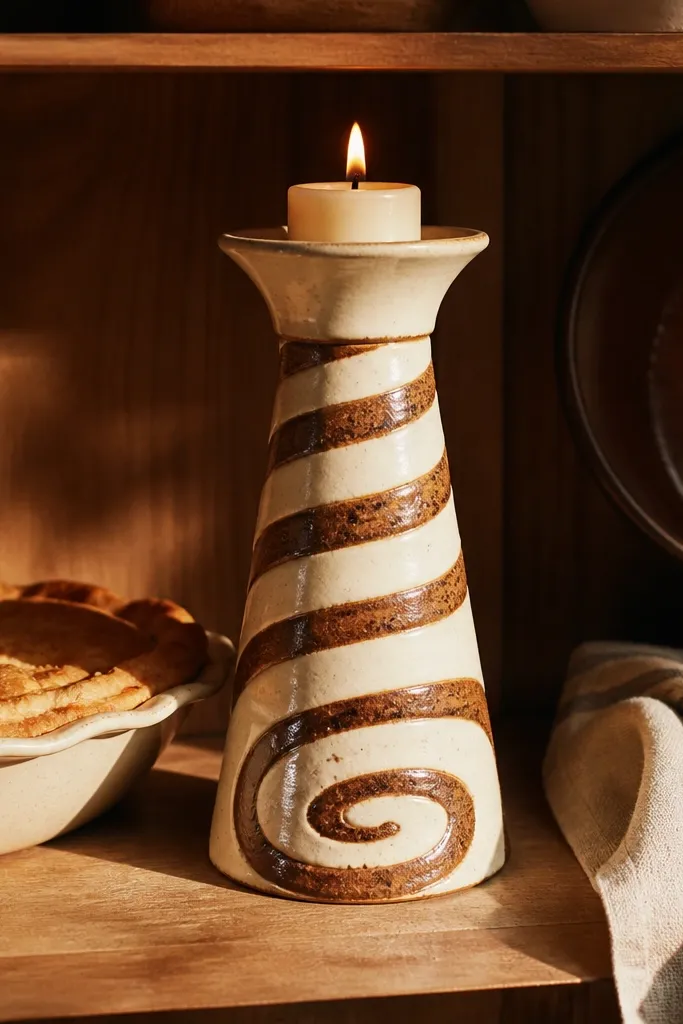
This idea looks like a baked treat, and it’s surprisingly easy because the spiral does most of the work. Use warm creams for the base and spice browns for the swirl, then add tiny speckles like cinnamon dust. It’s cozy, playful, and very photogenic because the spiral catches light as it curves. It’s best for shelf displays with warm wood, cream ceramics, and kitchen-themed decor. Time is about 45-70 minutes depending on how many swirls you add.
Step 1: Paint the candle base in warm cream. Step 2: Draw one big spiral from the lower third upward using a pencil guide, then paint the spiral lines in cinnamon brown. Step 3: Add a second thinner line inside the spiral to mimic frosting layers. Step 4: For speckles, tap a stiff brush or toothbrush lightly over a small area with diluted brown paint. Step 5: Seal with matte or satin clear coat.
Editor's noteDilute your speckle paint slightly so it lands as dots instead of blobs.
Skip thisDon’t make the spiral too thick; it should look delicate, not like a thick marker.
10. Ocean Breeze Ombré with White Foam Edge
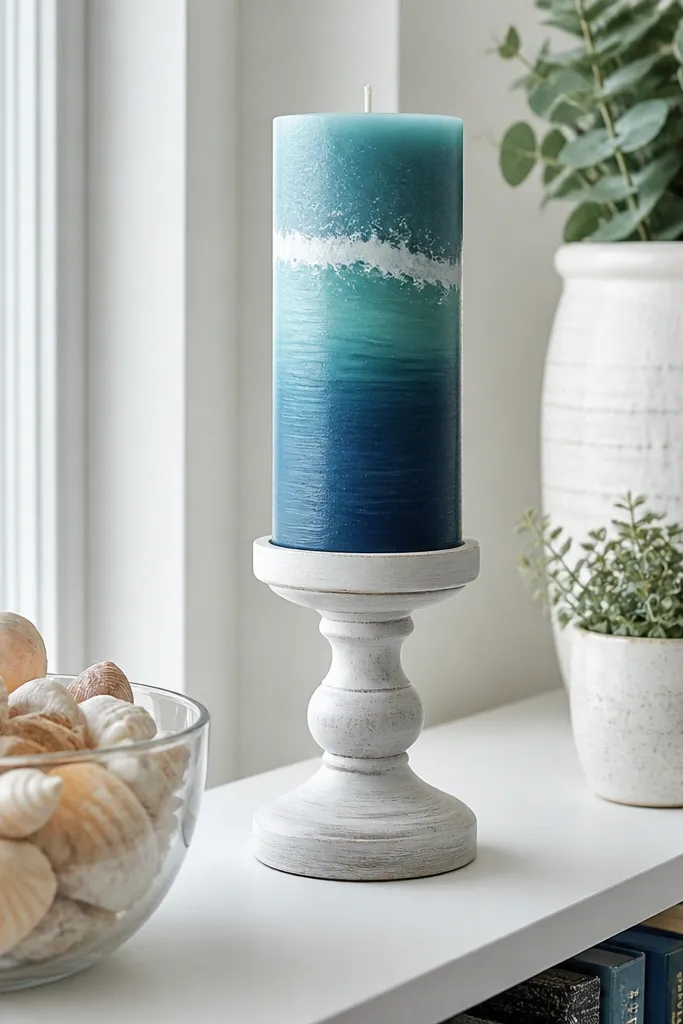
Ombré looks smooth and calming, and the foam edge makes it feel like a real seaside moment. Start with blue, blend into teal, and keep the top line in white so it reads like foam. This is a great choice for a cozy shelf because it feels light and relaxing without being childish. It also photographs well because the color gradient shows even from a distance. Expect about 60-90 minutes for smooth blending and drying.
Step 1: Paint the candle bottom in deep blue and blend upward into teal using a sponge brush. Work in horizontal passes and keep blending while the paint is still wet. Step 2: After the ombré dries, paint a thin curved white line near the top of the candle, then add short jagged strokes upward to mimic foam. Step 3: Lightly dry-brush a tiny amount of white over the foam line for texture. Step 4: Seal with satin clear coat so the gradient doesn’t get dull.
Use a makeup sponge for the gradient; it gives smoother transitions than a flat brush.
Avoid painting straight over dry brush streaks; it creates harsh bands.
11. Berries and Leaves Half-Panel
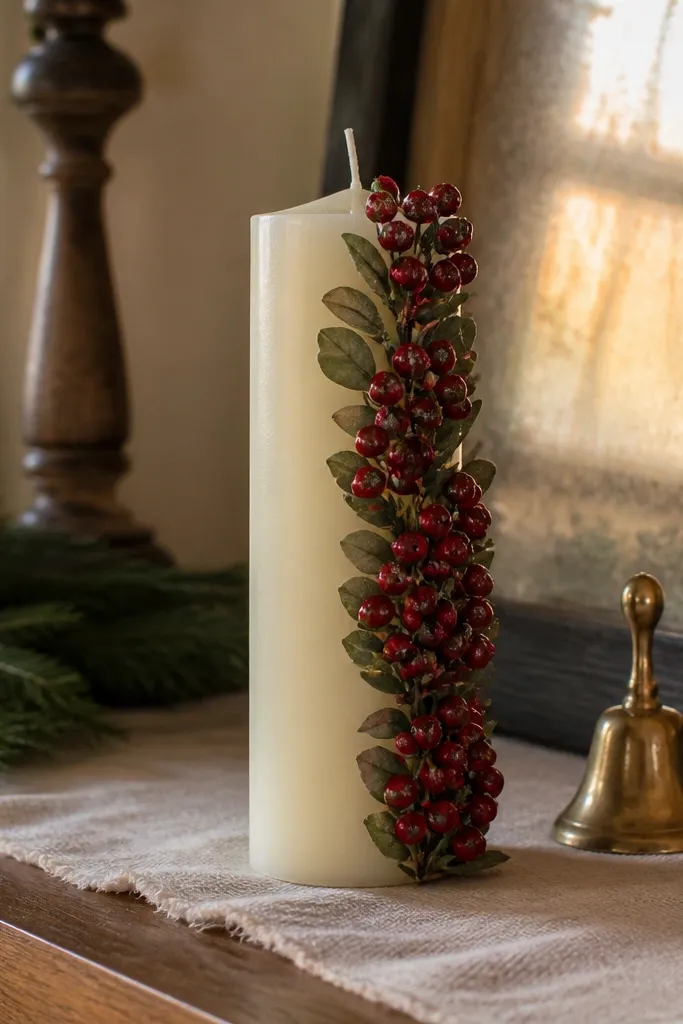
Half-panel designs look intentional and balanced, which is why they look good on shelves. Keep the right or left side decorated and leave the other side mostly clean. That negative space makes the berries read clearly and keeps the candle from looking busy. Use red berries with tiny white highlights, and leaves in muted green. It’s a cozy look for fall and winter, and it pairs well with wood risers and linen covers. Time is about 60 minutes for painting and drying.
Step 1: Paint the base in cream. Step 2: Tape off a half-panel on one side, then paint a simple branch line in dark green. Step 3: Add berries as small circles in red, then dot tiny white highlights on each berry. Step 4: Fill leaves with a simple oval shape and a single vein line. Step 5: Remove tape, then seal with satin clear coat to protect the berries and leaves.
Highlight berries last with a tiny brush tip so the shine looks like glossy fruit.
Don’t cover the whole candle; full coverage makes berries blur into a sticker-like look.
12. Cream + Charcoal Ombre with Wavy Mask Lines
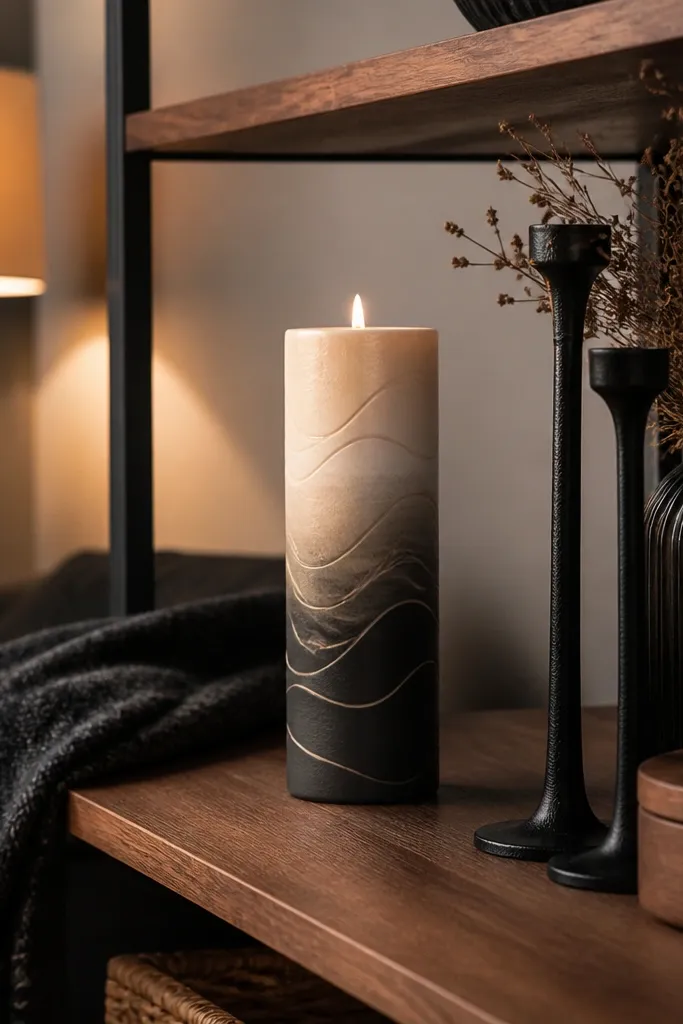
This is moody-cozy without going dark-dark. Cream fades into charcoal, and wavy masked lines add a graphic layer that still feels soft. The beauty is in the contrast: the gradient gives depth, and the wavy lines keep it from looking like a simple paint job. It looks great on shelves with black metal candle holders, stoneware, and neutral textiles. Plan for 75 minutes if you want super clean mask edges.
Step 1: Paint the candle bottom charcoal and blend upward to cream using a sponge brush. Let it dry fully. Step 2: Use painter’s tape to create a wavy band across the middle — make the wave gentle, not sharp. Step 3: Paint the band in a contrasting tone like warm taupe or a lighter grey, then remove tape after the paint is touch-dry. Step 4: Seal with matte or satin clear coat depending on how soft you want it to look.
Editor's notePress tape edges firmly and pull tape back on a diagonal to avoid tearing the paint film.
Skip thisDon’t rush the ombré; blending over semi-dry paint creates streaky stripes.
13. Linen Texture Wash with Speckled Spear Dots
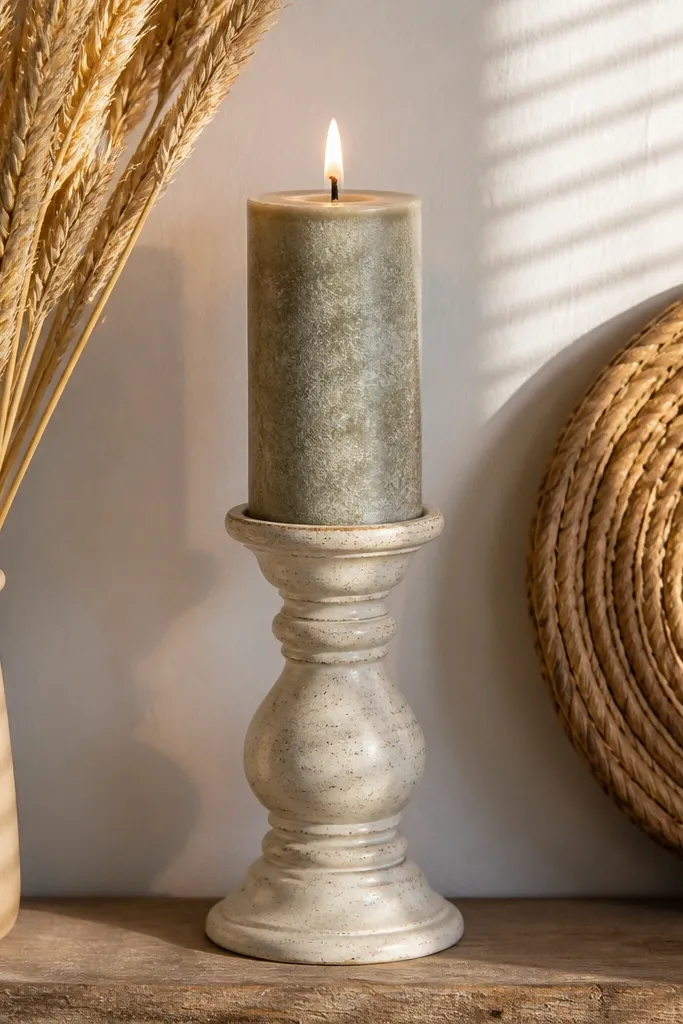
This one looks like painted linen, which makes it feel cozy even when the design is minimal. You’re not painting a picture; you’re creating texture. The speckled dots add just enough detail to make it interesting in photos without cluttering your shelf. It suits farmhouse decor, neutral palettes, and any setup that needs calm. Time is about 40-65 minutes because the texture technique is quick.
Step 1: Paint a light beige base and while it’s still tacky, dab a dry sponge lightly to create a linen-like texture. Step 2: For speckles, dip the tip of a stiff brush into dark brown paint diluted with water, then flick gently over the surface. Step 3: Add a few slightly larger spears by dragging the brush tip briefly before lifting. Step 4: Seal with matte clear coat so the surface doesn’t look slick.
Editor's noteKeep speckles sparse; place them in clusters so the eye reads pattern instead of random dots.
Skip thisAvoid thick paint for speckles — it dries into raised blobs.
14. Terracotta Tile Pattern with Thin White Grout Lines
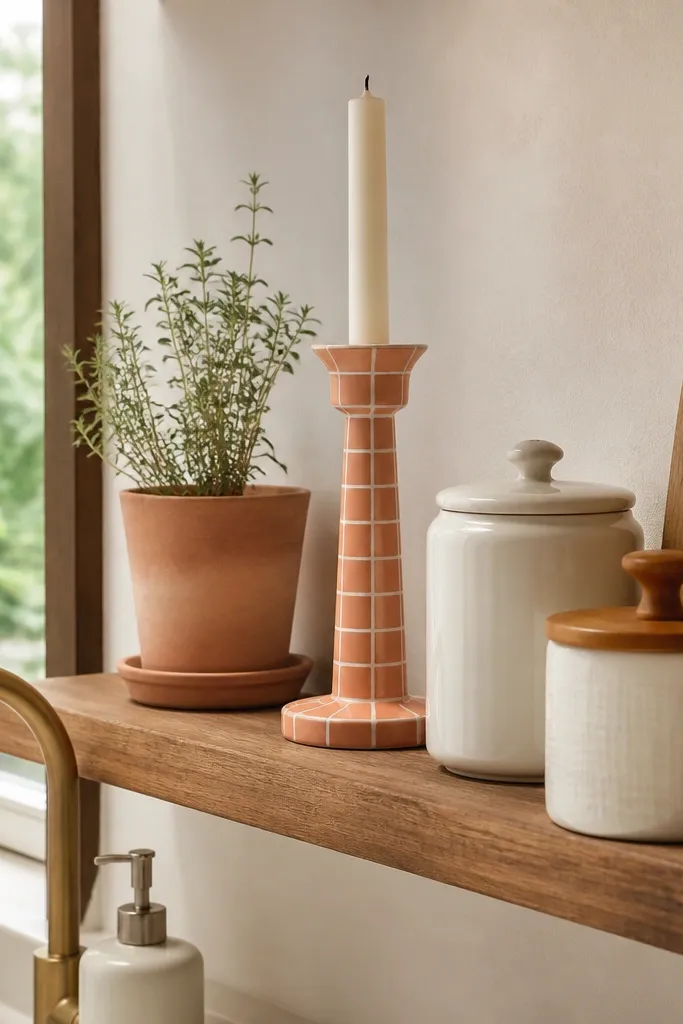
Tile patterns look structured and expensive because grout lines create instant realism. This project turns a candle into a tiny ceramic tile column. Terracotta keeps it cozy, and thin white grout lines make the grid pop even from far away. It looks great in kitchens, bathrooms, and any shelf with earthy tones. Skill level is medium because you’re drawing a grid, but it’s still manageable with tape. Time is about 60-80 minutes.
Step 1: Paint the candle terracotta and let it dry. Step 2: Use painter’s tape to create a grid — decide on 4-6 columns and 3-5 rows depending on candle height, then tape across and around. Step 3: Paint over the taped gaps with white acrylic, then remove tape while paint is still slightly tacky. Step 4: Finish with a clear satin topcoat so the grout lines stay crisp.
Editor's noteKeep grout lines thin (about 1-2 mm) so the tile effect looks believable.
Skip thisDon’t make the grid too tight; narrow tiles turn into a blur on tall candles.
15. Modern Botanical Branches in One Vertical Stripe
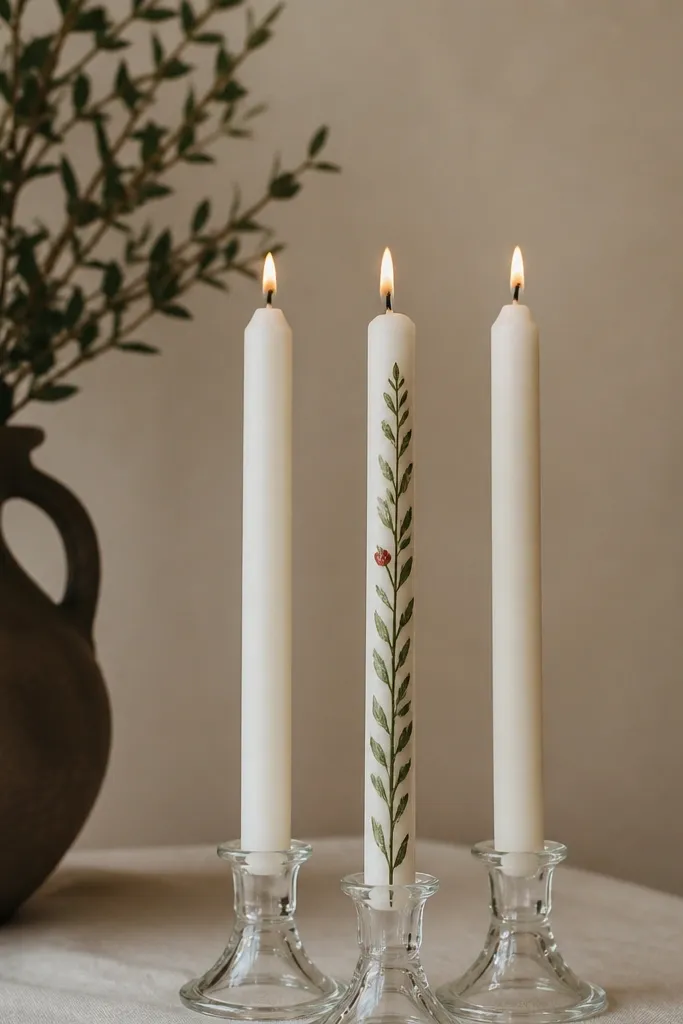
A single vertical stripe makes botanical art look modern and intentional. It’s cozy because the branch curves softly, but it stays clean because you’re not covering the whole candle. Use muted greens with tiny leaf shapes and one small accent flower or berry. This works especially well when you have multiple candles — you can repeat the stripe placement so the set looks coordinated. Time is about 45-70 minutes depending on detail.
Step 1: Paint the candle cream or light ivory. Step 2: Mask a narrow vertical stripe down the center (or slightly off-center) and paint it a muted green. Step 3: Remove tape and paint a branch line that crosses the stripe edges, then add small leaves on alternating sides. Step 4: Add one tiny accent dot in a contrasting color like dusty rose. Step 5: Seal with satin clear coat.
Use a liner brush for the branch and a dot tool or toothpick for leaf bases.
Don’t add too many flowers; one accent reads better than a full bouquet.
16. Rose Quartz Pink with Metallic Edge Fade
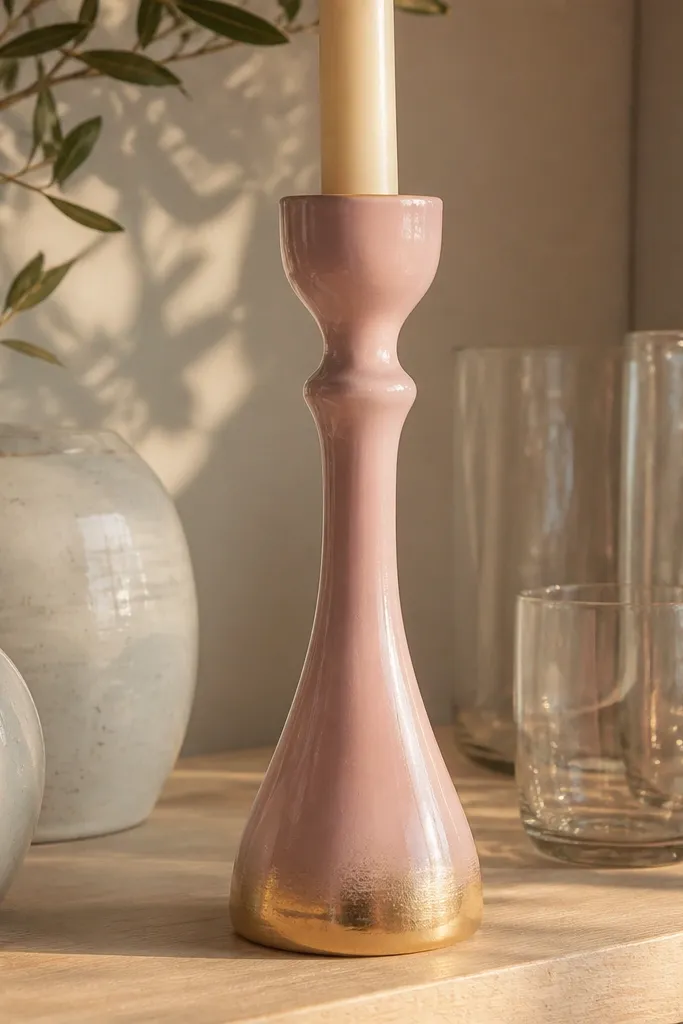
This is the “pretty but not loud” candle look. Rose quartz pink is gentle, and the metallic edge fade gives you that glow when light hits the bottom. It makes a shelf look more polished without requiring a full pattern. Pair it with clear glass holders or pale ceramics for best contrast. Skill level is beginner; it’s mostly painting and a careful metallic finish. Time is about 40-60 minutes.
Step 1: Paint the candle base rose quartz pink and let it dry. Step 2: Load a small brush or sponge with metallic gold and apply it only along the bottom 1-2 inches, blending upward with light taps. Step 3: Use a clean dry brush to soften the transition so it looks like a fade, not a hard line. Step 4: Seal with satin clear coat to protect the gold and smooth the finish.
Editor's noteMetallic paint hides streaks better when you tap instead of brushing long strokes.
Skip thisAvoid matte sealing on metallic edges; it kills the glow.
17. Chocolate Drip Top with Cream Speckle Base
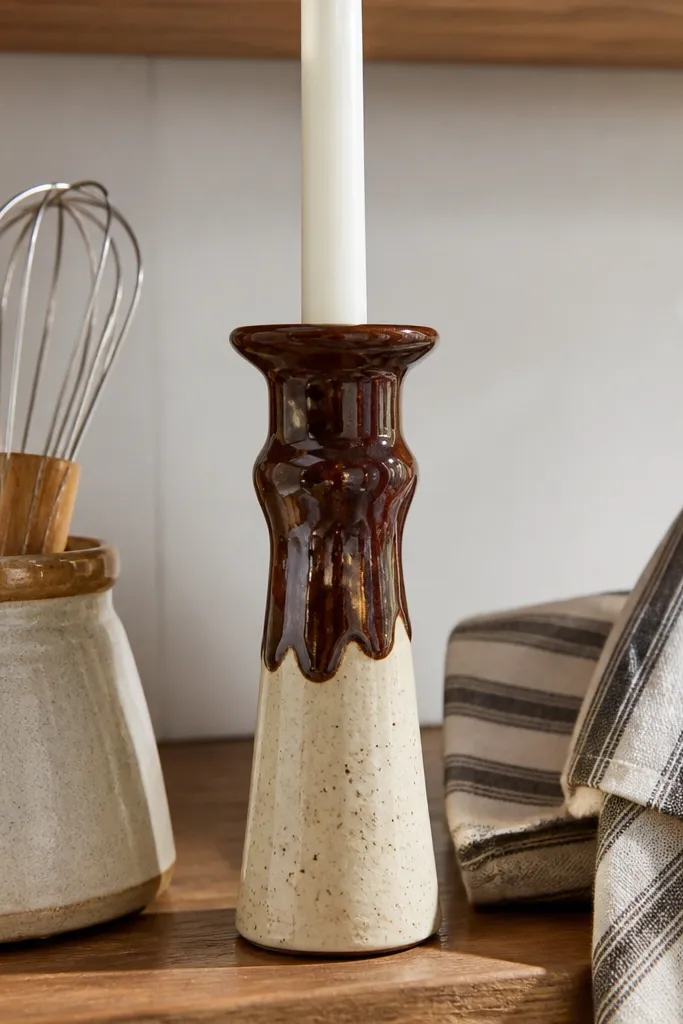
Drips are fun, and they look extra cozy when the base is speckled like cake batter. This style gives you a bold top moment that reads clearly from across the room. Use chocolate brown for the drip and cream for the base, then add tiny speckles to tie it together. It’s a great choice for kitchen shelves, baker-style decor, or anyone who likes playful aesthetics. Time is about 60 minutes because you need controlled drip edges.
Step 1: Paint the base cream. Step 2: Add speckles using diluted brown paint and a stiff brush flick. Step 3: For the drip, paint a thick horizontal line near the top, then pull downward with the tip of a brush to create 6-10 drips of different lengths. Step 4: Add a second thin chocolate line at the top edge for definition. Step 5: Seal with matte or satin clear coat after everything is dry.
Editor's noteMix drip paint slightly thicker than your base paint so it holds shape.
Skip thisDon’t make drips all the same length; repetition makes it look like a stencil.
18. Winter Snowcap with Blue Ombre and White Peaks
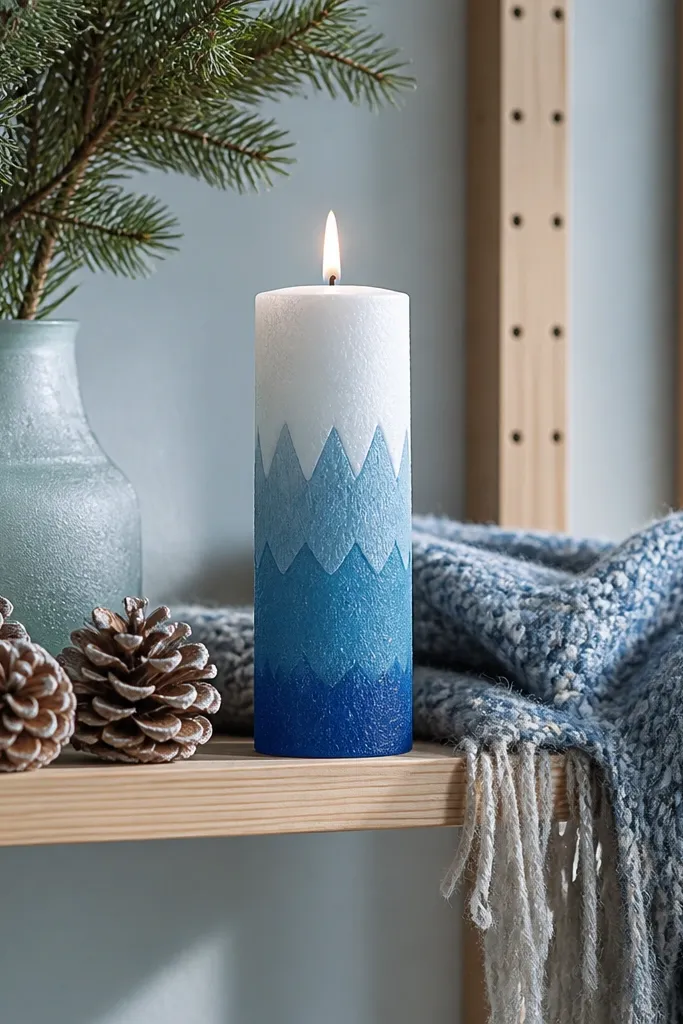
Snowcap peaks look cozy and graphic, and they’re one of the easiest ways to make a candle feel seasonal. The blue ombré gives depth, while the white peaks look like snowdrifts. This is a strong shelf idea because the top area grabs attention even when candles are grouped. Keep the palette simple: one blue range and white. Time is about 60-75 minutes for blending and peak detailing.
Step 1: Paint a blue ombré from deeper blue at the bottom to lighter blue near the top. Let dry. Step 2: Paint the snowcap by creating jagged peaks with white paint, then add a second thinner white highlight along the peak edges. Step 3: Lightly dry-brush a tiny amount of light grey between peaks to add depth. Step 4: Seal with satin clear coat so the snow stays bright in photos.
Use the corner of a flat brush for peak edges; it makes cleaner triangles than a round brush.
Avoid pure white everywhere; add grey shadows so the peaks look dimensional.
19. Sunset Gradient with Crackle Glass-Look Top Coat
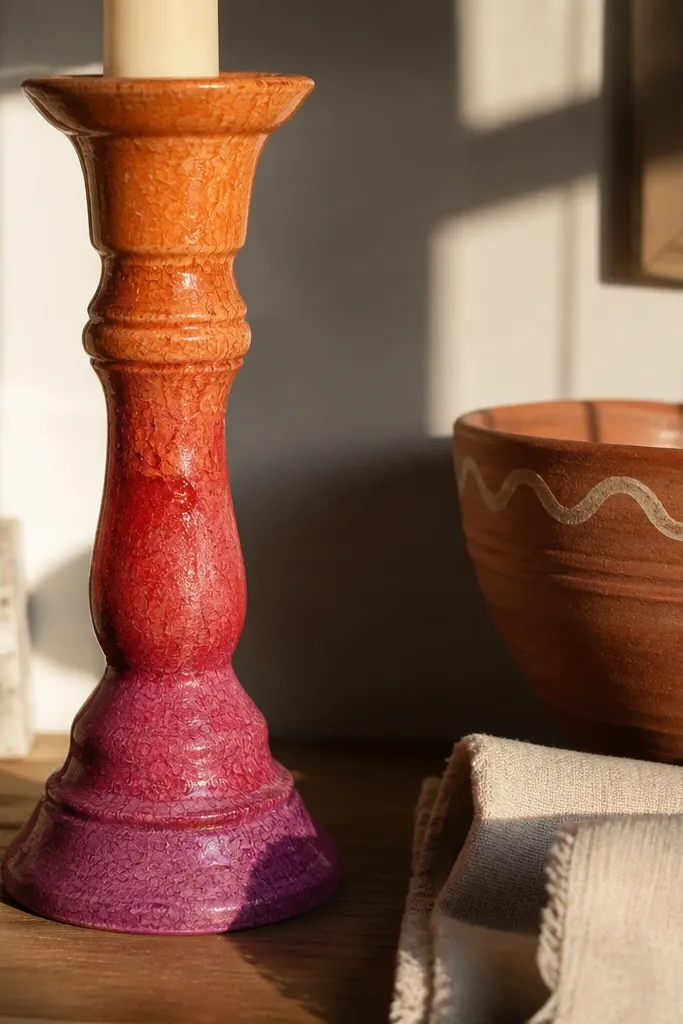
This one looks like sunset glass, and it stays photogenic from every angle. You paint a smooth orange-to-magenta gradient, then seal it with a crackle top coat so the surface breaks into tiny, even lines like aged stained glass. It makes plain candle sticks look expensive without needing gold leaf or complex stencils. The finish is glossy enough to catch warm light, so it reads cozy in photos and in real life. Skill level is beginner-friendly — the only tricky part is mixing paint consistency so the gradient looks smooth.
1) Paint the candle stick in 3 quick bands: deep orange at the base, peach in the middle, and magenta near the top, then blend with a damp foam brush so the edges fade (about 2-3 minutes of blending per stick). Let it dry fully, then apply a crackle medium in an even layer with a cheap flat brush; keep the strokes light so you don’t create thick ridges. 2) Once the crackle layer is tacky, brush on your clear crackle top coat over it in one direction — don’t keep re-brushing the same spot. You’ll see the crack pattern form as it dries. 3) After it cures, add a final thin clear coat only if the crackle feels rough to the touch, and let it dry with good airflow.
Use foam brushes for the gradient — bristle brushes leave streaks that fight the crackle pattern later.
Don’t rush the crackle medium — if the layer is too wet, you get smears instead of crisp crack lines.
20. Antique Map Coordinates with Compass Rose Center
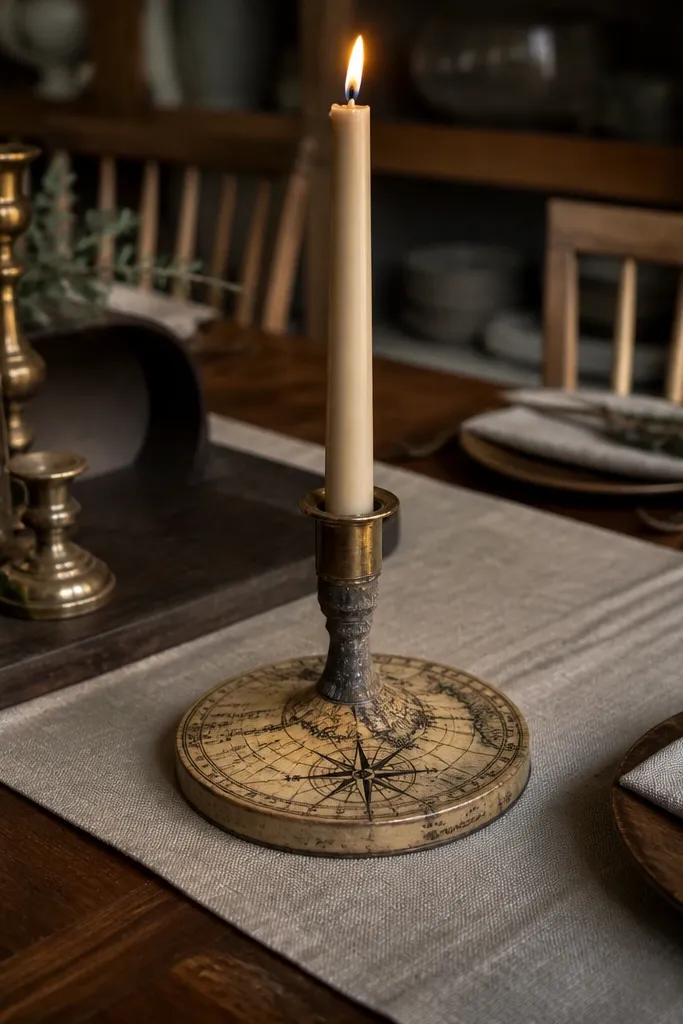
This turns candle sticks into a cozy “found object” piece — the kind that looks good grouped on a shelf or dining table. You get a muted, vintage base with cartography lines, then a compass rose as the focal point so the design has structure even from a distance. It fixes the problem of simple paint patterns looking flat — the compass adds a clear center and the coordinates add texture. Materials are cheap and the look hides small brush imperfections because the lines are meant to look printed and slightly worn. It’s a medium-skill project, mostly because you need steady hands for the compass lines, but the rest is forgiving.
1) Start with a warm parchment base: paint the whole candle stick in matte cream, then glaze over it with diluted tan-brown paint so it looks faded. While it’s still slightly tacky, lightly drag a dry brush with gray paint to create thin map-like streaks; keep it subtle and uneven. 2) Trace latitude and longitude arcs using a pencil first — draw 3 curved lines spaced about 1 cm apart across the middle area, then add small tick marks. Paint the arcs in a dark sepia using a fine liner brush, and wipe any mistakes with a damp cotton swab before it dries. 3) For the compass rose, stencil or freehand an 8-point star in the center, then add a ring around it and a few micro text lines like “N E S W” (keep the letters small, about the width of a match head). Seal with a matte or satin clear coat so the printed look doesn’t turn plasticky.
Editor's noteIf you want the coordinates to look like ink, thin your sepia paint with a drop of water and test on paper first — liner brushes behave better at a milk-like consistency.
Skip thisSkip thick paint for the text — heavy paint blobs ruin the vintage map effect fast.



