
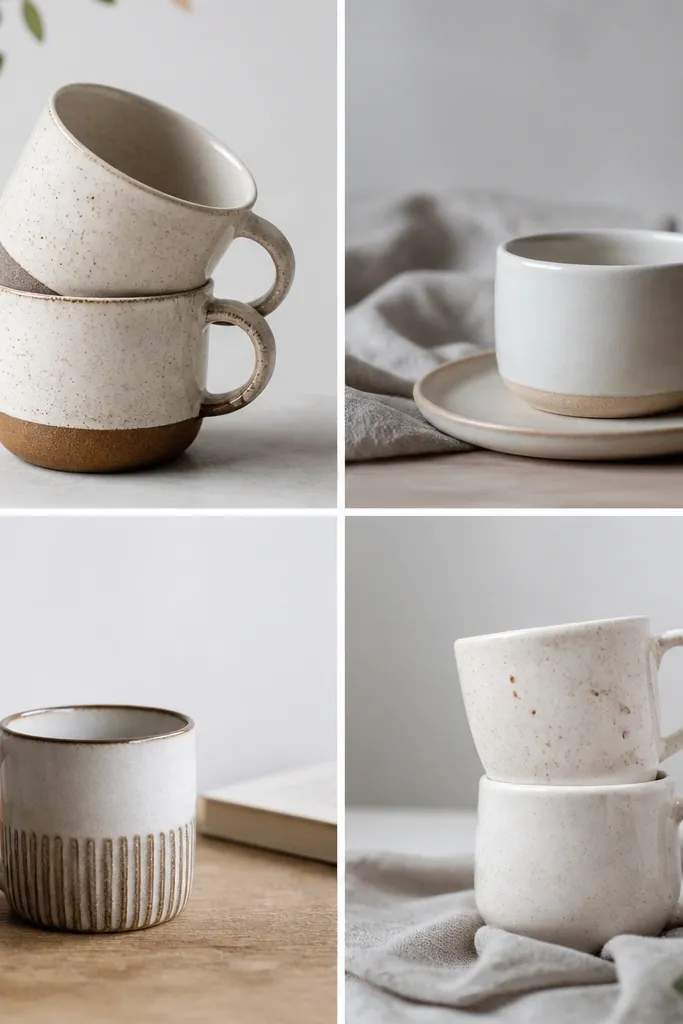
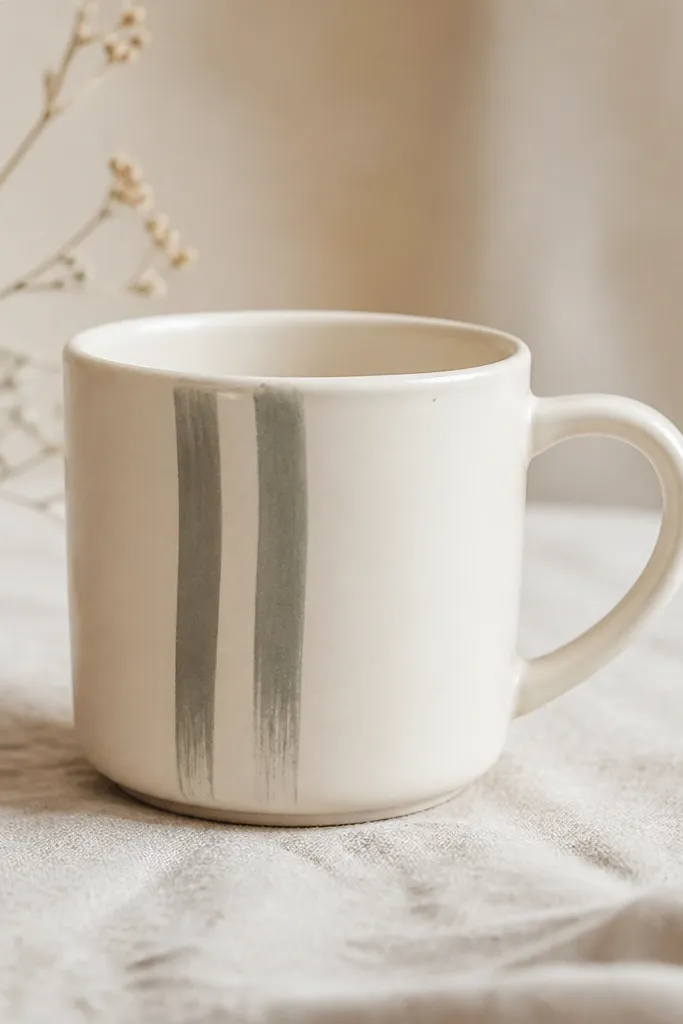
1. Single-Stripe Clay Band in Warm Sand
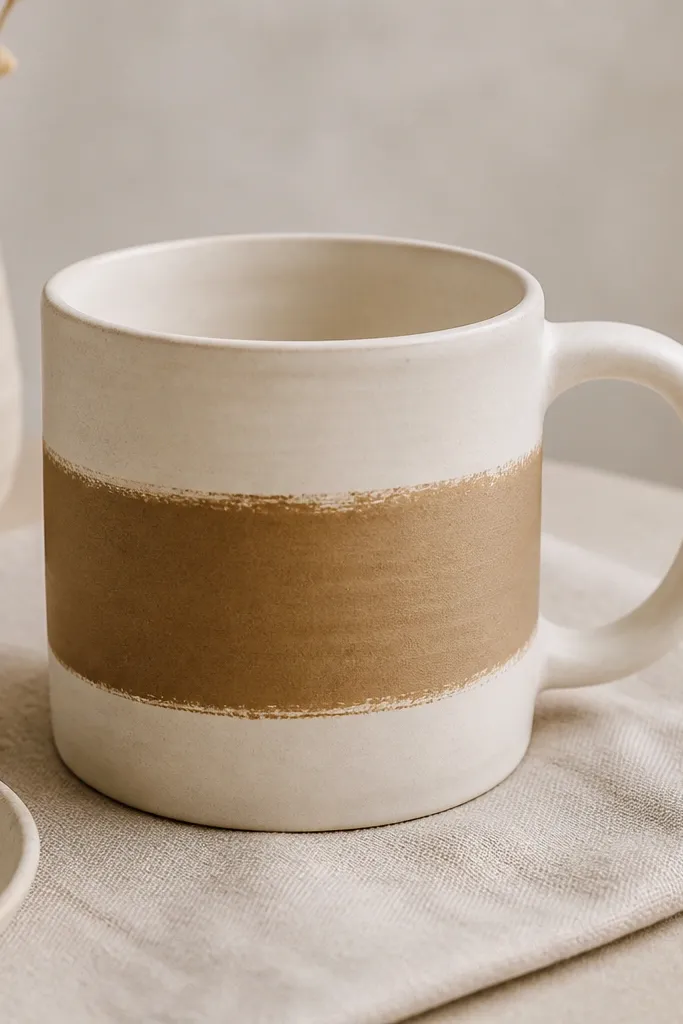
This look works because one band gives structure without clutter. I like warm sand because it reads cozy against a light mug and it doesn't fight with different home colors. The hand-brushed edge keeps it from looking industrial, but the stripe stays thick enough to hide minor unevenness. It feels modern because the stripe is straight and minimal, not decorative.
Roll out a slip or use underglaze in a warm sand tone, then brush one band around the mug at the same height all the way around. Keep the band width at about 1.5 to 2 inches. After firing, if you're sealing, use a satin clear glaze or a satin topcoat that won't turn the band chalky.
Pro tipDry-fit the stripe height with painter's tape before you paint so it lands exactly at the same level around the whole mug.
AvoidDon't make the band too thin - thin lines show every wobble and look like a sticker.
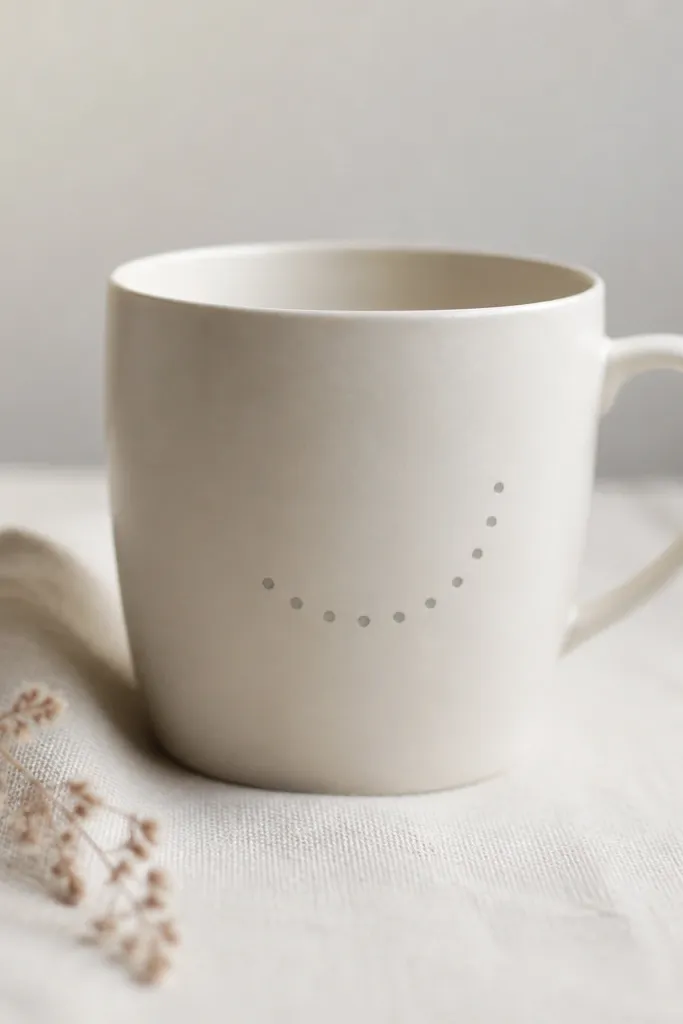
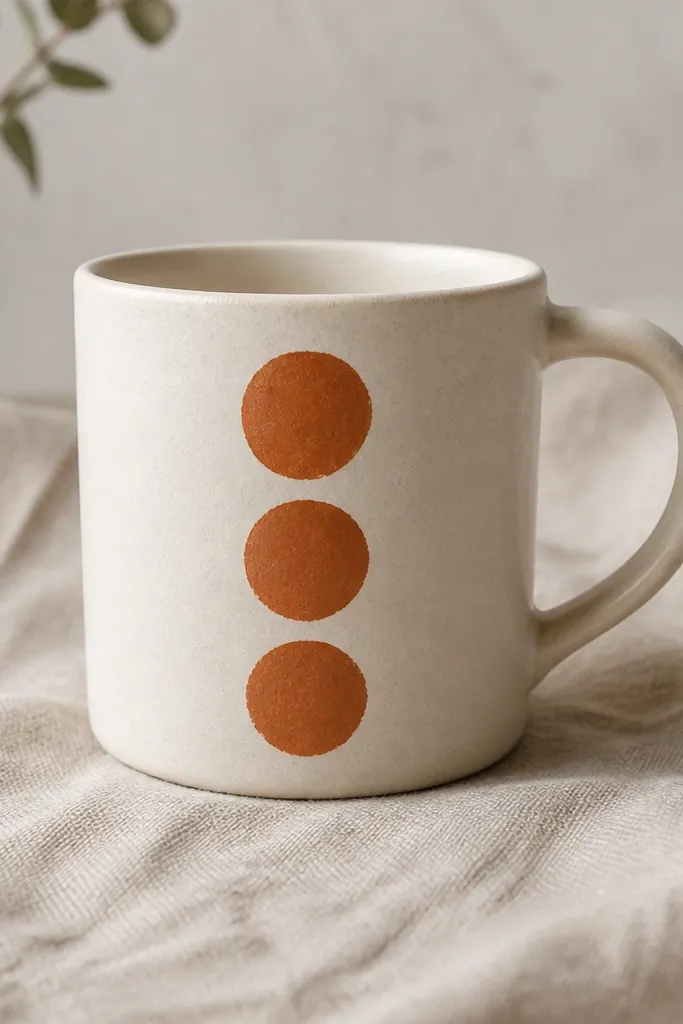
2. Handle-Side Dot Column in Charcoal
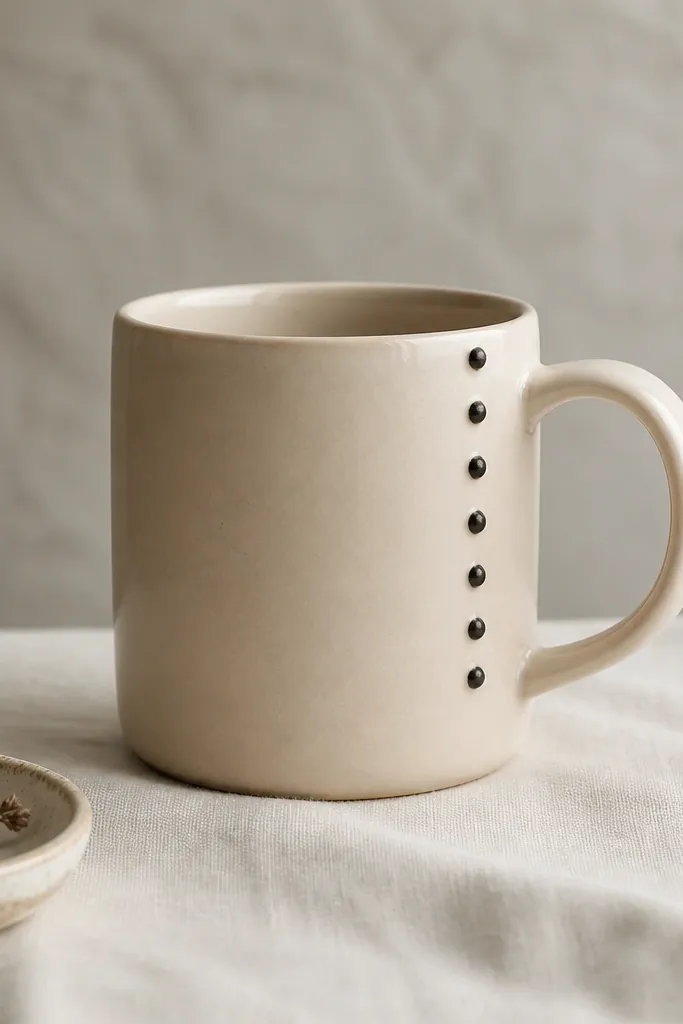
A dot column is minimalist but still reads as intentional. Charcoal gives contrast without going harsh like black. The vertical rhythm makes the mug feel taller, which looks good in photos. I've used this on gifts for coworkers and it always looks "designed," even when the mug is otherwise plain.
Mark a straight line on the mug using a removable pencil or light tape. Stamp or paint 7 dots, each about 6-8 mm wide, spaced evenly. Seal with a clear coat made for painted ceramics, and let each layer dry fully before the final coat.
Pro tipUse a toothpick for dots - load it lightly and tap straight down for consistent circles.
AvoidSkip freehand dots without spacing marks - uneven gaps make it look accidental.
3. Monochrome Leaf Shadow with One Accent Leaf

This design works because most of it stays quiet in monochrome, and one leaf gives personality. The muted olive reads cozy and modern, especially when the rest is soft gray. I like using a leaf stencil because it keeps the pattern consistent on a curved surface. The result looks like it belongs in a calm, Scandinavian kitchen.
Stencil or sponge a light gray leaf pattern around the bottom third using a foam stencil brush. Choose one leaf near the handle and paint it olive, leaving the other leaves gray. After drying, seal with a clear matte or satin topcoat so the gray pattern doesn't shine.
Pro tipUse a paper towel to blot your stencil brush before you apply so the leaves look like shadows, not solid blocks.
AvoidDon't add more than one accent color - two accents turn it into a busy pattern fast.
4. Two-Tone Rim Fade in Clay Pink
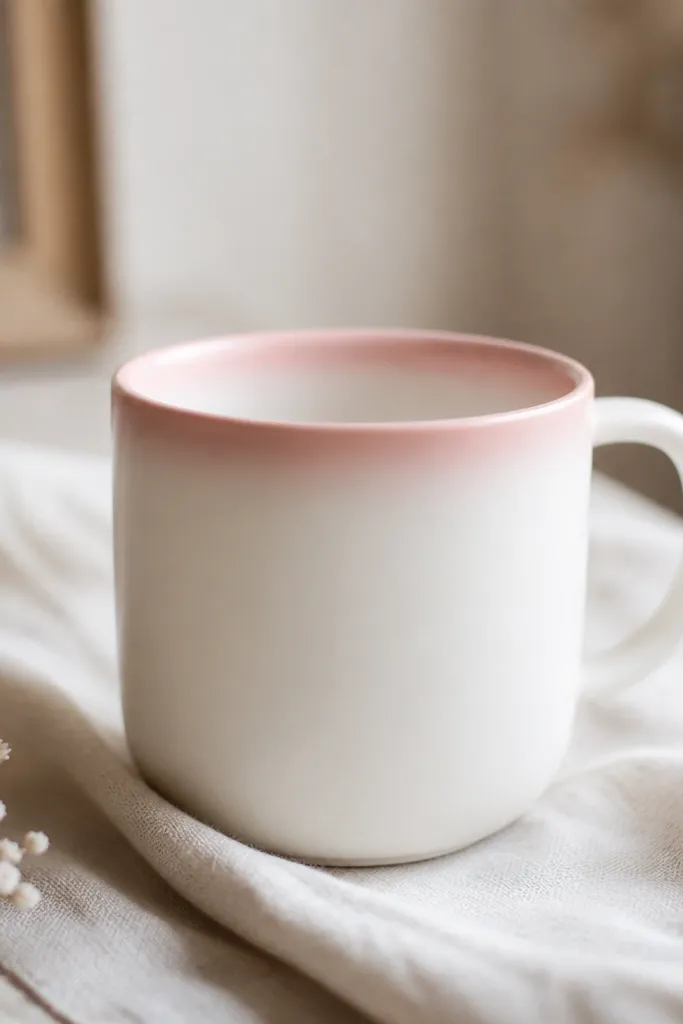
A rim fade looks fancy because your eye hits the top first when you lift the mug. It's also modern because it's controlled and small. Clay pink is warm and flattering on camera - it doesn't look like bubblegum. When the fade is smooth, it reads like ceramic glaze work rather than paint.
Use a sponge or makeup wedge to apply clay pink only at the rim, then lightly blend downward into white. Keep it to about 3-5 mm thick at the top. Seal with a clear topcoat that dries evenly so the fade doesn't dull in spots.
Pro tipPractice on a scrap ceramic plate or tile first so you can control the blend pressure.
AvoidAvoid wet brushing - it creates streaks that look cheap on a rim.
5. Minimal Mountain Line Near the Handle
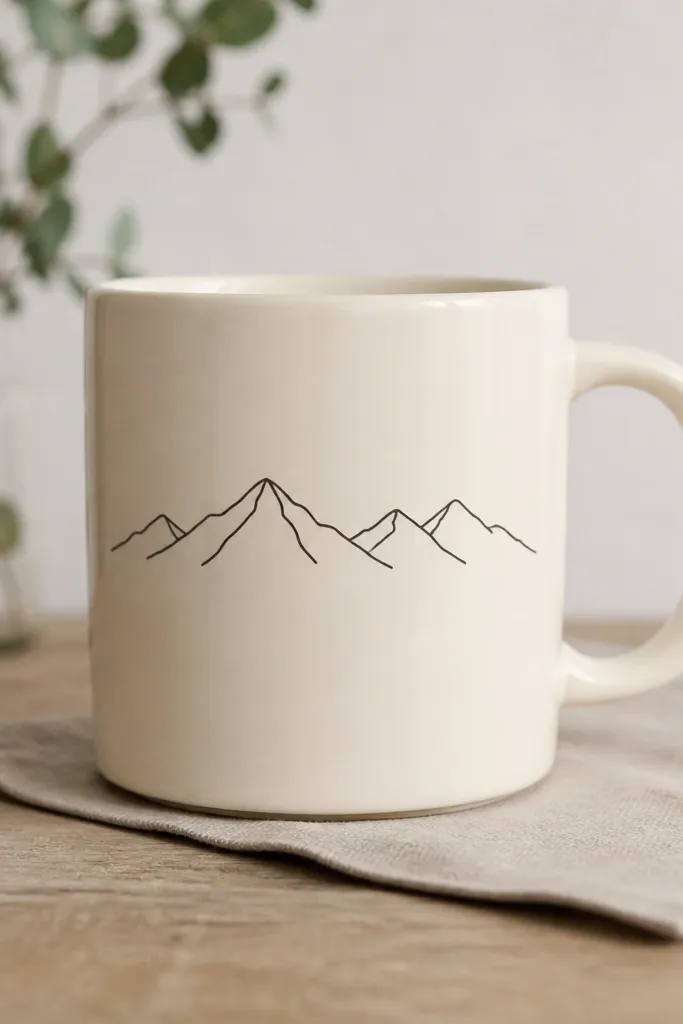
One continuous line drawing feels modern because it's graphic and restrained. Thin black line keeps it crisp and doesn't compete with the mug color. I've made this for people who love hiking and it still looks good in an apartment with neutral decor. The key is keeping the line simple - no extra peaks, no filling.
Use ceramic liner paint or a paint pen made for dishware. Sketch lightly with pencil first, then paint one continuous mountain silhouette. Place it 1 inch below the rim so it doesn't get crowded by the handle curve.
Pro tipLet the first line fully dry before you add any second pass; otherwise the line thickens and loses that minimalist feel.
AvoidDon't add dots, stars, or extra icons - the drawing needs space to look intentional.
6. Satin Black Band with Micro-Texture
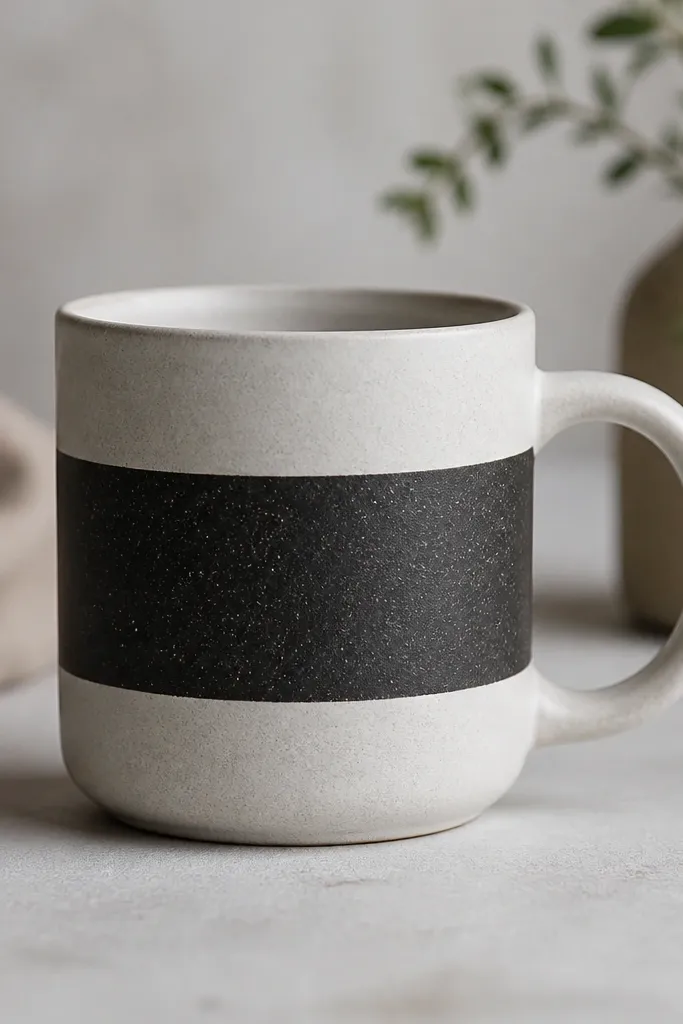
This is the "modern coffee shop" look. Satin black reads sleek, and the micro-texture keeps it from looking like a plain sticker. I like the speckle effect because it hides tiny brush marks and makes the band feel handmade. It also photographs beautifully since satin reduces glare.
Paint a satin black band using a sponge brush so it deposits evenly. For texture, tap a second layer with a toothbrush loaded with a tiny amount of watered-down black paint - keep it subtle. Seal with a satin clear coat compatible with painted ceramics.
Pro tipMask the band edges with painter's tape and remove the tape while the paint is still slightly tacky for the cleanest border.
AvoidDon't use glossy black - it shows every uneven spot and looks like craft paint.
7. Upcycled Denim Patch Pocket Mug
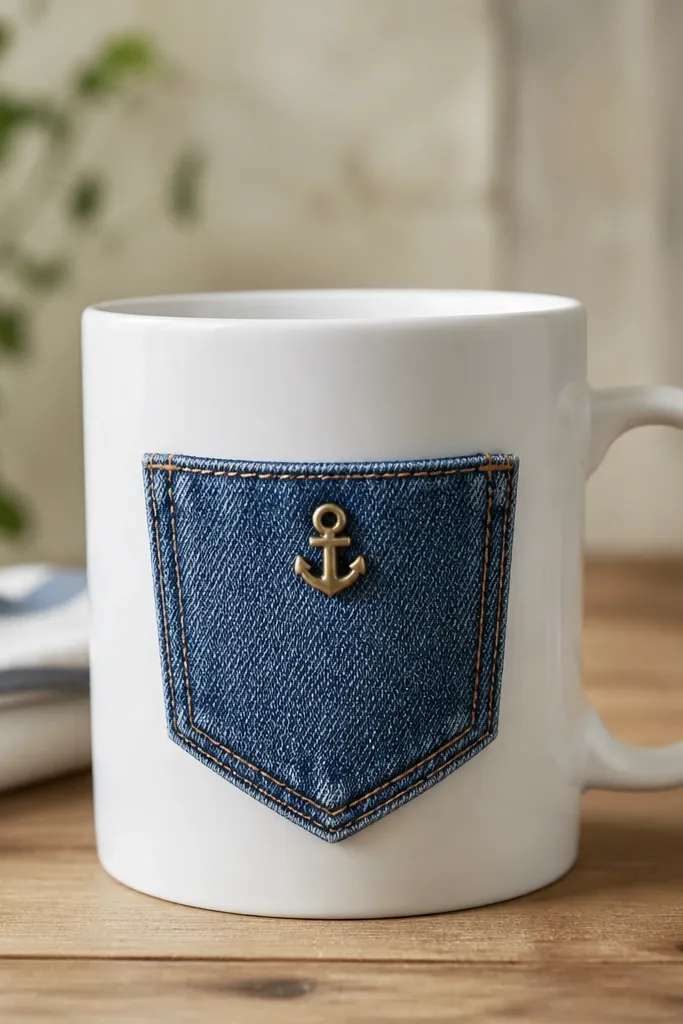
Denim patch details make a mug feel like a repurposed object, not a generic craft. The texture shows through the clear seal, which keeps it interesting up close. The modern part is the simple pocket shape and the limited palette: indigo + off-white. This one is great for work-from-home gifts because it looks cozy without being childish.
Cut a denim patch about 3.5 x 2.5 inches and hem the edges or use fray-check. Glue it to the mug with a strong fabric-safe adhesive, then seal over the patch with a clear topcoat made for mixed materials. Keep the patch below the rim so it never contacts lips.
Pro tipSand the denim lightly where it will sit flat so you don't get bubbles under the sealant.
AvoidDon't place fabric near the drinking area - even sealed cloth can wear faster from heat and scrubbing.
8. Silver Leaf Corner Accent on Matte White
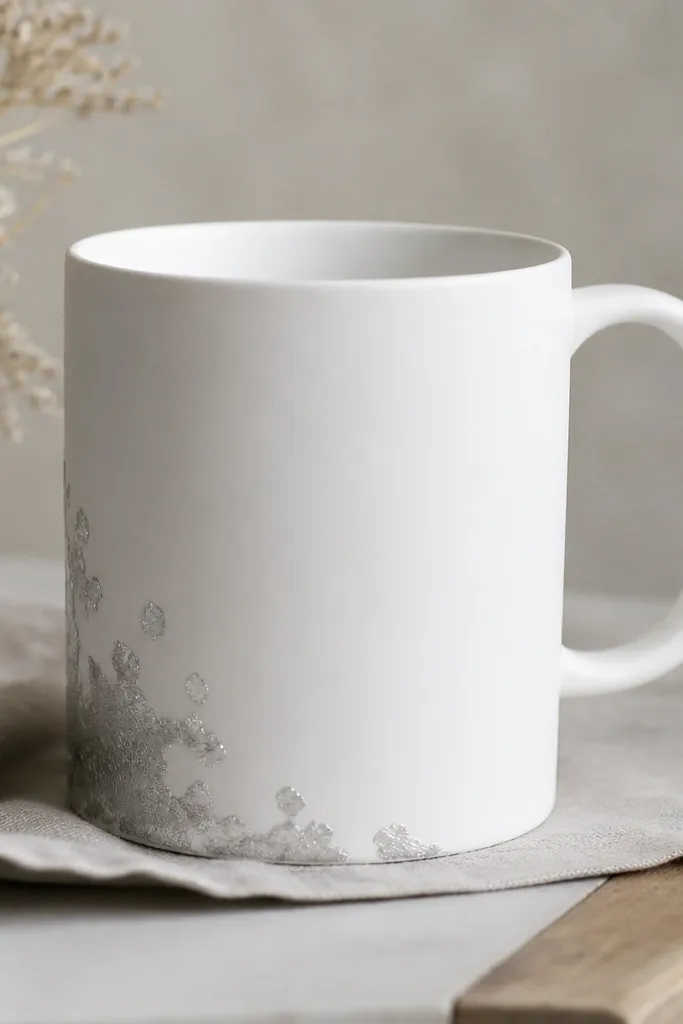
Silver leaf gives instant "gallery" energy while staying minimalist because it's only in one corner. Matte white is the perfect partner since it kills glare and makes the leaf pop. I used this for a friend's birthday and it looked expensive even though the design is tiny. The irregular edge keeps it handmade instead of geometric-perfect.
Apply a thin adhesive leaf size to a small corner area, then lay silver leaf pieces and press lightly. Burnish with a soft cloth. Seal with a clear topcoat so the leaf doesn't shed, and let it cure fully before washing.
Pro tipPractice on cardboard first so you learn how much leaf to tear off - too much makes it look messy.
AvoidDon't seal too soon - leaf can smear if the adhesive is still tacky.
9. Washi Tape Negative Space Frame
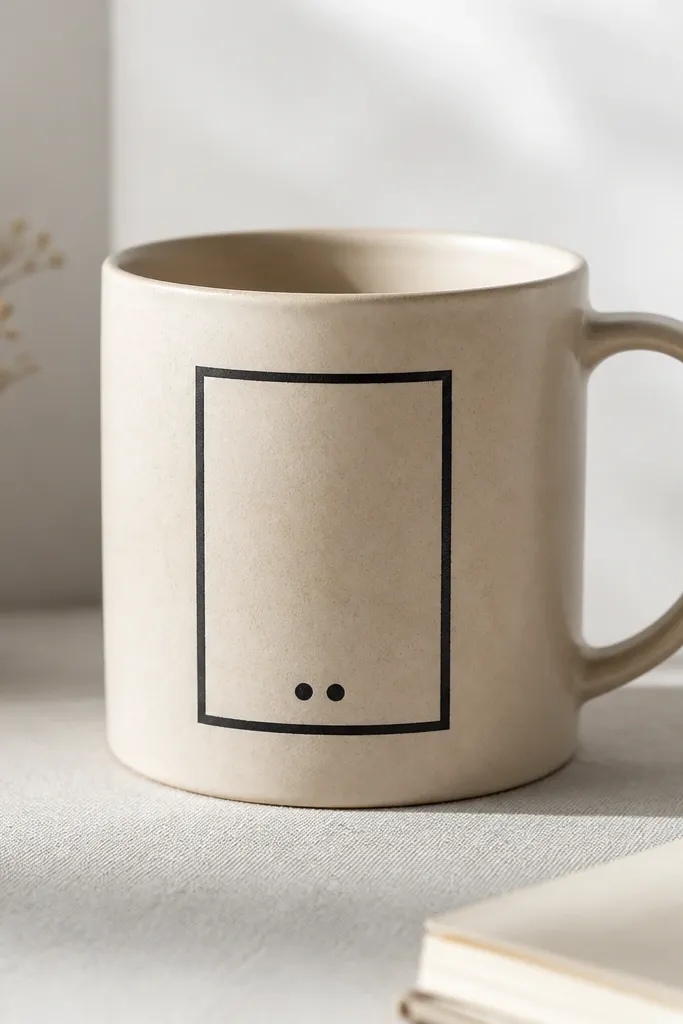
Negative space makes this look modern. The tape acts like a drawing tool, and you don't have to paint the whole mug. I love black washi on light mugs because it feels graphic and clean. The tiny dot at the bottom adds personality without turning into a pattern.
Apply washi tape to form a rectangle about 3 x 2 inches, with the bottom edge parallel to the handle. Add two small dots with ceramic paint inside the frame. Seal over the tape and paint with a clear topcoat made for dishware.
Pro tipPress tape edges firmly with a plastic card so the sealant doesn't creep under.
AvoidAvoid thick tape layers - raised edges catch water and wear faster.
10. One-Line Monogram in Terracotta
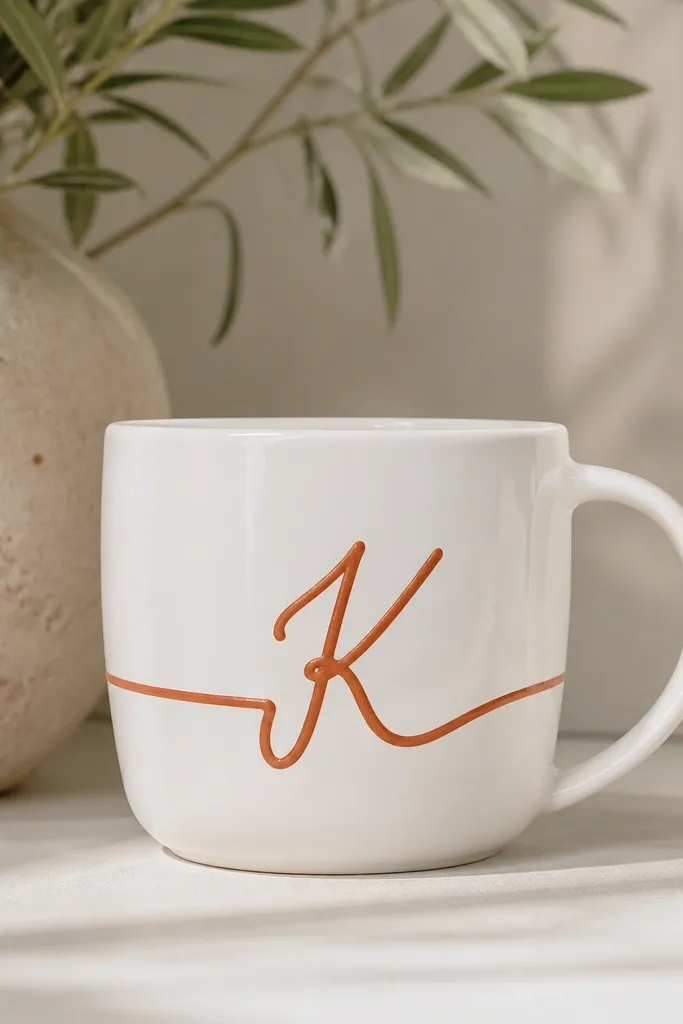
A one-line monogram stays minimalist because it's one shape, one color. Terracotta feels warm and handmade, and it doesn't look harsh like bright orange. When the line is clean and consistent, the mug reads modern even if the person is sentimental. I've used this for couples gifts and it always gets compliments.
Use a ceramic paint pen or liner brush for a steady stroke. Place the monogram about 1 inch below the rim and keep it narrow so it doesn't stretch over the handle curve. Seal with a clear coat and let it cure for the full time on the bottle.
Pro tipWrite the letter on paper first, then place the paper against the mug and trace lightly with a pencil before painting.
AvoidDon't go over the line repeatedly - thick strokes look like brush paint, not clean monogram work.
11. Geometric Tape Triangle Accent
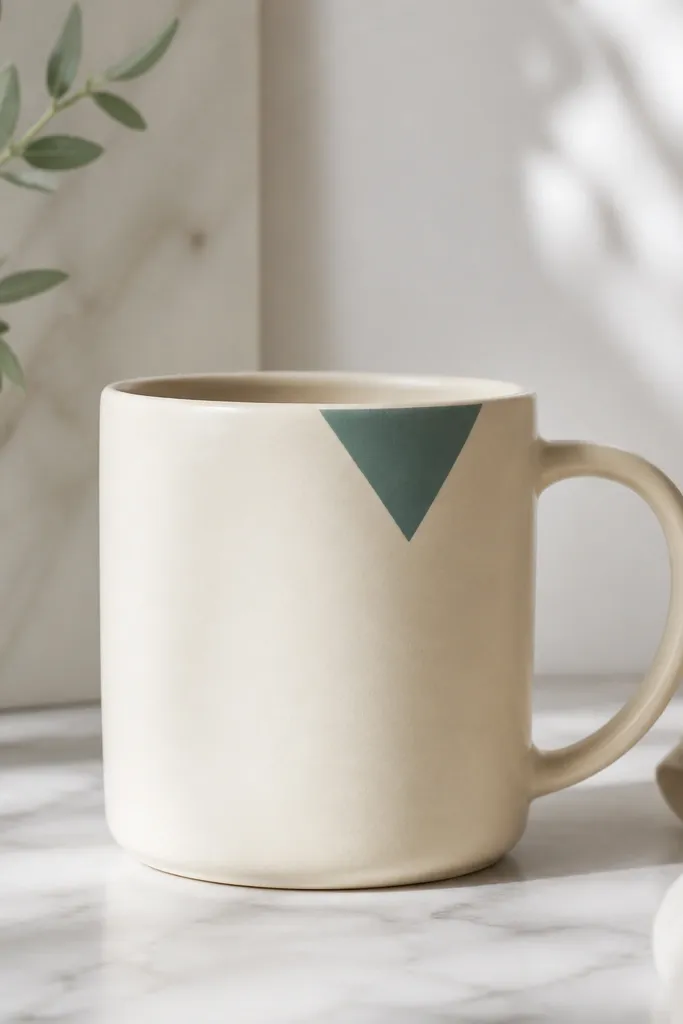
Tape-cut geometry is the fastest way to get sharp modern shapes. Matte teal gives a cool accent without overpowering the mug. This design works especially well on mugs with a simple silhouette because the triangle has room to breathe. It's small enough to stay minimalist but visible enough to feel personalized.
Mask a triangle area using painter's tape or vinyl stencil tape. Paint matte teal in one thin layer, let dry, then remove tape. Seal with a matte or satin clear coat so the triangle doesn't turn glossy and look like sticker residue.
Pro tipRemove tape within 10-20 minutes of painting so edges stay crisp.
AvoidDon't use painter's tape meant for walls - the adhesive can leave residue on ceramic.
12. Matte Speckle Base with Clean White Top
Speckles create texture without adding a busy graphic. Keeping the top clean makes it modern and makes the mug easy to pair with any kitchen. The straight boundary line is the trick - it turns random specks into intentional design. I've found people love this because it looks like artisan glaze even when it's painted.
Mask the upper section with tape to get a straight line. Use a toothbrush technique: load gray/black paint on the brush, flick onto the masked lower area. After drying, remove tape and seal with a clear matte or satin coat.
Pro tipUse two speckle colors - one dark and one medium gray - so the texture looks layered.
AvoidDon't flood the speckle area - heavy paint turns into blobs instead of speckles.
13. Single Vertical Band with Tiny Breaks

A vertical band adds movement and makes the mug feel taller. The tiny breaks keep it from looking like a perfect decal, which is where minimalist designs can accidentally feel sterile. Charcoal is forgiving and hides small brush imperfections. This one is great for gifts where you want "clean but not boring."
Paint a vertical band about 3/4 inch wide using a small flat brush. Add three small gaps by wiping the paint away with a damp cloth or by leaving small spots unpainted. Seal after full drying, using satin so the band doesn't glare.
Pro tipKeep the band on the side opposite the handle so the viewer sees it without the handle curve breaking the line.
AvoidAvoid very dark glossy paint - it shows streaks and drips instantly.
14. Wreath of One Line Tiny Dots
Tiny dots near the handle look delicate but still modern because they're controlled. The half-wreath shape feels like a frame for the mug without taking over the surface. Light gray is subtle enough for everyday use, and it doesn't clash with other decor. I like this for birthdays because it feels like a nod to celebration without loud colors.
Use a dotting tool or the tip of a toothpick to place dots along an arc. Make the arc about 2 inches wide and keep it near the handle so it's visible when the mug is on a desk. Seal gently so the dots don't get blurred.
Pro tipIf dots smear, wait until the paint is dry, then go back for a second layer instead of pressing harder.
AvoidDon't make the dots too large - big dots look like polka dots, not a minimalist wreath.
15. Decoupage One-Word Strip in Black
A single-word strip gives personality while staying clean. The key is that it's narrow and straight, so it reads like a label, not a collage. I've used old book pages, but only printed text works best because the letters stay crisp. The black-on-cream contrast feels modern, and the sealed paper texture adds depth.
Cut a strip of printed text paper about 1 inch wide and 3 inches tall. Brush a thin layer of decoupage medium, place the strip, then smooth from center outward. Seal with multiple thin coats, letting each cure, and keep the strip away from the lip area.
Pro tipUse a laser-printed font if you can - ink edges stay sharper after sealing.
AvoidDon't use thick, fibrous paper - it creates bumps under the seal.
16. Color Block Quarter Panel in Dusty Blue
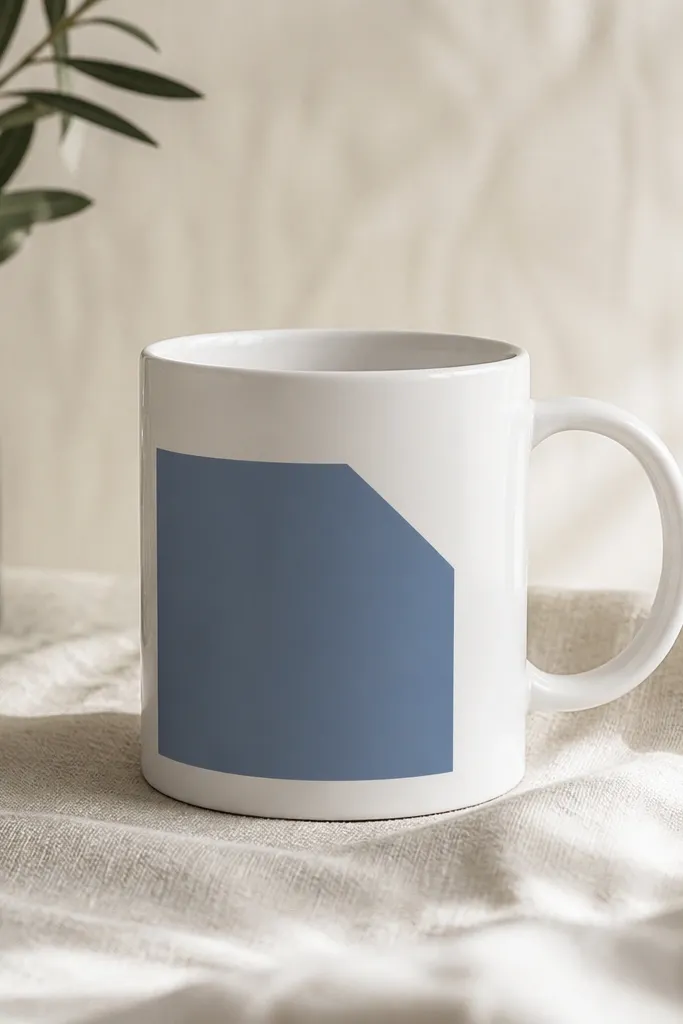
Color blocks look modern when they're crisp and limited to one panel. Dusty blue is calm and works with both warm and cool kitchens. I like using a quarter-panel shape because it feels designed, not random. It also hides small surface imperfections because the block is flat and matte.
Mask a quarter-panel area using tape, then paint dusty blue with ceramic paint. Keep the panel about 2 x 1.5 inches and place it near the handle. Seal with a matte or satin clear coat and cure fully before washing.
Pro tipBurnish tape edges with a fingernail so paint doesn't seep under and blur the edges.
AvoidDon't blend the block edges - soft bleeding makes it look messy.
17. Tiny Icon Stack - Sun, Dot, Line
Small icon stacks feel personal without becoming a theme park. The sun reads playful, but the dot and line keep it minimalist. Muted gray stays classy and doesn't scream for attention. I made this for a friend who likes stationery and she uses it every day.
Paint icons using a stencil or a paint pen. Size them so the stack fits within a 2-inch tall rectangle. Seal with a clear coat and avoid the inside rim so the icons don't wear from scrubbing.
Pro tipKeep icon stroke width consistent by using the same pen tip angle for every mark.
AvoidSkip tiny details that require shading - they blur after sealing.
18. Handle Wrap in Minimal Knit Yarn
This one isn't paint at all, which is why it stays clean. A yarn handle wrap makes the mug feel cozy and handmade instantly. The modern part is that it's only on the handle - the body stays minimal. I've used it for winter gifts where people want something warm to hold, not just look at.
Use thick cotton or wool yarn and wrap tightly around the handle base, leaving about 1/4 inch gap from the rim. Stitch the ends underneath with invisible thread or a hidden knot. If you want durability, add a thin fabric glue dab where ends meet and let it cure fully.
Pro tipMeasure the handle circumference once and wrap with the same tension each pass so it doesn't twist.
AvoidDon't wrap with slippery acrylic - it loosens after a few uses.
19. Upcycled Paint Chip Color Bar

Paint chips are perfect for modern minimal because they already come in neat rectangles. Layering a few shades creates a subtle gradient without painting. The border keeps the collage from looking messy, and the grays pair with everything. I've made this for apartment housewarmings and it looks like real design material.
Cut 4-6 paint chip rectangles about 1 x 2 inches each. Stack them and glue to the mug side, then trim edges so the strip stays straight. Seal over the whole strip with a clear topcoat in thin layers so it dries flat.
Pro tipPick paint chips that are close in value (lightness) so the transition looks intentional.
AvoidDon't use too many colors - five chips max keeps it minimalist.
20. Matte Terracotta Stamped Circle Trio
Stamped shapes look handmade even when they're simple. Terracotta adds warmth and depth, and the circle trio gives a rhythm that feels modern. I like that the circles don't need perfect symmetry - the stamp texture makes small variations look charming. This works well for gifts where you want something graphic but not too personal.
Use a small stamp with terracotta ceramic paint or underglaze. Stamp three times vertically, spaced about 1 inch apart, keeping them within a 2-inch tall area. Seal with a clear matte or satin coat and cure fully.
Pro tipPress the stamp straight down for 2-3 seconds instead of swiping - it keeps the circle crisp.
AvoidAvoid glossy sealant over matte paint - it makes stamp edges look shiny and cheap.
21. One-Line Wave + No Other Markings
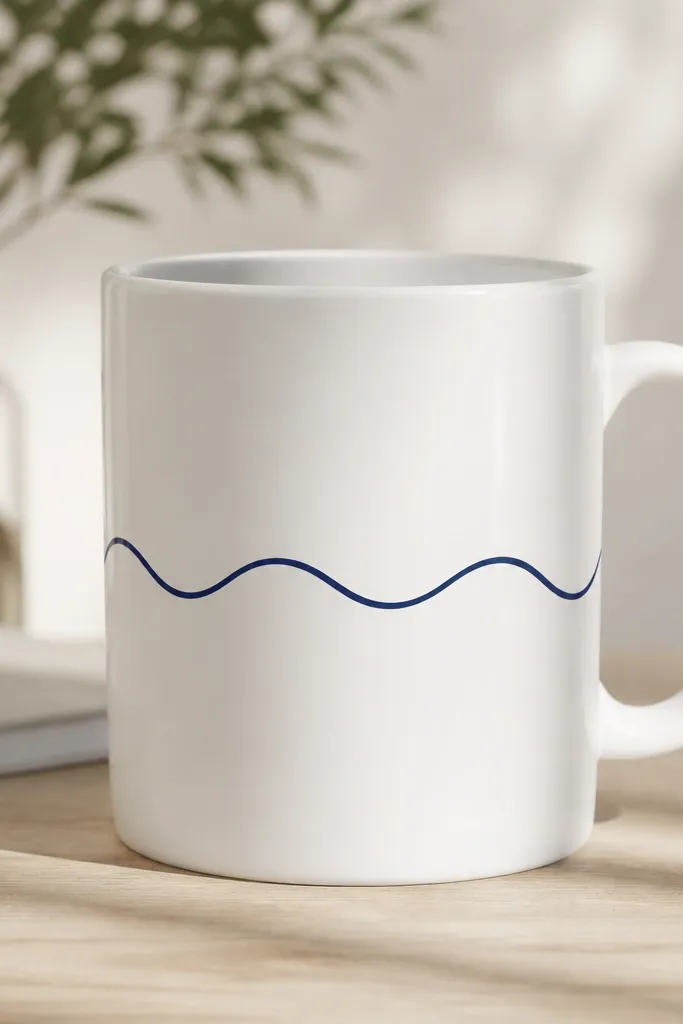
A single wave line is calm and modern because it's one idea, one color. Navy looks crisp and slightly nautical without going full theme. Keeping the mug otherwise blank makes the wave feel like a signature. I've used this for people who like ocean aesthetics but want something subtle.
Paint a wave line using a liner brush or paint pen. The wave should span about 3-3.5 inches and sit around the mug's center. Seal with dishware-safe clear coat so the line stays smooth and doesn't lift.
Pro tipMark the start and end points with tiny tape dots so the wave doesn't drift after the mug curve changes.
AvoidDon't add dots or extra swirls - one line needs space.
22. Sponge-Blurred Color Halo Bottom Third
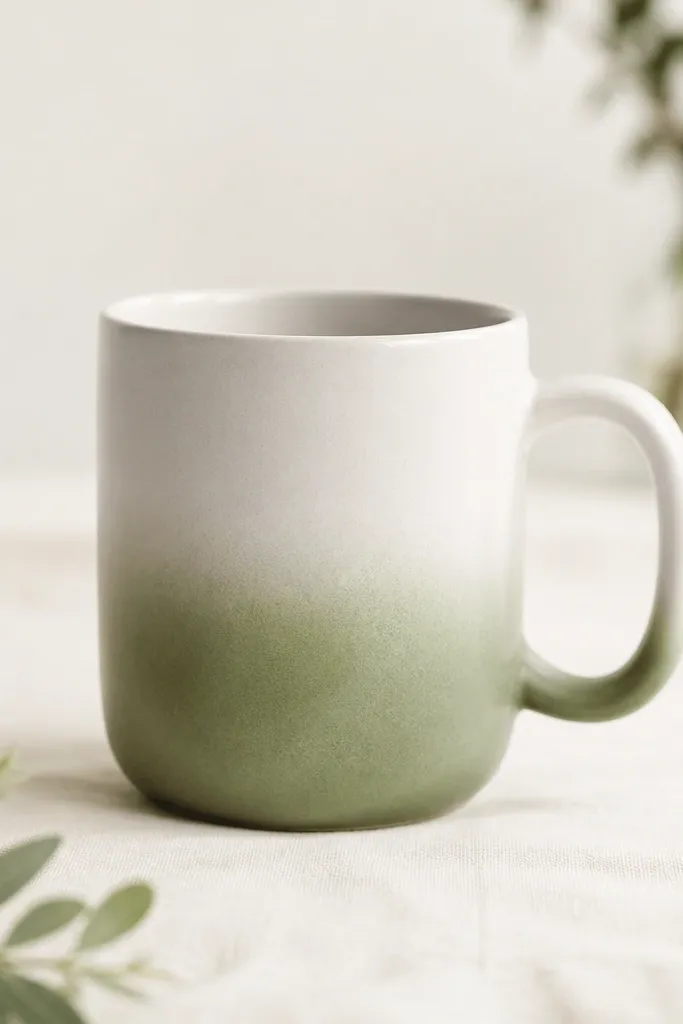
A halo fade feels artsy but still minimalist when it stays in one color family. Sage green reads modern and gentle, and the sponge blur hides brush marks. The bottom placement looks good because it doesn't interfere with the drinking area. This is one of my go-to looks for gifts because it feels handmade without needing fine line skills.
Mask the mug above the bottom third, then sponge sage green upward in light passes. Build color slowly so it fades, not blocks. Seal with a clear satin coat so the sponge texture stays soft.
Pro tipUse a dry sponge for the top fade and a slightly damp sponge for the darker bottom - it gives a natural gradient.
AvoidDon't use too wet paint - it creates hard tide lines.
23. Minimal Border Dots Around Base
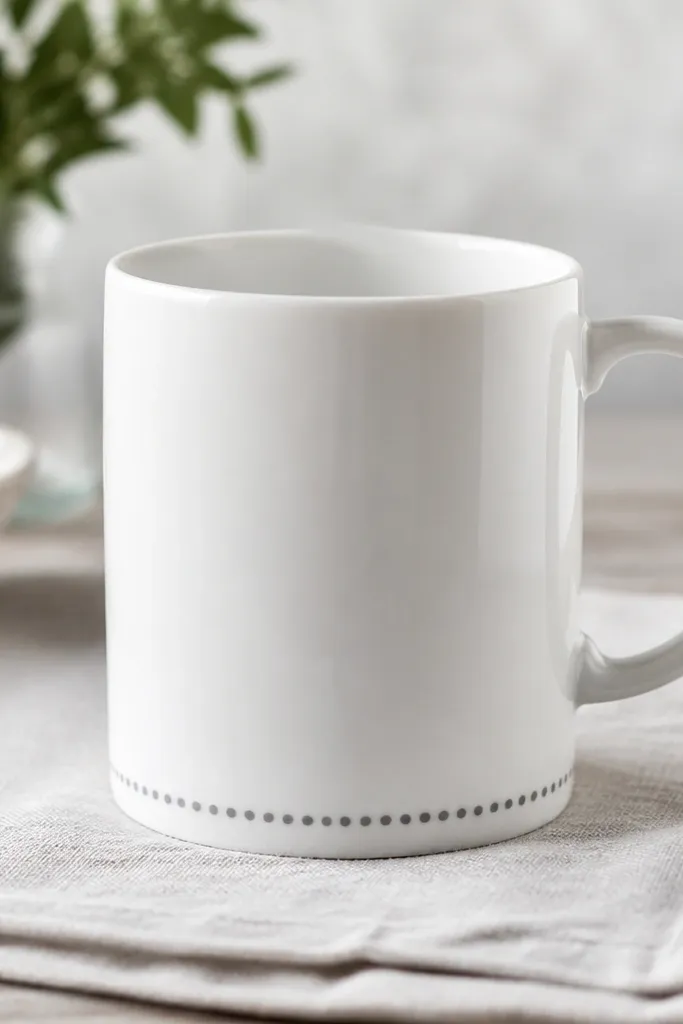
A base border is minimalist because it's peripheral. The ring of dots gives a finishing touch and makes the mug look intentional when viewed from the side. Gray keeps it calm, and the dot ring hides tiny imperfections near the base where mugs often have small manufacturing marks. I've made these for housewarming gifts and they always look "finished."
Paint dots around the bottom rim area, about 1/4 inch above the base. Space dots evenly using a stencil with spacing holes or by counting intervals. Seal with a clear coat and let it cure before any washing.
Pro tipRotate the mug and dot in one direction, counting out loud - it keeps spacing consistent.
AvoidAvoid random dot spacing - irregular rings look like you ran out of patience.
24. Monochrome Striping with Uneven Brush Edges
Uneven edges are what make striping look handmade instead of printed. Two stripes feels modern because it's minimal, and gray keeps it wearable. I like this look when the recipient likes art but doesn't want anything loud. The stripes also frame the handle visually without covering it.
Mask stripe areas with tape, then paint thin gray lines. Remove tape right away for crisp edges, then lightly "feather" the ends with a dry brush while paint is still workable. Seal with satin clear coat so the feathering doesn't look glossy.
Pro tipUse a small angled brush and load less paint than you think you need - thick paint makes stripes look like bands, not lines.
AvoidDon't do three or more stripes - it stops being minimalist fast.
25. Matte Black Quote Tag with Only Three Words

A quote tag works when it's short. Three words keeps it graphic and modern, and the black rectangle gives a label effect. I've used this for birthdays where the message is personal but not long enough to become clutter. Matte black also hides small edge imperfections better than glossy paint.
Paint or tape a black rectangle about 2 x 1.25 inches, then add white text using a paint pen. Seal carefully with a clear matte topcoat so the text stays readable. Keep the tag away from the inside rim so it doesn't get scrubbed.
Pro tipWrite the words on paper first and check spacing - text looks wrong faster than images.
AvoidSkip long quotes - more words means smaller letters, and small letters chip first.


