
1. Terracotta Linework Mug with Masked Stripes
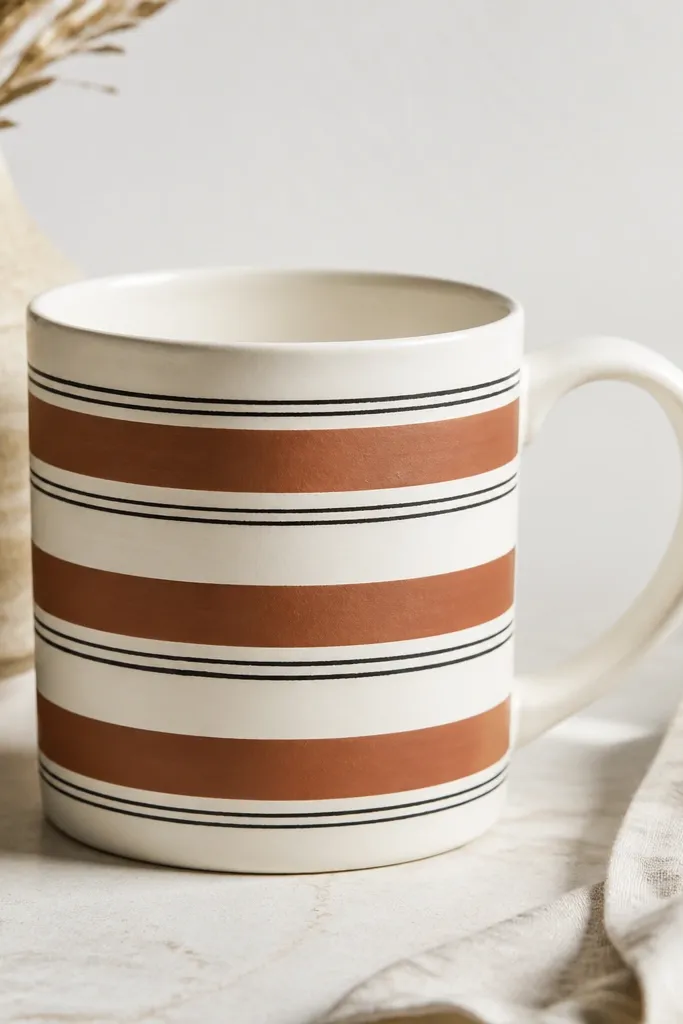
This one looks expensive because the stripes are clean and the linework is controlled. Use terracotta as the main body color, then add a thin black outline so the stripes feel graphic. The texture comes from slightly raised paint lines, not from extra decoration. It reads as cozy and modern on a kitchen shelf.
Start by masking two horizontal bands with painter's tape, about 1 inch tall each, leaving a 1/4 inch gap between them. Paint the bands with ceramic terracotta (two thin coats). After drying, add black acrylic paint linework around the bands using a fine liner brush, then seal with a heat-safe ceramic clear coat.
Pro tipPress the tape down with a credit card edge so you get a sharp border, then peel the tape while the paint is still slightly tacky.
AvoidAvoid thick paint blobs; they dry uneven and look like a craft paste job.
2. Buttercream Floral Transfer Mug
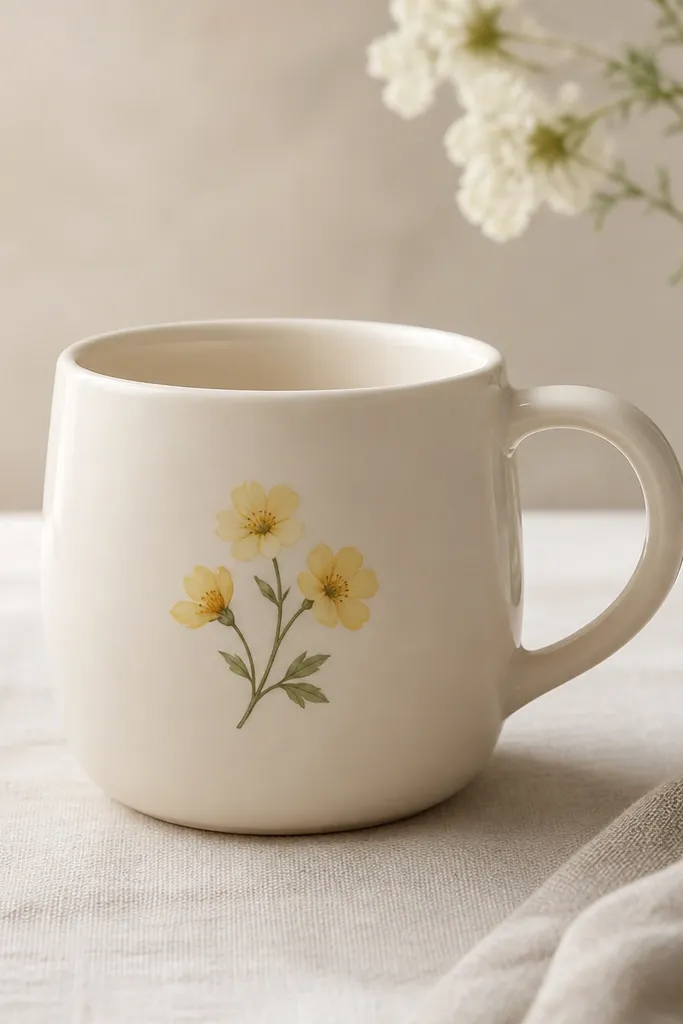
Floral transfers look neat because the printing is already balanced. The trick is scale - a small bouquet beats a giant sticker because it looks like it belongs to the mug. Buttercream yellow and muted green keep it soft and not loud. I like it for morning tea setups because it stays calm in photos.
Use a ceramic transfer sheet made for mugs (inkjet or laser, depending on the sheet). Cut close to the bouquet, soak if the instructions say to soak, then slide onto the mug at about 3 inches below the rim. Smooth from center outward with a damp cloth, let it set, then apply a clear ceramic topcoat.
Pro tipChoose a bouquet with thin petals and light outlines; thick cartoon flowers look bulky after sealing.
AvoidSkip big transfers that cover the whole mug; they look like bargain decals.
3. Washi Tape Grid with Tiny Heart Accent
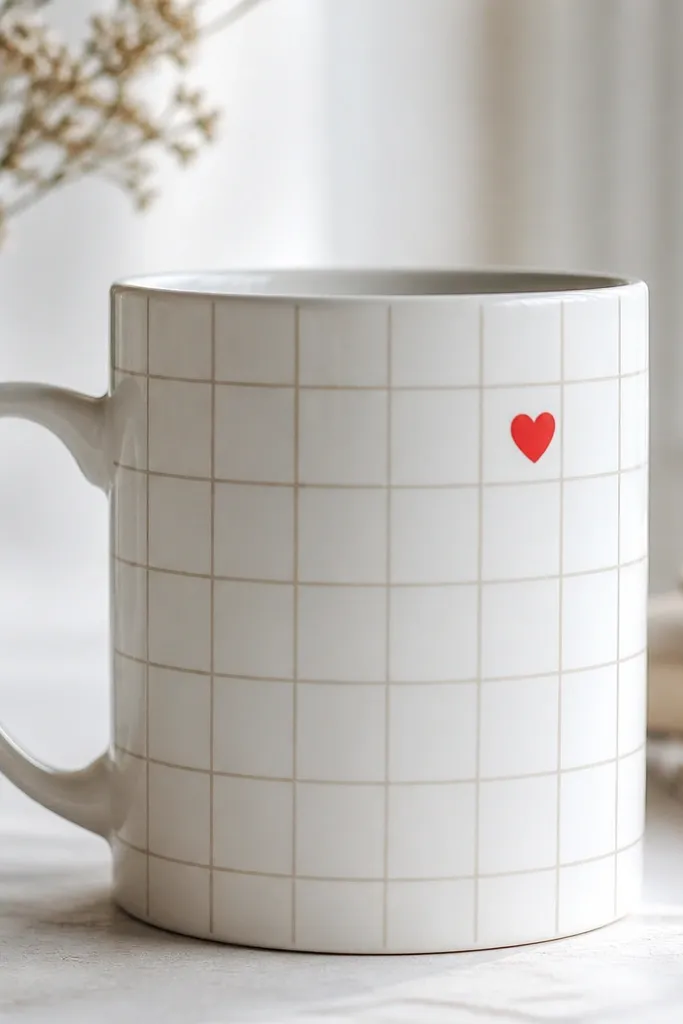
This is the fastest entry in cheap handmade mug ideas that still looks intentional. Washi tape creates instant pattern without brush strokes. Keep the grid tight and the heart small so the mug doesn't look like wrapping paper. It's cheerful but controlled, and it photographs well because the tape edges are crisp.
Cut washi strips into consistent widths, like 1/4 inch for horizontal and vertical lines. Lay them across the mug front in a grid, leaving a 1 inch plain area near the handle so it looks clean. Add a tiny heart from contrasting tape near the top band, then seal over the tape with a mug-safe clear sealer.
Pro tipUse two or three tape rolls max - one neutral, one accent, one optional outline - so the grid doesn't go noisy.
AvoidDon't overlap tape layers; thick corners catch light and look cheap.
4. Cozy Cable Knit Texture Mug (Fabric + Dimensional Paint)
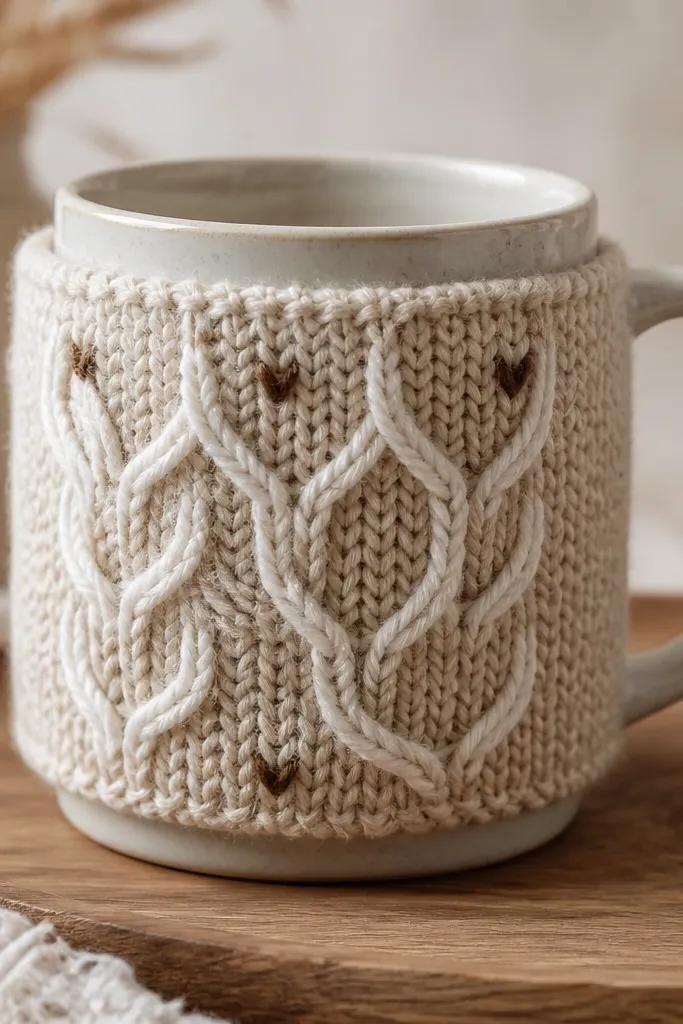
This mug feels like a sweater because the texture is physical. The knit panel gives you real depth, then dimensional paint turns it into a cable pattern. I keep it mostly neutral - oatmeal and cream - because it looks warm without being cluttered. It's a great gift mug for winter and it looks stunning on a wooden tray.
Cut a fabric patch from a knit remnant, size about 3.5 inches wide by 2.5 inches tall. Adhere with fabric glue or a thin layer of clear craft adhesive, then press smooth. Use dimensional fabric paint or ceramic dimensional paste to draw cable lines and small crossovers, letting each section dry so lines stay raised. Seal the edges lightly so nothing frays.
Pro tipRoughen the fabric back with a quick sandpaper pass so glue grips and the patch doesn't peel later.
AvoidDon't place fabric where liquid hits; keep the fabric only on the outside front.
5. Speckled Clay Look with Sponge-Dab Gray
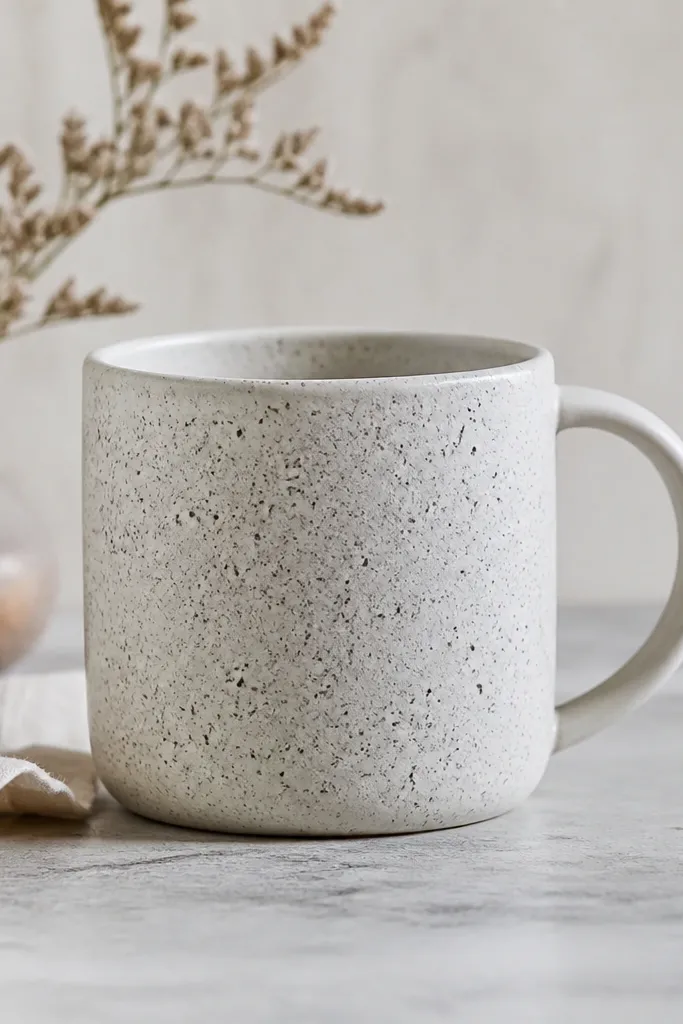
A speckled finish is how you get that handmade pottery vibe without firing anything. The sponge-dab method creates natural irregularity, so it looks like clay texture instead of paint splatter. I use a light base (warm white or off-white) and a mid gray speckle so it feels calm. It's one of the easiest cheap handmade mug ideas that still looks "artisan."
Paint the mug front with a thin base coat of warm white ceramic paint. When dry, dab a sea sponge loaded with gray paint (wipe most paint off) onto the front only. Keep the speckle heavier toward the center and lighter toward the edges. After it dries fully, seal with a clear ceramic topcoat.
Pro tipPractice on a scrap tile first so your speckle size matches what you want on the mug.
AvoidAvoid using a wet sponge; it makes streaks and big blobs.
6. Monochrome Stamp Border with Metallic Dot Row

Borders make a plain mug look finished instantly. Stamping gives you repeatable rhythm, and metallic dots add a tiny "special" detail without covering the whole surface. This one looks good in black-and-gold kitchens and in minimalist setups. It also hides small imperfections because the border frames the mug.
Use a small craft stamp (like tiny leaf or small geometric) with black ceramic paint. Stamp a line about 1/2 inch below the rim across the front. Then add a row of gold dots using a toothpick dipped in metallic ceramic paint, spaced about 1/4 inch apart. Seal with clear topcoat once everything cures.
Pro tipIf dots look uneven, drag a clean toothpick lightly through each dot to make a crisp point.
AvoidSkip cheap metallic paint that turns cloudy after sealing.
7. Chocolate Drip Accent with Matte Cocoa Seal
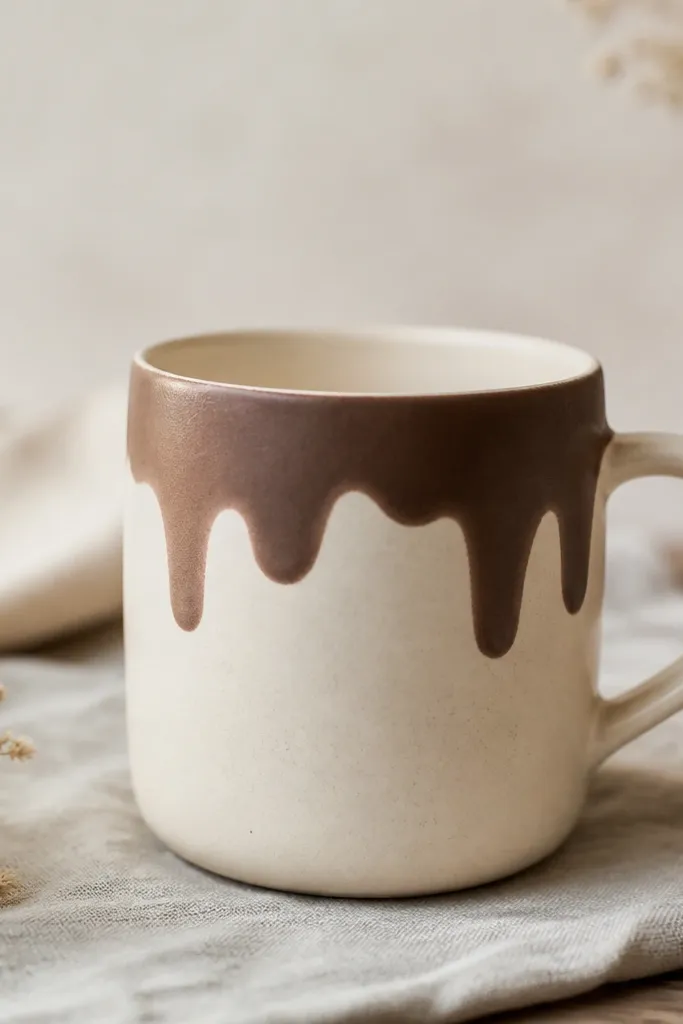
Drips look fun, but the difference between cute and messy is control. A single drip - not a whole pattern - gives you character. Matte cocoa paint makes it feel like dessert art, and it doesn't glare under kitchen lights. This is a gift mug that makes people smile when they grab it.
Tape off a small 1.5 inch wide vertical column near the front center. Paint the base color first, then use a small brush to pull a thick line downward, stopping before the bottom. Add a second thinner drip next to it for balance. Seal with a matte ceramic clear coat so it stays dessert-like.
Pro tipLet the first drip line set for 5-10 minutes before adding the second so it doesn't merge.
AvoidDon't add multiple drips across the mug; it reads like a paint spill.
8. Linen Tag Mug with Handwritten Date and Twine Bow
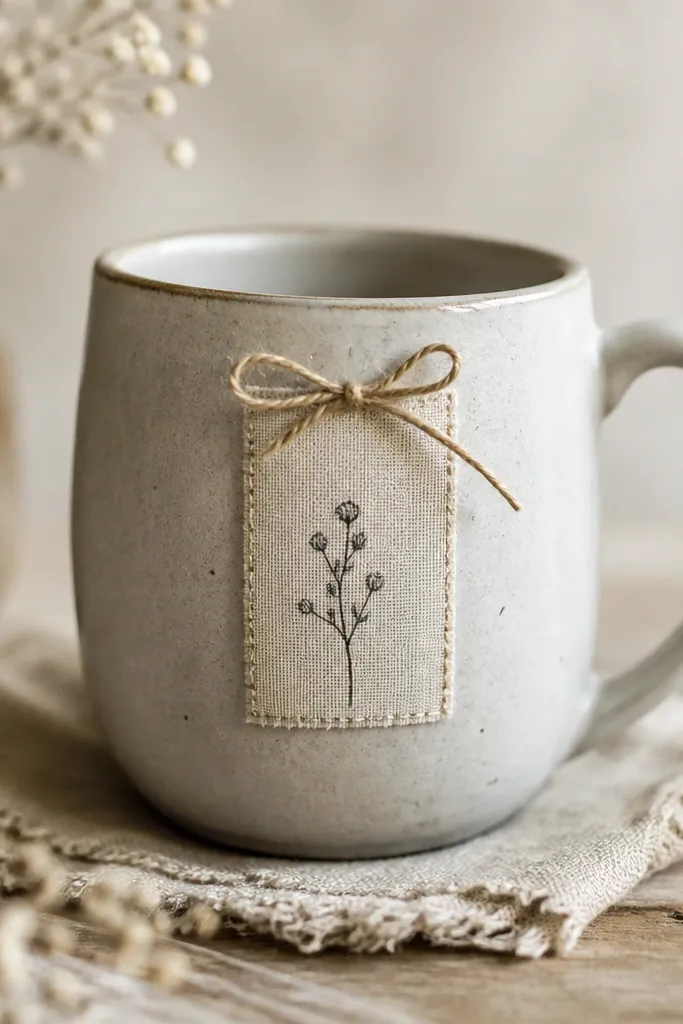
This is how you make a mug feel like a gift even if it's just for your own shelf. Linen has texture that hides small adhesive bumps, and the tag shape gives you a focal point. The twine bow adds a tactile detail that looks good in close-up photos. Keep the handwriting neat and short so it feels personal, not cluttered.
Cut linen fabric into a tag shape about 3 inches wide by 2 inches tall. Stitch the edges with a simple running stitch using matching thread, then write a date or word with fabric-safe marker. Adhere the tag to the mug with a thin layer of strong craft glue on the back side only. Tie a small twine bow and glue just the knot area. Seal the mug front around the tag with a clear topcoat that won't soak into the linen.
Pro tipUse a scrap of cardboard behind the tag while writing so marker doesn't bleed through.
AvoidAvoid putting glue on the marker ink; it smears.
9. Vintage Button Corner Mug (One Big Button)
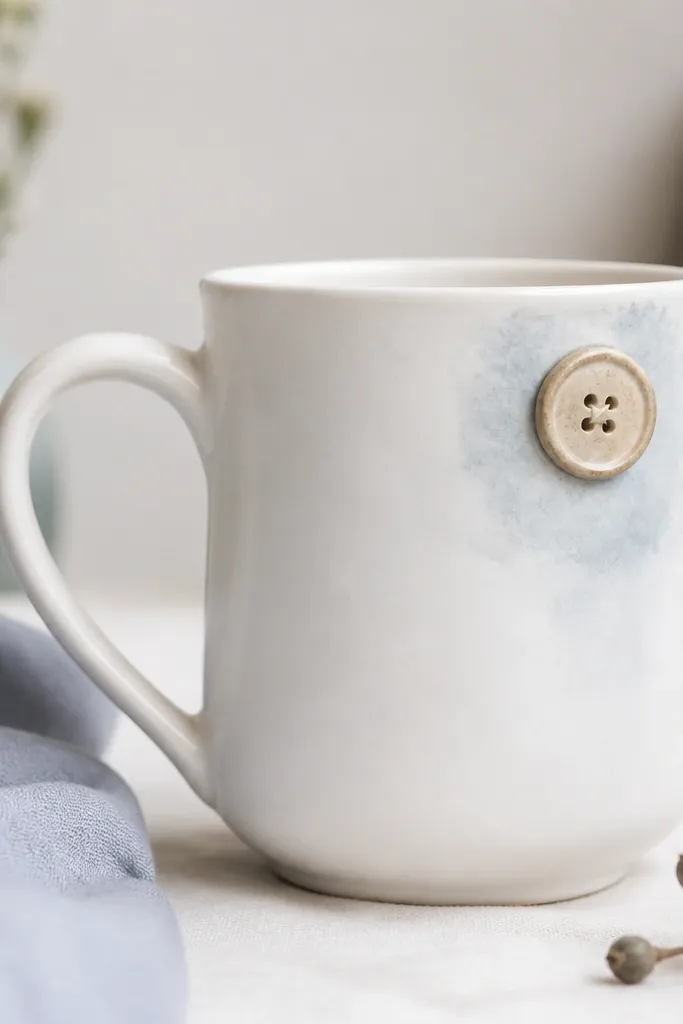
One button is enough. It looks curated because it's intentional and it adds real dimension. I pair it with a soft wash so the button doesn't look floating. The trick is keeping the button centered on a corner so it doesn't block the main view. It works for people who love thrift finds.
Paint a pale blue wash rectangle about 2.5 inches wide on the upper right front. Let it dry, then glue a single large button using epoxy or strong craft adhesive, pressing for 30-60 seconds. Add a tiny dot of paint beside the button for balance. Seal carefully around the button edges with clear ceramic topcoat.
Pro tipChoose buttons with a flat back so the mug front doesn't rock or wobble.
AvoidDon't glue multiple buttons; that turns into cheap costume jewelry.
10. Scrapbook Paper Decoupage Panel with Rounded Corners

Decoupage looks clean when you treat it like a single panel, not a collage. Paper gives you instant pattern and color, and the rounded corners keep it from looking cut-and-pasted. I like floral or vintage map prints because they add warmth without needing fancy painting. Once sealed, it holds up for everyday use if the clear coat is ceramic-safe.
Cut scrapbook paper into a rectangle about 3.25 inches wide by 2.5 inches tall, then round the corners with scissors or a corner punch. Apply decoupage medium on the mug front, lay the paper, then brush more medium over it in thin layers. Smooth bubbles with a soft brush. Let it cure, then topcoat with a clear ceramic sealer.
Pro tipTrim paper edges slightly smaller than the glue area so you don't see ragged seams under the topcoat.
AvoidAvoid heavy paper wrinkles; they show through the clear coat.
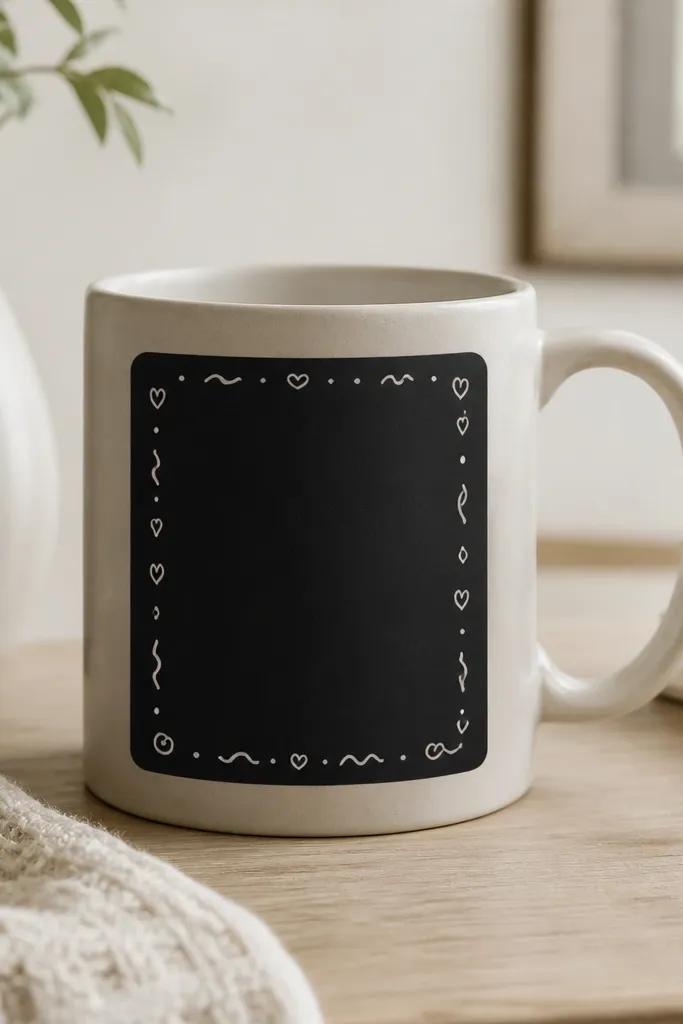
11. Chalkboard Paint Caption Mug (Write Your Own Quote)
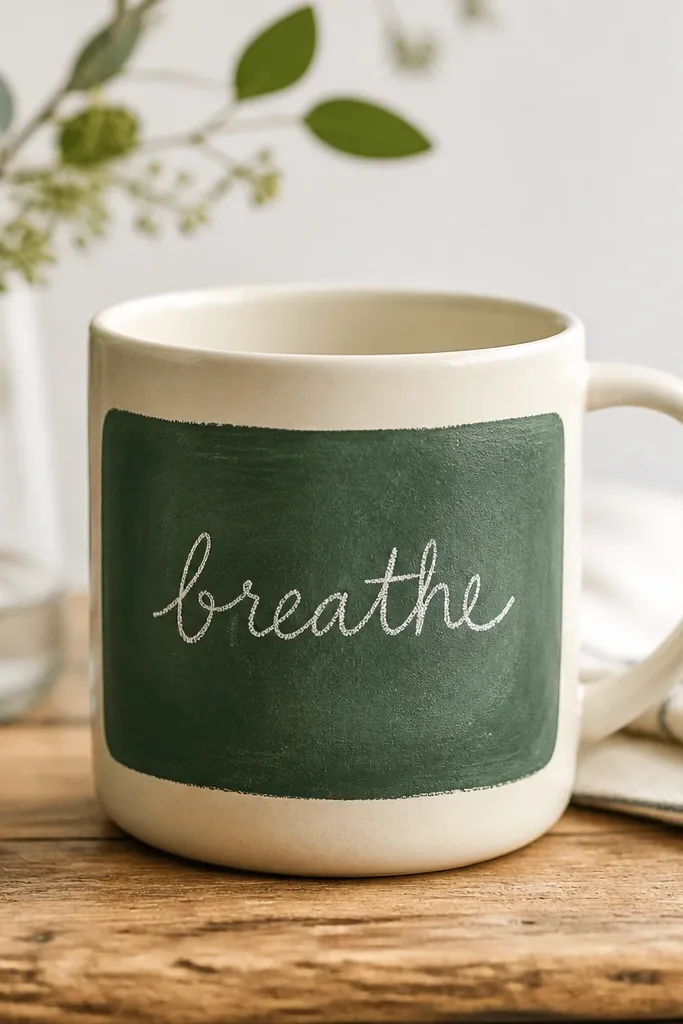
A chalkboard panel makes the mug interactive. You can change the caption for seasons and it always looks intentional because the writing is the design. Dark green chalkboard paint looks warmer than pure black. This is one of my go-to cheap handmade mug ideas because it keeps working after the craft day.
Tape off a rectangle about 2.75 inches wide by 1.75 inches tall, centered on the front. Paint two coats of chalkboard paint, then cure per label instructions. Rub chalk over it, then wipe - do this a few times before first use. Seal the edges only; don't seal over the chalkboard writing surface.
Pro tipUse a thicker chalk stick for bold letters that don't scratch the paint.
AvoidDon't skip the initial chalking steps; the board won't write smoothly.
12. Neutral Macrame Wrap Mug with Fringe Edge
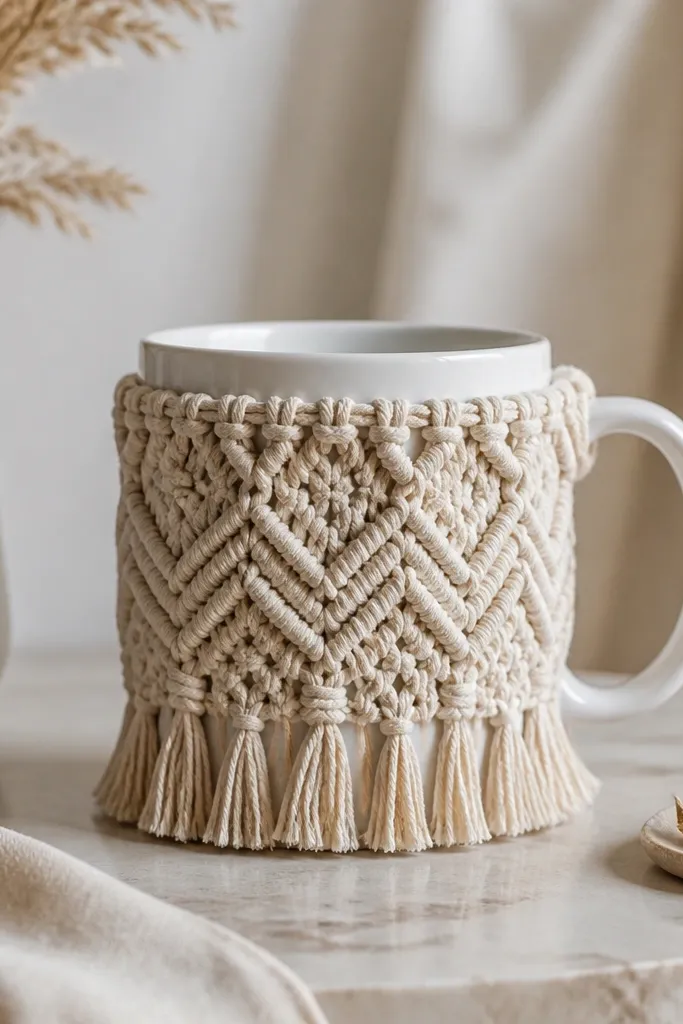
Cord wrap gives you cozy texture without painting. Macrame looks handmade even when it's clean and simple, and it hides minor surface marks on the mug. Keep it neutral - natural jute or cream - for a warm, farmhouse vibe. The mug feels like a desk accessory as much as a drink container.
Cut two lengths of macrame cord, around 18 inches each. Tie them around the mug with a tight wrap around the middle, then braid or knot the ends on the underside. Leave a fringe of about 1 inch by trimming the ends after tying. Secure with a hot glue dot near the top and bottom edges, keeping glue off the sip-contact area.
Pro tipWet the cord ends lightly and hold them flat while drying to stop fraying.
AvoidDon't wrap the cord at the bottom where you set the mug down wet; it loosens.
13. Acrylic Pour Swirl Mug with One Clean Border
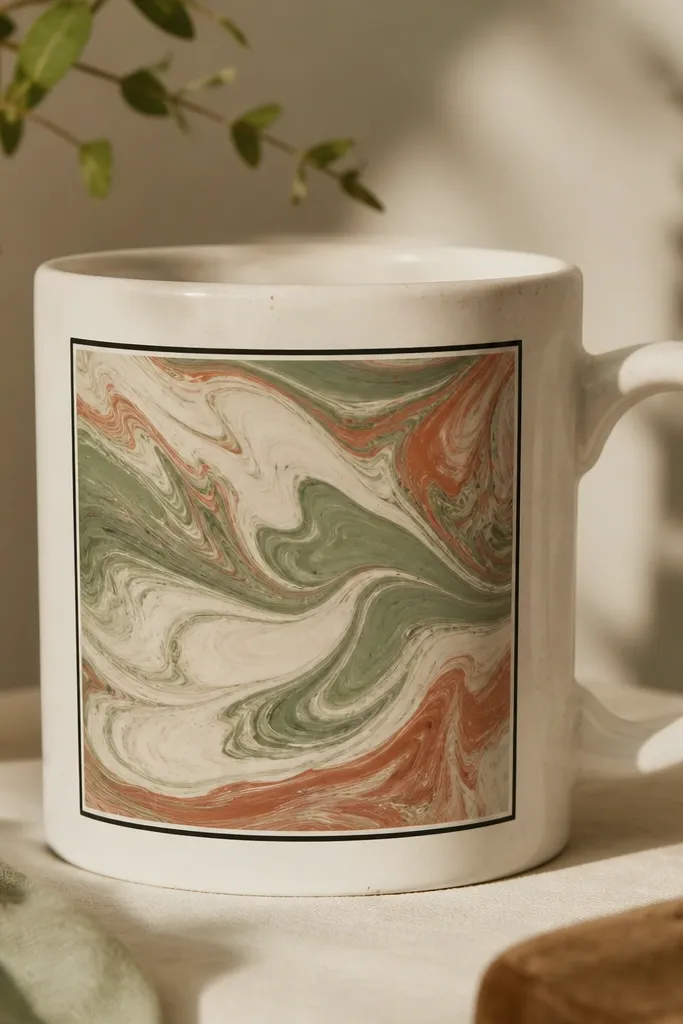
Pour art looks high-end when you frame it. A single framed swirl keeps the surface from looking random and messy. I use sage green plus cream and a touch of terracotta so it feels calm and warm. The glossy finish makes it look like enamel even though it's paint.
Mask a front panel area with painter's tape so you pour only inside the rectangle. Mix acrylic pour medium with paint to a yogurt-like consistency. Pour a small amount, tilt gently to form a swirl, then pop bubbles with a pin. After curing, paint a thin dark border around the panel and seal with a clear ceramic topcoat.
Pro tipMake the pour panel smaller than you think - about 3 inches wide - because large pours look chaotic on mugs.
AvoidAvoid pouring too thick; it cracks when it cures.
14. Sea Glass Color Fade with Sponge Ombre
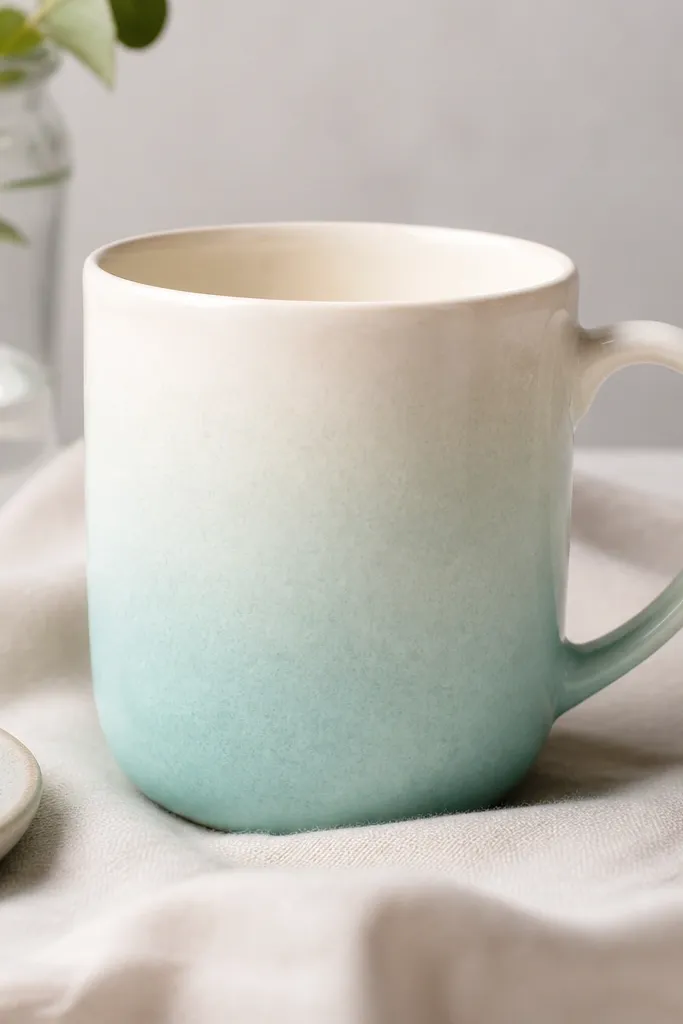
Ombre looks classy because it creates movement without clutter. Sea-glass colors feel coastal and calm, and the sponge texture makes the fade look more like painted ceramic than sticker art. This is perfect for a morning corner where you want light, airy tones. It also hides tiny brush marks.
Paint the bottom 1/3 of the mug aqua, then sponge in a lighter aqua and blend upward with a clean damp sponge. Leave the top rim area plain so it stays bright. Work in thin layers, letting each layer dry 10-15 minutes. Seal with a clear ceramic topcoat.
Pro tipUse a makeup sponge and rotate it constantly so you don't get repeating blotches.
AvoidDon't blend with a wide brush; it makes streaks.
15. Herb Stencil Mug with Tiny Dots Around the Leaves
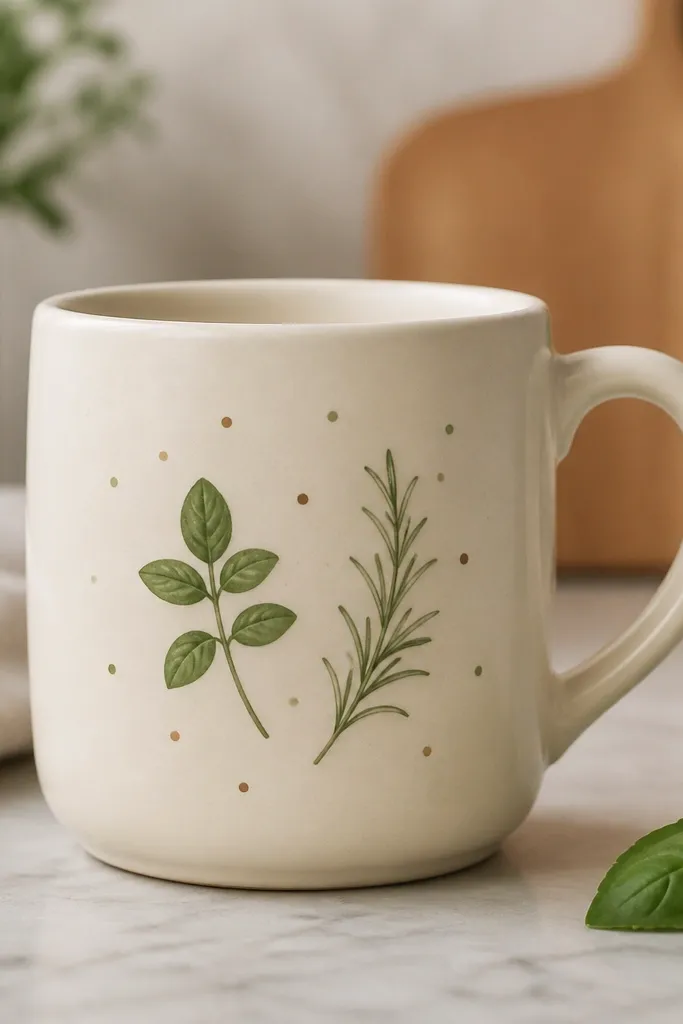
Stencils make herb art look neat and repeatable. The tiny dot pattern adds a hand-drawn feel without needing freehand skill. I keep the leaves in two greens - olive and sage - plus a warm brown stem so it feels natural. It looks great for cooking gifts and kitchen shelves.
Tape a stencil with reusable stencil tape about 3 inches below the rim. Use a foam stencil brush with olive green for leaf shapes, then add sage for highlights. Add stems with a fine liner brush in warm brown. Dot around the herb cluster using a toothpick and dark brown paint, then seal.
Pro tipPat stencil paint lightly; pressing hard makes the edges fuzzy.
AvoidAvoid using thick paint on stencils; it bleeds under the edges.
16. Thread-Wrapped Handle Side Charm Mug
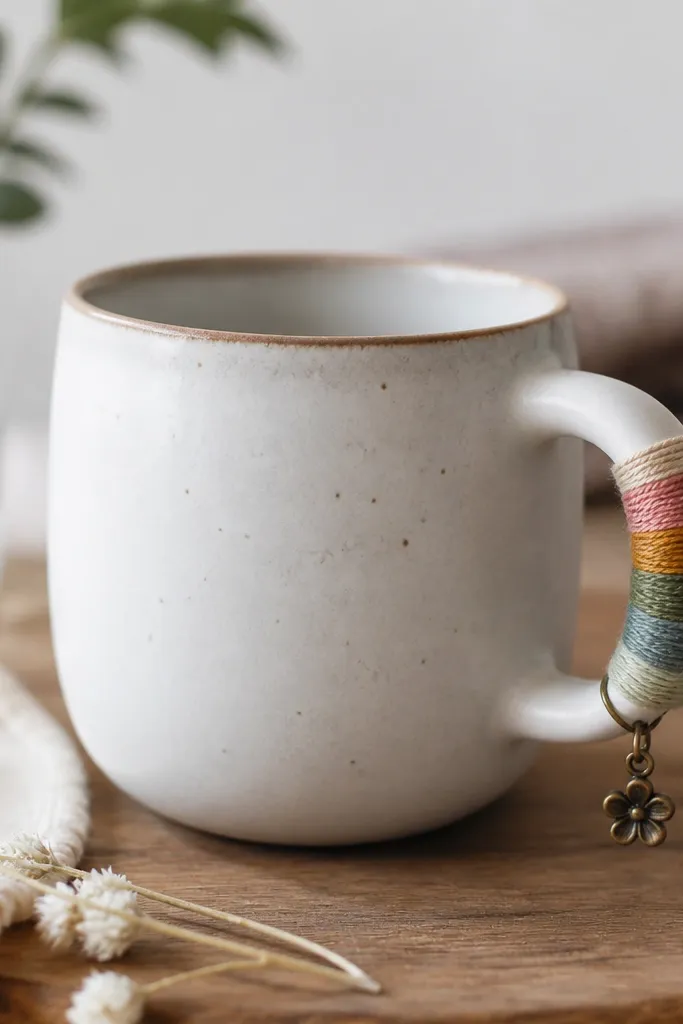
This one is subtle but looks thoughtful because the detail is at the handle side, where people grab the mug. Thread wrapping makes a soft color accent that never blocks the face of the mug. I use 3-4 strands of embroidery floss so it stays smooth and doesn't look fuzzy. A small charm adds personality without crowding.
Pick a floss color like deep mustard or rust, wrap it around the handle side in tight stacks, and secure with a tiny dab of clear strong glue at the top and bottom. Tie off the end on the back side so the knot hides. Glue a small metal charm (like a mini spoon or leaf) near where the thread ends. Seal the charm area lightly with a clear ceramic topcoat.
Pro tipWrap with steady tension - loose thread looks like it slipped off after one week.
AvoidSkip bulky knots; they press into the hand and look uneven.
17. Kintsugi-Inspired Gold Crack Lines Mug
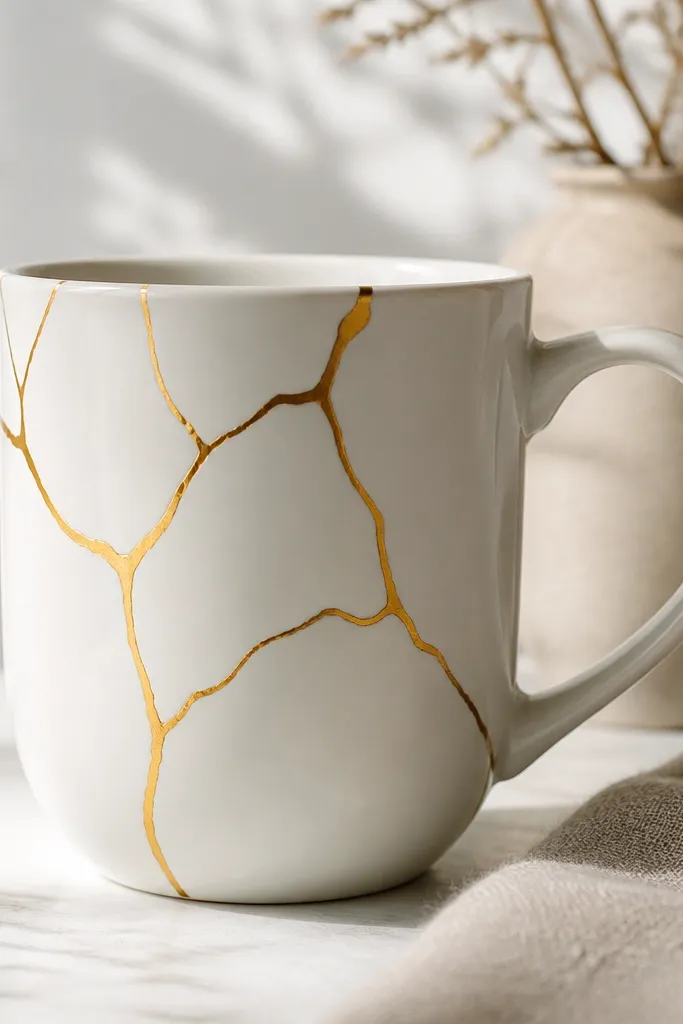
Kintsugi style is all about lines that look intentional. You're not breaking the mug - you're drawing the story. Gold crack lines turn a plain mug into a statement piece, and it pairs with any kitchen color. I prefer thin lines and a few branch points so it looks like art, not random scribbles.
Sketch crack paths lightly with a pencil on the mug front. Paint over with a metallic gold ceramic paint in thin strokes. For extra depth, add a tiny amount of dimensional paste at one or two intersections. Let cure fully, then seal with a clear topcoat that won't dull the gold.
Pro tipUse a reference photo of real kintsugi cracks to get the branching rhythm right.
AvoidDon't draw thick crack lines; they look like marker doodles.
18. Sky Map Coordinates Mug (Tiny Numbers and Lines)
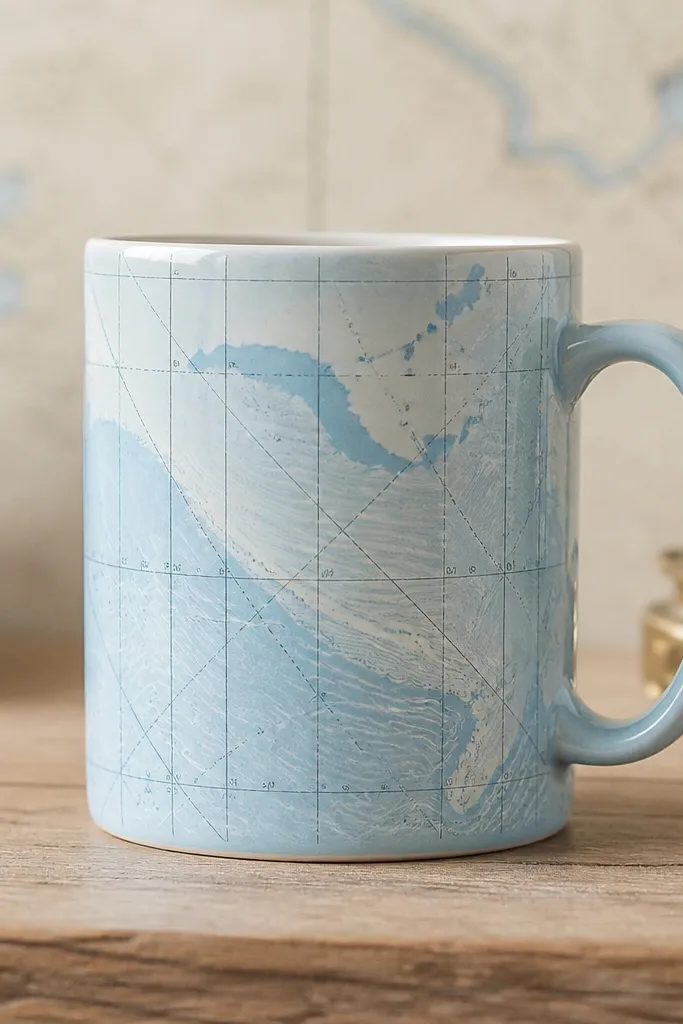
Coordinate-style art looks cool because it's precise. The design feels nerdy in the best way, and it still reads cozy because the colors are soft. I like pale blue with off-white ink and a warm gray for numbers. It's a great mug for astronomy lovers and travel planners.
Paint the mug front a very light pale blue wash. Add thin dashed lines with a fine liner brush using warm gray paint. Write small numbers with a paint pen or micro brush, keeping them about 1/8 inch tall. Seal after everything dries and cures.
Pro tipUse a ruler to place the dashed lines, then freehand the numbers for a human look.
AvoidAvoid oversized fonts; big numbers look like labels.
19. Parchment Wrap Mug with Mini Paper Scroll Label
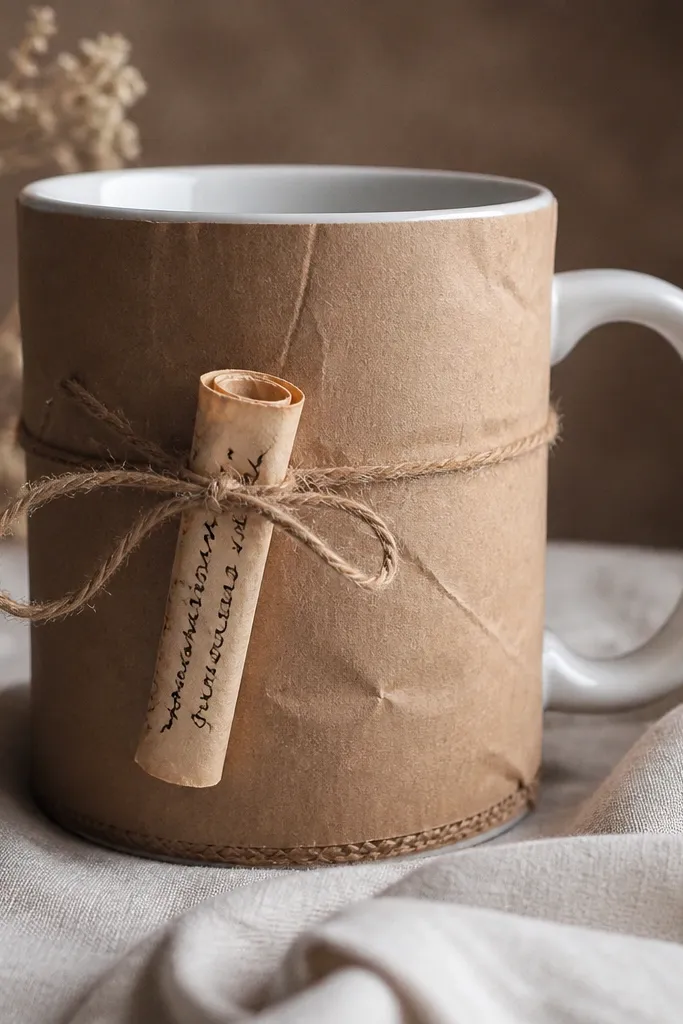
Paper wrap gives you that old-world apothecary vibe. The mini scroll label makes it feel like a theme set, even if the mug is plain underneath. I use tan or kraft paper and dark ink so it stays readable and warm. It's one of the best cheap handmade mug ideas when you want a "prop" look for parties.
Cut a strip of kraft paper, about 3.5 inches tall by enough width to wrap the front panel. Spray lightly with water, crumple once, then flatten to get parchment creases. Glue it in place with a thin craft adhesive and seal the surface with clear decoupage medium. Tie a mini scroll label from thin paper with twine and glue only the ends.
Pro tipCrumple lightly - too much texture makes the glue lines show through.
AvoidDon't use glossy magazine paper; it peels under clear coat.
20. Tiny Starburst Sprinkles Mug with Off-White Base
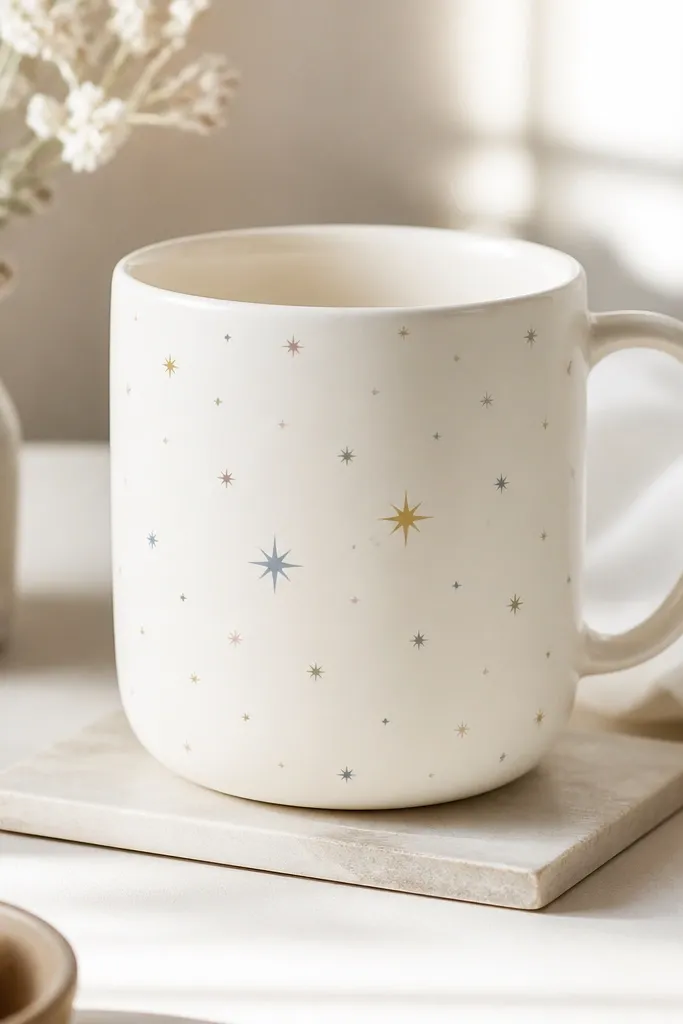
Sprinkle art looks cute because it's playful, but the secret is keeping it small. Starbursts read like confetti without covering the mug. I use pastel pink, soft blue, and a hint of yellow so it feels sweet. It's a fun mug for birthdays and stocking stuffers.
Start with an off-white base coat. Mix pastel ceramic paints and use a dotting tool or the back of a small paintbrush to place tiny starburst shapes. Make sure the sprinkles cluster slightly around the center and thin out toward the edges. Seal with a clear ceramic topcoat.
Pro tipPress your dotting tool straight down to get crisp star points.
AvoidAvoid large sprinkles; they look like candy wrappers stuck on.
21. Rope and Chalk Ink Nautical Strip Mug
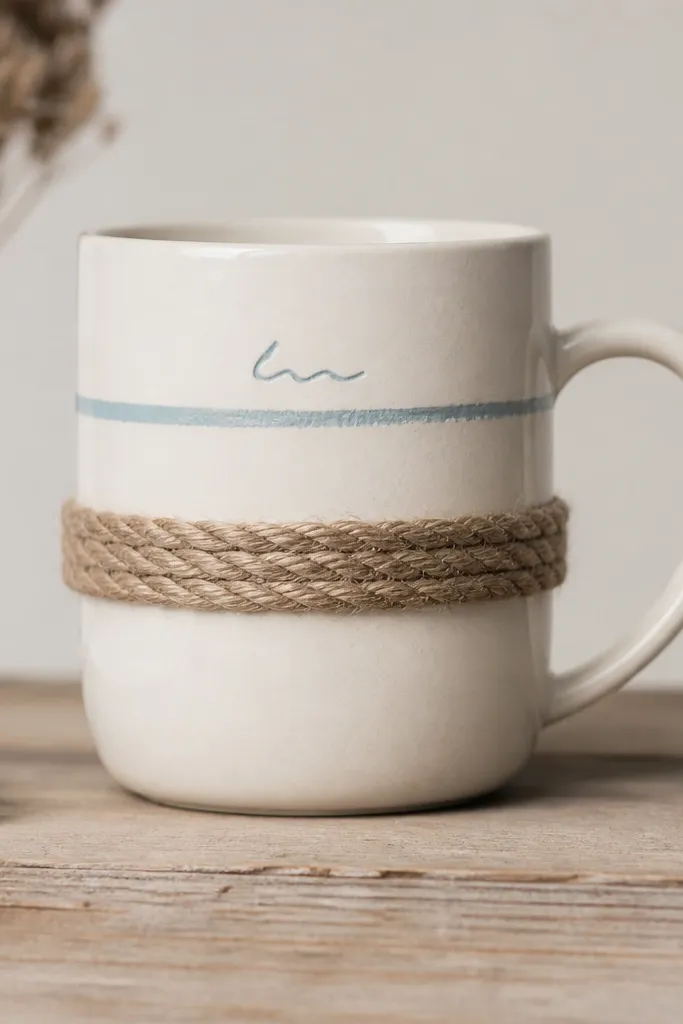
Rope adds a real tactile element that paint alone can't. The nautical strip looks intentional when it's one clean horizontal band. I pair rope in natural jute with chalky blue paint so it feels coastal but not childish. It's also good for outdoor patios because the texture catches light.
Choose a thin jute rope about 1/4 inch thick. Glue it in a straight line across the mug front using hot glue, then press to set. Paint a thin chalky blue line above and optionally a small word (like "salt" or "waves") below using a small brush. Seal around the rope edges carefully so the rope doesn't fray.
Pro tipUse a metal ruler to guide the rope placement and keep it perfectly level.
AvoidDon't leave glue strings; they show as shiny threads.
22. Folded Fabric Flower Mug with Button Center
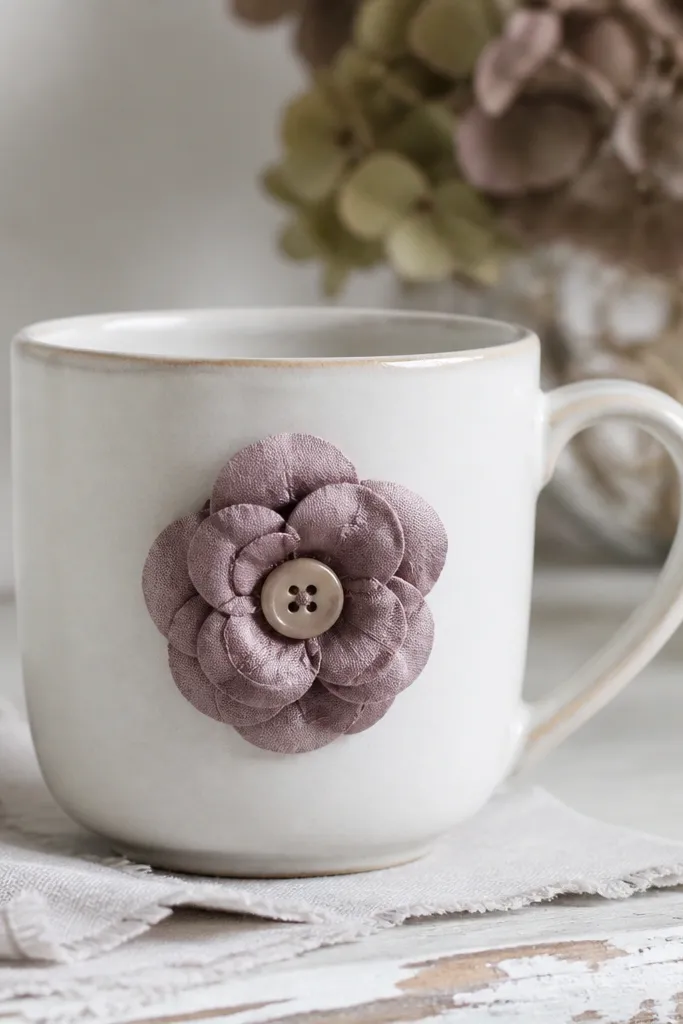
Fabric flowers look handmade and cozy, especially when the petals are layered and soft. A button center makes it feel complete without adding extra paint. I use cotton scraps or felt for the petals because they hold shape. This mug works great for spring gifts and tea parties because it looks delicate but stands out.
Cut petal shapes from felt or cotton (about 1.25 inches each). Fold each petal slightly and glue at the base, layering from biggest to smallest. Glue the layers onto the mug front near the top center, then add a small button in the middle. Seal the perimeter around the flower with clear topcoat, keeping glue away from the drink-contact area.
Pro tipUse felt for the first try; cotton looks gorgeous but needs careful glue control.
AvoidAvoid flat flowers; they look like glued scraps.
23. Matte Black Frame Mug with White Ceramic Doodles
A matte black frame makes the mug feel like a little gallery print. White doodles inside the frame add charm without cluttering the whole surface. Matte finishes reduce glare, so the design stays readable in photos. This is a great option for people who want modern cozy instead of cute-kawaii.
Paint a matte black rectangle panel area on the front with tape guides. Let it dry fully, then use a white ceramic paint pen or fine brush to draw simple doodles. Keep the doodles small and spaced, mostly in the middle. Seal with a clear matte ceramic topcoat so the black stays non-shiny.
Pro tipDraw doodles with light pencil marks first; matte black hides pencil well until you paint.
AvoidDon't use glossy clear coat over matte paint; it turns the frame shiny and cheap-looking.
24. Painted Denim Pocket Mug (Mini Patch + Stitch Lines)
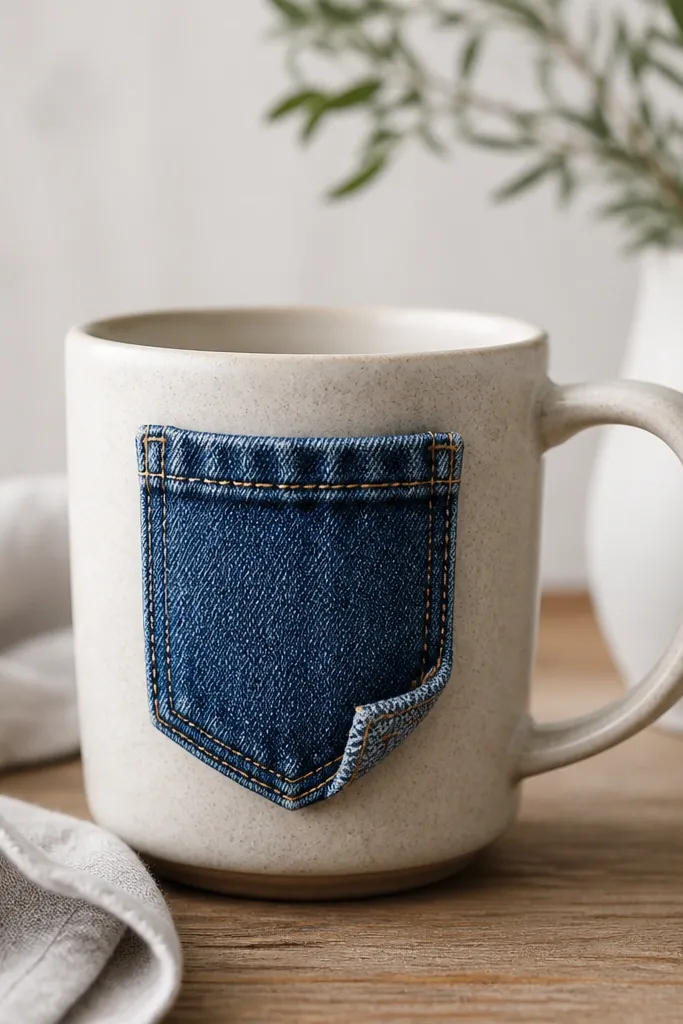
Denim on a mug front looks like a tiny jacket pocket, and that makes it feel cozy instantly. You get texture from the fabric and structure from the pocket shape. I like light-wash denim with tan stitching so it looks like a repurposed piece of clothing. It's a fun craft when you have old jeans scraps.
Cut a denim patch about 3.25 inches wide by 2.5 inches tall. Sew or paint a simple pocket seam and a small folded corner using tan fabric paint. Glue the patch to the mug front and seal the outer edges with clear topcoat. Keep the pocket only on the front - don't let fabric touch where drinks sit.
Pro tipUse fray glue on the denim edges so the patch doesn't shed fibers over time.
AvoidAvoid bulky patch thickness; thick denim makes uneven glue ridges.
25. Color-Blocked Corner Mug with Textured Sponge Base
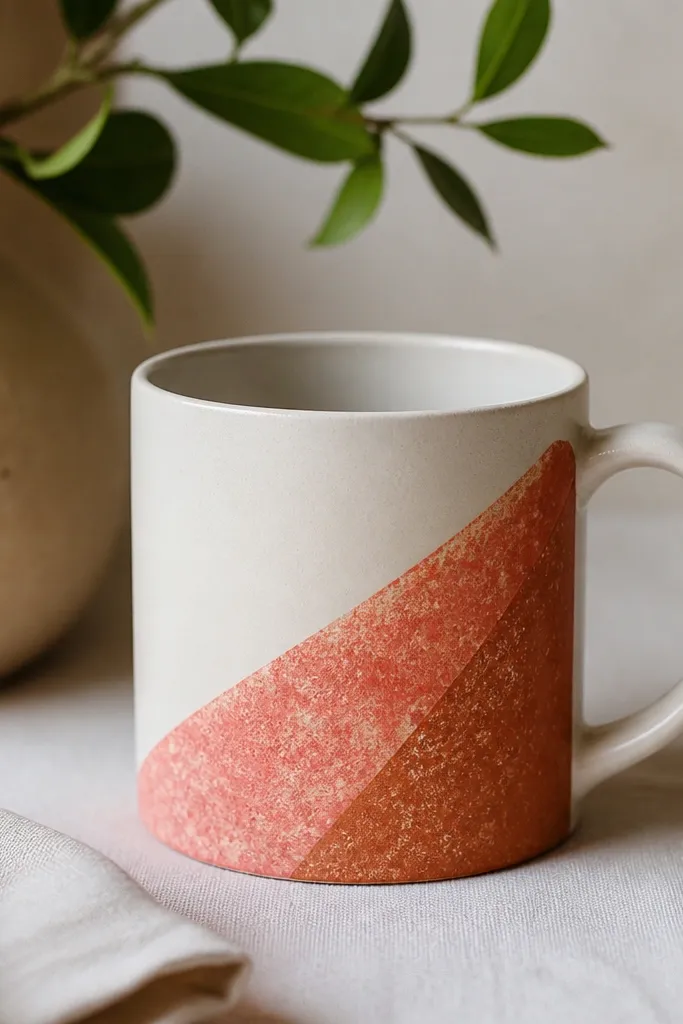
Color blocking looks sharp and intentional when the edges are crisp. A textured sponge base keeps it from looking flat and painted-too-perfect. I like coral and terracotta together because they feel warm without being bright neon. This is one of the easiest cheap handmade mug ideas for beginners who want a clean result.
Tape a corner shape on the mug front - about 2.5 inches tall by 2 inches wide. Paint a base off-white first, let it dry, then sponge coral inside the taped area. Add a slightly darker terracotta layer near the bottom right for depth. Remove tape carefully and seal when fully cured.
Pro tipUse two thin sponge layers instead of one heavy layer for better edge control.
AvoidAvoid freehand edges; crooked tape-free blocks look like accidents.