
1. Matchbox Stack Frame with Tiny Photo Window
This looks like a mini shadowbox because the matchboxes create depth right away. The black paint makes the texture read intentional instead of random. I like it with photos that have strong contrast - portraits, street shots, or anything with a dark background.
Use 5x7 foam board as the backing and cut a 4x6 opening with a 1/2 in border. Glue matchboxes around the opening in a rectangle, stacked two boxes thick on the sides for a 3D frame edge. Seal the painted boxes with matte clear spray so the paper-thin matchbox surfaces don't absorb glue marks.
Pro tipPaint the matchboxes before assembly, then glue only once they're fully dry - wet paint makes the edges bleed.
AvoidDon't glue matchboxes directly onto the photo; always keep the photo behind a backing window.
2. Coffee Stirrers Geometric Frame (Herringbone Corner Pops)
Stir sticks give you clean lines without needing a miter saw. The trick is using herringbone only in the corners so you get the "designed" look without the hard work everywhere. Light oak stain keeps it warm and works with beachy, vintage, and family photos.
Cut a 4x6 opening in 1/4 in foam board. Arrange full-length stir sticks on the top and bottom, then do 3 short herringbone blocks in each corner using hot glue. Stain with a light wood stain, then wipe after 2 minutes and seal with matte clear coat.
Pro tipLay all sticks on your table first and mark the exact lengths with a pencil before you stain.
AvoidSkip thick glue blobs - they dry shiny and show under the clear coat.
3. Kraft Paper Rolled Rose Border
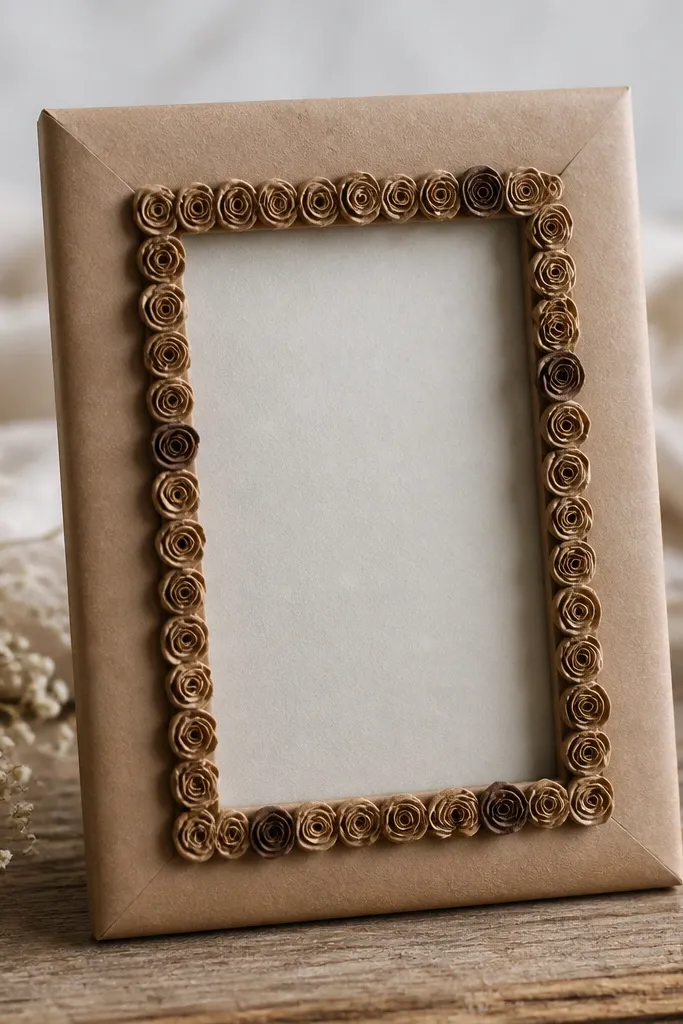
Rolled paper roses add softness and texture without adding bulk. Kraft paper keeps everything earthy, and rolling gives you a tight, clean spiral that looks like craft-store flowers. This one is perfect for wedding photos, baby milestones, and warm indoor lighting.
Make a base frame from a 5x7 foam board. Cover the outside with kraft paper using spray adhesive, then cut a 4x6 inner opening. Roll 1/4 in wide strips of kraft paper into tight spirals, glue the base, and attach them in a ring leaving a 1/2 in gap around the photo opening.
Pro tipUse a metal needle or toothpick to roll the spiral; it keeps the center tight and round.
AvoidDon't use wet glue directly on paper strips; it warps the roll.
4. Scrap Fabric Braid Frame with Velcro Backing
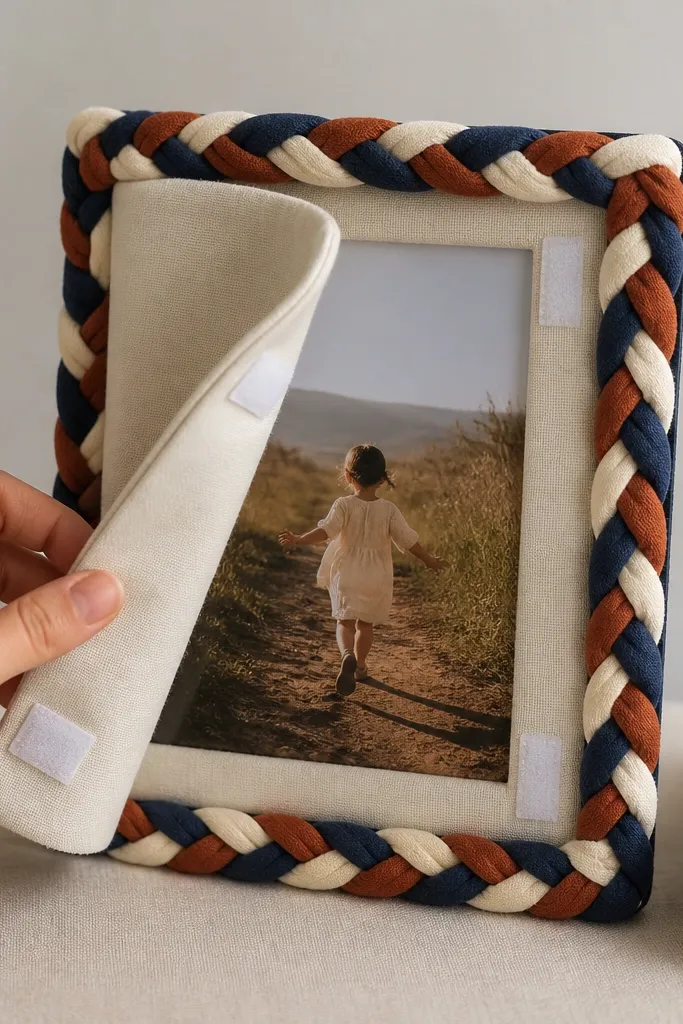
Fabric braids hide uneven edges because the weave pattern masks small cuts. The Velcro closure makes it easy to swap photos, which is why I keep making this design. Use this for seasonal prints - it looks cozy and lived-in.
Cut three fabric strips 1 in wide and 16 in long, then braid tightly. Wrap braid around a 4x6 foam board opening and glue down the back edges only. Cover the outer frame with matching fabric, then attach Velcro to a small removable flap so you can replace the print without tearing anything.
Pro tipIf your fabric frays, run a quick pass of Fray Check on the strip ends before braiding.
AvoidDon't stretch the fabric while gluing; stretched fabric makes the braid ripple later.
5. Old Book Page Frame with Ink-Stamped Border
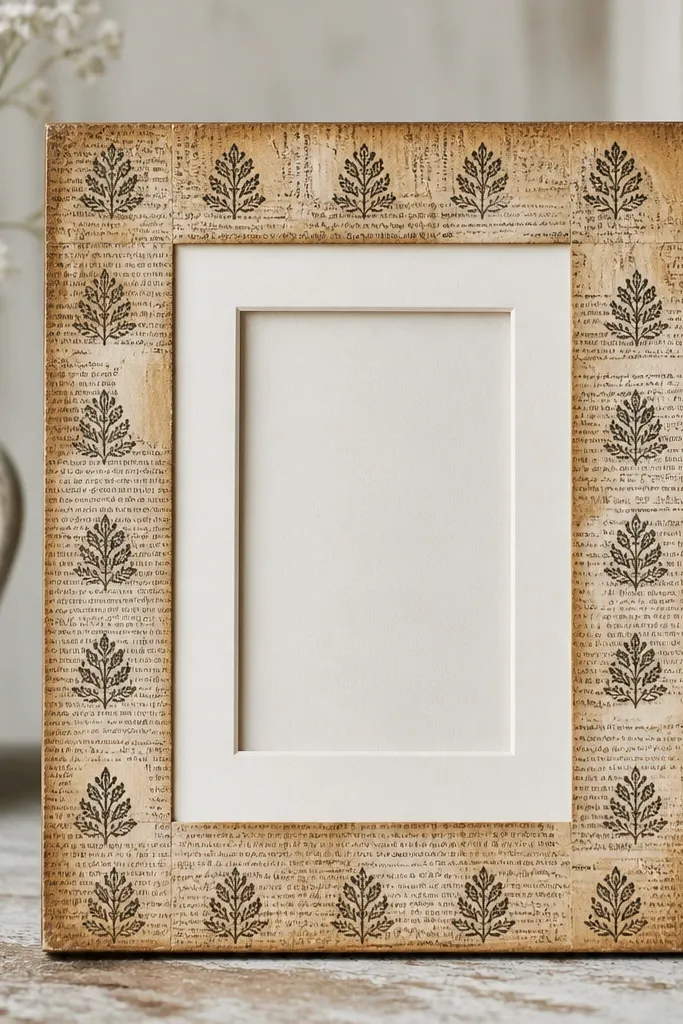
Book pages make a photo look like it belongs in a vintage display cabinet. I like adding an ink stamp border because it gives structure - otherwise the pages can feel flat. This works best for black-and-white photos and sepia-toned prints.
Cover a 5x7 foam board with book pages, smoothing with your palm and pressing seams down. Cut an inner opening for a 4x6 photo. Add a repeating ink stamp line along the outer 1 in border, then seal the whole front with matte Mod Podge or matte clear spray in thin coats.
Pro tipStain the edges with watered-down coffee (one part coffee to three parts water) and dry fully before sealing.
AvoidDon't soak the pages; soaking makes bubbles and wrinkles you can't sand out.
6. Washer and Twine Corner Frame (Industrial Photo Holder)
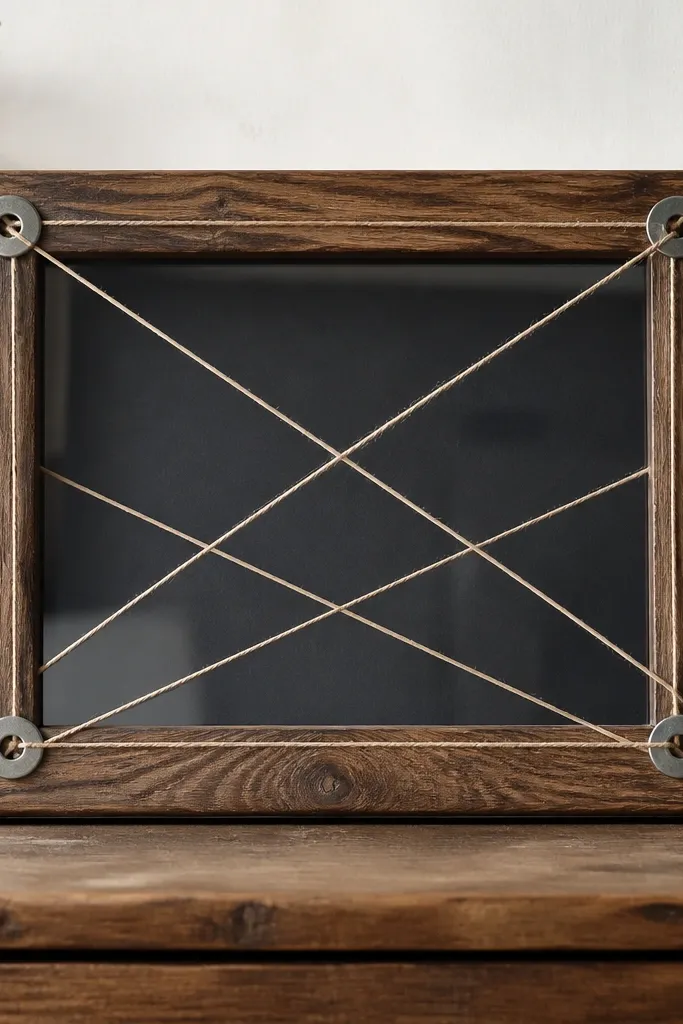
This design looks industrial but it's cheap because washers and twine are pennies. The crossed twine creates a graphic frame effect even if your photo has a busy background. It looks great for sports, city scenes, and moody portraits.
Use a 4x6 foam board base painted charcoal. Cut a 4x6 inner opening and glue a thin strip of clear acrylic or plastic from an old photo protector. Screw washers into small pre-drilled holes at the corners, then wrap twine around and tie tight. Add a thin strip of tape at the back to keep the twine from shifting.
Pro tipPull twine tight like you're lacing a shoe; slack twine makes the whole frame look unfinished.
AvoidAvoid using super-thick knots in the front corners - they cast ugly shadows.
7. Painted Popsicle Stick Steps Frame

Layered popsicle sticks create a stepped profile that reads high-end without expensive carpentry. I like using four colors in a gradient - it keeps it modern. This one works well for bright prints and kids' photos because the border adds fun without clutter.
Cut a 5x7 foam board backing and a 4x6 opening. Paint popsicle sticks in four shades (for example, mint, cream, coral, navy) and let dry overnight. Glue sticks in two staggered rows for the step effect: first row sits flush to the inner opening, second row sits slightly out, leaving a consistent 1/4 in step.
Pro tipUse a ruler to mark a 1/4 in offset so the step line stays even on all sides.
AvoidDon't use glossy craft paint - it highlights uneven glue lines.
8. Wallpaper Stripe Frame with Book-Mat Center
Wallpaper gives you instant pattern, and stripes make the frame feel designed. The book-mat center adds structure and makes the photo look like it's under glass. This is the best choice when you want something clean for a gallery wall.
Cut a 4x6 foam board backing and cover only the outer 1.5 in with wallpaper. Use a strip of leftover hardcover board for the mat and cut a 3x5 opening if your photo is 4x6 - center it with even margins. Glue mat edges down and seal the wallpaper with a thin matte spray so it doesn't peel.
Pro tipChoose wallpaper with a repeating stripe every 1-2 inches so alignment looks crisp.
AvoidDon't cover the whole frame in wallpaper if your edges are messy; confine pattern to the outer border.
9. Tile Chip Mosaic Frame (No-Tile-Tools Version)
Tile chips look expensive because they catch light and create tiny color shifts. You don't need fancy tile tools if you buy broken tile pieces or mosaic packs. The mosaic border keeps the center clean so the photo stays the focus.
Start with a 5x7 foam board base and cut a 4x6 opening. Trace a 1 in thick border around the opening and glue tile chips in small clusters using tile adhesive or strong craft glue. Mix your own grout look with white caulk tinted lightly with gray acrylic paint, then wipe excess with a damp cloth after it sets 10 minutes.
Pro tipLay tiles on parchment first to plan a gradient before you glue.
AvoidSkip huge gaps; uneven chip spacing makes it look like broken craft scraps.
10. Lemon Tea Stain Ombre Frame with Linen Tape
Tea staining gives you a gentle aged look without buying specialty paper. Linen tape is the secret because it creates a crisp inner boundary that stops the stain from looking blotchy. Use this for vintage prints, postcards, and handwritten-style photos.
Cut a 4x6 foam board backing and a 3.5x4.5 opening. Paint the border area with watered-down black tea (or lemon tea) in three layers, letting each layer dry before the next. Add linen tape around the inner opening as a clean frame line, then seal with matte clear spray.
Pro tipUse a foam brush and dab, not swipe; dabbing prevents streaking.
AvoidDon't seal before the final layer dries fully or the stain can smear.
11. Bottle Cap Photo Frame with Shiny Ring Outer Edge
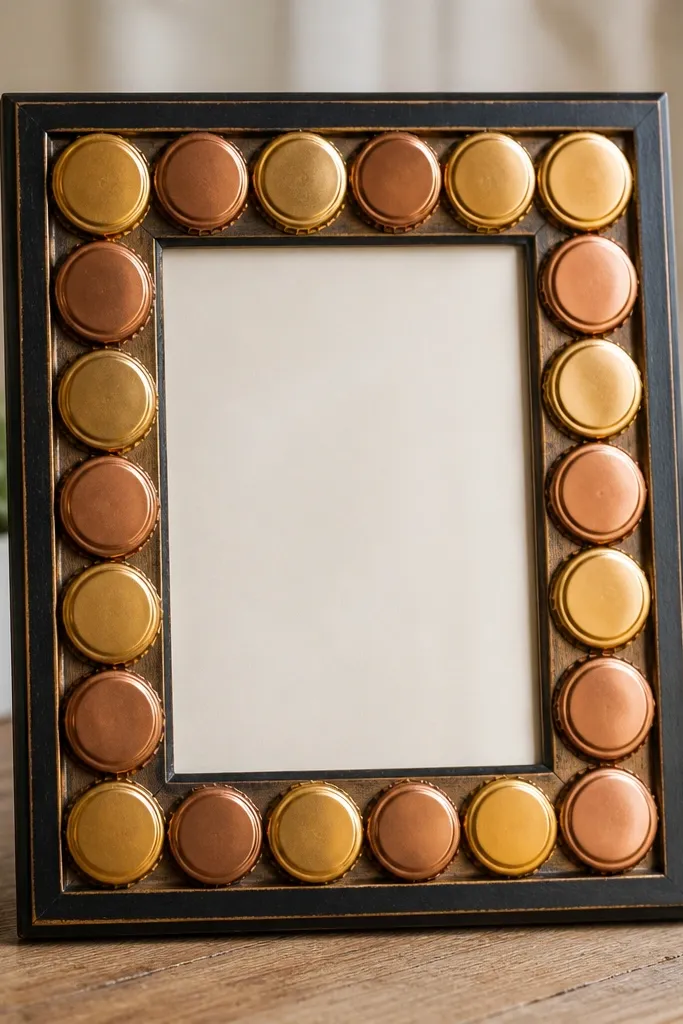
Bottle caps give you instant sparkle, so keep the center clean. This design is great for party photos, summer trips, and anything with bright colors. The caps act like a rim, framing the photo without needing a full carved border.
Use a 4x6 foam board base painted solid white or matte black. Arrange 18-22 bottle caps around the outside edge, spacing them evenly, then glue down. Add a clear plastic sheet cut to size from a report cover to protect the photo. Seal the caps lightly with clear matte if you don't want fingerprints.
Pro tipSort caps by shade before you glue so your ring looks intentional.
AvoidDon't leave sharp cap edges exposed; trim any warped caps so they sit flat.
12. Pinecone and Jute Twine Frame for Fall Photos
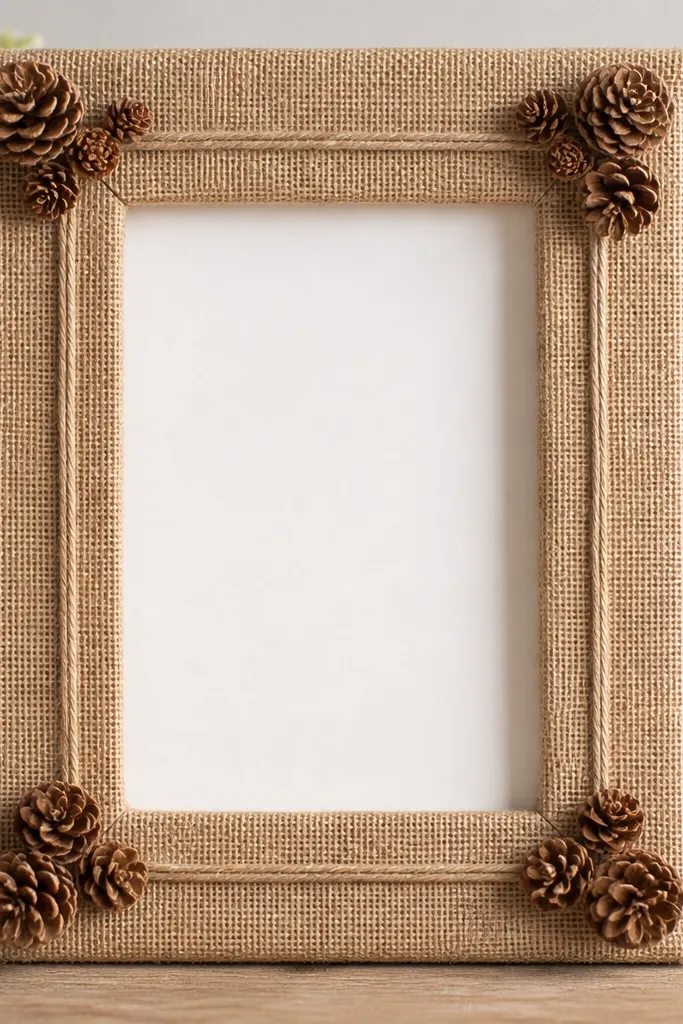
Pinecones add texture you can't fake with paper, and jute twine keeps the look rustic but tidy. I like this for fall family photos because it pairs naturally with browns, creams, and deep greens. The burlap background makes the photo feel warmer.
Wrap a 5x7 foam board with burlap using spray adhesive. Cut a 4x6 inner opening and add jute twine around the inner edge with hot glue. Glue small pinecone pieces at the corners, then spray with a light clear coat to keep the surface from shedding.
Pro tipBreak pinecones into small sections so the corners look full without covering the photo.
AvoidSkip loose pinecone placement; if pieces wiggle, they look temporary.
13. Reclaimed Wood Scrap Frame with Burnt Edges
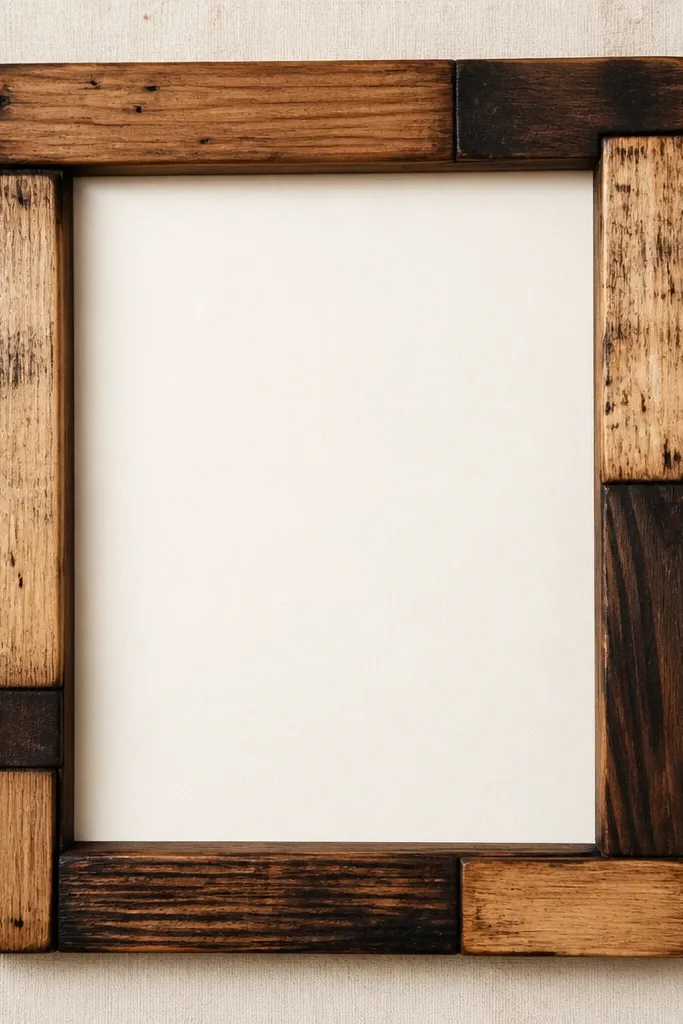
Reclaimed wood gives you character, and burning the edges makes it look deliberate. I keep the center matte and light so the wood grain shows up without glare. This is my go-to for landscape photos, pets, and any photo with earthy tones.
Use four wood strips around a 5x7 foam board backing, leaving a 1/2 in inner mat area. Burn only the outer edge with a wood burner at low heat, then sand the face lightly so it doesn't look charred. Finish with clear matte wax or matte polyurethane, then attach the photo behind a plastic protector sheet.
Pro tipDry-fit the wood strips first; wood thickness differences are the reason frames end up crooked.
AvoidDon't skip sanding after burning; rough char catches light and makes it look messy.
14. Cereal Box Cutout Frame with Color Blocking
Cereal box cardboard is surprisingly sturdy if you reinforce it with another layer. Color blocking keeps it graphic and modern, and it hides the fact that the materials are recycled. This is perfect for kids' art photos or bright prints.
Flatten the cereal box, then glue a second layer behind it to make a 1/4 in thick board. Cut a 4x6 outer rectangle and a 3.5x4.5 inner opening. Paint or cover the outer area with solid color scraps, then outline the inner edge with a black permanent marker for a crisp boundary.
Pro tipUse a craft knife on a metal ruler and make two shallow passes instead of one deep cut.
AvoidDon't rely on a single cardboard layer; thin cardboard warps when you seal it.
15. Modern Paper Quilling Border Frame (Flat Coils Only)
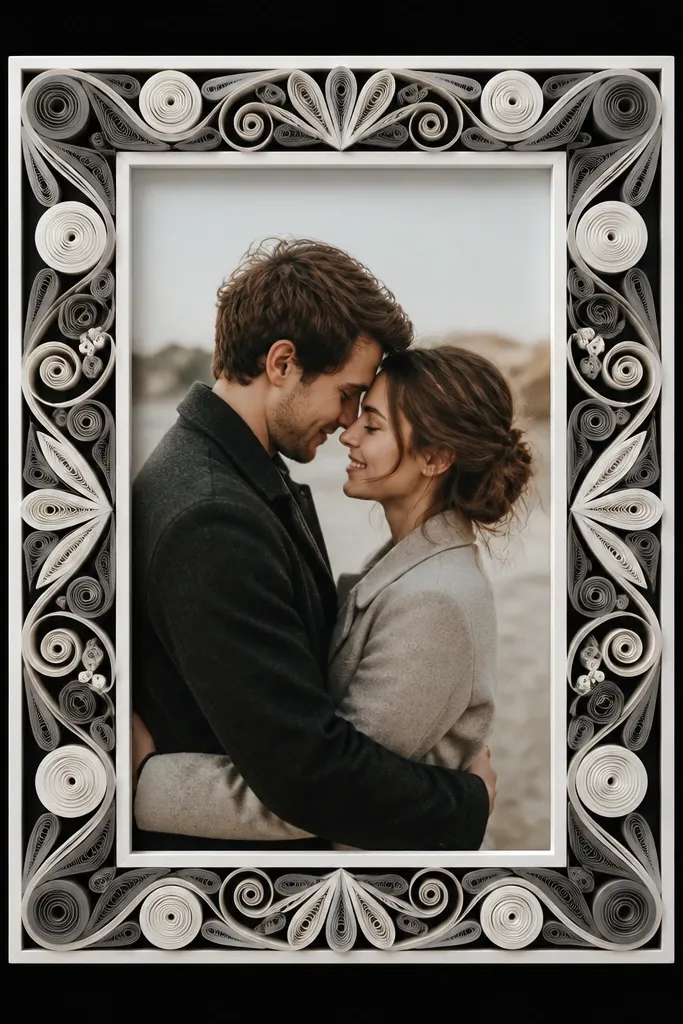
Quilling looks fancy, but flat coils are the easiest version to make look neat. Black backing makes the coils pop, and the border stays light so your frame doesn't feel heavy. I like it for minimal portraits and monochrome prints.
Cut a 5x7 foam board backing and paint it matte black. Add a 4x6 inner opening. Make flat coils using paper strips and a quilling tool, then glue them along the inner edge in a repeating pattern. Seal the coils lightly with matte spray from a distance to avoid clumping.
Pro tipMake 10 extra coils; you'll break a few while placing them.
AvoidDon't use wet glue on coils; it soaks the paper and makes it curl.
16. Old CD Frame with Prism Edge
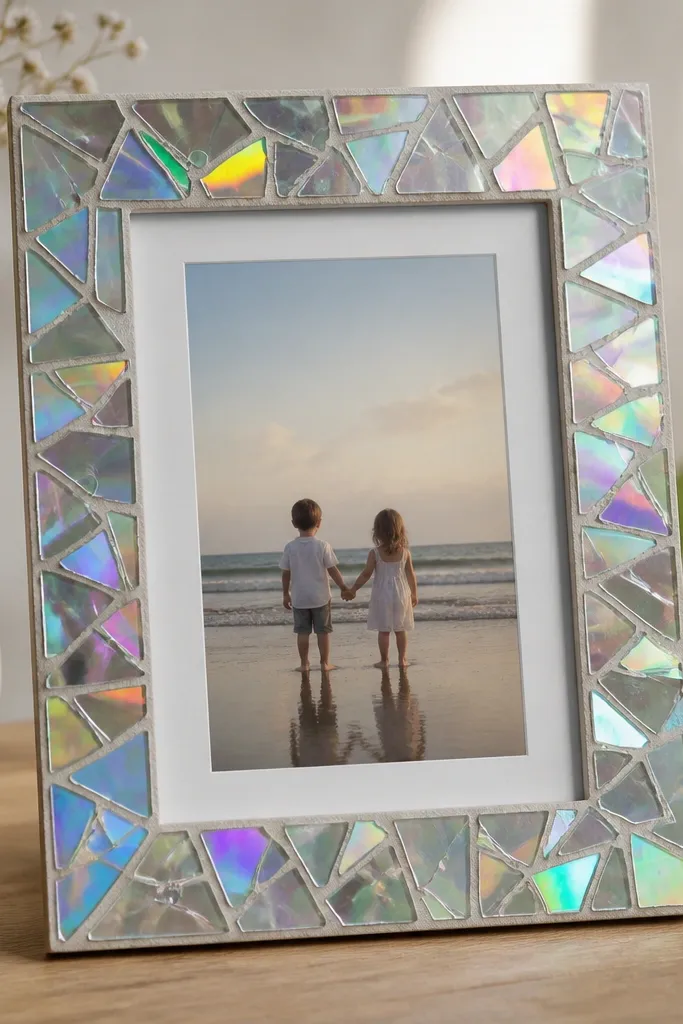
CD fragments throw prismatic color across the room, and that makes the frame feel like decor. Keep the center matte so you don't compete with your photo. This works best for night city photos, concerts, and anything with a cool-toned background.
Cut a 4x6 foam board backing and paint the center matte white. Glue CD fragments around the outer edge in a mosaic ring. Cover the whole front with a thin layer of clear packing tape or a clear plastic sheet to protect sharp edges, then seal if needed.
Pro tipWear gloves when trimming CD pieces; the edges cut.
AvoidDon't leave CD shards exposed near the photo opening; the sharp edges snag paper.
17. Washed-Out Denim Frame with Contrast Stitch Look
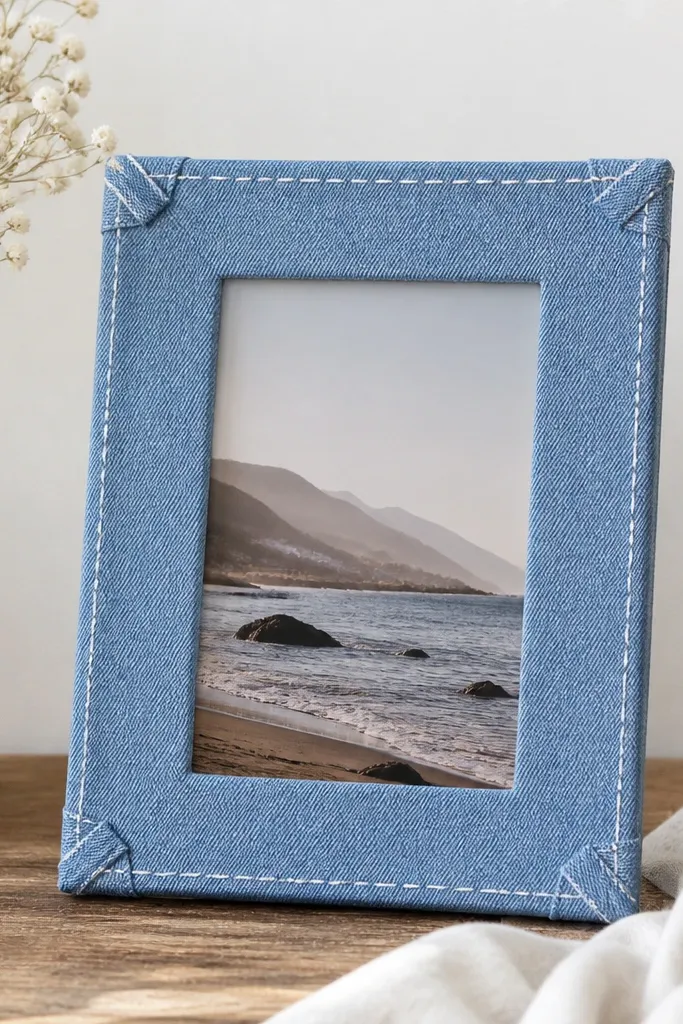
Denim gives you a soft, casual texture that photographs well. The trick is adding a stitch-like border line so the frame reads finished. I use this for graduation photos, camping snapshots, and any memory you want to feel relaxed.
Wrap a 5x7 foam board with denim using spray adhesive. Cut a 4x6 inner opening and fold denim edges to the back. Add white fabric paint lines around the outer 1 in border to imitate double stitching, then dry flat overnight before mounting the photo behind clear plastic.
Pro tipPractice your paint line on scrap denim first; denim nap makes some strokes thicker.
AvoidDon't glue denim with thick hot glue along the front; it leaves bumps you'll see in daylight.
18. Tin Can Ring Frame (Raised Metal Circle Accent)
A raised metal ring creates a strong focal frame without covering the whole border. Seafoam green and brushed metal look great with beach photos and pastels. It also gives you a clean, modern edge that doesn't rely on complicated cuts.
Flatten a cleaned tin can and cut a ring slightly larger than your photo opening. Paint it seafoam green and lightly sand after drying for a brushed finish. Glue the ring onto a 4x6 foam board backing, then add a clear plastic protector and your 4x6 photo behind it.
Pro tipIf the tin ring won't sit flat, score the back lightly with scissors and press it down with a heavy book.
AvoidSkip sharp tin edges; file or cover them so you don't cut yourself when hanging.
19. Scrap Leather Strip Frame with Edge Burnish
Leather strips look expensive because the material has weight and a clean edge when burnished. The warm tan tone makes skin tones look better in portraits. I like this for family photos and gift frames because it feels special even when the leather is from an old belt.
Cut 1/2 in wide leather strips and wrap them around a 5x7 foam board backing. Use cream cardstock as a mat with a 4x6 opening so the leather frames the photo cleanly. Burnish the leather edges with a little water and a cotton cloth, then seal with a matte leather finish.
Pro tipCut leather edges with a rotary cutter for straight lines that don't fray as much.
AvoidDon't skip edge burnish; unburnished leather reads rough and unfinished.
20. Seasonal Paper Fan Frame (Folded Accordion Border)
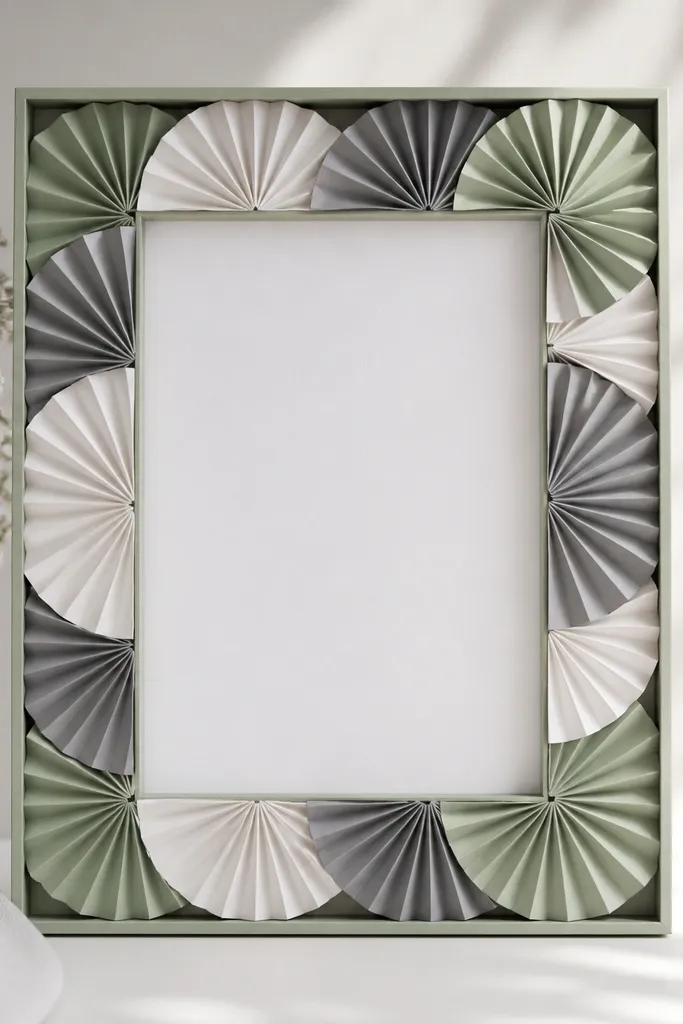
Folded fans add movement and light texture while staying flat against the wall. Alternating two or three colors keeps the border from looking random. This one is great for spring and summer photos because it feels airy.
Make a 4x6 foam board backing and cut a 3.5x4.5 opening. Create paper fans by folding 1/2 in accordion pleats along a strip, then glue the fan base to the border area. Use two color strips alternating along the top and bottom, and keep the sides simpler with fewer fans. Seal the finished frame lightly with matte spray so the paper holds its shape.
Pro tipPress the folds with a ruler before you assemble; crisp pleats look store-bought.
AvoidDon't overfill the border; too many fans makes the photo feel cramped.