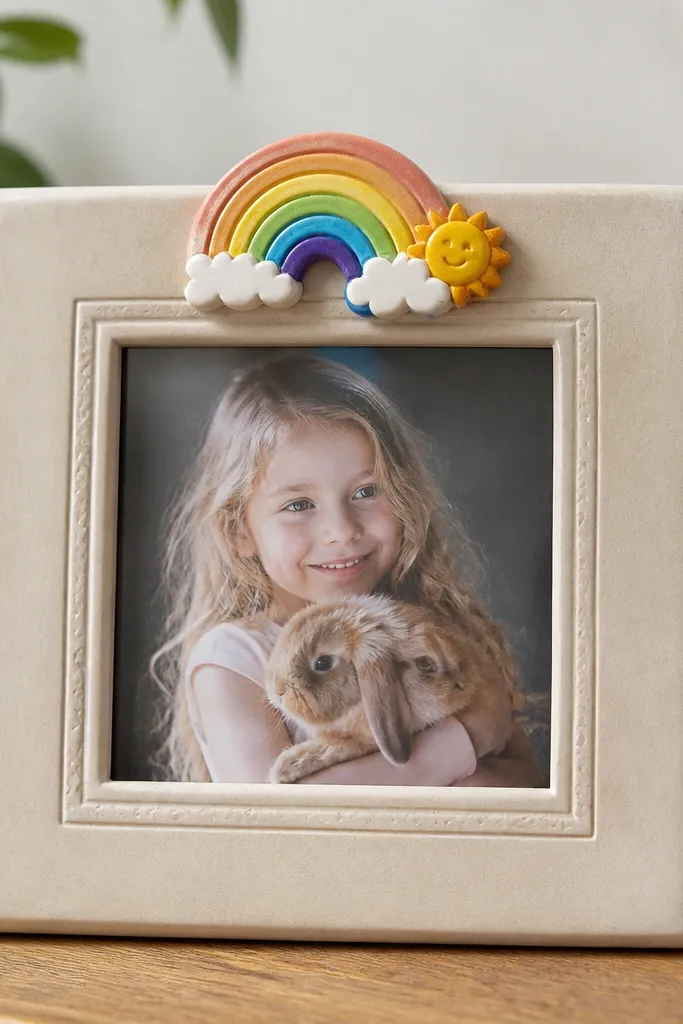
1. Cardboard window frame with tissue-paper stained glass
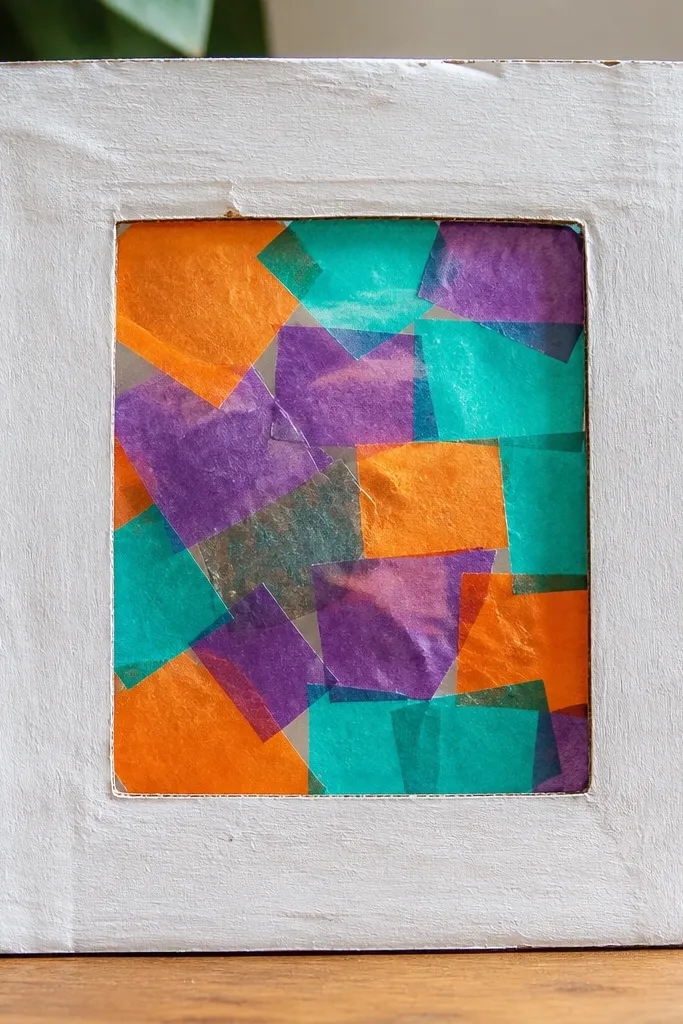
This one looks like stained glass without needing glass. Tissue paper gives bright color when it's layered and pressed tight, and clear tape makes the surface smooth enough for photos to sit behind it. I like it because the cardboard base is stiff, so the frame doesn't warp. The edges look neat when you paint the border first.
Cut a thick cardboard frame about 8x10 inches with a 4x6 inch window. Paint the outer border white or cream, let it dry, then layer tissue squares inside the window. Press each piece down with clear packing tape over the top edges so nothing tears loose. Mount the photo behind the window using double-sided tape on the cardboard edges.
Pro tipUse tissue paper pieces of slightly different sizes so the colors blend instead of forming hard blocks.
AvoidDon't leave the tissue edges loose - they snag and start peeling, making the whole frame look unfinished.
2. Thrifted frame makeover with washi tape chevrons
This is the fastest way to make something look "designed" using easy materials. Washi tape chevrons create a clean pattern, and the natural wood keeps it warm. It works especially well for family photos because the pattern sits behind the image without overpowering it. I've done this with five- and seven-year-olds - straight lines are forgiving because tape covers errors.
Remove the backing and glass from a thrifted frame. Cover the inside area with washi tape strips, starting at one corner and building a chevron pattern with a ruler or a phone grid. Add a thin border line of gold tape along the inner edge. Slide the photo in and secure it with the original backing or cardstock tabs.
Pro tipPress tape down with a plastic card so it sticks evenly, especially on textured wood.
AvoidDon't stretch tape while placing it - stretched tape puckers and makes the chevrons look wavy.
3. Button border frame with yarn "stitch" corners
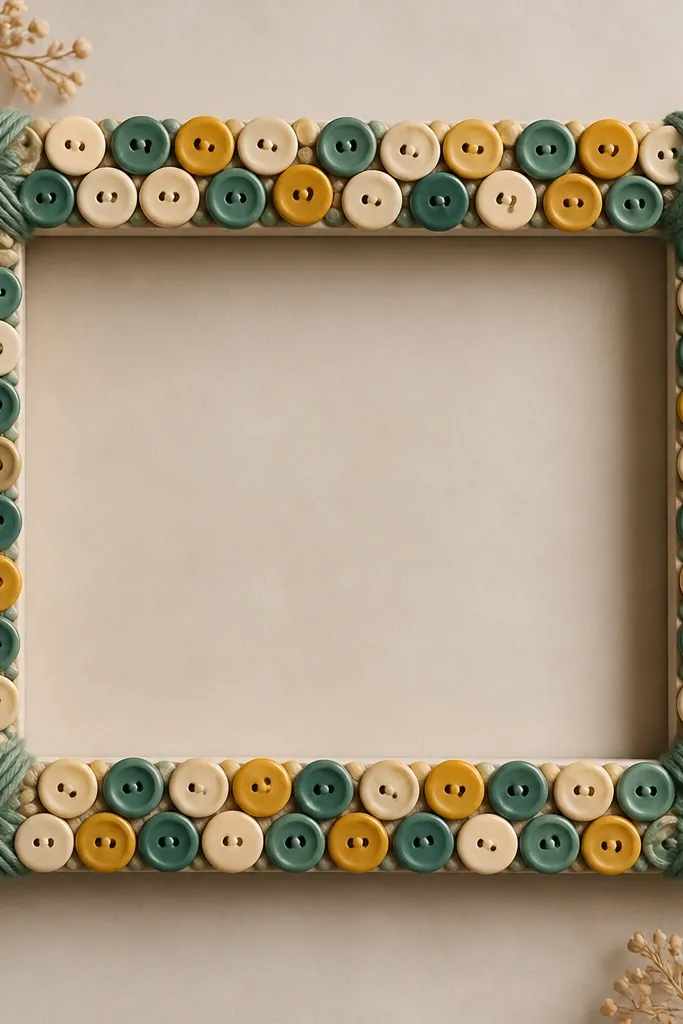
Buttons add weight and texture, and yarn wraps make the corners look intentional. This frame looks cute on a shelf because the border catches light. It also hides uneven edges because you're covering the whole perimeter. The best part is kids can place buttons freely, then tighten the look with a yarn corner wrap.
Use a foam board frame base or a cardboard frame with a rigid backing. Paint the border area a solid color first - I use cream or light gray so button colors pop. Glue buttons in a neat row around the edges, spacing about 1/4 inch apart. Wrap yarn around each corner 6-8 times, then tie off and glue the tail on the back.
Pro tipPick buttons with two sizes max so the border looks planned instead of random.
AvoidDon't glue buttons only on the front - add a small dab to the back edge too so they don't pop off after handling.
4. Spray-painted paper mosaic frame (no real cutting required)
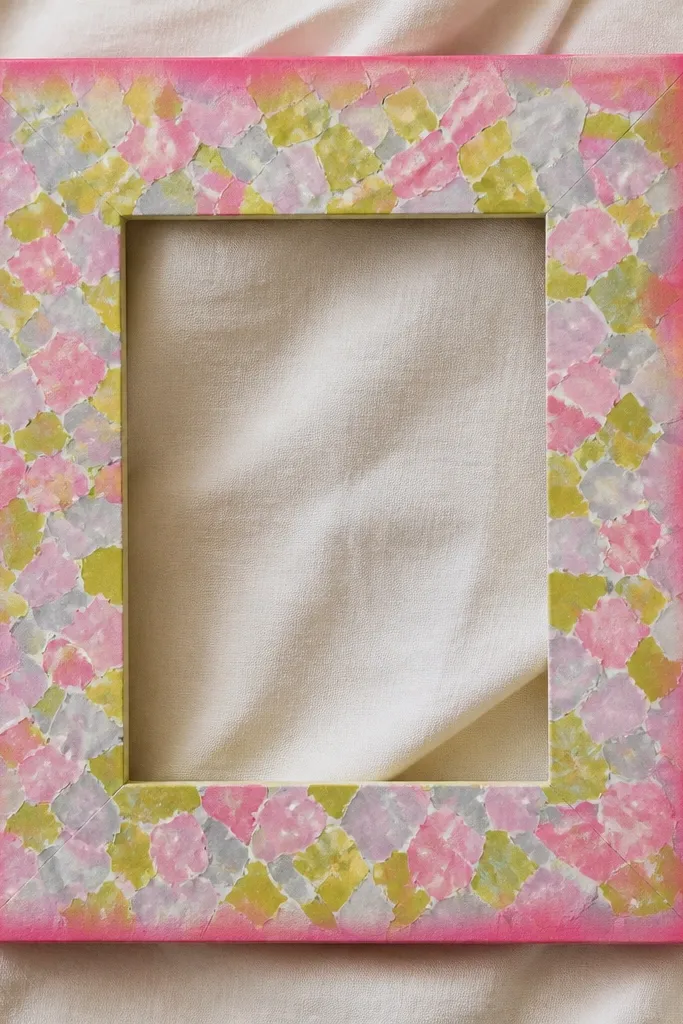
Tearing paper is easier than cutting, and it still looks neat when you keep piece sizes consistent. Spray paint gives a smooth, unified finish that makes the mosaic look like it belongs together. I've used this for birthday photos - the frame turns into a mini party backdrop. Kids like choosing colors, and the torn edges create a soft, handmade texture.
Cut a frame base from cardboard and paint the outer rim first (spray or thick acrylic). Tear paper into small squares about 1/2 inch wide. Add a thin layer of glue to the inside area and press squares down tightly, mixing colors in a checker or fade pattern. Seal the mosaic with a clear acrylic spray or a thin brush layer of Mod Podge.
Pro tipKeep your paper pieces the same thickness by tearing gently - thick tears create bumpy ridges.
AvoidDon't skip sealing - unsealed paper fibers get dusty and start lifting at the edges.
5. Felt pocket frame for easy photo swaps
If you want kids to swap photos without re-gluing, felt pockets are the answer. Felt grips the photo and stays flat, so the picture doesn't sag. This works great for rotating school photos, sports team pics, or seasonal pictures. The front can be simple - the pocket system does the heavy lifting.
Cut a rigid base from foam board, then wrap it in felt for the front. For the pocket, cut a felt rectangle slightly larger than the photo and glue it along the sides and bottom, leaving the top open. Add a stitched-look border by drawing lines with a fabric marker or using embroidery thread with a few tack stitches. Slide the photo in, then close the top with a small Velcro dot on the back.
Pro tipUse a photo sleeve or laminate strip on the photo so it slides smoothly.
AvoidDon't glue the pocket across the top edge - that makes it impossible to swap photos.
6. Clothespin mini-frame grid for desk photos
This one turns photos into a rotating display without any complicated assembly. Clothespins hold the photo edges tight, so kids don't have to align glue perfectly. The grid layout looks clean on a desk or fridge counter, and the photos change in seconds. I like it for grandparents because you can swap out a new picture after school.
Paint a small board (about 6x10 inches). Attach clothespins (4-6) spaced evenly along the board. Cut small cardstock frames around each photo, leaving a border so the clothespin grips. Clip the photo-frame pieces onto the clothespins, then add a tiny felt strip behind each one so the photo doesn't snag.
Pro tipSpray a clear coat on the board so fingerprints wipe off easily.
AvoidDon't clip directly onto glossy photo paper - it slips. Use matte cardstock backing behind the photo.
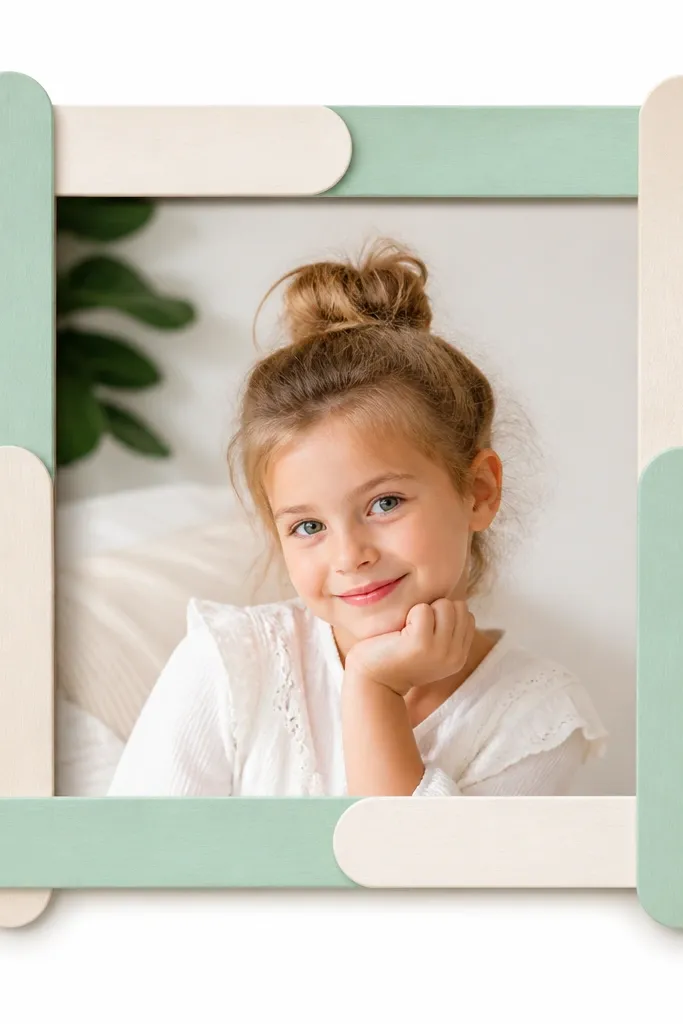
7. Ice-pop stick frame with rainbow "ladder" stripes
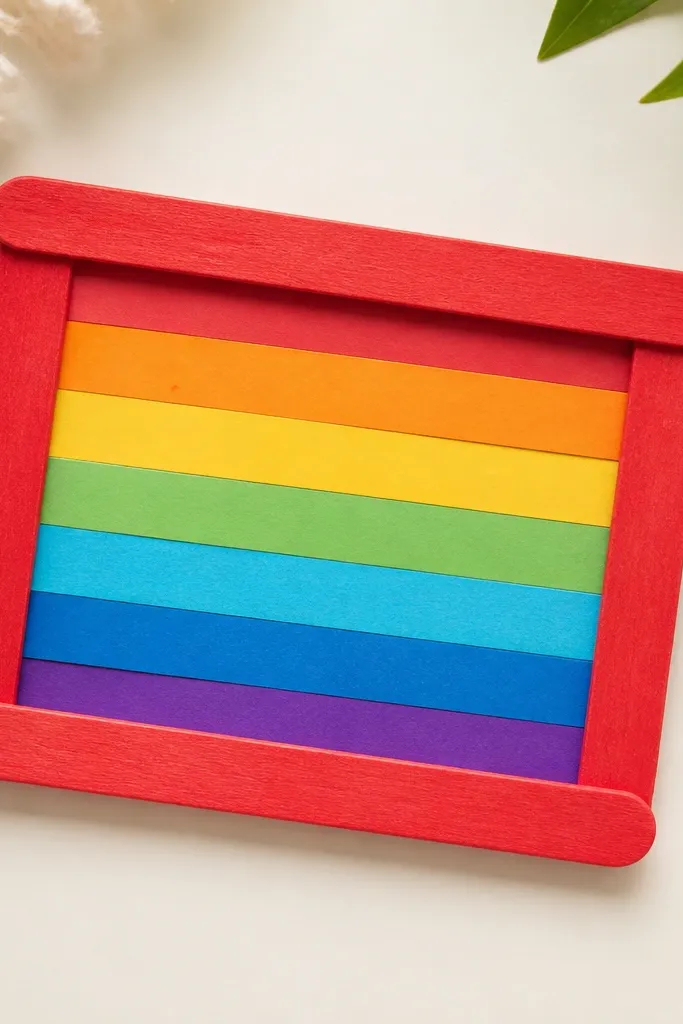
Ice-pop sticks are cheap and easy to cut, and they look charming when painted. The ladder stripe pattern gives motion, even when the photo is still. This is a good craft for younger kids because the pieces are large and hard to mess up. It also holds up better than paper frames because the sticks create a real structure.
Glue four ice-pop sticks into a rectangle. Paint the sticks one color - I like red or teal. Cut paper strips about 1/2 inch wide and glue them diagonally in alternating colors, leaving tiny gaps so you can see the base. Mount the photo behind the stripes using a second cardstock backing.
Pro tipUse a ruler to keep the strip spacing consistent - it makes the whole frame look cleaner.
AvoidDon't use wet glue in large blobs on sticks - it warps the wood and makes corners uneven.
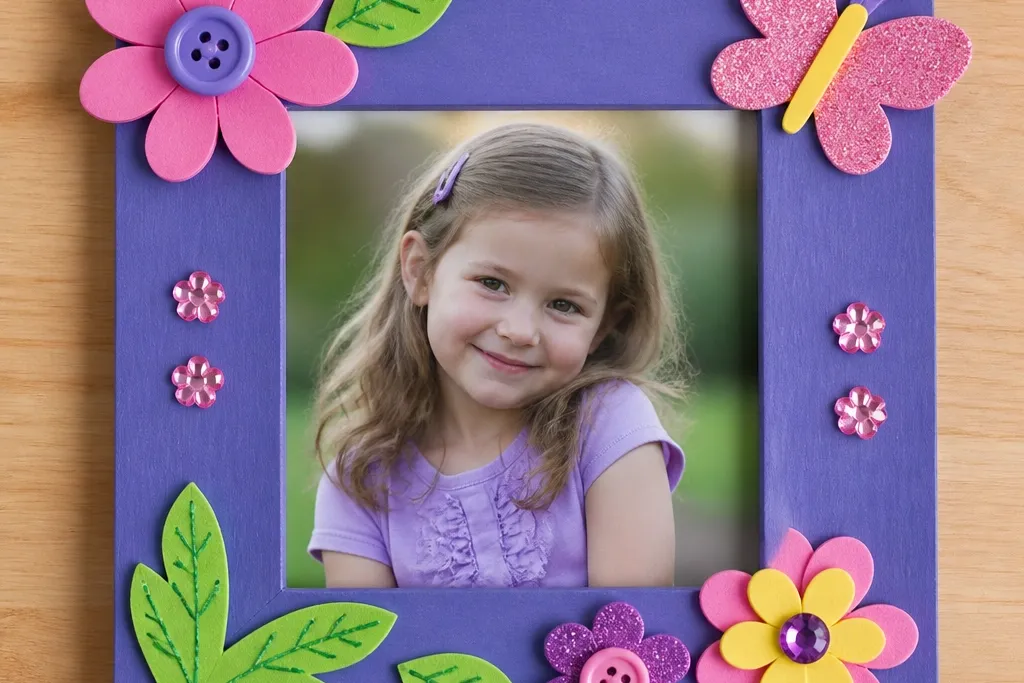
8. Egg carton flower frame with 3D petals
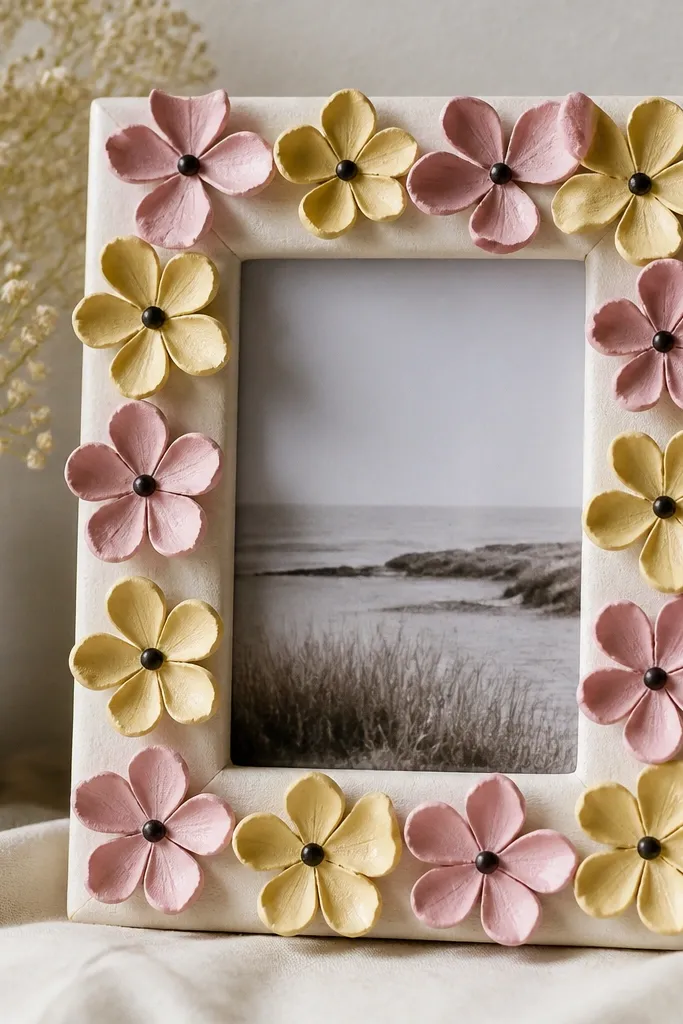
Egg carton gives you instant 3D shapes without buying craft foam. Painted petals look like real flowers, and the raised border makes the photo pop. I've used this for Mother's Day photos and it always gets compliments because it looks more detailed than it is. It also hides small edge cuts since the petals cover the perimeter.
Cut petal shapes from an egg carton (one carton makes enough for two frames). Paint the petals in soft colors, then glue them around the frame edges with a small overlap. Add a small circle at each flower center using a button or paper dot. Put the photo behind a window cut from cardstock so it sits centered.
Pro tipPaint the egg carton pieces first, then glue - glued raw cardboard soaks glue and looks dull.
AvoidDon't overload glue between petals - squeeze-out makes white blobs that ruin the pastel look.
9. Sticker collage frame with a clean matte border

This is the "my kid has too many stickers" solution that still looks polished. A matte border keeps the chaos contained, so the photo stays the main subject. Stickers also let kids personalize fast, and you don't have to cut or paint. I like using matte cardstock because it makes stickers look less shiny and more cohesive.
Use a pre-made frame or cardboard frame base. Cover the inner mat area with matte white cardstock. Place stickers in a balanced layout, leaving a consistent margin around the photo window. Seal the whole mat with a light spray of clear acrylic so stickers don't lift.
Pro tipPick one theme color for the border - like light gray or soft mint - and stick to it.
AvoidDon't cover the photo area with stickers - glossy sticker edges catch light and make the photo look washed out.
10. Coffee stirrer frame with woven paper strip mat
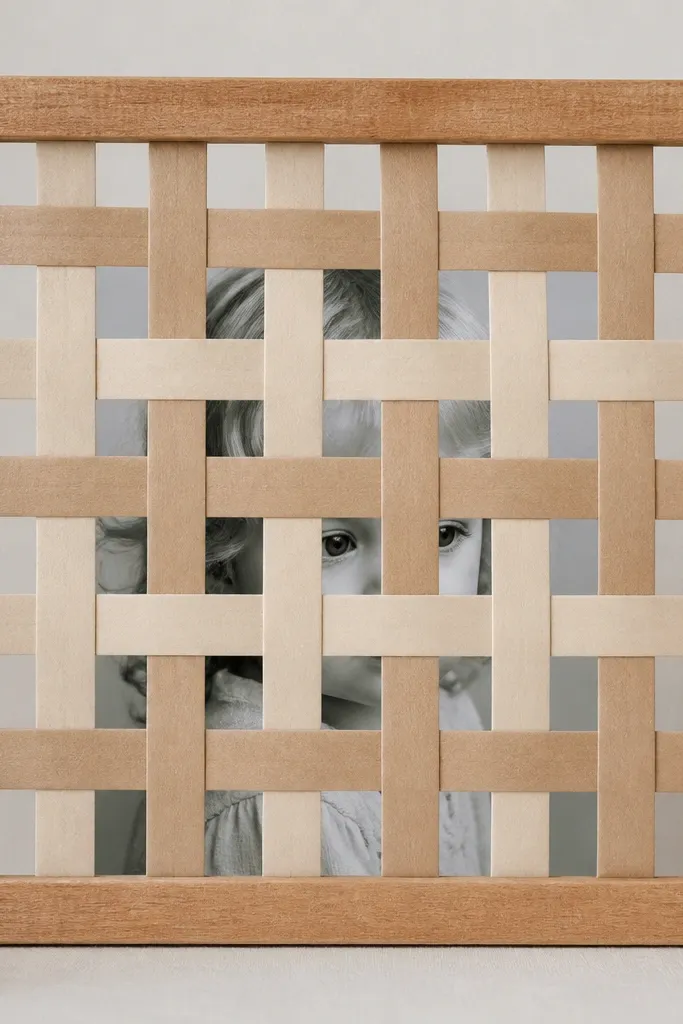
This one feels crafty without being fussy. Woven paper strips add texture, and the stirrers create a light border that looks like a mini loom. It's a great choice for kids who like patterns because you can follow a simple over-under rhythm. The finished frame looks warm and cozy on a kitchen wall.
Glue coffee stirrers into a rectangle. Cut paper strips about 1/2 inch wide and weave them into a grid on top of cardstock. Leave space in the center for the photo, then glue the woven ends down to the cardstock backing. Insert the photo behind the weave and secure with a backer board.
Pro tipUse strips from the same paper pack so the weave has consistent thickness.
AvoidDon't pull the weave tight - it buckles. Keep tension even across the grid.
11. Painted popsicle stick border with photo "shadow"
The shadow effect makes a handmade frame look store-bought. By mounting the photo slightly forward on foam tape, you get depth without heavy decoration. The painted stick border stays simple and clean, which helps the photo feel intentional. This is one of my go-to options when kids want to decorate but also want the picture to look sharp.
Paint four or six popsicle sticks for the border, then glue them around a cardboard or foam board base. Cut a photo window and mount the photo behind it. Add foam tape strips around the photo edges so the photo sits 1/4 inch forward. Finish with a thin layer of clear tape over the photo for protection.
Pro tipUse black or dark gray foam tape for a cleaner shadow line.
AvoidDon't glue the photo flat if you want depth - flat photos look like they're stuck on top.
12. Recycled cereal box frame with printed fabric strips
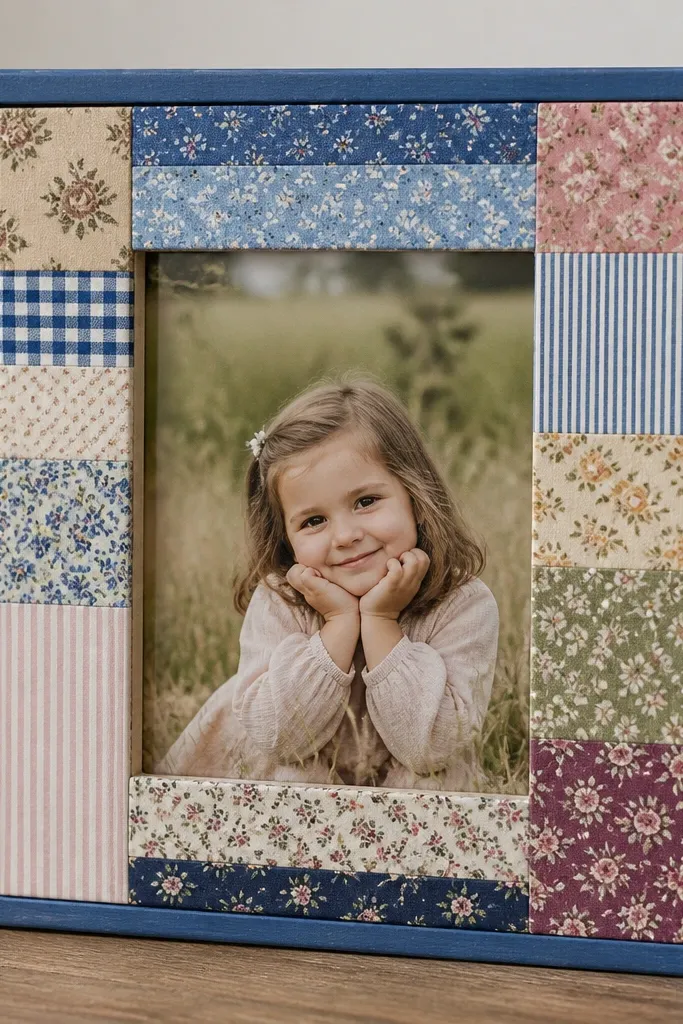
Cereal box cardboard is surprisingly sturdy once you double it, and fabric strips make it look expensive. This works well when you have scrap fabric - old T-shirts, pajama scraps, or bits from sewing projects. The fabric texture hides minor crooked edges, and the frame has a soft look. Kids like picking fabric colors because it feels like a quilt.
Cut the frame from doubled cereal box cardboard. Paint the outer edge, then glue fabric strips across the inside mat area. For the photo, cut a clean window and leave a solid fabric background behind it. Mount the photo behind the window using double-sided tape and a backing card to keep it flat.
Pro tipUse fabric glue or a glue stick for fabric strips, then press with a book for 20 minutes.
AvoidDon't use thin paper backing only - the frame warps when handled.
13. Yarn wrap frame with big "frame within a frame"
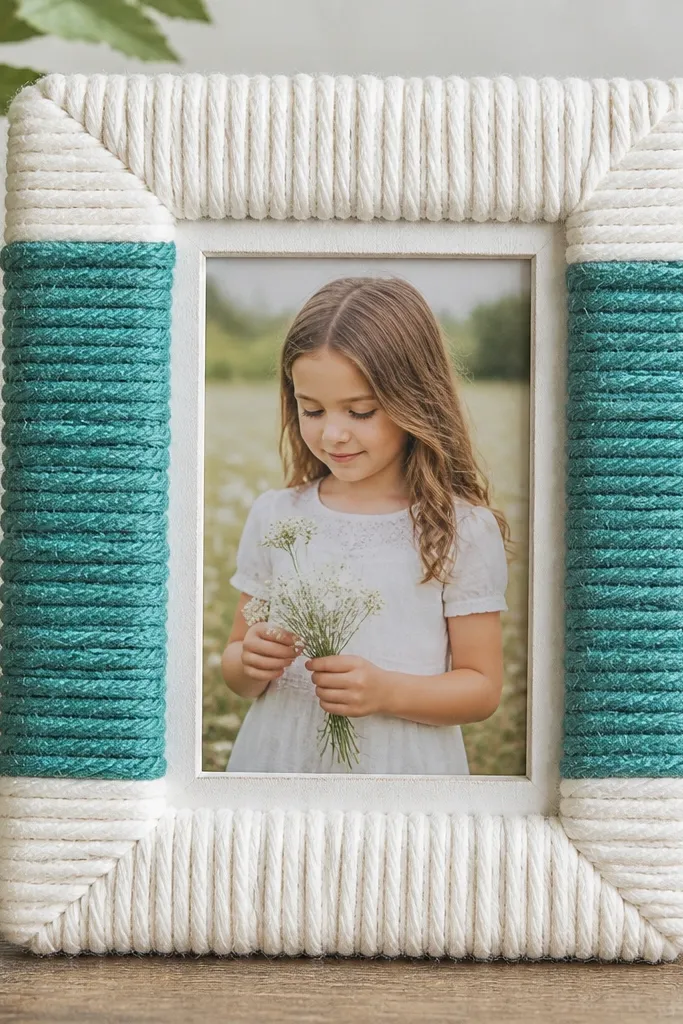
Thick yarn makes an instant cozy border and hides uneven corners. The "frame within a frame" look happens when you keep a clean inner cardboard border before you mount the photo. This is great for winter photos, pets, or anything you want to feel soft. I've used this with kids because they get fast visual progress as yarn covers everything.
Wrap yarn around the outer edge first in tight rows, gluing as you go. Leave the inside area uncovered, then paint it a solid color like teal or navy. Cut a photo window and mount the photo behind the inner border. Seal the yarn with a light brushed layer of clear glue on the back only so the front stays textured.
Pro tipCut the yarn ends clean with scissors right before gluing so seams look tighter.
AvoidDon't glue yarn directly over a glossy surface - it slips unless you rough it up with sandpaper.
14. Paper quilling-style frame with rolled dots
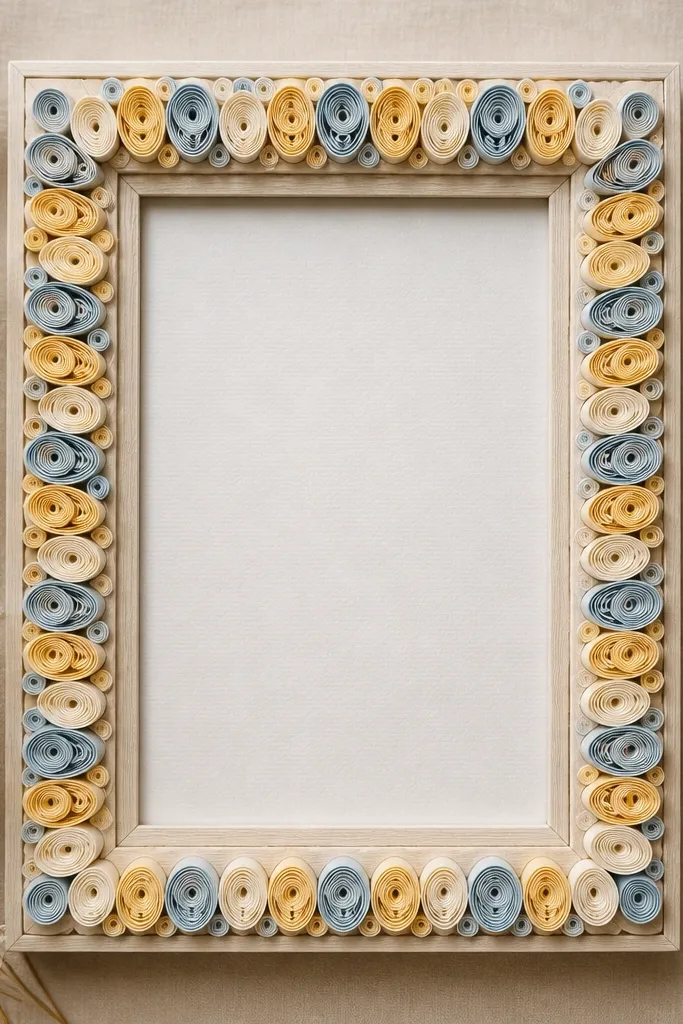
You get the quilling look without buying a quilling tool set. Rolled paper dots create a textured border that makes the frame feel delicate, even though it's made from scrap paper. Kids can roll larger strips and still get a good effect. It also keeps the center clean so the photo stays sharp.
Cut paper strips about 1/4 inch wide and roll them around a toothpick. Glue each rolled dot to a cardstock border area, building an oval or rectangle outline. Paint or color the border cardstock first so gaps don't show white. Mount the photo behind a window cut from the center.
Pro tipRoll a bunch of dots before gluing so your pattern stays consistent.
AvoidDon't use wet glue on rolled paper - it warps and makes the dots look lumpy.
15. Mini "gallery wall" frame with duct tape corners
Duct tape corners are a sneaky way to make a simple frame look intentional. The center stays calm, so the photo reads clearly. I like this for busy kids' photos because it doesn't fight the image. It also lets kids choose patterns without covering everything.
Use a pre-made frame base or cardboard rectangle. Wrap each corner with duct tape strips folded over the edges to catch light. Keep the inner mat blank or painted white. Add a photo window and mount the photo behind the mat with tape tabs.
Pro tipPress duct tape corners with a butter knife edge so it folds cleanly.
AvoidDon't wrap duct tape over thin cardboard edges - it can peel. Use a thicker base.
16. Natural leaf silhouette frame with painted background
Leaf silhouettes look classy without needing fancy supplies. Kids can pick leaves, paint them, and print the shape onto the frame background. It makes the frame feel personal to your yard, park, or sidewalk walks. The photo stays visible and doesn't get buried under craft clutter.
Paint a cardboard frame background in a solid color like sage green or sky blue. Place a leaf on scrap paper and paint over it with black acrylic, then press it onto the frame for a clean silhouette. Let it dry, then cut a photo window in the center and mount the photo behind it. Seal with clear acrylic spray.
Pro tipUse leaves with strong veins - they print darker and look sharper.
AvoidDon't use too much paint on the leaf - it smears and makes the silhouette look muddy.
17. Salt-dough "nameplate" frame topper
A homemade topper makes the frame feel like a keepsake right away. Salt dough is easy to press into letters or shapes, and it dries hard enough for a backpack. I like putting the photo under the nameplate so kids feel pride when they see their own title. This also helps with sorting - you know whose frame is whose.
Mix salt dough (2 cups flour, 1 cup salt, 3/4 cup water) and roll to about 1/4 inch thick. Cut a rectangle or letters, then bake at 250F for about 2 hours until hard. Paint with acrylic, seal with Mod Podge, and glue the nameplate onto the top of a simple frame base. Mount the photo behind a window using a backing card.
Pro tipAdd a small hole at the top before baking if you want to hang it on a string.
AvoidDon't bake too hot - it browns fast and can crack near the edges.
18. Crayon-resist frame with blended watercolor edges

Crayon-resist makes patterns appear like magic, and the edges look soft and artsy. Kids draw with crayons, then watercolor washes over it - the crayon lines stay bright. I've done this for kids who don't want "messy glue" but still want a dramatic result. The resist pattern adds texture without covering the photo.
Use a cardstock base with a photo window. Draw swirls or simple shapes with white or light crayons on the inside paper area. Wet watercolor around the edges and lightly blend toward the center without soaking the whole page. When dry, tape a clear sheet or packing tape over the artwork to protect it, then mount the photo behind the window.
Pro tipUse a thin brush and less water - watercolor bleeding ruins crisp resist lines.
AvoidDon't use dark crayon on a light watercolor wash - it can overpower the photo and look muddy.
19. Toilet paper tube monogram frame with circular photo mat
Tube monograms look bold and graphic, and they're made from trash you already have. The circular mat makes the photo feel like it's framed inside a "halo." This is a fun craft for older kids who can handle more precise cutting. It also looks great for sports numbers and first-initial photos.
Cut toilet paper tubes into thick rings and half-rings for letters. Glue pieces onto a cardboard base painted in one color, like navy or coral. Add a circular window mat by cutting a circle opening in cardstock and gluing it around the photo. Mount the photo behind the circle using tape tabs and a backing card.
Pro tipPaint tubes before assembling the letter - seams hide better once the color is consistent.
AvoidDon't leave tube edges unpainted - they show brown and make the frame look unfinished.


