1. Coffee-stained map border with inked coordinates
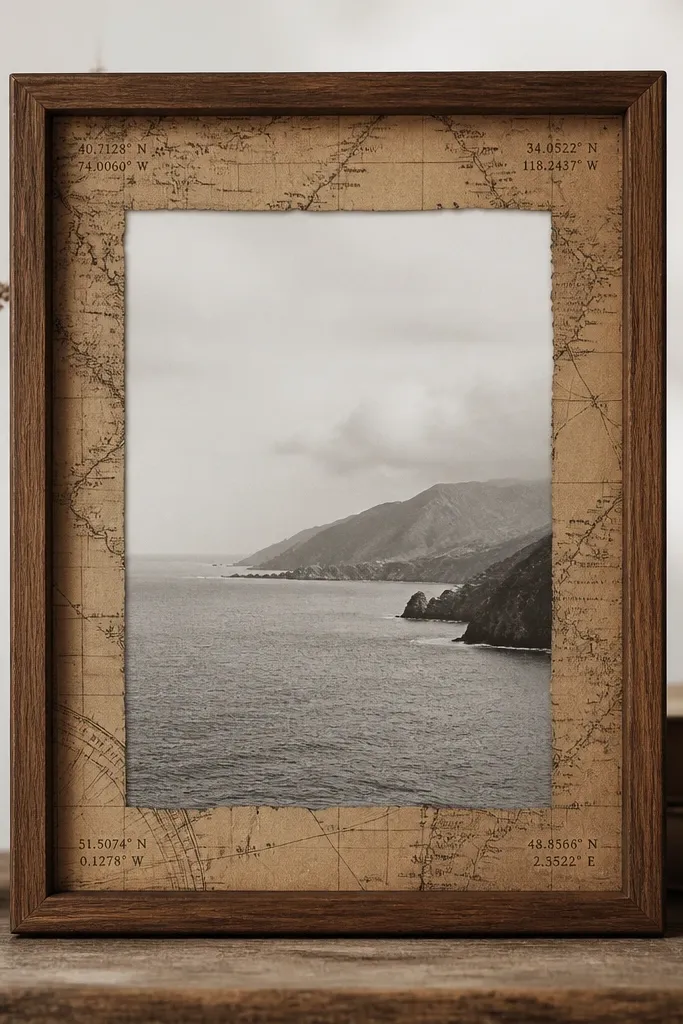
I do this when I want a travel photo to feel older and personal without turning it into a craft project. Coffee stain gives the paper that warm, lived-in color, and the crisp black ink coordinates make it feel intentional. Use thin map strips so they frame the photo without covering it like a border sticker.
Cut four strips that are about 1.25 inches wide for an 8x10 frame opening. Brew strong coffee, dip the strips, then dry flat under a book so they don't curl. Seal the strips with matte Mod Podge before gluing to the frame, then write coordinates with a fine-tip archival ink pen.
Pro tipWrite coordinates that match your photo location, even if it's just a city center - it makes the frame feel specific instead of random.
AvoidDon't glue unstained paper directly to a glossy frame; it will lift and warp at the edges.
2. Broken tile mosaic frame corners
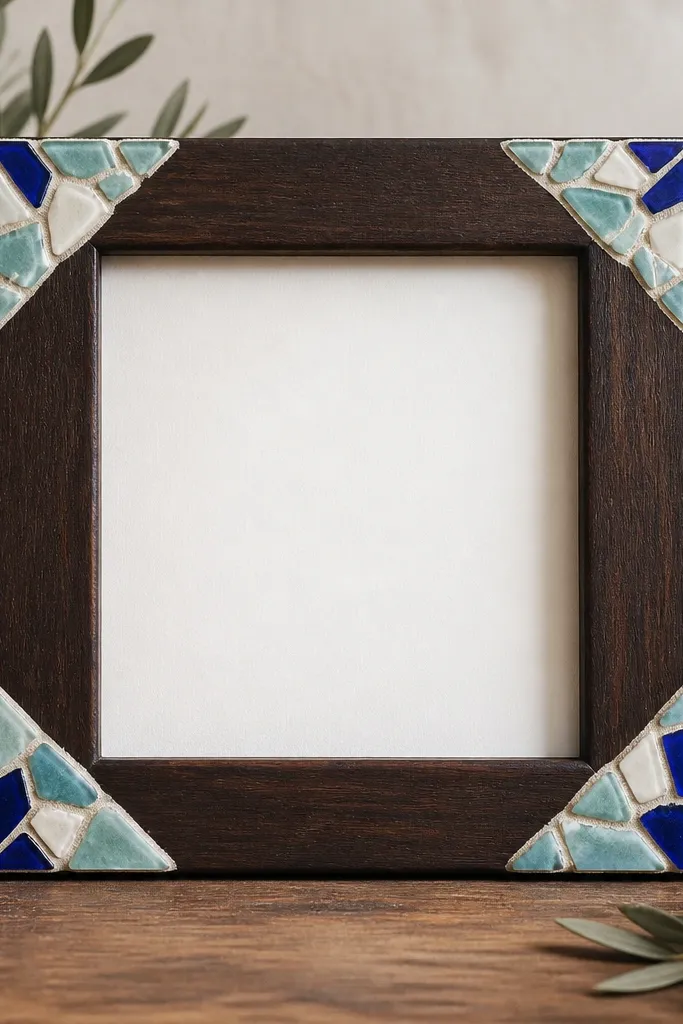
Corners-only mosaics look expensive because they create detail where your eyes land first. Tile gives a hard, glossy sparkle that reads well in daylight, and the grout lines add structure so it doesn't look messy. This is great for beach, lake, or street photography.
Wrap painter's tape around the inside edge of the frame to mark the photo-safe area. Break tiles into 1/4 to 1/2 inch chunks with a tile nipper, then arrange dry first so the colors balance. Mix grout (or use grout-like filler) and press it into gaps, then seal with a clear tile sealer after curing.
Pro tipUse three color families max - seafoam + cobalt + warm white - and keep grout lines thin for a clean look.
AvoidDon't flood the gaps with too much grout; thick grout makes corners look bulky.
3. Fabric rosette ring around the mat
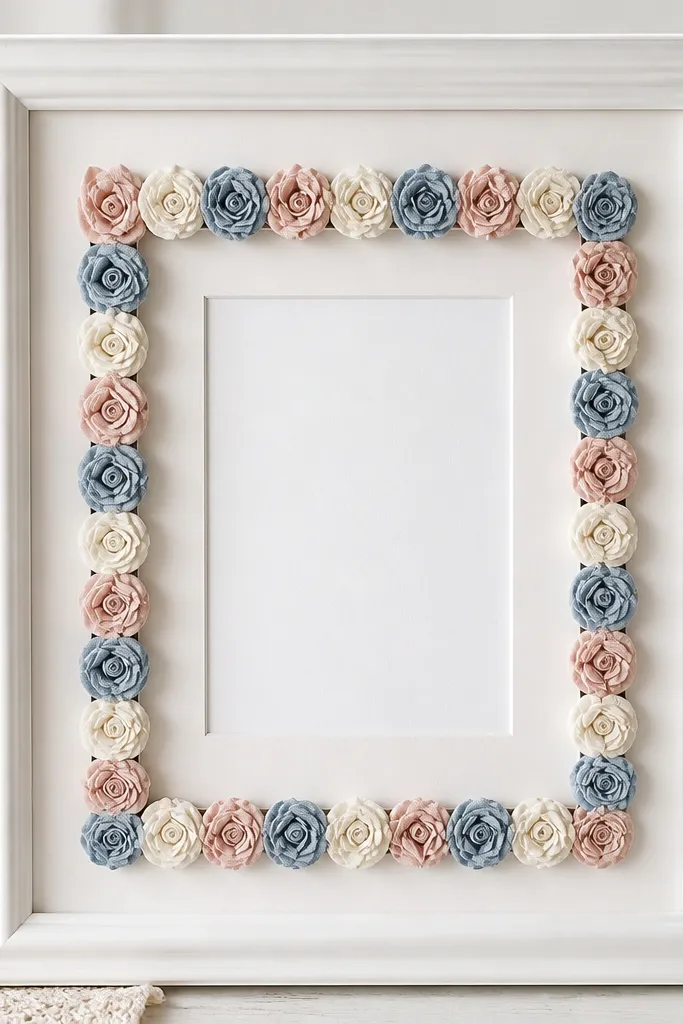
Fabric rosettes soften portraits and wedding photos better than paper borders. The layered petals create shadow, so the frame looks dimensional even if the photo is flat. I like a tight ring because it frames without stealing attention.
Use 1-inch squares cut from cotton scraps, then roll each square around a needle thread to form a rosette. Glue the rosettes to a thin ribbon strip or directly to the frame with hot glue, spacing them 1/4 inch apart. For a 5x7 opening, plan about 18-22 rosettes.
Pro tipMix matte fabrics only. If one fabric is shiny satin, it catches light differently and the ring looks uneven.
AvoidDon't use stretchy knit scraps; they sag and pull the rosettes out of shape.
4. Twine spiral with a tiny brass nail star
This is a simple design that looks crisp because the spiral rhythm is controlled. Twine adds texture without covering the whole frame, and the small metal star gives a sharp focal point. It works especially well for kids' photos and rustic family portraits.
Start by hot-gluing twine at the center top of the border area. Wrap in a tight spiral with each loop touching the last, keeping tension even. For the nail star, hammer five tiny finishing nails into a paper template then remove the template and hot-glue the star outline to the frame.
Pro tipSpray the twine lightly with a clear matte sealer once it's glued so it won't fuzz over time.
AvoidDon't leave gaps between twine loops; wide gaps make it look unfinished.
5. Gold leaf drip edge on black frame
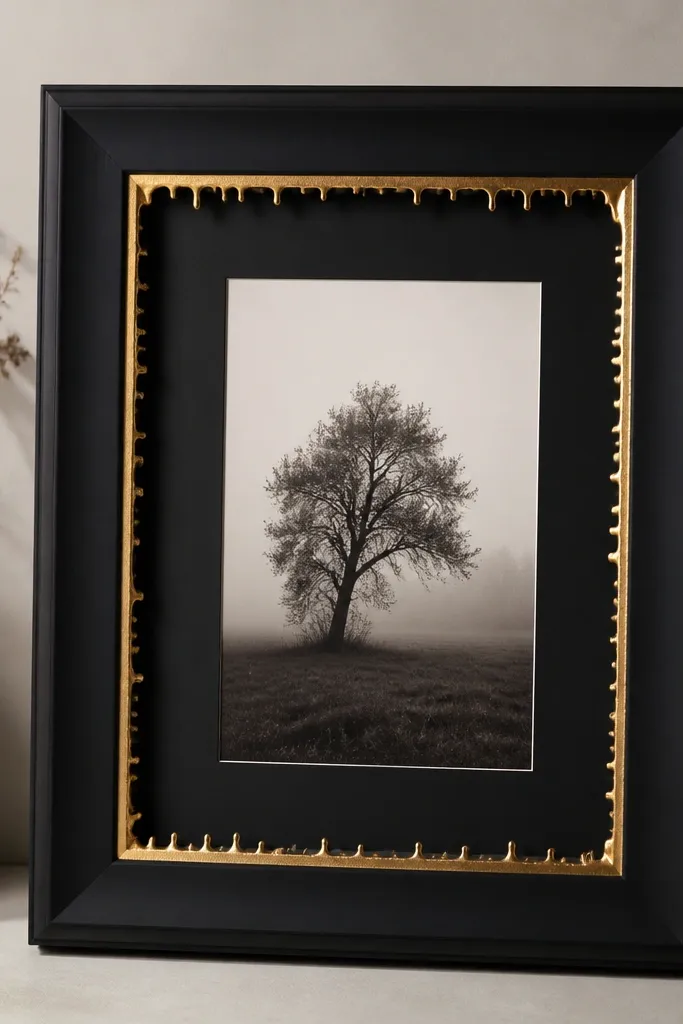
Gold leaf looks best when you keep it to one line - the inner edge drip gives drama without turning the whole frame into a craft fair item. Black paint makes the gold read bright even in dim rooms. This design suits black-and-white portraits and simple nature shots.
Paint the frame with matte black acrylic and let it dry fully. Apply gold leaf adhesive along the inner edge in short segments, then press gold leaf sheets to catch the adhesive. Use a soft brush to press and tear away excess so drips look intentional.
Pro tipPractice two drips on scrap first. Once you like the length, repeat on the frame corners only.
AvoidDon't seal gold leaf with a wet gloss coat; it dulls the metallic shine.
6. Washed denim pocket frame
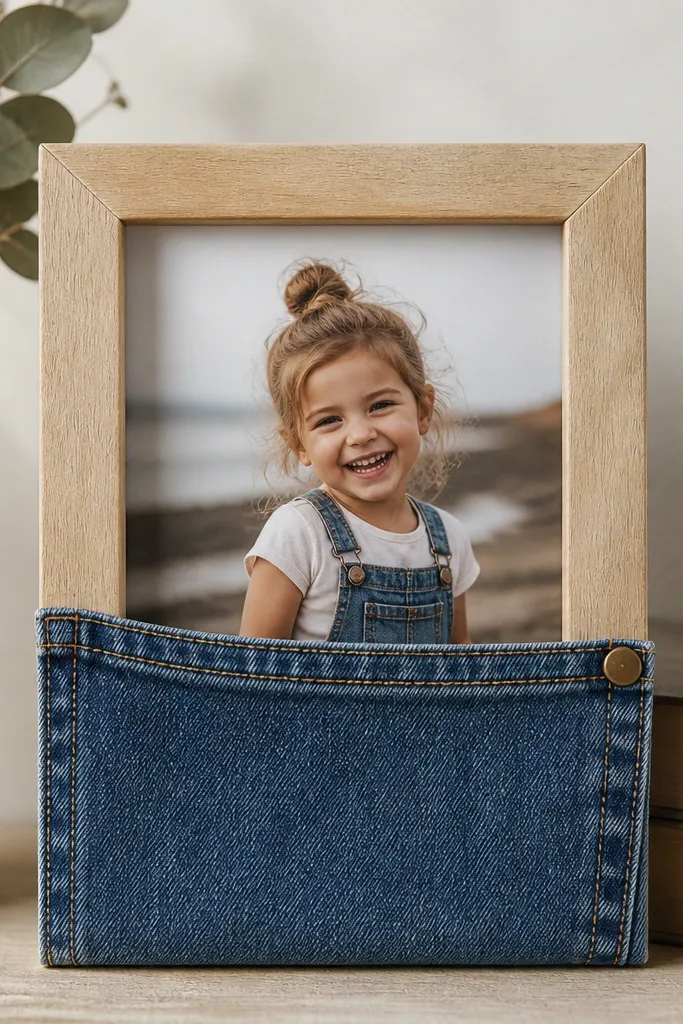
A denim pocket adds a story feel because it looks like a wearable detail. The heavy fabric gives structure and makes the frame look custom even if the photo is ordinary. I use this for graduation, summer hangouts, and candid group pics.
Cut a denim pocket shape from an old pair of jeans, keeping the hem and any original stitching. Sew or glue the pocket onto the frame bottom, then place the photo so its bottom edge sits just above the pocket opening. Seal the denim with a fabric-safe matte finish so glue doesn't soak through.
Pro tipChoose denim that already has fading or whiskering - you don't need extra painting to make it look lived-in.
AvoidDon't soak denim with liquid glue; it spreads and stains the wood.
7. Scrapbook paper fan corners
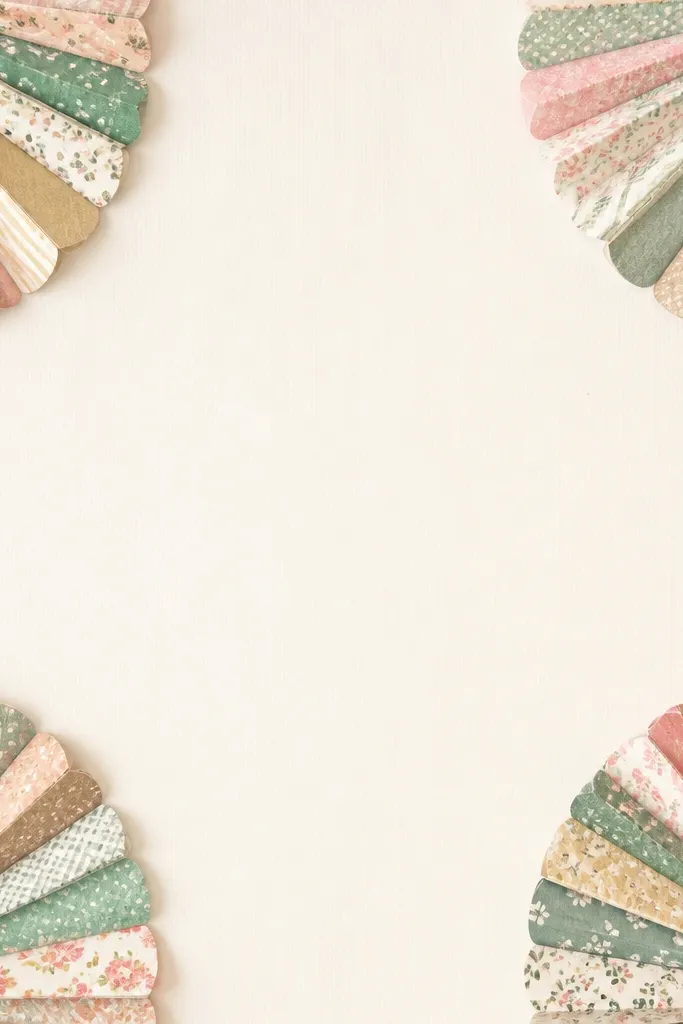
Paper fans give a geometric pop while staying light enough to not warp the frame. Layered corners draw the eye toward the photo edges and add movement. Pick two patterns and one solid so it reads designed, not chaotic.
Cut 8 small rectangles for each corner, about 1 inch by 2.5 inches, then fold each strip accordion-style. Stack them from shortest to longest and glue the base to a tiny backing square of cardstock. Attach the fan clusters to the frame corners with hot glue.
Pro tipFold the fans with a bone folder so they stay sharp and don't look crumpled.
AvoidDon't use thick glossy paper; it won't fold cleanly and the fans look lumpy.
8. Pressed leaf and seed frame overlay
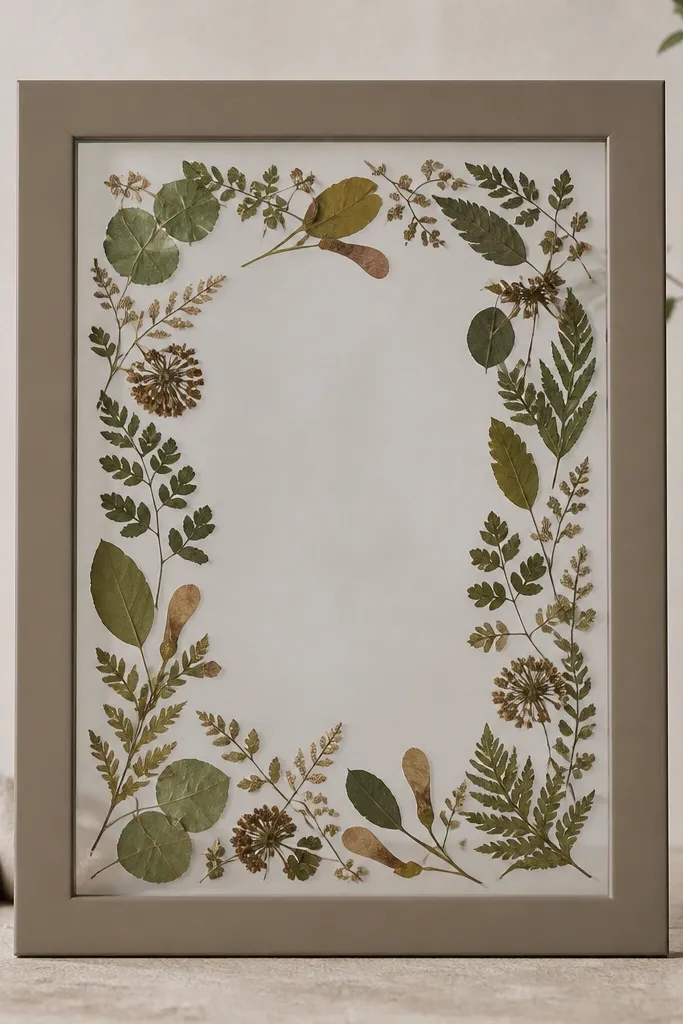
Pressed botanicals look best when they're sealed flat under a clear top layer. The thin overlay keeps the photo readable while the leaves add texture. This design works great for seasonal photos and farmhouse-style interiors.
Press leaves between book pages for 2-3 weeks, then trim stems. Arrange leaves on a strip of clear acetate or craft plastic cut to fit the inner border. Seal with clear acrylic gel or a resin layer, then glue the finished overlay to the frame.
Pro tipUse flat, thin leaves like fern fronds; thick leaves create air pockets under clear sealers.
AvoidDon't rush pressing. Fresh leaves will curl and ruin the flat look.
9. Rainbow paint swipe with masking tape edges

Clean masking-tape edges make paint look graphic instead of messy. The color swipes give energy without covering the photo, and the white frame keeps it modern. This is perfect for bright travel photos and kids' artwork.
Tape off three bands across the frame border, leaving about 1/2 inch between bands. Paint with acrylic in thin coats, letting each coat dry 15 minutes. Remove tape while the paint is still slightly tacky so edges stay sharp.
Pro tipUse painter's tape, not masking tape; painter's tape peels cleaner off acrylic.
AvoidDon't paint too thick in one pass; thick paint chips when you remove tape.
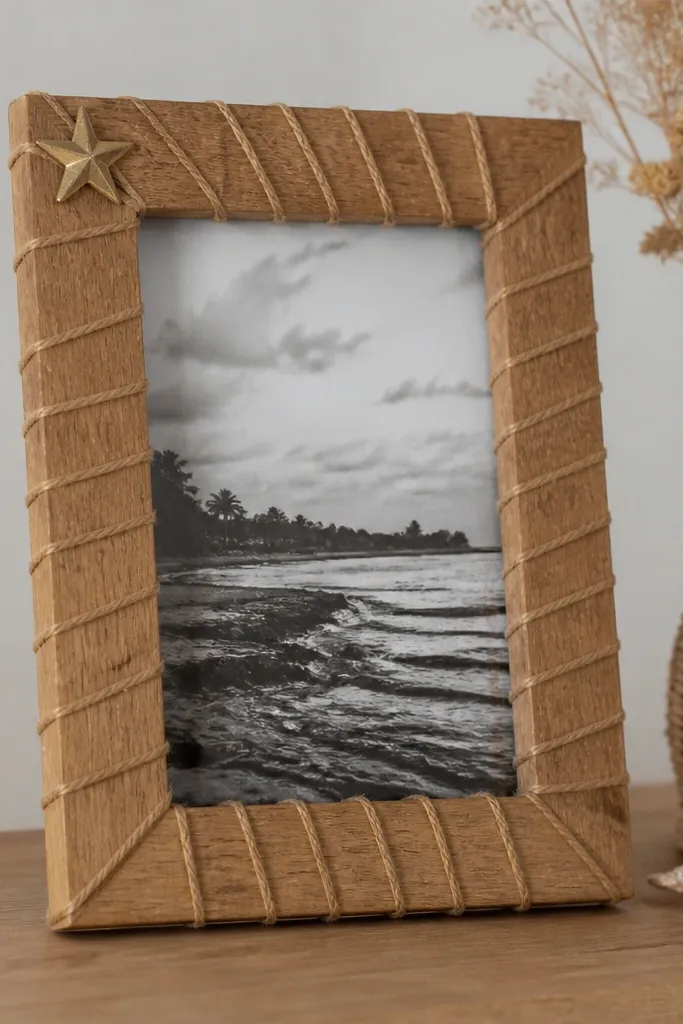
10. Rope border with black ink date stamp
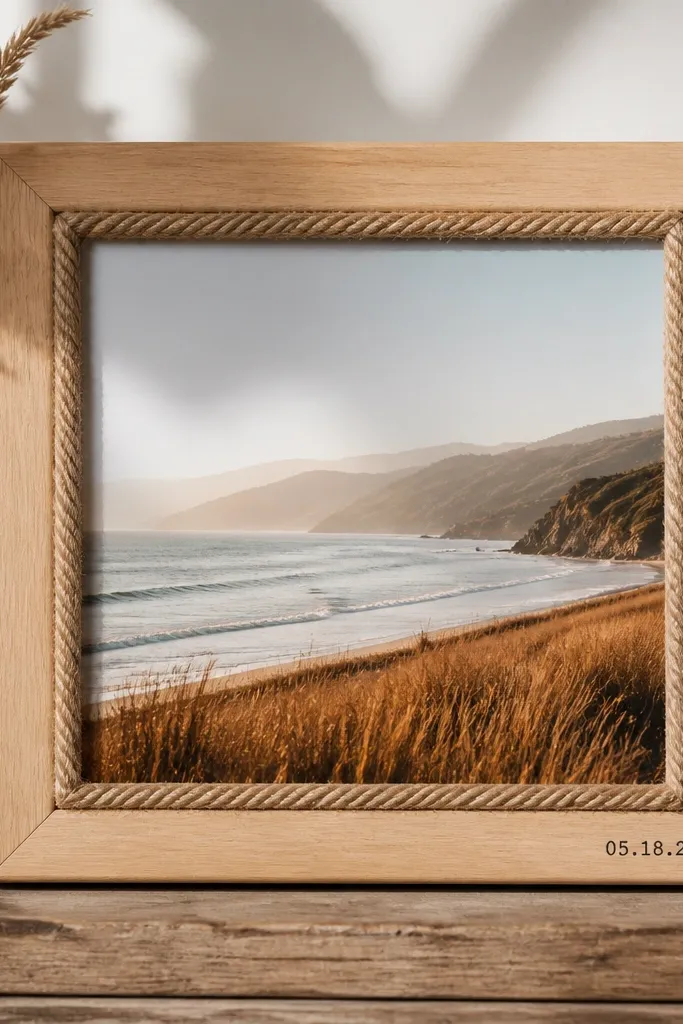
Rope reads warm and tactile, and the date stamp makes it feel like a keepsake. The contrast between natural rope and black ink looks sharp on both color and grayscale photos. I use this when the photo is from an event date - birthdays, moves, weddings.
Glue rope around the inner edge leaving a 1/8-inch gap between rope and photo opening. Use a fabric-safe ink stamp on a small cardstock label, then glue that label to the frame corner. Seal rope with matte spray to stop fraying.
Pro tipCut rope ends at an angle and glue them overlapping to hide the seam.
AvoidDon't use glossy clear coat on rope; it makes it look plastic.
11. Button mosaic center stripe
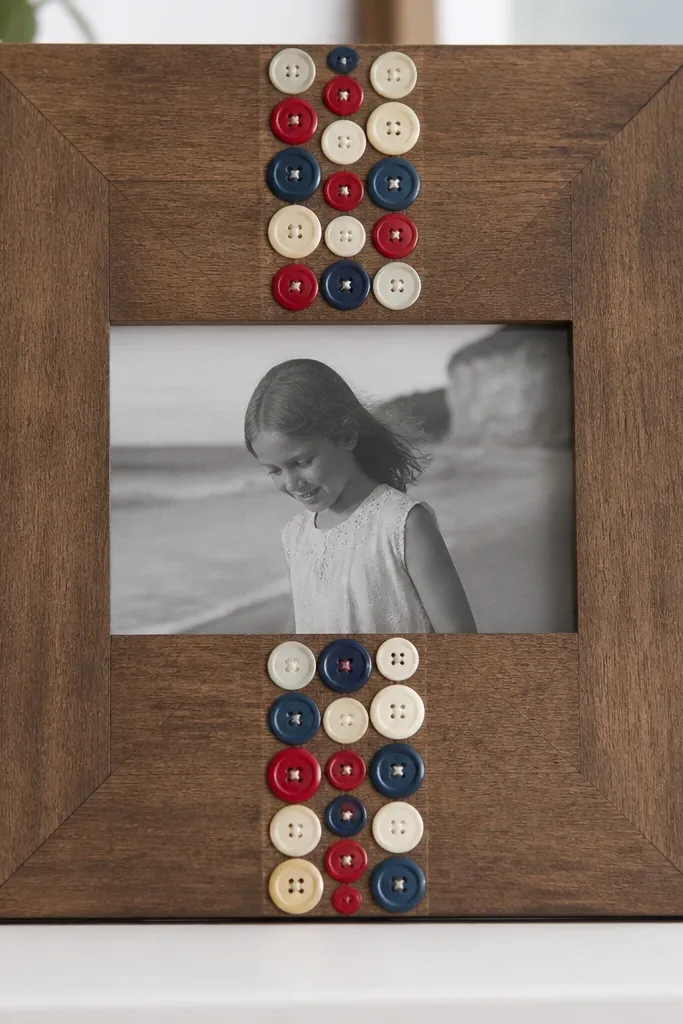
A center stripe keeps the design bold but controlled. Buttons add color variety and tiny highlights, and a stripe makes the photo feel framed rather than boxed in. This works for vintage photos and holiday portraits.
Paint the frame background first, then mark a vertical line in the center border area. Arrange buttons dry in a tight grid, then hot-glue each one. Fill gaps with small rhinestones or seed beads if you want extra sparkle.
Pro tipUse a mix of matte and slightly shiny buttons so the stripe catches light without looking uniform.
AvoidDon't glue oversized buttons too close to the photo; they cast shadows right onto faces.
12. Book page decoupage with torn edge control
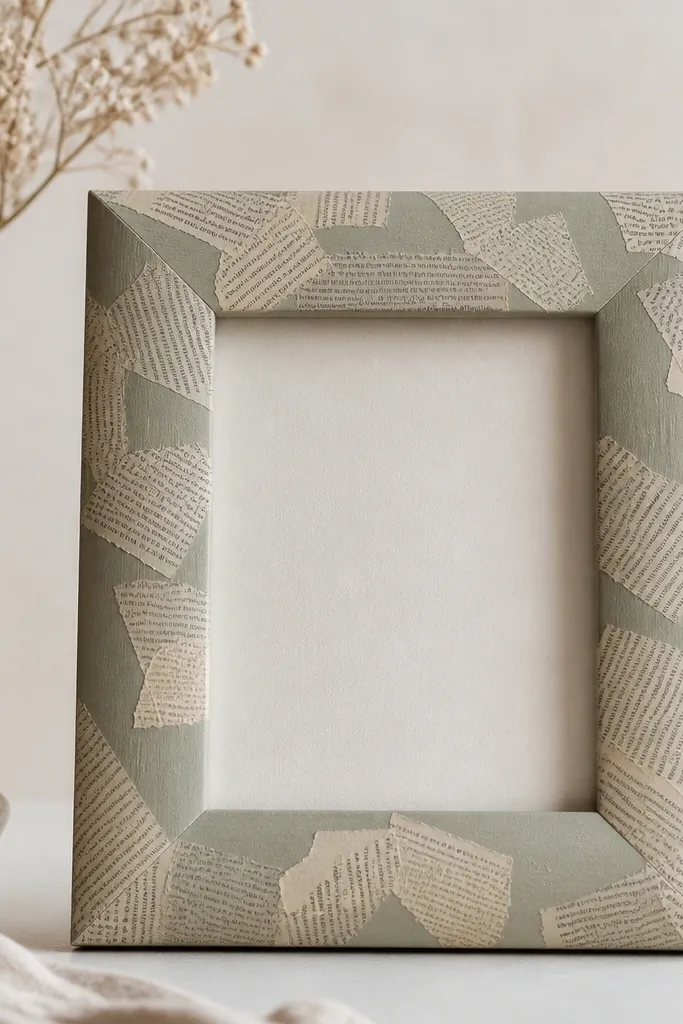
Book page decoupage looks best when the tears are deliberate and the finish is matte. The text fragments give depth without needing extra graphics. I do this when I want a neutral frame that works with almost any photo.
Sand the frame, wipe with alcohol, then tear pages into 1-2 inch pieces. Brush matte Mod Podge onto the frame, lay paper pieces, and smooth with a foam brush so no bubbles form. Seal two coats, letting it dry between coats for at least an hour.
Pro tipTear by pulling, not cutting. Pulling makes edges feather and blend better.
AvoidDon't use glossy Mod Podge; it makes torn paper look like plastic.
13. Sheet music accordion border
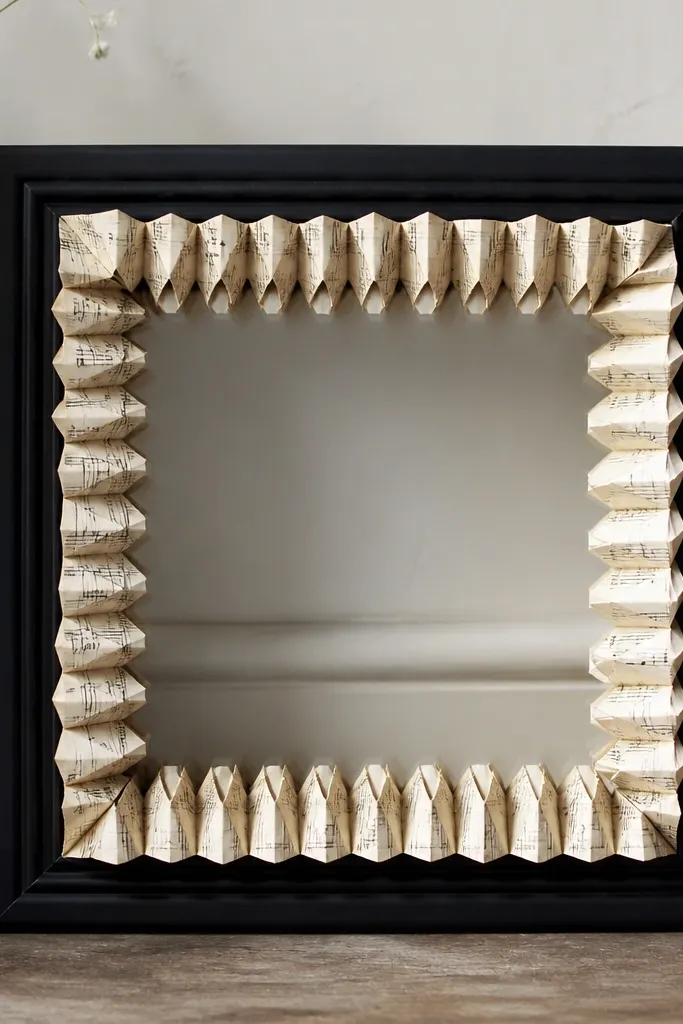
Accordion folds make paper look dimensional and musical without turning the whole frame into a poster. Sheet music has built-in patterns, so you don't need extra decoration. This fits music students, recital photos, and jazz nights.
Cut strips about 1 inch wide and 8-10 inches long depending on the frame sides. Fold accordion-style every 1/4 inch, then glue the folded strip to the frame inner border with a thin line of hot glue. Use a matte acrylic medium over the paper to lock it down.
Pro tipKeep the folds tight and uniform. Uneven folds look handmade in a bad way.
AvoidDon't soak the paper with wet glue; it buckles and the border stops looking crisp.
14. Nailhead studs and faux leather strips
Nailheads make cheap materials look intentional. Faux leather gives a smooth surface and strong contrast against wood, and the grid pattern keeps it clean. This one looks great with fashion photos and black-and-white portraits.
Cut faux leather into 1 inch strips and glue in a grid around the inner opening, leaving a 1/4 inch margin. Place nailheads along intersections, 3-4 per side, spaced evenly. Seal leather with matte clear spray so it doesn't feel sticky.
Pro tipUse a ruler and painter's tape to mark lines before you glue any strip.
AvoidDon't use hot glue on leather directly if it smears; test on scrap first.
15. Painted chevron with salt texture
Salt texture gives you a speckled look without buying special paint. Chevrons add movement, and the speckles read like weathered fabric. This suits outdoor photos and cozy interiors.
Tape a chevron pattern on the frame border area. Brush a mid-thickness layer of paint, then sprinkle coarse salt on the wet paint. Let it dry fully, then brush off salt residue and seal with matte clear coat.
Pro tipUse coarse salt, not table salt. Coarse salt leaves bigger, nicer texture.
AvoidDon't wipe wet paint with a cloth; it spreads the chevron edges.
16. Acrylic paint splatter over matte gel medium
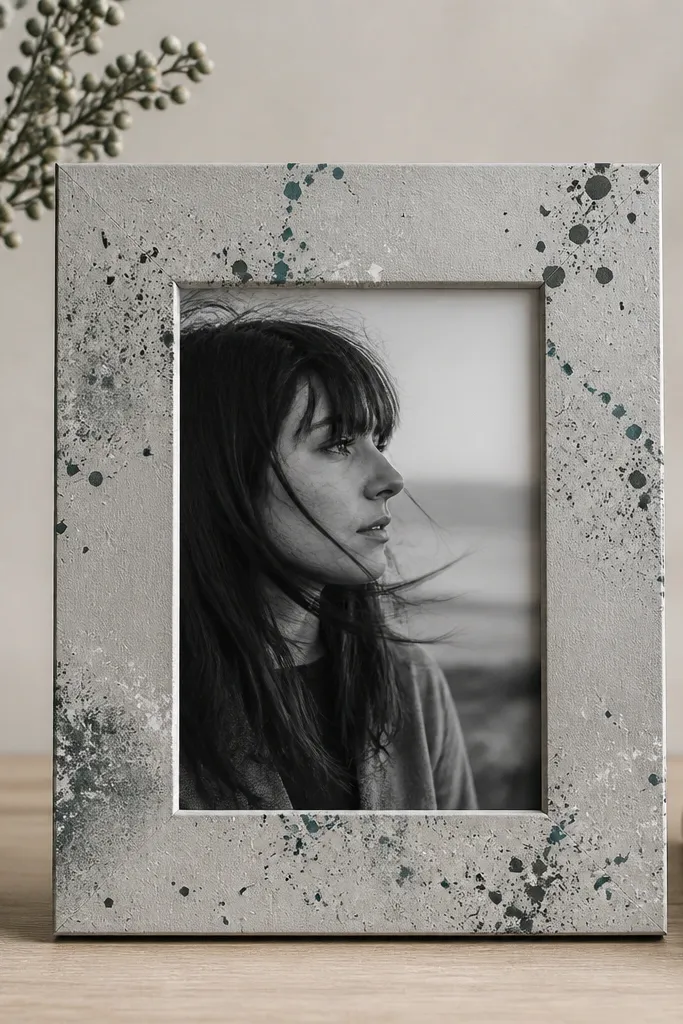
Splatter looks artsy when it's controlled by a surface that grips. Matte gel medium holds splatters in place so they don't soak in unevenly. Keep splatter small - it frames the photo without overwhelming it.
Brush a thin layer of matte gel medium on the frame border, then use a toothbrush or paint splatter tool to flick paint. Use diluted paint for smaller dots, and test on cardboard first. After it dries, spray a matte seal coat.
Pro tipMask the photo opening with plastic wrap and tape so splatter stays on the frame only.
AvoidDon't use thick paint for splatter; it turns into blobs.
17. Washer and bolt industrial corner accents
Hardware corners look bold but work best when they're small and symmetrical. Washers create circles that echo photo frames, and bolts add a little height. This style suits workshop shots, cars, and masculine-themed prints.
Scuff and paint the frame with satin black. Arrange 3 washers per corner in a triangle, then glue with epoxy for metal-heavy pieces. Add one bolt head at the corner point and let epoxy cure overnight before handling.
Pro tipUse silver-toned washers only. Mixing too many metals makes it look messy.
AvoidDon't hot-glue washers if you'll touch the frame often; epoxy holds better.
18. Washed acrylic ombre with dry brush edge

Soft ombre gives a calm backdrop for delicate photos. Dry brushing the inner edge adds texture without adding clutter. I use this for newborn photos, pastel wedding pics, and nature shots.
Thin acrylic paint with water until it looks like tinted milk. Paint the top area, then blend downward with a damp sponge in horizontal strokes. For the inner edge, dip a dry flat brush in a slightly darker shade and lightly drag along the margin.
Pro tipDo three very thin layers instead of one thick one so the ombre stays smooth.
AvoidDon't skip blending; hard lines make the frame look amateur.
19. Stencil stars with brushed-on chalk paint
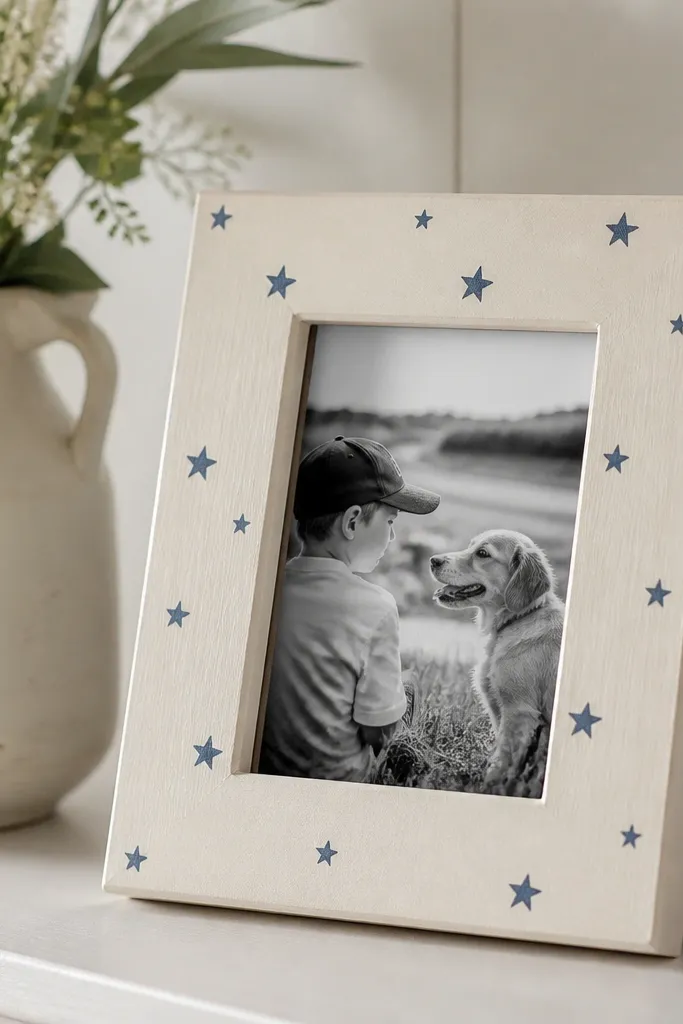
Chalk paint looks cozy and hides small imperfections in the wood. Stenciling stars gives a playful pattern while still letting the photo be the main event. This design works for kids rooms and holiday snapshots.
Tape a star stencil in place near the corners, then dab chalk paint using a sponge brush. Keep the dab pressure light to avoid paint bleed. Seal with matte wax or matte spray once dry.
Pro tipReposition the stencil every 2-3 stars so they don't line up too perfectly.
AvoidDon't drag the brush over the stencil; it smears the edges.
20. Monogram ribbon wrap with pearl pushpins
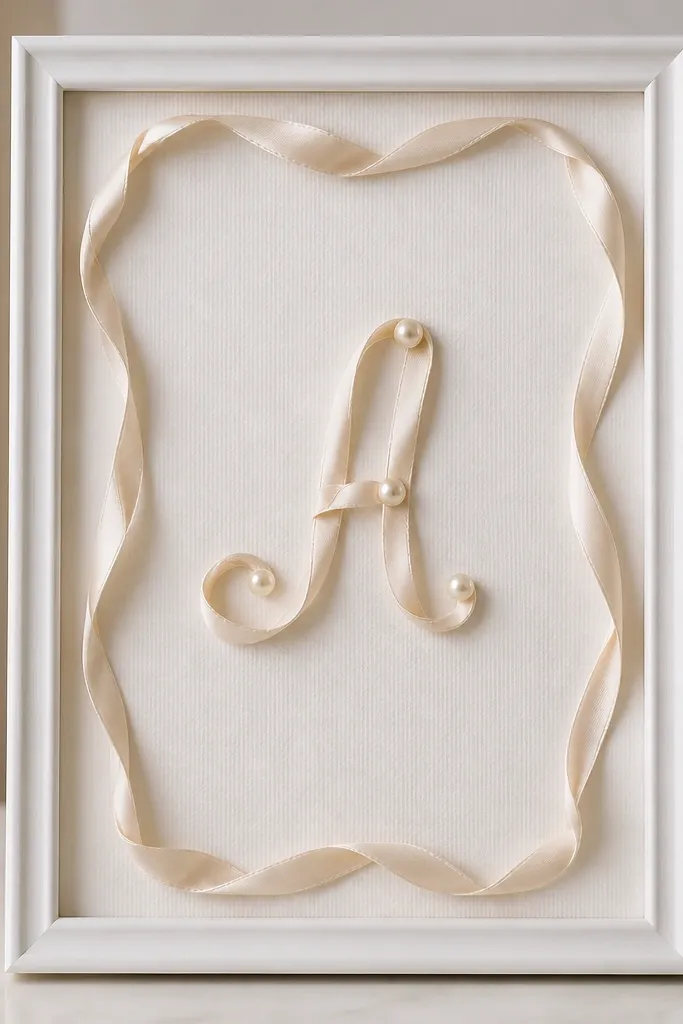
Ribbon wraps look neat when the loop spacing is consistent. A monogram makes it feel personal fast, and pearl pushpins add tiny shine without needing jewelry supplies. This is great for gifts and anniversaries.
Cut a length of satin ribbon about 1.5 times the frame inner perimeter. Glue the ribbon ends at two points, then wrap around evenly and secure with small pearl pushpins. Form the monogram from ribbon strips and pin it on top with straight pins.
Pro tipUse double-sided tape under the ribbon before you pin; it keeps the ribbon from shifting.
AvoidDon't use wrinkled ribbon; it shows through every pin.
21. Paper quilling strips in a tight rectangular frame
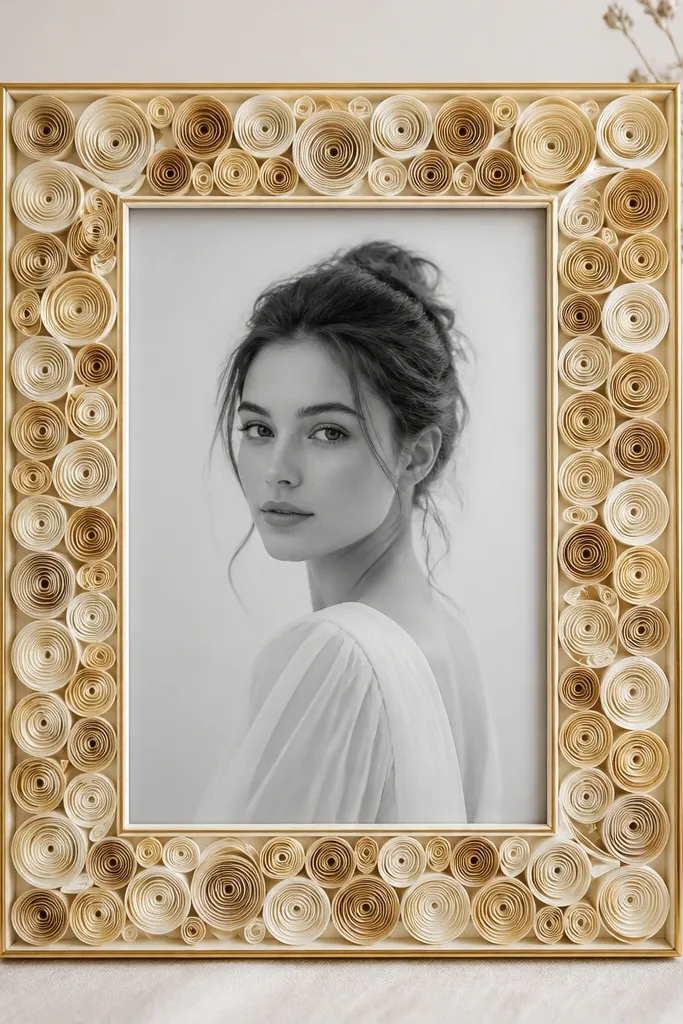
Quilling looks delicate, but a tight rectangle is sturdy and readable from across the room. Pale gold and cream coils match warm lighting and look good with vintage photos. The coils create a raised edge that gives depth without heavy materials.
Use pre-cut quilling strips, roll coils with a quilling tool, and glue each coil to a paper template strip. Build a rectangle border 1.5 inches wide around the photo opening. Seal with a thin clear acrylic spray so the coils don't loosen.
Pro tipMake your rectangle slightly thicker at the corners by adding one extra coil at each corner - it frames more naturally.
AvoidDon't skip sealing; loose coils catch dust and look messy.
22. Acrylic gem dots on a faded watercolor wash
Watercolor washes give a soft background, and acrylic gems add sparkle only where you place them. Keep the gem pattern sparse so the photo still feels like the focus. This looks amazing for engagement photos and dreamy portraits.
Paint a watercolor wash on the border area with diluted acrylic or watercolor paint, then let dry completely. Glue 8-12 acrylic gems with clear craft glue, spacing them evenly near corners. Seal the whole frame with a matte spray, avoiding direct heavy coating on the gems.
Pro tipUse gems with flat backs so they sit flush and don't pop off edges.
AvoidDon't use superglue near paint; it can fog the finish.
23. Aged copper patina with sponge texture
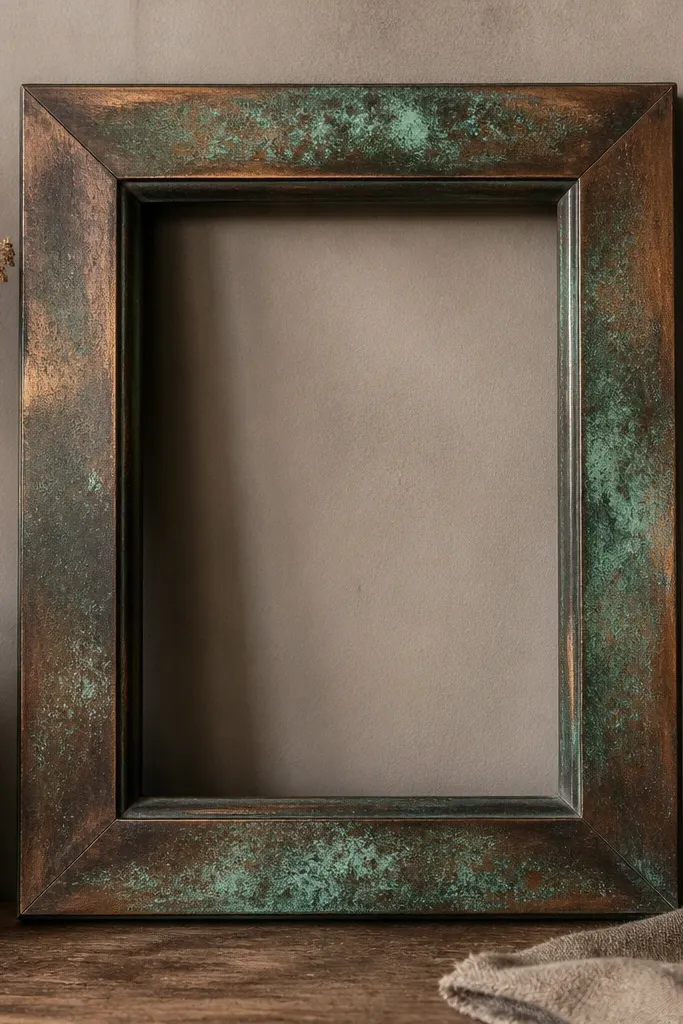
Copper patina looks like a found object, even when it's just paint. The sponge texture creates depth and hides brush marks that would otherwise look DIY. It pairs well with black-and-white photos and industrial themes.
Base coat the frame with dark brown or black acrylic. Sponge on copper paint, then add a tiny amount of green paint mixed with clear medium for streaks. Finish with a dry brush of bright copper on raised areas only.
Pro tipUse a sea sponge and dab lightly - press too hard and you'll lose the patina effect.
AvoidDon't overmix the green; too much green turns it into a flat green block.
24. Chalkboard frame with removable label strip
A chalkboard frame lets you change the label for seasons, birthdays, or dates. The removable label strip keeps it tidy, and the matte black surface hides fingerprints. I've used this for monthly baby milestones.
Paint the frame with chalkboard paint and let it cure 48 hours. Apply a thin strip of painter's tape where you want the label, then write with white chalk. For a removable label, use a small cardstock strip sealed with clear matte spray and glue it under the chalk area.
Pro tipRub chalk gently with a dry cloth after writing so it looks crisp instead of smudgy.
AvoidDon't seal chalk too early; it smears under clear spray.
25. Reclaimed wood slat lattice border
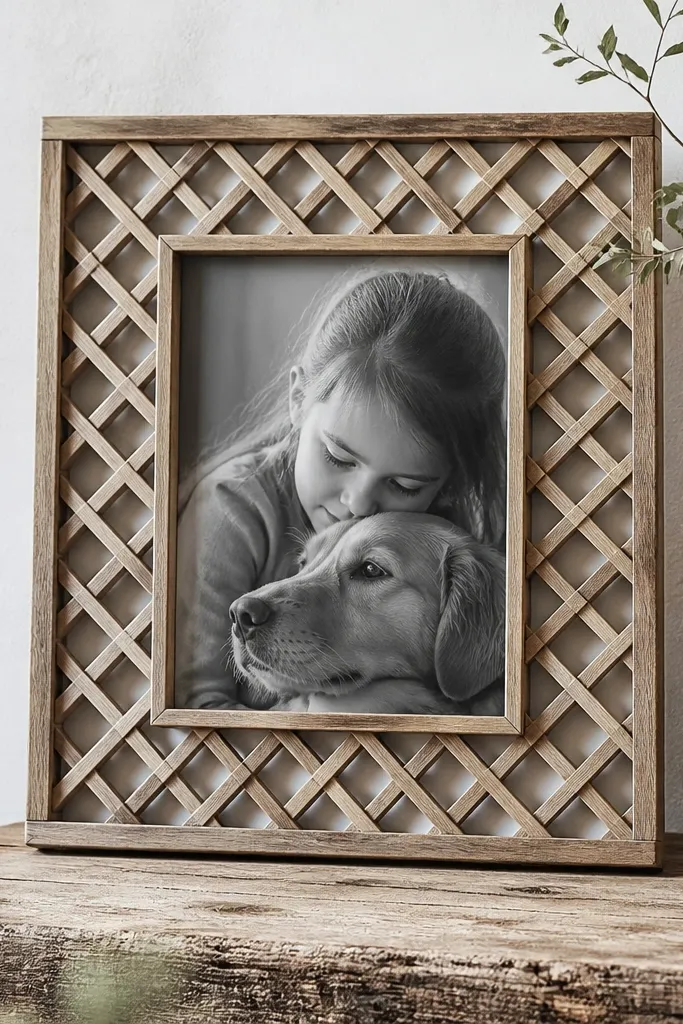
Thin slats create a lattice that reads architectural. It adds shadow patterns onto the wall, so the frame changes slightly as the light shifts. This looks great for landscape photos and cabin-style interiors.
Cut slats about 1/4 inch thick and 3/4 inch wide, then sand edges smooth. Build a diamond lattice on a backing cardstock strip sized to the inner border, then glue the lattice onto the frame. Stain the slats with one coat, then wipe back to keep grain visible.
Pro tipUse hot glue for slats on the frame, but use wood glue for slat-to-card backing so it stays flat.
AvoidDon't skip sanding; splinters show up fast on the wall.
26. Polymer clay photo frame charms
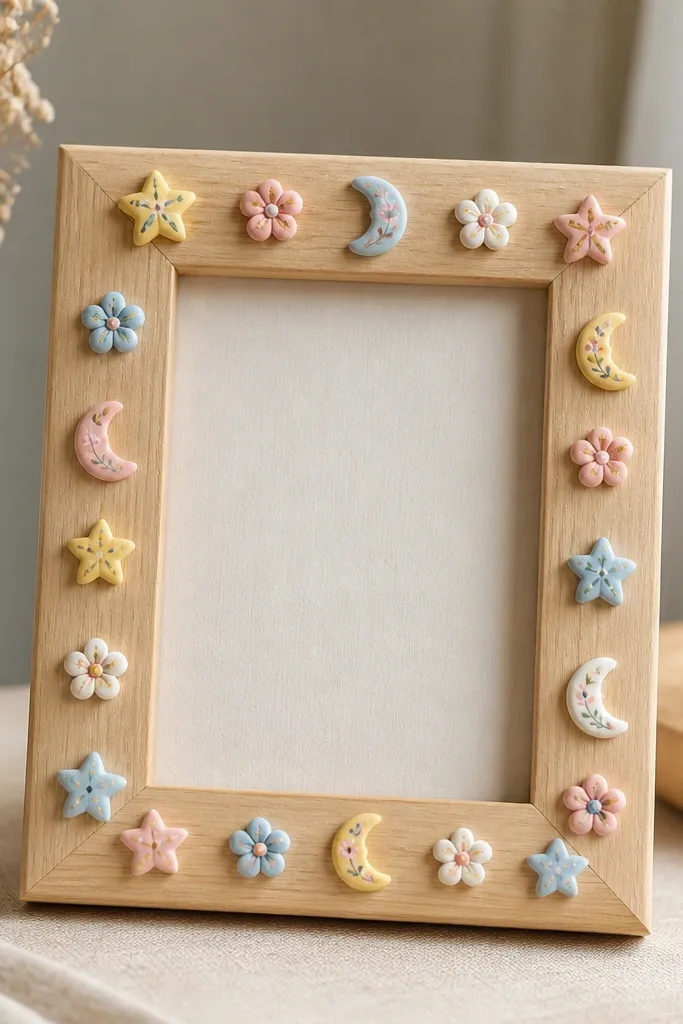
Clay charms add a playful 3D layer that makes the frame look like a handmade collectible. Paint details make them match the photo colors, even if the charms are small. This works for kids photos, pets, and birthdays.
Roll polymer clay slabs and cut small shapes with cookie cutters. Add texture with a fork or lace imprint, then bake per package directions. Seal baked charms with matte varnish, then glue to the frame border with superglue.
Pro tipChoose one repeating shape (like stars) and use it in different sizes for a clean pattern.
AvoidDon't place heavy charms too close to the photo edge; they cast big shadows.
27. Clear acetate window with printed film strip edges
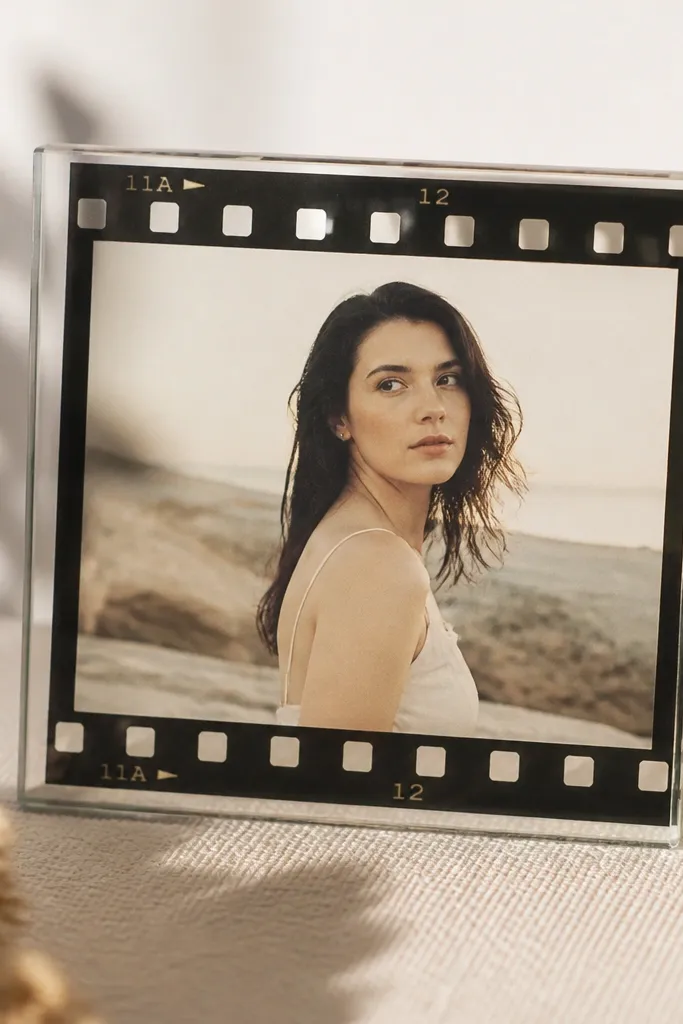
Film strip edges give a photography vibe without covering the photo. Acetate keeps the border crisp and makes the printed strip look like it's behind glass. This design fits camera photos, street snapshots, and concert prints.
Cut printed film strip paper to fit the inner border, then glue it onto a strip of clear acetate. Use a thin double-sided tape around edges so it stays aligned. Attach the acetate strip to the frame, then seal the paper edges with a thin clear medium.
Pro tipUse matte paper for the film strip so the printed numbers don't glare under light.
AvoidDon't use thick paper; it bends the acetate and creates waves.
28. Yarn tassel corner clusters
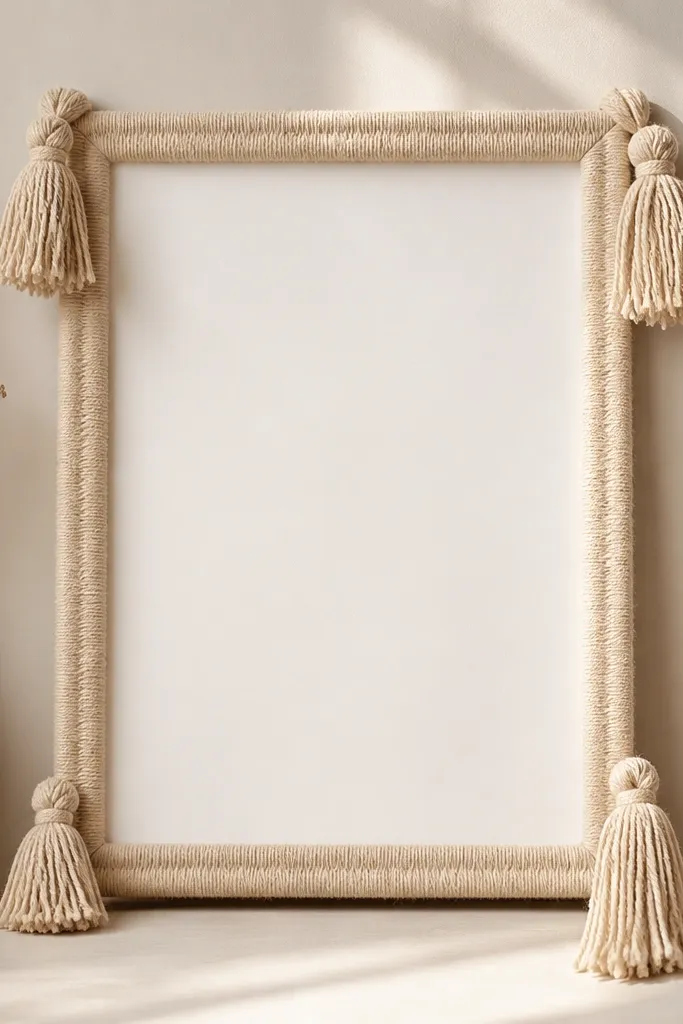
Tassels add height and movement, so the frame looks alive even when the photo is still. Corner clusters keep it tidy and prevent the design from swallowing the picture. It's a good match for boho portraits and warm indoor lighting.
Wrap yarn around a fork or small cardboard strip for consistent tassel length, about 5-6 inches for an 8x10. Tie at the top with a thin thread, then trim ends. Glue tassels to the frame corners with hot glue, then add a small braided cord loop if you want a cleaner tie-off.
Pro tipCut tassel lengths so each corner is within 1/4 inch of the others.
AvoidDon't use loose yarn ends without trimming and sealing; they shed.
29. Stencil stripes with fabric paint on a thrift frame
Fabric paint gives you a durable finish that holds up to handling better than regular acrylic. Stenciled stripes look clean when your stencil is taped down flat. This design is easy, and it makes thrift frames look intentionally styled.
Sand and prime the thrift frame if the old finish is glossy. Tape a stripe stencil with low-tack painter's tape and dab fabric paint in thin layers. Let it dry 24 hours for the best durability, then seal with matte clear spray.
Pro tipUse a small foam roller for stripes; it keeps the paint even and reduces streaks.
AvoidDon't rush the stencil removal; peeling too early smears the edges.
30. Small pegs and clothespin mini grid
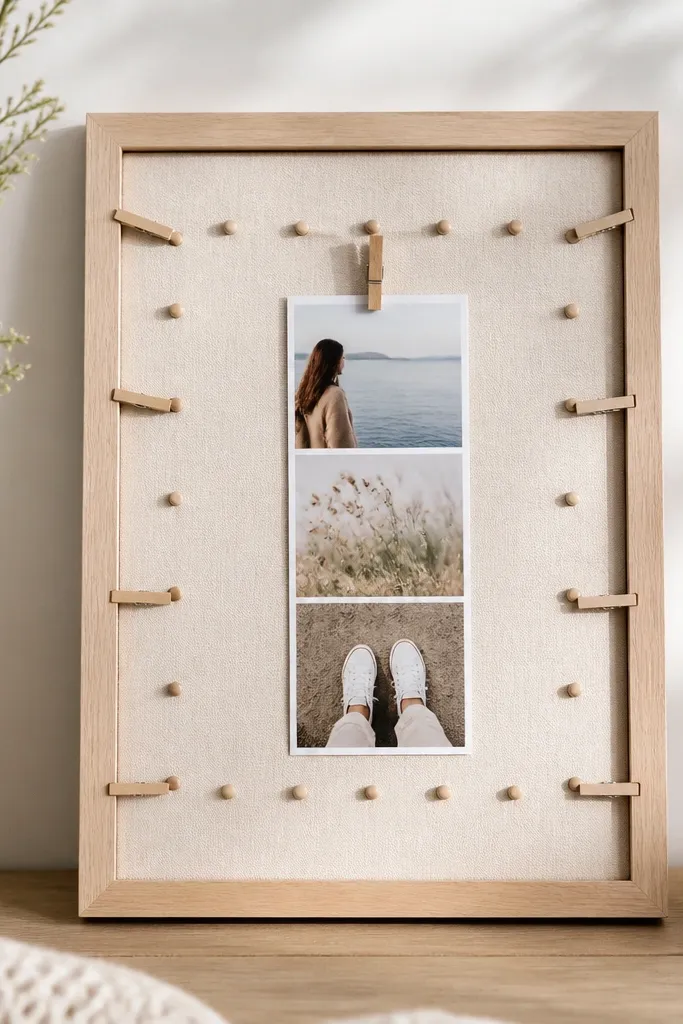
This turns a standard frame into a rotating display. I use it for recipe photos, ticket stubs, or rotating prints from the same event. The pegs add function, not just decoration, and they keep the look organized.
Screw or glue small wooden pegs around the inner border, then attach tiny clothespins at two sides. Cut a narrow photo strip and mount it with a clip so you can swap it. Paint or stain the pegs to match the frame and seal with matte varnish.
Pro tipLabel the back of each mini print with date and location using a fine pen so swapping stays easy.
AvoidDon't overload the grid; too many clips turn it into clutter.


