
1. Cream Speckle + Tiny Berry Dot Band
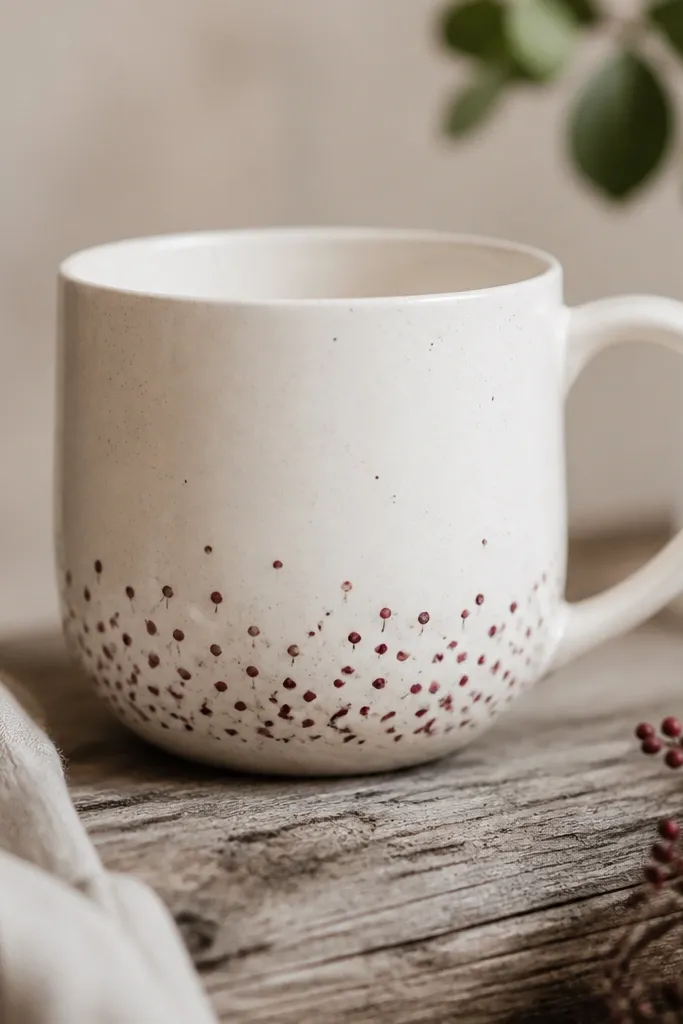
This design makes a plain mug look intentional because the dots read like a hand-printed fabric pattern. The cream base softens everything so the red dots don't look harsh. I like adding a few slightly larger dots to break the repetition. It looks cozy even with minimal effort because the pattern sits low where it catches light when you lift the mug.
Paint the mug outside with a light cream ceramic paint, then let it fully dry. Use a toothpick or small dotting tool to place deep red dots in a straight band around the lower 2.5 to 3 inches. Add a couple burgundy dots between the deep red ones for variation, then seal with a clear ceramic sealer according to the label.
Pro tipStencil a thin line first with painter's tape so your dot band stays level around the mug.
AvoidDon't load too much paint on the dot tool - blobs look messy and feel raised when you hold the mug.
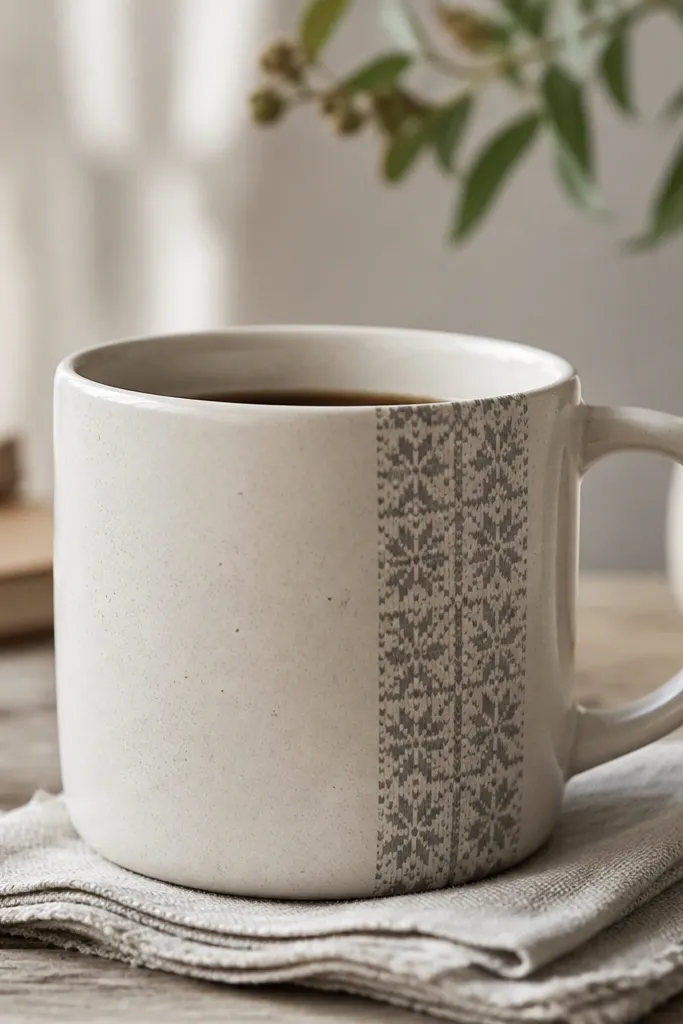
2. Sage Linen Wrap With Fabric Knot Handle Accent
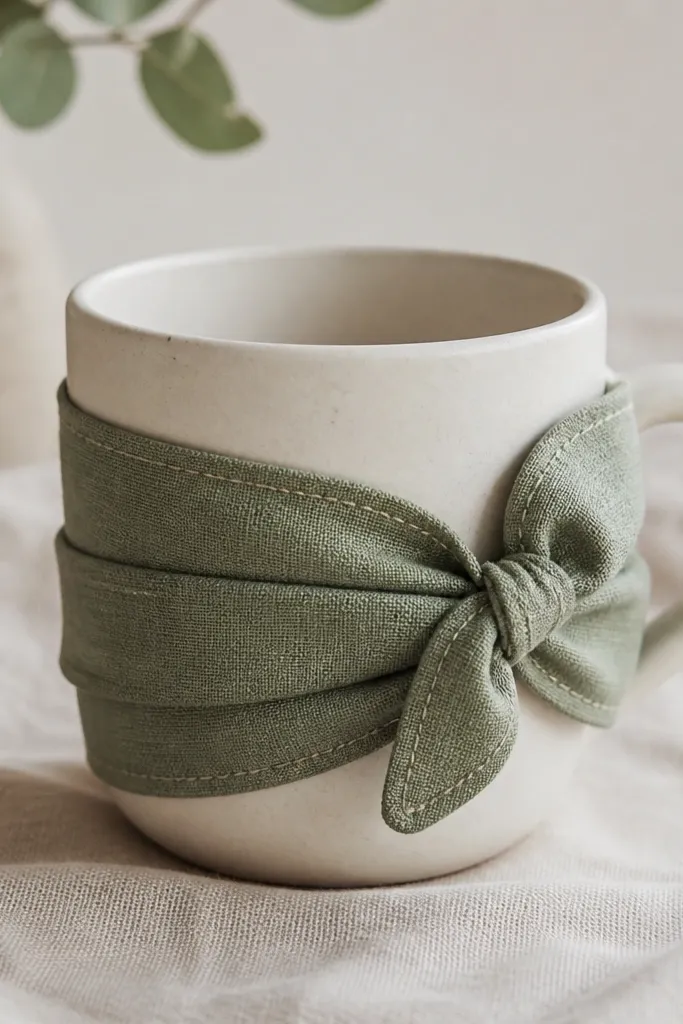
Fabric wraps make the mug feel cozy in a physical way. Sage linen reads calm and warm, and the knot gives the mug a handmade focal point without covering the rim. I've used this for desk mugs because it looks great even when you don't notice it at first glance. The knot also helps visually frame the handle so your hand finds the same spot every time.
Cut a strip of sage linen or cotton canvas about 3 inches wide and long enough to wrap the outside with a 1/2 inch overlap. Turn the raw edges under with a narrow hem (about 1/4 inch) and glue or stitch the overlap. Make a small "tie knot" strip (about 1 inch wide, 5 inches long) and stitch it to the wrap near the handle.
Pro tipUse fabric glue for the wrap, then stitch only the overlap so it doesn't add bulk near your fingers.
AvoidAvoid stretchy knit fabric - it warps after heat and makes the wrap look uneven.
3. Brown Sugar Ombre With Paint Brush Fade
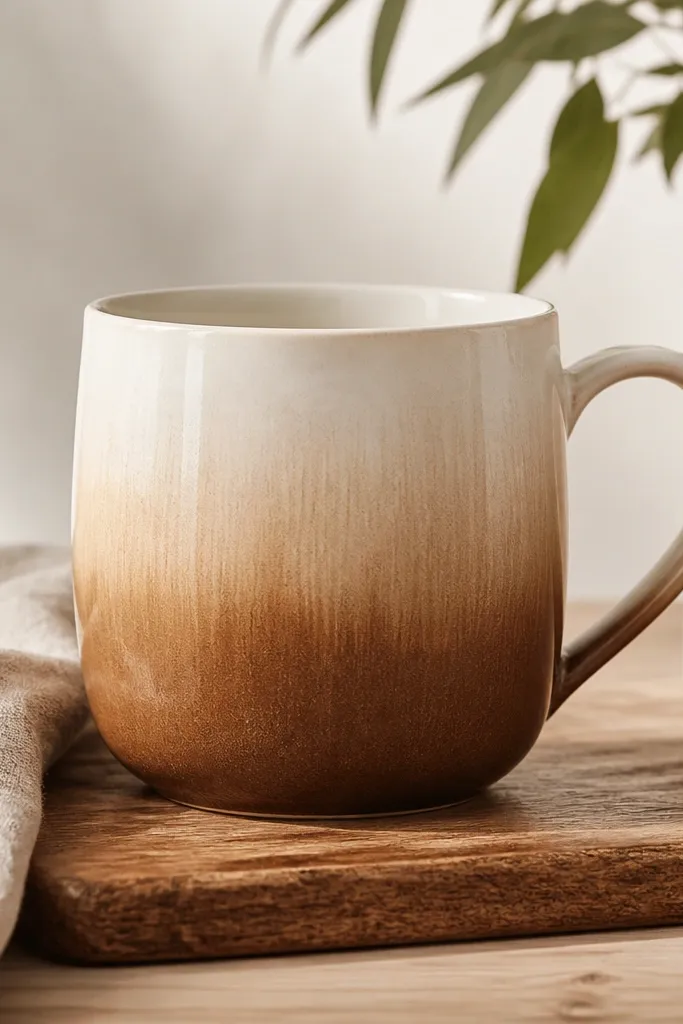
Ombre is cozy because it mimics the way real drinks look when milk swirls into coffee. The gradient also hides small brush marks, so it's forgiving. I prefer cocoa-brown on the bottom because it makes the mug feel grounded. Keep the top lighter so the handle area doesn't look heavy.
Tape a straight guideline around the mug at the height where you want the darkest color to start, roughly 1/3 from the bottom. Paint the top section with creamy beige, then blend downward with a cocoa brown using a damp sponge or wide flat brush. Work in thin layers and stop as soon as the fade looks right. Seal with a clear ceramic sealer when fully cured.
Pro tipBlend with a slightly damp sponge instead of adding more paint - it smooths the fade without streaks.
AvoidDon't paint thick in one pass - thick layers crack or look chalky after sealing.
4. Mini Knit Scarf Decal Using Heat-Set Vinyl
Heat-set vinyl can mimic knit texture because you can cut a repeating pattern and place it cleanly. The off-white and gray palette reads like winter without looking childish. It's also one of the neatest ways to get a "handmade" look without messy painting. I like it because it stays sharp and doesn't smear.
Find or create a simple knit pattern (tiny zigzag or ribbing) in two colors, then cut it on heat-transfer vinyl. Position it on the mug outside about 1 inch away from the handle. Apply with heat press or household iron per vinyl instructions, then add a thin protective topcoat compatible with vinyl.
Pro tipDo a test press on a scrap mug or tile so you know the exact heat time for your vinyl.
AvoidDon't press directly on a glossy glaze with no cleaning - vinyl lifts if there's residue.
5. Upcycled Paper Doily Decoupage Band
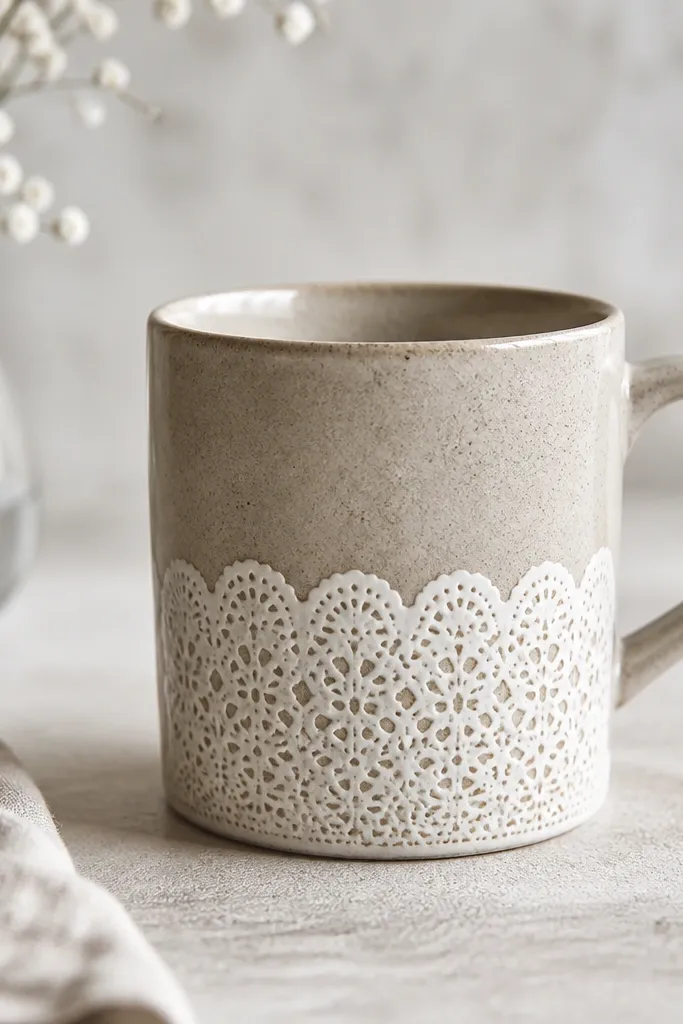
Doily decoupage looks cozy because it's soft, lacy, and reads like old-fashioned tea sets. A band design is better than full coverage because it keeps the rest of the mug clean and reduces peeling risk. The scalloped edge adds movement when the mug sits on a table. I've made these for holiday gifts because they look "fancy" even when the technique is simple.
Cut a doily or doily-style paper strip to fit the mug circumference at the lower 3 inches. Brush a thin layer of decoupage medium, place the paper, then smooth from center outward. Seal over the top with multiple thin coats, letting each coat dry. Keep the decoupage at least 1/4 inch away from the rim and handle grip area.
Pro tipUse a foam brush for the topcoat so you don't tear the paper fibers.
AvoidAvoid thick paper - it wrinkles and shows edges after sealing.
6. Terracotta Clay Dot Handle Charm
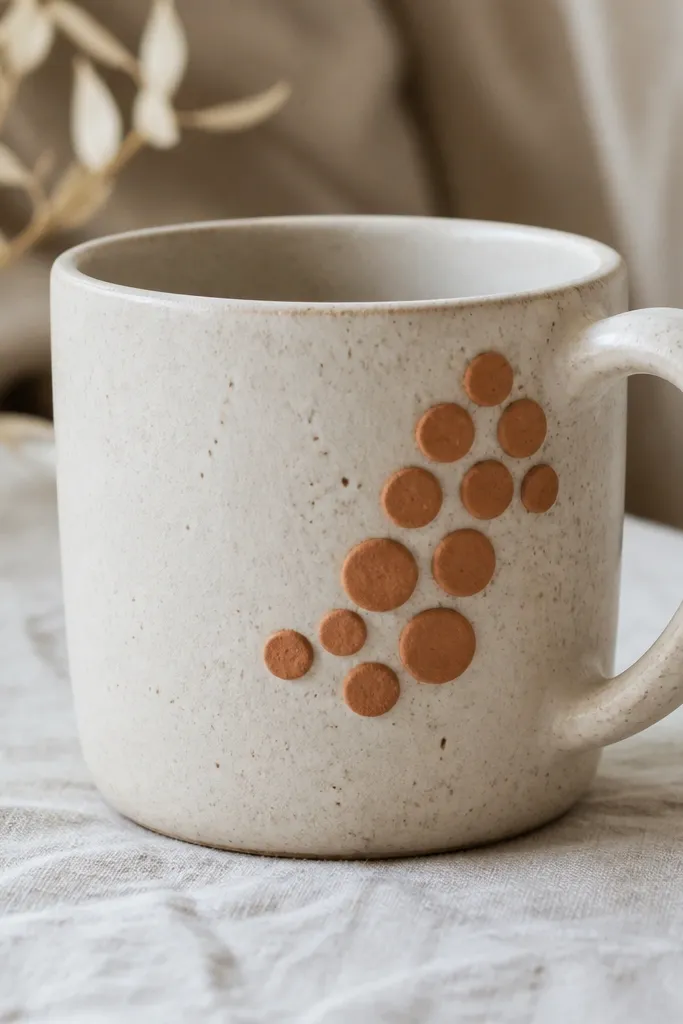
Clay dots add real texture, which makes the mug feel handmade even from across the room. Terracotta warms up the whole mug and pairs well with creams, greens, and natural wood tones. I like placing the dots near the handle because they become a visual "grab point" when you pick the mug up. The texture also catches light in a way paint can't.
Use air-dry clay or polymer clay for small dots. Stick dots with ceramic-safe adhesive or bake polymer clay per package directions. Press each dot lightly so it bonds, then paint the rest of the mug with a neutral base if you want. Seal the clay with a clear topcoat meant for ceramics.
Pro tipMake dots slightly smaller near the ends so the cluster looks intentional, not like a random pile.
AvoidDon't place clay on the handle where your fingers rest - it can feel rough after repeated use.
7. Black Coffee Stripe With Gold Tape Finish
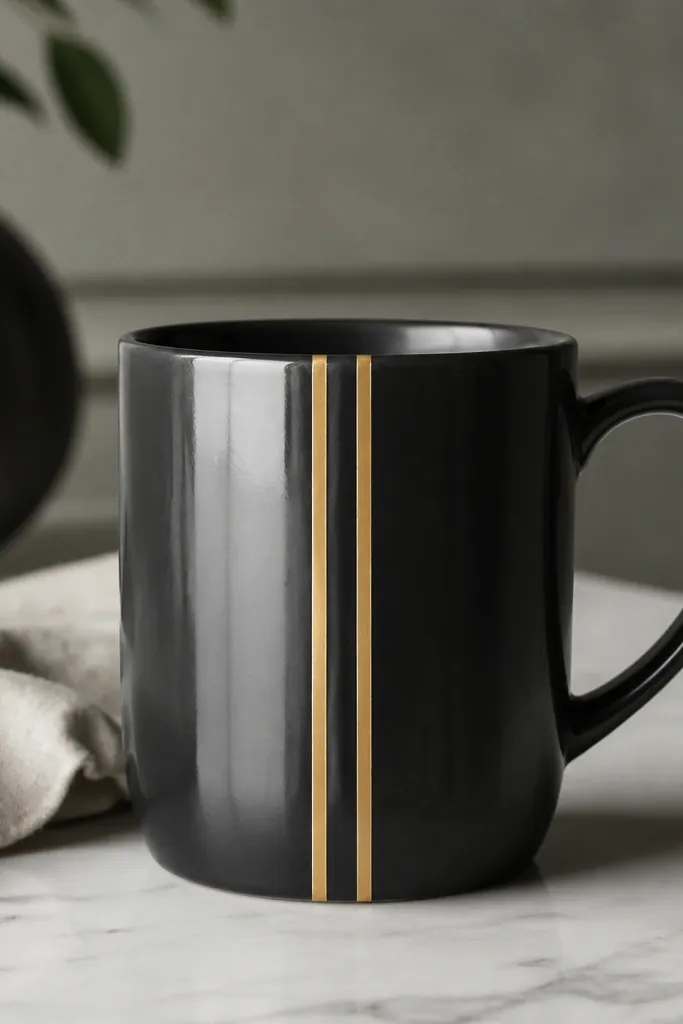
This one looks cozy because it's bold and graphic, like café signage. The gold tape lines add a warm glow without needing fancy painting. If you like clean design, this is the fastest way to make your mug feel styled. Keep the stripes narrow so it stays sleek and cozy, not loud.
Paint the mug outside charcoal or deep coffee brown. When dry, apply thin painter's tape strips vertically, then paint over the tape with gold acrylic made for ceramics if possible. Remove tape while paint is still slightly tacky for crisp edges. Seal with a clear glossy or satin ceramic sealer.
Pro tipUse a ruler and tape alignment - even a 1/8 inch drift shows on stripes.
AvoidAvoid cheap masking tape - it can peel paint and leave ragged edges.
8. Warm Oatmeal Face Mug (Hand-Drawn Smile)

A face makes the mug feel personal the second you see it. Oatmeal beige keeps the expression soft instead of creepy. I've used this for mornings when I want something calm but not boring. The key is keeping the facial lines thin and the blush subtle so it reads cozy, not childish.
Base coat the mug with oatmeal beige ceramic paint. Use a fine liner brush for eyes and mouth in medium brown, then add two tiny blush dots in terracotta or pinkish brown. Let it dry, then seal with a clear coat. If you want it extra cozy, add a tiny steam line above the head in one corner.
Pro tipSketch the face lightly with pencil first, then paint over your lines.
AvoidDon't thicken the outlines - heavy lines crack more often after sealing.
9. Forest Moss Leaf Collage
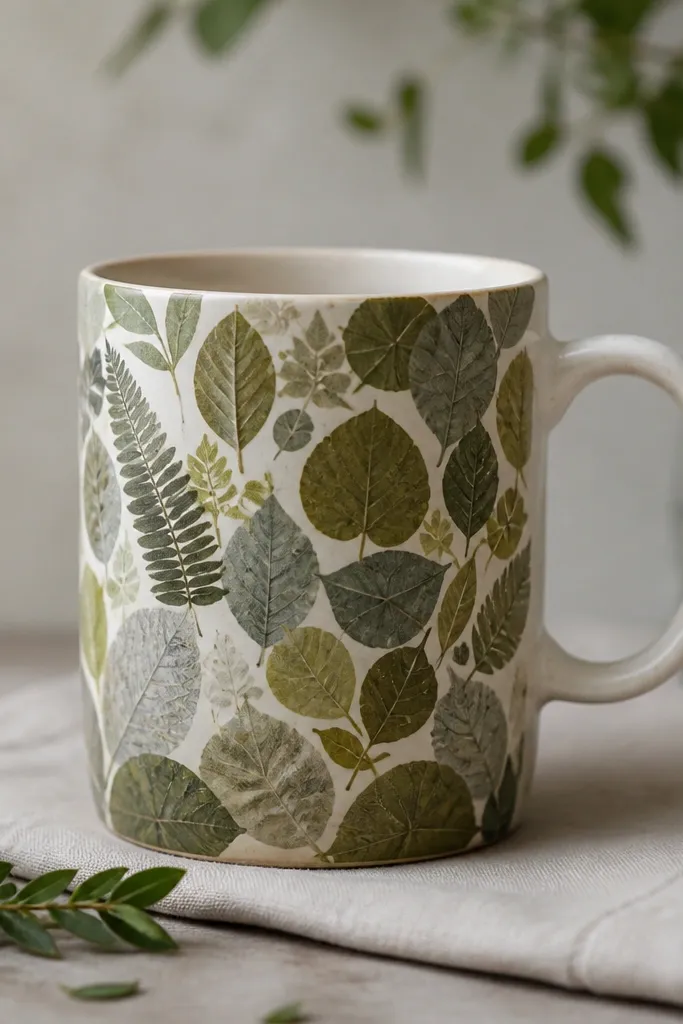
Leaf collage reads cozy because it looks like something you'd find in a woodland kitchen. Moss greens and olive tones feel grounded, and the overlap gives depth. I like adding one muted gray leaf so the greens don't all blend into each other. This also hides small imperfections because collage has lots of edges.
Cut leaf shapes from scrapbook paper, upcycled book pages, or thin fabric scraps. Arrange them around the outside in a loose cluster near the front, then decoupage with matte medium. Seal with several coats, letting each coat dry fully. Keep edges flat - trim any leaf corners that would lift.
Pro tipUse a craft knife and place paper on a cutting mat so your leaf shapes look crisp.
AvoidSkip glittery paper - it flakes under repeated washing.
10. Celestial Speckle With Tiny Star Paint Dots
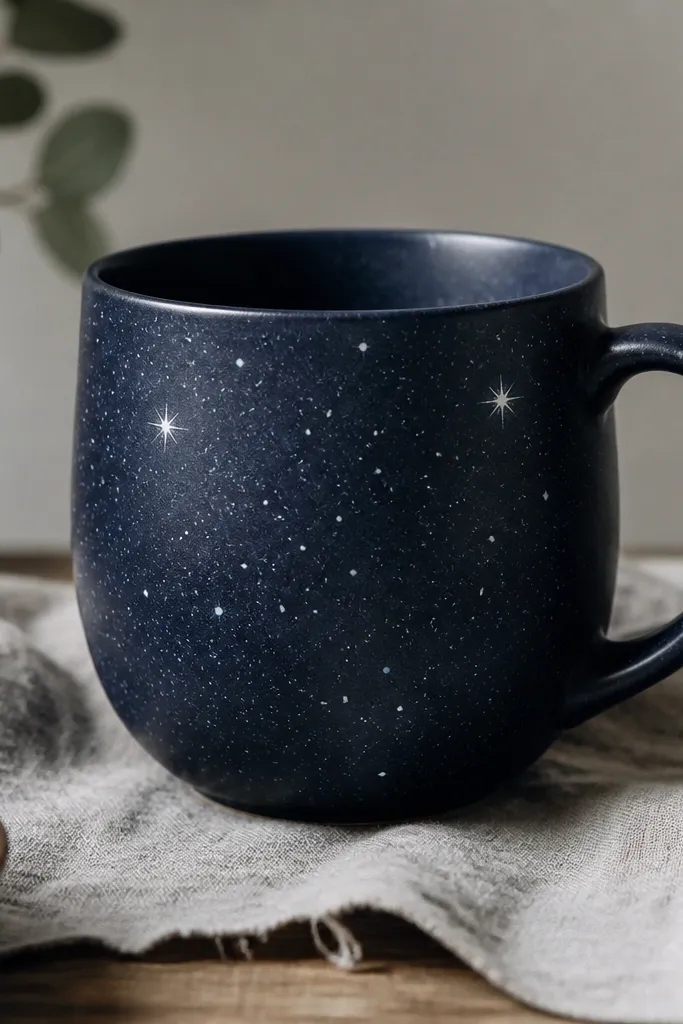
Dark mugs look cozy when the decoration is light and speckled like night sky. Star dots make it feel calm and a little magical without being loud. I've found navy + pale blue reads best because pure white can look too stark. Keep the speckles random, not perfectly even.
Paint the mug navy and let it dry. Use a toothbrush technique to flick lighter paint for speckles, then dot stars with a small brush. Add a few pale blue stars and mostly white stars. Seal with a clear sealer that won't yellow.
Pro tipCover the handle grip area with painter's tape so speckles don't land where you hold the mug.
AvoidDon't skip sealing speckles - they rub off on sleeves and hands.
11. Marble Effect With Dish-Safe Clear Coat
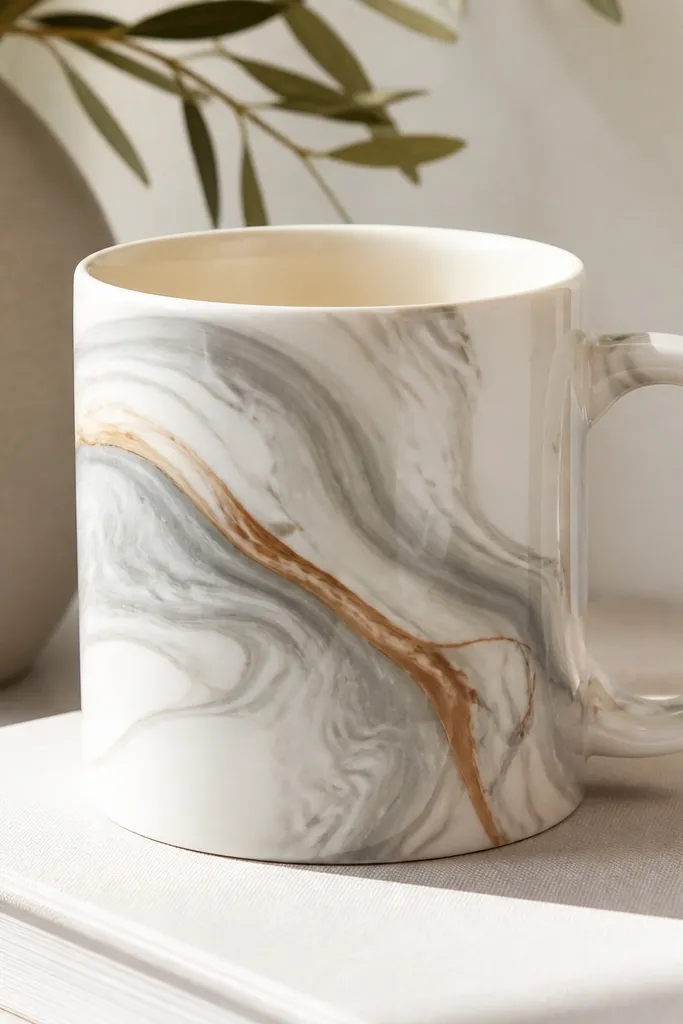
Marble effect looks cozy because it reads expensive, but it's mostly controlled mess. Swirls catch light when you move the mug, which makes it feel special. I like a warm tan ribbon because it ties the gray to café tones. This design also hides small brush marks since marbling covers everything.
Use marbling technique on acrylic paint: drop thinned gray paint into white base, then drag a toothpick through the drops to make swirls. Apply in thin layers so the pattern stays crisp. Let it cure fully, then seal with clear ceramic topcoat. If you're using a dishwasher-safe sealer, follow its cure time exactly.
Pro tipPractice on a cheap ceramic tile first - marbling is all about timing.
AvoidAvoid thick swirls - they feel rough when you run your fingers along the mug.
12. Knotted Twine Bow With Minimal White Labels
Twine bows look cozy because they read handmade and slightly rustic. The white labels keep it from looking cluttered, and handwritten text makes it personal without needing fancy art. I use this when I want a mug that matches a kitchen shelf, not a craft table. It also works great for gifts because you can write what the person likes.
Wrap twine around the mug near the handle and tie a bow on the front. Add two small label strips (about 1 inch wide) secured with a thin glue dot or decoupage medium. Write with a fine permanent marker that's compatible with ceramic, then seal the labels. Keep the labels low on the mug so your fingers don't scrape them.
Pro tipUse one bow, not two. One bow keeps the design clean.
AvoidDon't use glossy sticker labels - edges lift when you seal.
13. Candy Stripe Rim Using Tape and Paint
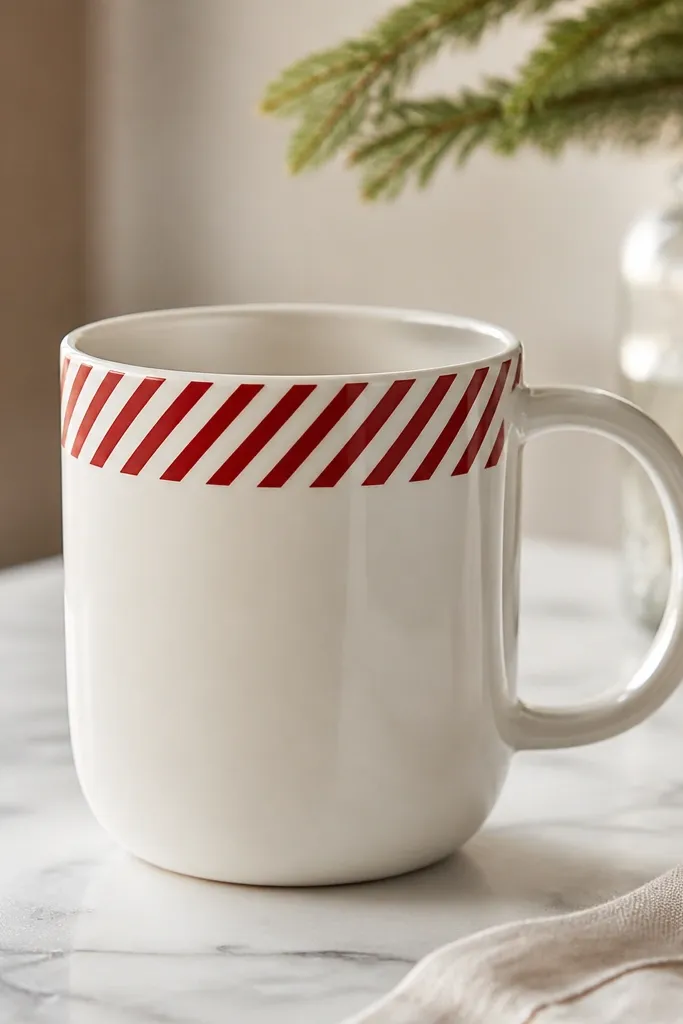
A striped rim looks cozy because it frames the drink like a holiday wrapper. Diagonal stripes add energy, but keeping them only on the top prevents it from taking over. I love cream and red because it feels classic and warm. This is a good beginner project because tape makes the lines straight.
Mask the mug around the rim with painter's tape in small angled strips. Paint over the tape with red ceramic paint on a cream base. Remove tape after a short dry window and touch up any gaps with a fine brush. Seal the whole outside area that you painted.
Pro tipDo two thin paint coats instead of one thick coat so the stripes stay smooth.
AvoidDon't paint over the inner rim - it chips faster and feels rough.
14. Upcycled Denim Pocket Mug

A denim pocket makes the mug feel cozy because denim is sturdy and tactile. The pocket also gives you a place to attach a small charm or tag, which makes the mug interactive. I've used this for kids' cocoa mugs and for my own desk mug when I want something fun but not messy. Denim blue plus cream thread looks great in daylight.
Cut a denim rectangle about 3 inches wide and 2.5 inches tall. Fold the top edge down to form a pocket opening and stitch it. Sew the pocket onto the mug with strong fabric thread using a needle and small even stitches around the pocket edges. Keep the pocket off the handle area and seal any paper tag with clear acrylic.
Pro tipUse a denim patch with slightly faded color so the pocket looks like it already belonged there.
AvoidAvoid thick layers around the handle - it makes the mug uncomfortable to hold.
15. Sea Glass Tone Block Pattern
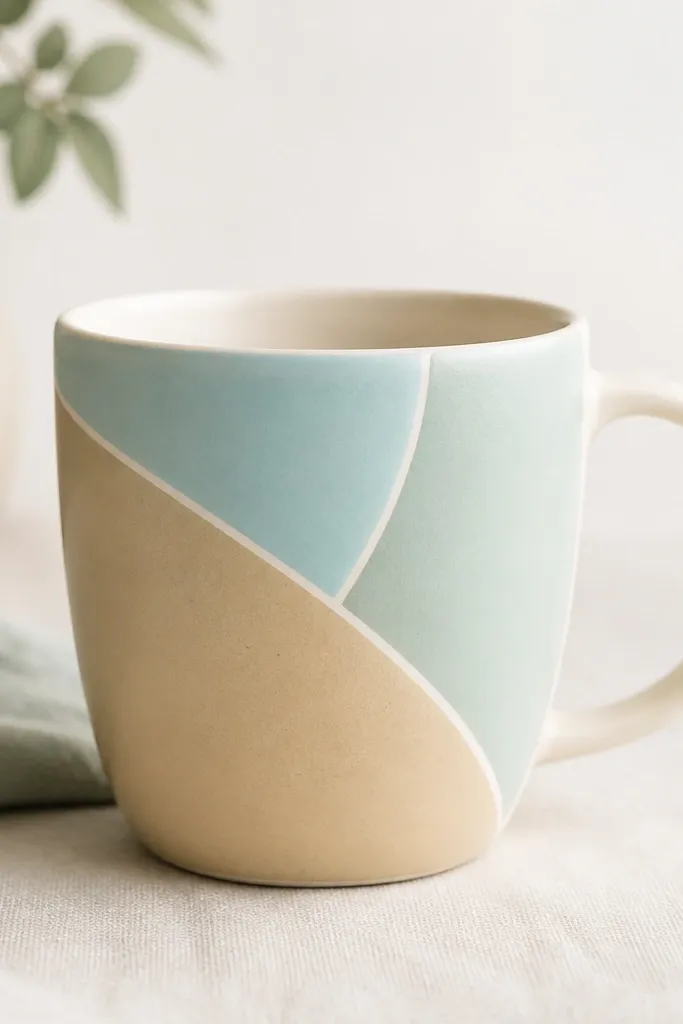
Sea glass tones look cozy because they're soft, faded, and calm. Block shapes give a modern cozy vibe, and the white separators keep it tidy. I like adding one sand block because it warms up the greens. The result feels like a summer kitchen even in winter.
Paint the mug with a base color (sand or cream). Use painter's tape to mask rectangles and paint aqua and seafoam blocks. Add thin white lines by painting a narrow strip between blocks, then remove tape carefully. Seal with a clear coat after everything cures.
Pro tipPress tape edges down firmly so your blocks have crisp borders.
AvoidDon't rush tape removal - pulling tape too early can lift fresh paint.
16. Vintage Tea Bag Tag Decoupage

This design is cozy because it looks like an old recipe card or tea label. A single panel is enough to make the mug feel curated without covering the whole surface. I like using actual tea bag wrappers or old label paper because the paper has texture and tiny fibers. It also makes the mug feel personal with minimal drawing.
Cut a label-sized piece from tea bag wrapper or aged paper. Apply decoupage medium to the mug, place the label, smooth out bubbles, and seal over it with 3 to 5 thin coats. Trim any hanging edges with scissors so it doesn't lift. Keep the label away from the rim and handle grip.
Pro tipSeal with matte if you want that paper softness, glossy if you want a cleaner look.
AvoidAvoid heavy ink bleed - test the paper with a drop of water first.
17. Cinnamon Stick Border (No-Fuss Wrap)
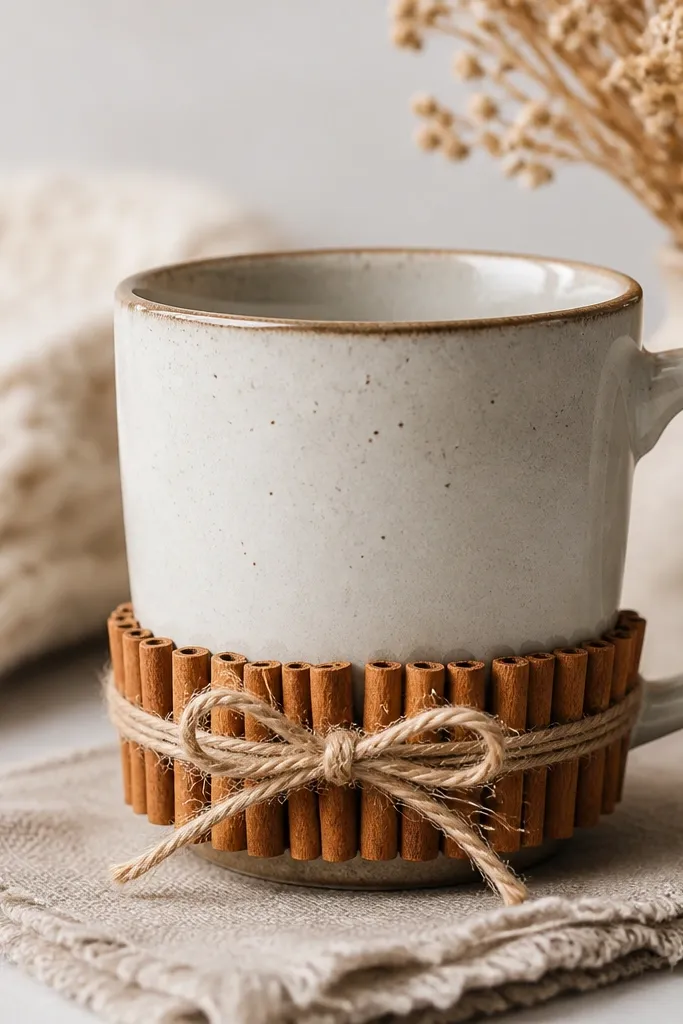
A cinnamon stick border reads cozy instantly because it looks like kitchen spice decor. I like this when I'm making a mug for the holidays or a winter brunch table. It also doesn't require paint if you keep it simple. The best part is that the border hides uneven coverage since it's a physical element.
Use faux cinnamon sticks or small craft sticks cut into short segments. Glue segments around the lower third with hot glue or craft adhesive, then tie a thin twine string around them to hold the look in place. Add a small bow near the front. Seal the twine and any paper bits with clear acrylic spray if you're using real paper labels.
Pro tipMake the border slightly uneven by 1-2 millimeters so it looks handmade, not factory straight.
AvoidSkip real cinnamon sticks for repeated use - they dry out and shed.
18. Beige Crochet Lace Trim Band
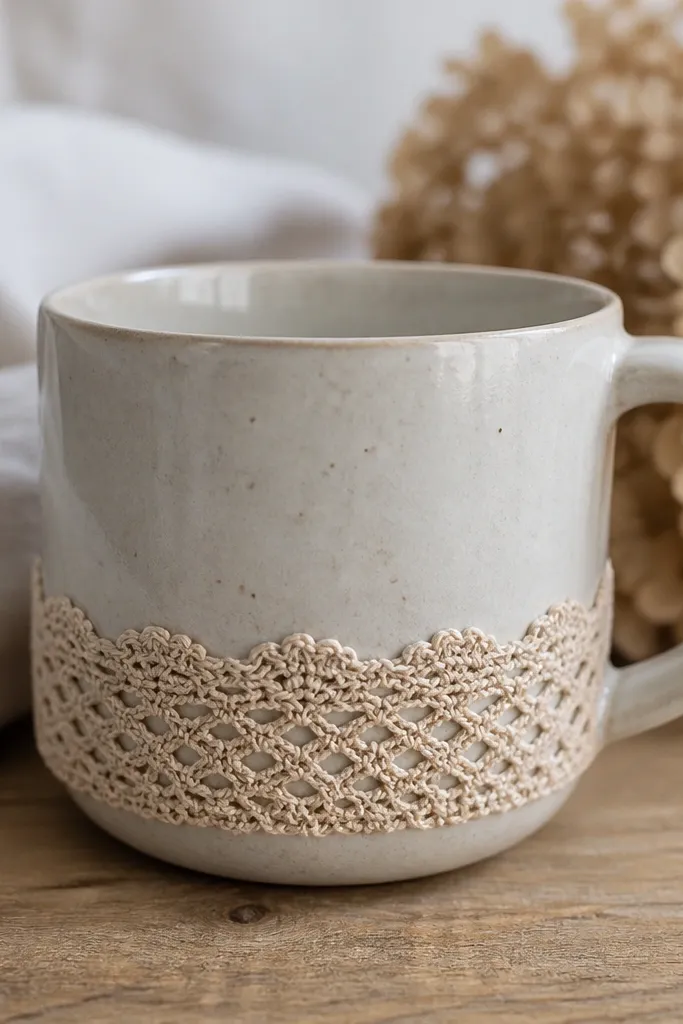
Crochet lace trim makes a mug feel like a vintage teacup set. The scallops create a soft edge that looks good in photos and on a table. Beige lace also pairs with almost any paint color underneath. I've used this to rescue mugs that already have a bold printed pattern - the lace calms it down.
Cut lace wide enough for a snug wrap around the mug. Glue the lace ends together or overlap by 1/4 inch. If the mug has a glossy print, lightly scuff where the lace will touch so adhesive grips. Add a thin layer of fabric glue under the lace edges so it doesn't lift.
Pro tipUse lace that has a sturdy backing or a tight stitch so it doesn't fray quickly.
AvoidDon't glue lace over the handle grip area - it peels from constant friction.
19. Sew-On Felt Pocket for a Mini Spoon Rest
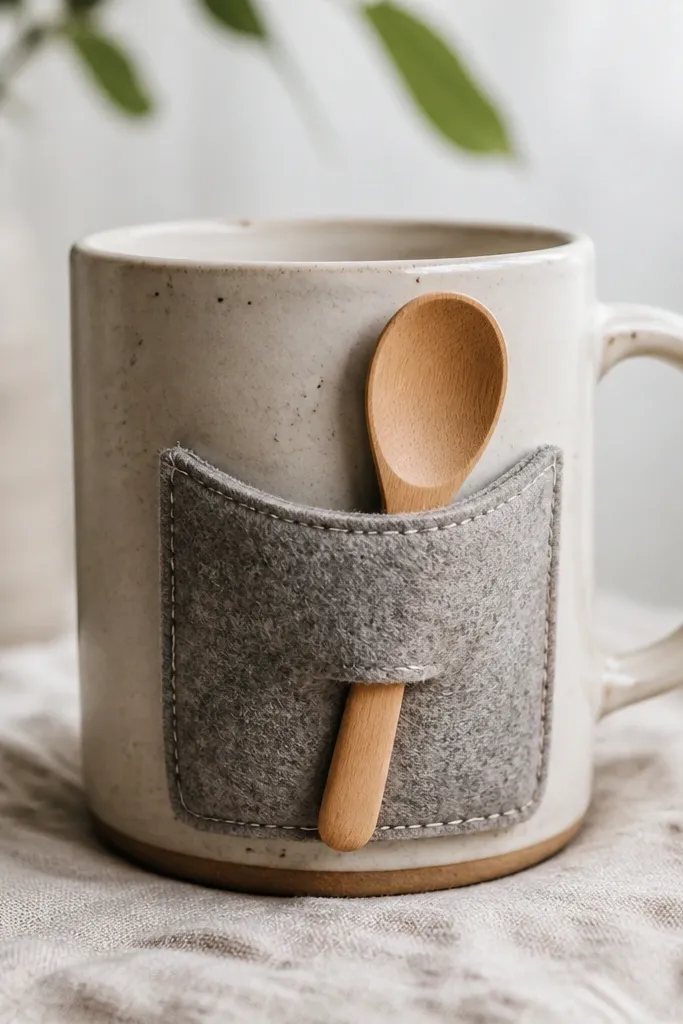
A felt pocket is cozy because it adds softness and a little "utility" cuteness. It's also practical: your spoon has a home, so your table stays cleaner. I like felt in warm colors like camel, rust, or olive so it looks like a craft store made it. The pocket makes the mug feel like part of a set, even if it's just one mug.
Cut felt into a pocket shape about 4 inches wide and 3 inches tall. Sew around the sides and bottom with blanket stitch. Glue or stitch the top edge to the mug front area, leaving space near the handle. Add a small felt strap inside the pocket so the spoon rests securely.
Pro tipUse wool felt if you can - it holds shape better than craft foam felt.
AvoidAvoid thin felt that collapses - it makes the spoon look like it's falling out.
20. Rose Clay Handprint Stamp (Tiny, Not Overdone)
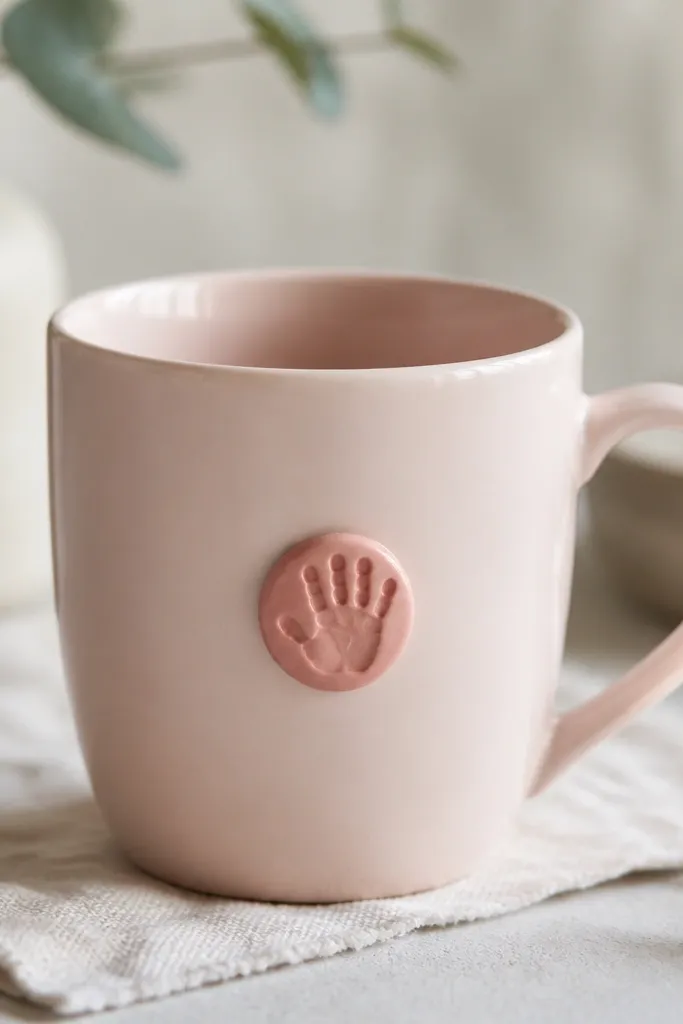
A tiny handprint stamp makes the mug feel personal without covering the whole surface. Rose clay on pale pink looks soft and sweet, and the raised texture adds cozy depth. I've made these for family gifts because you can press a small silicone hand stamp or a custom stamp. Keep it small so it doesn't look like a kid craft.
Stamp clay by pressing a small silicone mold onto softened clay, then attach it to a painted or plain base mug with ceramic adhesive. Let it cure fully. Paint the mug base in a pale pink or cream, then seal everything with a clear sealer safe for textured pieces.
Pro tipPress the stamp once and stop. Re-pressing smears the detail.
AvoidDon't place the stamp where your thumb rubs - raised edges wear down.
21. Ink Blue Brush Script With White Cut Vinyl

This is cozy because it looks like a handwritten note on a café mug. Ink blue feels warm when paired with white, and the vinyl keeps the lettering sharp. I like adding a small underline or dot accent so it looks finished. It's also easy to customize for your own routine - coffee, tea, cocoa.
Paint the mug with ink blue ceramic paint. After curing, apply white cut vinyl lettering and press firmly around edges. Add a thin lighter-blue vinyl underline if you want extra detail. Seal over vinyl if your vinyl instructions allow it; otherwise keep sealing minimal.
Pro tipUse a font with thick strokes so the vinyl doesn't look fragile.
AvoidAvoid thin, delicate letters - they lift and peel at corners.
22. Mini Hot Cocoa Marshmallow Sprinkle (Ceramic Paint Texture)
This one makes the drink feel like the art. Raised dots read as marshmallows, and the cocoa base anchors everything. I like adding tiny squiggles too - it keeps the pattern from looking like random dots. The cozy factor is the texture, not the theme.
Paint the mug cocoa brown and let it cure. Mix ceramic paint with a small amount of texture medium if you have it, then dot with a small brush or squeeze bottle to create raised marshmallow spots. Add a few off-white squiggles. Seal with a clear coat that won't flatten the texture.
Pro tipLet each layer dry fully before adding texture so the dots keep their shape.
AvoidSkip glitter - it catches on lips and looks messy after a few washes.
23. Monochrome Photo Transfer From Old Magazine
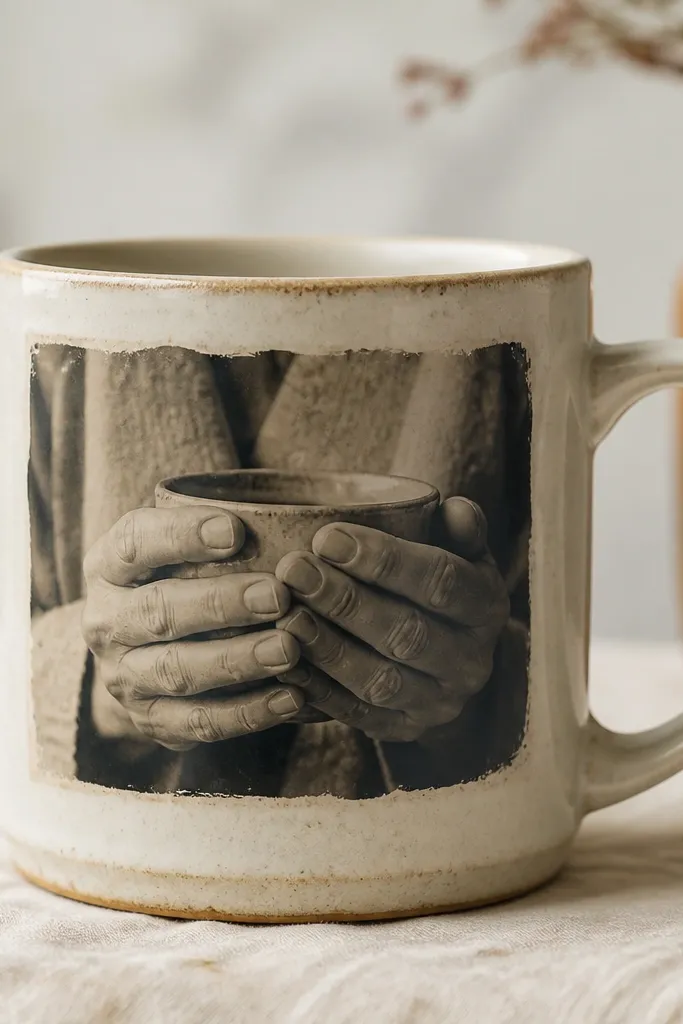
Photo transfer looks cozy because it turns a mug into memory. Monochrome keeps it classy and warm, and the aged edges hide transfer imperfections. I've used old magazine photos because the paper already has a nice grain. This is the best design when you want something sentimental but not childish.
Pick a photo printed on laser or copy-friendly paper. Use a photo transfer medium and follow its timing, then gently rub to reveal the image. Seal with a clear ceramic topcoat. Keep the transfer panel at the center front and leave the handle area clean.
Pro tipChoose a photo with strong contrast - gray-on-gray transfers look faded.
AvoidDon't over-scrub during reveal - it removes details and leaves blotches.
24. Satin Ribbon Band With Tiny Gold Button
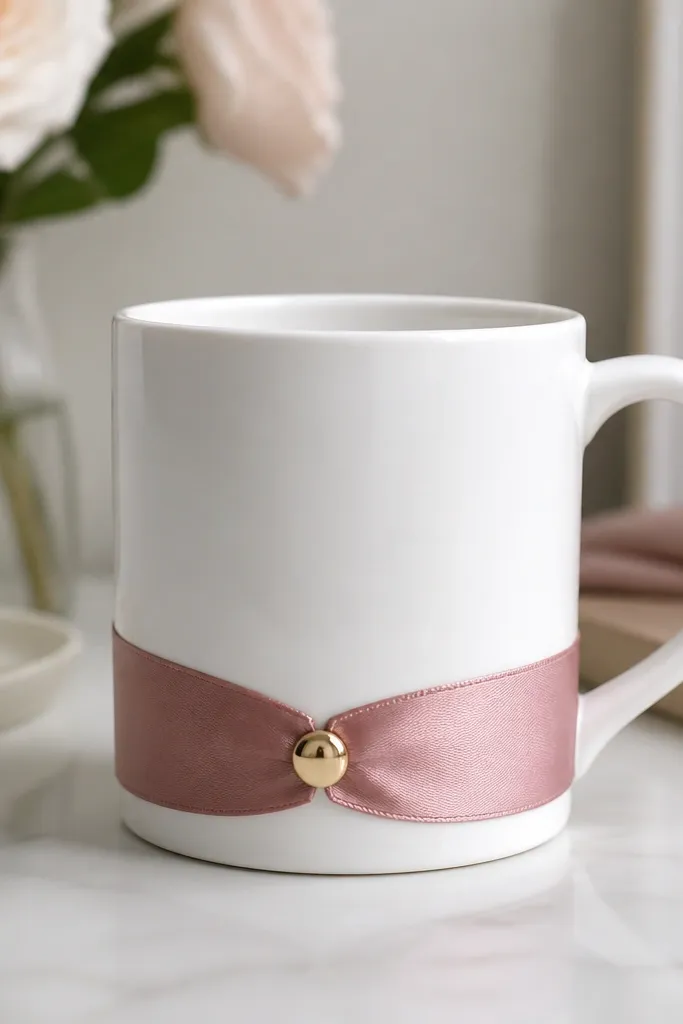
A ribbon band looks cozy because it frames the mug like a gift tag. Dusty rose is soft and warm, and the gold button adds a tiny sparkle. I like this when I'm making mugs for dinner hosts or holiday cookies. It looks tidy even from across the room.
Cut ribbon about 1 inch wide and wrap around the mug lower third. Overlap ends by 1/2 inch and secure with fabric glue on the back. Stitch or glue a small gold button over the overlap point. Seal only the outer ribbon edges with fabric-safe clear glue so it doesn't soak through.
Pro tipUse a ribbon with a matte finish - satin glare can look harsh in daylight photos.
AvoidAvoid hot glue directly on ceramic glaze - it can pop off after temperature changes.
25. Glaze-Style Speckle With White Splash
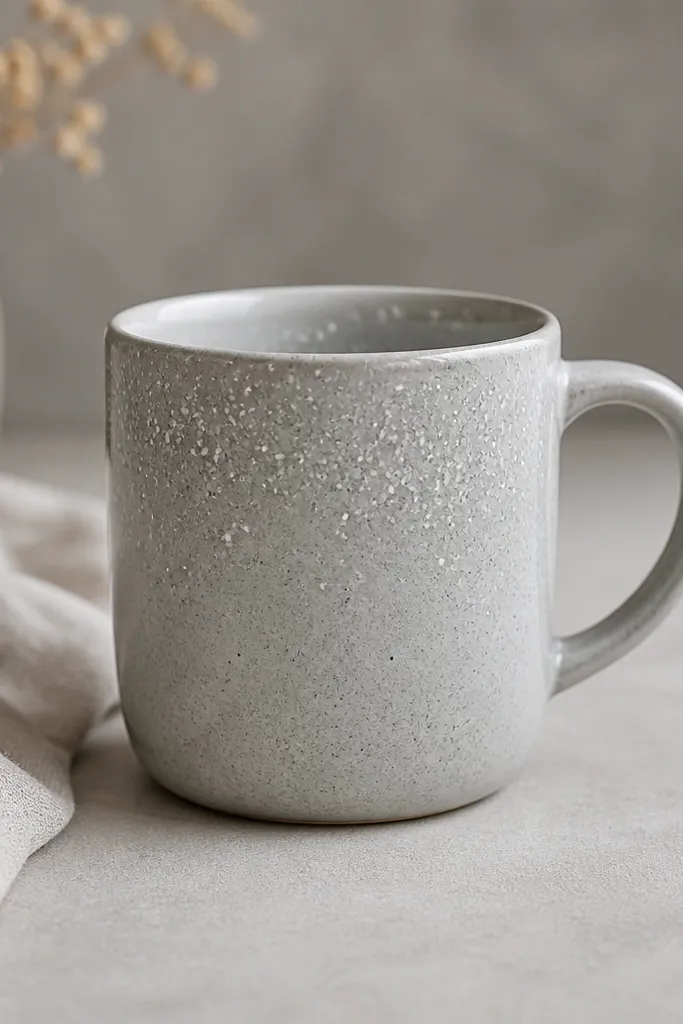
This design looks cozy because it mimics handmade pottery. The speckle is random, so it hides brush streaks and makes every mug feel one-of-a-kind. I like putting more splashes near the top because it frames the drink and looks good when you set it down. Keep the base color neutral so the speckle reads as texture, not clutter.
Paint the mug light gray and let dry. Use a stiff toothbrush to flick white paint, aiming for a heavier cluster near the top 2 inches. Add a few larger splats with the tip of a brush. Seal with a clear coat in thin layers.
Pro tipCover your work surface with a sheet and do splatter over the mug, not beside it.
AvoidDon't use watery paint - splatter becomes drips.
26. Candle Wax Drip Effect With Beige Base
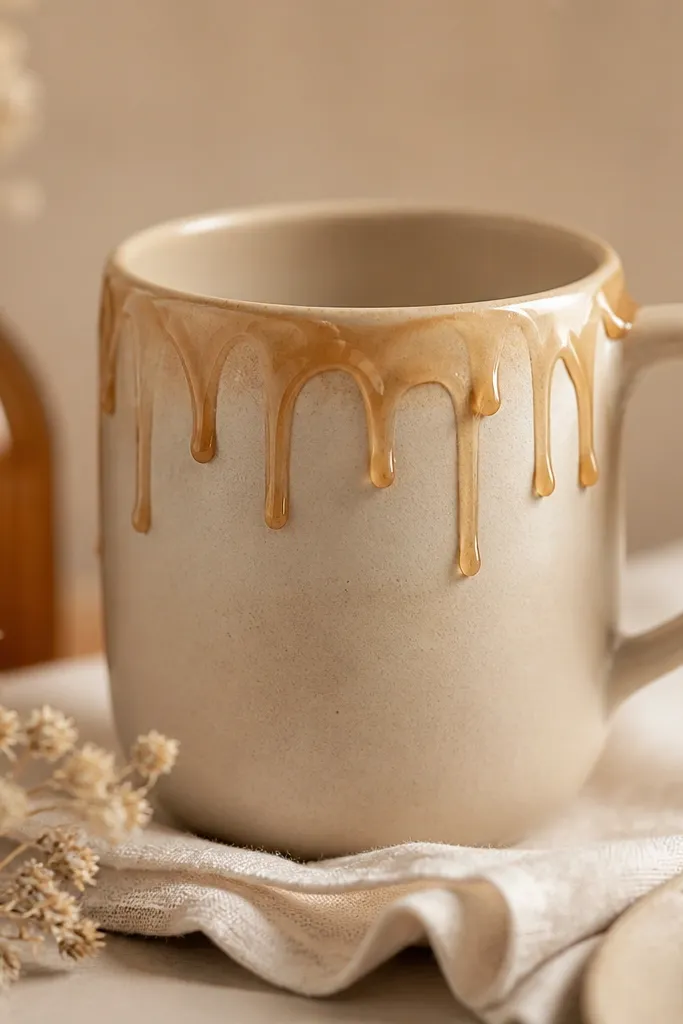
Wax drips feel cozy because they mimic the look of melted candle tops and hot drinks. The beige base keeps it warm and calm. I like caramel-toned drips because they look like real wax without turning orange. This is a fun design for fall when you want something cozy without winter graphics.
Paint the mug beige first. For drips, use a paint mixed with a thickener or use a wax medium effect product if you have it. Drag the thick medium downward with a palette knife to create uneven drips. Let it dry hard, then seal around the outside.
Pro tipMake 4-6 drips max so it reads like wax, not accidental paint runs.
AvoidAvoid drips that reach the rim - they chip and feel sticky when hot liquid hits them.
27. Patchwork Quilt Squares Using Fabric Scraps
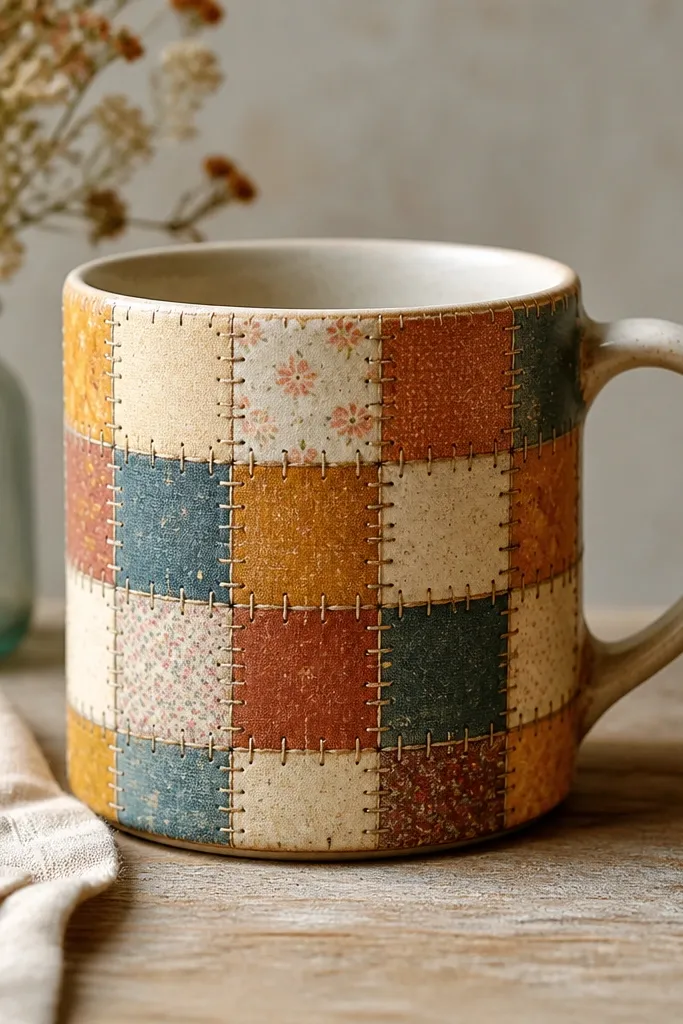
Patchwork looks cozy because it's literally made from scraps, so it feels warm and human. The mix of colors reads like a quilt, and the small scale keeps it cute. I like using solids and tiny patterns together so it doesn't turn into chaos. This design also works well for mugs that already have a faded print - the patchwork covers it.
Cut fabric scraps into 1.5 to 2 inch squares. Back them with thin fusible interfacing if the fabric frays. Arrange squares on the mug and glue in place, then add a thin black fabric paint line to mimic stitching between squares. Seal if your glue allows it, or keep it as a display/hand-wash mug.
Pro tipPress the fabric pieces flat with a warm iron on low through parchment before gluing.
AvoidDon't use bulky seams - they make the mug uneven to hold.
28. Coffee Stain Look With Watercolor Wash
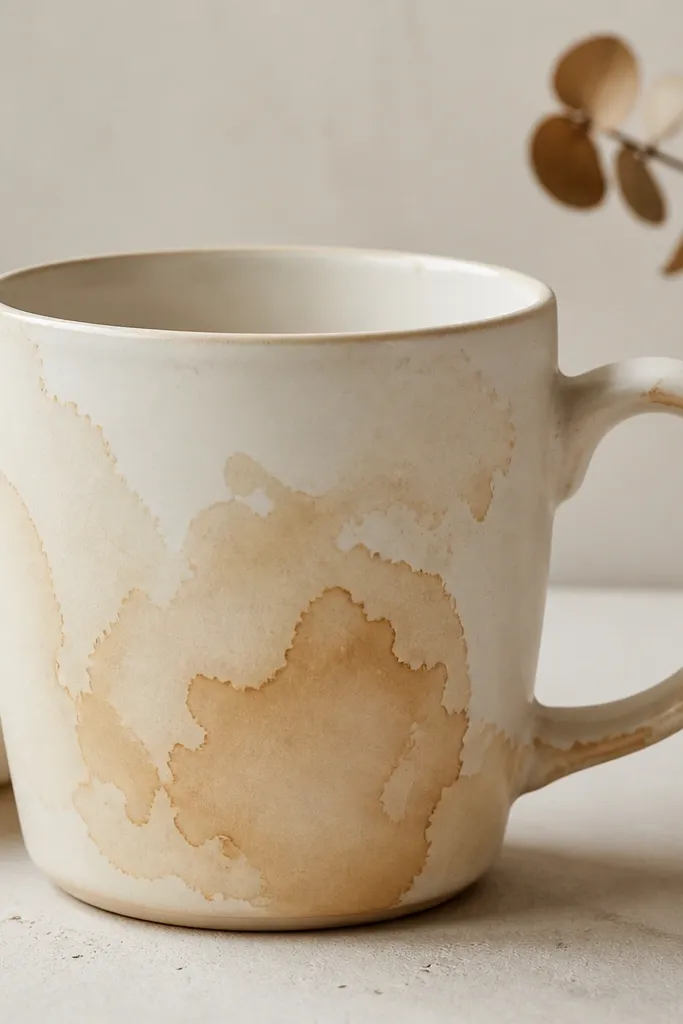
Coffee stain art is cozy because it's accidental-looking but controlled. The soft edges feel like real coffee bloom on paper. I like this on plain cream mugs because the effect looks like it belongs. It also hides small imperfections in the base coat.
Paint the mug cream. Mix a light brown watercolor-like ceramic paint with water to make a wash, then dab in irregular shapes with a sponge. Build intensity in layers: start light, then add a darker center in a couple stains. Seal with a clear coat after the final layer dries.
Pro tipUse a sponge corner, not a full sponge, so you get ragged edges instead of circles.
AvoidAvoid super-dark stains all over - it looks dirty instead of cozy.
29. Red Buffalo Check With Vinyl Cut Squares
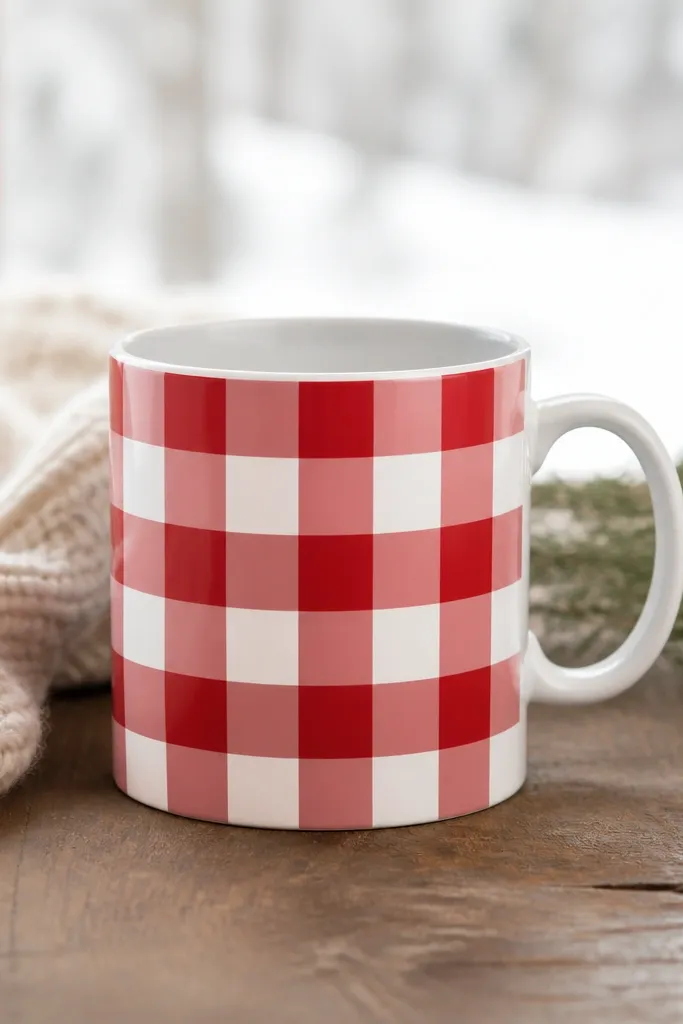
Buffalo check screams cozy in a way that still looks tidy. Vinyl makes the grid straight, which is where most DIY versions fail. The red and cream combo looks like a cozy kitchen towel. Put it on the front panel area and leave the back plain if you want a calmer vibe.
Apply a cream base coat or use a white mug. Cut red vinyl strips and small squares to form the check pattern, then place them with alignment marks. Press firmly and trim edges cleanly. Seal lightly over vinyl if allowed, or protect by keeping the mug hand-wash only.
Pro tipMark the mug with a pencil grid lightly before applying vinyl so spacing stays consistent.
AvoidAvoid freehand check lines - they never look straight and the mug looks rushed.
30. Tiny Flower Linework In Black Ink
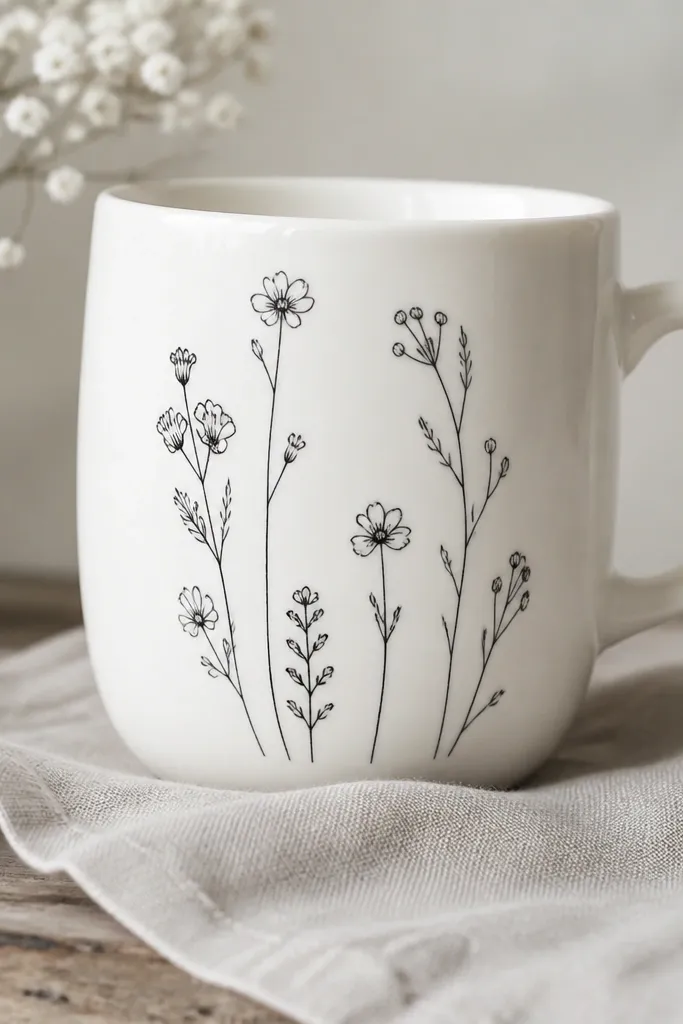
Linework is cozy because it feels like a sketchbook, not a sticker. Black ink on white stays crisp and timeless, and the tiny scale makes it look thoughtful. I like using one vertical cluster so it doesn't spread across the whole mug. The stems also visually lead your eye toward the handle.
Start with a white ceramic mug. Draw flowers with a fine paint pen or brush pen designed for ceramics. Add thin stems and small leaf dots, then let it dry. Seal with a clear ceramic topcoat, and keep the design away from the rim.
Pro tipAdd one thicker line on each flower center to make it look intentional.
AvoidDon't use watery ink - it bleeds into glaze and blurs the petals.


