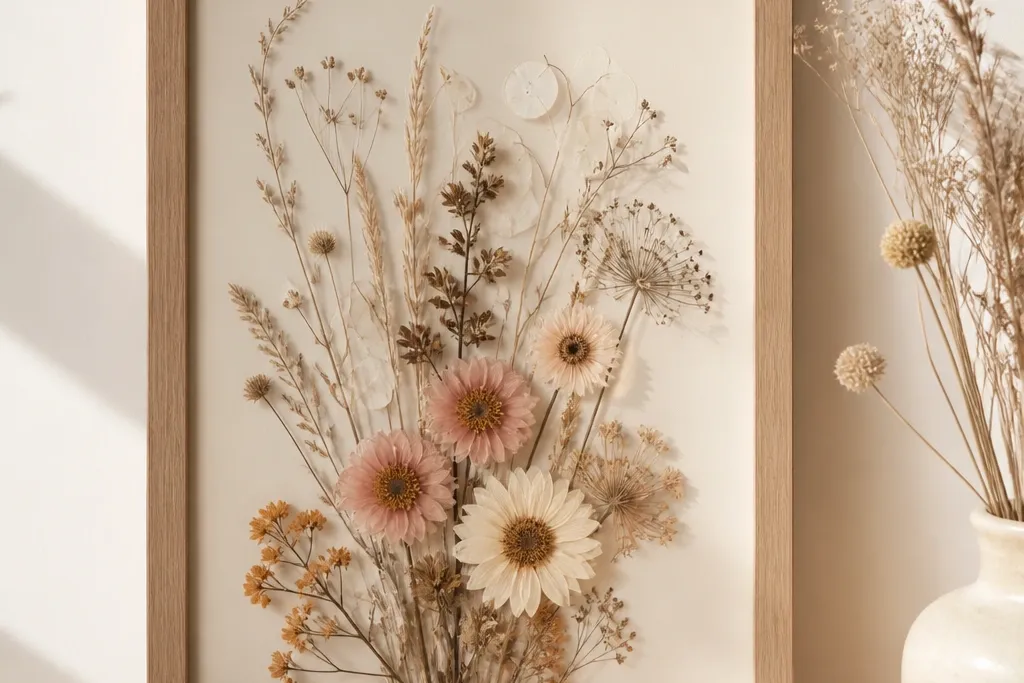
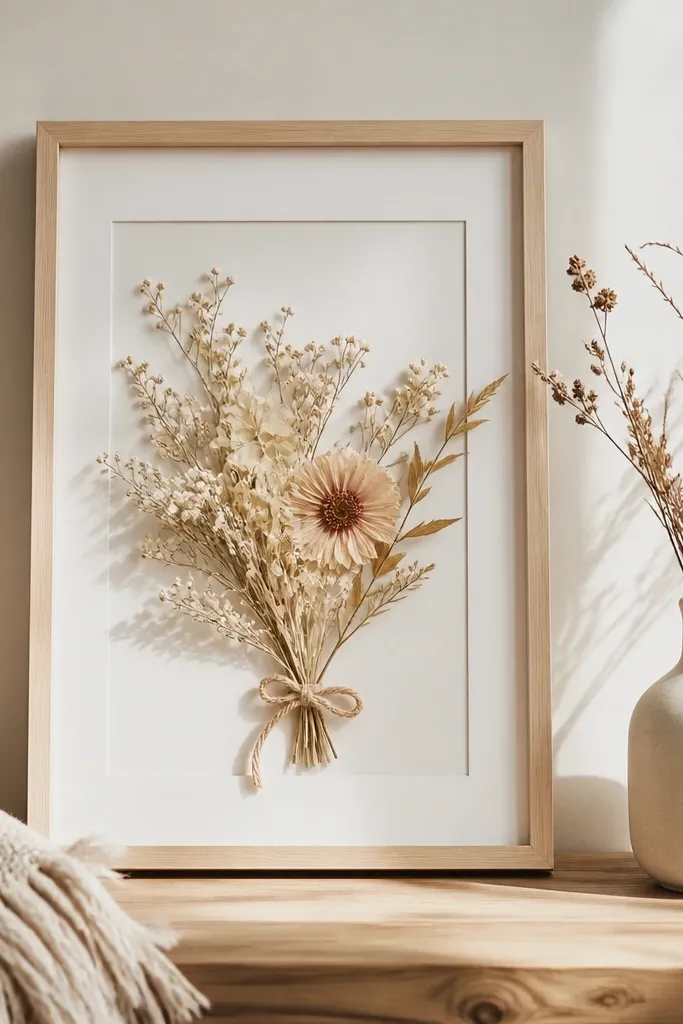
1. Blush Pressed Petal Frame with Linen Backing
This one looks cozy because the linen adds warmth and the pressed petals stay delicate. Use blush tones (pale pink petals, a few deeper rose fragments) so the center reads soft, not loud. The flat, papery texture of pressed flowers makes a clean contrast against the weave of linen. I like it for spring and Valentine season because it feels airy even when the wall is small.
Buy an 8x10 frame that has a removable backing and fits 8x10 inch mat board. Cut linen slightly smaller than the backing, then staple or glue it to the backboard. Arrange pressed petals on the fabric, then secure with thin dots of archival glue at the petal centers only. Finish by sealing with an acrylic-safe clear spray and cover with acrylic or glass.
Pro tipPress your petals under a heavy book for 10-14 days, then sort them by thickness. Thinner petals make better "feathering" around the edges.
AvoidDon't glue the entire petal surface - it makes pressed flowers look shiny and cheap.
2. Dusty Rose Statice + Baby's Breath Corner Pop
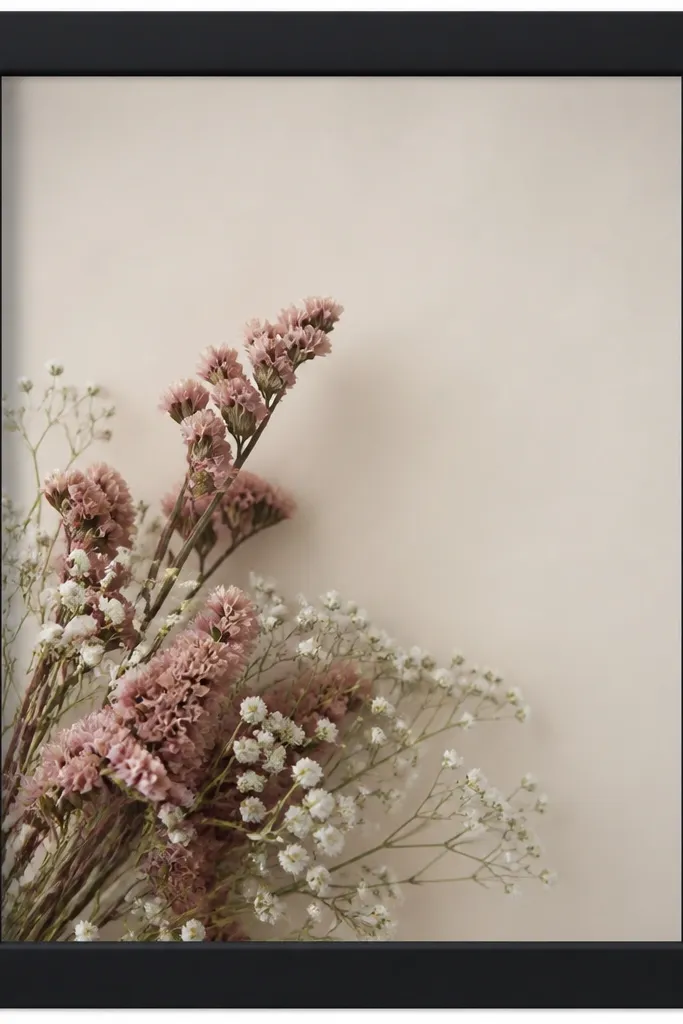
This layout feels modern-cottage because the diagonal sweep pulls your eye across the frame. Dusty rose statice has a crisp, dry look, and baby's breath adds tiny white dots that read like soft light. Keeping a chunk of negative space prevents the frame from looking like a jammed bouquet. The black frame makes the pink look more intentional.
Use a black frame with a deep enough backing to allow a spacer. Add 1/4-inch foam tape around the inside perimeter so the flowers sit slightly off the backing. Bundle statice stems into a few short "arms," then tuck baby's breath clusters between them. Secure with hot glue on the stem ends only, then mist lightly with floral sealant.
Pro tipTrim statice stalks to about 3-4 inches each so you can stack them without crowding the corner.
AvoidDon't fill every gap - dense corners make dried flowers look like a craft-store sticker.
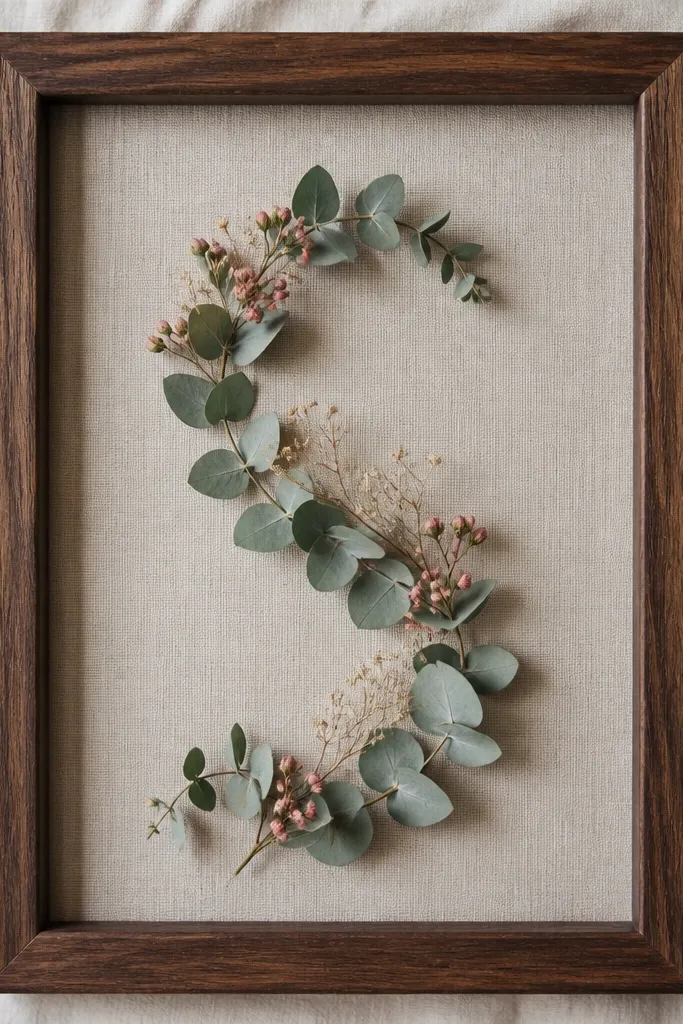
3. Pink Strawflower Halo with Soft Green Eucalyptus
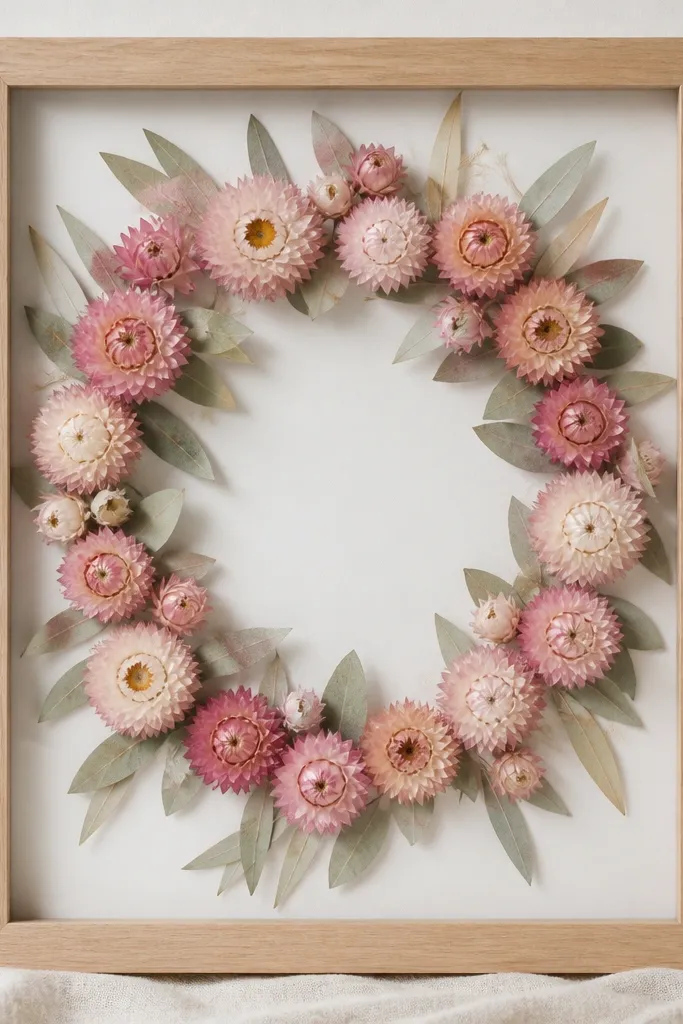
A halo layout always reads neat because it creates a clear shape. Strawflower has a sturdy petal structure, so it holds form and looks fresh for months. The eucalyptus adds that "cozy contrast" - gray-green tones keep the pink from feeling too sweet. Leaving the center open also makes the frame look breathable on a busy wall.
Choose a natural wood frame, ideally 11x14 for the halo scale. Cut a circle of cardstock or mat board to fit the center opening, then mount it so it sits flat behind the flowers. Arrange 8-12 strawflower blooms around the circle, then tuck eucalyptus strands between blooms. Add a few tiny rosebud fragments inside the ring for depth.
Pro tipUse a ruler to mark the circle position on the backing. It keeps the halo even even if your flowers vary in size.
AvoidDon't let eucalyptus overpower the pink - keep greens to about 15-25% of the visible area.
4. Pressed Flower Grid with Pink Micro-Botanicals
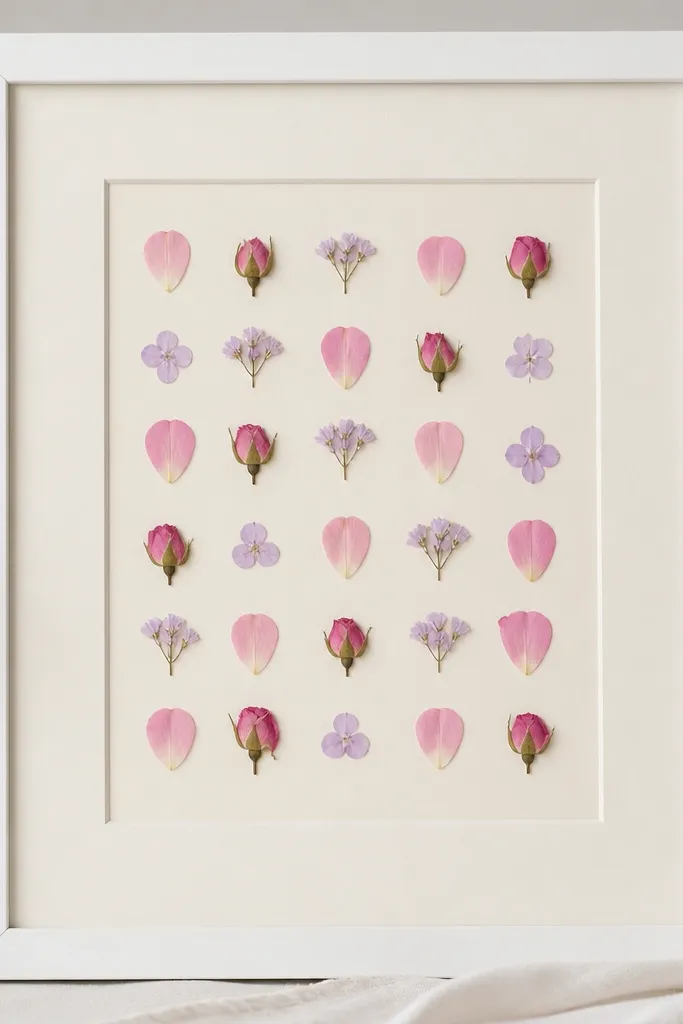
This one is cozy because the order makes it calm. Tiny pressed botanicals look extra pretty when they're spaced like a mini specimen page. A cream mat softens the whole piece, and the grid keeps it from feeling cluttered. It's also the easiest style to photograph since the arrangement stays crisp.
Use a frame with a mat and cut a window that's about 6x8 inches. Press small items (mini petals, micro leaves, tiny rosebud bits) so they fit the grid cells. Arrange in rows, then secure with archival glue just at the edges. Keep each cell to one main element so the grid stays readable.
Pro tipLay everything out on the table first and take a quick photo. You'll spot spacing issues before you glue anything down.
AvoidDon't stack pressed pieces on top of each other - they create bumps that look messy under glass.
5. Blush Dried Peony-Style Cluster on Kraft Paper
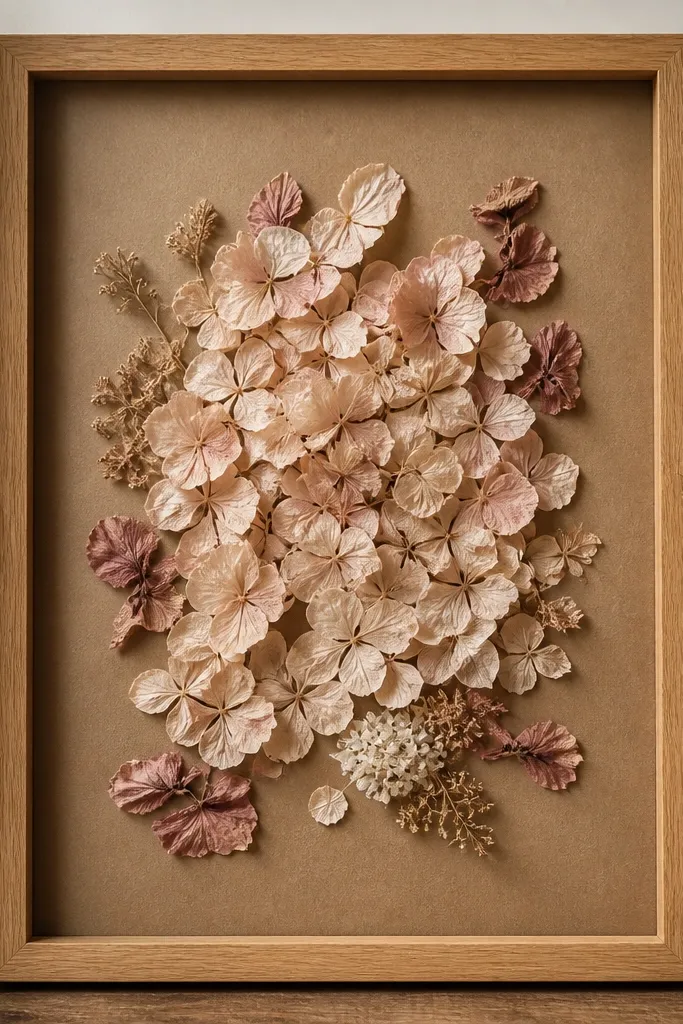
Kraft paper makes pink feel more cottage and less "wedding bouquet." The trick is using curled, deeper rose pieces around the perimeter to mimic a peony's layered look. Blush petals in the middle give that soft center. This frame looks great in kitchens and entryways because it pairs with warm surfaces.
Use a kraft paper sheet sized to your backing board. Lightly crumple it once, then flatten - it adds texture without looking wrinkled on camera. Arrange a big central cluster using 6-10 petals pieces, then add a ring of curled rose fragments. Secure with a small amount of glue at attachment points, not across the whole petal.
Pro tipTear the kraft paper edge slightly before mounting. The uneven edge hides backing seams and looks intentional.
AvoidDon't use glossy craft paper - it reflects light and makes the dried flowers look dull.
6. Pink Ribbon Tie Frame with Dried Stem Arch
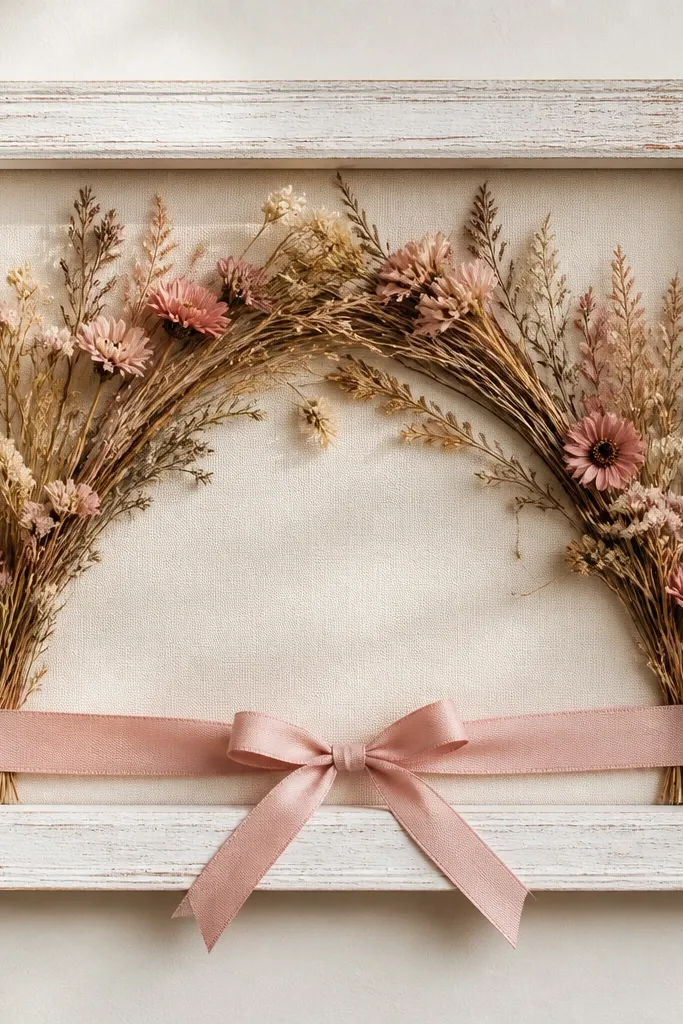
This idea adds cozy "gift energy" without being childish. The arch shapes the composition and keeps it from looking like random loose flowers. A dusty blush ribbon tie gives texture you can feel when you walk by. It's great for holidays because it reads as seasonal even if the flowers aren't super winter-themed.
Use a frame with a backing you can pin into. Tie 1/2-inch satin ribbon (or grosgrain if you want less shine) into a bow, then stitch or glue it to the backing at the bottom center. Build a shallow arch with 3-5 dried stems (statice, strawflower, or thin eucalyptus sprigs). Glue stems at the ends to the backing, then tuck small pink blooms behind the arch.
Pro tipCut ribbon tails to 3-1/2 inches and angle the ends. Straight tails look flat in photos.
AvoidDon't choose ribbon that's too wide - anything over 1 inch starts to look like a store display.
7. Pink Ombre Floral Strip Along the Side
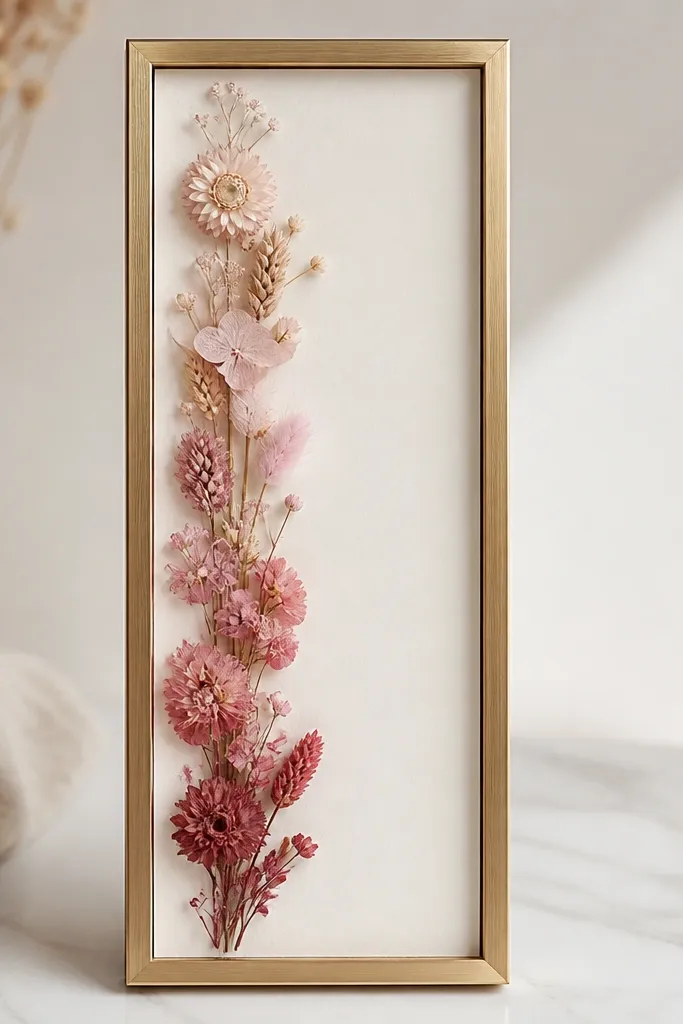
A vertical ombre looks intentional because your eye reads color progression. Keeping it as a strip prevents the frame from feeling busy. The brushed gold frame makes the pink tones look warmer and more "cozy candlelight." This format is perfect for narrow walls and beside mirrors.
Get a tall frame like 5x15 or 6x18 if you can. Create a vertical "track" by placing a thin strip of cardstock behind where the flowers will sit. Start with pale blush petals at the top, then layer slightly darker pieces down the strip. Secure the bottom ends first so the gradient doesn't shift.
Pro tipTrim stems at different lengths so the strip has a gentle wave, not a straight line of equal heights.
AvoidDon't force all flowers to face the same direction - it reads stiff and cheap.
8. Heart-Shaped Pink Dried Rose Bud Frame
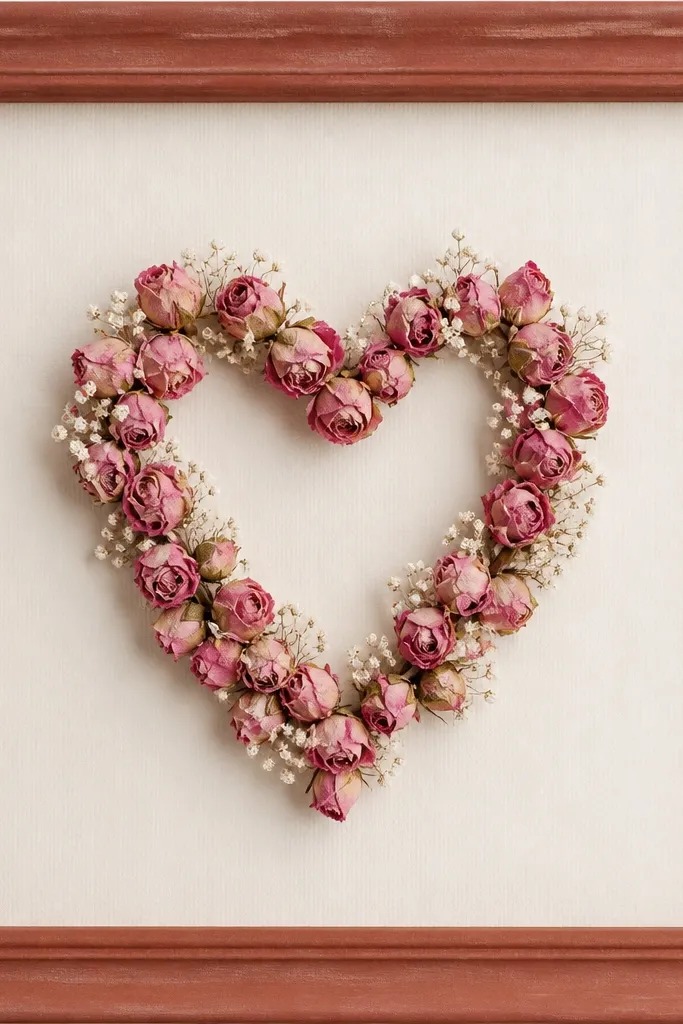
A heart shape is cozy because it's instantly readable, even from across the room. Rose buds give the heart a textured, dimensional look. Baby's breath sprigs soften the edges and prevent the shape from looking like a craft stencil. This works for Valentine season and also for anniversaries.
Trace a heart shape on a piece of mat board, then cut it slightly smaller than your frame opening. Build the heart using dried rose buds glued along the outline. Fill the inside with small rosebud fragments and one or two baby's breath clusters. Add a thin spacer behind the heart so buds don't flatten against the glass.
Pro tipUse two bud sizes: larger buds on the outline, smaller bits in the center. It makes the heart look full without piling.
AvoidDon't use too much glue at the edges - it leaves dark blobs through the petals.
9. Blush Pampas + Pink Statice Minimal Frame
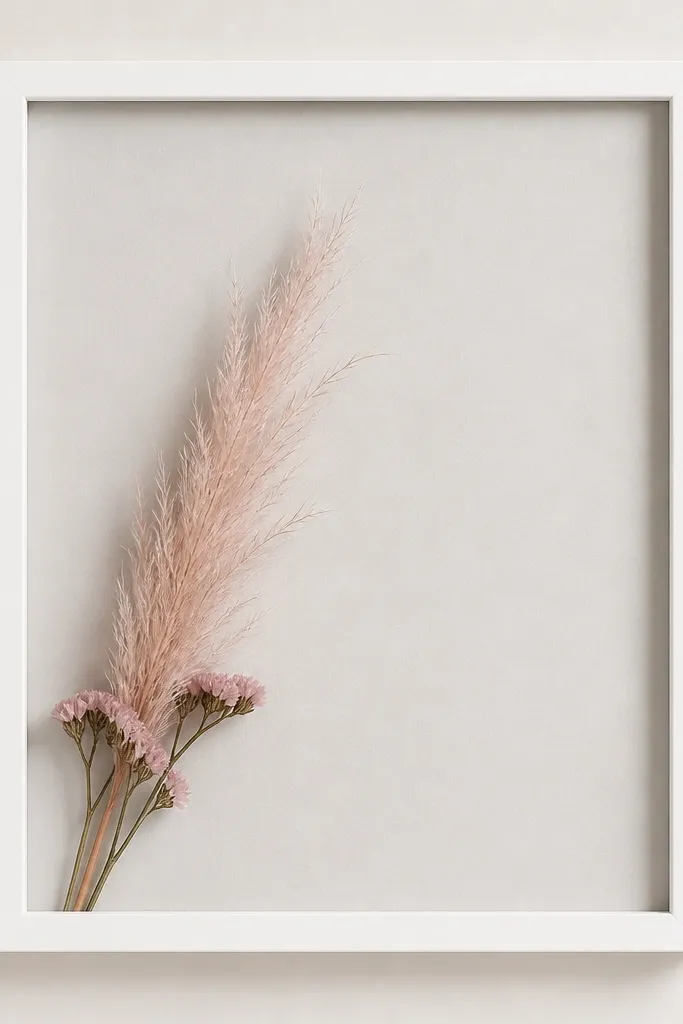
Minimal frames feel cozy when the materials have movement. Pampas plumes are airy, and statice adds small structured pops. The empty space is the point - it makes the pink look intentional instead of crowded. This one works in hallways because it doesn't compete with decor.
Choose a frame with a clean, thin border. Back with pale gray cardstock so the blush plume reads soft. Glue the base of the pampas plume first, then add 2-4 statice sprigs like a little fan. Keep the plume tip away from the top edge by 1-2 inches.
Pro tipSpray pampas lightly with a clear matte sealant before assembly so shedding is lower.
AvoidDon't put the plume right against the glass - it flattens and looks messy.
10. Pink Pressed Flower + Gold Foil Dots Frame
The gold foil dots add that cozy "warm light" effect without using glitter. Pressed petals keep the texture gentle, and the foil gives tiny highlights that catch room light. This is a great option when you want pink but not too romantic. It also photographs really well.
Use a cream or ivory backing so the foil stands out. Arrange pressed petals in a small bouquet shape, then add gold foil dots using a craft glue pen or tiny adhesive dots. Seal lightly with a clear spray so the foil doesn't lift over time. Keep the bouquet size about 5-6 inches wide in an 8x10 frame.
Pro tipUse a toothpick to place foil dots - you get smaller, more controlled specks than with fingers.
AvoidDon't use chunky glitter glue - it looks raised and can peel under glass.
11. Dusty Rose Eucalyptus Sprig Frame with Pink Buds
Eucalyptus sprigs make the frame feel like a living plant, even when it's dried. The gray-green leaves balance dusty rose buds and keep the palette from turning flat. The S-curve gives motion, and the buds add cozy focal points. I made this for my own entryway because it looks good even when I'm not changing decor seasonally.
Cut eucalyptus sprigs so the total height fits the frame with 2 inches of breathing room at the top. Lay out an S-curve on the backing, then glue the stems at the bends. Tuck pink buds every 1-1.5 inches along the curves. Use linen or textured paper behind it so the leaves don't look like they're floating in empty space.
Pro tipTrim bud stems short, then glue them at the base only. Long stems show through leaves and look messy.
AvoidDon't skip the balancing leaves - a bud-heavy frame looks lopsided.
12. Pink Dried Flower Confetti in a Clear Acrylic Frame
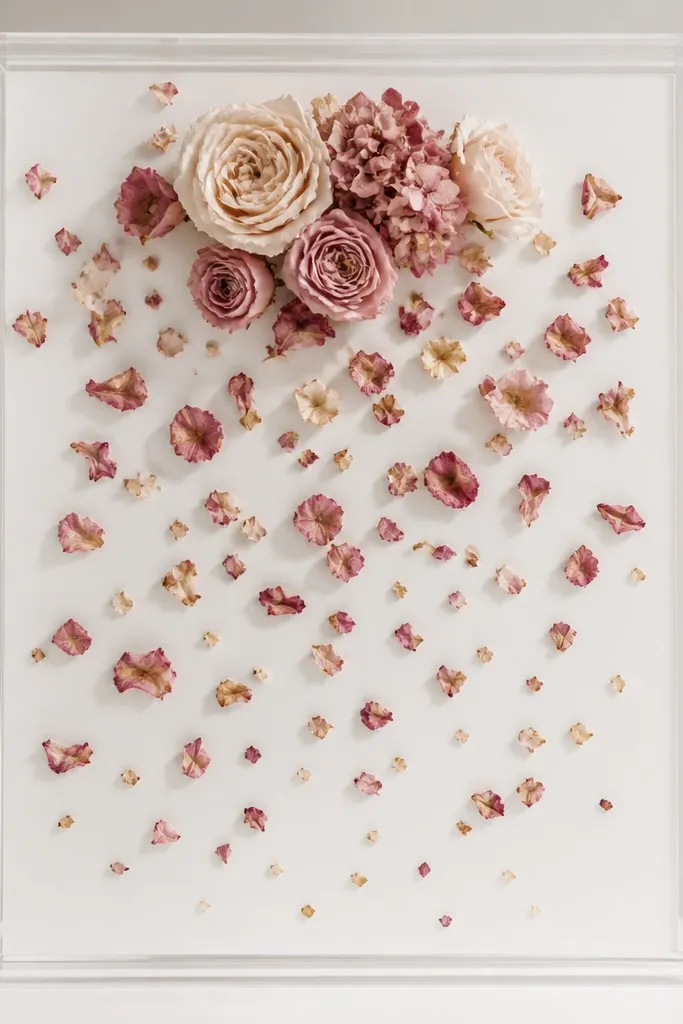
Confetti-style frames look cozy because they feel light and airy. The larger bloom at the top center gives the arrangement a "main character," while the rest is just gentle texture. Using clear acrylic keeps the flowers visible without the boxed-in look of deep frames. It's also a good way to use small leftover petals.
Use a clear acrylic frame with a removable back. Put a thin layer of archival glue dots across the backing where you want petals to stick, then sprinkle petals and press lightly with a clean tool. Cluster 3-5 larger blooms near the top center, then fill around them with tiny pieces. Let it dry fully before closing the frame.
Pro tipMix petal sizes: 70% tiny bits, 30% medium pieces. That ratio keeps it from looking like random trash.
AvoidDon't shake the petals in - scatter control looks sloppy fast.
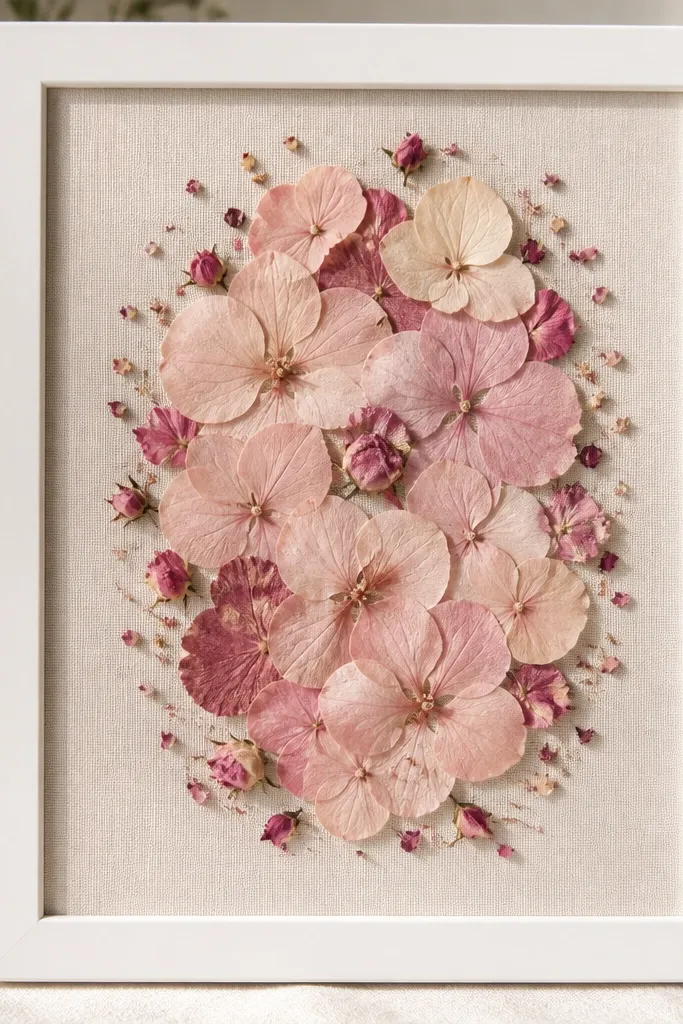
13. Pink Bouquet in a Shadow Box with 3D Depth
Shadow boxes look cozy because they actually hold depth. When you layer flowers at different distances from the back, the frame looks more like a preserved arrangement than a flat craft. Blush petals in the front make the center feel close, while dusty rose buds behind add depth. The cream background keeps everything warm and readable.
Pick a shadow box around 8x10 with at least 1 inch depth. Mount a cream backing card, then start with your back layer of larger blooms. Add a middle layer of buds, then a front layer of petals and tiny sprigs. Use foam squares between layers so each cluster sits at a different depth.
Pro tipBuild in layers from back to front and photograph after each layer. It helps you keep the shape from drifting.
AvoidDon't glue everything to the back wall - you lose the 3D effect instantly.
14. Pink Dried Flower Wreath Mini Frame
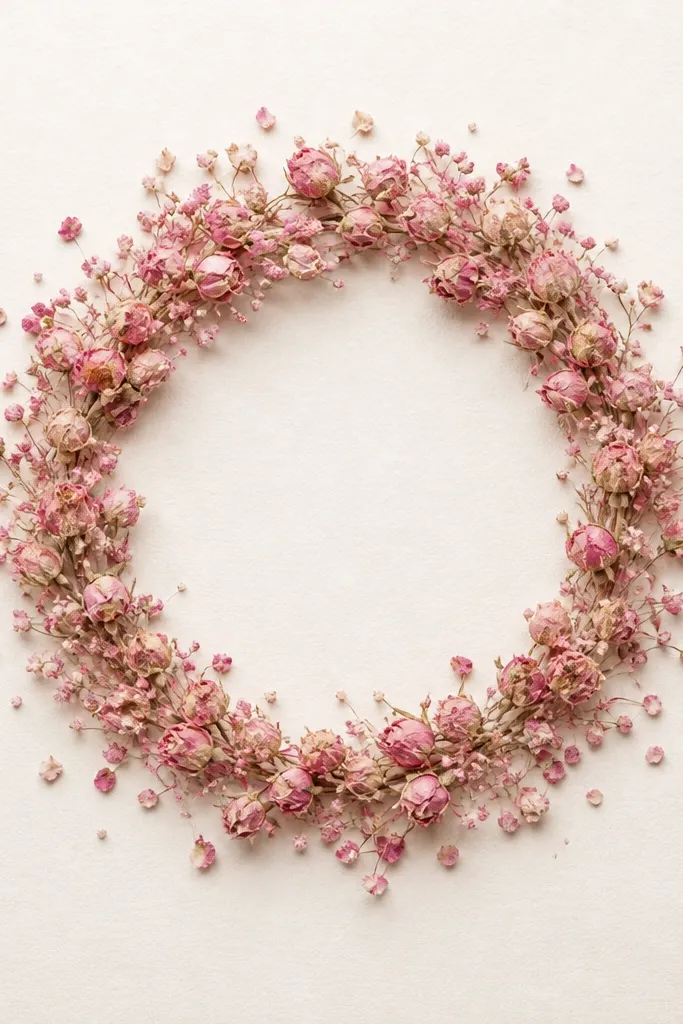
A wreath frame feels cozy because it reads seasonal without needing a holiday theme. Keep the center open so it looks modern, not like a heavy holiday ornament. Use a mix of small rose buds and blush petals so the wreath has texture but stays airy. This one looks great on shelves and around doorways.
Use a rectangular frame but build a circular wreath using a foam ring or cut cardstock ring. Glue buds to the ring, then add petals between them like filler. Leave a 1-2 inch center gap for a clean focal point. Mount the ring with foam tape so it sits off the backing and catches light.
Pro tipIf your wreath looks too sparse, add one concentrated burst at the top half instead of filling evenly.
AvoidDon't use thick, wet-looking glue - it seeps through petals and darkens the ring.
15. Pink Christmas-Style Pine Tips with Dried Rose
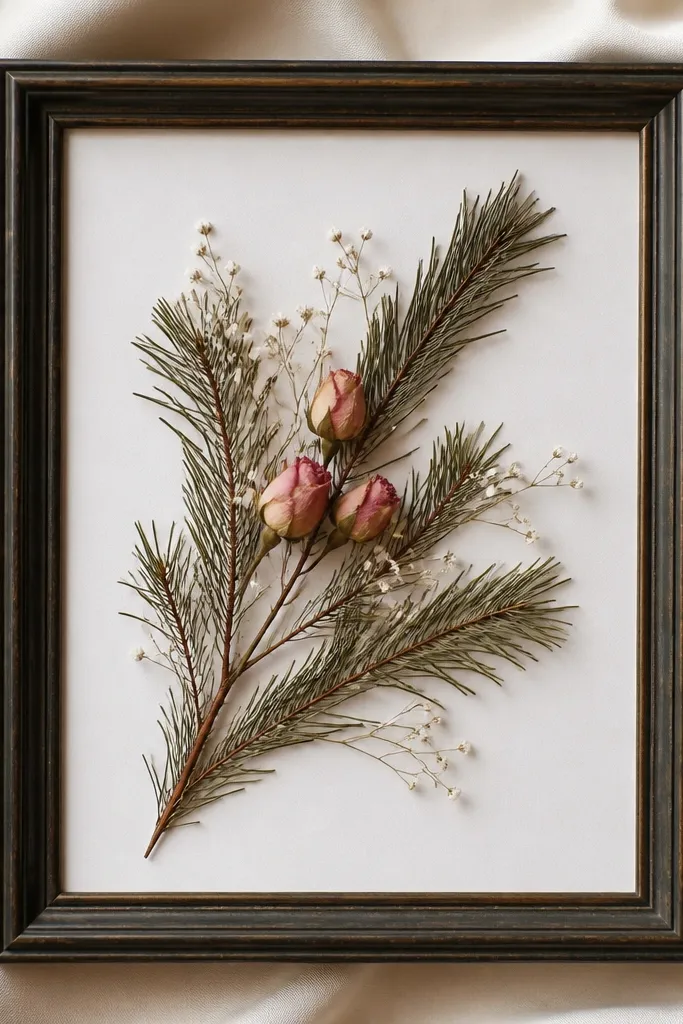
This is a holiday-friendly cozy dried flower frame because the pine gives winter structure. Pink rose buds act like ornaments, and baby's breath adds that icy sparkle without actual glitter. The color contrast - dark green and blush - reads festive but still soft. I've hung this next to my front door when the weather turns cold.
Use a dark frame and a white or icy gray backing. Arrange pine tips diagonally so they point toward the center, then glue rose buds at 3-4 focal spots. Add baby's breath sparingly like tiny snow dots. Seal everything lightly so the pine tips don't shed.
Pro tipSpray pine tips with matte clear sealant before assembly. It reduces flaking and keeps the texture from getting dusty.
AvoidDon't overdo the pine - too much green makes it look like a craft wreath glued flat.


