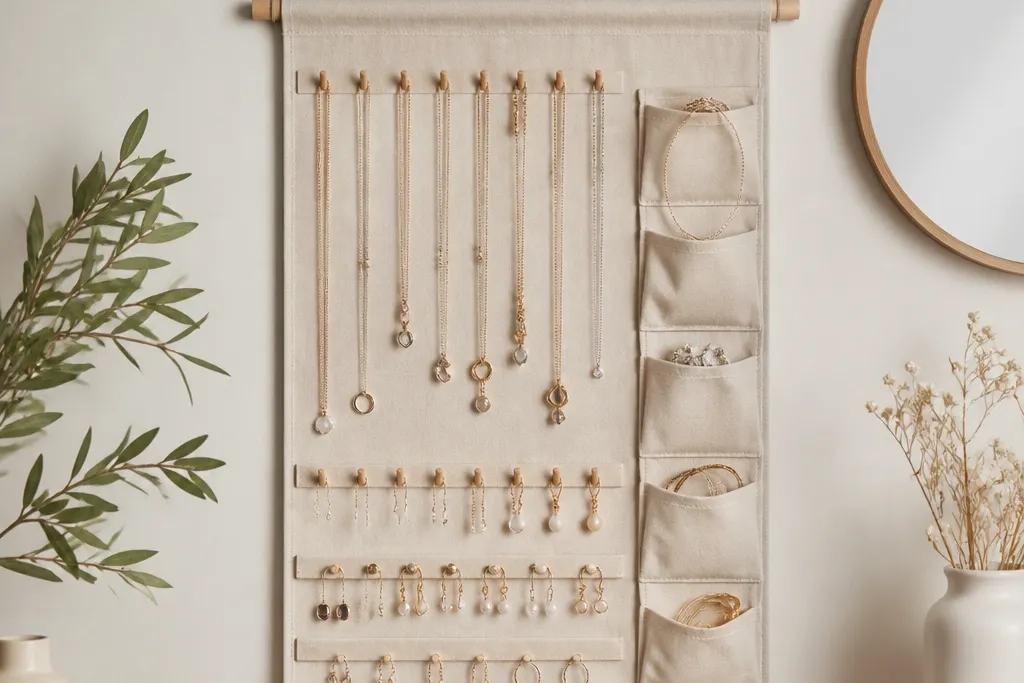
1. Painted dowel bar with sliding ring clips

This one looks tidy because the dowel creates a clean top line and the sliding clips keep rings separated instead of piled. I use a matte paint so chains don't glare under light, and I keep clip spacing tight enough that rings don't clink. Cup hooks under the bar hold short necklaces and pendant chains without tangling. The clear clips also let you see which ring is where without opening anything.
Cut a 1 inch diameter dowel to 24 inches wide. Paint with matte chalk paint, then let it cure overnight. Mount two screw eyes into the studs or use proper wall anchors, then hang the dowel from a 1x2 wood backer. For rings, attach a vertical strip of thin acrylic or wood and screw binder ring clips along it so they slide freely but stop before they hit the edge.
Pro tipAdd small felt pads where clips touch the dowel so the finish stays scratch-free and chains glide instead of snag.
AvoidSkip glossy paint on the touching side - it shows scratches and makes metal hardware look messy.
2. Cork board with mini clothespin earring parade
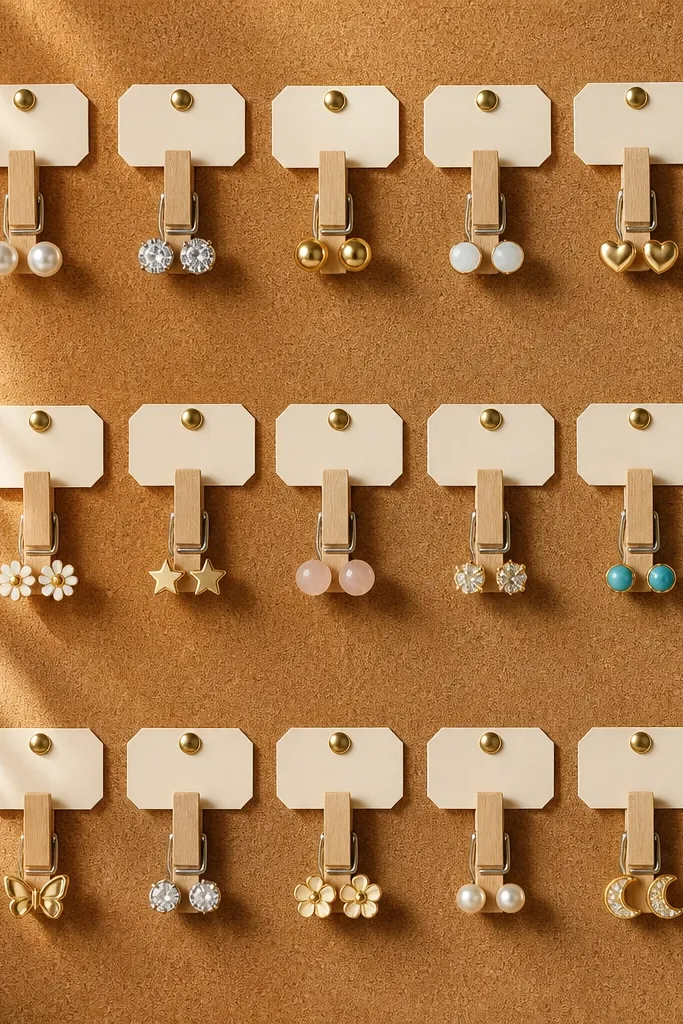
Cork holds pins and screws without splitting, and clothespins make earrings visible from a distance. I like this because you can mix studs and small drops in one system, and the cork surface has enough texture that nothing slides. The labels keep pairs together when you're tired and moving fast. It also looks like intentional decor, not storage.
Use a 12x16 inch cork sheet with a thin backing. Seal it with a matte clear spray so chains and metal don't leave marks. Hot glue or screw in mini clothespins every 2.5 to 3 inches in a grid - leave at least one empty column for seasonal swaps. Mount on a picture rail or two hooks so it hangs straight.
Pro tipPin earrings with the backs facing outward so you can grab the pair without flipping them.
AvoidDon't cram the clothespins - if they touch, small stones catch each other and you end up untangling.
3. Pegboard with brass hooks and fabric-wrapped necklace bar
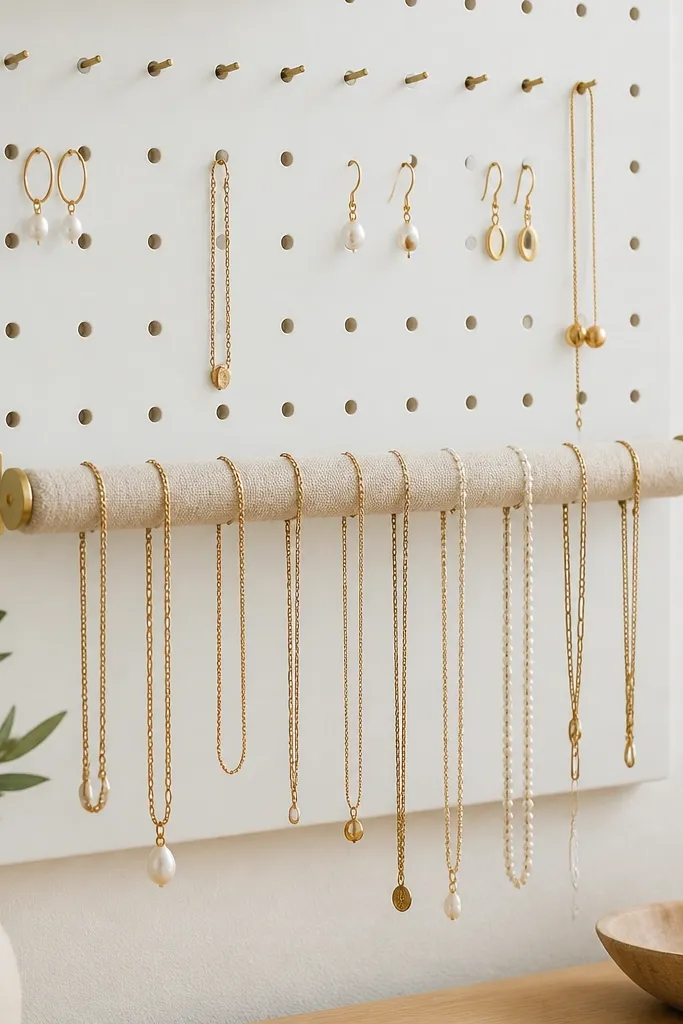
Pegboard is my go-to for year round hanging jewelry organizer builds because it's adjustable. Brass hooks look warm and the spacing stays consistent. The fabric-wrapped bar is the secret - necklaces slide onto soft linen instead of catching on metal. It keeps long chains from twisting into each other because the fabric creates a gentle friction point.
Cut pegboard to 16x24 inches. Paint it white or leave it raw and clear-seal it. Install a horizontal dowel bar across two pegs, then wrap with linen and staple the underside. Place brass hooks below the bar for earrings and short necklaces, spacing hooks about 2 inches apart for smaller pieces.
Pro tipUse a small ruler and painter's tape to map hook positions before you drill, so the grid looks intentional.
AvoidAvoid bare metal contact points where chains rest - they snag and leave fine scratches.
4. Vintage window frame with mesh netting for chain layers
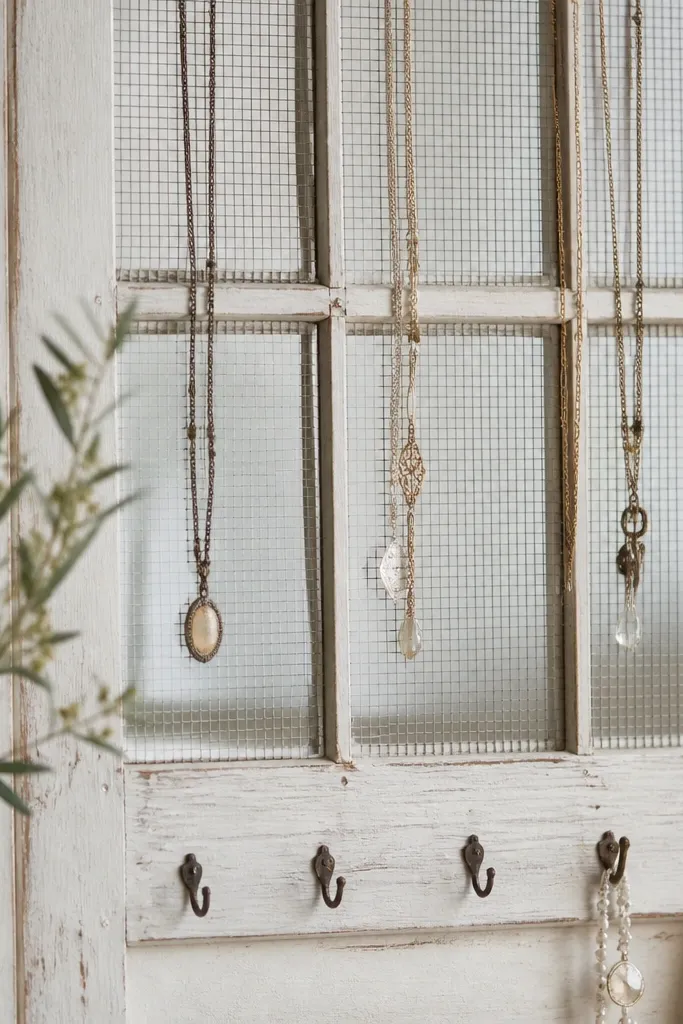
This looks like art and it works because mesh creates separate lanes for each necklace. I like the off-white frame because it hides dust and makes gold and silver pop. The mesh is also forgiving for different chain lengths - you can drape and clip without them locking together. It's a great option if you want a statement piece in a bedroom or entryway.
Remove old glass if present and sand the frame lightly. Stretch fine metal mesh over the back and staple it at the rear so the front stays smooth. Add a row of small hooks along the bottom rail for earrings and bracelets. Hang the frame with two wall anchors and keep the top hook level so it doesn't tilt.
Pro tipLine the mesh edges with thin felt tape so chain links don't catch on sharp metal.
AvoidDon't use oversized mesh - gaps let chains slip into knots.
5. Resin-coated picture wire with mini S-hooks
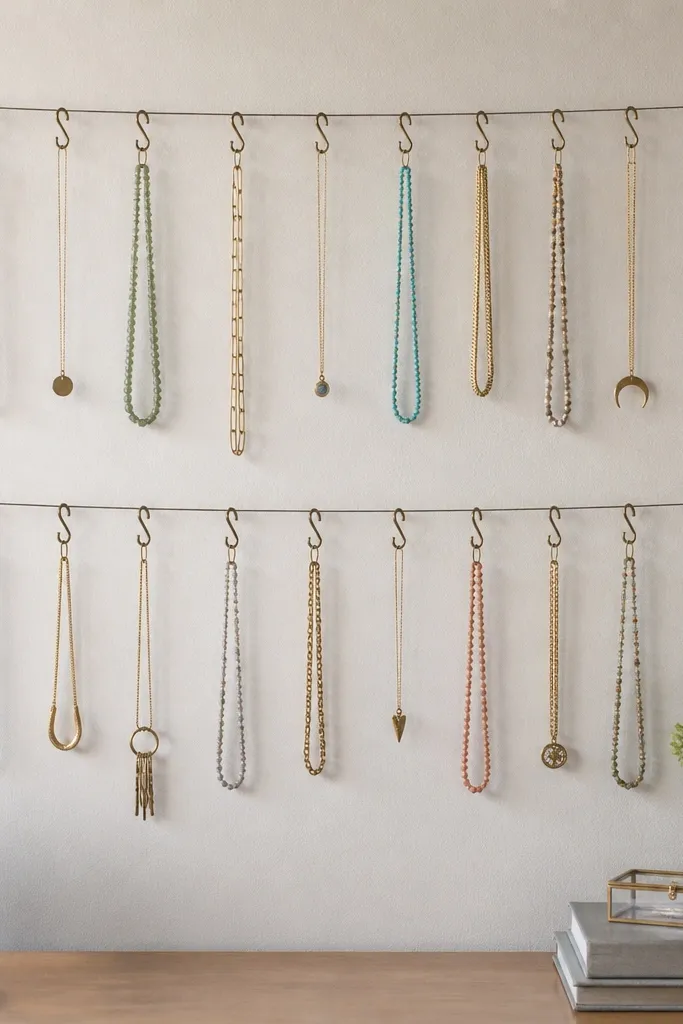
Wires make a clean "line" look and they don't take much space. I use resin-coated wire so it doesn't feel sharp and so chains don't snag. S-hooks let you adjust lengths - you can shorten a necklace for daily wear and move it to the side when you're not using it. The visual is airy, which matters if your wall space is tight.
Install two sturdy wall anchors 6 to 8 inches apart vertically, then run resin-coated picture wire between them. Add small S-hooks spaced every 3 inches along the wire. For heavier pieces, clip to the lower wire and keep the upper wire for lighter chains. Use a level and measure from the floor so the lines stay straight.
Pro tipAttach a tiny label tag to each hook group (like "work," "weekend") so you don't move pieces back and forth.
AvoidAvoid thin bare wire - it bends, and chains catch on frayed edges.
6. Hinged jewelry cabinet door organizer with pocket lining

This is the "I want everything in one place" build. The pockets are perfect for earrings, bracelets, and small charm sets, and the hinge door makes it feel like a real cabinet. I line the pockets with felt so metal doesn't scrape and so pieces don't rattle. Clear sleeves on top let you see what's in each pocket without dumping everything.
Use a cabinet door about 18 inches wide. Attach a fabric organizer panel back-to-back with felt lining - cut pockets in 4x4 inch squares for earrings and 4x7 inch for bracelets. Use a heavy-duty hook and hinge hardware so the door swings open smoothly. Add a row of small hooks on the inside top edge for pendant necklaces.
Pro tipMake the pockets slightly deeper than you think - 1.5 inches extra depth stops pieces from sliding out when the door swings.
AvoidSkip thin unlined fabric - it stretches and turns the pockets into a floppy mess.
7. Pegboard + clear acrylic earring bar for stud pairs
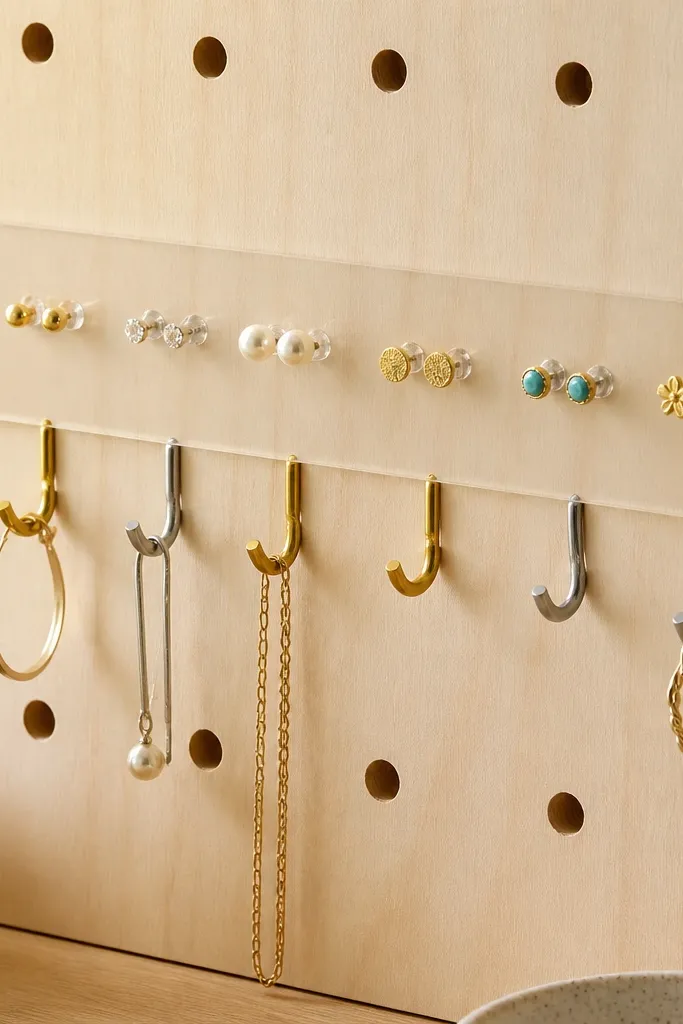
Stud earrings disappear in drawers. This setup makes them visible and separated by pair. The clear acrylic bar keeps earrings aligned and gives a clean modern look. I like using tiny pegs because they hold posts without bending them. Below the bar, I add a couple peg rows for hoops and short necklaces.
Mount a 12x20 inch pegboard. Paint it warm white and seal. Cut a clear acrylic strip about 18 inches long and mount it with spacers so it sits 1/2 inch above the pegboard. Screw in small acrylic or metal stud holders evenly across the bar. Use a mix of hook sizes below for different necklace lengths.
Pro tipSort by metal tone on separate sides of the pegboard (silver on left, gold on right) - it speeds up outfit matching.
AvoidDon't place clear acrylic too close to metal hooks - it scratches fast.
8. Macramé necklace ladder with dowel top and bead ends
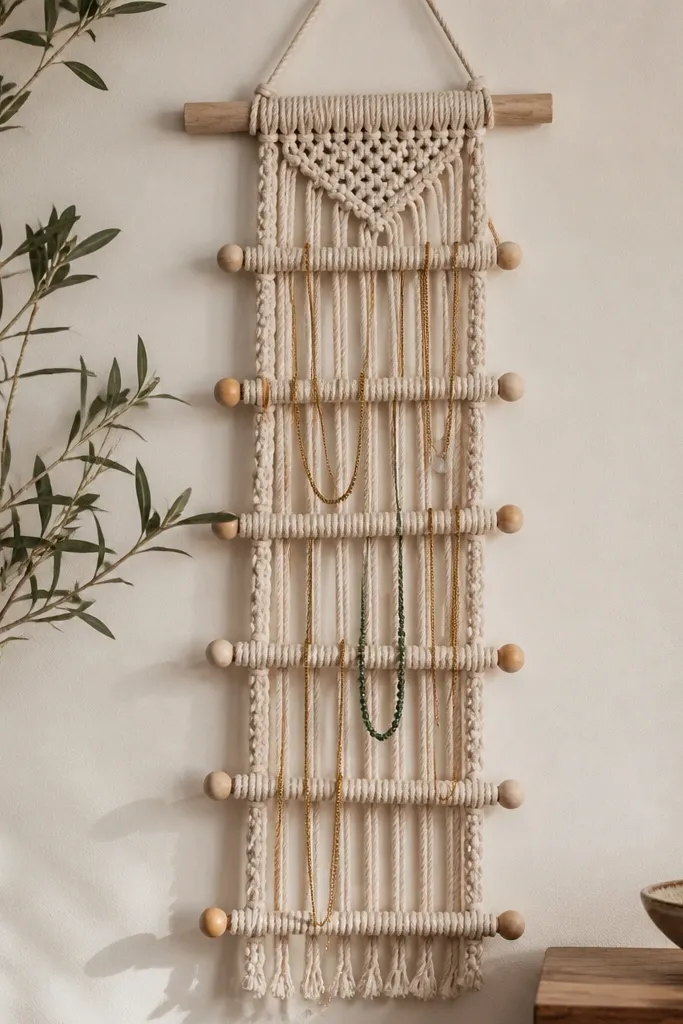
This is the softest-looking option and it's surprisingly practical. The rope ladder creates natural separation so chains don't braid into each other. I use it for layered necklaces and delicate chains because the rope doesn't have sharp edges. The bead ends also keep the ladder from twisting when you hang heavier pieces.
Buy or make a macramé ladder panel sized about 22 inches tall. Attach it to a 24 inch dowel using strong knots and a ceiling hook. Add small wooden beads at the ends of each rung and keep spacing around 4 inches between rungs. Hang it from a single hook bracket so it stays centered.
Pro tipDrape necklaces over rungs in order from shortest to longest - it prevents the long ones from falling behind.
AvoidAvoid knot spacing that's too tight - it tangles chains when you move around.
9. Leatherette strap organizer with snap-on compartments
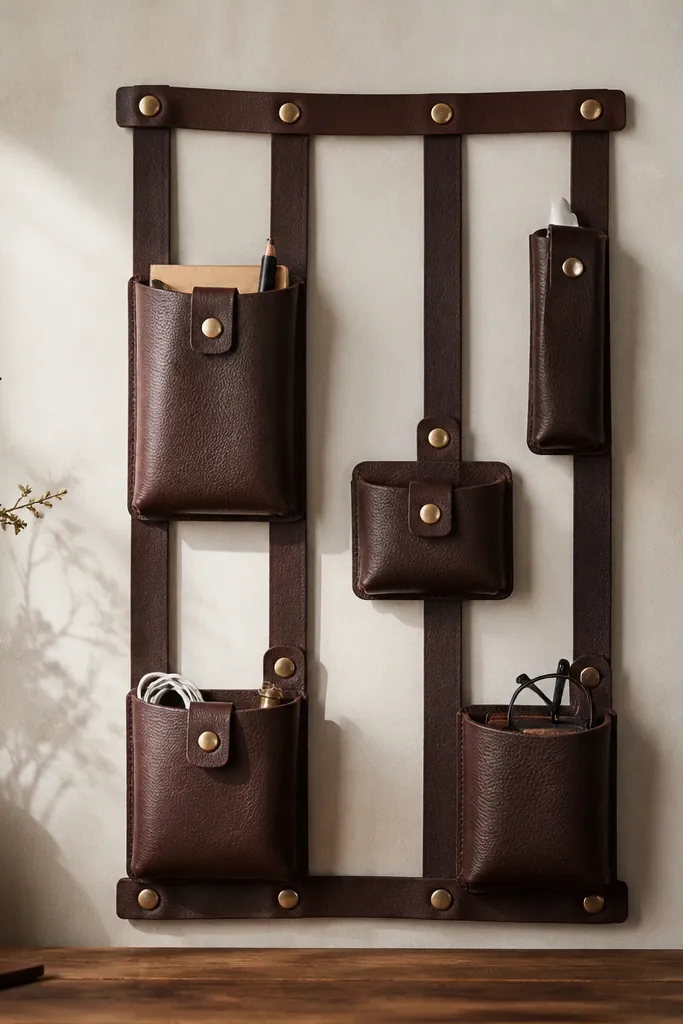
If you like a sleek, grown-up look, leatherette straps hit the mark. Snapped compartments let you swap seasonal pieces without rebuilding the whole organizer. I use suede-like lining inside each pouch so earrings don't scuff. The straps also prevent chains from sliding off because they create a defined drop path.
Cut two vertical straps (about 1.5 inches wide) and mount them to a backing board or directly to a wall. Add snap buttons every 3 to 4 inches for compartments. Make small pouches from leatherette with a soft lining, sized 3x4 inches for studs and 4x6 for bracelets. Use brass snaps for a warm tone and hang the unit from two screws.
Pro tipUse a fabric pen to mark snap positions on a test strap first, then transfer the spacing to the final piece.
AvoidDon't skip lining - metal on leatherette looks scratched within a month.
10. Clear shoe organizer turned sideways for earrings and bangles
This sounds too simple, but it's one of the fastest ways to get a year round hanging jewelry organizer without tools. The clear compartments let you see everything at a glance, and the plastic keeps the shape even when you add weight. I like it for earrings and bangles because each slot is consistent. It also looks clean because the compartments match.
Hang the organizer sideways so the deeper compartments hold bangles and bracelets. Use two wall hooks or a single tension rod bracket at the top so it doesn't sag. Add small adhesive felt dots at the bottom of each compartment so pieces don't clack. For earrings, use small paper dividers inside the compartments to separate pairs.
Pro tipLabel the top edge with painter's tape and a fine marker so you can rotate seasonal jewelry in minutes.
AvoidAvoid hanging it with one point only - the plastic bows and earrings end up at the bottom.
11. Shallow drawer pull bar with mini hanging bins
Drawer pulls make hooks that look intentional and sturdy. The mini bins catch rings and tiny pieces that otherwise roll around. I use this when I have lots of small items like charm bracelets, hair jewelry, and statement studs. The bins keep everything contained while the hooks handle necklaces and chains.
Use a 10x30 inch board. Mount drawer pulls evenly along the top, then hang small metal bins from the pulls using jump rings or small clips. Space hooks about 3 inches apart for necklaces, and keep bins closer together since rings are lighter. Finish the board with satin paint and seal it so it wipes clean.
Pro tipAttach a thin strip of felt to the back of the board so bins don't rattle against the wall.
AvoidDon't use cheap plastic bins - they crack and look off-color fast.
12. Wall-mounted umbrella stand with rotating earring trays
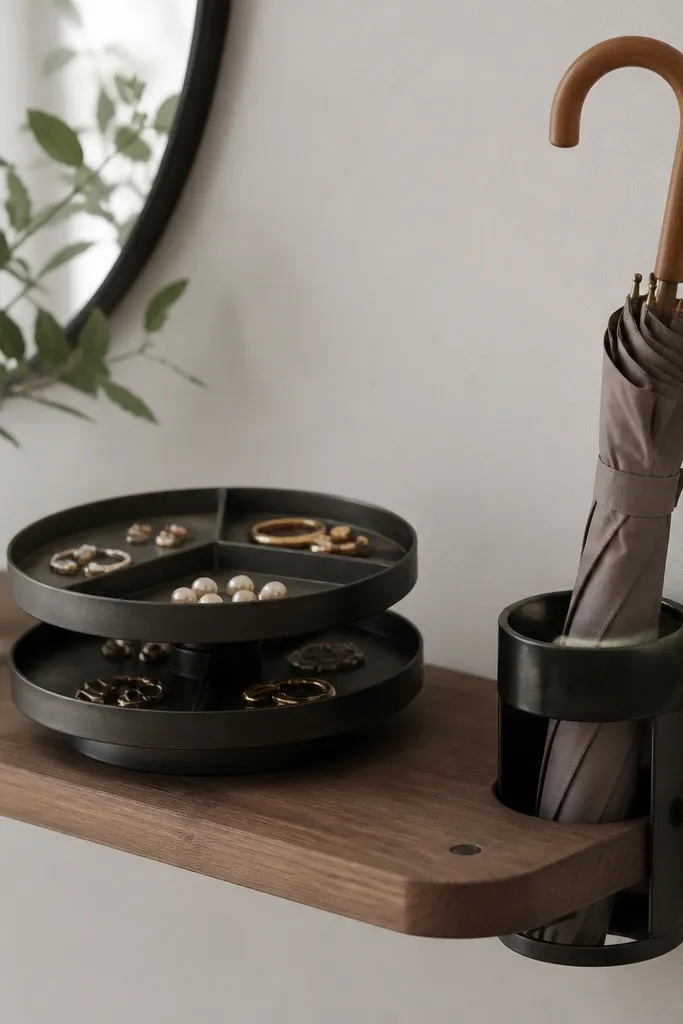
This is my "functional but still cute" option. The stand keeps it upright and the rotating insert means you don't dig - you spin to find what you want. Shallow trays stop studs from mixing, and the metal stand holds heavier bracelets. It looks like a decor object, not a craft project.
Mount a small umbrella stand (about 8 inches wide) to a wall shelf using two screws into studs. Add a lazy Susan insert or a rotating cake stand top inside. Place three to four shallow trays on top - one for studs, one for hoops, one for rings. Keep trays snug so nothing slides when you spin.
Pro tipUse felt on the bottom of each tray so earrings don't move when you rotate.
AvoidSkip deep trays - they turn into a pile and you lose pairs.
13. Wine rack with hanging chain loops and ring dish bottom
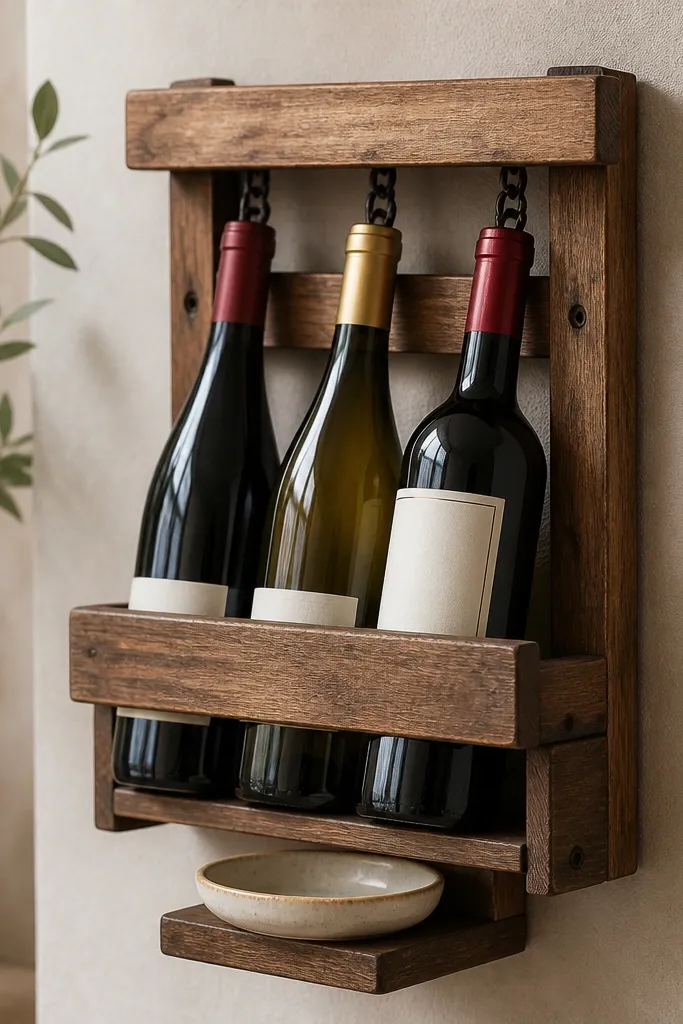
A wine rack layout is already designed for spacing, and that helps with necklaces. I add chain loops under the top slats so layered necklaces hang in separate arcs. The bottom ceramic dish holds rings and keeps them from getting lost. The wood warms up the look and makes gold jewelry look extra clean.
Use a small 12x18 inch wine rack. Mount it with two wall anchors at the top. Screw in small eye bolts under the top slats and attach chain loops with jump rings. Put a ceramic dish centered at the bottom, and add a thin felt pad under it so it doesn't scrape.
Pro tipUse two loop lengths: one for 16-18 inch necklaces and one for 20-24 inch so they hang at different heights.
AvoidAvoid leaving the wood raw - it holds oils and fingerprints from frequent handling.
14. Brass picture ledge with pegboard inserts for necklaces
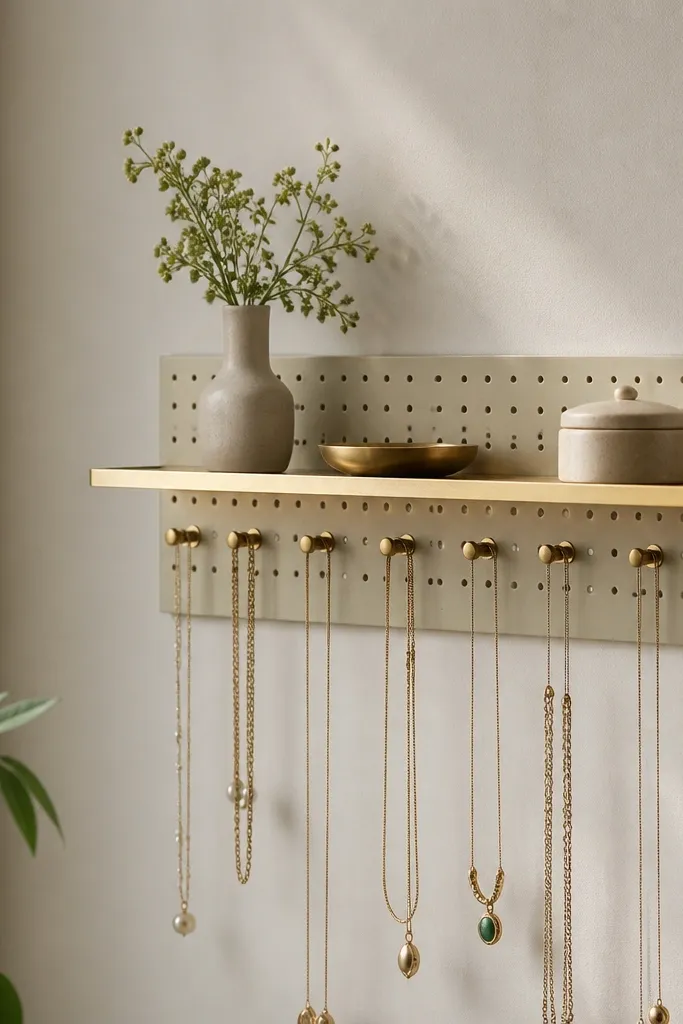
This gives you a "gallery wall" feel without the fuss. The brass ledge catches light and keeps the top edge clean, while the pegboard insert gives you hook adjustability. I use it when I want a small organizer that still holds a lot of pieces. It's also great for mixing necklace lengths because peg holes let you move hooks as your collection changes.
Mount a slim brass ledge (about 20 inches long). Behind it, mount a small pegboard insert about 10x16 inches. Paint the pegboard the same color as the wall or leave it neutral, then add hooks. Use a short dowel or bar at the very bottom for bracelets if you want extra order.
Pro tipMark hook positions with painter's tape before you drill so your necklaces hang in evenly spaced rows.
AvoidDon't mount the pegboard too low - necklaces drag and collect dust on the ledge.
15. Clear acrylic keychain organizer with magnet clips for earrings
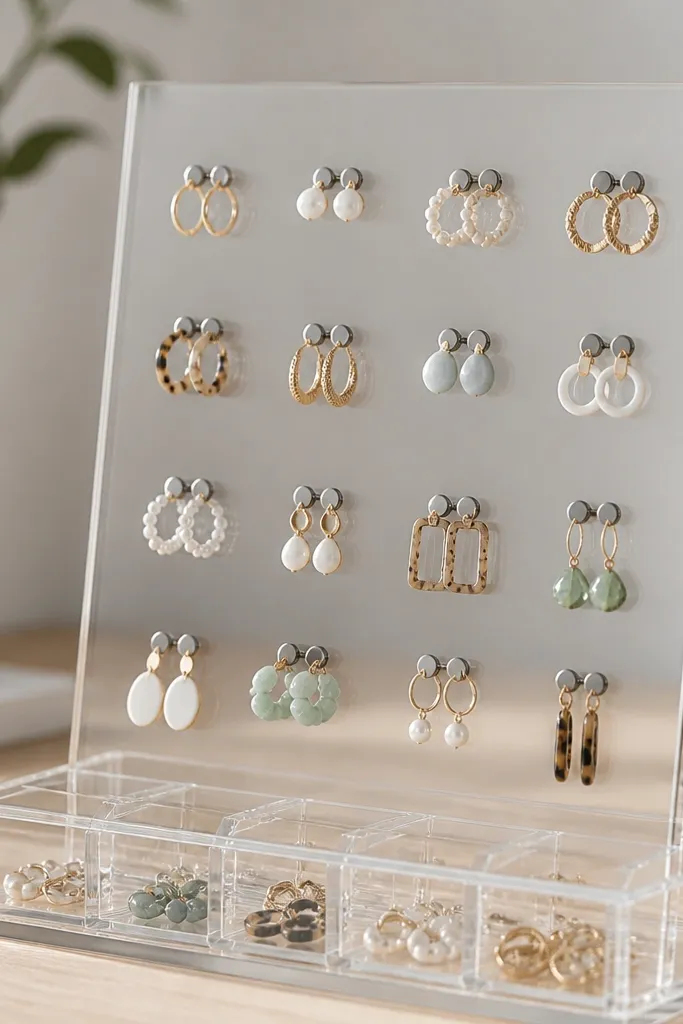
Magnet clips keep earrings flat and aligned, and the clear acrylic makes the whole thing look like display hardware. I use this for lightweight earrings and for sets that I want to see quickly. The panel style stops pairs from mixing because each clip holds one earring. It's also easy to wipe down since it's fully smooth.
Use a clear acrylic keychain organizer panel with multiple rows. Attach small neodymium magnet clips or magnet-backed earring holders along the rows. Keep clips about 2 inches apart for studs and 2.5 inches for drops. Hang the panel with two picture hooks so it stays straight.
Pro tipStick a thin foam strip behind the magnets so they don't scratch the acrylic.
AvoidAvoid using it for heavy statement earrings - magnets lose grip and items slide.
16. Fabric roll-up travel organizer that hangs on a hook
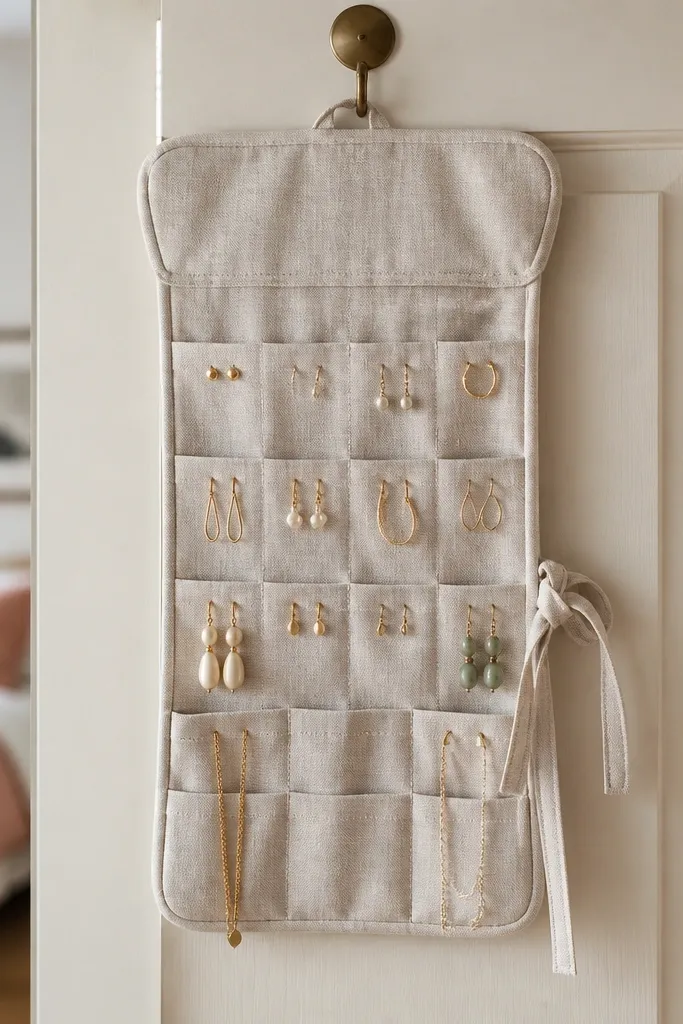
This is the one I use when I'm constantly switching jewelry for events. Roll-up organizers take up almost no space and they look neat because the fabric keeps everything contained. I prefer a cotton canvas outer with a non-slip lining so it doesn't flop. The pockets are great for earrings, small pendants, and mini charm bracelets.
Sew or buy a fabric organizer with at least 8 pockets. Add a tie strap so it rolls tight, then hang it on a command hook inside your closet door. Use small elastic loops inside pockets for chain ends so they don't snag. Keep the heaviest pieces in the center pockets where the roll is thickest.
Pro tipUse a small fabric label by each pocket for quick swaps like "summer," "work," "wedding guest."
AvoidSkip slippery lining - it makes the roll loosen and your pieces shift every time you open the door.
17. Wall shelf with peg strip and tiny glass jars
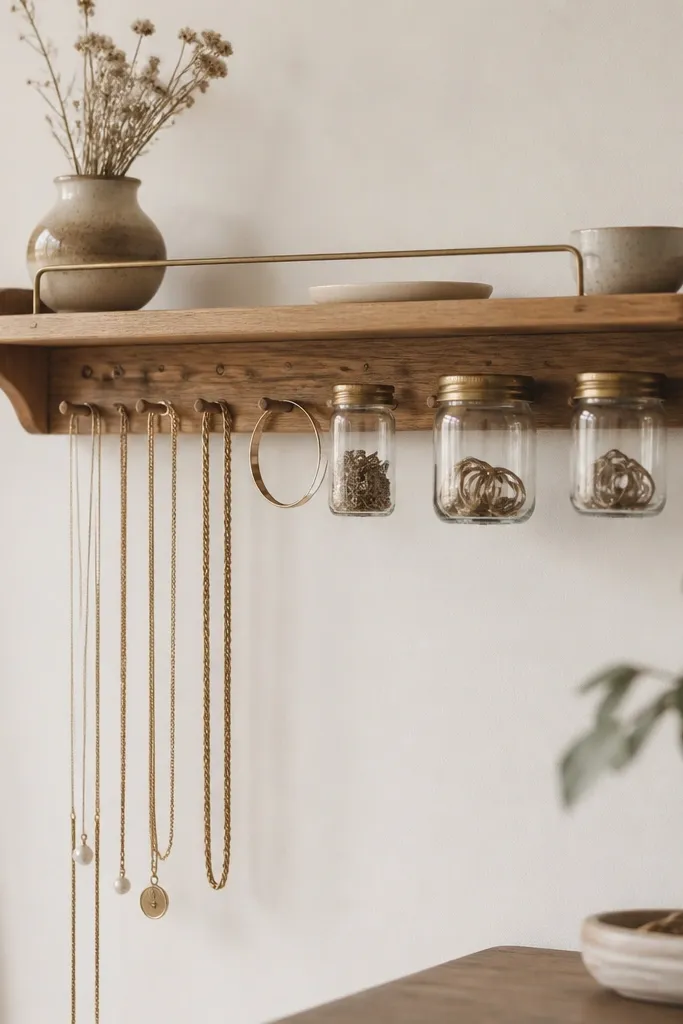
Glass jars make rings look like you're styling a store display. The peg strip holds necklaces and hoops, and the jars keep tiny pieces from scattering. I like using two jar sizes so you separate studs from ring clusters. The shelf also gives you a place for a lint-free cloth so you can wipe jewelry before you wear it.
Mount a narrow shelf about 6 inches deep. Under it, attach a peg strip with small hooks spaced 2.5 inches apart. Place 3 to 5 glass jars on top or mount them under the shelf with brackets. Use felt pads under jars to prevent clinking and scratches.
Pro tipAdd a small piece of museum wax or anti-tarnish strip inside jars for silver pieces.
AvoidAvoid open jars without pads - metal-on-glass noise is loud and pieces drift.
18. Shutter panel with ribbon ties for long necklaces
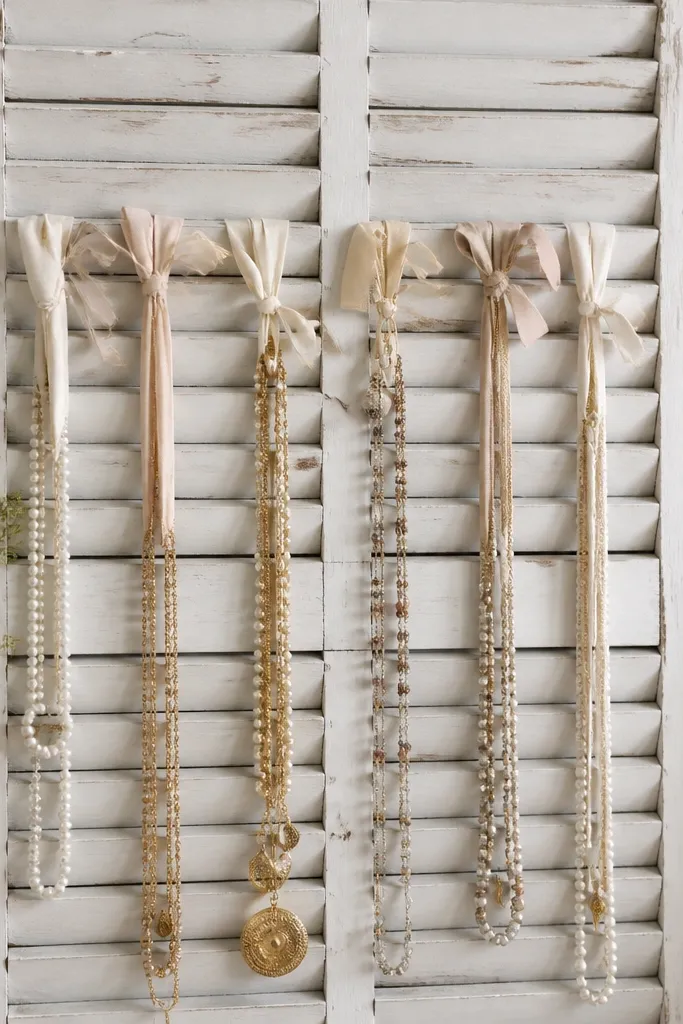
Ribbon ties give you control over length and placement. I use this for long necklaces that like to coil - tying them to a ribbon lane keeps them from braiding. The shutter slats create natural vertical spacing, and the white paint makes everything look crisp. This setup also makes it easy to rotate pieces by season without losing order.
Use a small shutter panel about 18 inches wide. Paint with white satin and lightly distress edges if you want a worn look. Tie ribbons vertically across the slats with knots, leaving about 3 inches between ribbon lanes. Secure ribbon ends to the back so knots don't snag chains.
Pro tipUse thin grosgrain ribbon - it grips chain links better than slippery satin.
AvoidDon't tie ribbons too tight - tight loops pinch delicate chains and leave marks.
19. Metal mesh panel with mini clips for layered necklaces
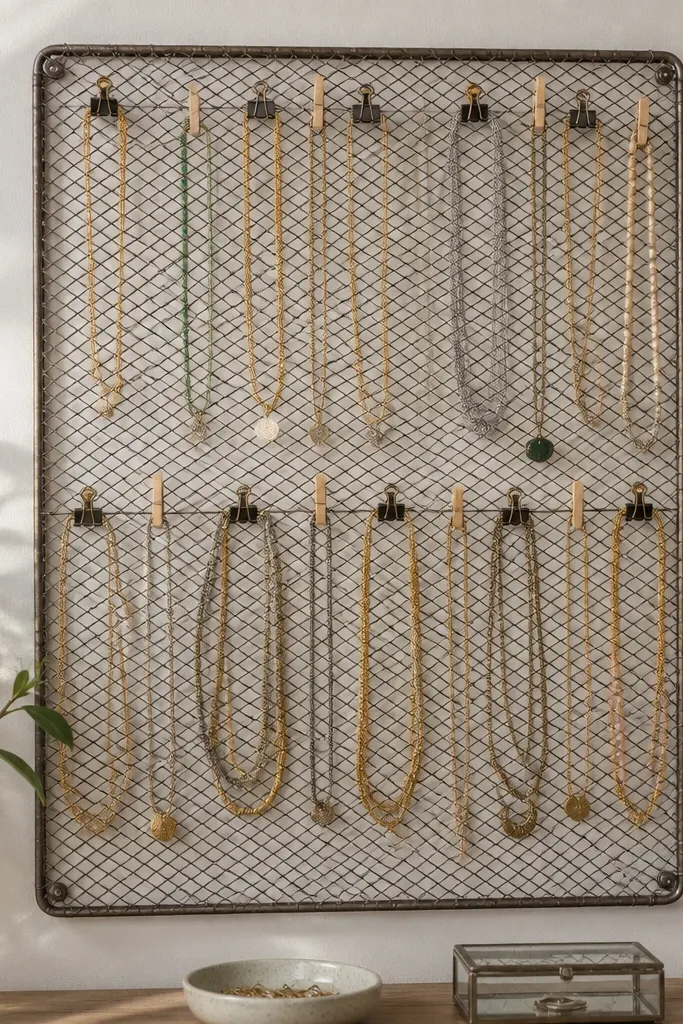
Metal mesh is hard-wearing, and it keeps chains from drifting into each other. Mini clips act like dividers, so each necklace stays in its lane even if you bump it. I like this for statement chains and mixed lengths because the mesh gives multiple attachment points. It also looks industrial in a good way.
Cut or buy a metal mesh panel around 16x20 inches. Paint it matte black for contrast, then mount with two brackets. Attach small binder clips or mini clothespins across the mesh lines to hold necklace ends. Add a strip of felt on the bottom edge where chains rest.
Pro tipClip necklace ends, not the middle - the middle should hang free to avoid kinks.
AvoidAvoid shiny mesh without finishing - it catches light and makes the whole organizer look too harsh.
20. Wall-mounted ring tree with removable earring cards
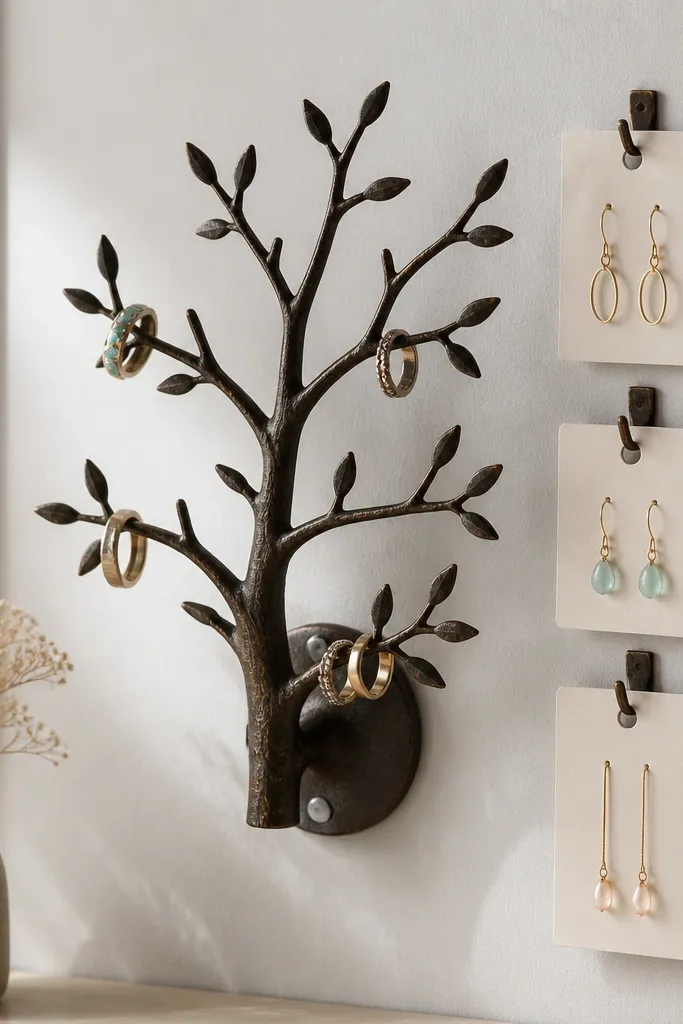
A ring tree is simple and it keeps rings from rolling, and removable earring cards solve the pair-matching problem. I use cardstock cards with clear laminate sleeves so they wipe clean. The cards clip on and off, which lets you swap what you wear most without reorganizing everything. It's clean, compact, and looks intentional on a bedroom wall.
Mount a ring tree (about 10-14 inches tall) using a wall anchor. Create earring cards sized 4x6 inches, laminate them, and punch holes at the top for binder clips. Clip cards to small hooks along the side of the ring tree. Keep the cards grouped by metal tone or style so pairs stay together.
Pro tipWrite directly on the laminate with a dry-erase marker for quick rotation, then wipe after.
AvoidDon't use loose cardstock without laminate - oils from fingers stain it fast.


