1. Tall Entry Wall Slat with Pull-Out Shoe Trays
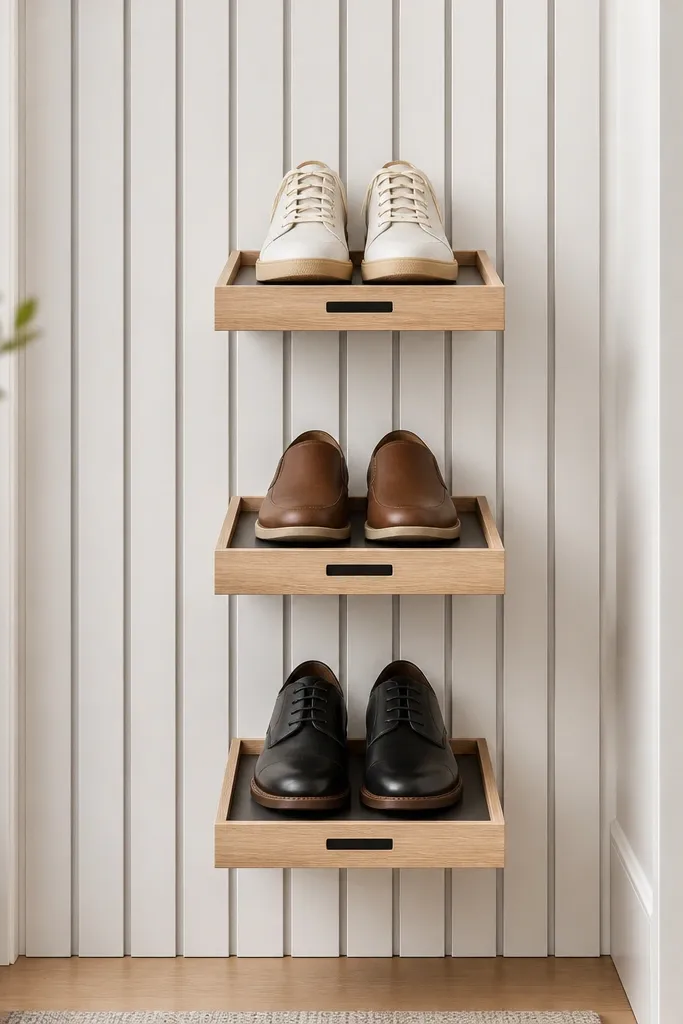
This setup looks tidy because every pair is visible in a controlled grid. The slats let you adjust tray heights, which matters in a tiny home where you might own both low sneakers and mid boots. I used shallow trays so the unit doesn't crowd the hallway, and the open front keeps shoes from turning into a closed, smelly box. Matte white slats also hide scuffs better than glossy paint.
I built 3 trays that are 18 inches wide and 6 inches deep, with 1/2-inch-thick oak edging. The trays slide on low-profile drawer slides mounted to the wall slats. Space the tray bottoms about 7 inches apart for sneakers, then add a 10- to 12-inch gap for boots. Use a satin clear coat over the oak so it wipes clean.
Pro tipMake the tray lip slightly higher (about 3/4 inch) so shoes don't creep forward when you pull the tray out.
AvoidAvoid closed-in trays without gaps - they trap moisture and make the unit smell like damp cardboard.
2. 4-Inch Deep Under-Shelf Wire Basket Line
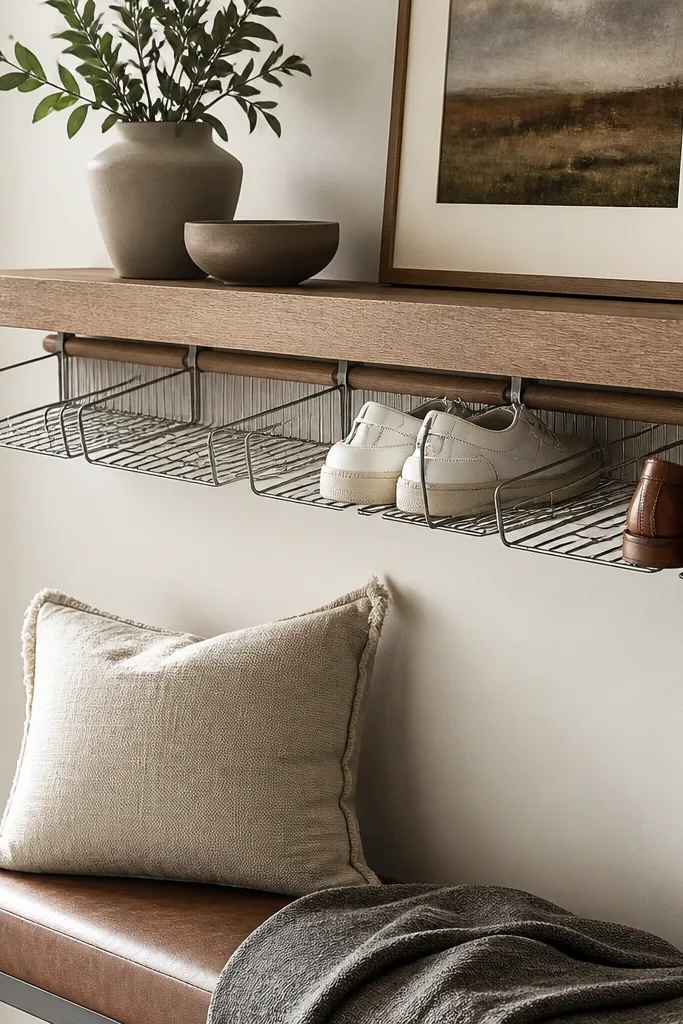
This is the "I need it off the floor but I don't want a bulky organizer" option. Wire baskets let air move around shoes, so wet soles dry faster than they do in plastic. The shallow depth keeps the storage from bumping your knees when you sit. It looks clean because the baskets line up under one shelf, like built-in furniture.
Mount a shelf at about 16 inches from the floor, then attach wire baskets underneath using a simple L-bracket or the basket's mounting rail. Choose baskets 4 to 5 inches deep and match them in width so you get a uniform line. I used baskets with open wire sides so the shoes don't look boxed in. Paint the mounting shelf the same color as your wall for a seamless look.
Pro tipUse a small silicone mat or thin rubber shelf liner in each basket so soles don't slide and scuff the wire.
AvoidSkip thick carpet scraps under the baskets - they hold moisture and turn into a smell source.
3. Slanted Shoe Bench Insert with Drain Tray
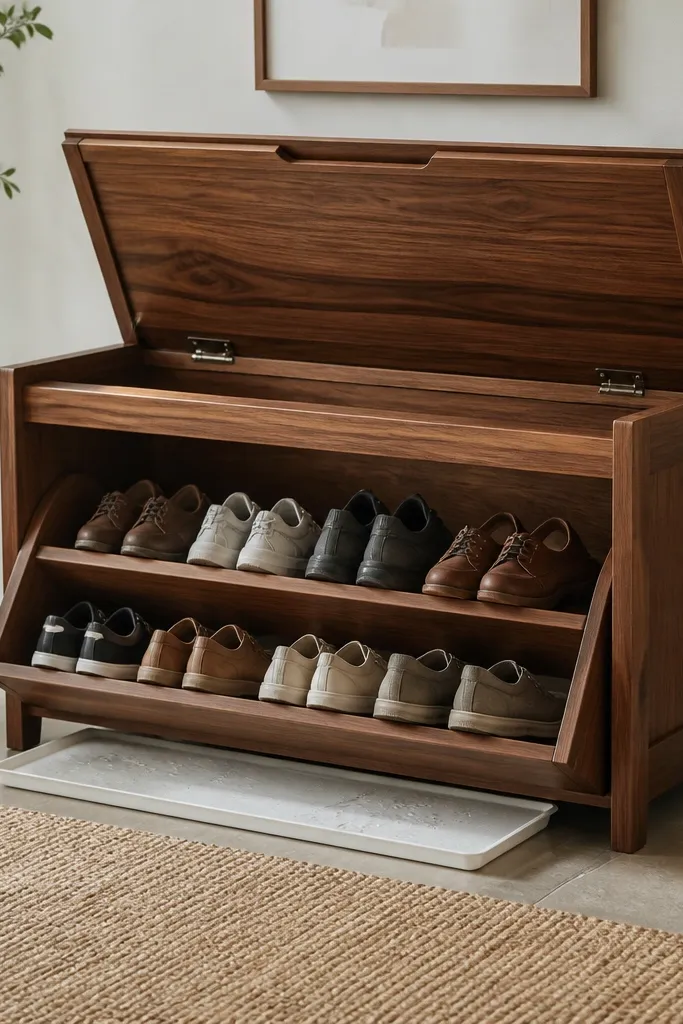
Wet shoes are where tiny homes get messy fast, and this bench insert solves that. The slanted surface helps water run toward the bottom instead of pooling around the toe. I like it because it hides the storage from view when the bench is closed, so the entry looks calm. You also get a dedicated staging area for shoes that need to dry overnight.
Build a base insert that's 28 inches long and 10 inches deep, with a 10-degree slant from back to front. The bottom edge holds a removable drain tray that's 2 inches deep, sized to the insert's width. Use exterior plywood sealed with polyurethane so it wipes clean. Place the shoes toe-forward so they don't slide down the slope.
Pro tipAdd a small hook inside the bench lid for wet laces or a microfiber towel so you dry the quick stuff immediately.
AvoidDon't skip sealing the wood - untreated plywood stains and warps from repeated damp use.
4. Pegboard Shoe Wall with Adjustable Peg Hooks
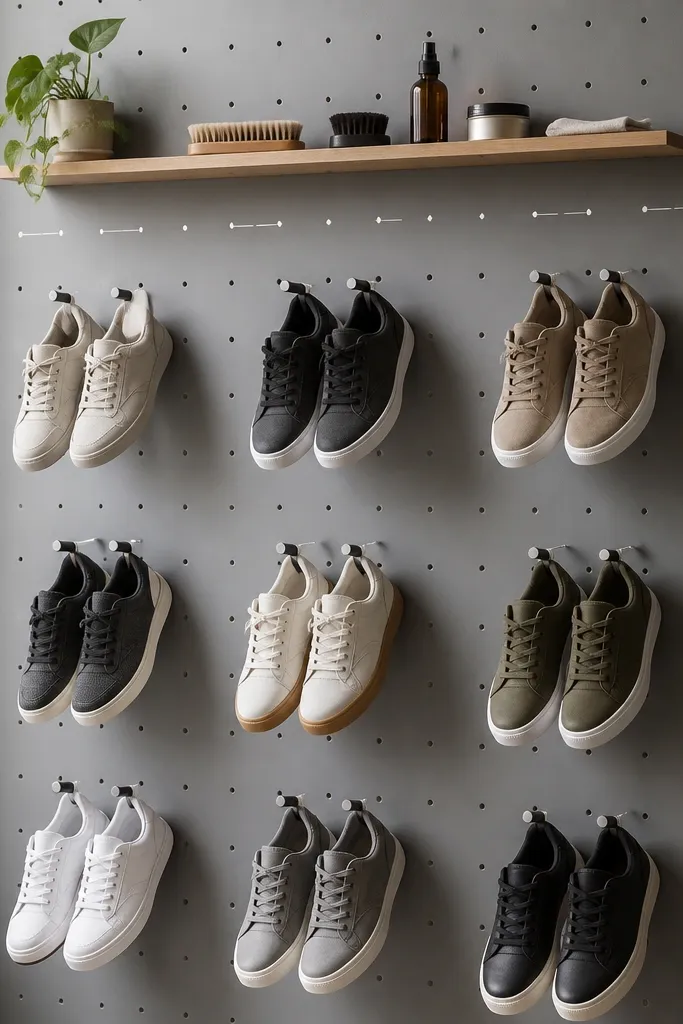
Pegboard storage looks intentionally "designed" because everything sits on a grid. I used hooks to hold shoes by the heel so the sole faces outward for faster drying. Adjustable hooks let you keep spacing consistent even when your shoe sizes change. It also makes it easy to grab a pair without moving other shoes.
Use 1/4-inch pegboard mounted to studs, then add hooks in two rows. Keep the hook height so the shoe sole stays 1 to 2 inches above the floor. I spaced hook centers 6 inches apart for sneakers and used wider spacing for boots by swapping in larger hooks. Paint the pegboard in a matte color that matches your walls, then seal the surface with a clear matte coat.
Pro tipMark a simple layout with a pencil outline for each shoe type so you can reset the wall in under a minute.
AvoidAvoid mounting pegboard to drywall only - the hooks rip out after repeated weight.
5. Door-Swing Over-the-Door Shoe Organizer with Fabric Pockets
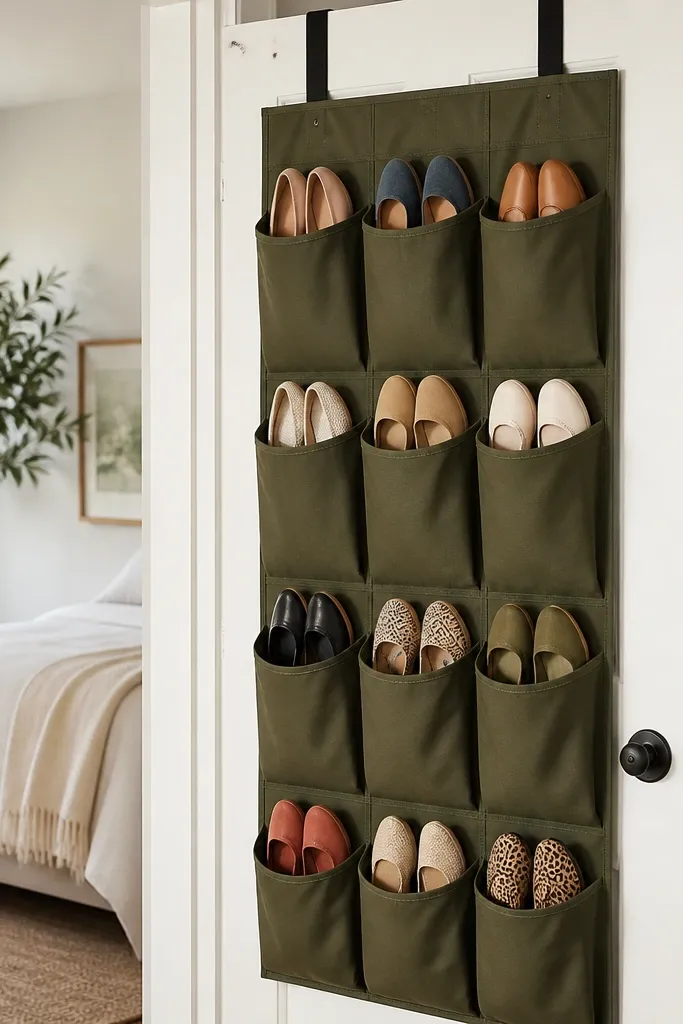
This is the fastest fix when you need storage today and you don't want tools. Fabric pockets are flexible, so you can fit different shoe shapes without forcing them. I used it for flats, slides, and indoor slippers where airflow is still decent. The look is clean because the pockets are uniform and the door keeps them out of sight.
Hang the organizer on the inside of the door at about knee height so shoes are easy to grab. Use reinforced pockets and keep the bottom row for smaller shoes so they don't stretch the fabric. I set it so the pockets align with the door's top trim, which makes the whole thing feel intentional. If your door has a thick frame, add felt pads under the hanging hooks to prevent wobble.
Pro tipPut a small washable mat under the door handle area so any shoe that slips out doesn't scuff your floor.
AvoidSkip thin pocket organizers that sag - damp shoes drag down the fabric and look messy fast.
6. Corner Vertical Boot Rack with 2x2 Frame
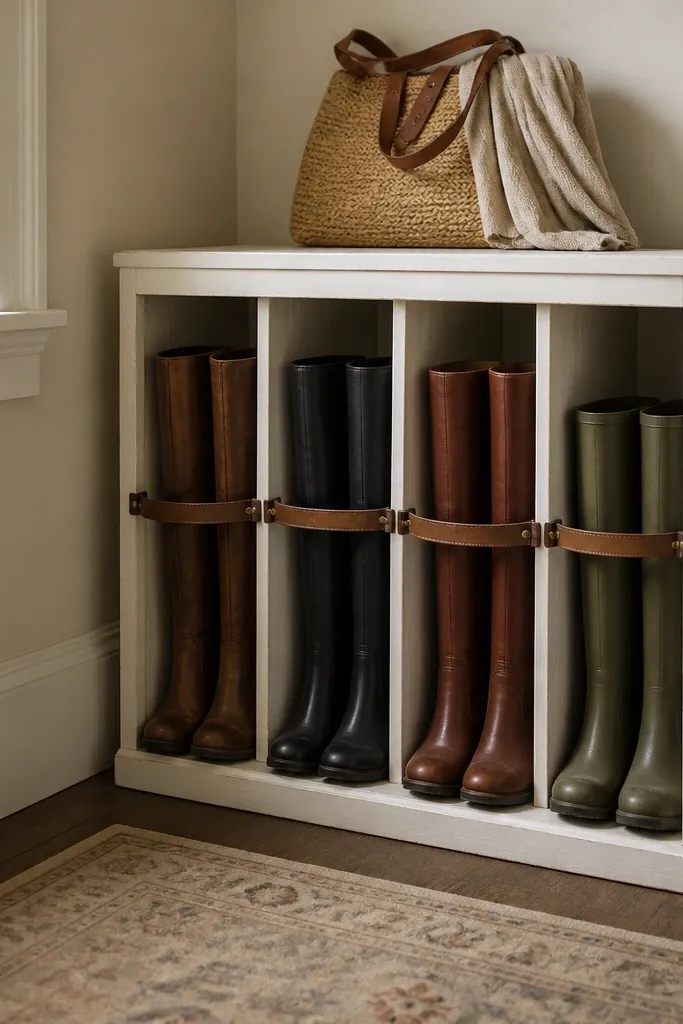
Corners are where tiny homes hide dead space, and a vertical rack uses it efficiently. Keeping boots upright prevents creases and keeps the shaft from collapsing. I like this design because it's sturdy without needing expensive metal systems. The off-white paint matches the wall and makes the rack feel built-in.
Build a frame from 2x2 lumber or 1.5-inch square stock, anchored to studs. Create dividers every 8 inches so boots don't rub. Leave 14 inches of vertical clearance for tall boots, and 10 inches for mid boots. Add a strap loop at the top of each divider using webbing so the boot stays straight.
Pro tipCut small felt pads for the divider edges where boot shafts touch so leather doesn't scuff.
AvoidAvoid thin dividers without padding - boot shafts wear through and the rack looks stained.
7. Under-Bed Rolling Tray System for Seasonal Shoes
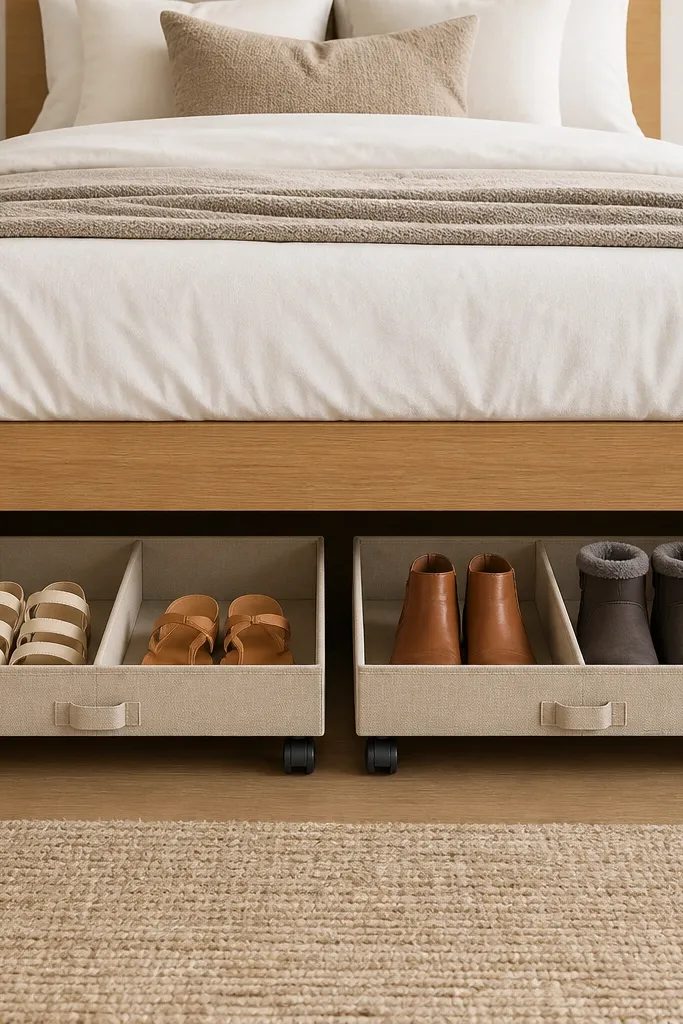
Under-bed storage is where I stash shoes I don't need daily, and rolling trays keep it from turning into a digging mess. The tray edges keep shoes aligned and stop them from sliding into the back. I used fabric dividers to prevent scuffs while still letting air move. It looks neat because each tray has a lid or a fabric cover.
Measure the clearance under your bed - I aimed for at least 4 inches of usable height. Use shallow rolling trays with casters rated for 50 pounds. Add removable dividers that are 2 inches thick foam covered in cotton so they don't scrape. Label the tray front with a piece of painter's tape, then swap to a permanent label once you confirm what fits.
Pro tipStore boots with the toe up and the heel supported by a rolled towel so the shape doesn't crush.
AvoidAvoid storing shoes directly on bare wood - friction scuffs and damp spots stain.
8. Woven Basket Stack with Removable Liners
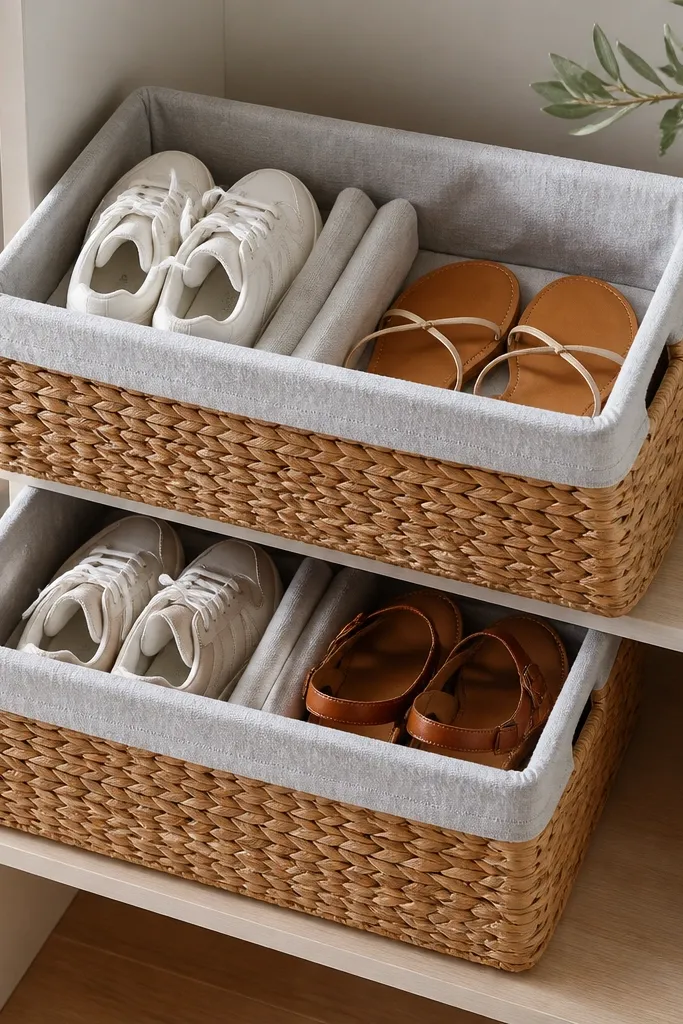
Woven baskets hide clutter without looking like plastic bins. Removable liners are the trick because you can wash or replace them when shoes get muddy. I used this for indoor shoes and gym pairs that don't stay wet for long. The texture looks warm in a tiny home, and the stack keeps the footprint small.
Choose baskets with flat bottoms and lids if you want less dust. Insert liners made from canvas or sturdy cotton in a light color that shows dirt early. Keep only one pair per basket to avoid squishing and to keep the liner from getting stretched. Place the stack on a shelf at about 12 inches high so you can grab without bending too far.
Pro tipAdd a thin layer of cedar sachet or a small charcoal pouch inside the liner pocket for odor control.
AvoidSkip soft baskets that collapse - they make shoes look messy and pairs end up mixed.
9. Magnetic Spice-Rack Rails for Shoe Accessories and Small Pairs
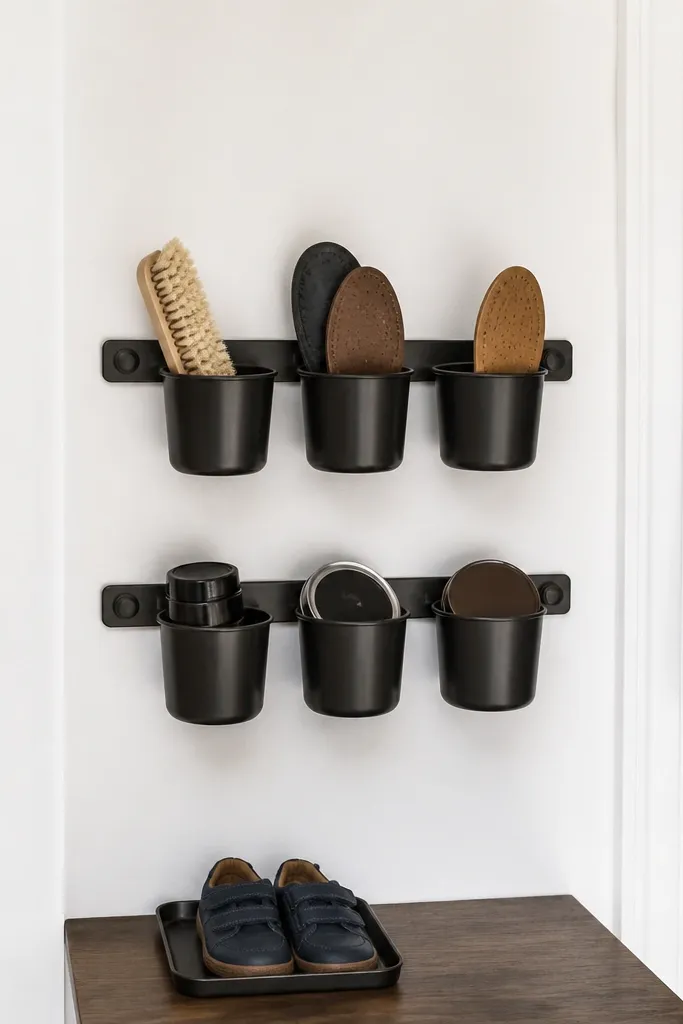
This one is for the stuff that causes chaos: insoles, brushes, extra laces, and tiny shoes. When those items live on the floor or bench, your shoe area looks cluttered even if your footwear is stored. I mounted small metal rails and used the cups for quick-grab accessories. It makes the whole shoe zone look organized and intentional.
Use magnetic rails sized for small metal cups, then mount them on a wall panel next to the entry. Keep cups shallow - 2 to 3 inches deep - so you can grab without knocking everything. I used a small tray shelf under the rails for kids' sandals or spare slippers, aligned with the door opening for easy access. Paint the wall panel the same color as the wall so the hardware fades.
Pro tipLabel cups with tiny pieces of painter's tape first, then commit when you're sure where each item belongs.
AvoidDon't mount on painted drywall with weak magnets - a full cup pulls off and leaves a scuff.
10. DIY PVC Pipe Shoe Holders on a Painted Backboard
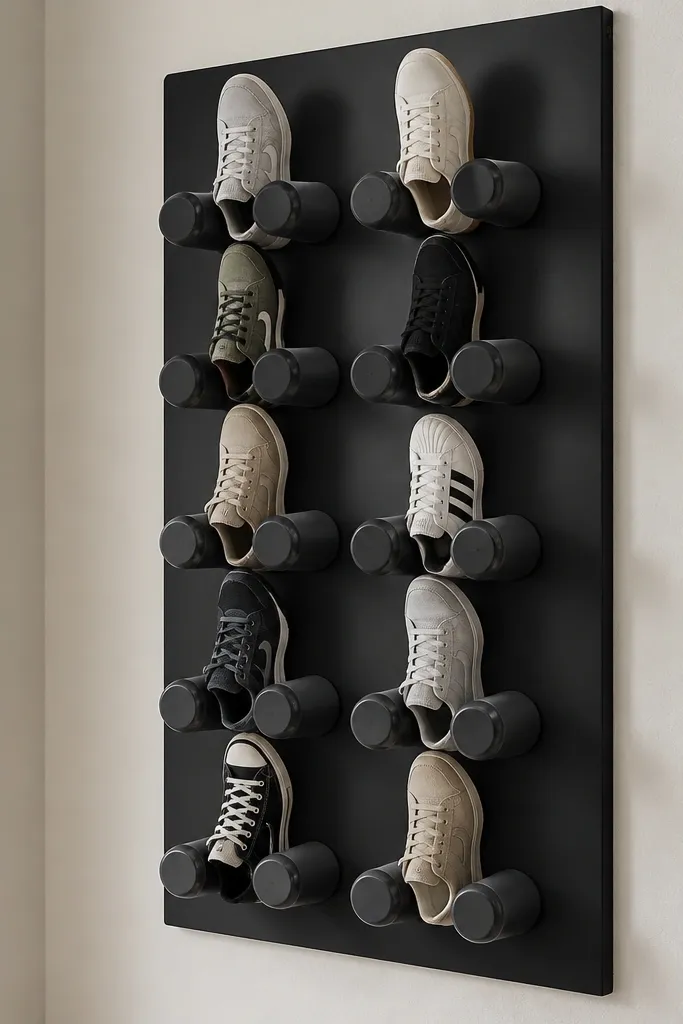
PVC pipe holders sound weird until you see how cleanly sneakers stand. The toe-in design stops shoes from tipping over, and the upright position keeps them off the floor. I used a backboard so the system looks like furniture instead of random plumbing parts. The matte black finish makes the pipes blend into a modern, industrial look.
Cut PVC into 5-inch lengths for sneakers, then cap the bottom with end caps. Glue the pipes to a plywood backboard using PVC cement, then drill ventilation holes if you store damp shoes. Paint the backboard matte black and leave the PVC unpainted or spray it in satin to match. Arrange pipes in columns with 4 to 5 inches between centers so shoes don't rub.
Pro tipWrap the inside rim of each pipe with a thin strip of felt so leather and rubber don't scrape.
AvoidAvoid leaving sharp cut edges - they catch socks and make the whole build look rough.
11. Two-Tier Shelf with Front Lip for Slip-On Shoes
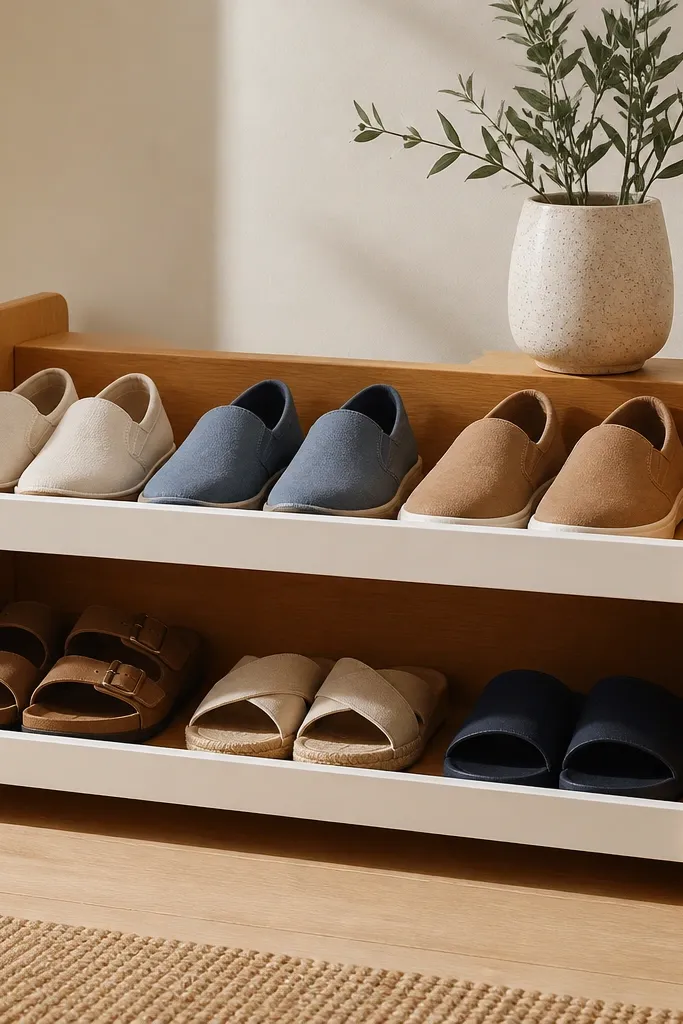
Slip-ons and sandals slide around if there's nothing to stop them, and that's where the front lip matters. I built this shelf so the shoes sit behind a 1-inch lip, which keeps them aligned even when the tiny home gets chaotic. Two tiers keeps the height low and the look clean. It also makes daily pairs easy to grab without opening anything.
Make a shelf unit 24 inches wide and 8 inches deep. Add a 1-inch front lip using an attached strip of wood or a thin mitered frame. Keep the top tier height around 6 inches from the shelf surface for sandals and about 8 inches for loafers. Seal with a wipe-on finish so it handles shoe scuffs and dust.
Pro tipAdd a non-slip rubber strip to the shelf surface under the lip so sandals don't slide forward.
AvoidAvoid flat shelves without a lip - slip-ons end up in a pile within a week.
12. Clear Acrylic Shoe Cubes with Vent Slots
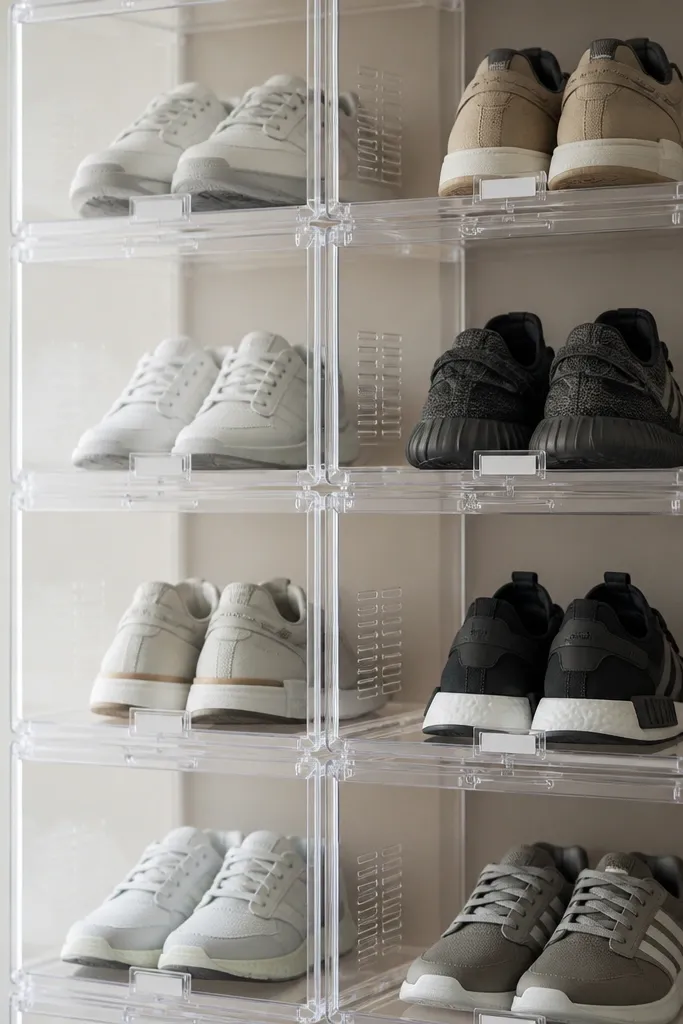
If you like seeing your shoes and you hate visual clutter, clear cubes are the answer, as long as you build in ventilation. Vent slots let air move, so shoes dry instead of staying damp in a sealed box. I liked the look because the cubes line up and create a gallery feel. It also keeps pairs from migrating into random spots because each cube has a dedicated spot.
Use acrylic panels pre-cut or cut with a maker-friendly jig, then assemble cubes with small drilled vent holes near the top. Size cubes for your biggest sneaker: I aimed for 10 inches wide and 6 inches deep per pair footprint. Add a removable label card holder made from thin acrylic strip so you can update seasonally. Mount cubes on a stud wall using standoffs so air can circulate behind them.
Pro tipWipe acrylic with microfiber and a little water-only cleaner so it stays clear and doesn't haze.
AvoidSkip fully sealed cubes - closed acrylic traps moisture and smells build fast.
13. Built-In Closet Side Panel with Peg + Bench Shelf Combo
This is the system I used when I had one narrow closet but no room for a big rack. The peg rail handles bags and hanging items, while the shelf stores the shoes I wear most. Keeping both on the same panel makes the closet feel intentional instead of cluttered. It also makes it easy to maintain because everything is in one zone.
Install a peg rail at about 60 inches from the floor, then add a shelf 12 inches high for shoe access. Use hooks that hold shoes by the heel without bending the sole. For the shelf, use 3 inches of depth for baskets and 6 inches for direct shoe placement. Paint the back panel a matte neutral and add a light wood shelf lip for contrast.
Pro tipPut the shoes you wear daily within arm reach of the shelf - mine are on the lower shelf to avoid bending.
AvoidAvoid stuffing the closet shelf full - crowded shelves make shoes look crushed and messy.
14. Shoe Rack Made from Pallet Wood with Slanted Top and Rope Tie
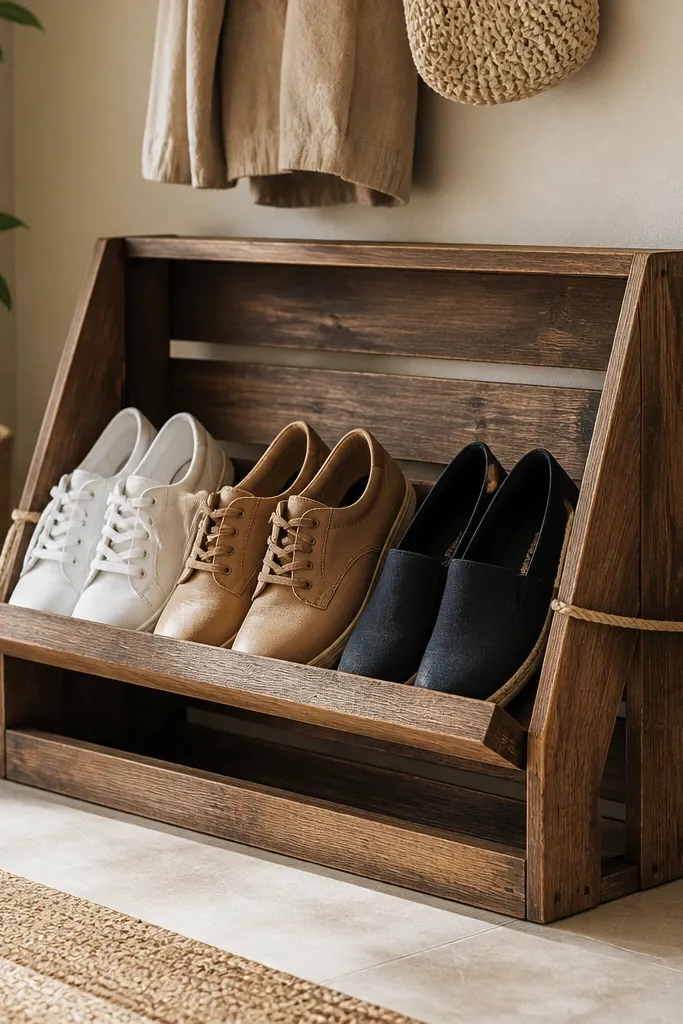
Pallet wood is rough, but when you sand it right and seal it, it gives you a sturdy, airy rack with a rustic look. The slanted top helps shoes sit better and encourages airflow. I used it as a bench-side rack for daily shoes because it looks good even with a little wear. The rope tie is practical - it keeps the rack from swinging if you move it.
Disassemble the pallet and use boards about 3/4-inch thick. Sand with 120 then 220 grit, then stain and seal with polyurethane. Build a frame that's 30 inches long and 10 inches deep, then tilt the top surface by 15 degrees. Add rope tie points at both ends using eye hooks so the rack holds position.
Pro tipDrill small drainage gaps in the slanted top so water doesn't sit in the wood grain.
AvoidAvoid using pallet wood without sealing - it stains floors and grabs dirt.
15. Stackable Fabric Drawer for Kids Shoes with Size Dividers
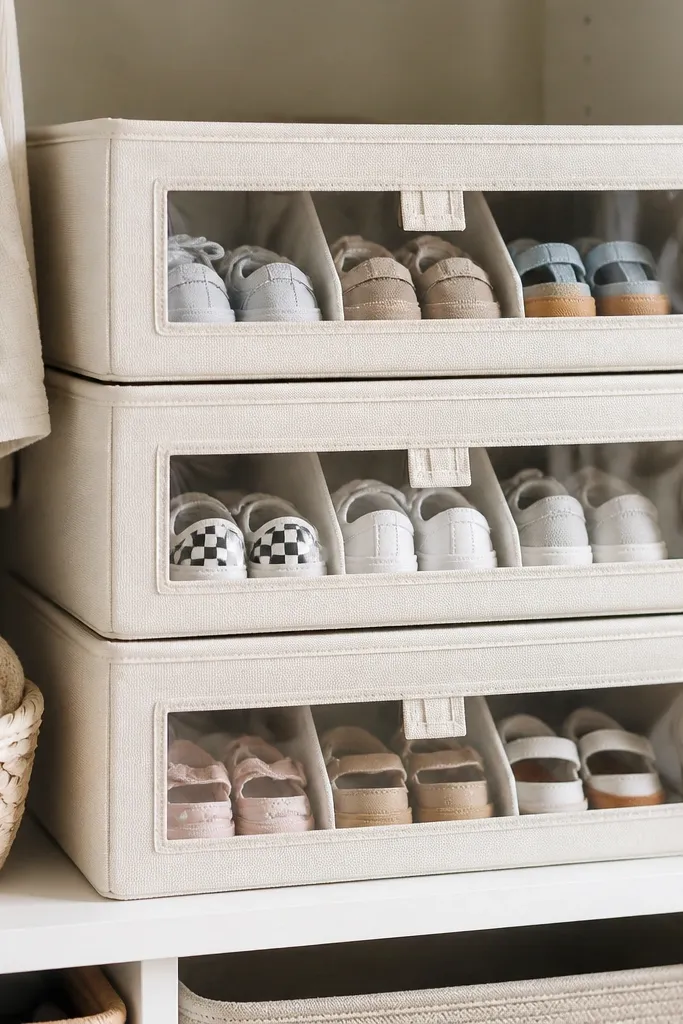
Kids shoes multiply fast, and a fabric drawer with dividers keeps pairs from mixing. The soft sides don't take up much space and they blend into the closet. I like fabric for kids because they spill snacks and mud sometimes, and the drawer is easy to pull out and wipe. Dividers also make it obvious which size slot is empty, so the drawer stays organized.
Use stackable fabric drawers with rigid inserts so they hold shape. Add removable dividers made from thin foam board covered in fabric, about 2 inches wide. Label each compartment with a fabric tag showing size or shoe type. Keep drawers at toddler height or on a shelf around 24 inches so kids can put shoes away without climbing.
Pro tipStore only one season per drawer stack - swapping seasons is faster than constantly re-sorting.
AvoidAvoid dividers that are too tall - they block airflow and shoes stay damp longer.


