
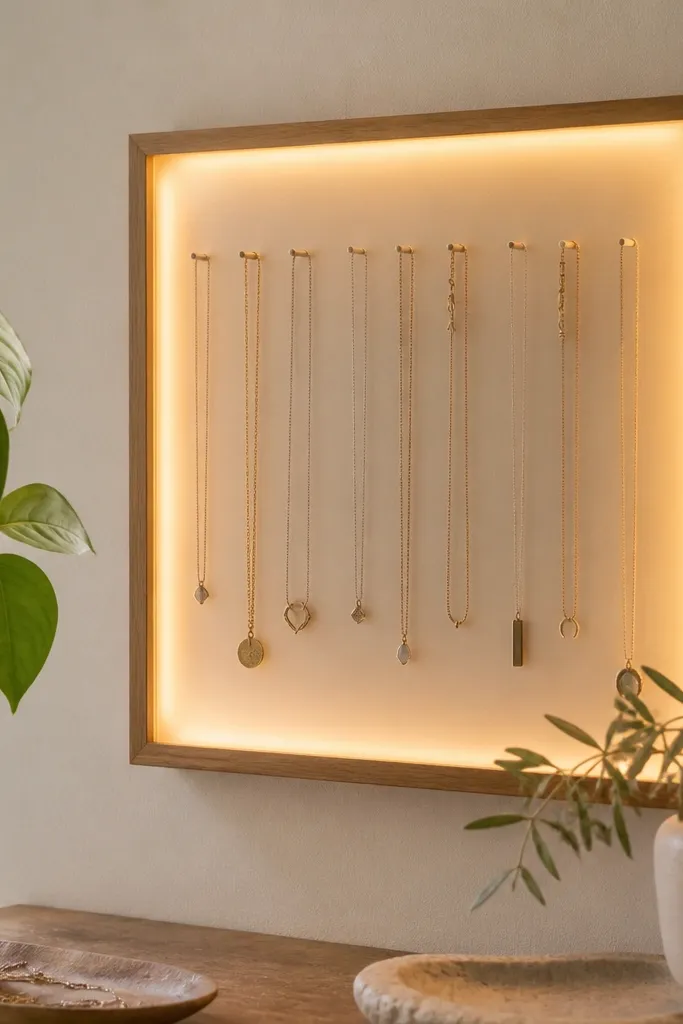
1. Backlit cork board with inline fairy lights
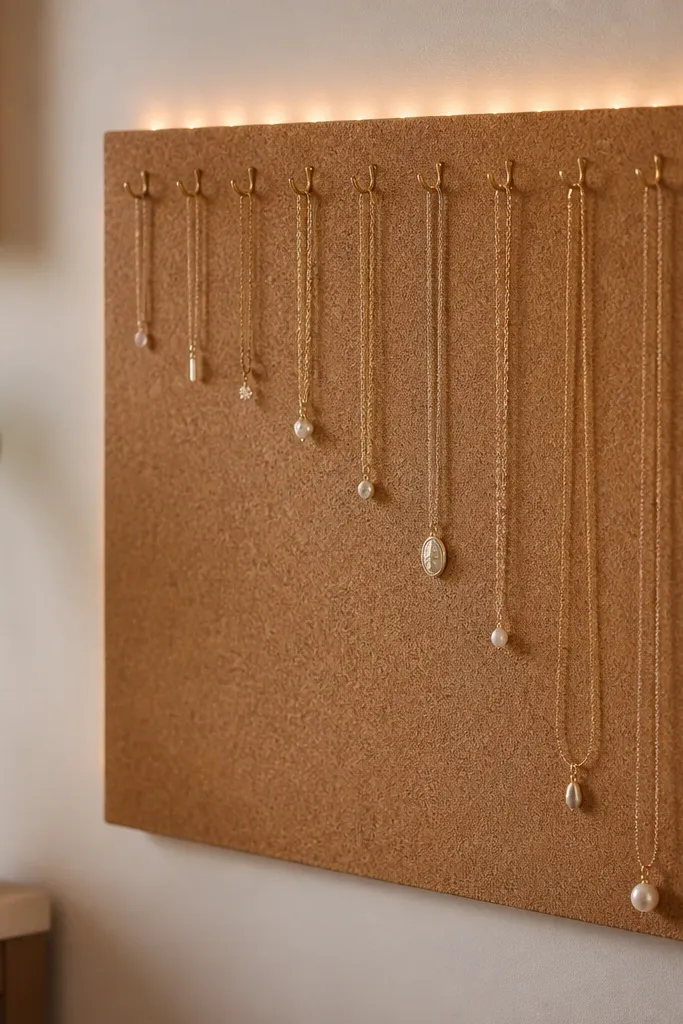
This build makes your necklaces look organized because the cork has natural texture that hides minor scuffs and keeps hooks from slipping. Inline fairy lights behind the board cast a soft glow on the chain links, so you can spot the clasp quickly. Warm white (not blue) makes gold and rose gold look closer to how they look in daylight. The hooks are the real anchor - the light just reveals them clearly.
Use a cork sheet at least 16x20 inches so you have room for hook spacing. Mark hook centers 2.5-3 inches apart for 16-20 inch necklaces, and 3.5 inches apart for longer pieces. Add a thin backing frame (1x2 wood or a picture frame) so the lights sit between wall and cork without flattening the cork.
Pro tipRun the fairy lights through a shallow channel made from hot glue beads on the back so the wire stays straight.
AvoidDon't cram hooks tighter than 2 inches - chains will overlap and tangle even with good lighting.
2. Clear acrylic panel with LED strip edge glow
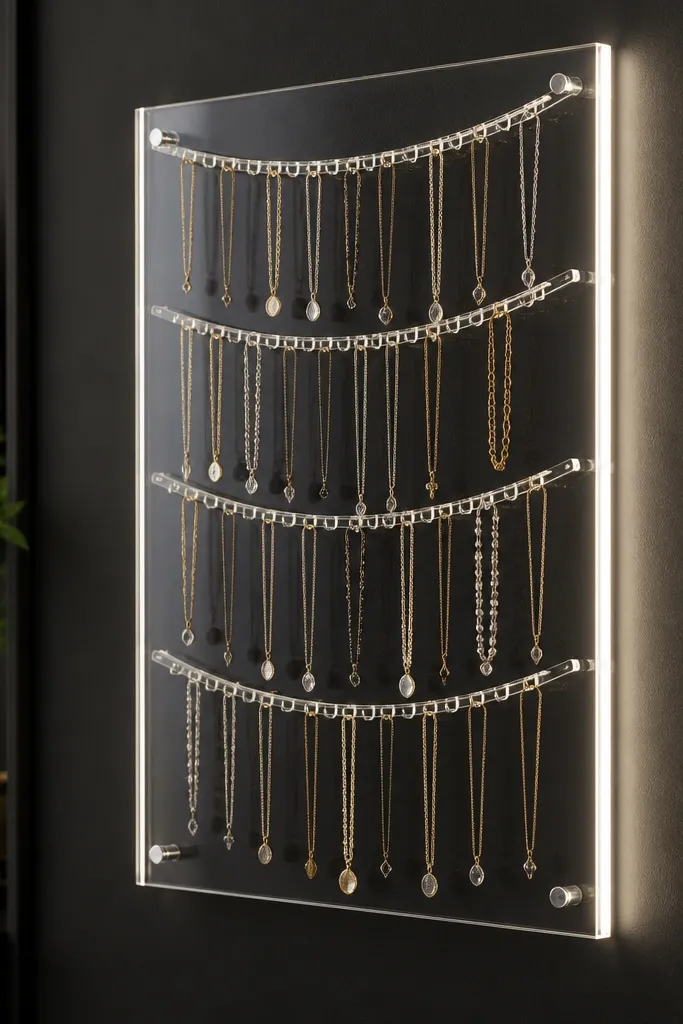
Clear acrylic shows the chain shape like a display case, and the edge LED strip gives you a controlled glow without glare. Matte black behind the panel makes silver look crisp and prevents bright reflections from washing out the links. Curved rows stop chains from hanging in straight lines that fold at the same spot. It looks polished because the acrylic gives clean edges and a consistent background color.
Pick an acrylic panel at least 12x24 inches so you can fit multiple necklace lengths. Use small adhesive hook bases or screw-in standoffs with hooks attached to a thin backing board. Mount the LED strip on the backing so it glows through the acrylic, not onto the front.
Pro tipUse a diffusing strip or frosted tape over the LED segment to soften hot spots on the acrylic.
AvoidAvoid cheap "clear" acrylic that scratches easily - every smudge shows under LEDs.
3. Shiplap shadow box with warm string lights
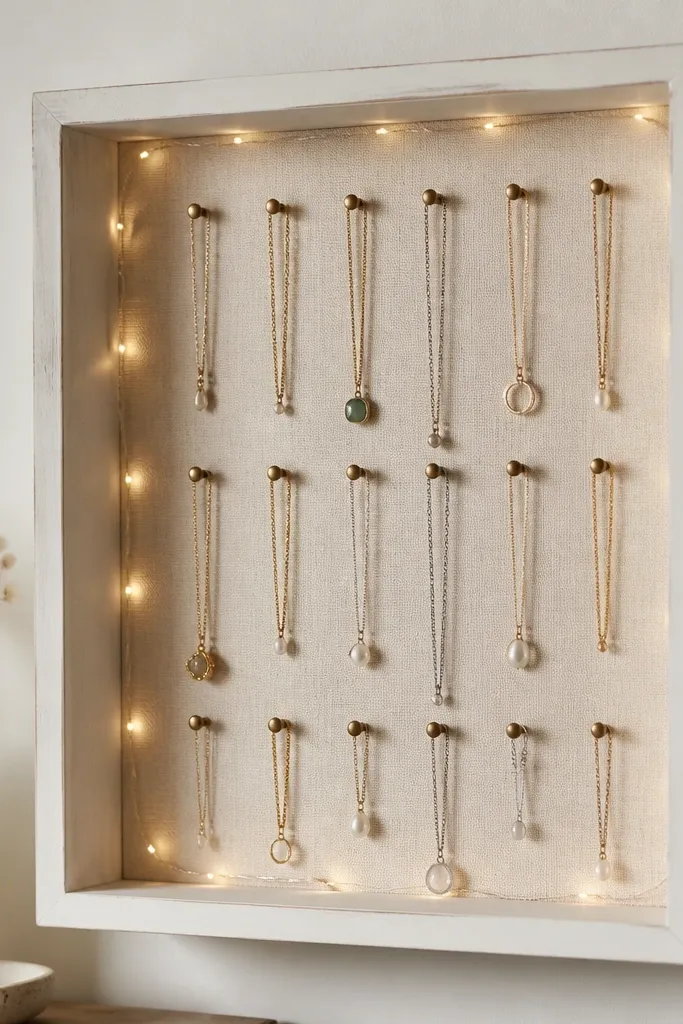
A shadow box creates distance between the necklaces and the wall, so the chains don't snag on anything behind. Shiplap adds texture that makes the lighting look intentional, not like a random strand. Warm lights make pendants glow without turning the metals harsh. The fabric backing also catches stray chain ends so nothing falls to the bottom.
Build or buy a shadow box with 2-3 inches of depth. Use a cream or oatmeal backing cloth stretched tight with a staple gun. Space nails 2.5 inches apart and keep pendants on their own row so they don't swing into other chains.
Pro tipTie the string lights with a few looped pieces of twine behind the nails so the wire never crosses the necklace paths.
AvoidSkip glossy satin backing - it reflects the lights and makes the organizer look messy.
4. Fabric-wrapped foam board with battery puck light
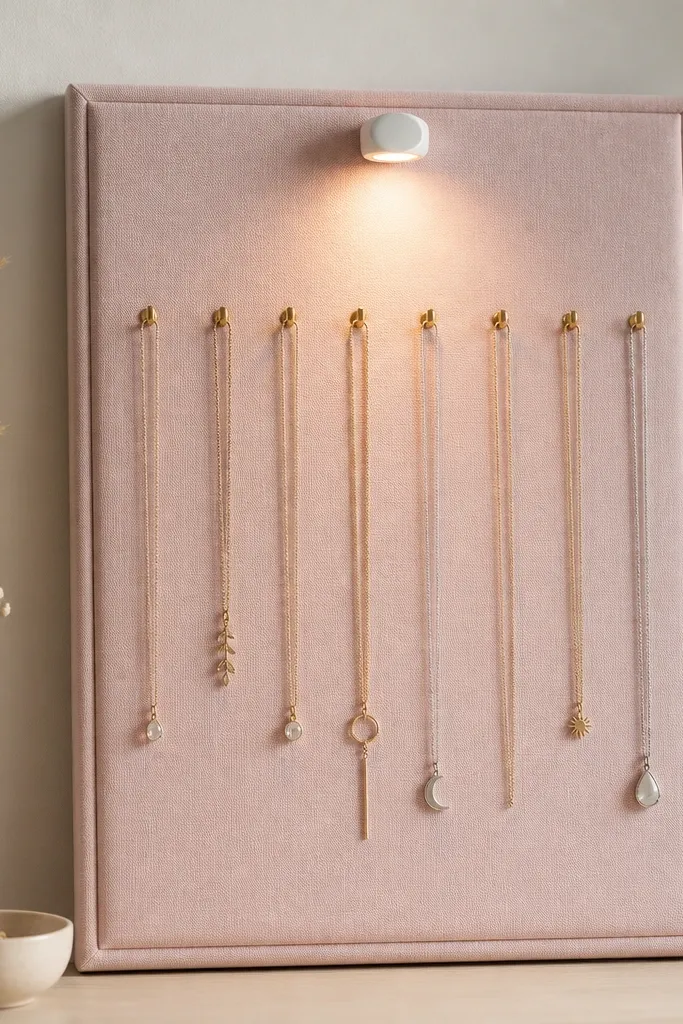
Foam board is the fastest way to get a with lights necklace organizer that looks soft and feminine. The fabric wrap hides the foam edges, and the puck light gives a focused glow that helps you spot clasps without lighting the whole room. This is great for dainty chains that tangle easily because you can add a narrow foam stop strip at the bottom of each hook row. The glow feels like a vanity light rather than a party light.
Cover 1-inch foam board with cotton fabric using spray adhesive. Add a thin strip of felt under each hook line so the chain has a gentle landing point. Mount a puck light on the frame top with double-sided tape rated for low heat, then route the switch to the side.
Pro tipUse a black marker to trace hook positions on the foam before wrapping so you don't guess after cutting the fabric.
AvoidDon't use slippery satin fabric - chains slide and twist under the glow.
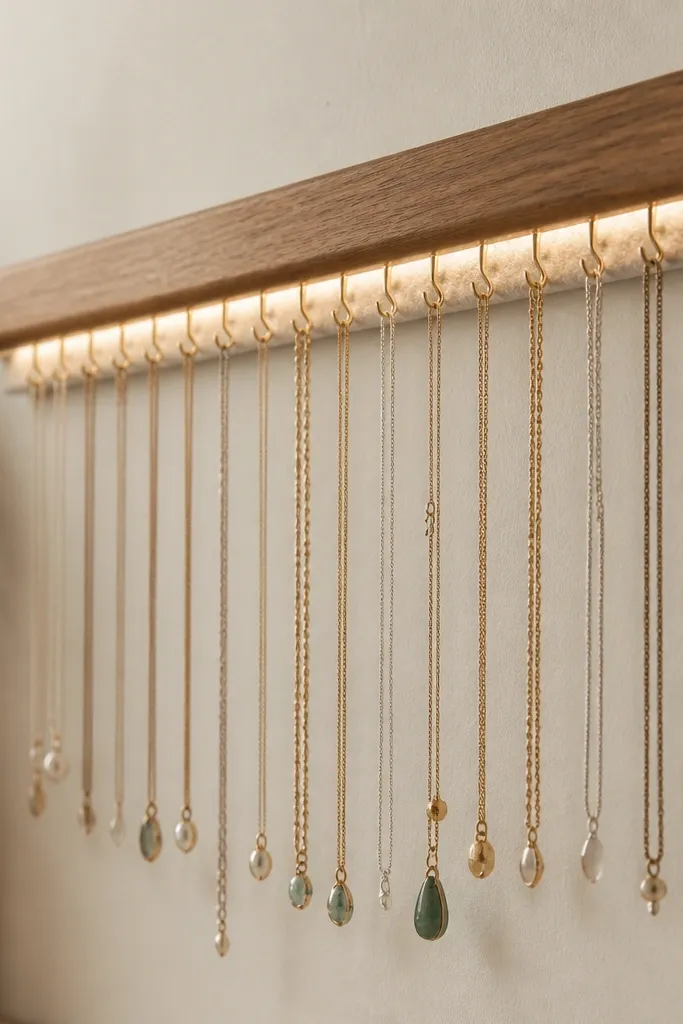
5. Vintage drawer front necklace light wall panel
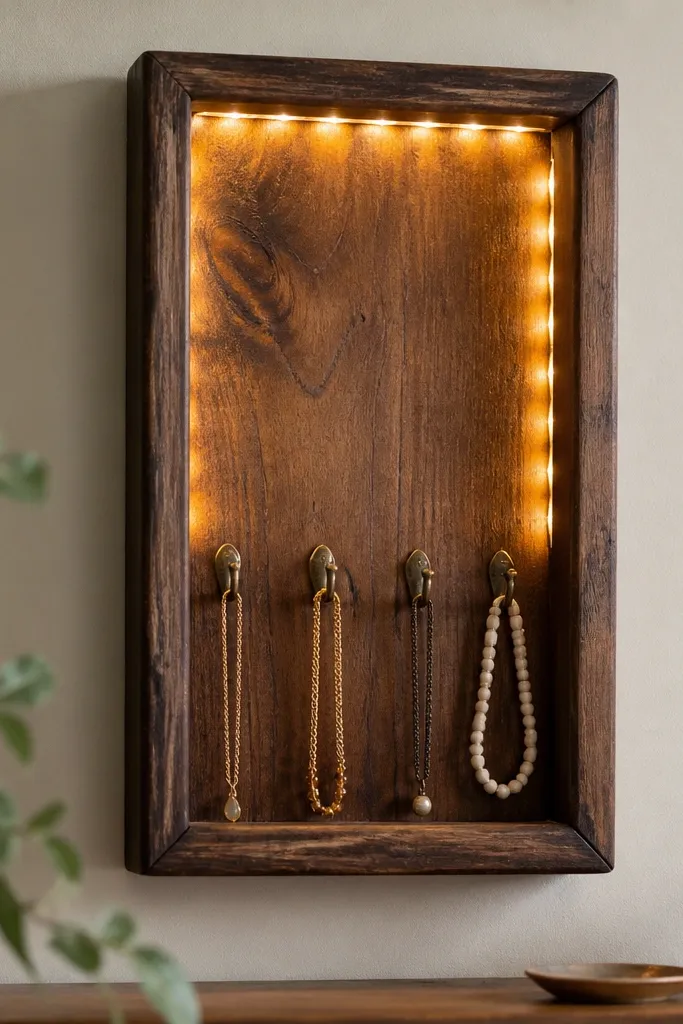
Using a drawer front gives you instant texture and a built-in border that makes lights look framed instead of stuck on. The drawer shape also helps you keep necklaces from drifting outward because the sides form a natural boundary. Warm LEDs highlight the wood grain and make metal clasps easier to see. This one looks like decor you'd buy, not like a craft.
Sand the drawer, then stain with a walnut tone and seal with matte poly. Attach cup hooks into the back rail so the necklace hangs in the center channel. Add a thin LED strip along the top inside edge, then a second short run along the side to reduce shadows.
Pro tipDrill a small hole through the back for the LED wire and keep it centered so the drawer front stays flat.
AvoidAvoid glossy varnish - it reflects LEDs and turns the necklace area into a glare spot.
6. LED-lit pegboard with rotating necklace rings
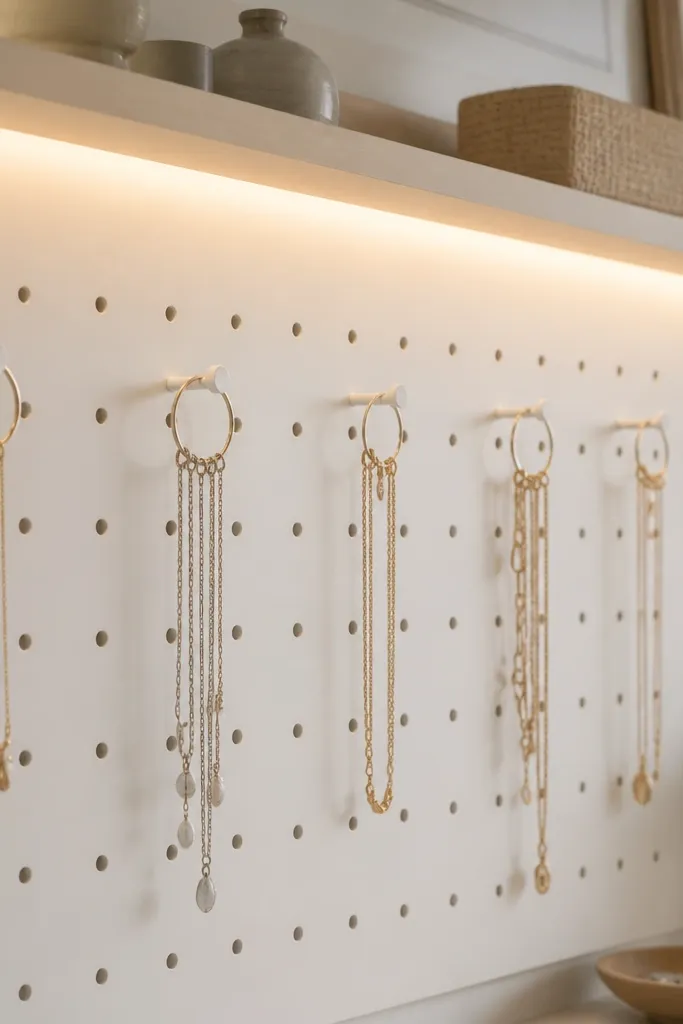
Pegboard is the organizer that grows with you, and adding rotating rings means necklaces don't twist when you pick them up. The LED strip under a small shelf reduces direct glare while still lighting the hook area. White pegboard keeps the look clean and makes silver chains pop. You can rearrange by moving rings to different peg holes when your collection changes.
Mount pegboard at least 18x24 inches. Install an LED strip along the bottom edge of a shallow wood ledge (about 1 inch tall) so light bounces upward. Use rotating keychain rings or small swivel hooks attached to pegs for each necklace.
Pro tipLabel the peg rows with tiny painter's tape dots behind the necklaces so you remember where each length goes.
AvoidDon't hang long necklaces on the same row as short ones - they will overlap and tangle.
7. Rattan panel with warm lantern-style string lights
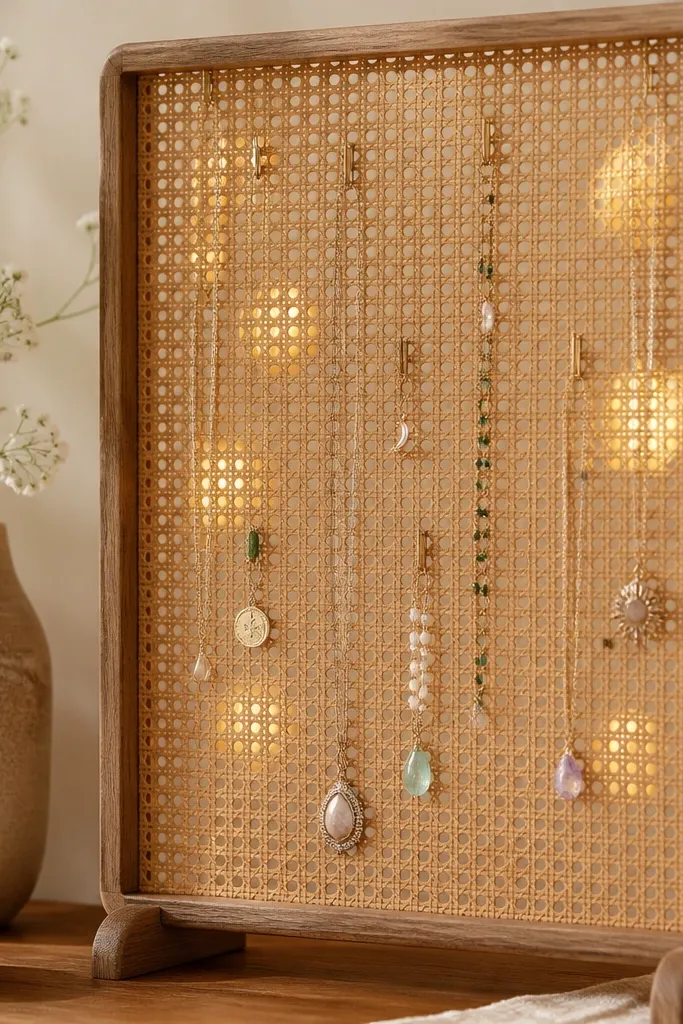
Rattan has open weave, so it spreads light softly and makes the organizer feel airy. Lantern-style bulbs look like decor even when the lights are off, which matters if it sits in your main room. Because the panel is breathable, you don't get the flat, plastic look that some acrylic organizers have. The hooks through the weave give each necklace a natural separation point.
Use a rattan panel framed with wood for stability. Clip or screw hooks through the weave at 3-inch vertical intervals for 16-20 inch necklaces. Add string lights behind the panel with zip ties so the wire stays off the chain path.
Pro tipChoose bulbs with a diffuser shade - exposed LEDs create bright dots that make the chains look messy.
AvoidSkip thin rattan that flexes - the hooks loosen and necklaces start sliding.
8. Wood frame with frosted plastic diffuser lights
Frosted plastic turns LED light into a smooth wash, so you don't get harsh hotspots on chain links. The wood frame makes the whole thing look like a wall art piece, not a storage bin. This design works especially well for silver-toned jewelry because the light looks even and the metal doesn't glare. It also hides wire clutter because the diffuser covers everything behind it.
Build a frame about 20x30 inches. Mount a backing board inside, then attach hooks to the backing with screws and washers. Place frosted plastic between the lights and hooks area so the glow stays soft. Use warm white LED strip and a battery controller hidden on the back.
Pro tipTest the diffuser thickness by holding it near the LEDs; thicker frosting gives more even light but less brightness.
AvoidDon't place LEDs directly behind clear plastic - it magnifies glare and makes the organizer look cheap.
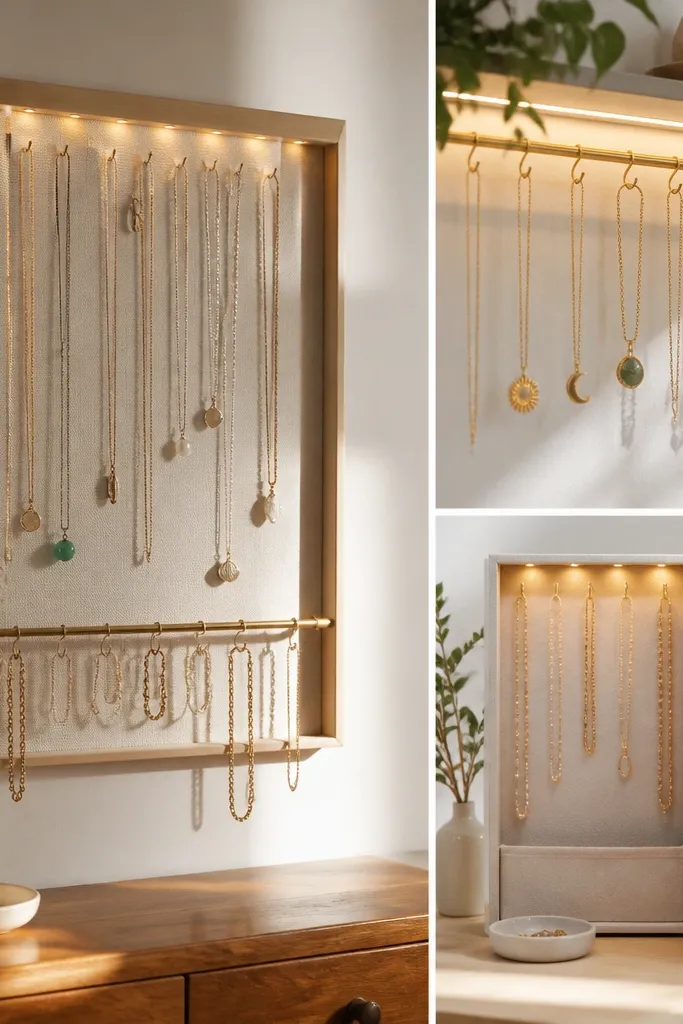
9. Wardrobe door organizer with under-shelf LED strip
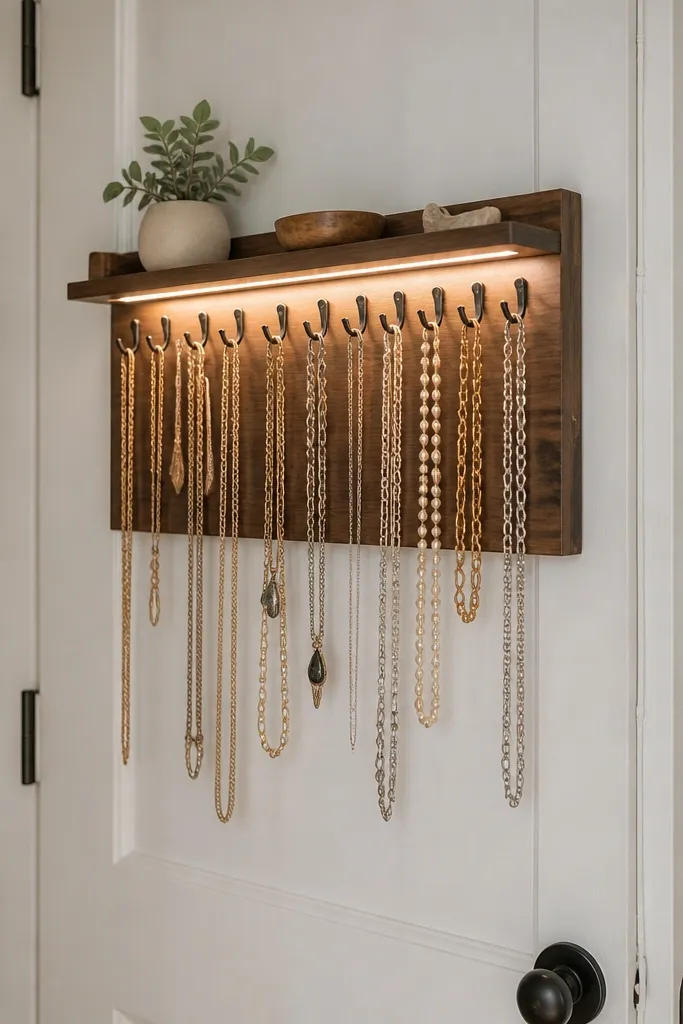
This is the one I use when I want the organizer out of sight but still easy to grab. Under-shelf LEDs light the hooks from above, so you can see pendants without glare on your face. Mounting on the inside door keeps dust off and reduces the chance of chains tangling with random items. The shelf also gives you a spot for a lint roller or a small jewelry pouch.
Use a door-mounted board about 14-18 inches wide so it doesn't swing too much. Add a top shelf 1.25 inches deep and mount the LED strip underneath it. Space hooks 2.75 inches apart and keep the longest necklaces on the outer sections so they don't bump the door hinges.
Pro tipAdd a small strip of felt behind the hooks where chains rest so they don't slip off when the door opens fast.
AvoidAvoid mounting hooks too low - coats and sleeves brush the necklaces and tangle them.
10. Resin tray frame with LED glow pocket hooks
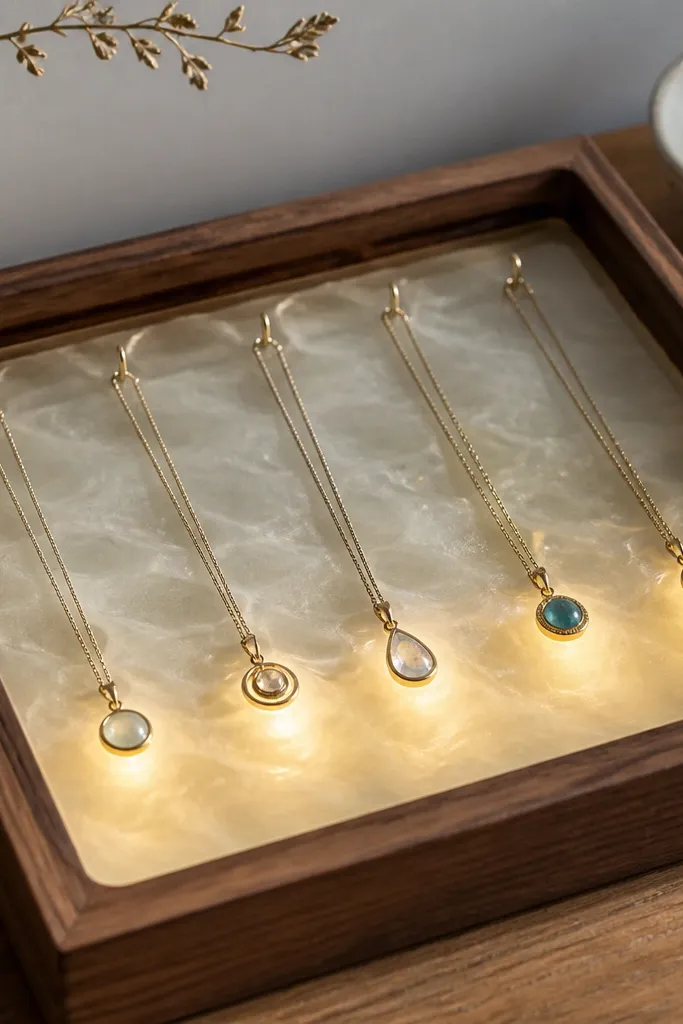
Resin underlighting makes each necklace feel like it has its own "spotlight" without needing a spotlight bulb. The glow is controlled by the resin thickness, so you don't get bright points. This works great if you like an aesthetic where pendants look intentional and centered. The resin tray also catches tiny chain ends that shift while you grab necklaces.
Pour or buy a shallow resin tray about 1/2 inch deep. Seal the resin well so it doesn't get sticky over time. Mount hooks on a backing board above the resin, and wire LEDs to a battery pack hidden in the frame base.
Pro tipUse translucent resin tint lightly (like a drop of amber pigment) so it reads warm, not orange.
AvoidDon't over-tint resin - it can turn silver necklaces yellow under LEDs.
11. Marble contact paper board with warm LED rope light
Marble-look contact paper gives you a clean, expensive background without painting. Rope lighting around the perimeter creates a halo effect that makes necklaces look framed. Warm light keeps the gray veining from looking icy. This is perfect for a dresser corner where you want the organizer to look like decor even when you're not wearing jewelry.
Cover a plywood or foam board with marble contact paper, smoothing with a plastic scraper. Install cup hooks in a grid, leaving 3 inches between hook rows for longer chains. Mount rope light behind the perimeter so it doesn't shine directly into your eyes.
Pro tipPress the contact paper edges with a hair dryer so it seals fully around corners.
AvoidSkip cheap wrinkly contact paper - wrinkles cast shadows under lights.
12. Felt-lined hanging rail with micro LED strip
Felt lining is the best friend of delicate chains because it prevents metal-on-metal contact. The micro LED strip keeps light close to the hooks, so you can see tiny clasps without lighting the whole wall. The felt also makes the organizer look cozy instead of industrial. If you have thin chains that snag easily, this layout reduces the chance they catch on backing surfaces.
Use a wooden rail about 24 inches long. Glue or staple felt along the rail underside and cut small slits where hooks attach. Place hooks 2.5-3 inches apart, then keep each necklace centered over felt so it never drapes into another chain's space.
Pro tipUse a warm white LED strip with a diffused cover so you don't see individual LED dots.
AvoidDon't use thick felt that grabs hooks - it can make necklaces hang at odd angles.
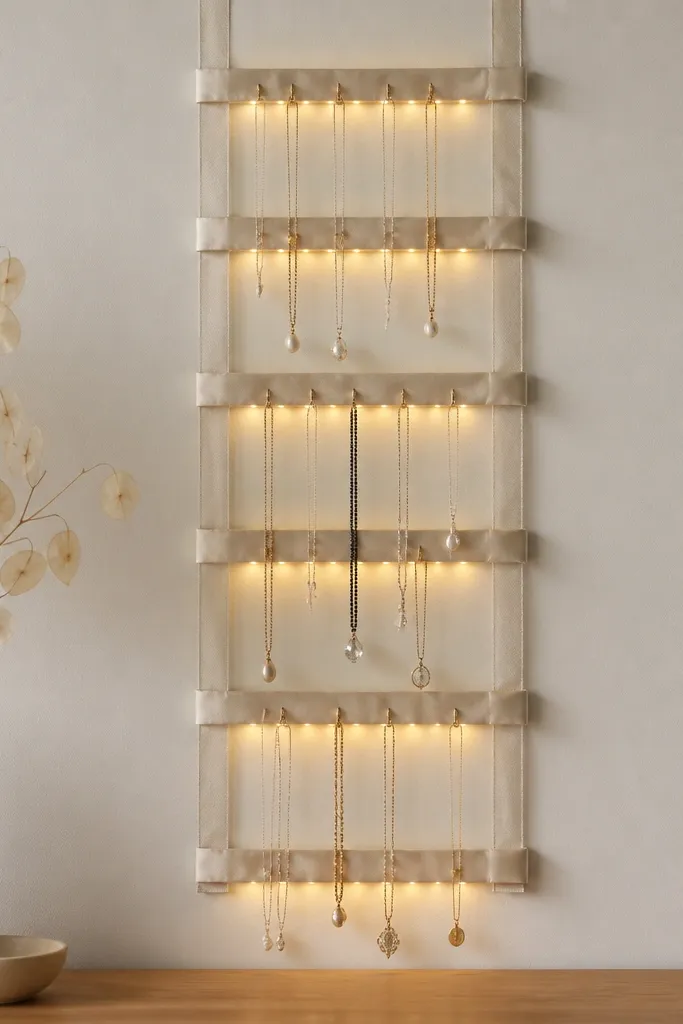
13. Acrylic ladder rack with LED step lights

The ladder shape separates necklaces by height instead of only by hook spacing, which helps long chains stay straight. LED step lights under each rung create a "stacked" display that makes it easy to pick the right length. Acrylic keeps the organizer modern and light, and the ladder geometry prevents overlap. It looks like a boutique counter display.
Build a ladder frame from acrylic or use a pre-made acrylic stand. Attach hooks to each rung with small screws. Wire micro LEDs to each rung section (or use one strip cut into segments) and mount the battery pack at the bottom behind the frame base.
Pro tipKeep the rung spacing at least 4 inches so pendants don't collide when you move necklaces.
AvoidAvoid placing hooks too close to the rung edge - chains slide off and tangle.
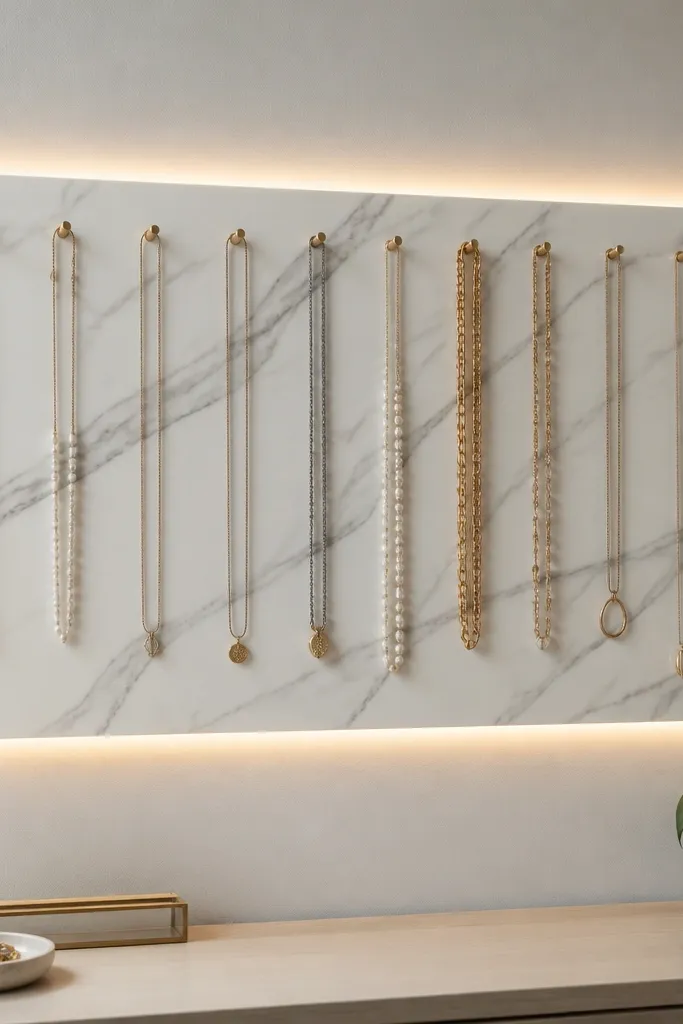
14. Pegboard with mirrored backing and warm LEDs
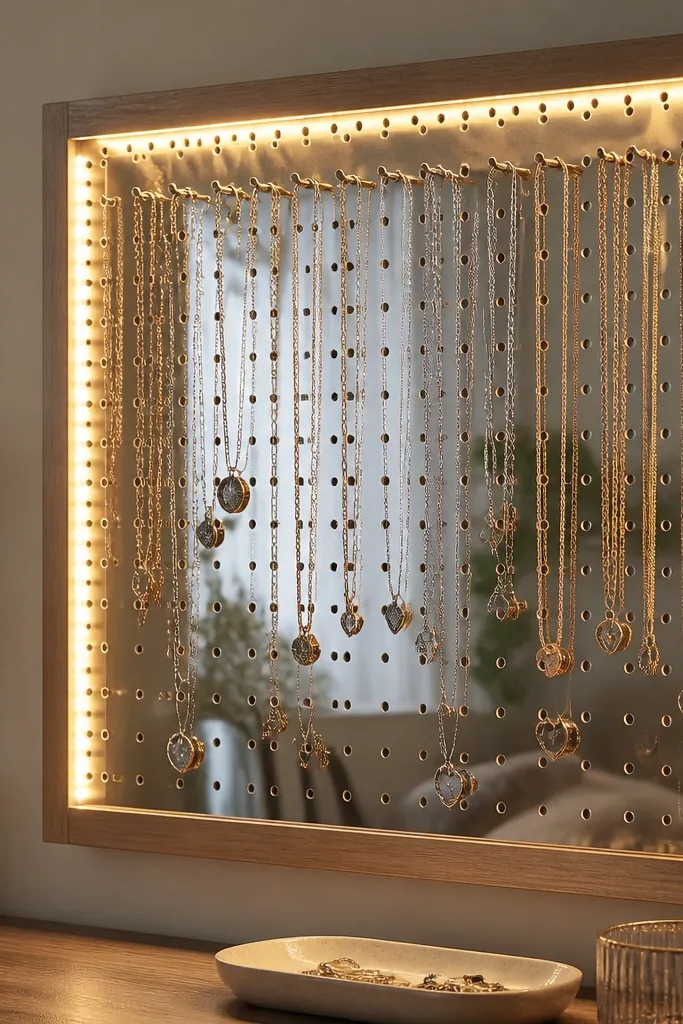
Mirrored backing doubles the visual space, so even a small necklace collection looks larger and more curated. The warm LEDs keep the reflection flattering instead of harsh. This style is great for people who wear lots of silver and want a bright, "ready" look at night. Just remember: mirrors show dust, so the organizer needs a wipe-down habit.
Mount pegboard onto a backing board, then add a mirror sheet behind the pegboard hooks area. Install LED strip along the top and side borders of the backing. Use cup hooks with small rubber rings if your chains slip.
Pro tipClean the mirror with a microfiber cloth before you turn the lights on; dust shows instantly under mirrored glow.
AvoidDon't use cold blue LEDs - the mirror reflection turns jewelry gray.
15. Bookcase-style vertical organizer with LED spine light
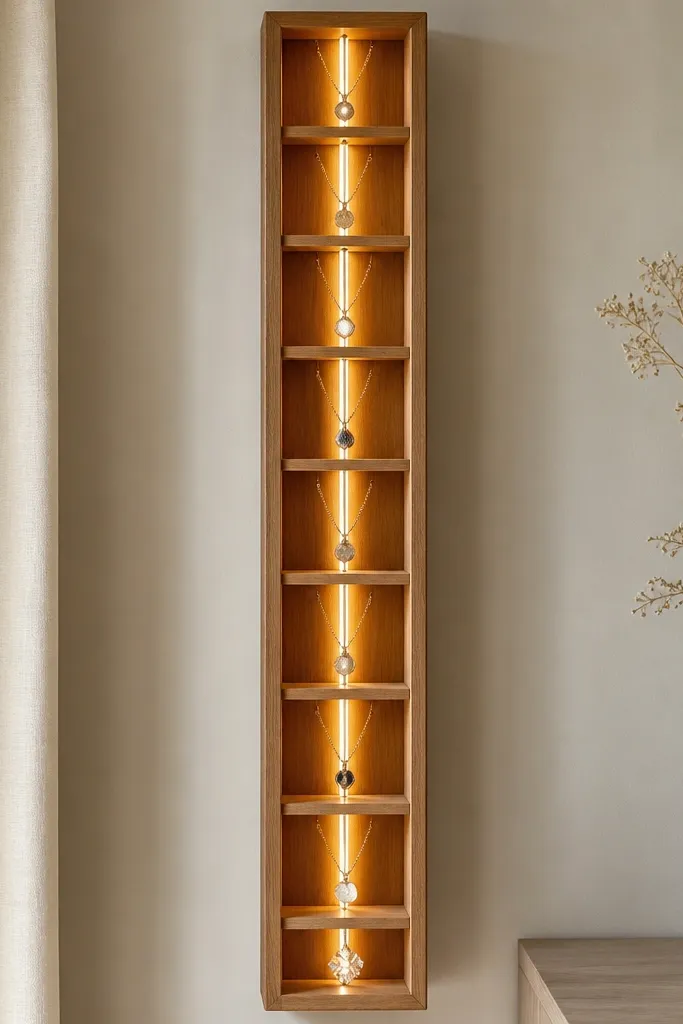
This one is great if you have different styles: chokers in one section, longer chains in another. The spine light guides your eye down the organizer so you don't miss necklaces tucked behind others. The compartment walls prevent chains from swinging into each other. It also looks like furniture, not a craft board.
Build a frame with four to six vertical compartments, each about 4 inches wide. Add hooks inside each compartment and keep 1.5-2 inches of wall between compartments so chains don't touch. Mount an LED strip along the back center and hide the battery pack behind the bottom panel.
Pro tipHang chokers higher and longer chains lower; the length difference looks intentional and reduces tangles.
AvoidSkip shallow compartments - short necklaces will slide into neighboring hooks.
16. Macrame hanger with LED strip behind knots
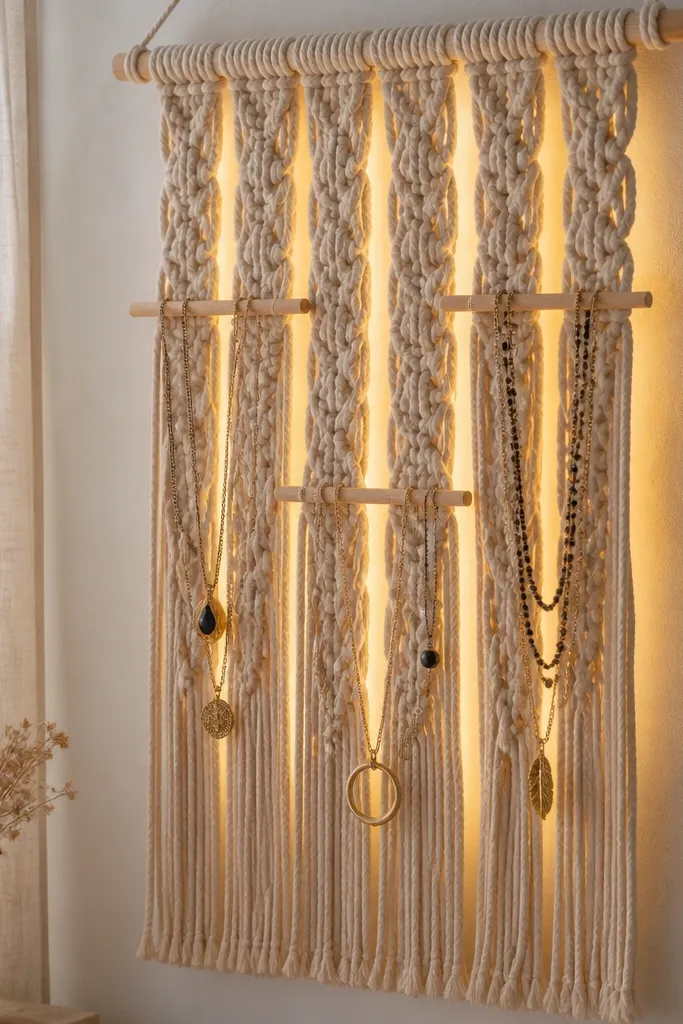
Macrame makes the organizer feel soft and decorative, and the rope gaps act like a diffuser. When the LED strip sits behind the knots, the light spreads in a warm halo around the necklaces. This layout works for statement pieces because the necklaces hang with natural curves instead of straight lines that tangle. It's also forgiving if your wall is uneven since macrame can hide small mounting gaps.
Use a macrame panel with enough open space behind the knots. Attach small dowels or ring clips where necklaces hang, then space them about 3 inches apart. Mount the LED strip on a thin backing board behind the macrame and keep wires secured with zip ties.
Pro tipUse warm white LED strip at 2700K so the rope looks golden, not pale.
AvoidDon't use thin string lights that snag on rope - they pull the whole look off.
17. Sew-on ribbon ladder with clip-on LED lights
Ribbons let you create a ladder spacing that matches your necklace lengths exactly. Clip-on LEDs are handy because you can move the light closer to whichever row you're using. The fabric backing also prevents chain ends from poking through and tangling on hardware. This build looks clean because the hardware is minimal and hidden behind fabric.
Sew ribbons to a canvas backing in two vertical lines with rungs every 4 inches. Attach small metal clips or S-hooks to the rung intersections. Place LED clips behind the canvas where the ribbon gaps let light through, then route the cord to a hidden side pocket.
Pro tipMark your necklace lengths with fabric tape before sewing so your ladder spacing matches your real collection.
AvoidSkip slippery ribbon - it makes clips slide and the necklace rows drift.
18. Mini vanity mirror organizer with corner LEDs
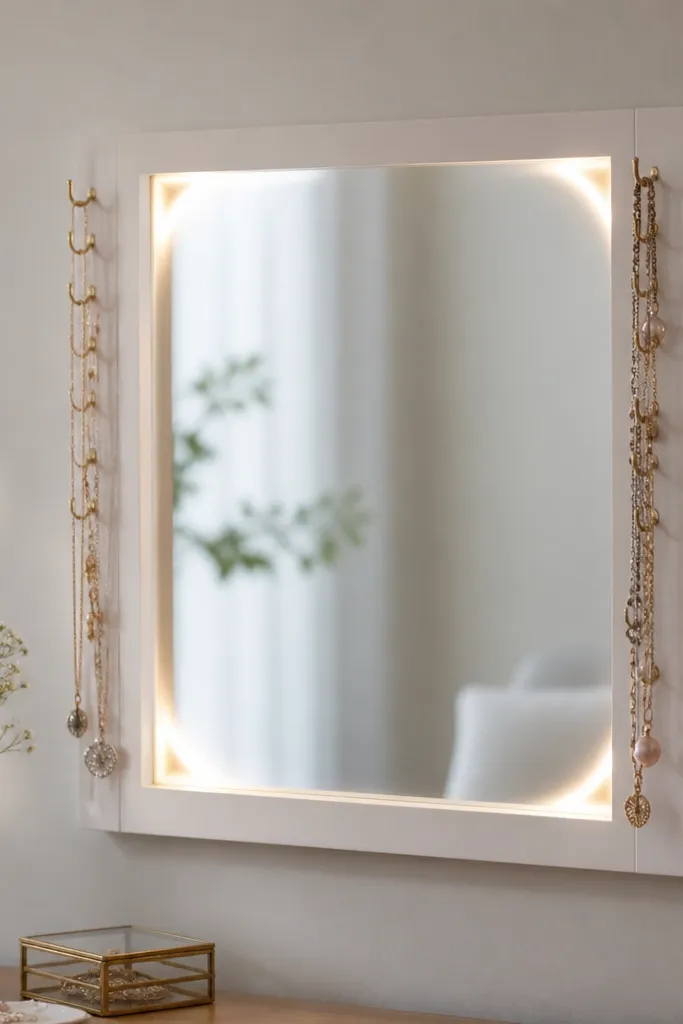
A mirror makes the organizer practical. You see how the necklace sits on your neck without removing it, and the corner LEDs add a flattering glow that makes clasps easy to grab. The side hooks use the frame edges as natural spacing guides, which keeps necklaces from crossing. This is the one I recommend for people who get ready in low light and hate turning on overhead lights just to find jewelry.
Use a small mirror frame at least 16 inches tall. Add hooks to the inside edge of the frame, spacing 3 inches apart. Install corner LED strips or battery LED corner lights, then hide the battery pack in the frame bottom with a small removable panel.
Pro tipKeep the mirror glass clean and dry; fingerprints under LEDs look obvious fast.
AvoidDon't put hooks too close to the mirror edge - chains rub the glass and pick up smudges.
19. Wall shelf with under-light and individual hook cups
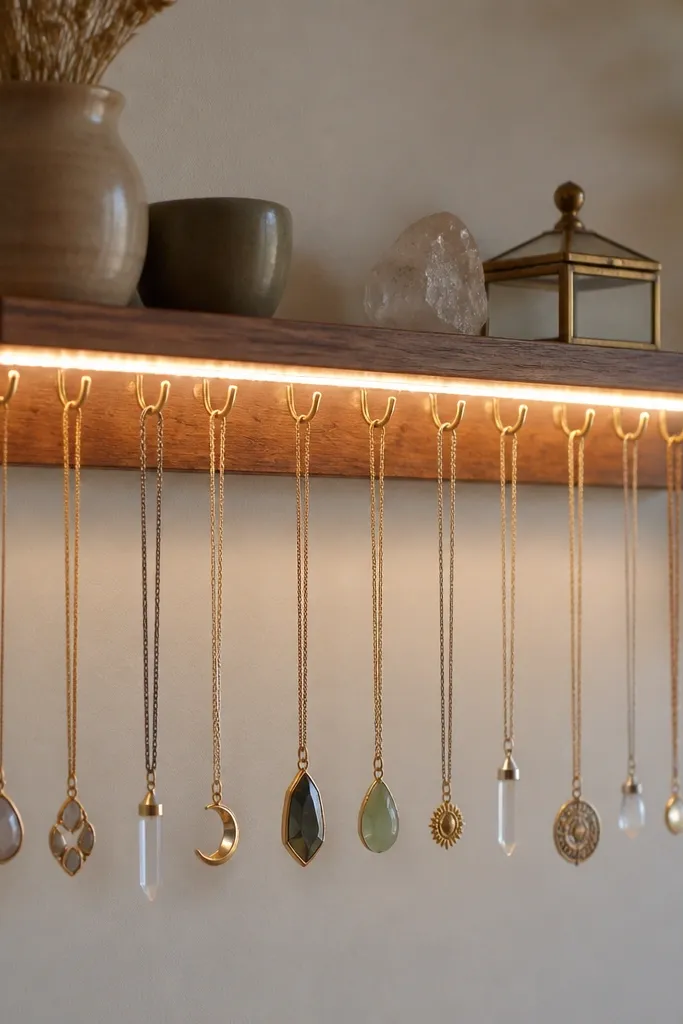
A shelf gives you height control. Under-light spreads evenly across the hooks, and the shelf lip acts like a guard so chain ends don't slip off. Cup hooks hold necklaces without letting them fold over the metal edge. It looks tidy because the shelf line makes the display feel like a designed unit.
Mount a shelf 6-7 inches deep so you have space for wiring. Drill and install cup hooks on the underside, then add a small foam pad inside each hook cup to stop chain kinks. Use warm white LED strip under the shelf and place the battery pack in a hidden notch on the back side.
Pro tipTest the light angle by holding your phone flashlight where the LEDs will sit; adjust until the clasps glow, not the ceiling.
AvoidSkip foam pads - chain links can slide and twist, even with good lighting.
20. Concrete-look board with neon warm LED dots

This design is dramatic without being loud. The concrete-gray background makes gold and brass look warmer, and the dot lights behind each hook create a "spotlight" for every necklace. I like it for statement pendants because it keeps attention on the centerpiece. The countertop stand also means you don't need wall mounting, which helps if you rent.
Use a board 10x20 inches and paint with concrete-look craft paint or textured spray. Install copper cup hooks and mount them on a thin plywood backing. Add small warm LED puck lights or tiny LED points behind each hook position, then wire them to one battery controller hidden under the stand.
Pro tipKeep the dot spacing 3 inches apart so lights don't blend into one big glow.
AvoidAvoid bright white LEDs - the concrete gray turns dull and jewelry looks flat.


