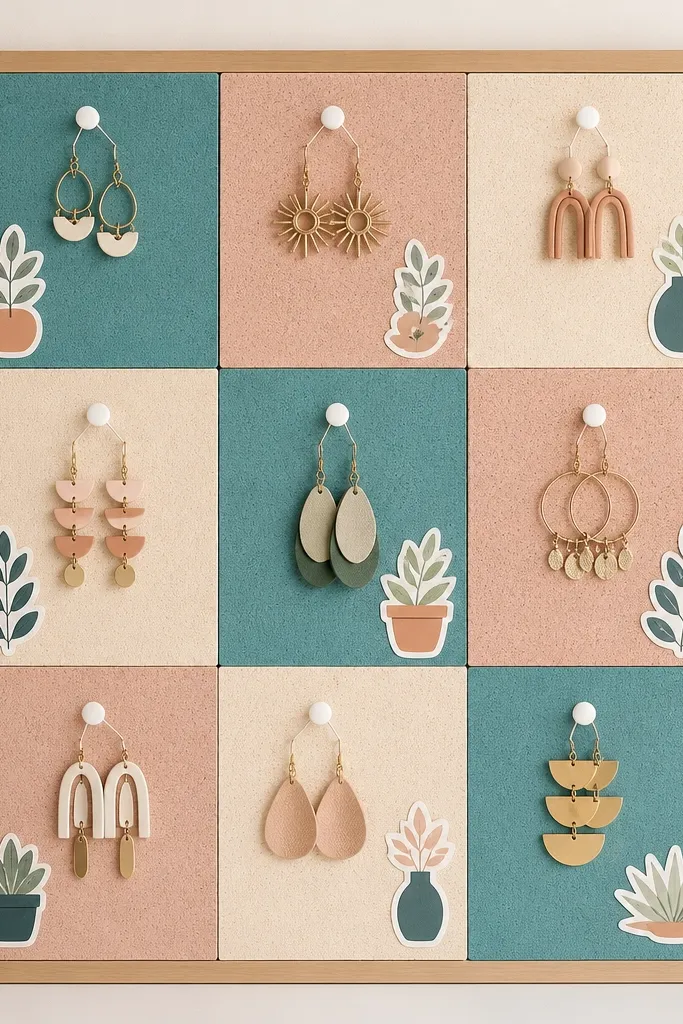
1. Pegboard earring grid with pushpin spacing
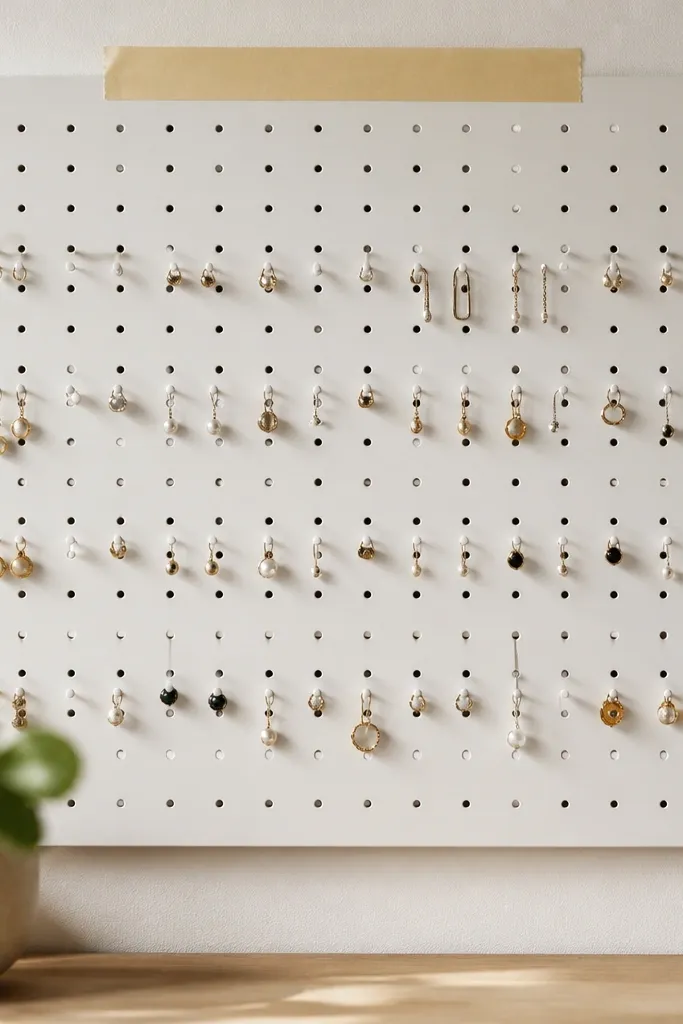
I use pegboard because it lets you control spacing without measuring every hole. The pushpins hold studs and small hoops securely, and the white board makes the metal look crisp. Add a tape label strip so you can find matching pairs fast. This stays cheap because you're not buying individual holders for each earring.
Cut pegboard to about 10x14 inches for a small wall spot. Mark a 1-inch grid, then push pins into the holes - leave 3/4 inch between rows for backs and dangles. Mount with two hooks or screws at the top corners so the board sits flat.
Pro tipSpray the pegboard with two light coats so the surface doesn't snag earring posts.
AvoidAvoid hanging heavy dangling earrings on only a couple pins - they pull out and start looking messy.
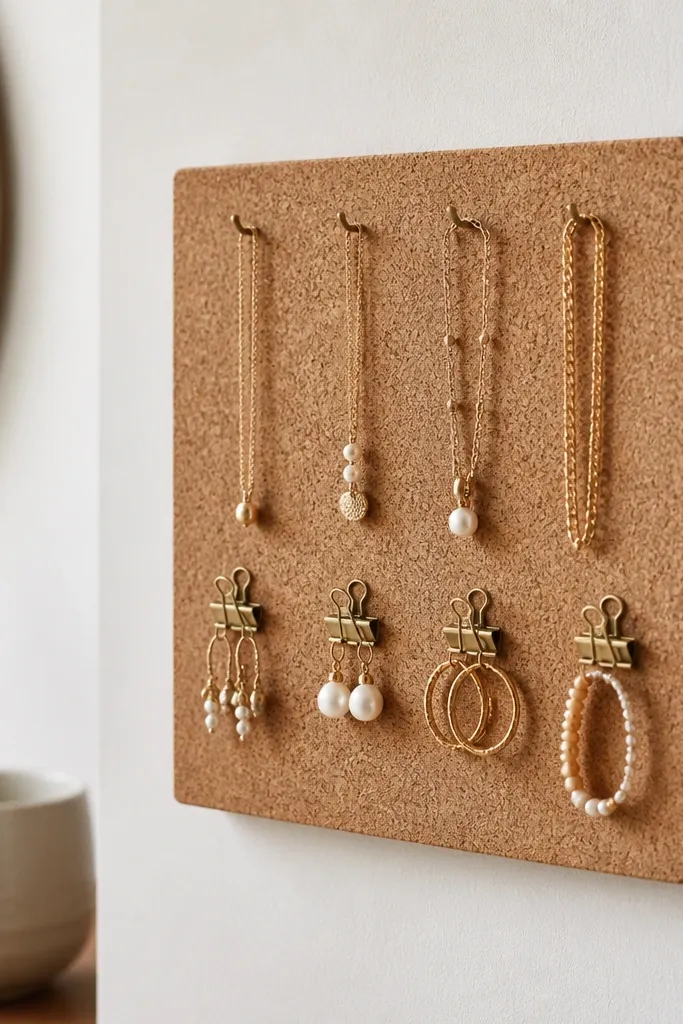
2. Frame shadowbox with cork + earring hooks
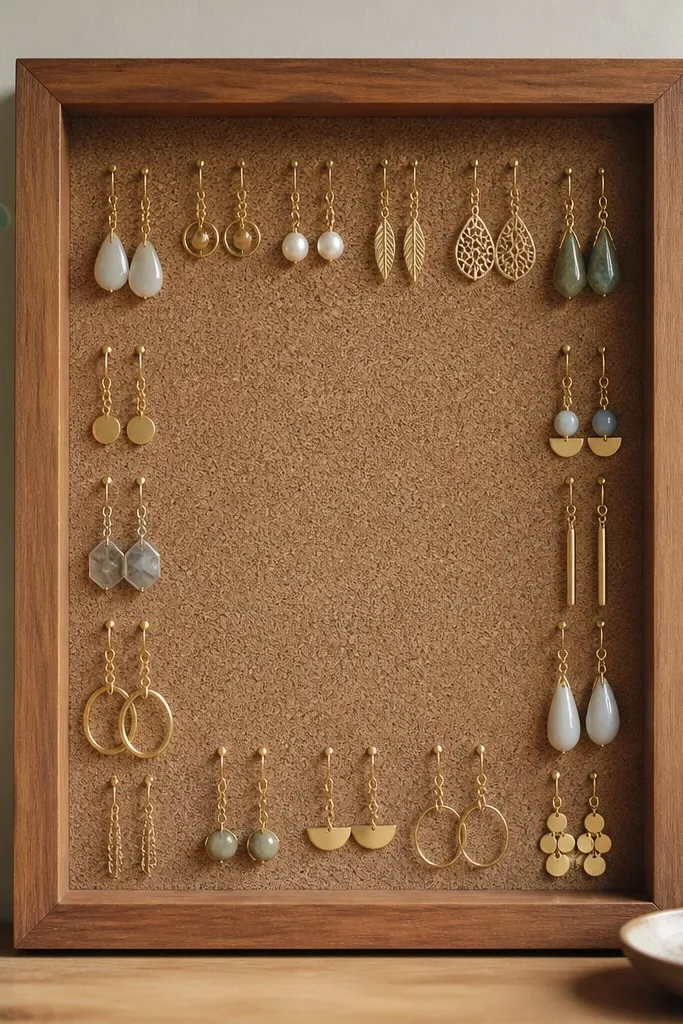
Cork grips earring posts and keeps them from sliding down. I like this for statement earrings because you can cluster them by size. The frame makes it look like decor, not storage. Cork also hides small hook holes so the back stays neat over time.
Buy a cork sheet and cut it to the frame's inner opening. Hot glue or tack it in place, then screw tiny hooks into the cork. Use a thin wire or picture-hanging tabs on the back so it mounts level.
Pro tipPaint the frame edges the same color as your hooks for a clean, matching look.
AvoidSkip super long hooks - they make earrings swing and tangle when you grab them.
3. Cookie sheet necklace display with binder clip rows
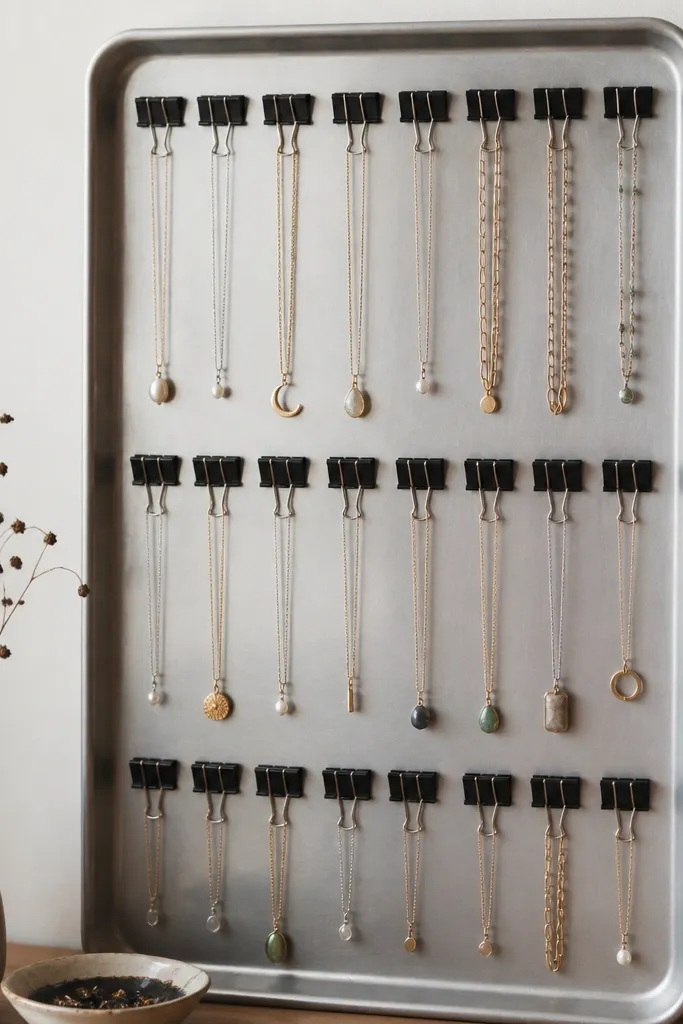
A cookie sheet gives you a sturdy backing and lots of surface area. Binder clips grip chain links well without bending them, and you can adjust rows as your collection grows. The metal sheen makes gold and silver chains pop. This one looks intentional even in a utilitarian finish like stainless.
Hang the cookie sheet by drilling two small holes near the top corners and using a wall bracket, or use an existing hanging loop if it has one. Clip necklaces into binder clips and arrange by length: short at the top, long at the bottom. Keep clips about 2.5 inches apart so chains don't cross.
Pro tipSpray the sheet with matte clear coat if it's glossy - it reduces glare in photos and in real life.
AvoidDon't pack clips too close - chain links start rubbing and you'll see scuff marks.
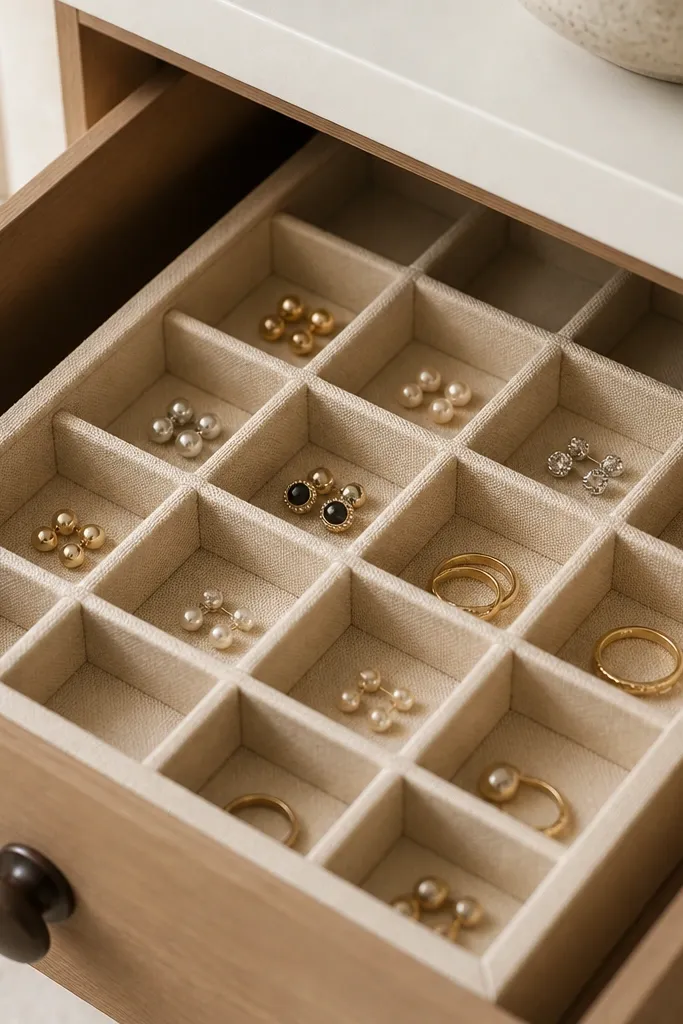
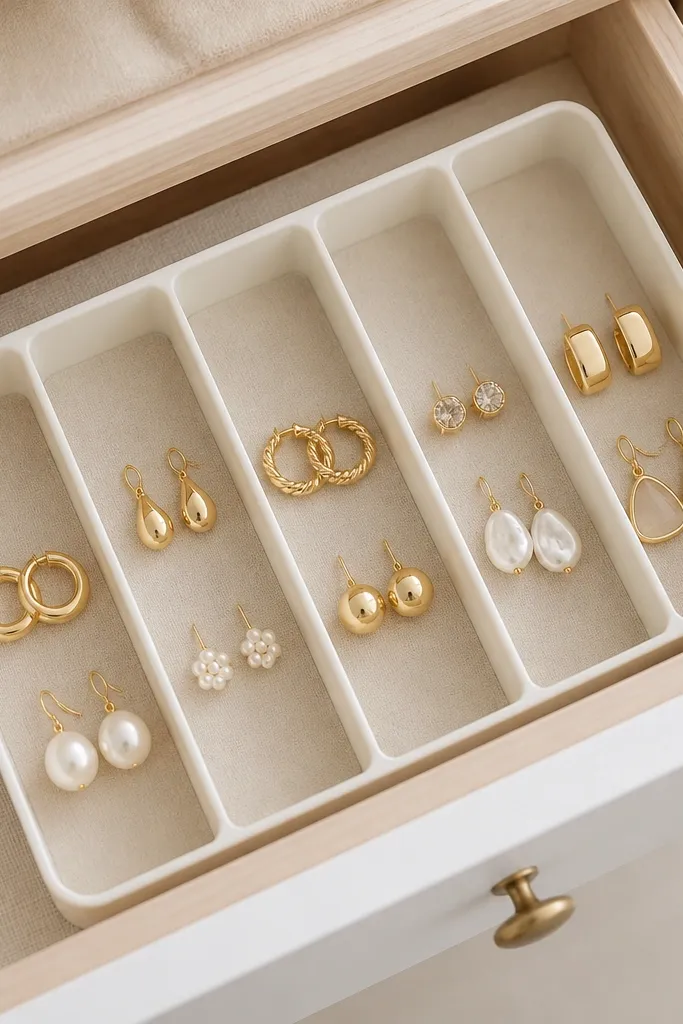
4. Shallow wooden drawer organizer for rings and studs
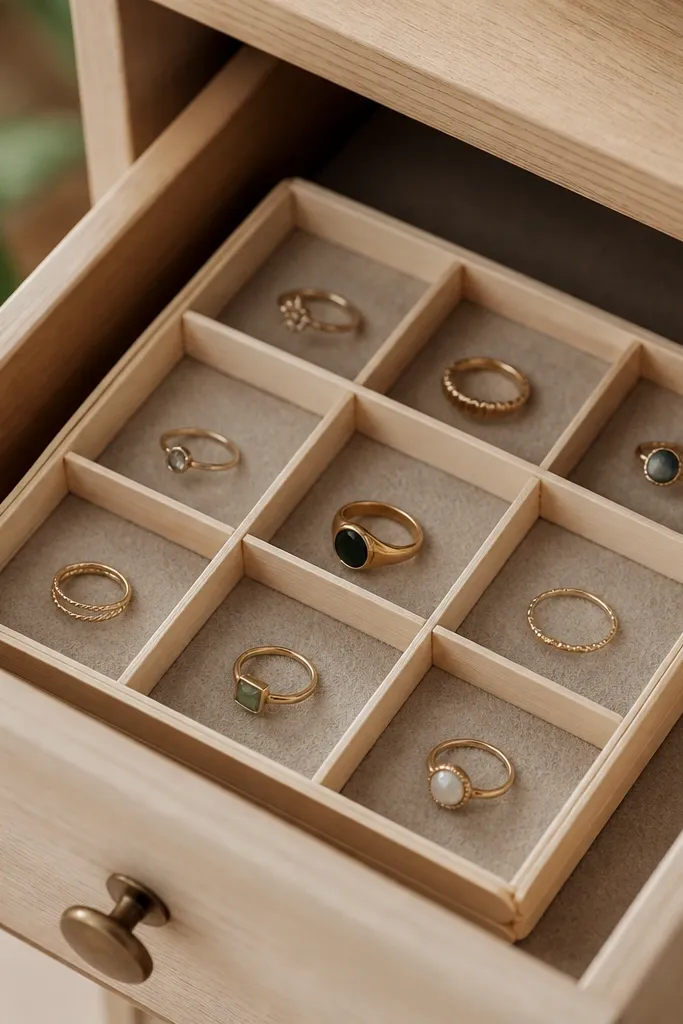
Rings and studs are the hardest to keep sorted because they're small and roll. A shallow tray with felt stops them from sliding and keeps metal from scratching. Popsicle-stick dividers cost pennies and let you customize compartment sizes. It looks clean because the felt makes everything feel "finished."
Measure your drawer and build a tray liner with adhesive craft felt. For dividers, glue popsicle sticks or thin wood strips into a grid, then cover the top edges with felt so nothing catches. Leave one larger bay for statement rings.
Pro tipUse a fabric glue instead of hot glue if you want a flatter, cleaner finish under rings.
AvoidAvoid bare wood contact - rings will scuff and the tray starts looking worn.
5. Mason jar earring stand on a painted board
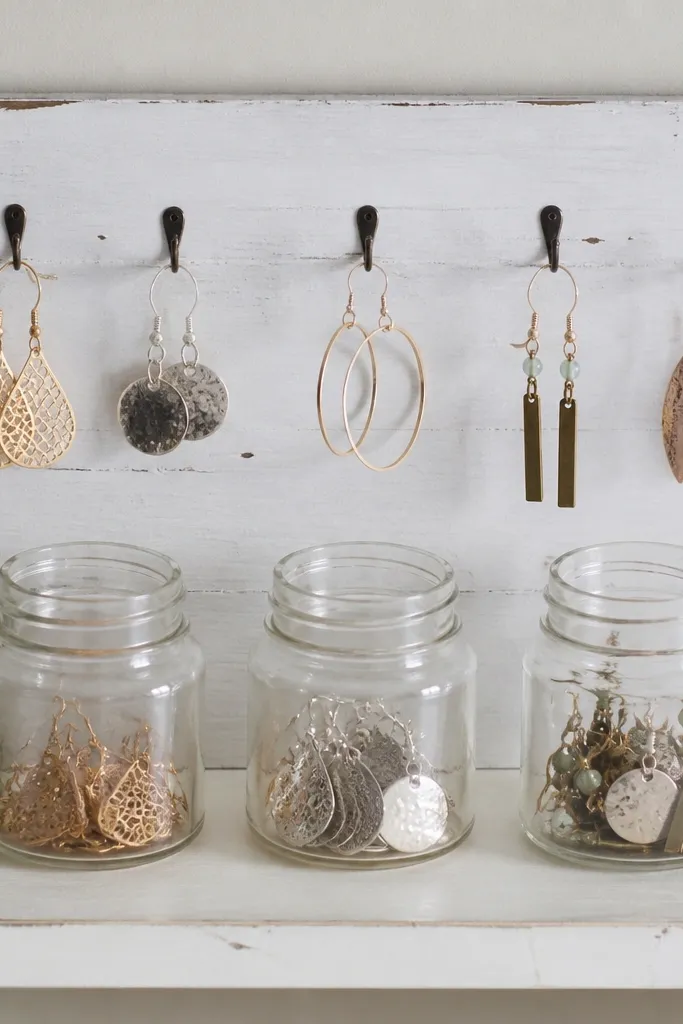
Mason jars are cheap and they look good on a vanity. The jars catch loose backs and small items, while hooks above keep pairs together. This design is helpful when you rotate your jewelry by week. You get visible storage without rummaging.
Paint a scrap board in a matte color like off-white or dusty blue. Screw in three jar lids (or attach jars with jar clamps) and add a row of small hooks along the top edge for hanging earrings. Keep jar openings facing forward so you can grab quickly.
Pro tipPut a small folded card inside each jar with a color dot so you know which jar is which.
AvoidSkip clear jars with greasy fingerprints - wipe them with glass cleaner before display.
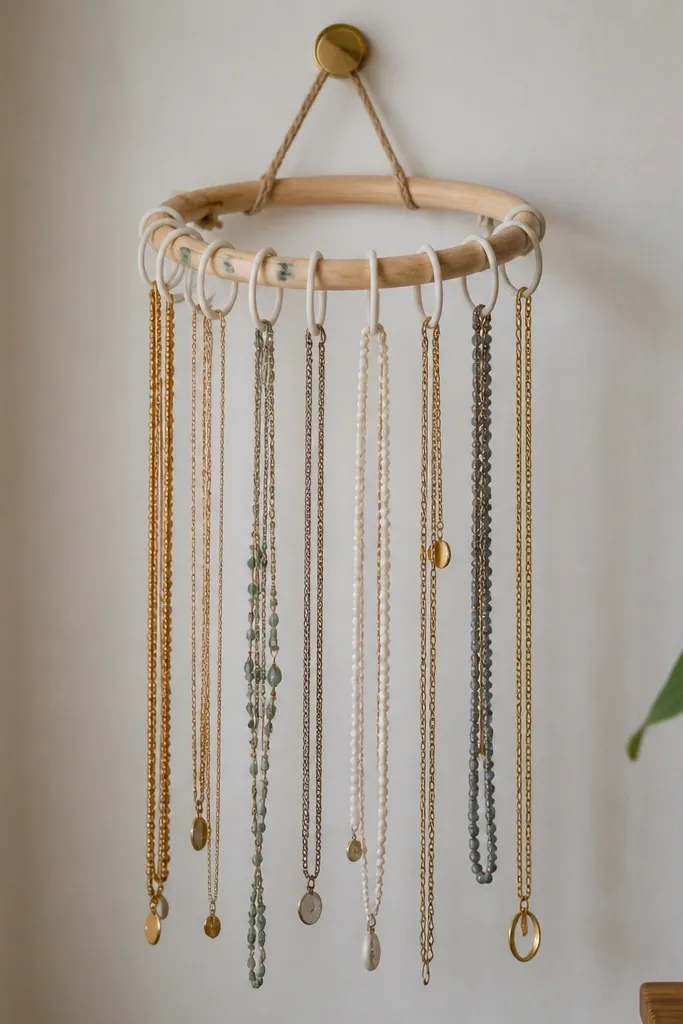
6. Pegboard + spray-painted dowel necklace rack
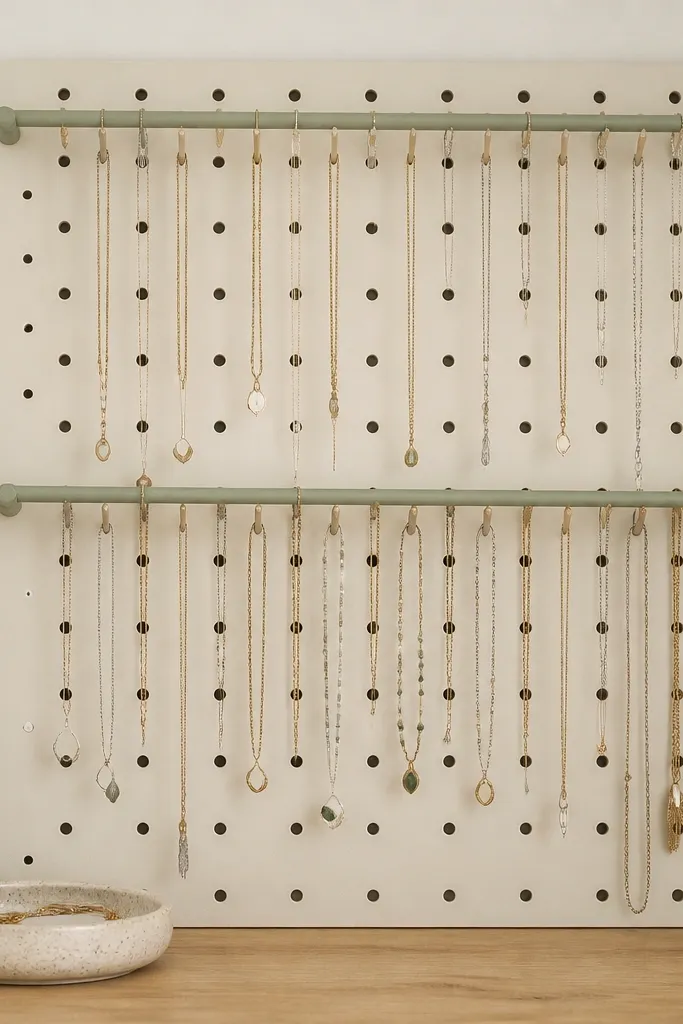
Pegboard gives structure, and dowels give you a bar to hang without bending chains. Spray-painting the dowels makes everything look like one planned piece. I like this for layered looks because each necklace hangs separately and doesn't twist together. The dowel also adds a slightly elevated, boutique feel.
Mount pegboard to a backing board or directly to the wall. Attach two dowels horizontally with screws through the pegboard, then add small S-hooks along the dowels. Space hooks so each chain has at least a finger-width gap.
Pro tipPaint dowels before attaching - it's easier to reach every angle.
AvoidAvoid using tiny hooks that press hard into chain links - they leave dents.
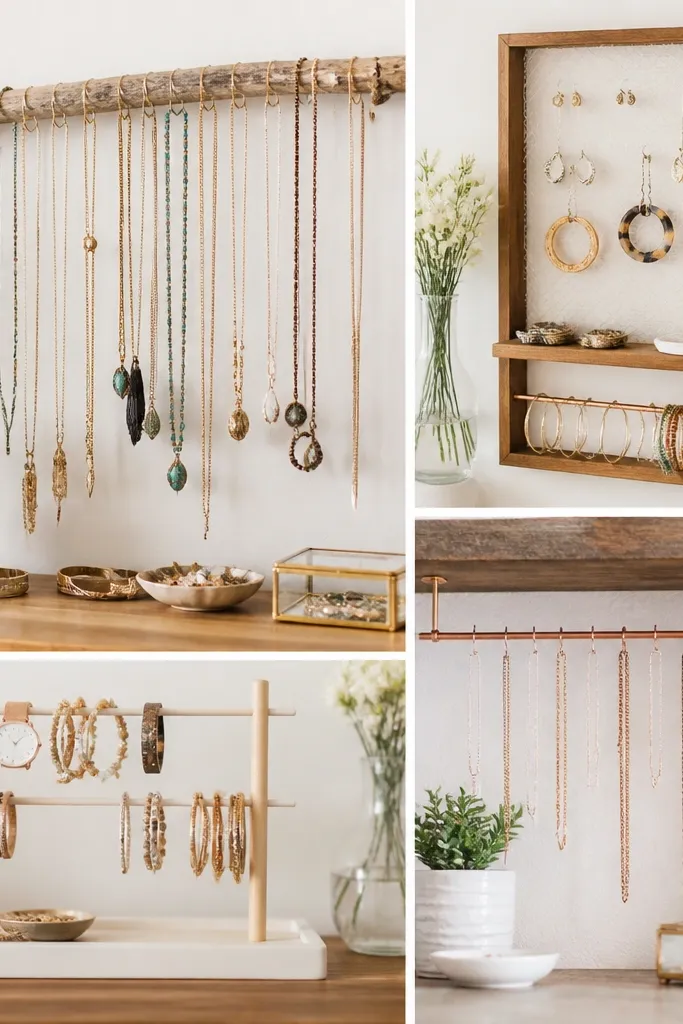
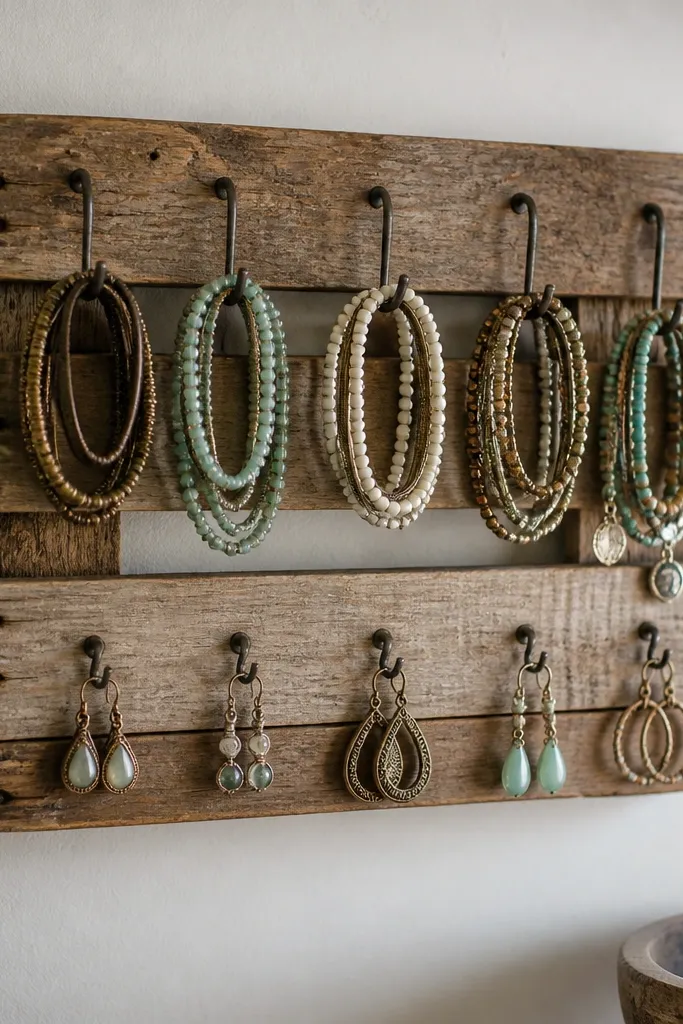
7. Reclaimed wood branch bracelet hanger
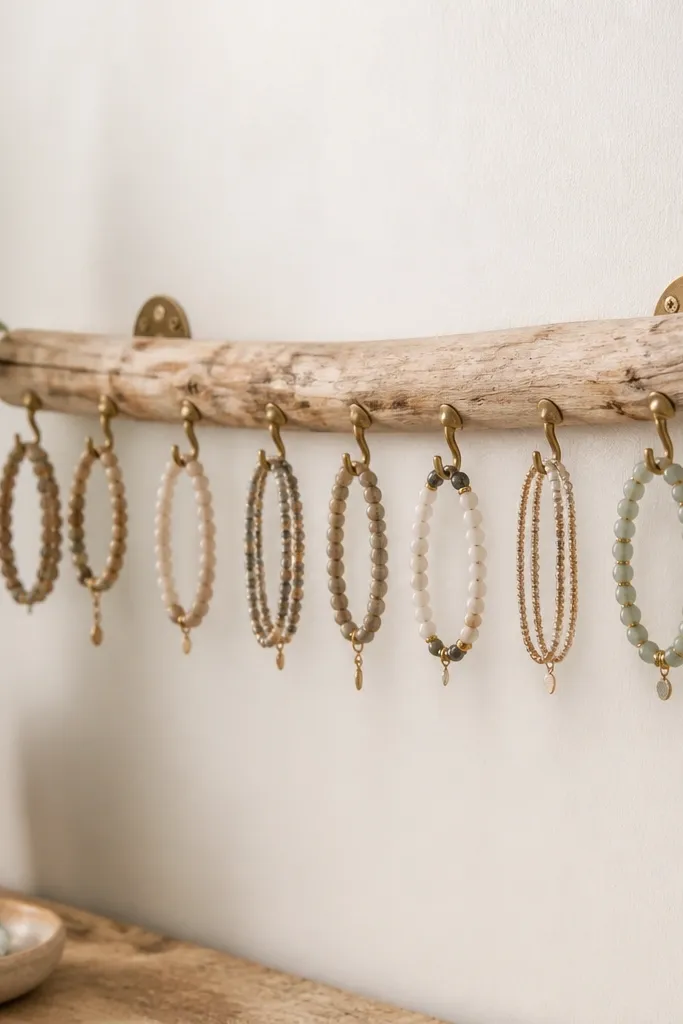
A branch looks natural and it gives you lots of hook points without buying a ton of hardware. Bracelets hang cleanly because you can spread them across different "arms." Sanding and a simple finish make it feel intentional. This is a good option when you have mixed bracelet sizes and want visual variety.
Find a branch about 10-14 inches long, then sand it smooth. Mount it with two screws into a stud or use strong wall anchors. Add 8-12 small hooks along the branch and hang bracelets by size, leaving one empty hook near the end for future pieces.
Pro tipSeal with matte clear spray so the finish doesn't feel sticky under your fingers.
AvoidDon't skip sealing - raw wood grabs oils and starts looking dark fast.
8. Binder clip rainbow earring organizer on cardboard
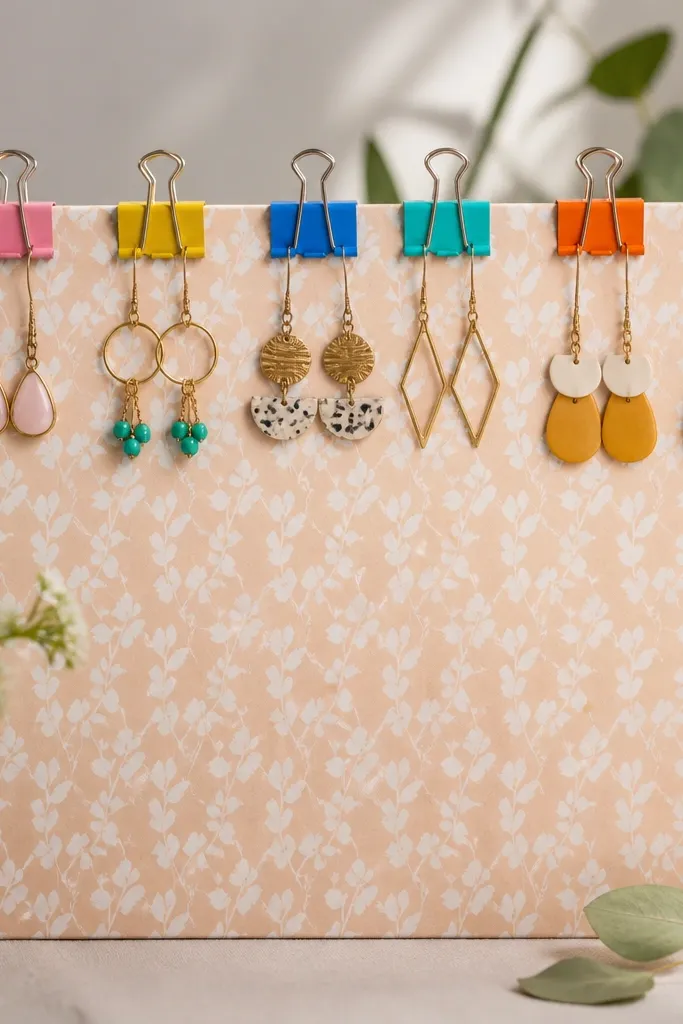
This is the fastest cheap diy jewelry organizer I've made for a guest room. The binder clips create instant sections, and bright clips turn the whole thing into decor. Using patterned paper behind them hides cardboard edges and makes it look layered. It works best for small studs and lightweight hoops.
Cover a piece of thick cardboard with patterned scrapbook paper using Mod Podge. Attach binder clips in a row - space them 1.5 inches apart. Clip earrings by type: studs in the center, hoops on the ends so they don't tangle.
Pro tipUse a hot glue dot to keep each clip handle from sliding over time.
AvoidAvoid cardboard-only edges without covering - the organizer looks unfinished in a hurry.
9. Clear acrylic shoebox mini organizer for travel jewelry

If you lose pieces when you travel, a clear shoebox is the simplest fix. You can see everything through the lid, and the compartments stop chain tangles. Fabric lining keeps metal from scratching and makes the box feel nicer than plain plastic. It's also easy to clean.
Use a clear plastic storage box and add removable dividers from thin foam board wrapped in fabric. Cut dividers to fit so they don't rattle. Pack rings in one section, earrings in another, and fold chains into a separate "flat" pocket.
Pro tipWrap chains in tissue paper before placing - it prevents knots even after a bumpy trip.
AvoidSkip overfilling - crowded compartments cause pressure tangles.
10. Magnetic strip for metal earrings and pins
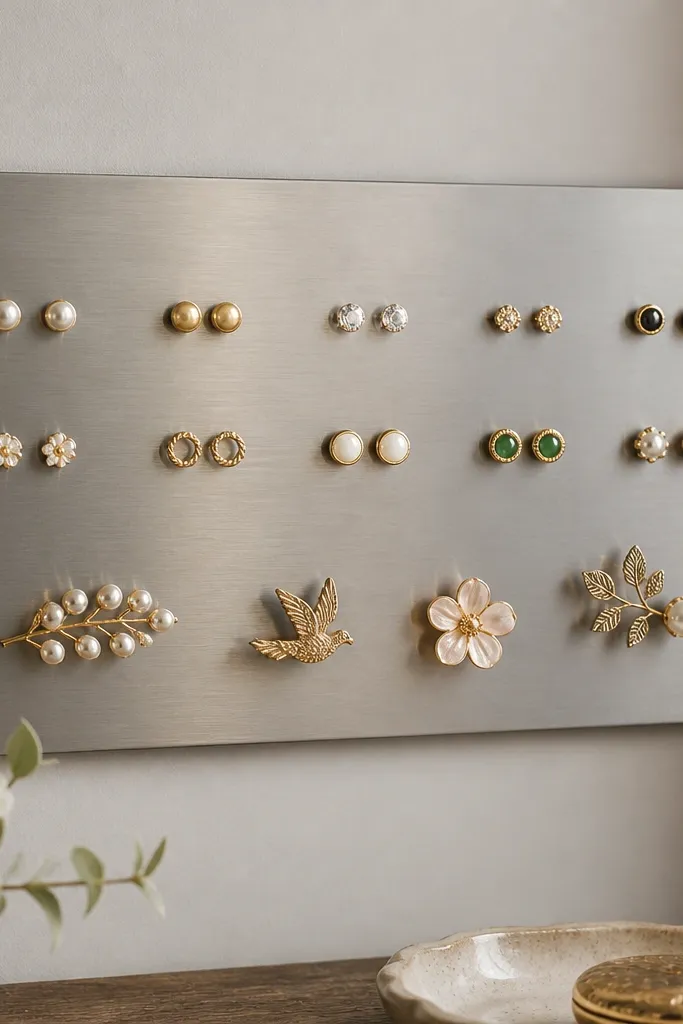
Magnetic storage is surprisingly clean when your earrings have metal backs or you use magnetic earring holders. The magnets hold flat pieces without hooks, so nothing pokes or catches fabric. I use this for brooches and any earrings that are already magnetic. It looks sleek and modern.
Mount a magnetic strip with screws or strong adhesive tape made for metal surfaces. Arrange earrings in a grid, keeping heavier pieces on the lower third. If you don't have magnetic backs, add magnetic earring pads to your studs with a tiny dab of adhesive meant for metal.
Pro tipWipe the strip with rubbing alcohol before sticking anything new so the adhesive bonds better.
AvoidAvoid magnetic storage for delicate wire posts - they can bend when you remove them.
11. Drawer insert using cut-up cereal box dividers
Cardboard is strong enough for jewelry if you wrap it properly. This cheap diy jewelry organizer hides the "made from boxes" look by covering everything with fabric and tying the colors to your room. It's also easy to rebuild if you change how you sort. I like it for small dresser drawers where you don't want a bulky tray.
Use cereal box cardboard for thickness, then cut dividers with a craft knife. Cover the top and sides with adhesive fabric sheets or spray adhesive + fabric. Line the bottom with felt so pieces don't slide.
Pro tipLabel compartments with tiny stitched fabric tabs so the organizer stays organized for months.
AvoidDon't leave cardboard edges exposed - they snag and peel.
12. Hanging shower curtain ring necklace stand
Shower curtain rings are cheap and they slide necklaces without snagging. The rings create a clear "lane" for each necklace, so lengths don't braid together. I use this when I want a vertical organizer that doesn't require pegboard. It looks artsy and light.
Mount a short dowel to the wall with two brackets. Thread necklaces through shower rings and hang rings on the dowel at different heights. Keep rings about 2 inches apart so clasps don't bump.
Pro tipPaint the dowel and rings with the same satin color for a matched look.
AvoidSkip metal rings with sharp edges - they can scratch chain plating.
13. Wine cork board with mini photo clips
Cork is soft, so earring posts and pushpins go in easily. Photo clips let you grab and swap without fighting with hooks. This works well for lightweight earrings and bracelets you change often. It also looks warm and homey on a nightstand or bathroom wall.
Glue cork sheets to a thin backing board. Add small hooks at the top for necklaces, then clip earrings onto mini photo clips attached to the cork. Space clips 1-2 inches apart so they don't overlap.
Pro tipUse black pushpins for a cleaner look than natural cork pins.
AvoidAvoid glossy cork - it shows every fingerprint and looks cheap fast.
14. Picture frame with wire mesh for statement earrings
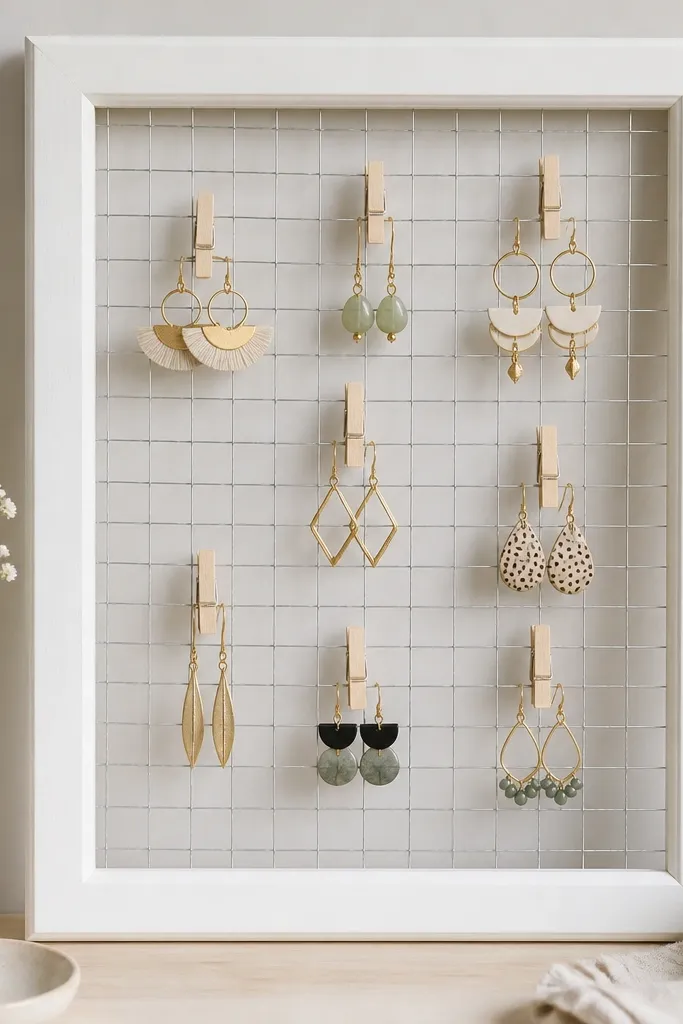
Wire mesh gives you lots of attachment points, and clothespins are easy to move. This is perfect for statement earrings because you can cluster by color and swap daily. The frame keeps it from looking like a craft project. It's also easy to adjust when you buy new earrings.
Remove the back of a frame and stretch wire mesh across the opening. Staple or screw it in place, then clip earrings using mini clothespins. Use a backing sheet to hide the staples if needed.
Pro tipPaint clothespins the same color as the frame for a uniform look.
AvoidDon't hang heavy chandeliers from clothespins - the pressure can twist the earring wires.
15. Pegboard + acrylic standoff shelves for bangles
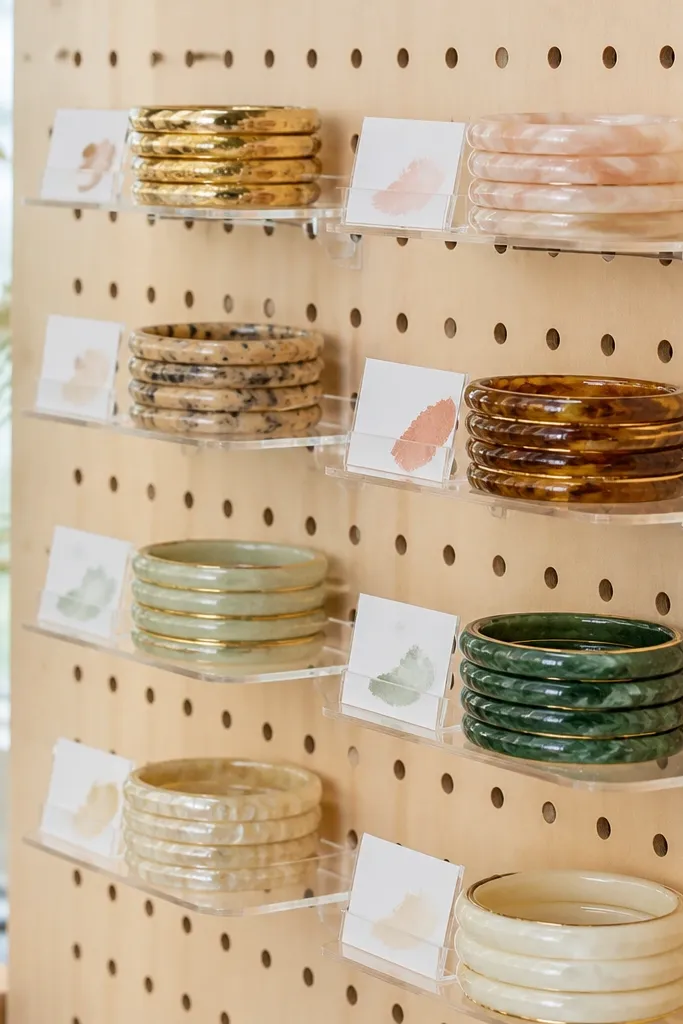
Bangles need flat surfaces with edges so they don't slide. Small acrylic shelves keep them visible and organized by size. Pegboard lets you reposition shelves without rebuilding the whole thing. The clear shelves also make the organizer feel light instead of bulky.
Mount pegboard and attach acrylic standoff shelf supports at measured heights. Cut acrylic shelf pieces to about 4x6 inches each and screw them to supports. Add label sleeves made from clear tape and paper strips.
Pro tipUse foam tape under acrylic to prevent scratching and reduce rattling.
AvoidSkip open pegboard-only storage for bangles - they fall into each other and scratch.
16. Plastic utensil caddy for earrings inside a dresser
Utensil caddies are made for compartments, so they work for jewelry without extra building. The plastic is easy to clean, and the shape keeps studs from rolling. I like this for drawers where you want quick access but don't want hooks on the wall. It's also cheap enough to replace when you outgrow it.
Pick a caddy with at least 8-10 slots. Line the bottom with felt and place studs in the narrow slots. For hoops, use the wider slots or add a small divider from craft foam.
Pro tipStick tiny fabric dots under each slot to mark gold vs silver.
AvoidAvoid glossy unlined plastic - earrings slide and the organizer starts looking chaotic.
17. Tension rod + shower hooks necklace wall rack
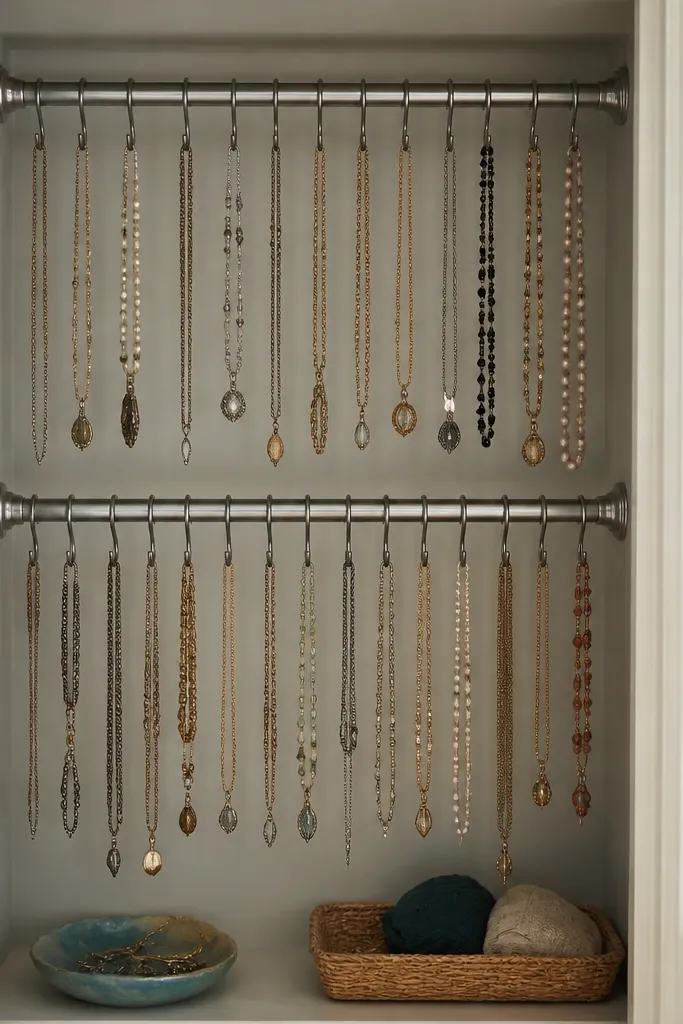
This is a renter-friendly organizer that looks clean in a closet. Tension rods hold steady, and shower hooks let you hang necklaces without tangling. It keeps necklaces out of sight but easy to grab. The hooks also work for small belts and scarves if you want to re-use the system later.
Install tension rods inside a closet or behind a door frame. Hang shower hooks evenly across the rod, using one hook per necklace. Keep a consistent direction so clasps face the same way.
Pro tipUse a small strip of removable label tape on each hook row to match necklace lengths.
AvoidDon't hang chains too long - if they reach the floor, they tangle on the next grab.
18. Yarn spool earring organizer with painted circles
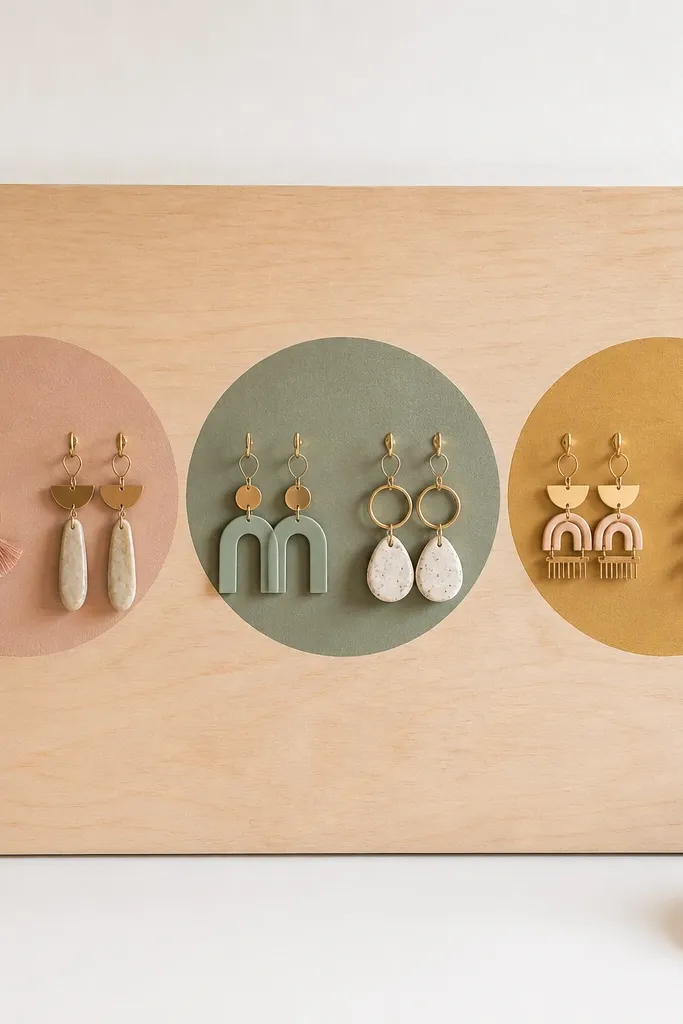
Spools and round shapes make earring storage feel playful instead of strict. Painted circles guide where each earring pair goes, and the hooks keep them visible. This works great for matching sets because you can assign each circle to a category. The board looks like wall art when you're not staring at it.
Draw three or five circles on a board and paint them in two tones like teal and cream. Screw in small hooks on the circle edges for a balanced look. Hang earrings so posts point outward and dangles sit inside the circle.
Pro tipUse a fine-tip paint pen to outline circles so the edges stay crisp.
AvoidAvoid thick paint blobs around hook holes - they make hooks sit crooked.
19. Clear tape + fabric pinboard for lightweight earrings
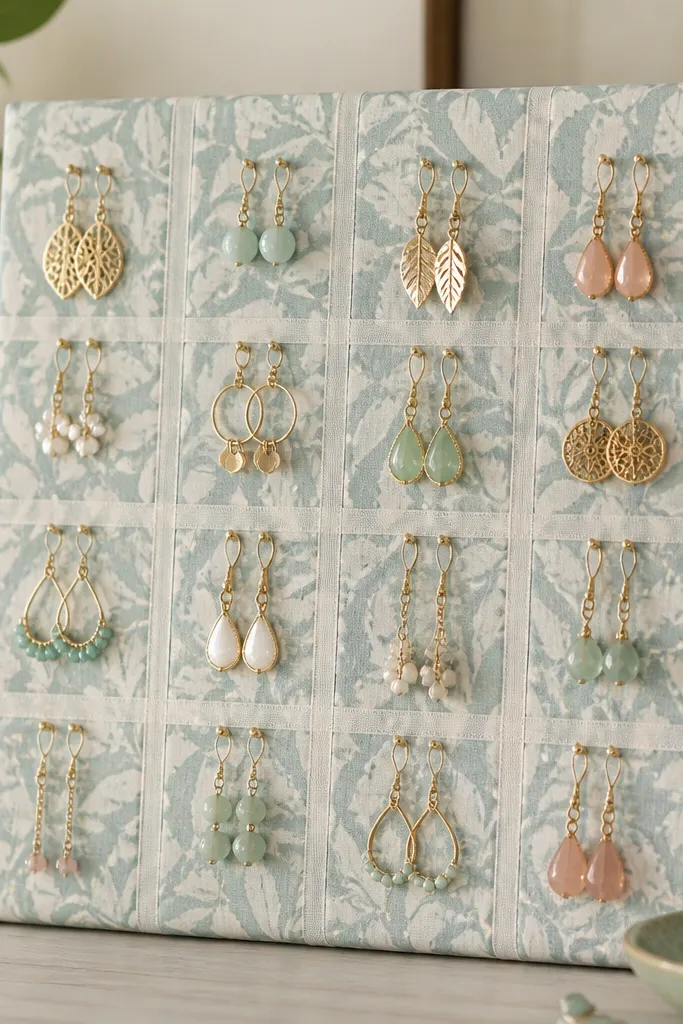
This is a low-cost way to get a grid without buying cork or pegboard. The fabric gives you a soft background that hides pin holes, and the clear tape lines keep your layout straight. Use it for studs, mini hoops, and lightweight earrings. It looks neat because the grid is intentional.
Wrap a board with fabric and tape the edges on the back. Add clear tape strips across the front to form a grid. Push straight pins into tape corners for grip, then hang earrings by inserting posts into the pins.
Pro tipPin earrings with posts first, then rotate them to straighten the angle.
AvoidSkip heavy dangling pieces - pins can bend and the layout sags.
20. Bottle cap magnet tray for rings and tiny studs
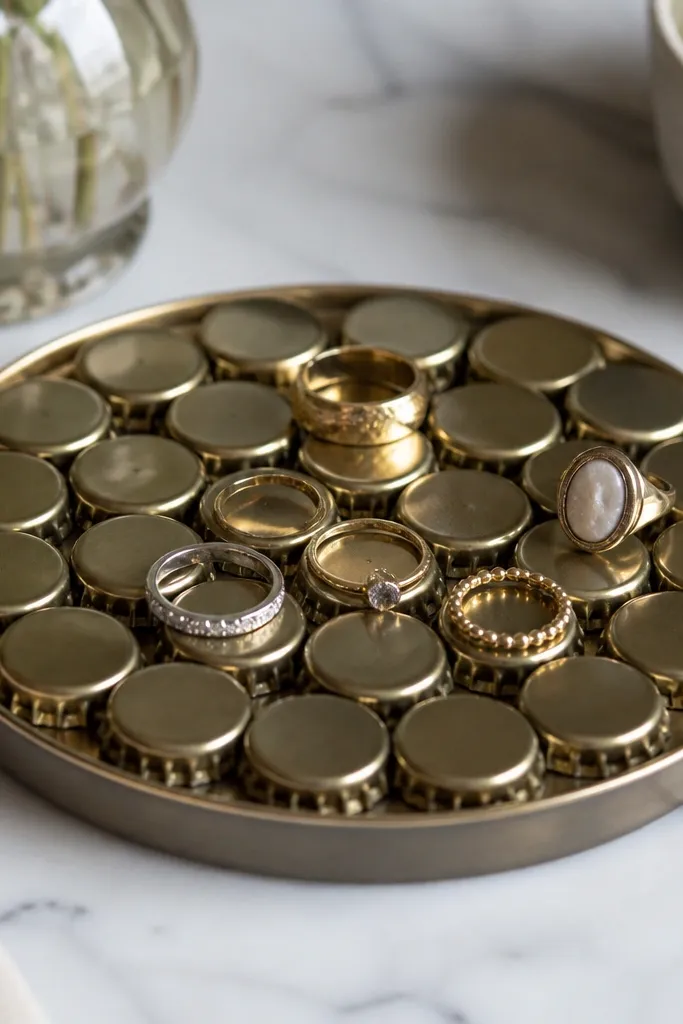
Rings and tiny studs drift and scratch on open trays. Bottle caps give you defined "landing spots," and the magnets keep pieces from sliding. This looks fun and slightly industrial because of the metallic caps. It's also a great way to use magnets you already have.
Glue bottle caps onto a shallow wooden or plastic tray. Attach small magnets under each cap with epoxy so they stay centered. Seal the top with a thin clear coat so the surface doesn't grab lint.
Pro tipGroup rings by size: small rings on one side, larger bands on the other.
AvoidAvoid magnets that are too strong for delicate stones - they can pull pieces out of their settings.
21. Lid-mounted jewelry organizer on a turntable base
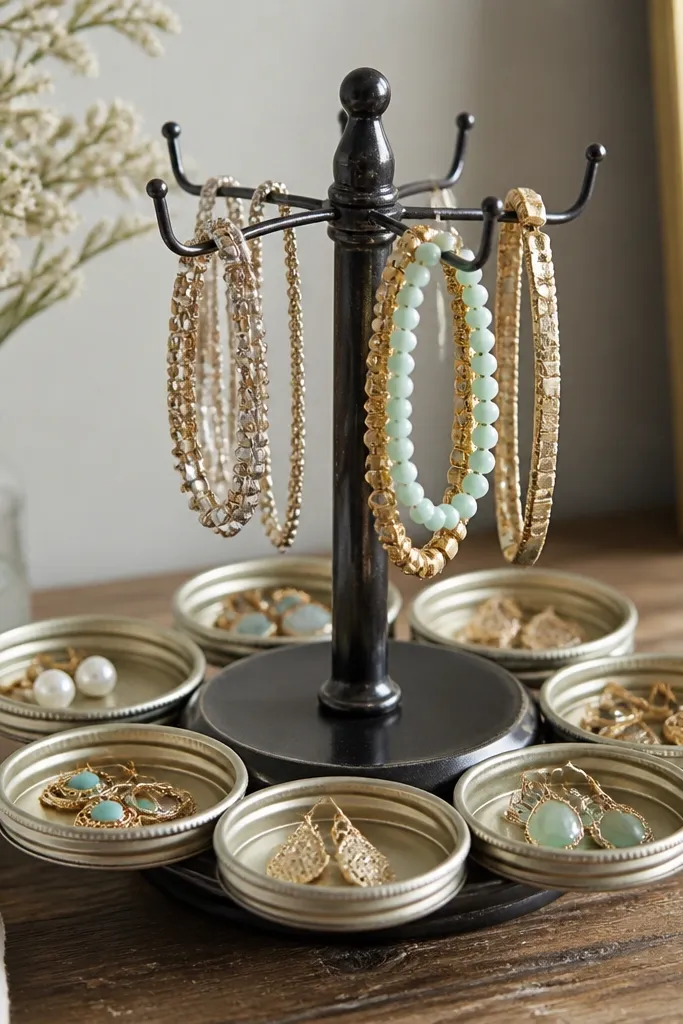
Rotation makes it feel effortless to pick earrings. Jar lids create shallow compartments for studs, and hooks on the top rim hold small necklaces. I built this for a vanity corner where I wanted storage that also looks like a decorative object. It's cheap because the turntable is the only "real" hardware.
Use a cheap plastic or wooden turntable base. Glue or screw jar lids around the edge, then line each lid with felt. Add 6-8 small hooks on a thin top strip and hang bracelets or short necklaces there.
Pro tipUse non-slip shelf liner under the turntable so it doesn't slide when you spin it.
AvoidSkip loose lids - if they wiggle, jewelry starts rattling and the whole piece looks unfinished.
22. Tin can + dowel earring chandelier
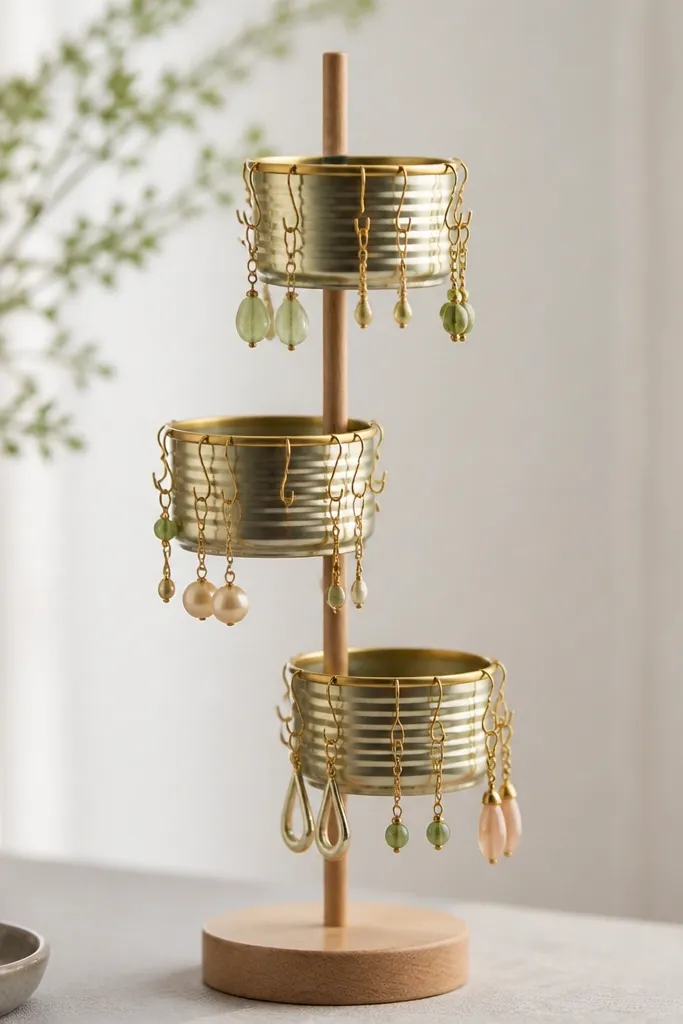
This looks like a tiny sculpture, and it's practical for earrings you wear often. Tin cans hold extra pairs, and the dowel gives you a central spine for hooks. The layered heights help you visually separate studs, hoops, and drops. It's also forgiving if your collection changes.
Mount a dowel vertically using a base board or wall screws. Attach three tin cans at staggered heights with hot glue and a strap clamp. Screw small hooks into the dowel and hang earrings by category.
Pro tipPaint cans and dowel the same color, then keep hooks in a contrasting finish like black.
AvoidDon't skip spacing - if hooks are too close, earrings tangle when you pull them.
23. Reversible fabric jewelry roll with snap compartments
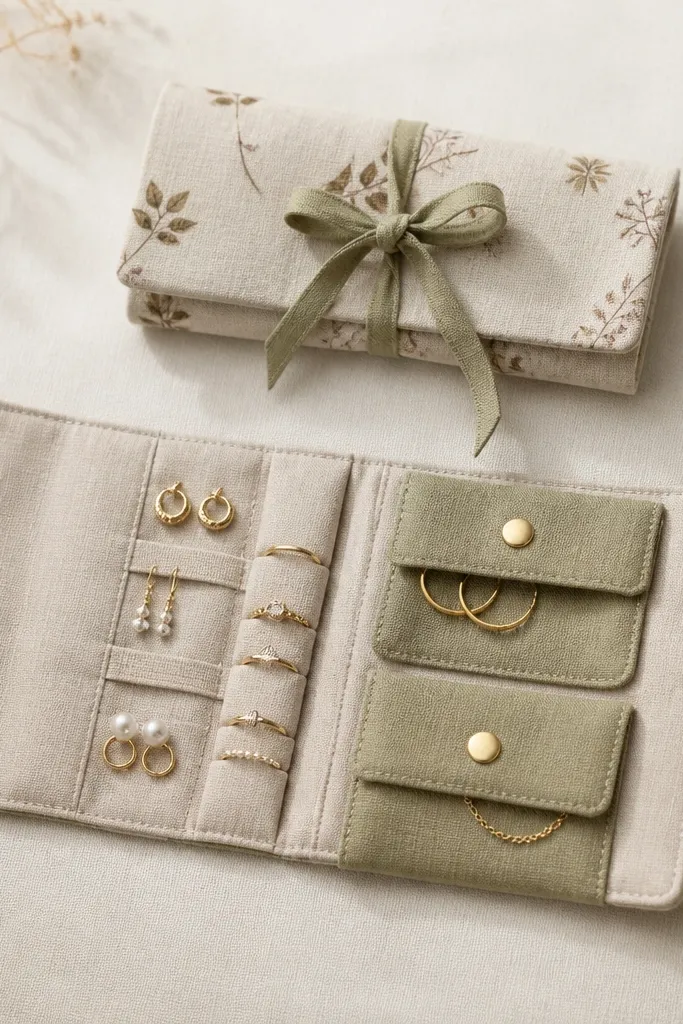
A jewelry roll solves tangles better than most boxes because pieces lie flat. Elastic loops keep rings and small studs from sliding, and snap pockets keep chains from snagging. I like reversible rolls because you can match it to your bag or outfit. It's not wall storage, but it's the best solution for daily grab-and-go jewelry.
Use sturdy cotton canvas and add interfacing for structure. Sew elastic loops in rows and make snap pockets for earrings. Roll it tight, then tie with ribbon or wrap a strap around.
Pro tipAdd a small pocket on the outside for earring backs so you don't lose them.
AvoidAvoid thin fabric without interfacing - the roll collapses and your sections blur.
24. Wood pallet board with metal wire loops
Pallet wood makes a great backing because it already looks textured and rustic. Wire loops are flexible and adjust to bracelet widths without cracking. This organizer works when you want a bold, handmade look over a dresser or entry. It also hides minor sanding mistakes because the wood grain already shows character.
Sand pallet wood lightly and seal with matte clear spray to prevent splinters. Bend wire into loops, then screw loop ends into the board with washers. Add 3-5 small hooks for earrings near the bottom.
Pro tipUse a drill bit slightly smaller than the wire screws so the wood grips tight.
AvoidSkip leaving raw edges - splinters show up fast when you grab bracelets.
25. Pegboard + spray-painted plastic drawer pulls for necklaces
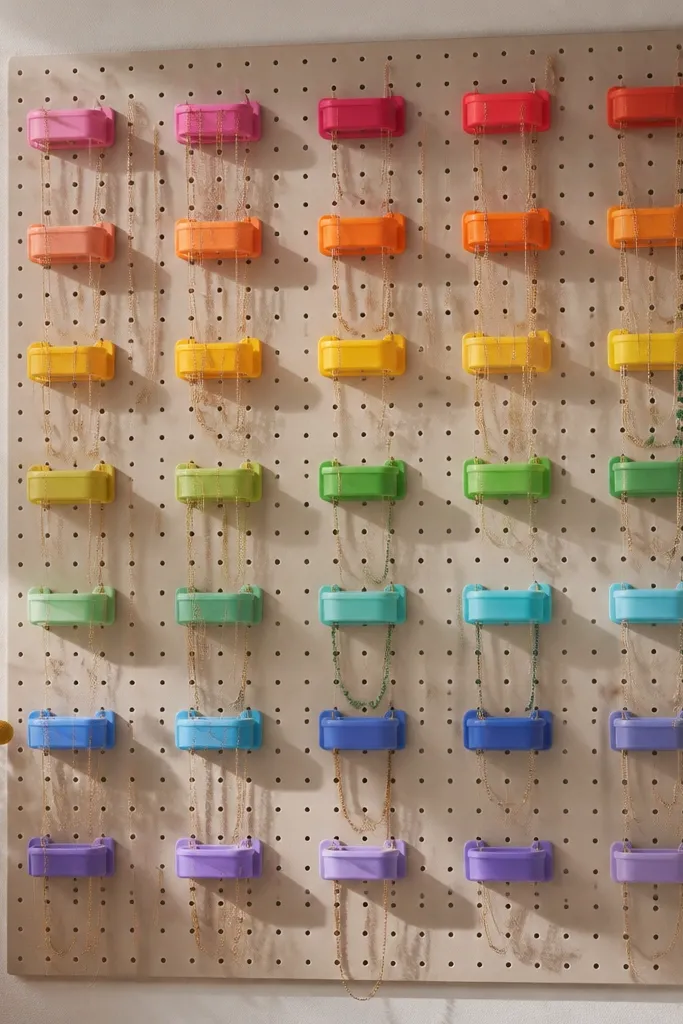
Plastic drawer pulls are cheap and they grip chain clasps without sharp hooks. When you spray them in a matching set of colors, the organizer looks like design work instead of hardware. The pulls also keep necklaces from twisting because they hang in a straight line. It's great for layered necklaces you want to grab quickly.
Attach drawer pulls to pegboard with small screws. Spray paint in two or three coordinated colors and let cure fully. Hang one necklace per pull, keeping each chain length aligned so the gradient looks intentional.
Pro tipSort necklaces by length first, then assign pulls from top to bottom.
AvoidAvoid using unpainted glossy plastic - it looks cheap and catches glare.
26. Stackable acrylic risers for rings and earrings
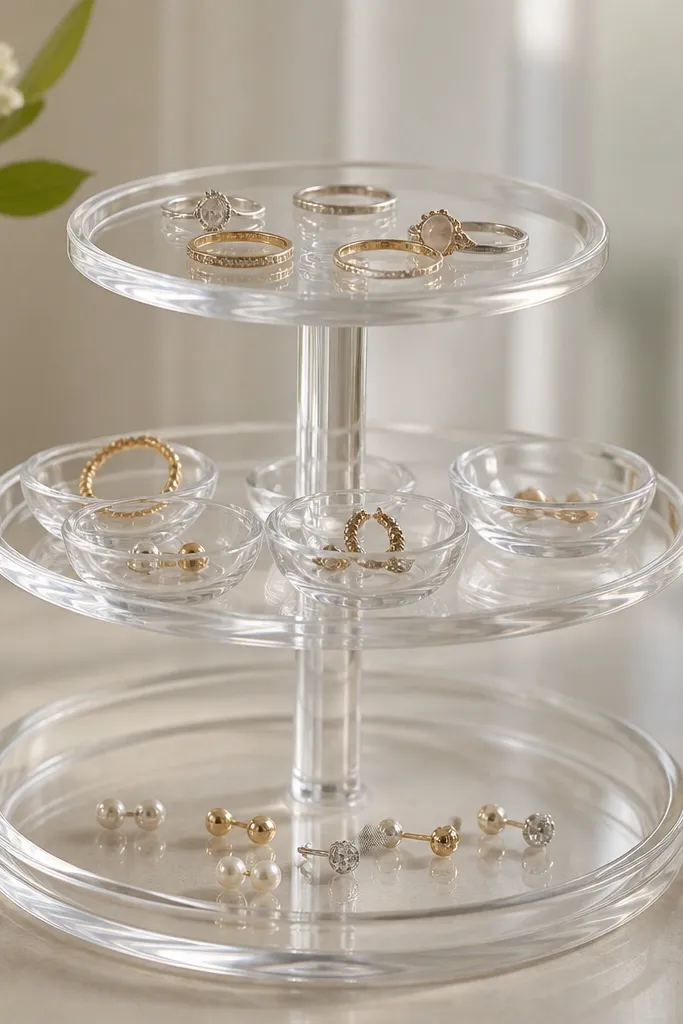
Clear risers keep your jewelry visible and stop the "pile in a bowl" problem. Acrylic tiers make rings look like they're displayed in a shop. You can build a similar setup cheaply with stacked plastic containers or acrylic scraps. It's the best choice if you like a clean, minimal look.
Use clear plastic risers or cut acrylic sheets into three shallow tiers. Add small earring cups made from tiny silicone molds or folded felt squares. Place rings in shallow sections so they don't slide off the edge.
Pro tipWipe acrylic with microfiber cloth so it looks crystal clear under light.
AvoidSkip overcrowding - rings and studs mix together fast on flat trays.
27. Ribbon + shower hook organizer for earrings and chains
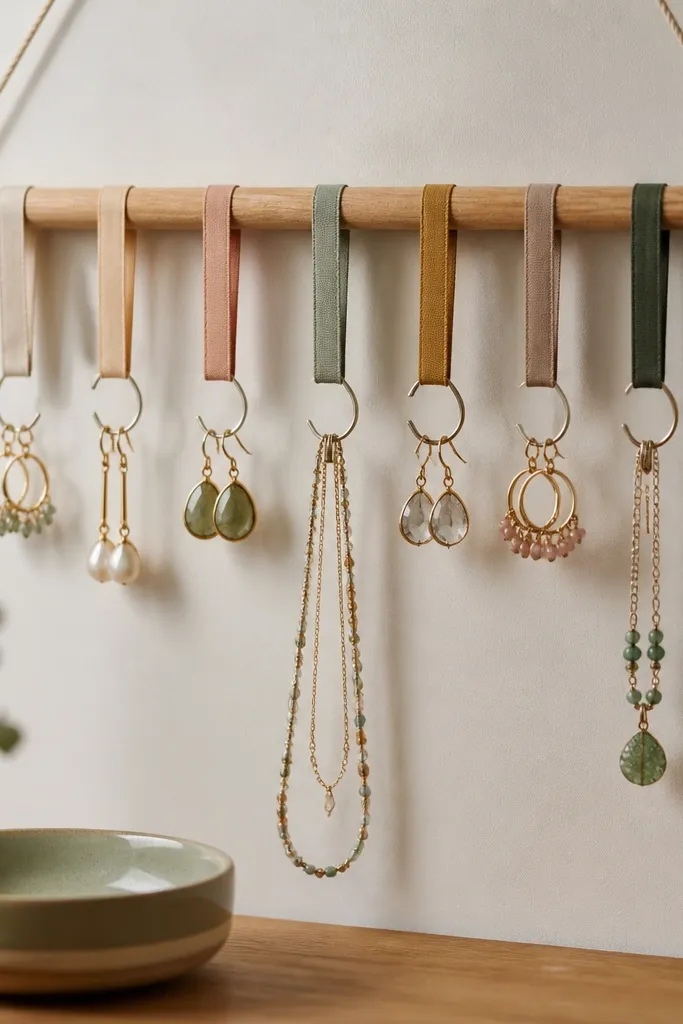
Ribbons add softness and make the organizer feel decorative. Shower hooks clip easily, and the ribbon length lets you adjust how far pieces hang. This works well for earrings that tangle easily because you can keep them separated by ribbon lanes. It also looks pretty in a bedroom corner where you want storage to blend in.
Attach a dowel to the wall with two mounts. Tie ribbons of equal width to the dowel at different heights, then clip shower hooks to ribbon ends. Hang earrings in hook loops and keep necklaces on the lower hooks so they don't snag on top pieces.
Pro tipUse satin ribbon for a smooth finish, then trim ends with a lighter to stop fraying.
AvoidAvoid stretchy ribbon - it droops and makes the whole organizer look messy.
28. Color-blocked cork tiles with label stickers
Color-blocking makes it easier to sort by mood or outfit. Cork tiles let you pin earrings in a stable spot, and labels keep you from forgetting where you put pairs. The color scheme makes the organizer look like decor, not a storage hack. I've used this on a small board because it fits behind a mirror or in a bedroom corner.
Paint cork tiles with craft paint in two or three colors. Seal with a thin clear matte spray so the pins go in smoothly. Arrange tiles on a board, then add label stickers on each tile edge and pin earrings into the cork.
Pro tipUse a fine paintbrush to clean the tile borders so colors don't smear.
AvoidSkip glossy sealant - it makes cork slippery and pins loosen.
29. Mini ladder with clothespins for necklaces
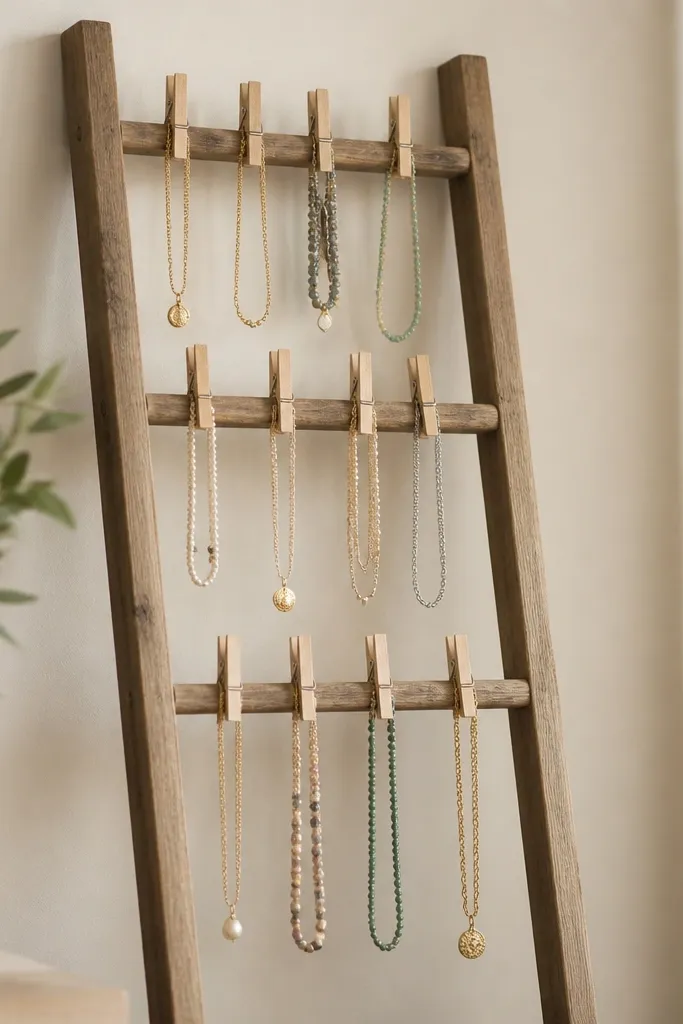
A ladder gives you natural height levels, so necklaces hang in separate lanes. Clothespins are cheap and adjust as you add pieces. This looks great in a corner because it reads like decor even when it's open. It's also easy to reconfigure without tools.
Use a mini wooden ladder or make one from scrap dowels. Clip necklaces into clothespins and attach them to different rungs. Keep chains facing the same direction so clasps don't twist.
Pro tipPaint the ladder white or black, then stain clothespins with a dark wood stain for contrast.
AvoidAvoid unsealed wood ladder - it scuffs and starts looking worn fast.
30. Clear plastic organizer with paper dividers for earrings
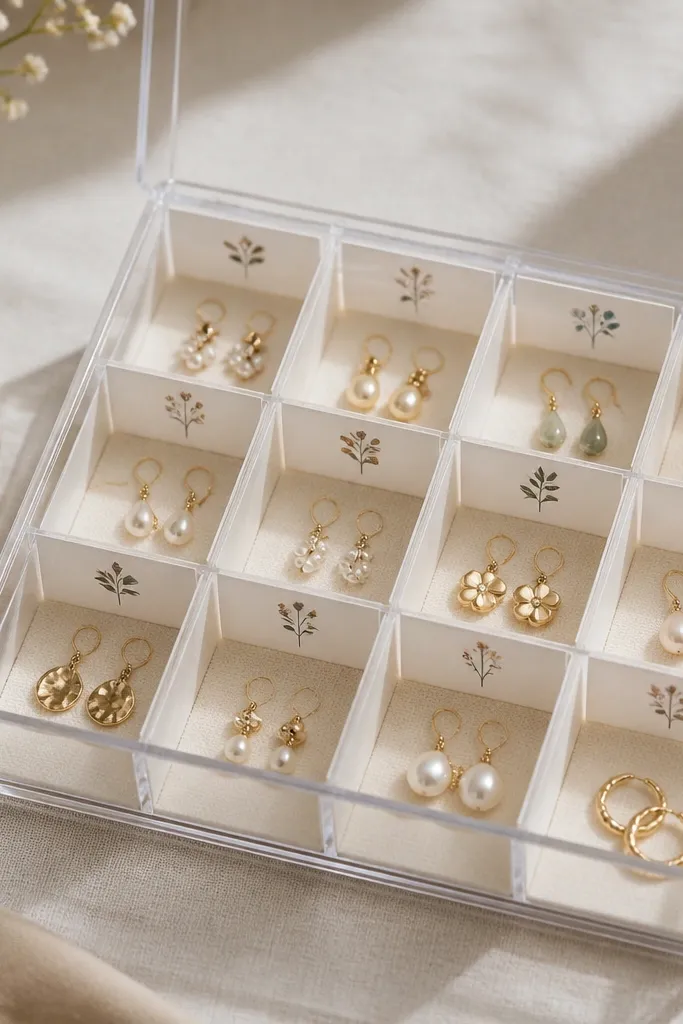
Clear organizers keep you from digging, and paper dividers let you customize sizes. I like this for studs and small drops because they lie flat and don't tangle. The labels are the difference between "storage" and "something you actually use." It looks neat because everything has a boundary.
Use a clear organizer box with compartments, or add dividers by inserting thin cardstock sheets. Seal the paper labels with clear tape so they don't peel when you wipe the box. Arrange earrings by type and keep each type in its own compartment.
Pro tipUse a label maker or write neatly with a fine black marker and a ruler.
AvoidAvoid handwritten labels without straight lines - the organizer looks sloppy.


