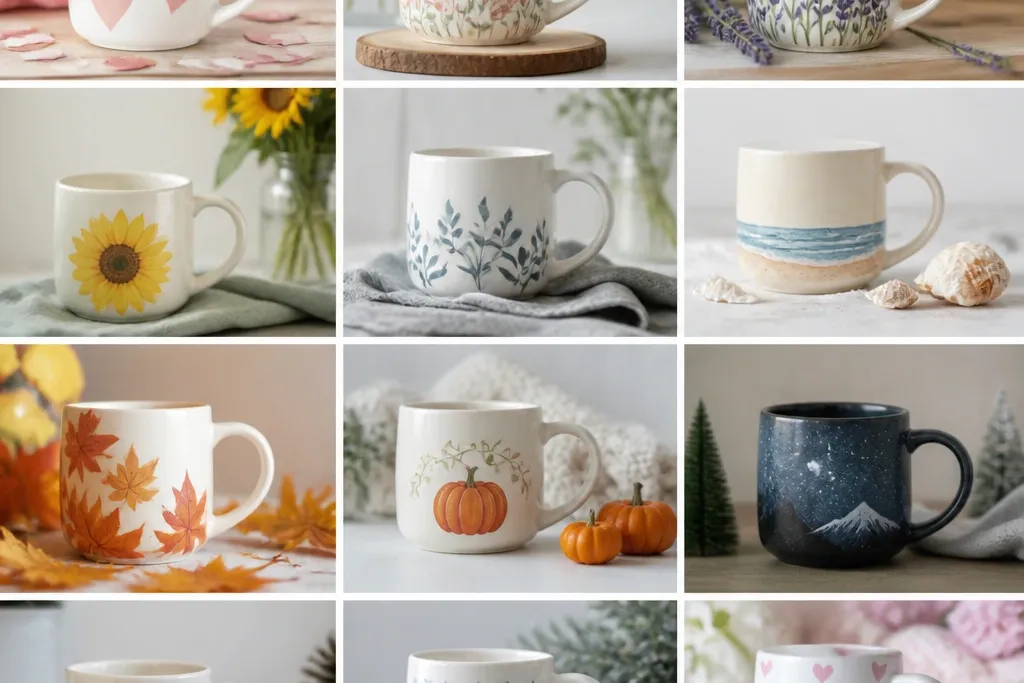
1. Cinnamon Roll Swirls with a Vanilla Outline
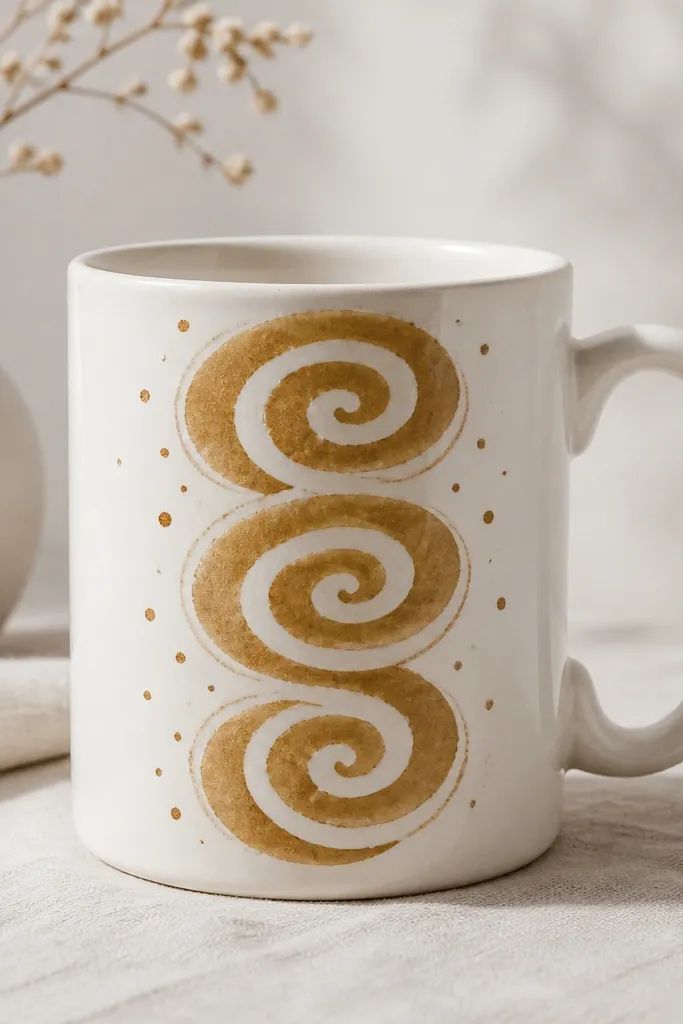
Paint three overlapping spirals in warm tan-gold (think cinnamon stick color) and outline them in creamy off-white so the swirl edges stay crisp on the curved ceramic. Add tiny specks in darker brown to mimic baked cinnamon, then leave a clean gap near the rim so the design doesn't blur when viewed from above. It reads cozy and edible, which makes it a strong winter gift.
Lightly sketch the spiral path with a pencil, then paint with a round detail brush. Keep each spiral about 1.5 inches tall, and space the centers so they slightly overlap. Finish by adding specks with the tip of the brush and a dotting motion.
Pro tipLet the first spiral coat dry 20-30 minutes before outlining, or the outline will bleed into the gold.
AvoidDon't spread the tan paint too thin or it turns patchy and chalky after sealing.
2. Midnight Sky Constellations with Glow-in-the-Dark Stars

A deep navy base makes the stars pop instantly, even after the mug is filled. Use white paint pens for dot stars and a fine brush for the connecting lines. For extra fun, put a few dots in glow-in-the-dark paint so the mug looks magical at night.
Blend navy paint with a sponge from the bottom up, stopping about 1 inch below the rim. Add a constellation of 6-8 stars using a fine point pen, then connect two or three with short lines. Place glow dots only on the largest stars so it doesn't look messy.
Pro tipHeat-set your glow paint per its label so it doesn't fade quickly.
AvoidAvoid putting glow paint on every star - it looks uneven and cheap once it's cured.
3. Rainbow Ombre Bands for Pride and Play
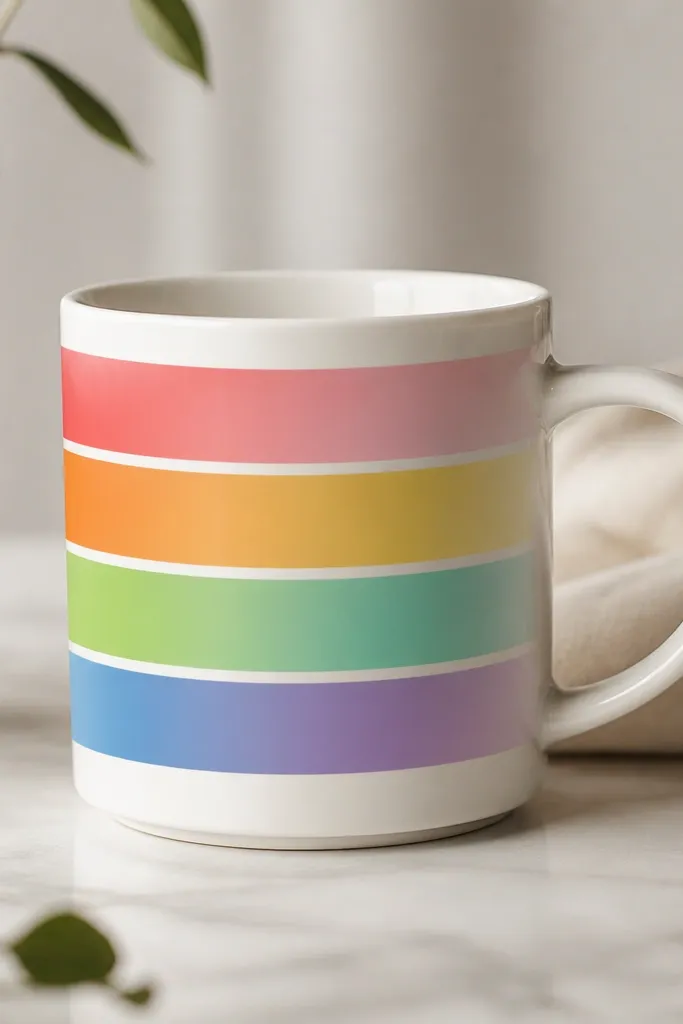
Horizontal bands look clean on mugs because they follow the curve instead of fighting it. Use five semi-transparent layers so the ombre blends smoothly. Keep the bands thick enough to show color after sealing and coffee staining.
Tape off four thin guide lines so your bands stay parallel. Sponge each band with two colors (for example, coral then pink) and blend at the center line. Let it dry completely between colors, then remove tape to reveal sharp boundaries.
Pro tipUse a makeup sponge cut in half so you get controlled blend edges.
AvoidSkip thin, watery paint - it streaks and turns gray after the clear coat.
4. Botanical Sprig in Sage and Terracotta
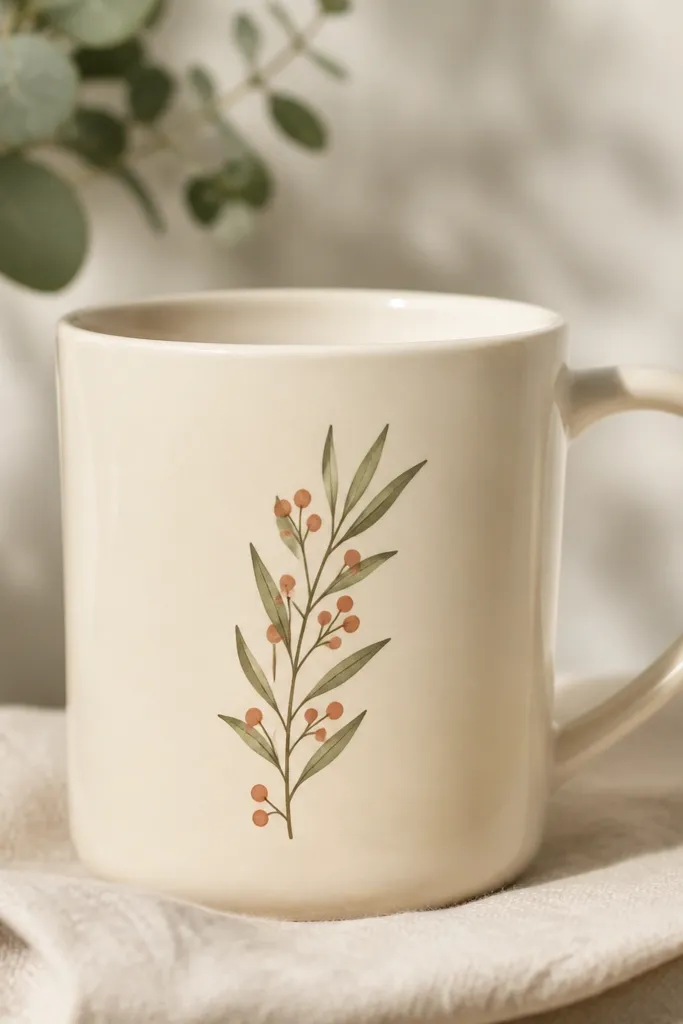
This design looks expensive because the lines are fine and the palette is restrained. Sage leaves stay soft and calm, while terracotta berries add warmth. The vertical layout works with the mug's height and makes the sprig look like it grew out of the ceramic.
Sketch a center line, then paint leaves with a small angled brush, using a thicker base and thinner tip. Add three to five leaf clusters, then paint berries as tiny circles with a dotting tool. Outline nothing; let the color variation create the shape.
Pro tipMix a tiny amount of white into sage for a lighter leaf highlight on the top edge.
AvoidDon't use black outlines - it makes the sprig look like a craft sticker instead of hand-painted.
5. Geometric Tape Blocks in Black, Cream, and Ochre
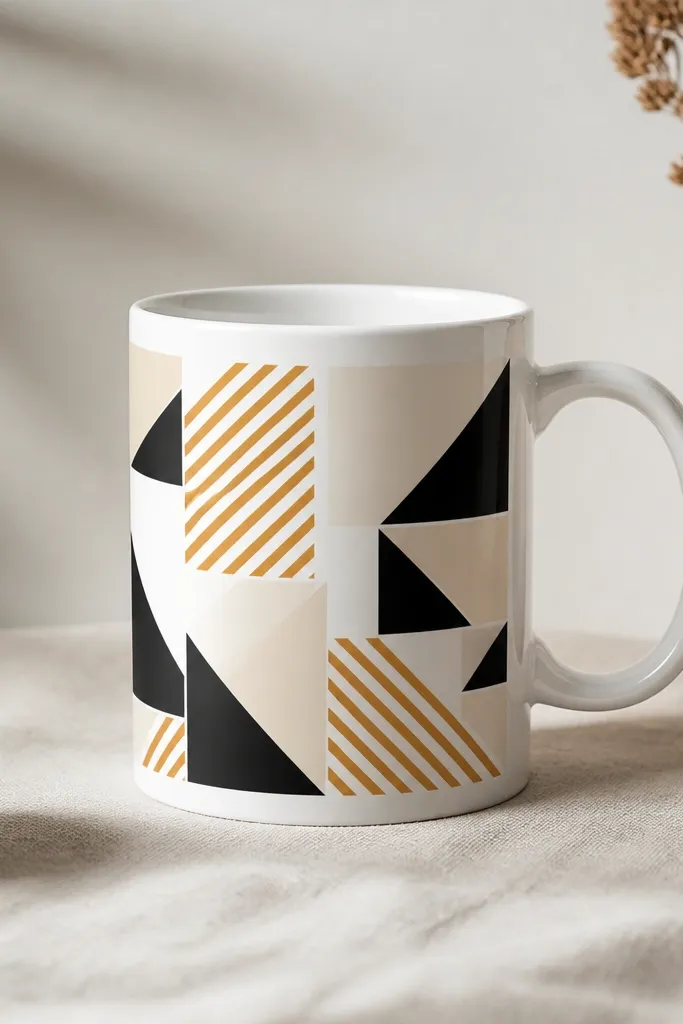
Tape blocks give you that graphic, modern look with almost no freehand pressure. Black and ochre create instant contrast, and cream keeps it from feeling too heavy. Because the shapes are bold, the mug still looks clean from across a room.
Use painter's tape to cover sections, then paint one color at a time. Let each color dry 15-20 minutes, pull tape slowly at a 45-degree angle, then re-tape for the next layer. Keep the total painted area to about 3 inches tall so it doesn't overpower the mug.
Pro tipBurnish tape edges with your thumbnail to prevent paint seepage.
AvoidDon't paint over wet tape - it seeps under and creates fuzzy lines.
6. Vintage Postcard Border with Tiny Flowers

The border makes it look like a keepsake postcard, and the tiny flowers add hand-made charm without taking over. Use muted colors so the design feels old-fashioned rather than loud. I like this for thank-you gifts because it's sweet but not childish.
Paint a double-line border using a fine liner brush, spacing the lines about 1/8 inch apart. Add 6-10 micro flowers inside using a dot for the center and five quick strokes for petals. Add corner dots in a light gray to finish the postcard feel.
Pro tipPractice flower placement on paper - the mug curve makes spacing feel different.
AvoidDon't crowd the border - if flowers touch the rim band, the design looks cramped.
7. Hot Cocoa Steam Lines on Snowy White
Steam lines are an easy win because you don't need perfect symmetry to look cute. The dark cup anchors the design, and the white steam reads like motion. It's a cozy winter mug that still works for early fall if you swap the cup color warmer.
Paint a rounded cup shape with a slightly tapered top, then add a small handle suggestion with a thin line. For steam, draw three sweeping lines with a liner brush, then lightly drag the end of each line with a damp brush to soften the fade.
Pro tipAdd one tiny highlight dot on the cup for a slightly glossy look.
AvoidSkip thick steam paint - it looks like glue once sealed.
8. Monogram Heart in Two-Step Brushwork
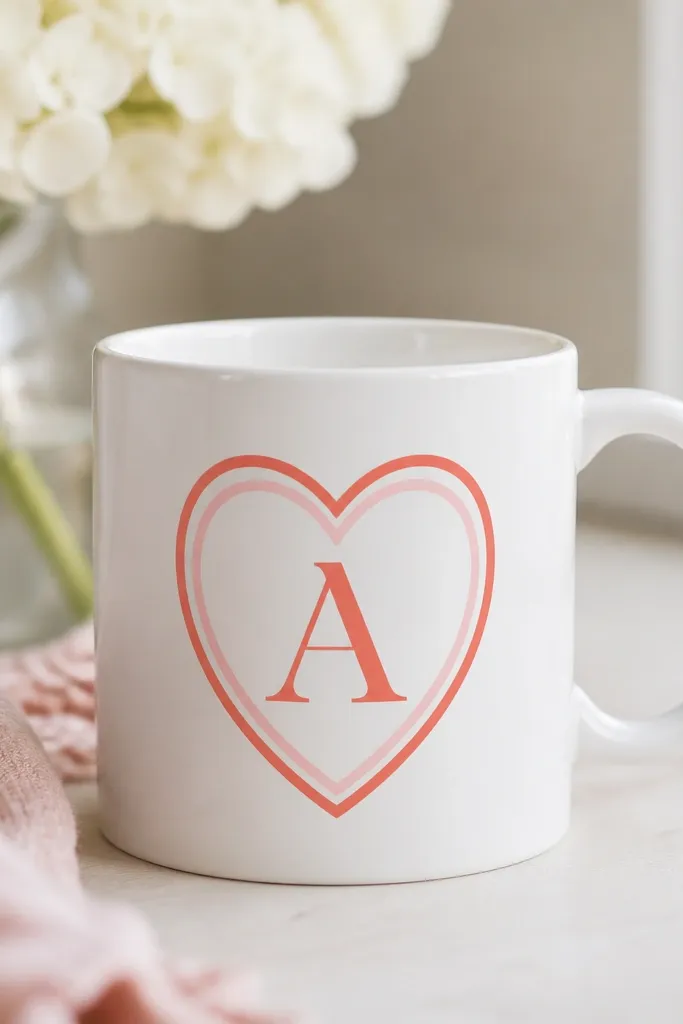
A monogram heart is the fastest "personal gift" style that still looks thoughtful. The two-tone heart gives dimension without shading complexity. Use the letter as your focal point and keep the heart outline clean so it doesn't get messy on the curve.
Lightly pencil the letter and heart, then paint the outer heart stroke first in coral. After it dries, paint an inner heart stroke in lighter pink, about 1/8 inch inside. Finally, fill the letter with a solid cream or matching coral for contrast.
Pro tipIf your letter looks shaky, use a stencil and paint over it, then lift the stencil while paint is still tacky.
AvoidDon't center the letter too low - it will disappear once you hold the mug.
9. Marbled Clay Look with Swirl Veins
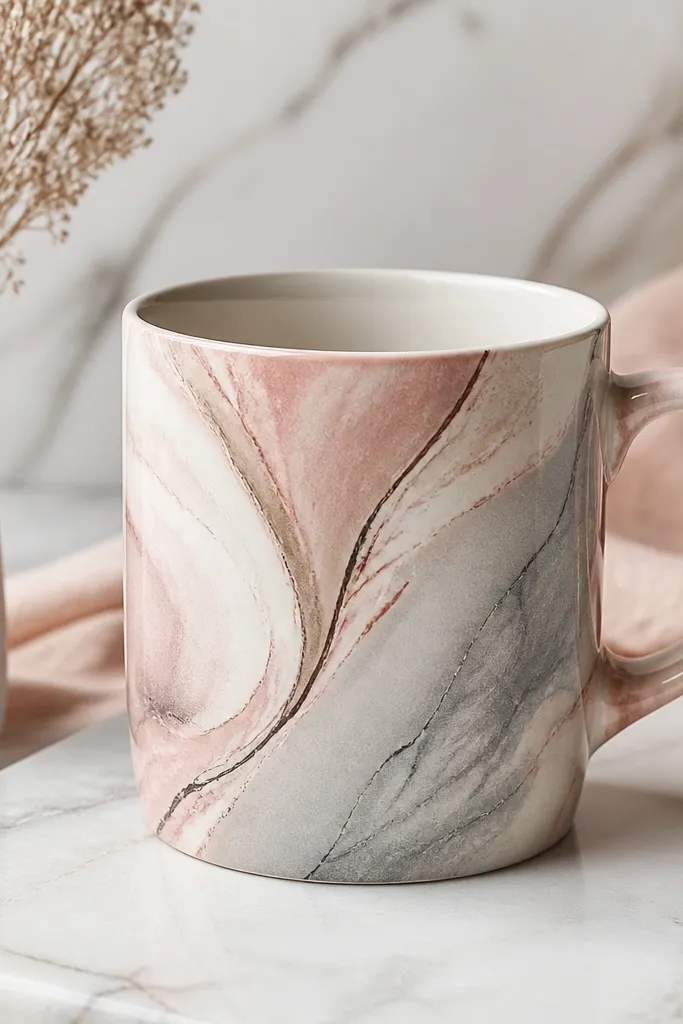
Marbling hides small brush mistakes because the pattern is organic. Dusty rose + cream keeps it feminine, and gray veins add realism. This one looks like store-bought ceramic because the texture reads like stone when you seal it.
Sponge on a base layer of cream, then dab dusty rose and gray in small patches. Use a toothpick to drag lines through the wet paint, creating swirl veins. Let it cure fully before any clear coat so the marbling stays smooth.
Pro tipWipe your toothpick between colors so the veins stay distinct.
AvoidDon't overmix the marbling - too much dragging turns it into muddy gray.
10. Coffee Bean Stamp Pattern with Brown Wash
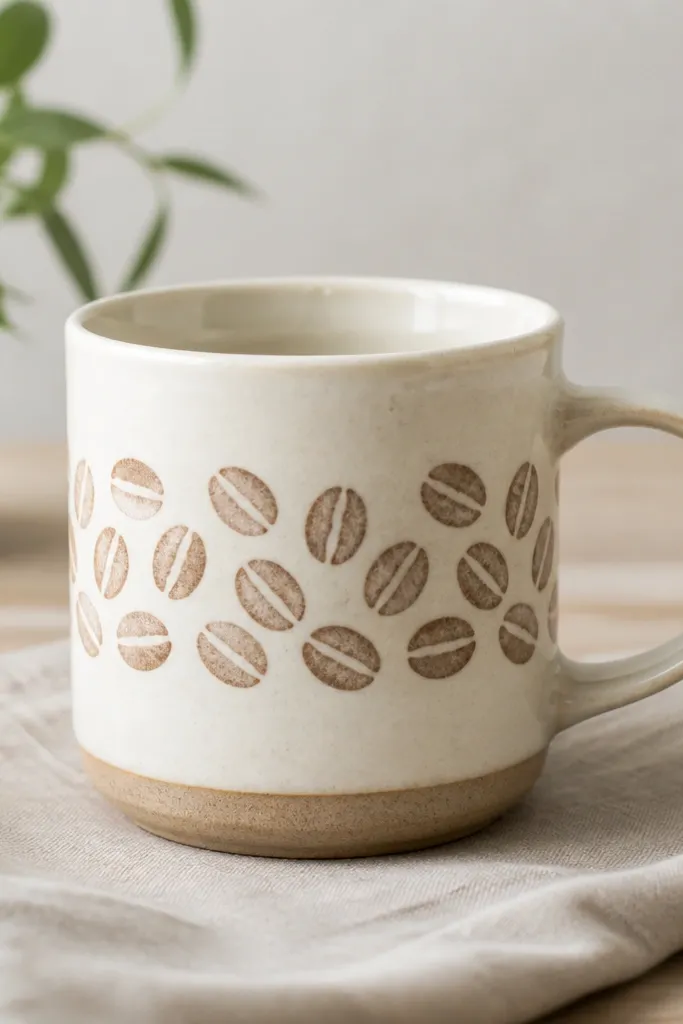
If you want a pattern without hand-drawing every bean, stamp it. A repeating coffee bean band looks great for everyday use and still feels gift-worthy. The light wash makes the pattern look vintage instead of flat.
Use a foam craft stamp shaped like a coffee bean, or carve a simple stamp into an eraser block. Stamp in medium brown across a 2.5-3 inch band, then dab a lighter brown wash over it with a sponge. Let it dry, then add a few darker stamp repeats for variation.
Pro tipTest stamp pressure on a paper towel first so you don't get blobs on the mug.
AvoidSkip heavy paint buildup - thick stamped layers crack when heat-set.
11. Watercolor Wash with a Bold "Sip" Banner

Watercolor splash behind a simple word gives you that artsy look without needing fancy lettering. Keep the word in dark navy so it stays readable through the wash. This style works for birthdays and casual thank-you gifts because it's playful but clean.
Sponge on a loose watercolor wash using diluted paint, then blot with a paper towel for soft edges. Once dry, paint a curved banner shape and fill the letters with a bold block font. Add a thin outline around the banner for crisp separation.
Pro tipUse painter's tape for the banner edges - freehand banners always look wobbly on mugs.
AvoidDon't paint the word before the wash is fully dry or it will bleed.
12. Halloween Jack-O-Lantern Faces in Orange Dots
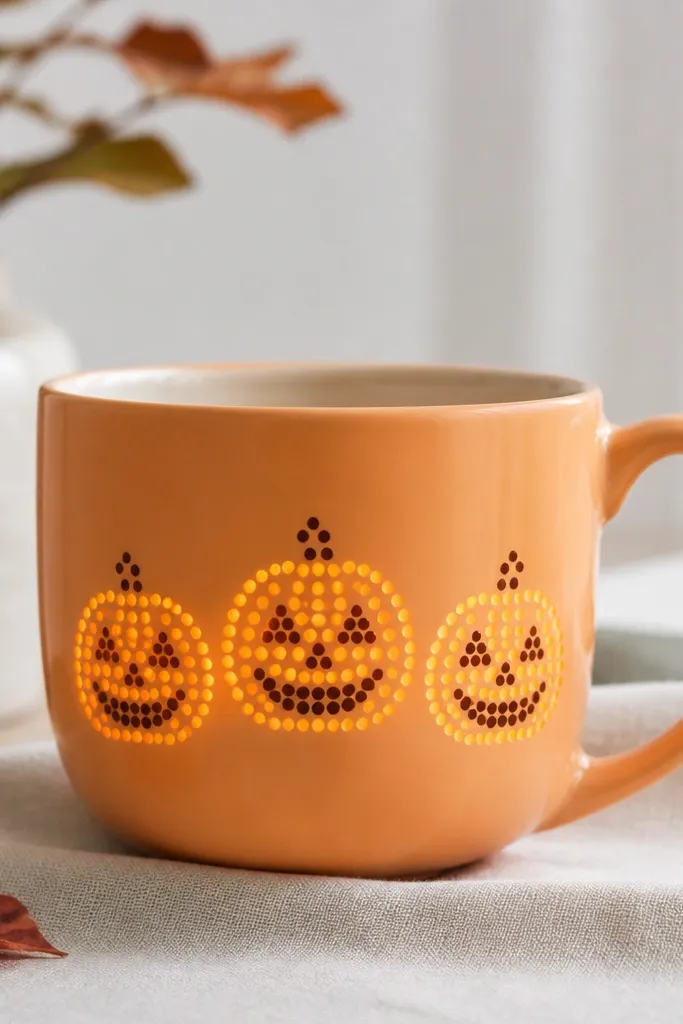
Dot clusters are easier than carving perfect faces and they look cute from any angle. Orange base ties it to the season, while darker dot features keep the faces readable. The dot style also forgives uneven spacing when you wrap the design around the curve.
Paint the base orange, then let it dry. Use a dotting tool to place small circles for eyes and mouths, and add a few larger dots as highlights. For the faces, keep each face about 2 inches wide and leave space between them.
Pro tipUse a toothpick for tiny nose dots - it gives you tighter control.
AvoidAvoid black for the eyes - it looks harsh and cheap on orange ceramic.
13. Thank-You Banner with Confetti Dots and Gold Sparkle

This is my go-to for teachers and neighbors because it's cheerful without being overly themed. Confetti dots make the mug look festive, and gold sparkle accents catch the light when the mug is moving. The teal text stays readable against white.
Paint the banner strip first with teal, then let it dry. Letter "Thank You" using a paint pen or stencil, then add confetti dots around the banner with three colors. Finish with tiny gold dots only in the corners of the design area.
Pro tipAdd a thin white highlight line under the teal letters if you want extra contrast.
AvoidDon't flood gold paint - too much makes the finish look gritty.
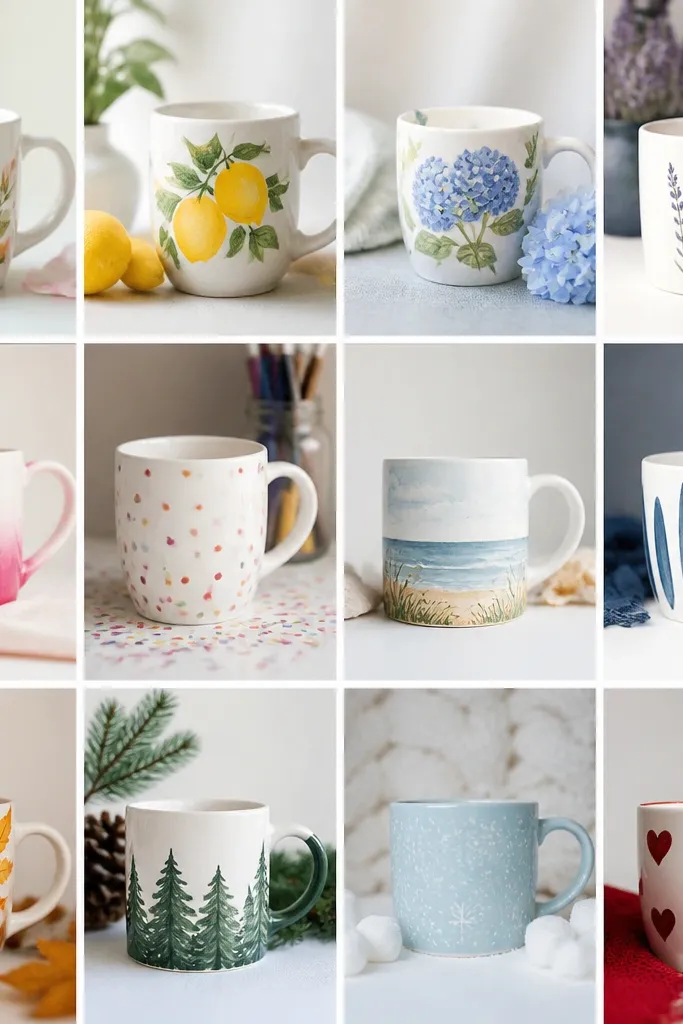
14. Spring Tulips with a Two-Color Stem
Tulips give you instant spring energy, but the two-color stem makes it look more hand-painted than stencil art. Coral-to-yellow petals feel bright even after sealing. Keep the stems slightly diagonal so the flowers look alive on the curved mug.
Paint stems in medium green, then add a thin darker green stripe down the center once dry. For petals, paint the coral base and blend yellow near the top edge with a sponge. Add two leaves and a small bud at the base if you want extra fullness.
Pro tipBlend petals while paint is still slightly tacky for a smoother gradient.
AvoidDon't use a single flat green for stems - it looks flat next to blended petals.
15. Winter Plaid Band with Red and Charcoal Lines
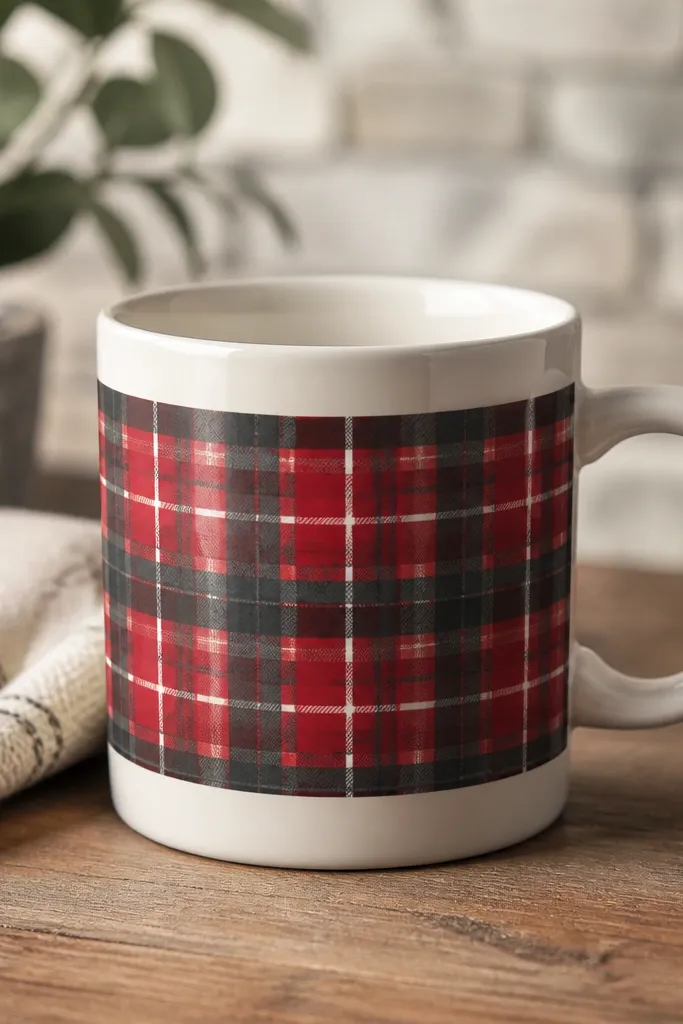
Plaid looks cozy and gift-ready with almost no shading. The trick is the grid: charcoal lines for structure, red blocks for warmth, and thin white separators so it doesn't blur after sealing. This style fits holiday gifts and also works for winter housewarming mugs.
Tape off a 3-inch band and paint the base block color (charcoal first or red first). Remove tape to reveal sections, then re-tape to paint the grid lines. Keep line width thin, about 1/16 inch, using a liner brush.
Pro tipUse a ruler and mark tape spots on paper first so your mug band spacing stays even.
AvoidAvoid thick plaid lines - they look like stickers once the clear coat goes on.
16. Minimal Black Cat Silhouette with Gold Eyes
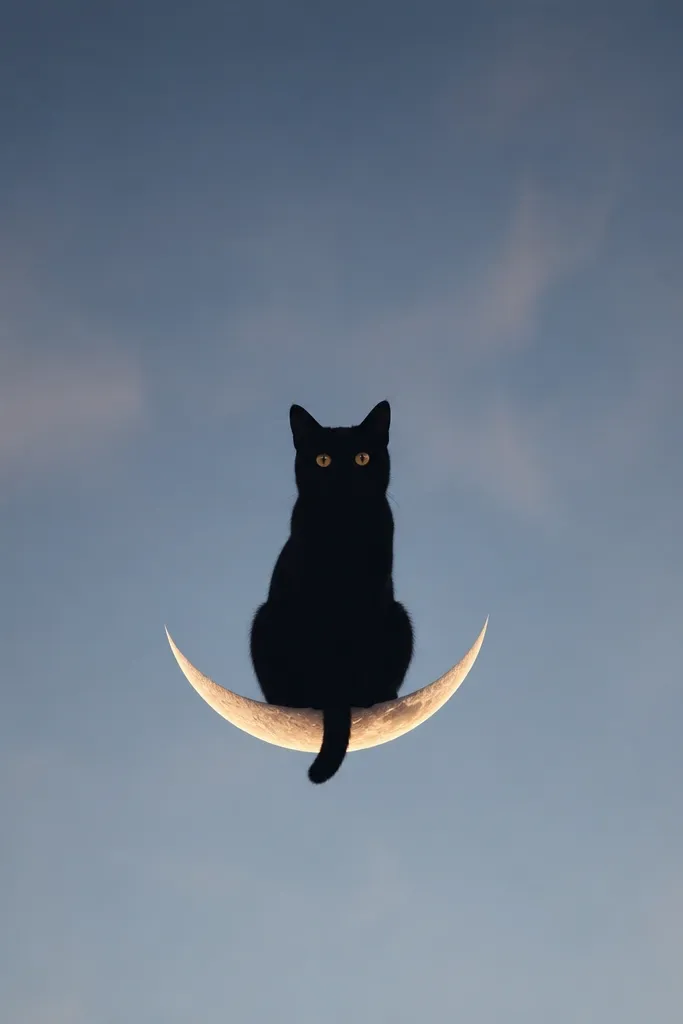
Minimal cat silhouettes look classy because the shape is bold and the details are tiny. Gold eyes add a warm pop without turning the mug into a cartoon. This one works year-round because it's not tied to Halloween only.
Paint the cat silhouette with a flat brush, keeping edges smooth. Add a crescent moon behind it in muted gray or light gold, then paint eyes as gold circles. Finish with a small white highlight dot in each eye.
Pro tipIf your silhouette looks shaky, draw it lightly with a pencil first, then trace with paint.
AvoidDon't use glitter in the eyes if you want a clean, non-gritty feel.
17. Ocean Waves with Turquoise and Seafoam Highlights
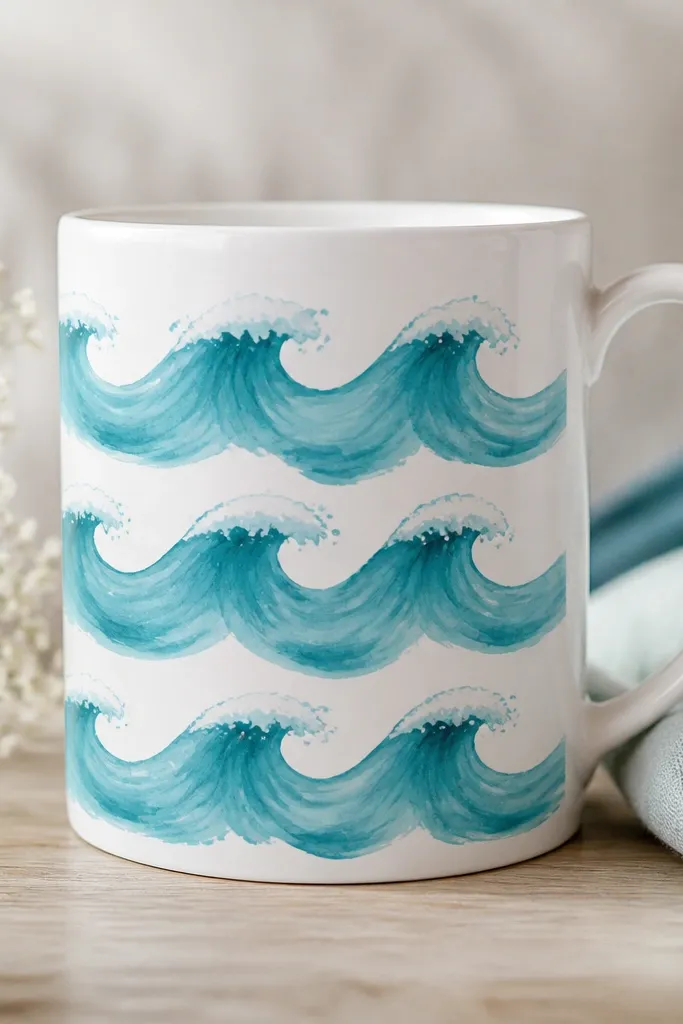
Wave rows are easy to repeat and they look great wrapped around the mug body. Turquoise gives the main color, and seafoam highlights create depth where waves crest. Add a few foam flecks so it looks like movement instead of stacked lines.
Paint the first wave row with a curved line, then fill under it lightly. For highlights, use a thinner brush to paint short wave arcs on top of the turquoise. Add tiny dot flecks with a dotting tool along the crest.
Pro tipKeep wave spacing consistent - it's what makes it look intentional.
AvoidAvoid drawing waves too close together or the pattern turns busy.
18. Monochrome Face with Brushstroke Hair
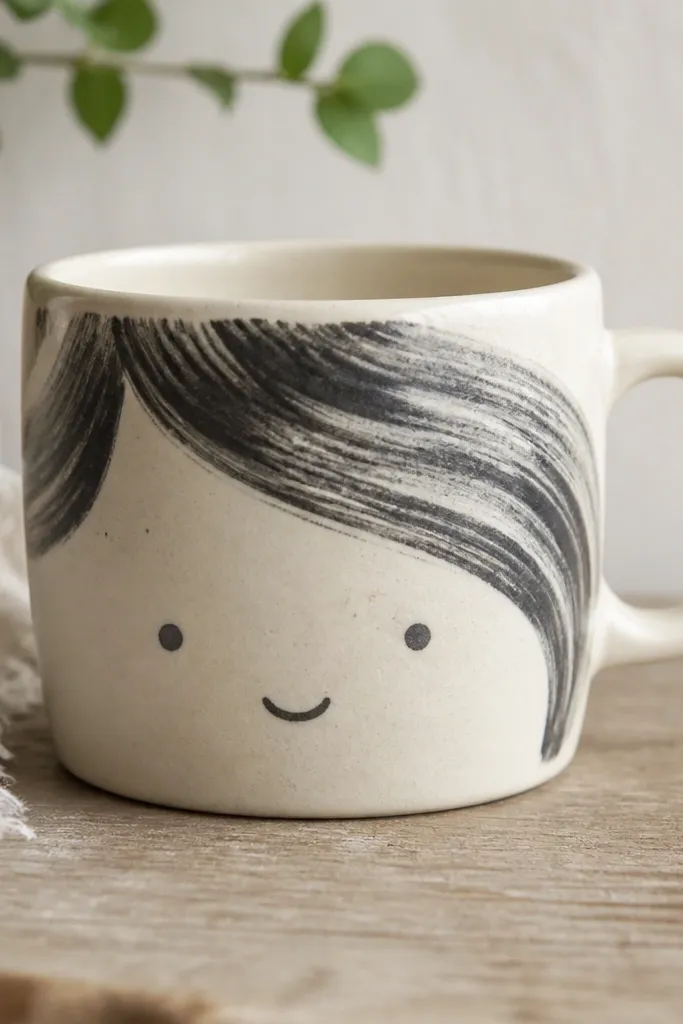
This face style is forgiving and modern. Monochrome keeps it classy, and brushstroke hair adds texture that looks good under a clear coat. It's a great "personal" gift for someone who likes minimalist art.
Paint the face first: eyes as small dots, nose as a tiny line, mouth as a short curve. Then paint hair using several long, slightly overlapping brushstrokes. Keep hair starting above the forehead and tapering toward the sides of the mug.
Pro tipUse two charcoal tones - one for the face and a lighter gray for hair highlights.
AvoidDon't make features too large - the mug curve distorts big eyes.
19. Lemon Slice Pattern with Textured Rind
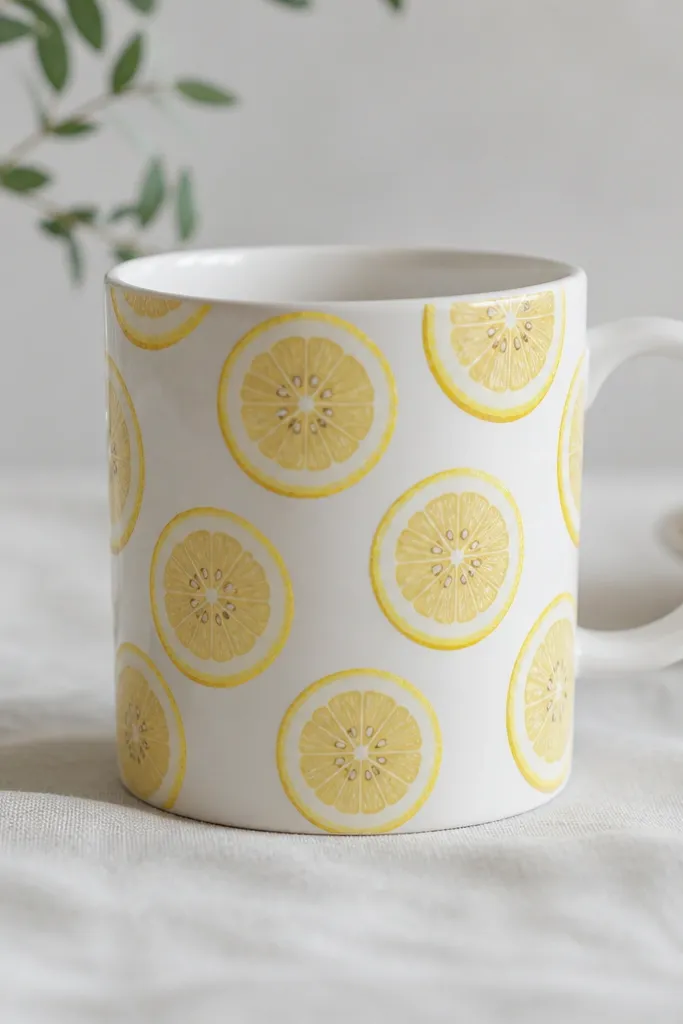
Lemon slices look bright and fresh without needing gradients. Textured rind gives it a more realistic feel, and the pale center keeps it from looking like a sticker. This design hits summer energy, but it also works for year-round "brighten my day" gifts.
Paint repeated semicircle lemon slices across a band. Use a sponge for the rind texture, then paint the center with a thinner, pale yellow. Add tiny seed dots in a darker yellow inside each slice.
Pro tipStagger slice placement so the pattern doesn't look like tiles.
AvoidAvoid uneven seed dot sizes - it makes the fruit look sketchy.
20. Christmas Wreath with Pine Needles and Red Berries
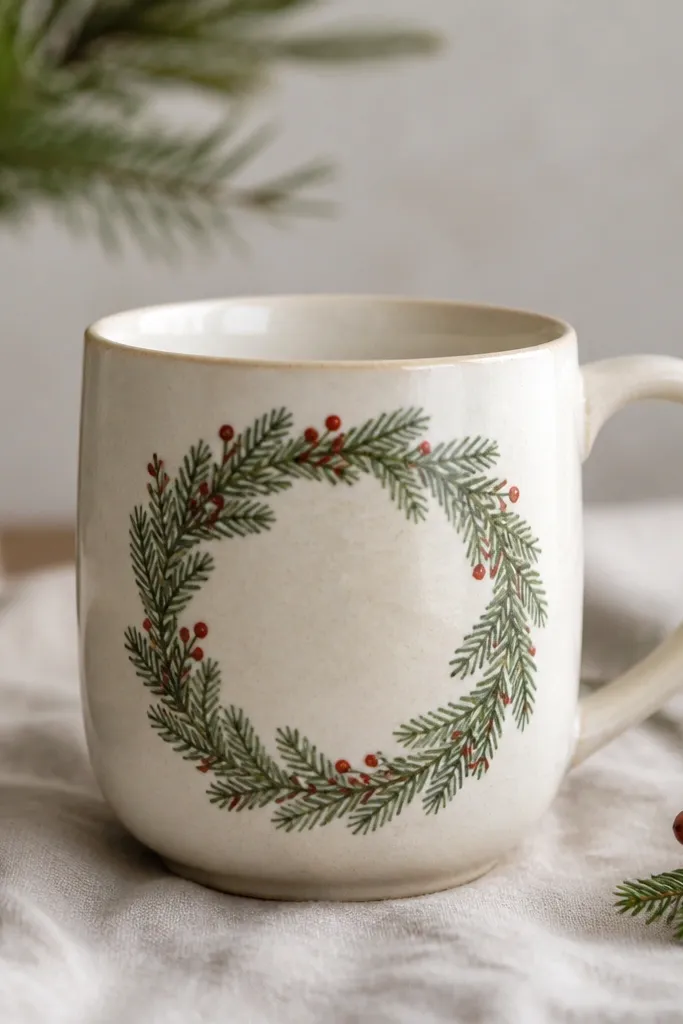
A wreath reads like holiday decor instantly, but the needle strokes make it look handmade instead of flat. Green strokes create texture, and red berries add the only contrasting pop you need. This one is also good for winter because it's not overly busy.
Paint an outer wreath circle with a mid-green, then add short needle strokes inward. Add a few berry dots around the ring in red, and place tiny white highlights on 3-4 berries. Keep the wreath centered and leave room near the handle.
Pro tipPaint needles in the same direction around the ring for a more realistic swirl.
AvoidSkip a thick outline around the wreath - it makes it look like a sticker.
21. Birthday Balloons with String Loops
Balloons are easy to scale and they look celebratory without needing a theme. Pastels feel soft and modern, and the string loops give your design a little movement. Confetti dots fill the empty space so the mug body doesn't look bare.
Paint balloon shapes as ovals with a slightly tapered bottom. Add a highlight curve on each balloon using lighter paint, then paint strings as thin lines that loop and meet at a knot. Scatter 10-15 confetti dots in two or three colors near the bottom half.
Pro tipUse a fine liner for strings - thick lines make balloons look cartoonish in a bad way.
AvoidAvoid overcrowding confetti - leave white space so it still looks clean.
22. Autumn Leaves with Burnt Orange Wash and Leaf Veins

Leaf clusters look rich because you can vary tones within one color family. Use a burnt orange wash as the base, then add darker veins to make it feel like real paper pressed leaves. This design is perfect for fall birthdays and teacher gifts in September.
Paint three leaves with a leaf-shaped brush or freehand teardrop tips. Base coat in burnt orange, then add darker vein lines with a thin brush. Add a light tan highlight along one side of each leaf to create a subtle depth effect.
Pro tipIf your veins look too dark, thin the paint with a drop of medium before painting veins.
AvoidDon't add green accents - it turns the palette into a messy fall mix instead of warm and cohesive.
23. Stacked Books with Tiny Labels and Bookmark Spine
Book spines are a great mug motif because they're naturally rectangular, so the curved mug won't distort them as much. Tiny label rectangles make it look intentional, like a real shelf. This one fits book lovers, graduation gifts, and "study month" surprises.
Paint three vertical rectangles for spines, leaving thin gaps between them. Add tiny label tabs at the top of each spine using lighter paint, and paint a thin bookmark stripe on the side of the stack. Keep the stack centered and about 2.5 inches tall.
Pro tipUse a ruler to mark spine widths on paper first, then transfer lightly with pencil.
AvoidAvoid glossy white labels - they look like decals after sealing.
24. Simple Snowflake Mandala in One Palette
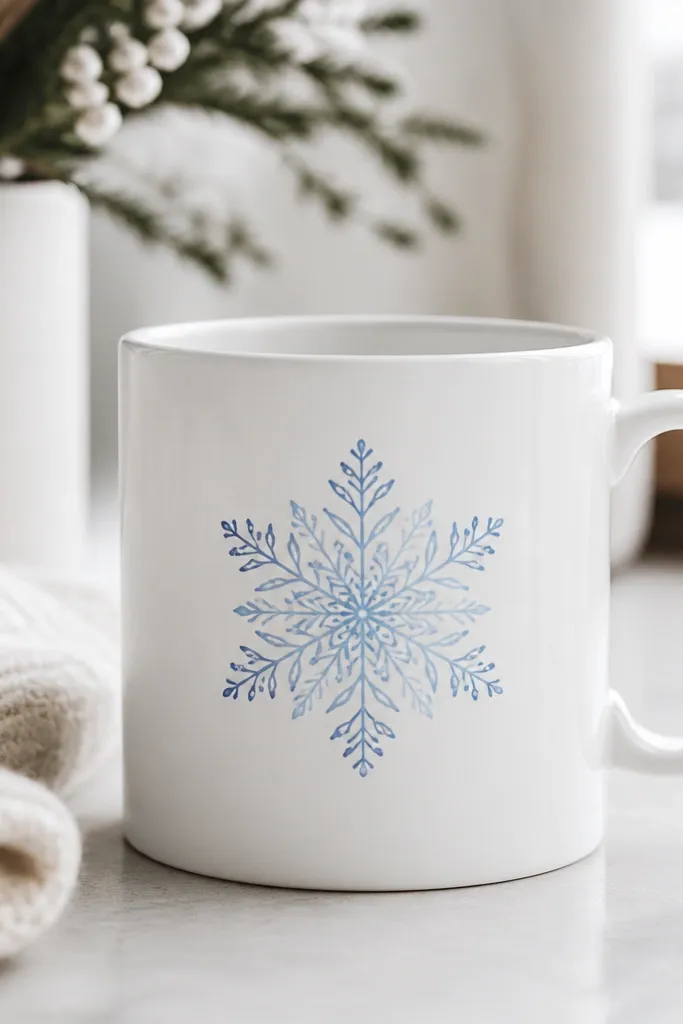
A single snowflake mandala is elegant without being overworked. Keeping it in one palette - light blue and one darker shade - makes it look cohesive. The geometry reads well even when the mug is viewed at an angle.
Paint a small dot center, then draw six long branches using a fine liner brush. Add shorter branches halfway down each arm and finish with tiny teardrop tips at the ends. Add just a few darker accents so it doesn't look flat.
Pro tipUse a steady hand by resting your wrist on the mug handle edge while you paint.
AvoidDon't add too many tiny dots - it clutters and loses the mandala shape.
25. Valentine Message in Heart Confetti Halo
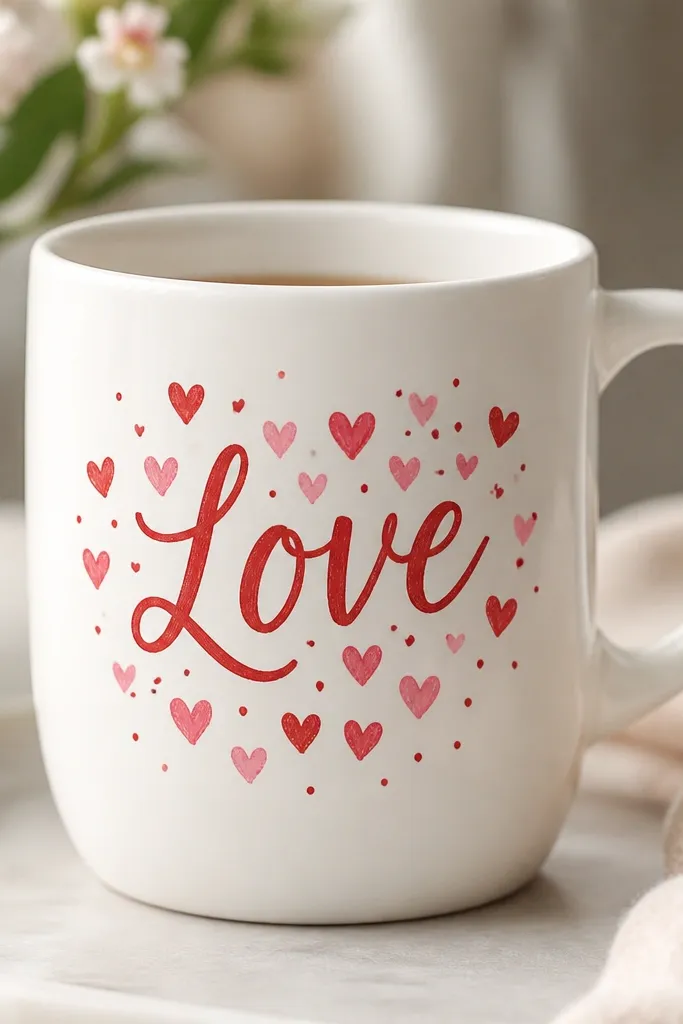
This gives you a clear Valentine message without painting big hearts everywhere. The confetti halo frames the text and makes it look full even with minimal writing. Red and pink hearts also photograph well, which matters if you're gifting and taking a pic.
Write "Love" in the center with a paint pen or stencil. Then add a ring of small hearts around it, about 1/2 inch away from the letters. Finish with a few tiny dots in a lighter pink so the halo feels balanced.
Pro tipAdd a thin outline to the word in darker red if your paint pen is too light after curing.
AvoidAvoid crooked lettering - if it's off, clean the edge with a damp cotton swab before it cures.


