
1. Gold Dot Constellation Mug
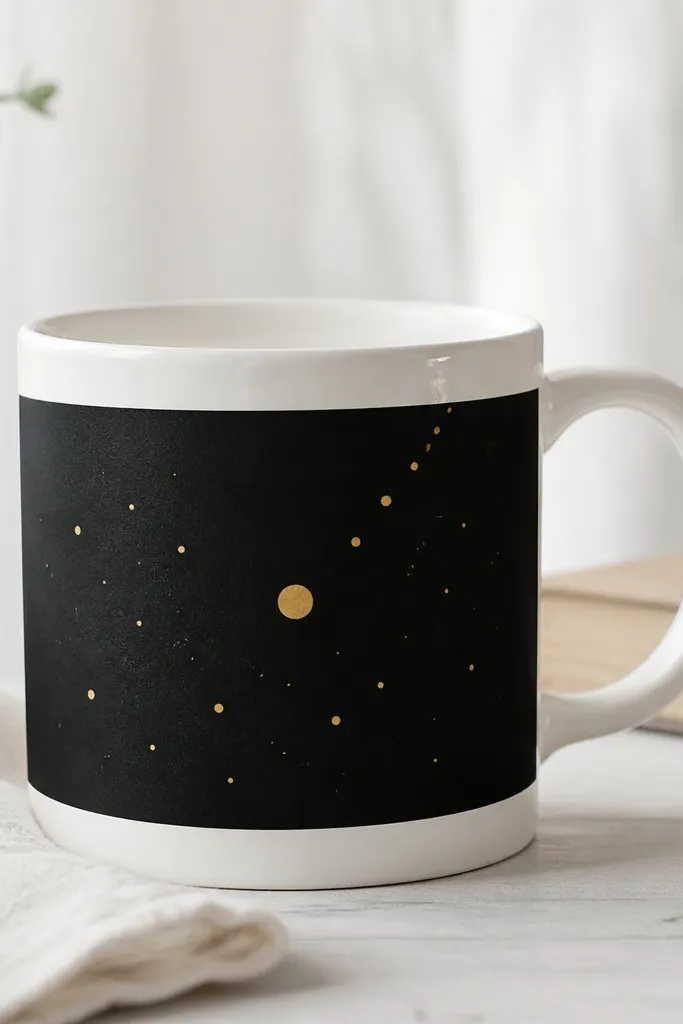
I paint a dark horizontal "sky" band first, then scatter gold dots like stars. The gold reads expensive because it catches light, but the black band keeps it grounded so it doesn't look like random glitter. I use dot sizes on purpose: bigger dots feel closer, tiny ones feel farther away. It works especially well for birthdays and thank-you gifts because it looks personal without needing a name.
Start by masking a strip 2 to 2.5 inches tall around the mug with painter's tape. Fill that band with matte black ceramic paint and let it dry 20-30 minutes. Use a gold paint pen or a fine brush with gold metallic ceramic paint to add 10-20 dots, keeping most dots within the band and letting a few drift upward for depth. Finish with a thin gold crescent or a single gold "star" near the handle side.
Pro tipIf you don't have a gold paint pen, use a toothpick to place dots - load it lightly so you get small, crisp circles.
AvoidSkipping the tape step makes the band uneven and the whole mug looks handmade in a messy way.
2. Black Stripe with Tiny Heart Outline
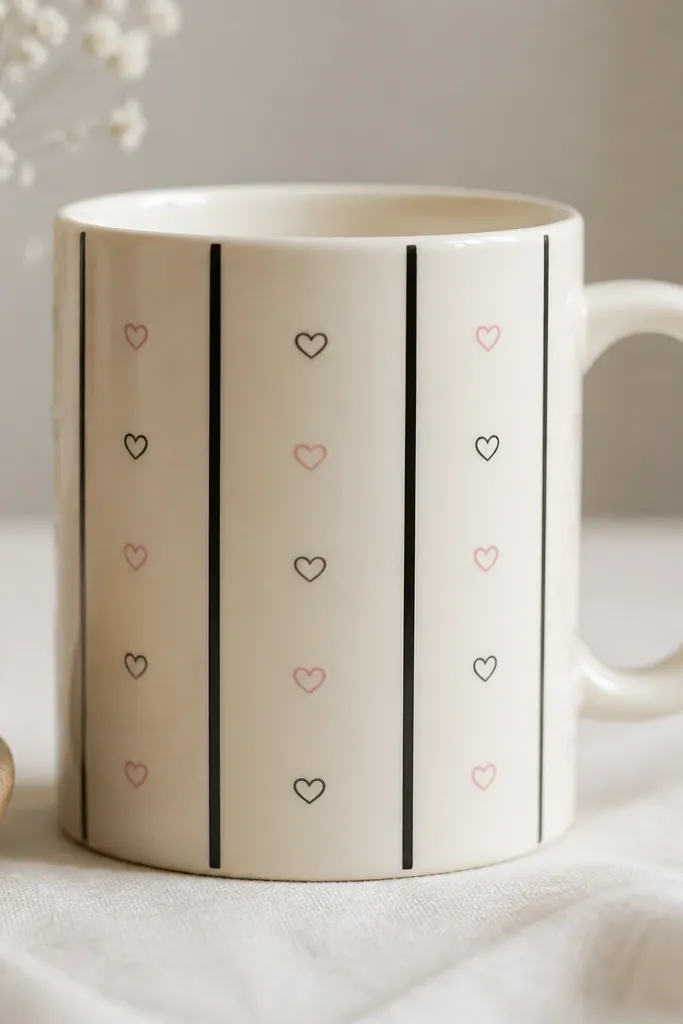
Vertical stripes make mugs look taller, and the tiny hearts add warmth without crowding. I like an outline heart style because it stays crisp on ceramic and doesn't blur when cured. Keep the hearts small - about the size of a pencil eraser dot - so the design stays airy. This one is great for Valentine's gifts, wedding favors, or "just because" notes.
Tape off three vertical stripes: each stripe about 1/4 inch wide with 1/4 inch gaps. Paint the stripes with matte black ceramic paint. After it dries, use a fine liner brush or paint pen to draw hearts in white or pale pink. Place hearts at a steady spacing, roughly every 1 to 1.25 inches around the stripe columns.
Pro tipPractice hearts on a scrap tile first so your curve and point match the same style on the mug.
AvoidDon't flood the hearts with thick paint; it pools on the ceramic and creates chunky edges.
3. Pastel Wash Band + Handwritten Name Block
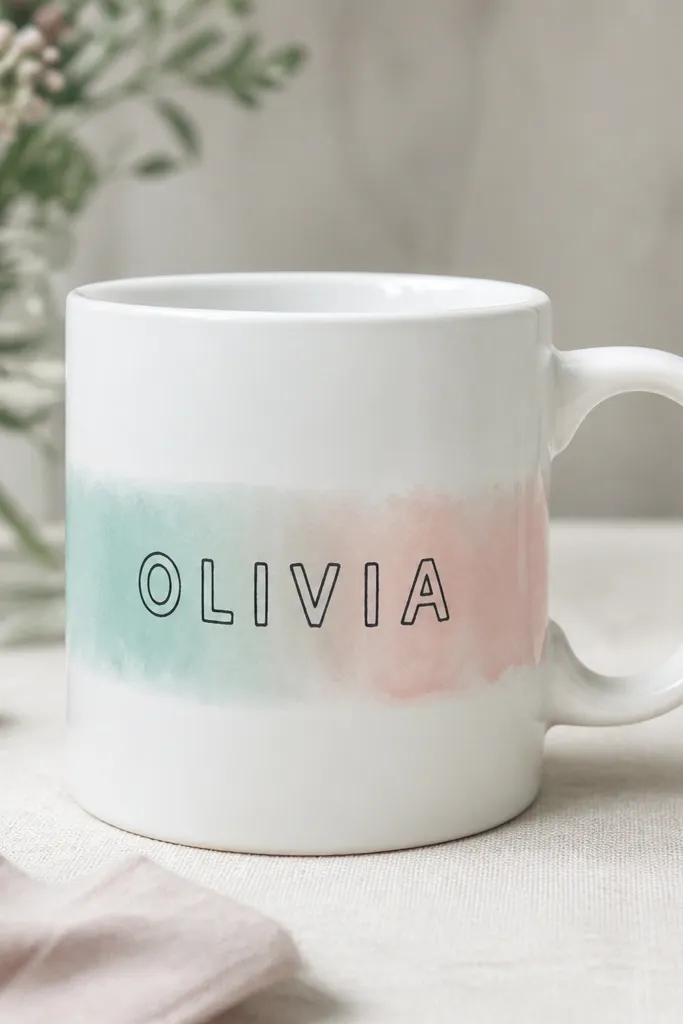
This design looks like a boutique stationery set because the background is a gradient wash, not a flat color. The name block pulls focus, and the thin outline makes the letters readable on a curved surface. Pastels feel gift-friendly for baby showers, birthdays, and teacher gifts. I keep the letters simple so they survive curing without looking shaky.
Mix two pastel ceramic paint colors (mint and blush) and water them slightly according to the paint label so they spread smoothly. Tape a horizontal band and paint the mint on one side, then blend blush into it with a damp sponge or a dry brush. Let it dry fully. Paint the name in the center using a rounded block style, then outline the letters with a thin line of charcoal gray or black.
Pro tipUse a pencil to lightly mark the name baseline around the mug before painting letters.
AvoidDon't paint the name while the wash is still tacky - it will bleed into the gradient.
4. Minimal Botanical Sprig in Sage
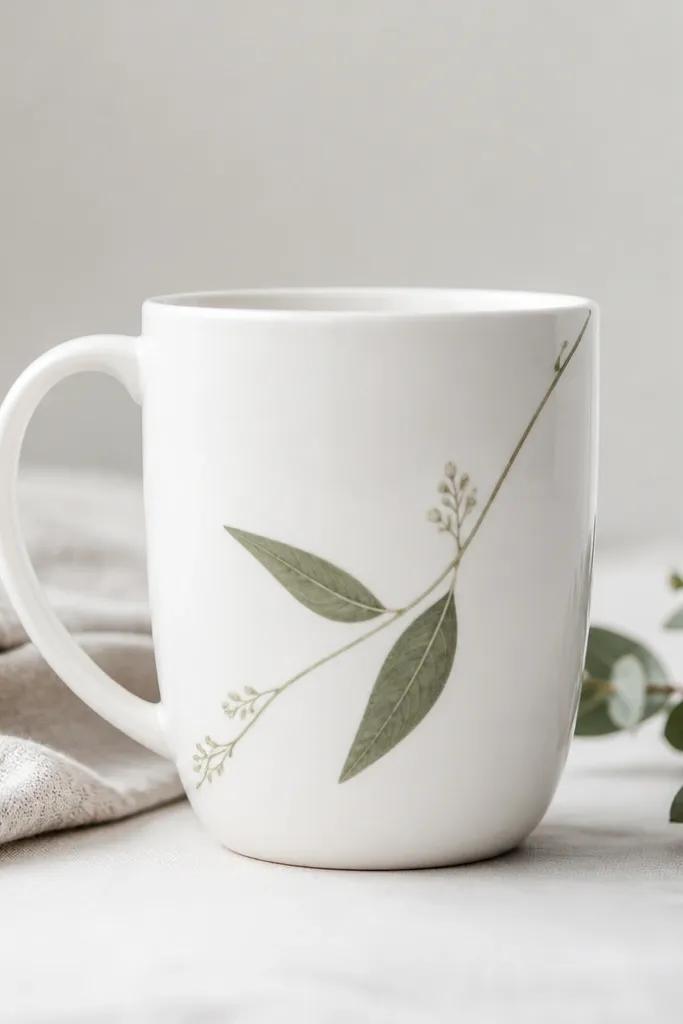
A single sprig looks classy because it's quiet and intentional. Sage green on white is forgiving, and the diagonal placement makes the mug feel designed instead of decorated. I keep the leaves small and pointed so they look like a pressed botanical sketch. This is my go-to for housewarming gifts when you don't know the person's style.
Draw a thin branch line using a fine brush with sage ceramic paint mixed with a touch of brown for depth. Add two leaves on the top half and one or two tiny buds near the end. Make the leaves about 1/2 inch long and vary the spacing so it feels natural. Let it dry, then add a second, lighter sage highlight line down the center of each leaf.
Pro tipUse a liner brush with a sharp tip; a wide brush makes leaves look like blobs on ceramic.
AvoidAvoid filling the leaves with heavy, opaque paint - it kills the sketch look.
5. Ocean Wave Wrap with Turquoise Highlights
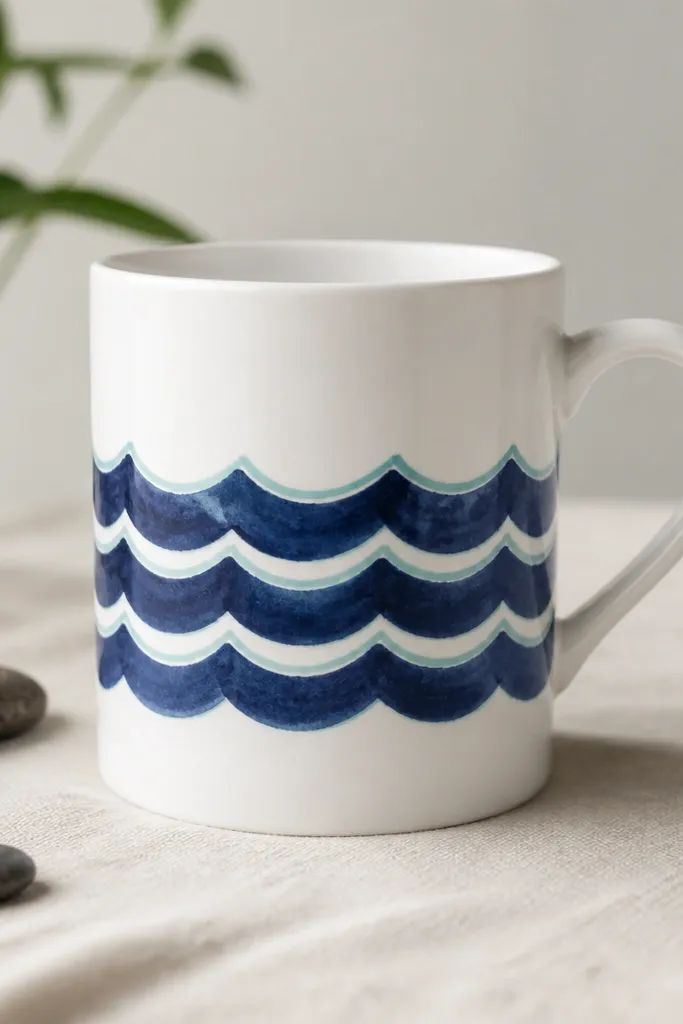
Wave lines look great on mugs because curves echo the mug's own shape. Navy gives you depth, while turquoise foam lines add that "just pulled from the beach" feeling. I paint waves with a repeating rhythm so the spacing looks deliberate. It's a fun gift for summer birthdays, lifeguards, and anyone who loves the ocean.
Mask a 2-inch band around the mug. Paint three horizontal wave rows in navy ceramic paint, each about 1/2 inch tall. For the foam, use turquoise paint and a smaller brush to trace just the crests - leave the troughs navy. Add a few tiny bubbles as circles at random spots near the foam lines.
Pro tipIf your waves wobble, mark three guide lines with pencil first, then paint over them.
AvoidDon't cover the entire band with solid color; the negative space is what makes the waves read as waves.
6. Monogram Medallion with Patterned Border
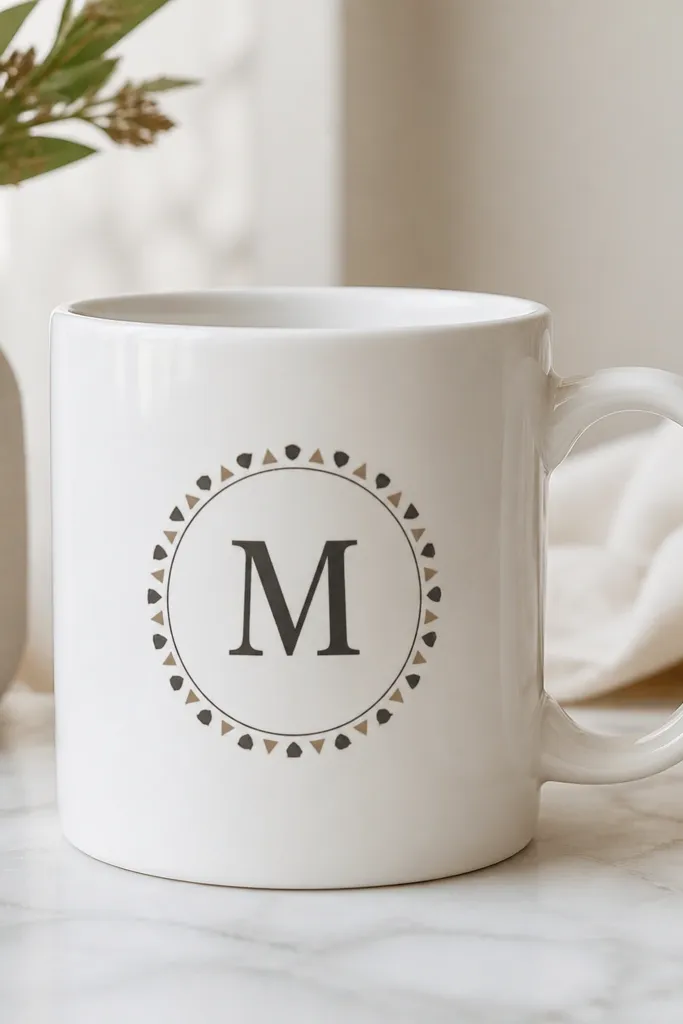
A medallion makes the mug feel like a personalized badge. The monogram adds the gift factor, and the patterned border keeps it from looking plain. I like using a circle because it hides minor unevenness from the mug's curve - your eye forgives small distortions inside a round frame. Great for weddings, anniversaries, and "new apartment" gifts.
Trace a circle template about 3 inches wide using a washable marker on the mug (or hold a ring/paper template and lightly pencil it). Paint the circle border with dark paint. Add alternating triangles and dot accents along the border using a toothpick for dots. Paint the monogram letter in the center, then outline it with a thin second color like gold or cream.
Pro tipFor a clean circle, use painter's tape cut into a ring shape instead of freehanding the edge.
AvoidDon't use too many patterns - one border pattern is enough, or it looks busy.
7. Rainbow Ombre Side Ribbon
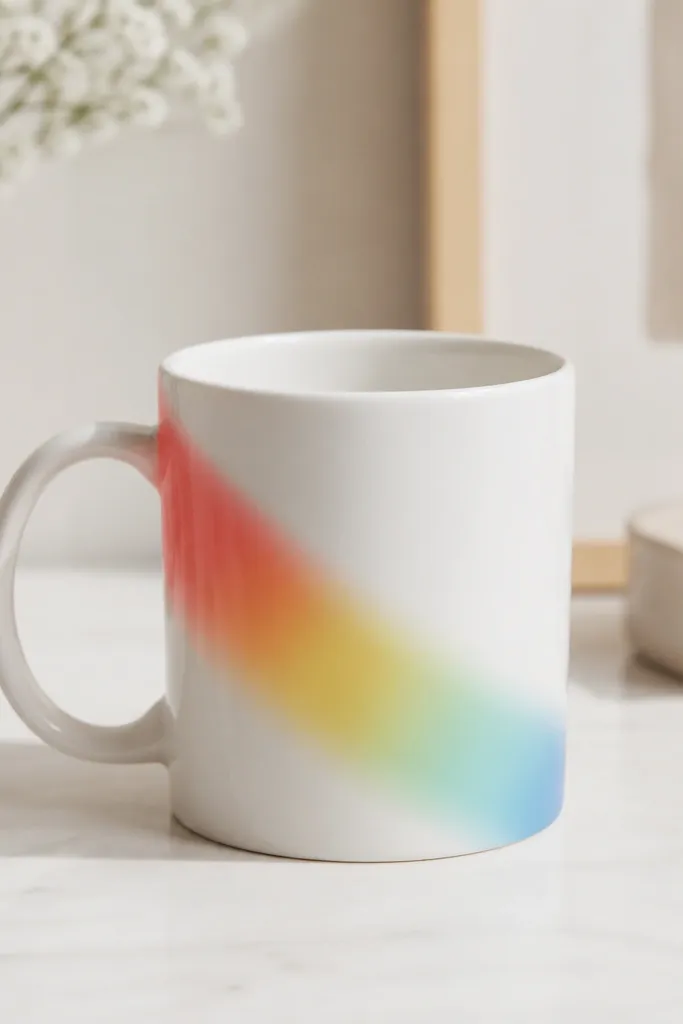
Diagonal color ribbons look like wearable art, and ombre keeps it soft. The ribbon placement near the handle makes it easy to "read" from one angle, so it still looks good in photos. I keep the ribbon narrow - about 1 inch - so the mug doesn't feel like a craft project. It's perfect for pride celebrations, kids' birthdays, or anyone who likes bold color.
Tape a diagonal strip across the mug, 1 inch wide. Paint the strip in bands: coral at one end, then blend to yellow, then mint, then blue. Use a damp sponge to blend edges between colors so you don't get hard steps. After curing, add a thin white outline along one edge of the ribbon to make it pop.
Pro tipBlend with a sponge in short taps, not long swipes, or you'll muddy the colors.
8. Terracotta Stamp Letters
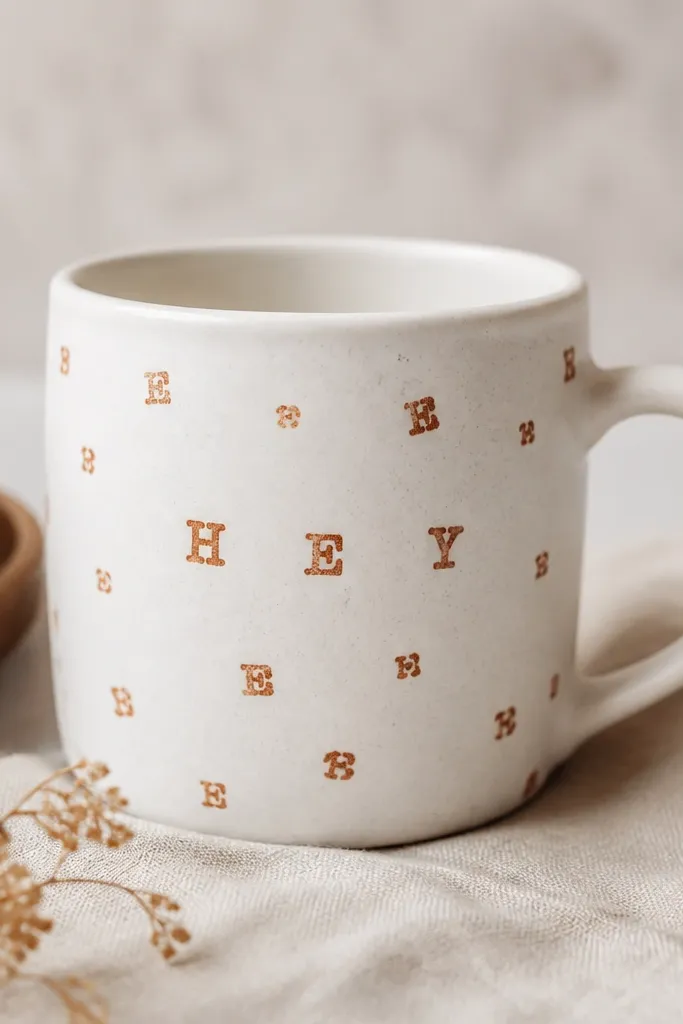
Stamp-style lettering looks charming and handmade in a good way because it has texture. Terracotta against white feels warm and modern, and it hides tiny imperfections since stamps never look perfectly identical. I use this when I'm making a set for teachers or coworkers because it's fast and consistent. The mug looks like it came from a small shop, not a weekend craft table.
Use a craft stamp pad and ceramic-safe paint (or a paint that dries for ceramics) in terracotta. If you don't have stamps, use a cut-out foam letter stamp or a block letter stencil you tap with a small brush. Place letters around the mug in a gentle arc so the word follows the curve. Let it dry, then outline the whole word with a thin black line for crispness.
Pro tipPress the stamp lightly - too much pressure smears the ceramic surface texture.
AvoidDon't use regular craft paint that stays tacky; it can smear during curing.
9. Marbled Accent with White Veins
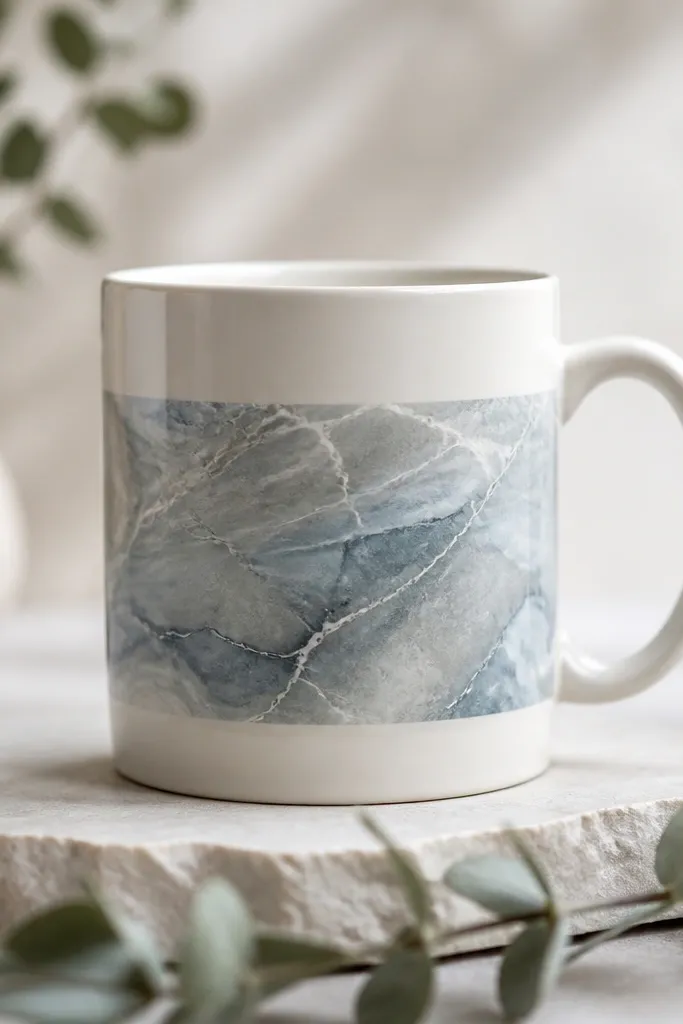
Marbling looks high-end because it's organic - you don't have to draw perfect lines. I've done this with a sponge and a feathering technique, and it always turns out unique per mug. Gray-blue stone tones feel modern, and white veins make it read as marble instead of messy paint. It's a great gift for grown-ups who like minimal decor.
Tape a horizontal band around the mug. Sponge on a base using light gray ceramic paint, then dab in soft blue in irregular patches. While it's still slightly wet, drag a toothpick through the paint to create thin channels, then pull white paint into the channels using the tip of a liner brush. Keep veins thin - about a hairline width.
Pro tipDo fewer passes than you think. One or two layers create a cleaner stone look than heavy repainting.
AvoidDon't blend the whole band smooth; marble needs variation.
10. Botanical Frame Border Around the Lip

A border near the top rim makes the mug feel "finished" because your eyes land there first when you pick it up. Leaves and berries look delicate, but you can do them with dots and short strokes. Keeping the center blank makes the gift feel intentional. It's perfect for simple names, short quotes, or when you want the mug to match any kitchen color.
Mask a 1/2-inch band below the rim. Paint a thin line in muted brown, then add tiny leaf shapes in green using a dot-and-swipe motion. Add a berry dot between leaves. Let it dry, then paint one small quote or a single initial in the center of the mug below the border.
Pro tipIf you can't freehand berries, use a punch tool made for crafts or the end of a fine brush handle for consistent dots.
AvoidDon't put the border too low; it can look like a sticker when the mug sits on the counter.
11. Blackboard Quote Mug with Chalk-Style Lines
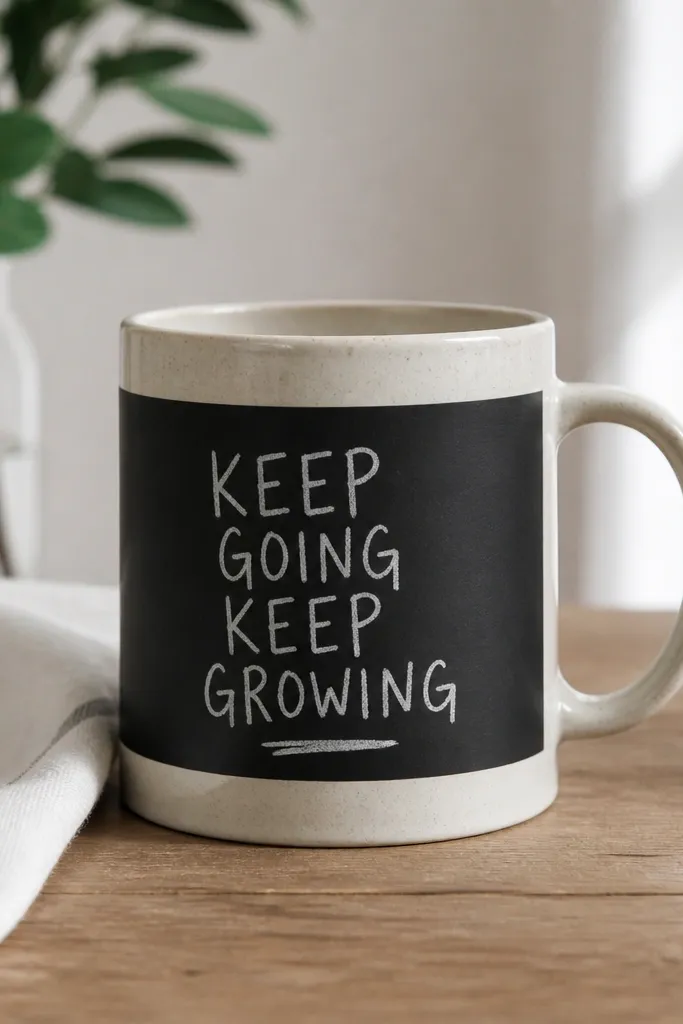
This design looks like a mini chalkboard, but you're painting it for permanence. Matte black is key because glossy black looks like vinyl. The "chalk" effect comes from using a dry brush and slightly dragging the paint so letters look hand-written. It's a great gift for coffee lovers and anyone who likes humor or daily reminders.
Tape a rectangle around the mug about 2 inches tall. Paint it matte black ceramic paint and let it cure/dry fully before lettering. Use a white paint pen or thin brush with white paint. For chalk texture, load your brush lightly, then drag the tip to create small breaks in the stroke.
Pro tipWrite the quote on paper first in the same size, then wrap the paper around the mug to check spacing.
AvoidDon't use glossy black paint - it makes the "chalk" letters look fake.
12. DIY Photo Frame Collage in One Color
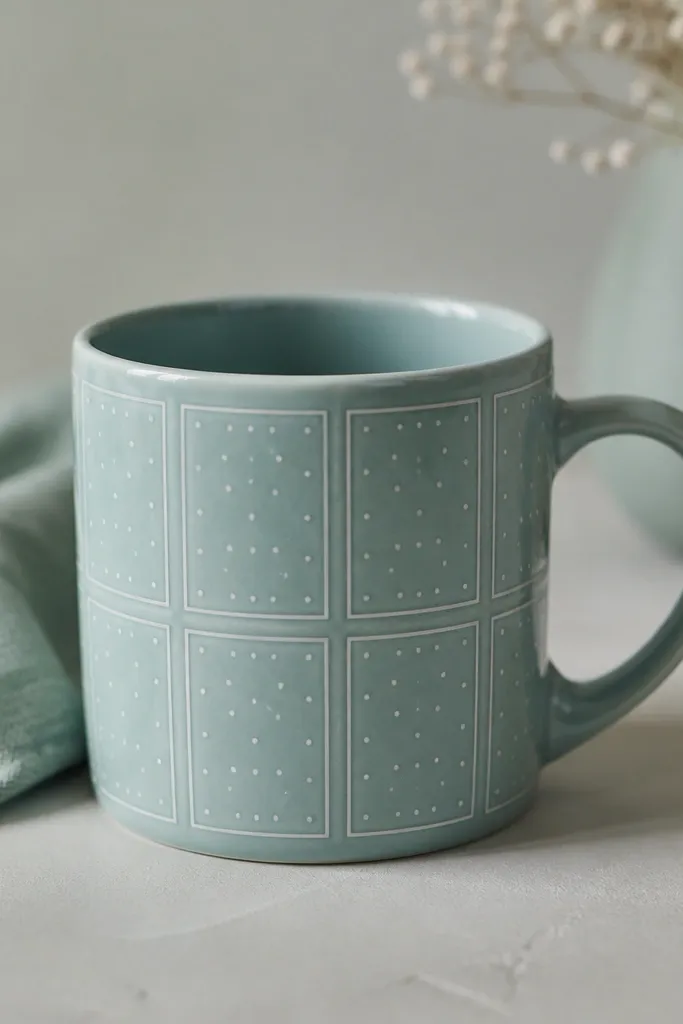
You're not adding real photos, but the frame layout gives the mug a scrapbook vibe. One color family keeps it cohesive, and the small rectangles look neat on a curved mug. I like teal or dusty blue because it feels calm and modern. This works well for gifts when you want it personal but don't want to print anything.
Mask a grid of 6-8 small rectangles around the mug, each about 1 inch wide and 1.25 inches tall. Paint rectangles in teal ceramic paint, leaving thin white gaps. Add a simple border around the outside with a dark outline. Inside one or two rectangles, paint tiny dots or a small heart to break repetition.
Pro tipUse a clear plastic ruler or a folded paper strip as your measuring guide so the rectangles line up around the curve.
AvoidDon't make the rectangles too small - tiny shapes blur after curing.
13. Soft Geometric Hexagon Grid
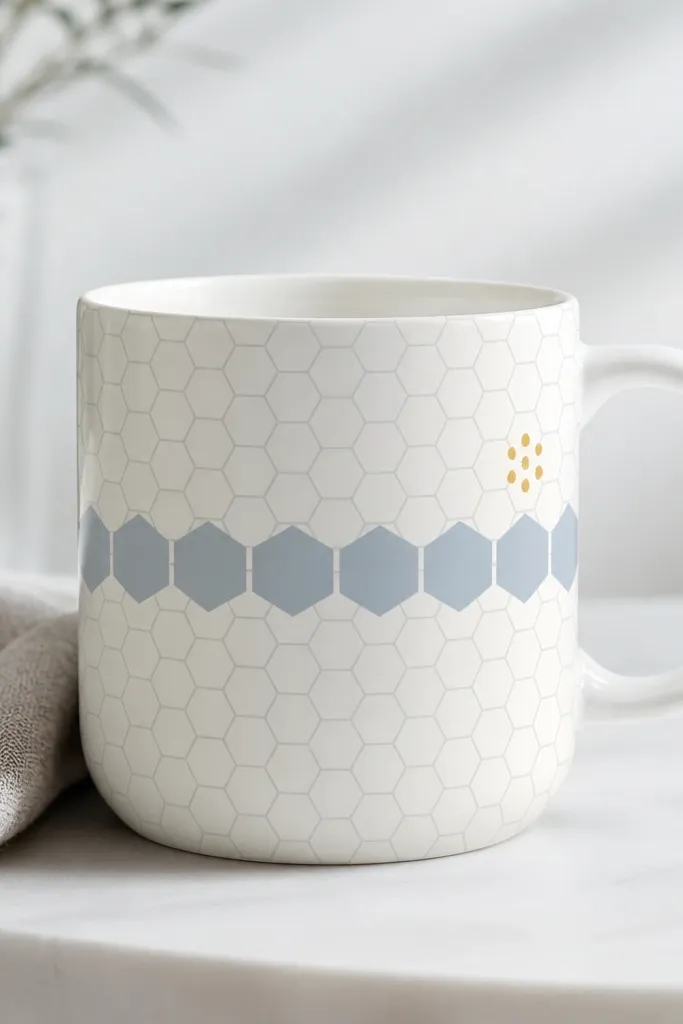
Hexagons look modern and clean, and the repeating pattern makes the mug feel designed even if you aren't super confident drawing. I keep the colors soft so it reads as decor, not loud craft. The thicker row across the middle gives you a focal band. A few gold dots near the handle make it feel intentional and festive.
Lightly sketch hexagon outlines with pencil or erasable marker. Paint outlines in light gray ceramic paint, then fill only the middle row with dusty blue. Add a small cluster of 6-8 gold dots near the handle, spaced like a tiny constellation. Let everything dry before curing.
Pro tipIf you don't want to sketch, use a hexagon stencil made for crafts and dab paint with a foam brush.
AvoidAvoid dark, heavy fills on every hexagon - it makes the mug look like a sticker sheet.
14. Single Flower with Center Dot Glow
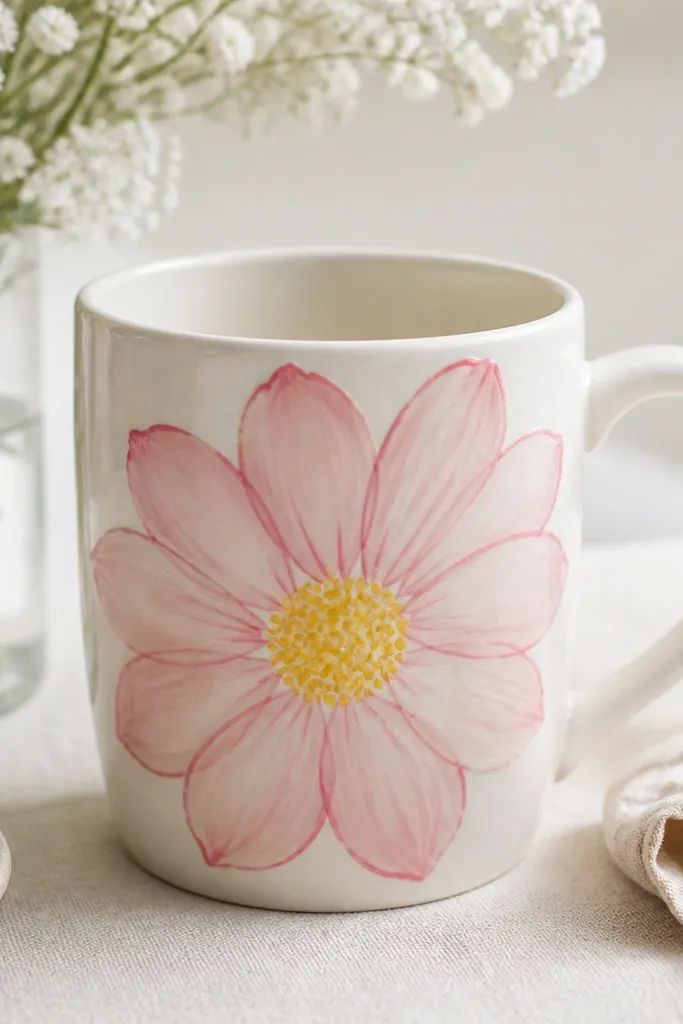
One big flower is the easiest way to make a mug look like a gift, not a craft. The center dot glow gives it depth and keeps it from looking flat. Blush and yellow read cheerful without being childish. I've used this for baby shower gifts and spring birthdays, and it always looks like someone tried.
Sketch a simple flower with 6-8 petals about 2 inches wide. Paint petals in blush pink, then outline with a slightly darker rose for definition. For the center, paint a yellow circle and layer small dots on top using a dotting tool or the tip of a toothpick. Add two tiny green leaves near the flower base.
Pro tipKeep the petal edges slightly uneven. Perfect symmetry looks artificial on curved mugs.
AvoidDon't put the flower too close to the handle or spout - it warps in photos.
15. Monochrome Marble Brushstroke Background
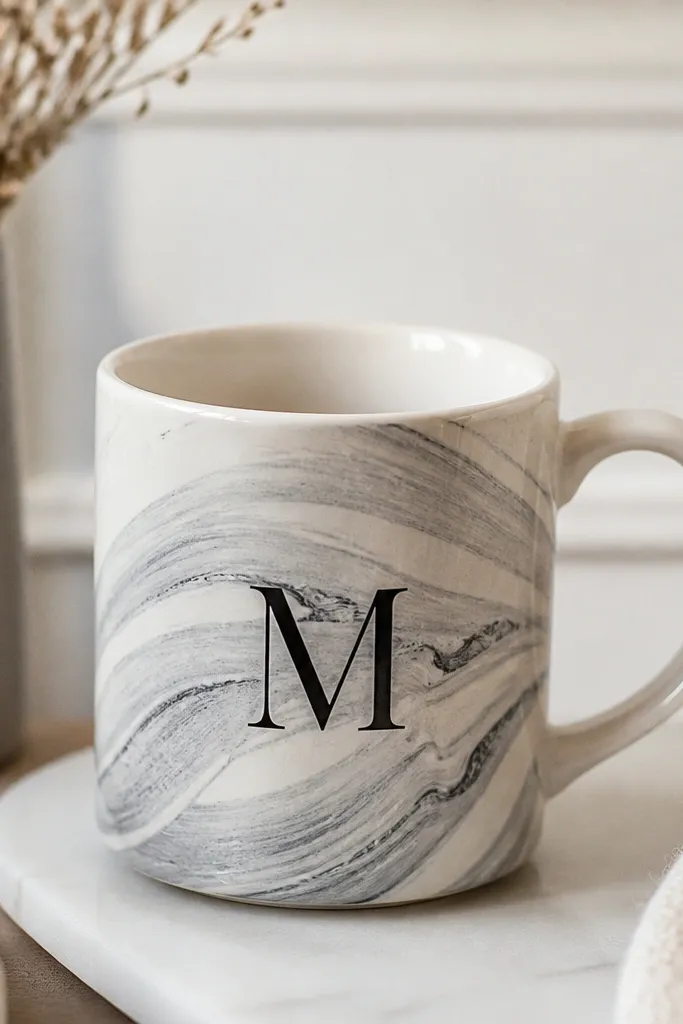
This is marbling without the mess of heavy sponge blending. Gray brushstrokes give you movement, and the white space between strokes keeps it airy. A black initial keeps it personal and readable. This style suits office gifts because it looks modern and not childish.
Tape a 2-inch band around the mug. Paint gray brushstrokes in multiple directions, then soften edges with a damp sponge lightly dabbed, not smeared. Add a few thin white swirls with a liner brush. After drying, paint a single initial in the center of the band in black.
Pro tipUse a fan brush or a dry medium brush so the strokes look textured after curing.
AvoidDon't overwork the swirls - repeated blending turns it muddy.
16. Cupcake Liner Pattern with Sprinkles
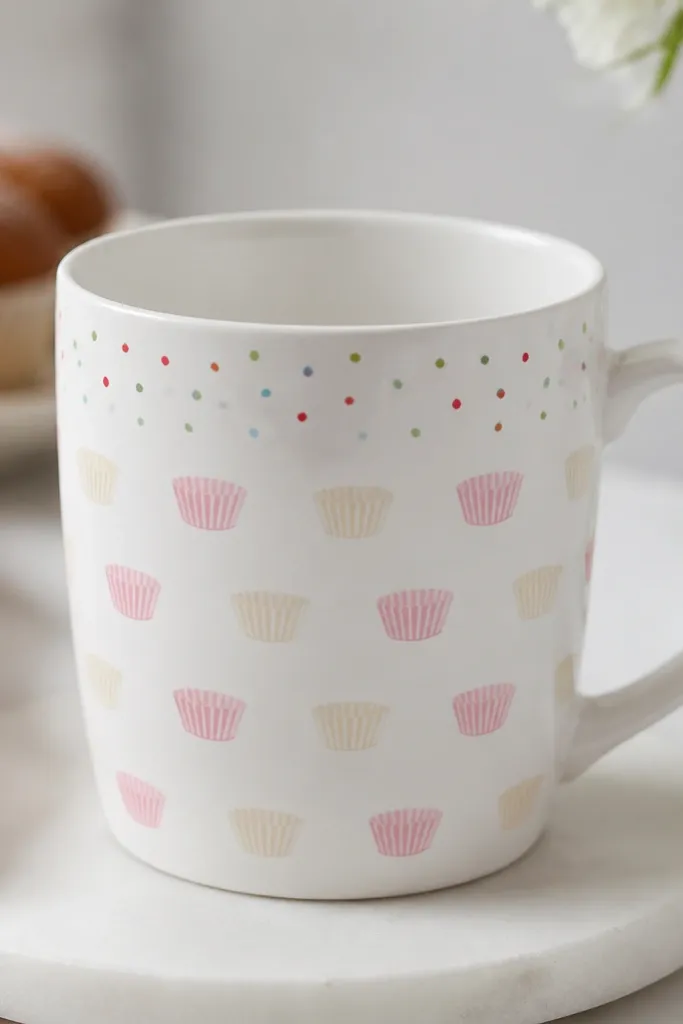
Cupcake liner patterns are cute without needing cartoon characters. The repeating shape looks tidy, and sprinkles add a playful pop that still reads as "gift art." I like using light pink and cream because it feels sweet for birthdays but still looks clean on a kitchen shelf. Add the recipient's age or first name and it becomes a fast personalized mug.
Paint a 1.5-inch top border of sprinkles using three colors. Then tape a horizontal band below it and paint small liner shapes in alternating pink and cream. Use a thin brush to add two tiny dot "chocolate" details on each liner. Keep each liner about 3/4 inch tall so the pattern fits the curve.
Pro tipMark the mug with small pencil dots to guide where each liner shape goes.
AvoidDon't use too many sprinkle colors; 3 colors is enough.
17. Citrus Slice Border with Zest Dots
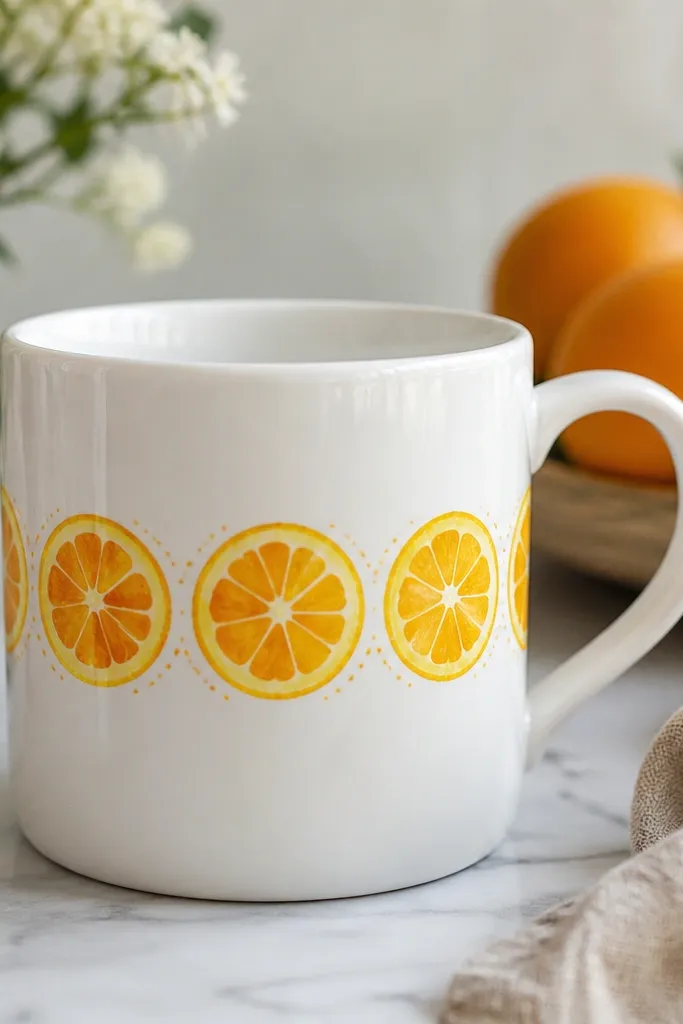
Citrus slices look fresh and give instant kitchen energy. The orange segments create movement, and the zest dots make it feel like you could peel it. I keep the background white so the slice colors stay bright after curing. This is perfect for brunch gifts, housewarmings, and anyone who hosts.
Tape a 2-inch band around the mug. Paint citrus slices as thin ovals with a yellow outer ring and orange wedge segments inside. Leave small gaps between slices so the white mug shows through. Add tiny orange dots as zest near the slices, then add one small green leaf at the top of the band.
Pro tipUse a toothpick for the wedge tips so they look pointy, not rounded.
18. Chef Hat Outline with Checkered Band
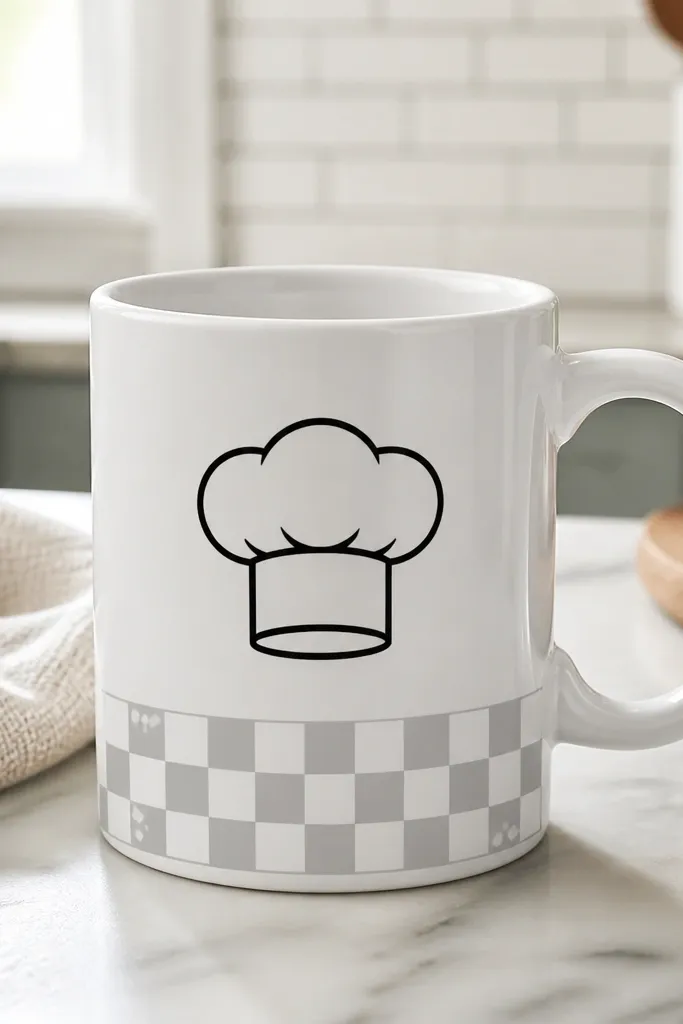
A chef hat outline looks fun and readable even from a distance. The checkered band adds a classic cooking cue without turning the mug into a full cartoon scene. I paint in black outline plus gray checks, then leave the rest white. It's great for cooking classes, new job gifts, and holiday baking.
Paint a centered chef hat outline about 2.25 inches tall using black ceramic paint. Add a checkered band around the lower half of the hat: squares about 1/4 inch each in light gray, leaving white gaps. Add tiny white dots in the checkered corner areas for a lighter look. Cure fully before gifting.
Pro tipCheck your hat proportions on a paper template first so the brim sits above the checkered band.
AvoidAvoid thick outlines everywhere; too much black makes it look like a stencil copy.
19. Name Tag Style with Dotted Border
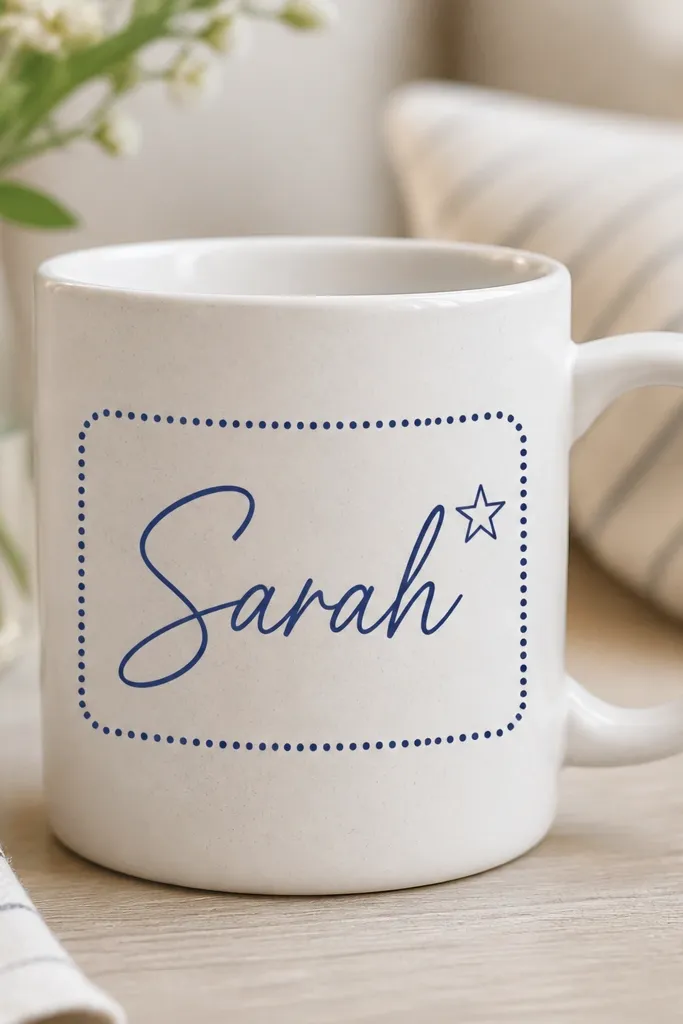
This looks like a cute desk name tag but on a mug, so it reads as personal fast. The dotted border is easier than a solid border and hides small hand wobble. Navy and white is clean and works for coworkers, teachers, and sports teams. I add one tiny star or dot to keep it playful without clutter.
Tape a rectangle around the middle about 2.5 inches wide and 1.75 inches tall. Paint it white or leave the mug white, then use a dark blue paint pen to dot around the edges. Add the name in a simple script or printed style in the center. Finish with one small star near the bottom corner of the rectangle.
Pro tipIf your script feels shaky, use a block font. It still looks sharp when outlined with a thin line.
AvoidDon't center the rectangle too high or too low - it should sit where your thumb naturally rests when holding the mug.
20. Color-Blocked Corner with Gold Lining
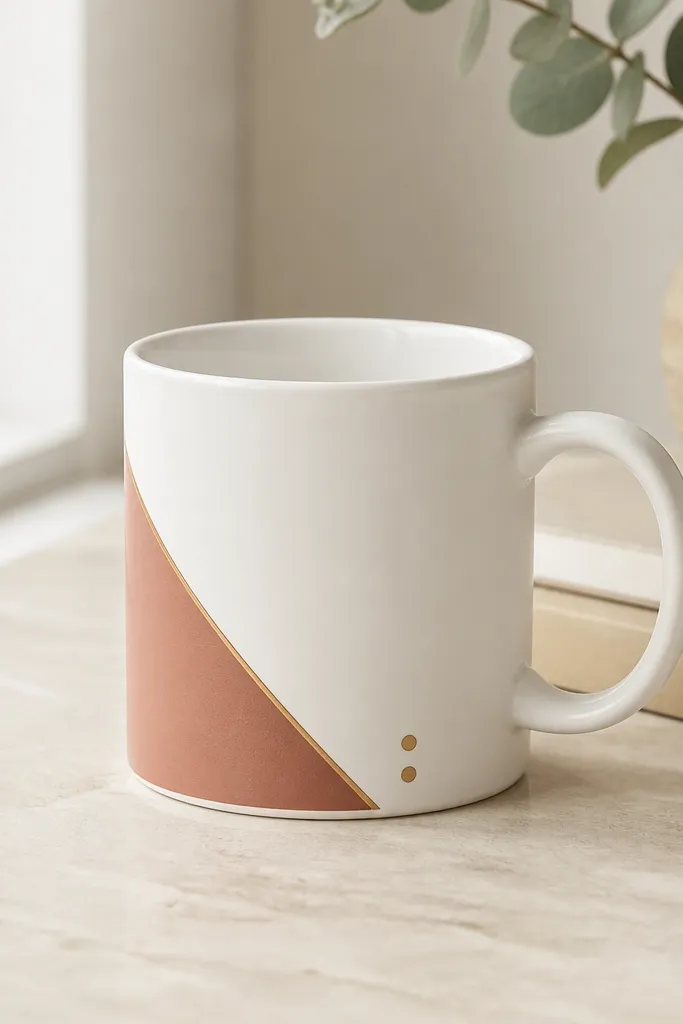
Color-block corners are minimal and modern, and they look great even if you're not confident drawing. Gold lining makes the triangle look like it's framed, not painted on. I keep the triangle small and placed near the handle side so the mug looks intentional from the front. This one is my go-to for adult gifts because it feels like wall art translated to a mug.
Tape a triangle shape on one side of the mug, about 2 inches tall and 2 inches wide. Paint the triangle with muted coral ceramic paint. After it dries, trace the taped edges with gold ceramic paint or a gold paint pen. Add two small gold dots near the bottom corner for balance.
Pro tipUse painter's tape and press it firmly along the curve so paint doesn't creep under the edge.
AvoidAvoid thin, watery paint for the triangle; it seeps and makes the gold outline look uneven.