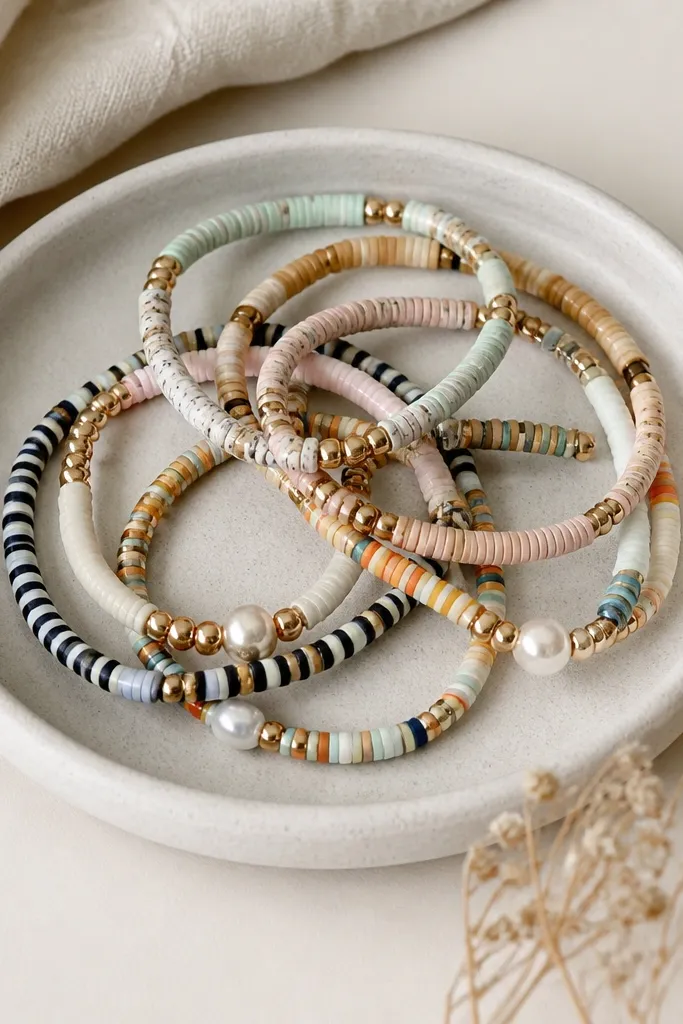

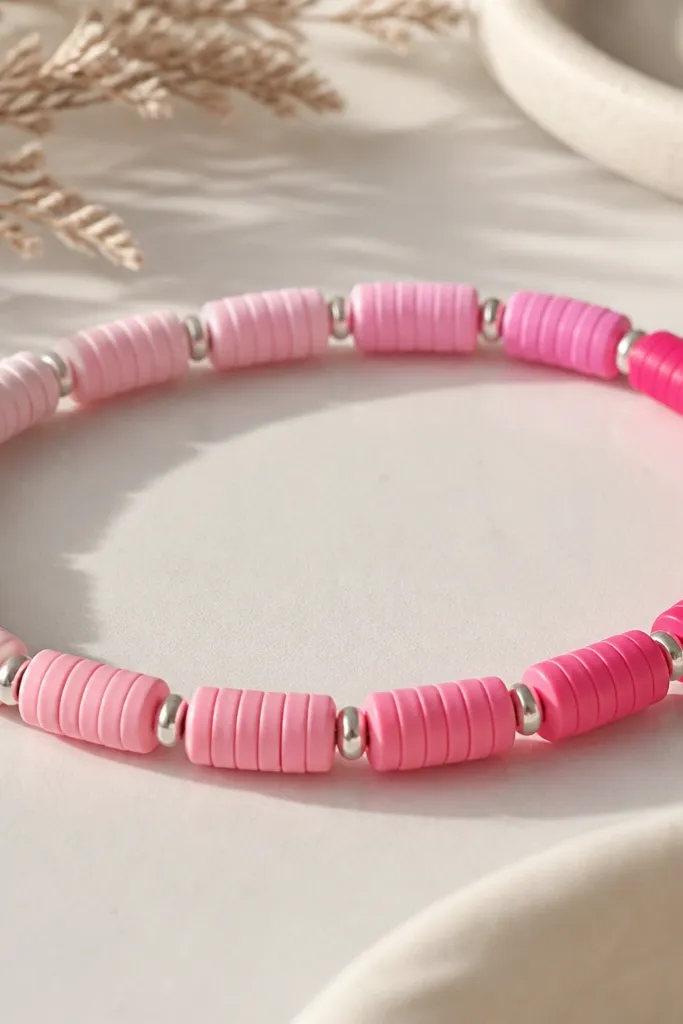
1. Rainbow micro-bead bar bracelet
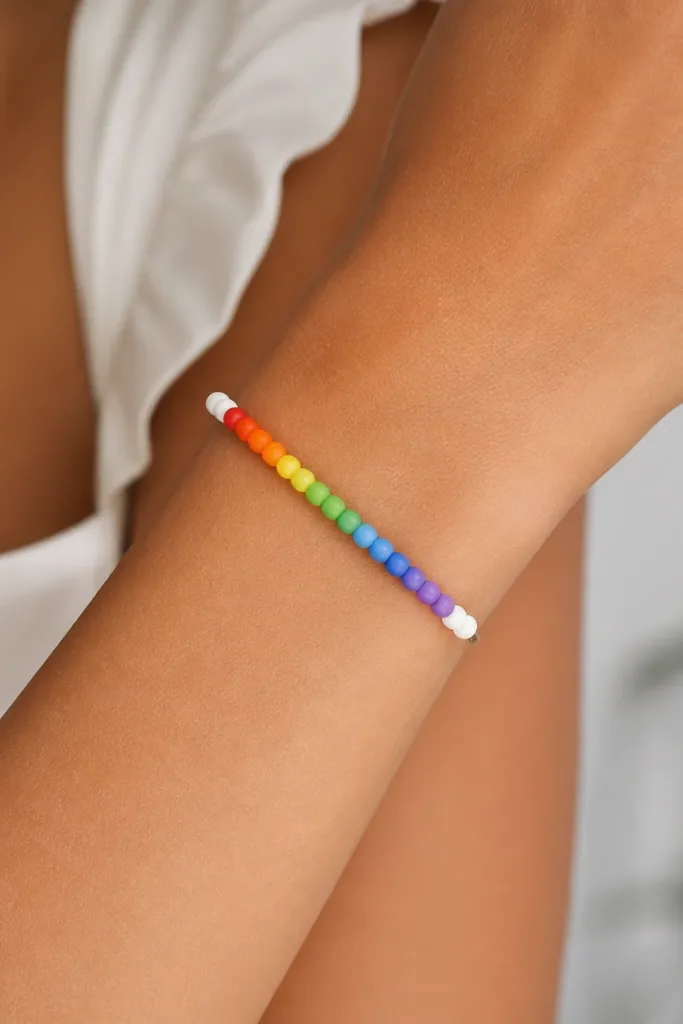
This design uses many small beads so the bracelet reads like a smooth rainbow stripe. I like it because it hides imperfections in individual beads - small pieces blend together visually. Use bright primary colors (red, orange, yellow, green, blue) plus white spacers so the colors don't muddy. The white ends make the bracelet look finished instead of unfinished.
Make 20-30 beads total. Mix 4-5 mm beads for the stripe and add two 8-10 mm white spacer beads at each end. String on clear elastic cord and tie with a tight double knot before trimming. Seal air-dry clay beads with satin varnish so the colors pop without going glossy.
Pro tipLay your beads on a paper towel in order before stringing; rainbow order mistakes show up fast.
AvoidDon't use uneven bead sizes for the stripe - it turns the bar into a bumpy ladder.
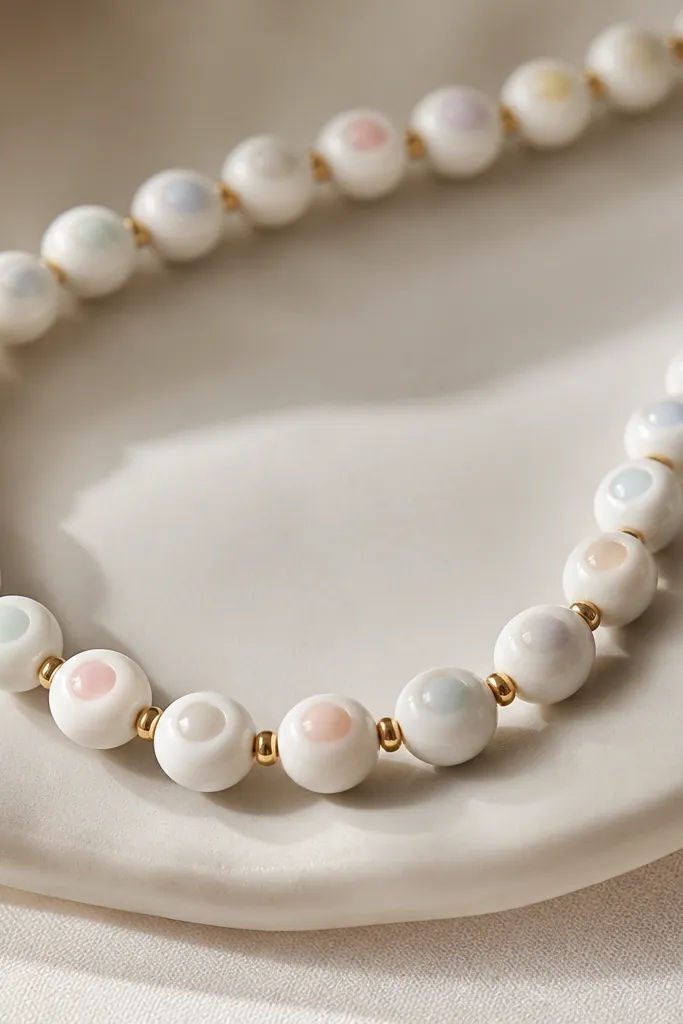
2. Matte pastel cloud beads with silver dots
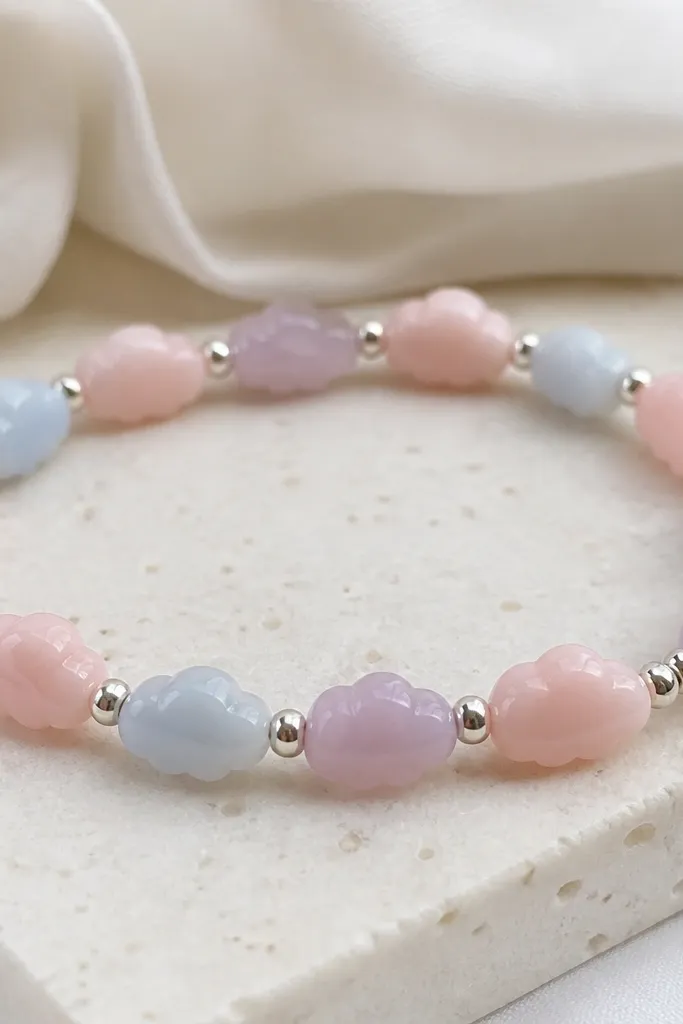
Cloud-shaped beads look cute because they catch light in little highlights instead of sharp shine. Matte pastel clay keeps the vibe soft, and the silver dots add a tiny bit of contrast. I like blush, powder blue, and lavender together because they don't fight. The silver dots make the bracelet look like it has "sparkle" even without glitter.
Use 3 colors for clouds and keep each color group to 6-8 beads. Add 1 silver dot bead every 2-3 cloud beads. If you're using air-dry clay, sand the cloud tops lightly with 400 grit after drying, then seal matte. If polymer clay, bake and then apply a thin matte topcoat.
Pro tipPress a small dot texture into the silver dots with a ball stylus so they look hand-made, not generic.
AvoidSkip glossy topcoat on pastel matte beads - it flattens the soft "cloud" look.
3. Black-and-cream checker clay beads
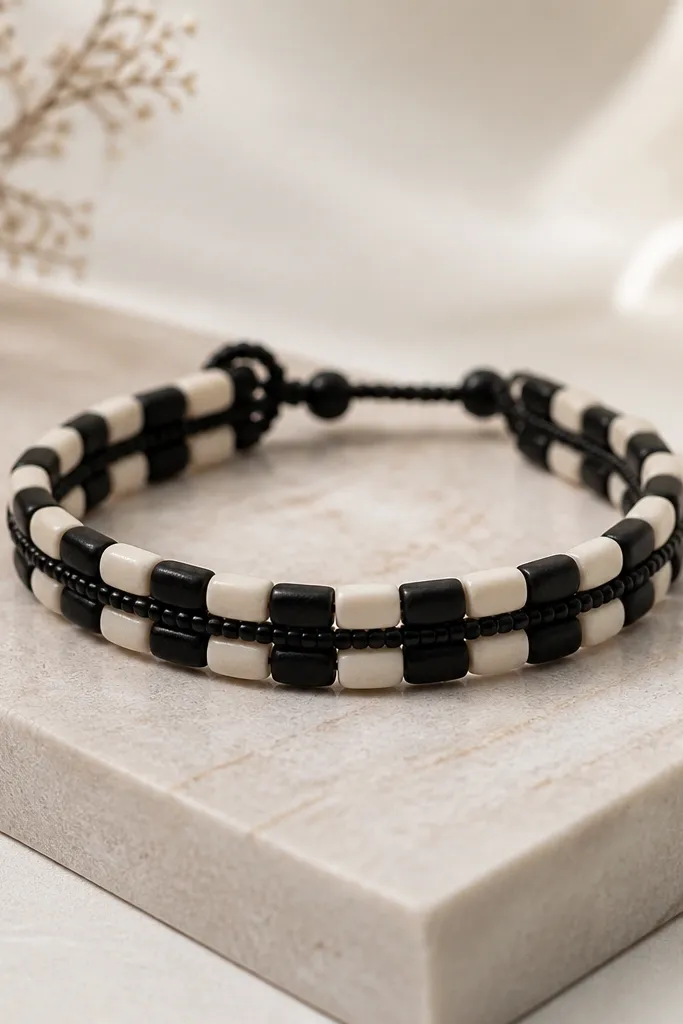
Checker patterns look graphic and expensive when the bead shapes stay consistent. Black and cream is my favorite combo because it matches everything and doesn't depend on seasonal colors. The thin seed beads in the middle add a "border" effect. It's bold without being loud.
Roll clay into logs, cut small cubes (about 6 mm), and shape lightly so they stay square. Alternate black and cream beads for 24-28 beads total. Add 1 strand of tiny black seed beads (or use seed beads as separators) in between larger cubes. Seal air-dry beads with satin sealer to keep the checker crisp.
Pro tipUse a ruler or bead guide to cut cubes the same thickness; checker patterns reveal every slip.
AvoidDon't mix rounded beads into a checker layout - it turns graphic into accidental.
4. Terracotta swirl beads with gold flecks
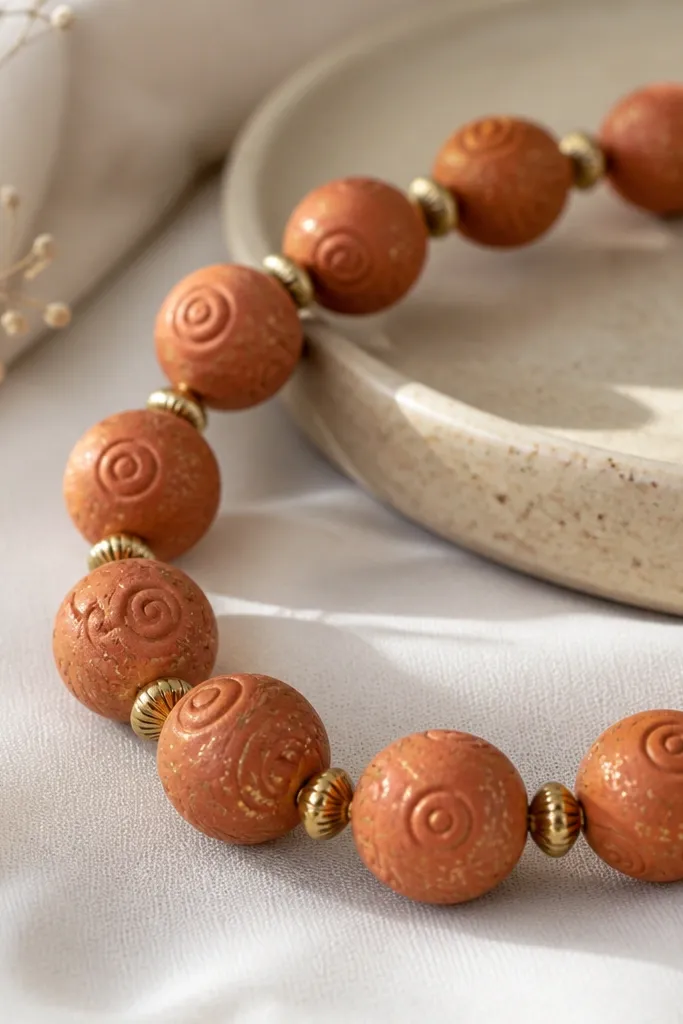
Terracotta swirls look like mini pottery pieces, and gold flecks make them feel special. The swirl pattern gives texture even if you keep the bead size consistent. Pair the warm clay with gold-toned separators to make the color feel richer. This one looks great with denim, white tees, and neutral dresses.
Create swirl beads by twisting two thin clay colors (terracotta and a darker brown) into a rope, then cutting short segments. Make 18-22 beads around 8-10 mm. Add a gold spacer bead every 3 beads. Finish with a satin clear coat so the flecks don't smear.
Pro tipPress the bead ends gently so they sit flat - swirl beads look cleaner when the holes are centered.
AvoidDon't overdo the gold flecks; too many turns the beads into glitter dust.
5. Tiny heart accent bracelet
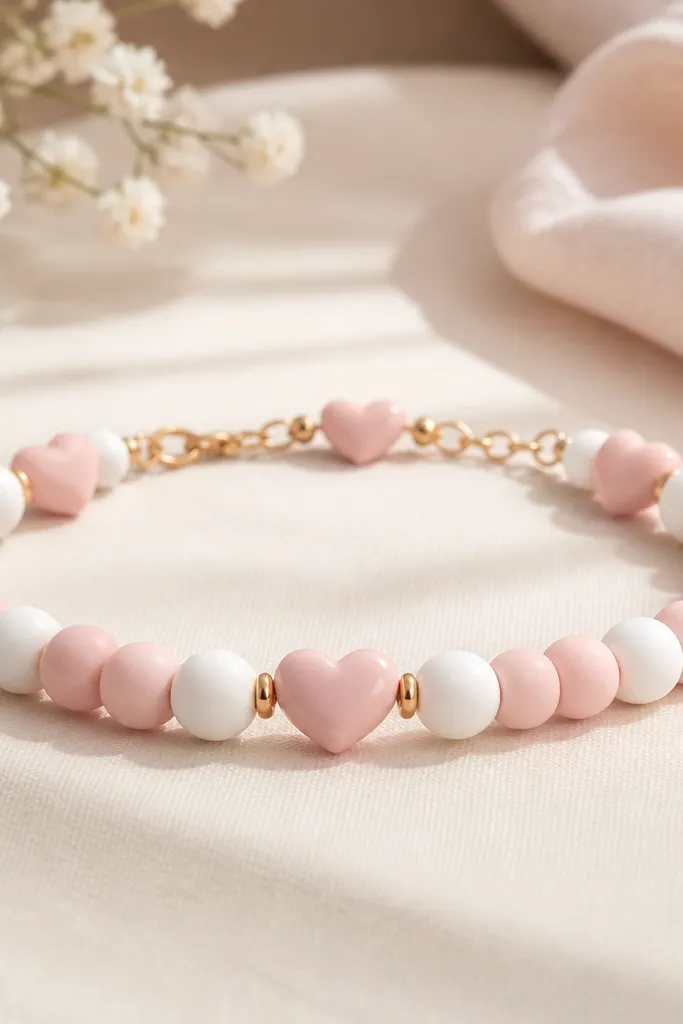
Hearts work best as accents, not the whole bracelet. This bracelet uses simple matte round beads so the hearts feel like little surprises. The raised hearts catch light when you move your wrist. Keep the heart beads bigger than the rounds so the design reads instantly.
Make or buy round beads in two tones (pale pink and white) for about 24 beads total. Add 3 heart beads: one center and two near the clasp. String with elastic for a quick fit or on beading wire with a small clasp if you want extra durability. Seal and lightly buff the heart surfaces so they don't look rough.
Pro tipUse a heart mold or a stamped heart shape so the hearts match size and depth.
AvoidDon't make every bead a heart - it looks cartoonish fast.
6. Speckled galaxy beads with star spacers
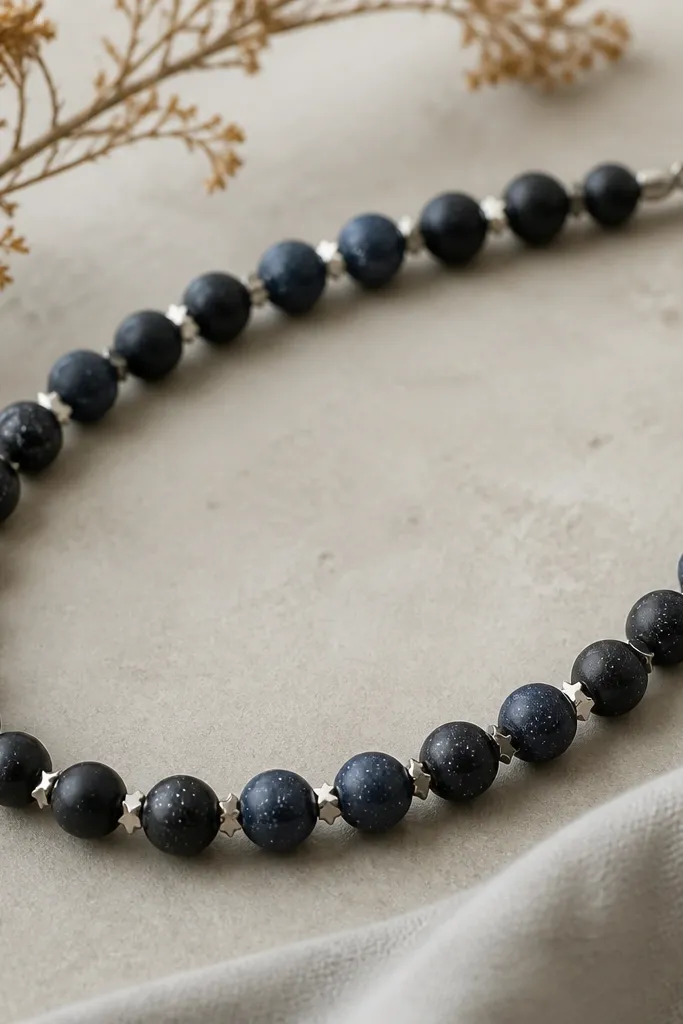
Speckled galaxy beads give you that "night sky" look without needing actual star glitter. Navy and black make the speckles stand out, and silver star spacers add the theme. I like this because it looks good even when the beads are small - the speckles do the heavy lifting. It's also easy to match with all-black outfits.
Mix navy clay with a small amount of white or light gray to create a speckled effect. Cut 8-10 mm beads and poke holes carefully. Use 20-26 beads and add a star spacer every 4-5 beads. Seal with satin so it stays dark and not shiny.
Pro tipSpeckle before you shape: roll the clay with speckles, then form beads so the speckles spread evenly.
AvoidSkip thick clear coat on dark beads - it can look cloudy.
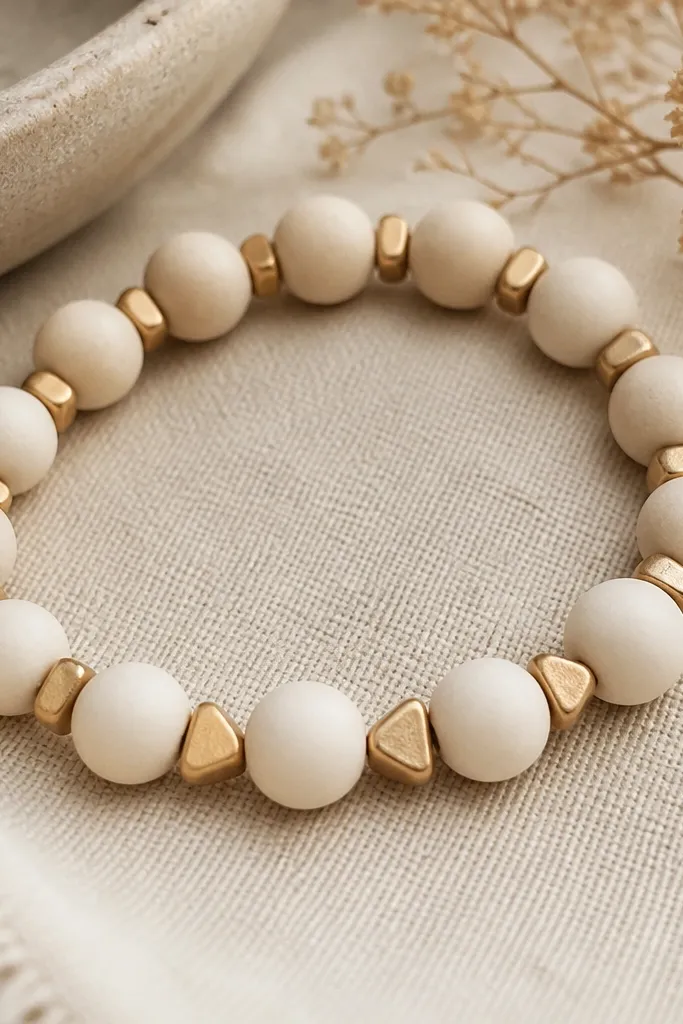
7. Monochrome terracotta + wood-look spacers
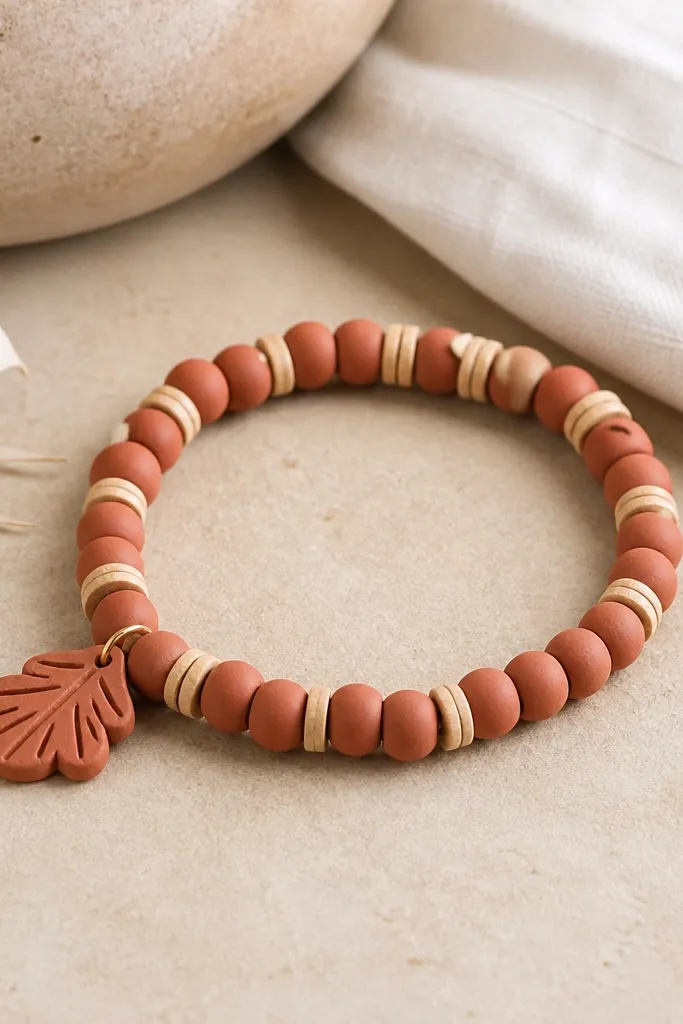
This one looks like a store-bought bracelet because of the spacer choice. Terracotta beads feel handmade, and wood-look spacers make it feel cohesive instead of mismatched. I like beige spacers because they soften terracotta's warmth. Add a tiny charm so the bracelet has motion.
Use 16-20 terracotta beads in 9-10 mm. Add wood-look spacers in 6-7 mm between most beads. Attach a small terracotta charm at the side by threading it between two spacers. Finish with satin sealer to keep the clay from looking plasticky.
Pro tipKeep bead holes centered so the charm dangles straight when the bracelet rests.
AvoidDon't mix cool-toned gray spacers with terracotta - it makes the whole set look off.
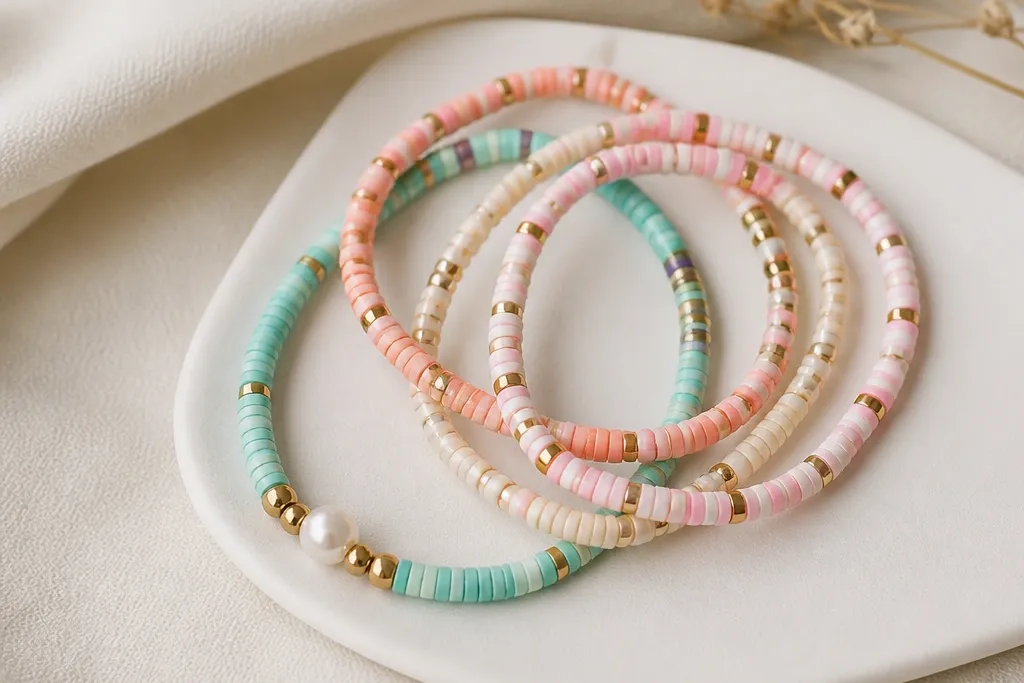
8. Pastel rainbow bead strand with macramé knots
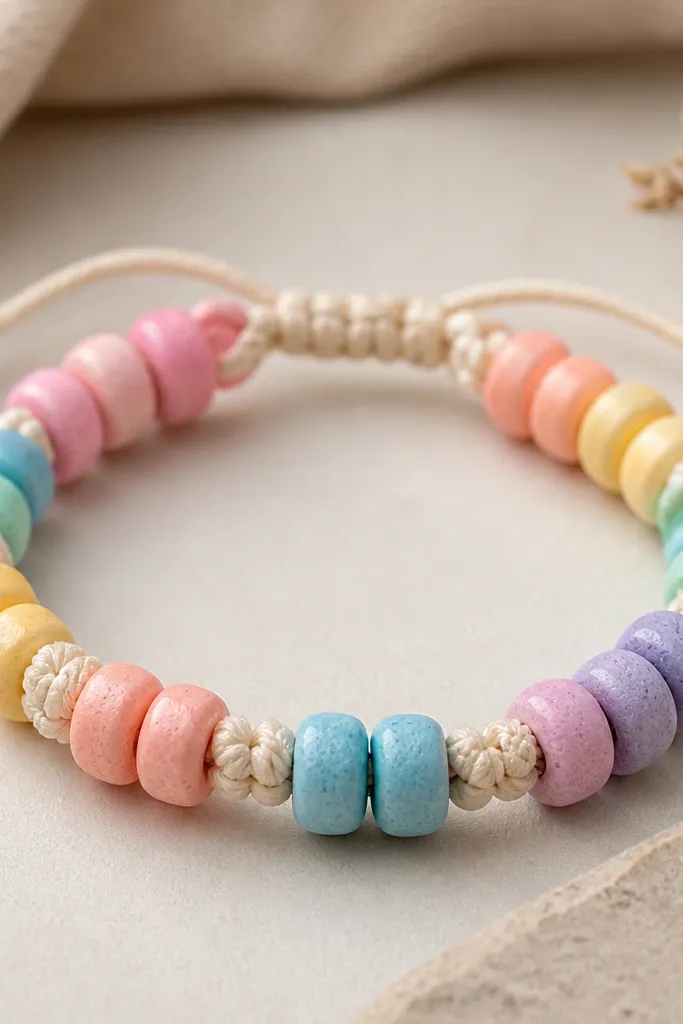
Macramé knots between bead clusters make the bracelet look more detailed than it is. The cord texture also hides small bead imperfections. Pastel rainbow beads keep it sweet and wearable. I like this when I want a bracelet that sits flatter on the wrist than stretchy elastic.
Use waxed cotton cord. String 3-4 beads, then tie a tight square knot, then string the next cluster. Repeat until you reach 7.5 inches. Finish with a simple adjustable knot closure. Seal air-dry beads with satin so the cord doesn't pick up dust.
Pro tipTighten knots with two fingers while the cord is taut - loose knots make the whole bracelet look messy.
AvoidDon't use super slippery cord - knots loosen and beads drift.
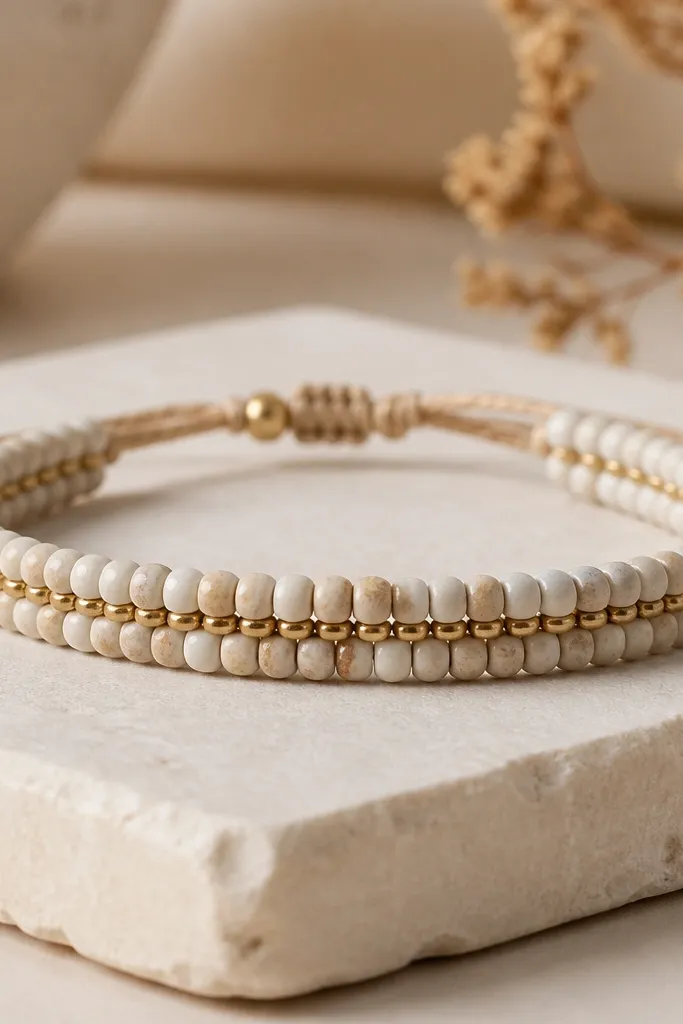
9. Black seed bead edge with clay center beads

Seed beads create a clean frame around your clay. The clay beads become the focal point, and the seed bead edges make the bracelet look jewelry-store finished. I like using cream and black centers because they show up clearly against seed bead rows. It also helps the bracelet sit evenly on the wrist.
Use 10-12 clay beads (8-10 mm) as the center focal beads. Add seed beads on both sides as borders, working with beading thread. Keep the seed bead spacing tight so the edges look straight. Seal clay beads with satin and let fully dry before threading.
Pro tipUse a beading needle and pour seed beads in a small dish so you can keep spacing consistent.
AvoidDon't leave seed bead borders loose - uneven borders make it look homemade in a bad way.
10. White marbled clay beads with clear spacers
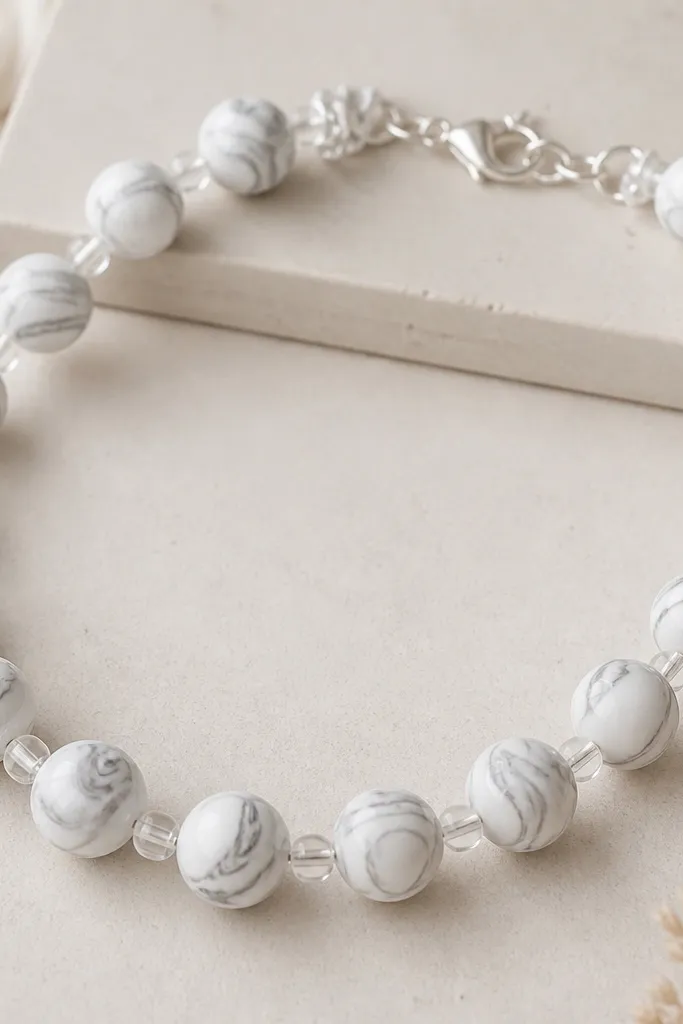
Marbling makes each bead look unique, but the bracelet still looks cohesive when you keep the palette simple. Clear spacers stop the white beads from clumping visually. Silver metal near the clasp gives a polished edge. This one looks especially good in daylight because the clear spacers catch highlights.
Create marbled beads using white clay with thin gray or black streaks. Make 18-24 beads around 7-9 mm. Add clear acrylic spacers (4-6 mm) between every 1-2 beads. Use beading wire with a small clasp so the bracelet doesn't stretch out over time.
Pro tipLet marbled beads rest on a foam pad while they dry or cool so they don't flatten and lose the swirl look.
AvoidDon't use matte sealer over clear spacers - it can haze the transparency.
11. Green leaf bead clusters with tiny gold dots
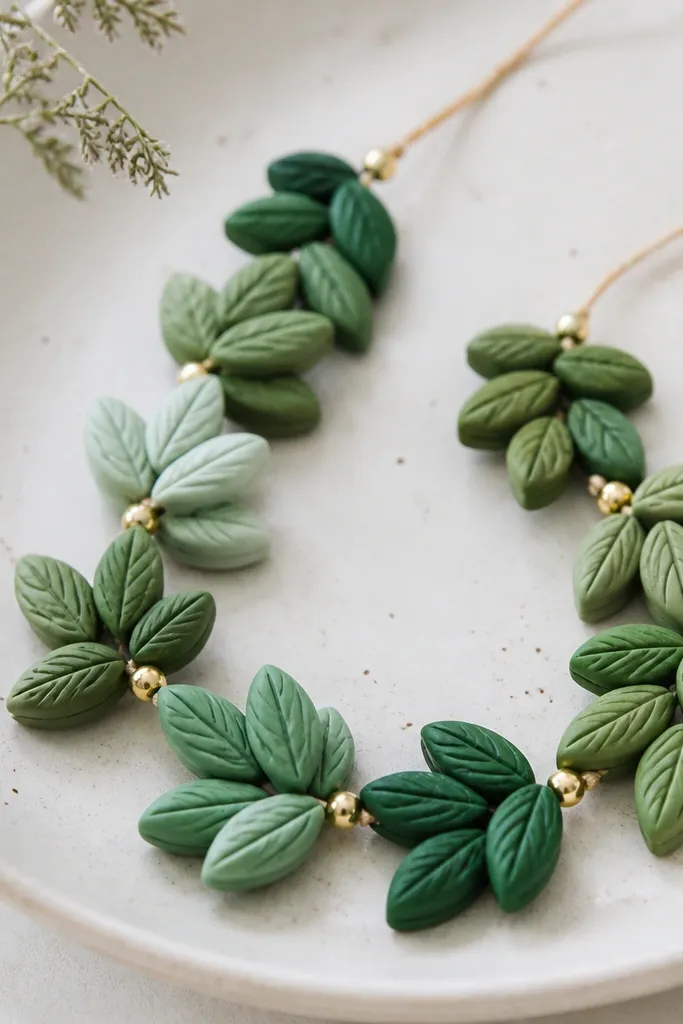
Leaf shapes make the bracelet feel like spring without needing actual floral charms. Use two green shades so the leaves look layered. Tiny gold dots mimic pollen and add contrast. Cluster spacing keeps it from looking like a craft project - it looks like a designed pattern.
Make 10-12 leaf beads, then repeat clusters of 2 leaves separated by 1-2 gold dot beads. Add round green beads as fillers so the bracelet has even coverage. Total beads usually land around 24-30. Seal with satin to keep the leaf texture visible.
Pro tipUse a ball stylus to slightly thin the leaf edges so they look delicate instead of chunky.
AvoidDon't make leaf beads all the same shade - flat color reads like plain blobs.
12. Pink ombré beads with silver micro-spacers
Ombre looks polished because your eye reads a gradual shift instead of separate colors. I like pink ombré because it flatters warm and cool skin tones. Silver micro-spacers keep the gradient from looking like a single blob of color. The bracelet also looks great stacked with neutrals.
Mix 5-6 shades of pink clay from pale blush to deeper rose. Make beads in 8-10 mm and arrange from light to dark. Use 1 silver micro-spacer every 2 beads. Plan for 22-26 beads for a 7.5-inch bracelet.
Pro tipMark the back of your bead tray with a light-to-dark arrow so you don't flip the gradient.
AvoidDon't jump shades; ombré needs small steps or it looks like random color blocks.
13. Sunburst bead mix with yellow center accents
Sunburst patterns work because you place the "hot" color in the center and repeat it rhythmically. Blue and white feels nautical, and yellow gives a bright focal point. This looks extra cute in summer because the yellow pops against cooler tones. It also hides bead-to-bead size variation better than fully symmetrical patterns.
Use 12-14 blue beads and 8-10 white beads in 7-9 mm sizes. Add 4-6 yellow accent beads in the middle of the bracelet run (not at the ends). Add a tiny round spacer bead between accent beads so they stand out. Seal with satin to keep it crisp.
Pro tipStart stringing from the center and work outward - your yellow placement stays centered.
AvoidDon't put yellow accents at both ends - it flattens the sunburst effect.
14. Beige clay beads with tiny black dot pattern
Dot patterns look intentional when the dots are the same size and placed in a loose grid. Beige keeps it neutral and wearable daily. The contrast is subtle but noticeable, especially when the bracelet moves. This is a great "starter" design if you're new to clay bead making.
Roll beige beads around 8 mm. Use a fine dotting tool to add 5-7 black dots per bead. Bake or dry fully, then seal satin. String 20-26 beads alternating dot-beige with plain cream beads, with one small black seed bead between sections.
Pro tipTest your dot size on a scrap bead first; tiny changes in dot diameter show up quickly.
AvoidDon't smear dots with your finger - it turns into a muddy speckle.
15. Chocolate brown beads with caramel swirl spacers
This pairing looks like dessert jewelry. The darker beads ground the bracelet, and the caramel swirls add movement. I like it for fall because it looks warm against sweaters. It also photographs well because the caramel lines catch light.
Make 14-18 chocolate beads in 9-10 mm. Create caramel swirl spacers by twisting caramel and cream clay into a rope, then cutting short cylinders. Use one caramel spacer every 2 chocolate beads. Finish with satin sealer so the swirl lines stay crisp.
Pro tipPush holes through swirls while they're slightly soft so you don't crack the clay.
AvoidDon't use too many swirl spacers - it competes with the chocolate base.
16. Teal and white striped beads with clear tubing separators
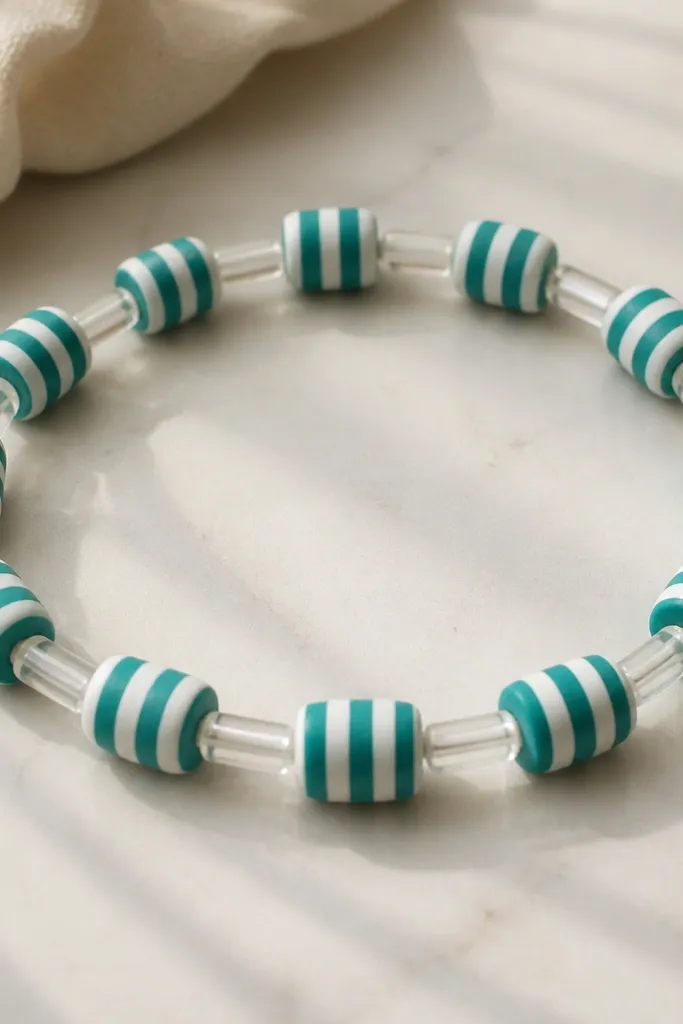
Striped beads look clean when the stripe width stays consistent. Teal and white read fresh, and clear tubing separators keep the stripes from touching visually. This is one of the most "snappy" designs for photos because the stripes make strong lines. It also feels like a modern bracelet instead of a craft bracelet.
Roll teal and white clay into thin ropes, twist or layer to create stripes, then cut short bead lengths. Make 18-24 beads around 7-8 mm. Slide clear tubing separators between every 1-2 beads. Use beading wire so the bracelet holds shape and doesn't stretch out.
Pro tipCut stripes with a sharp blade and avoid compressing the bead - stripes distort under pressure.
AvoidDon't over-bake polymer clay stripes - they can curl and weaken the bead holes.
17. Gold leaf effect clay beads with dark green base

Gold leaf effect beads look high-end because the flecks move with light. Dark green makes the gold stand out without turning the bracelet into pure sparkle. I like adding small gold-toned spacers so the flecks don't have to carry the whole design. This one looks great with black tops and holiday outfits.
Use dark green clay as the base. Press tiny gold leaf flakes onto each bead surface after shaping. Seal with a satin clear coat in thin layers so flecks don't lift. String 20 beads in 8-9 mm, with gold spacers every 3 beads.
Pro tipSeal in multiple thin coats instead of one thick coat so the gold flecks stay textured.
AvoidDon't rub the gold leaf after sealing - friction dulls the shine.
18. Tiny flower bead caps with pink petals
Flower caps look like mini charms even when you keep them simple. Pink petals plus a white base gives a clean, sweet look. The raised center makes the bracelet feel dimensional. I like it because it's cute without leaning too childish.
Make 8-10 flower cap beads, then fill with 14-18 smooth white beads. Space flower beads evenly across the bracelet so you see them in motion. Use elastic cord if the beads are light; use beading wire if your flower caps are thick. Seal with satin to keep petal edges defined.
Pro tipIf petals flatten while drying, prop beads on a soft silicone mat so air hits evenly.
AvoidDon't make flower beads too large - small caps look intentional, big ones look chunky.
19. Monochrome lilac with matte crackle finish
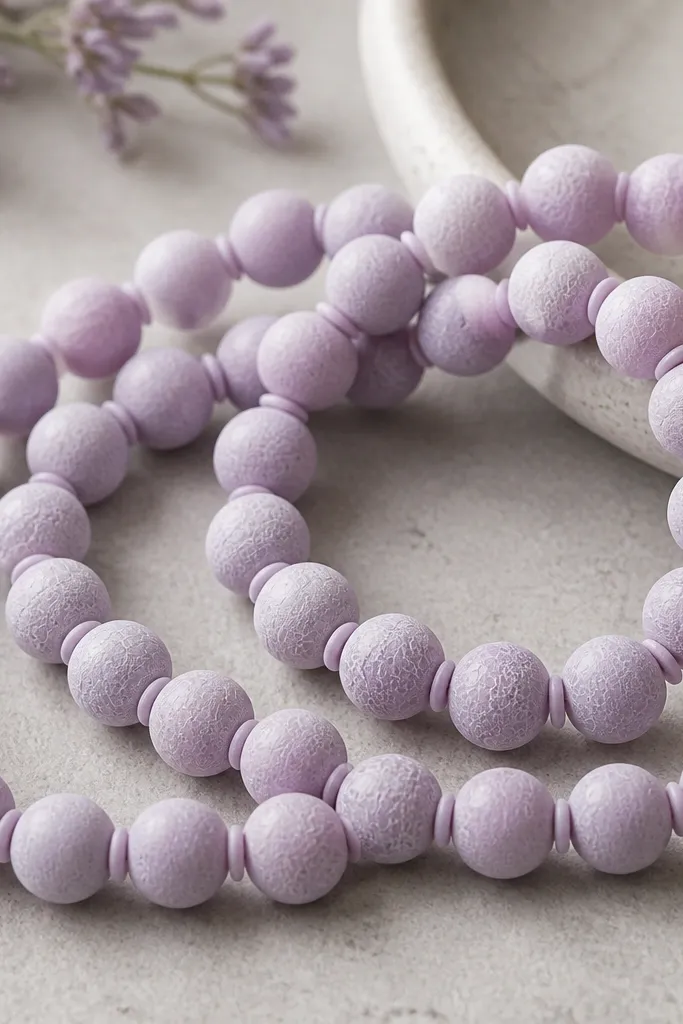
Crackle texture makes a monochrome bracelet interesting without adding new colors. Lilac is soft and looks good with silver or gold accents. I like this design because it hides tiny surface flaws you might see on smooth beads. The crackle also creates a slightly vintage look.
Make lilac beads around 8 mm. Add crackle effect by using a crackle medium or by scoring fine lines and then sealing lightly, depending on your clay type. Seal with matte so the texture stays dry and tactile. String 24 beads in a tight pattern with matching spacers.
Pro tipTest your crackle finish on one bead - too much crackle can weaken the surface.
AvoidDon't use high-gloss sealer on crackle - it fills the texture and looks slick.
20. Two-tone clay bead braid bracelet
A braided look makes the bracelet look more complex than it is. The trick is to keep the two bead strands consistent and tie them together at the edges. Cream and teal is a great combo because it reads clean and modern. When it moves, the braid pattern creates depth.
Use two cords and string 10-12 beads on each strand. Alternate cream and teal on both strands. Tie the strands together at each end with a small clasp connector or a knot and wrap the ends with cord. Seal beads so the cords don't grab dust.
Pro tipKeep strand tension even - one loose strand ruins the braid illusion fast.
AvoidDon't mix bead sizes between strands; the braid loses its symmetry.
21. Rainbow confetti beads with clear seed separators
Confetti inside the bead gives you a playful look even with a simple bead shape. Clear seed separators make the bracelet sparkle without glitter. This design is fun for birthdays and summer parties. It also works well when you want each bead to feel slightly different.
Mix tiny bits of colored clay into a base (white or light beige works best). Shape 18-24 beads around 7-9 mm. Add clear seed beads between every 1-2 confetti beads. String on beading thread with crimp ends for durability.
Pro tipRoll confetti beads gently so the confetti doesn't smear into streaks.
AvoidDon't use opaque separators - you lose the light-catching effect.
22. Textured striped clay beads with tiny fringe charm
Raised stripes add a tactile look that reads "handmade" in the best way. Gray and cream keep it wearable and match lots of outfits. The tiny fringe charm gives motion, so the bracelet looks lively even when you stand still. This one feels artsy without being chaotic.
Make beads with a comb tool or a silicone texture sheet pressed into the surface. Use 20 beads around 8 mm in alternating gray and cream. Add a fringe charm at the clasp side using a small jump ring. Seal with satin so the texture stays visible.
Pro tipPlace the fringe charm where it won't rub against your wrist bone - it should swing freely.
AvoidDon't over-texture - deep grooves collect dirt and make it look worn fast.
23. Red berry beads with green leaf tips
Berry beads are cute because they look like tiny fruit. The green leaf tips are small but they make the whole bracelet read as a theme. Red and cream is a satisfying contrast, and it looks great with winter knits. I also like that the leaf tips create a natural focal point near the center.
Make 10-12 red round beads and attach tiny green leaf caps on top before sealing/baking. Fill the gaps with cream beads for balance. Use 24-28 beads total for a standard adult wrist. Seal with satin to keep the leaf edges from getting shiny and plastic-looking.
Pro tipAttach leaf tips with a dab of slip or extra-thin clay so they bond firmly.
AvoidDon't make leaf tips too thick - they crack when you string and flex the bracelet.
24. Blue glassy beads with silver wire wrap ends
Glassy-looking beads happen when you bake polymer clay and then add a thin clear topcoat. Mixed bead sizes create a natural rhythm so the bracelet doesn't look uniform in a boring way. Silver wire-wrapped ends make the bracelet feel handmade and sturdy. This is a great "wear it everywhere" design.
Use polymer clay for the blue beads. Make 18-22 beads in 6-10 mm sizes, mixing a few 12 mm accents. String on beading wire, then twist silver wire loops at both ends. Add a small jump ring for a clasp if you want easy on/off.
Pro tipSand only the bead edges if needed; avoid sanding the whole surface or you lose the glassy look.
AvoidDon't use hot glue to hold wire ends; it can soften and loosen over time.
25. Cream beads with tiny gold triangle accents
Triangles add a geometric edge to an otherwise soft cream bracelet. When you repeat the triangles at steady intervals, the design looks intentional instead of random. Gold triangle accents can be real metal or gold-toned clay, and either way they catch light. This is the kind of bracelet that looks good stacked because the base is neutral.
Make 20-24 cream round beads in 8 mm. Cut or stamp 6-8 small triangles from gold clay and bake/dry them. Thread in a repeating sequence: triangle, 2 cream beads, triangle, 3 cream beads. Seal with satin or semi-gloss if you want the gold to feel slightly shinier.
Pro tipUse a consistent triangle size, around 5-6 mm, so the pattern stays clean.
AvoidDon't put triangles at both ends only - the bracelet needs a repeating rhythm across the whole run.
26. Black marble beads with clear crystal separators
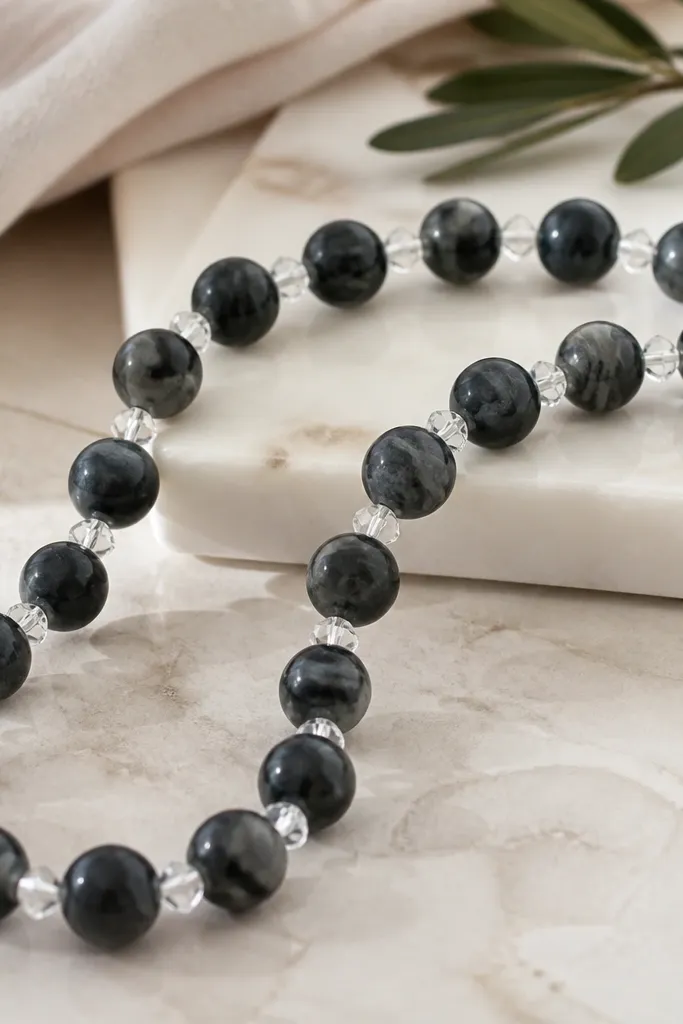
Marble beads look expensive because each bead is slightly different, but the palette stays consistent. Clear crystal separators add sparkle and also keep the beads from sticking together visually. I like this design for evenings because the separators catch light. It also looks good with both gold and silver jewelry nearby.
Make 16-20 black marble beads around 9 mm. Use clear faceted beads (4-6 mm) as separators every 1-2 clay beads. String on beading wire or thread with crimp ends for strength. Seal polymer clay with a clear topcoat for that smooth marble finish.
Pro tipIf your marble has streaks, rotate beads as you string so the streak directions alternate for a more dynamic look.
AvoidDon't use matte finish with crystal separators - it makes the contrast feel off.
27. Neon pop beads with clear elastic and spacer stars
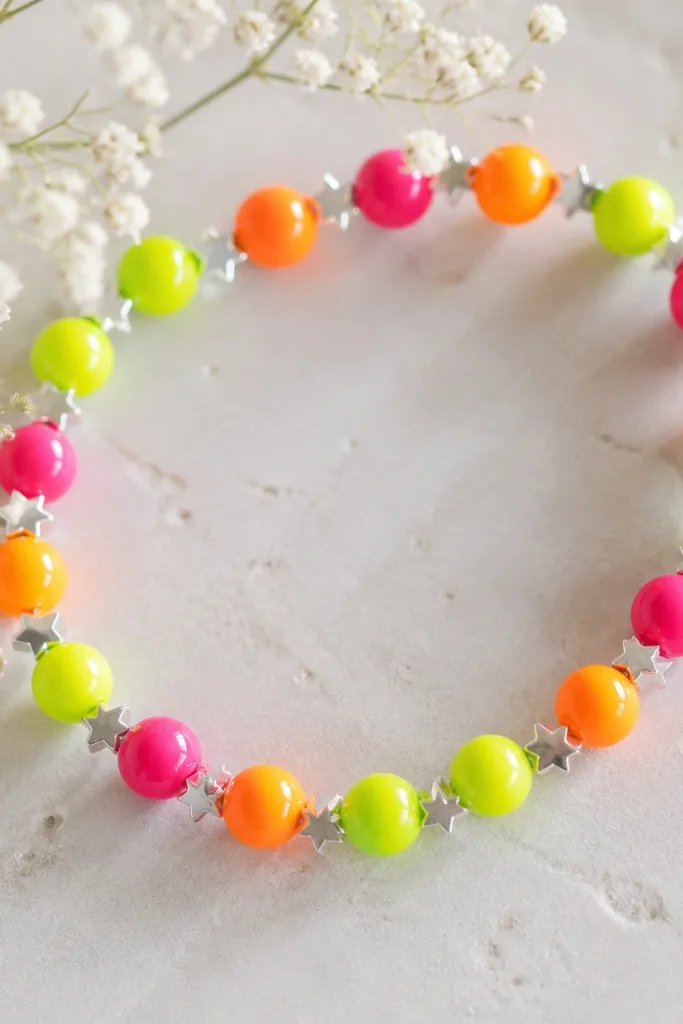
Neon beads look fun and playful when they're separated clearly. Clear elastic keeps everything tidy without color clashes. Silver star spacers add a "pop" that matches the neon energy. This design is perfect for festivals or summer nights.
Use neon beads in 6-8 mm sizes, totaling 26-34 beads so the bracelet feels full. Add a star spacer every 3-4 beads. Tie tight on elastic and use a tiny drop of clear jewelry glue only on the knot area. Seal air-dry beads with satin so neon doesn't look dull.
Pro tipChoose one neon shade as the main color and keep the others as equal accents - it looks more designed.
AvoidDon't mix neon with too many dark beads - the bracelet becomes heavy and messy.
28. Two-row style: clay beads with a seed bead middle line
This two-row effect makes clay beads look like they're woven. The middle seed bead line creates a clean separation and adds a subtle shimmer. I like using similar colors on both rows so it stays cohesive. It looks more "jewelry" and less "craft stringing."
Use beading thread and create two parallel rows of clay beads (about 10-12 beads per row) with a seed bead line down the center. Add seed beads as separators so the spacing stays even. Wrap ends with a small clasp or use a hook-and-eye connector with crimped wire. Seal clay beads before assembly.
Pro tipKeep thread tension tight and consistent; loose thread makes the middle line sag.
AvoidDon't use huge seed beads - the center line becomes chunky and uneven.
29. Mini pearl-look clay beads with pastel core
Pearl-look beads feel classy even when they're cheap clay. The pastel core gives a subtle hint of color without turning the bracelet into a rainbow mess. Gold micro-beads add that "wedding guest" vibe. This is a bracelet I made for a friend's bridal shower and it looked polished without being heavy.
Make beads with a white outer layer and a tiny colored center (like blush or mint). Keep beads 6-7 mm so they read as pearl-like. String 28-34 beads with a gold micro-bead every 2-3 clay beads. Seal with satin or pearl-like finish so the surface stays smooth.
Pro tipIf your beads look too matte, add one thin pearl shimmer topcoat to the surface only.
AvoidDon't pick large beads for a pearl look - big pearls look like decorative rocks.
30. Earthy mix: terracotta, sand, and rust with brass spacers
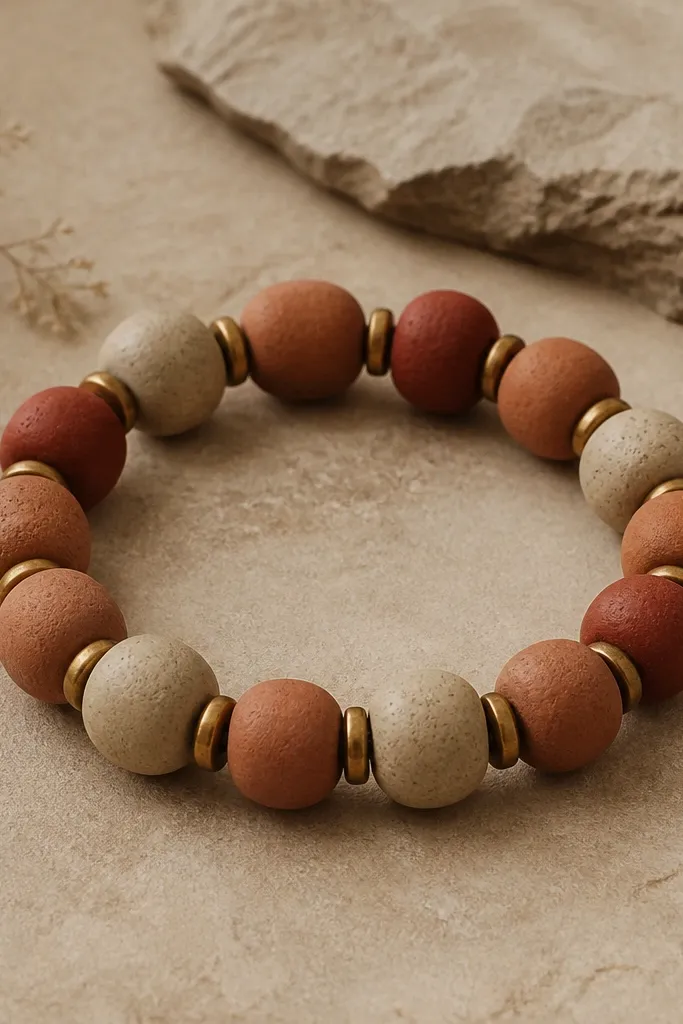
Earth tones look best when you let the materials do the work. Terracotta, sand beige, and rust red create a warm palette that doesn't need heavy embellishment. Brass spacers add a tiny metallic warmth that matches the clay tones. This bracelet sits nicely next to watches and rings.
Use 3 clay colors and keep each color bead count within 20-40% of the total so it doesn't tip too far into one shade. Add brass spacers every 2 beads. Total beads usually land around 24-30. Seal with satin so it feels like pottery, not plastic.
Pro tipMix bead sizes slightly (6-10 mm) but keep spacers consistent for a "collected" look.
AvoidDon't add bright neon accents - it breaks the earthy mood.