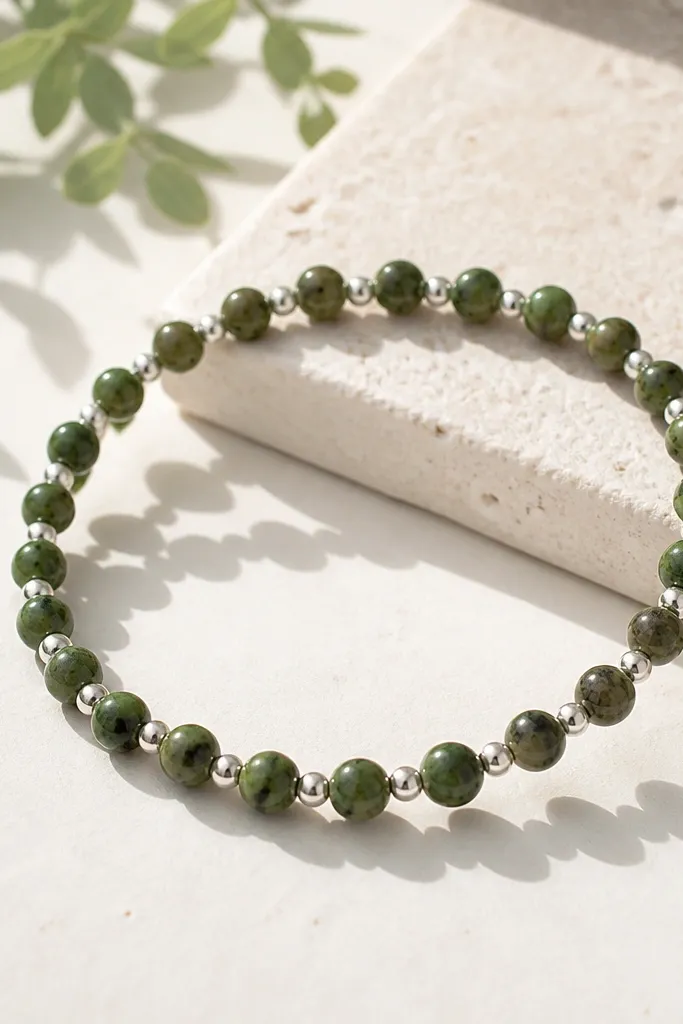
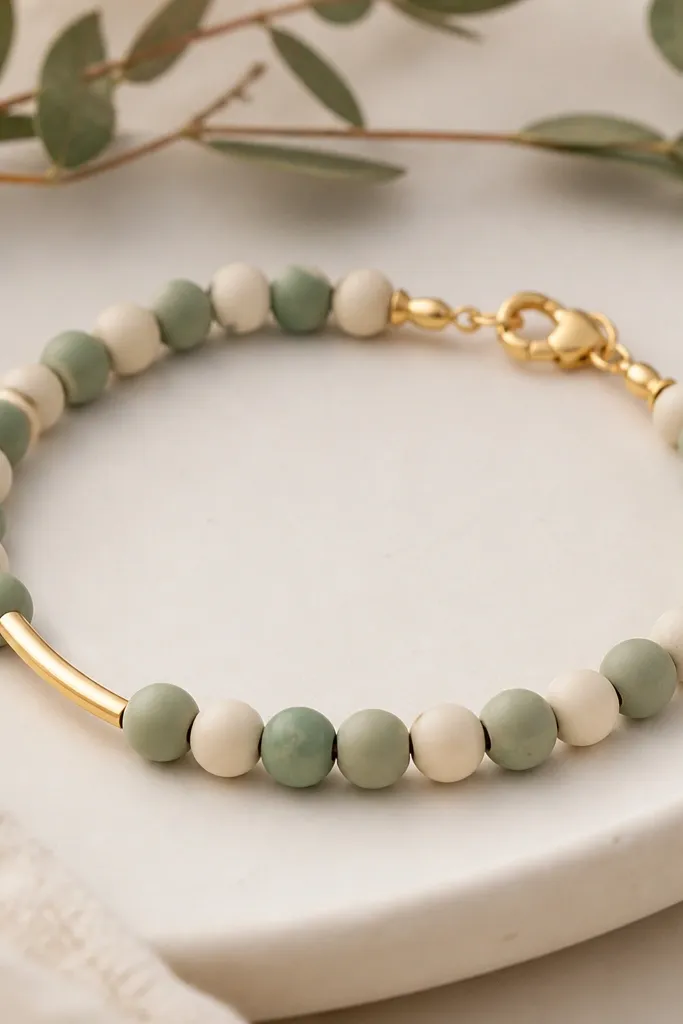
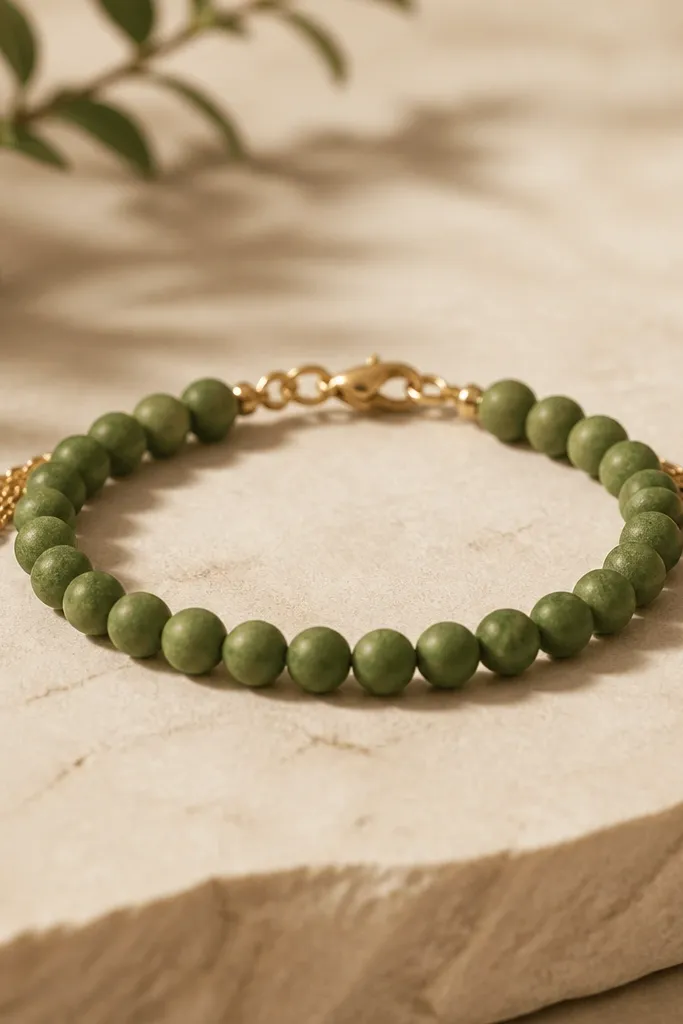
1. Sage Matte + Gold Micro-Spacer Line
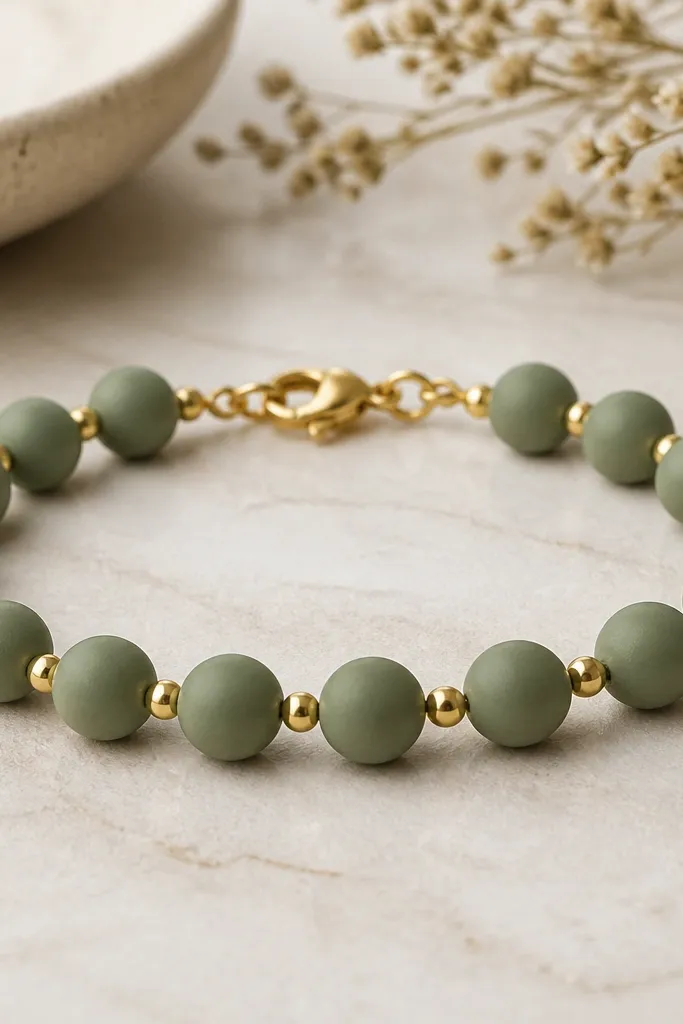
This one looks modern because the beads stay calm and evenly spaced. The matte sage green absorbs light softly, while the micro gold seed beads create a thin "spark" line without taking over. I like it for everyday wear because it doesn't fight with clothing textures. The result reads clean and intentional - like a minimal bracelet from a boutique, minus the price.
Use 8mm matte sage green rounds as the main beads. Add 2mm gold seed beads between each clay bead and keep the gold count consistent across the bracelet. String on stretchy cord (0.8mm) and tie with a double surgeon's knot, then glue the knot with clear jewelry glue.
Pro tipBefore you knot, lay the beads on a strip of tape in order so you don't accidentally swap two spacers - that's where uneven gaps start.
AvoidAvoid chunky jump rings or oversized spacers - they make the whole piece look heavy and less "sleek."
2. Deep Emerald Gloss with Clear Teardrop Accents
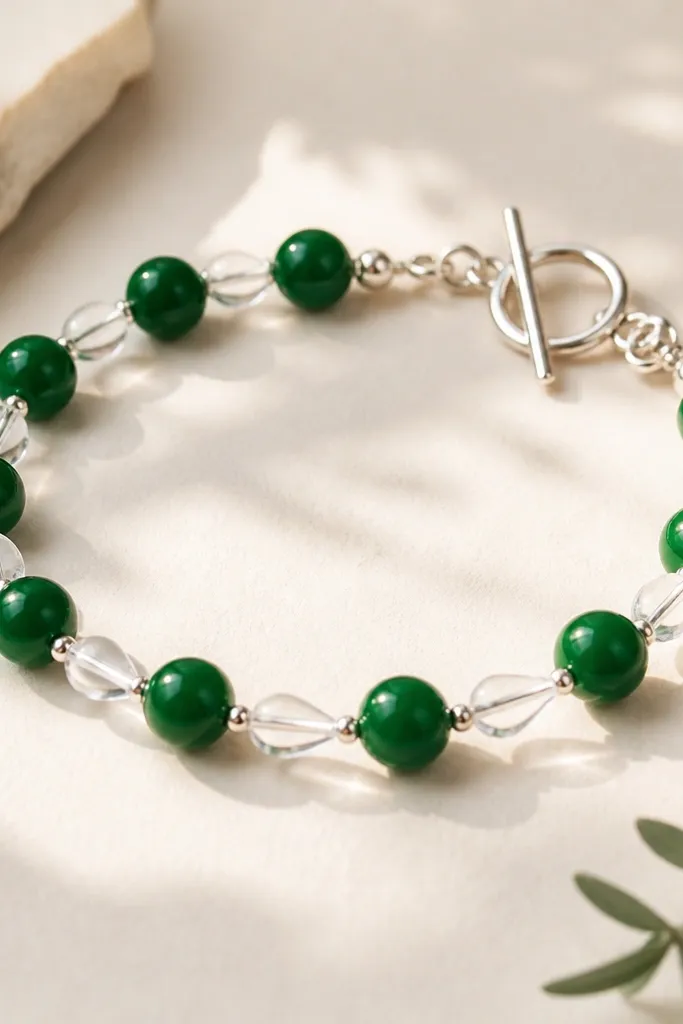
Glossy emerald beads look richer when the light bounces off a smooth surface. The clear teardrops act like tiny highlights, so the bracelet has movement even when you're standing still. This combo feels more "evening" than casual because the clear beads read as light-catching. It's also a great way to add contrast without adding more green shades.
Main beads: 10mm glossy emerald rounds. Accent: clear teardrop glass beads about 6mm tall, placed every other gap. Use 4mm silver spacer beads only at the clasp sides to keep the pattern crisp. Finish with a small silver toggle so the bracelet opens flat instead of bunching.
Pro tipThread two teardrops per gap if you want extra sparkle, but keep the total bead count the same so it still fits your wrist comfortably.
AvoidDon't mix silver and gold metal tones - it makes the clear accents look accidental.
3. Moss Green Coin Beads with Blackened Brass Half-Moons
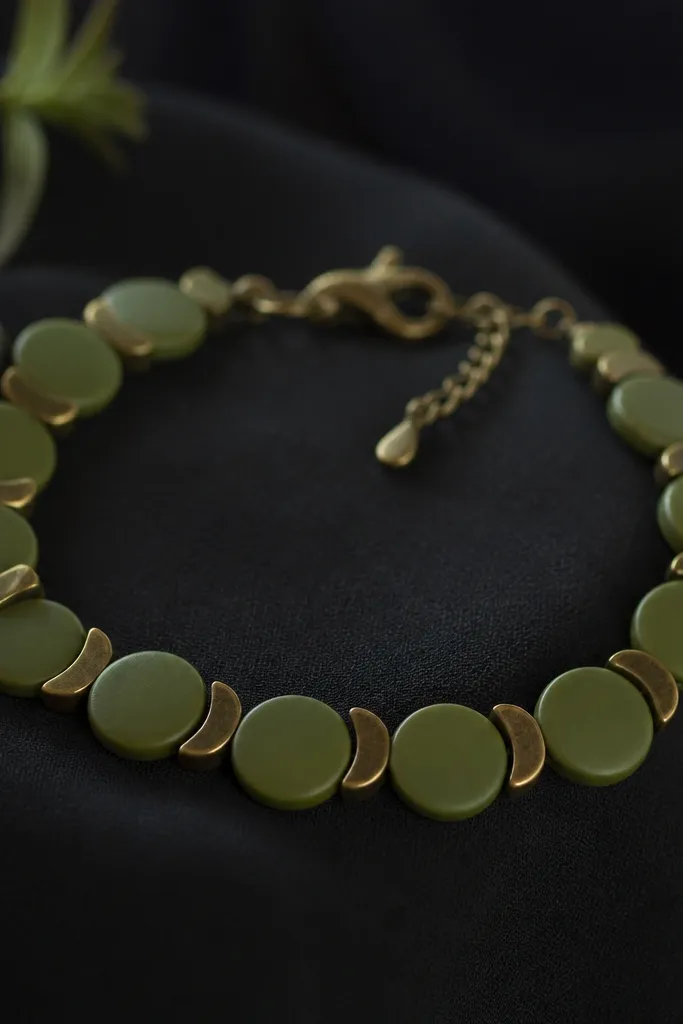
Coin beads sit flatter than rounds, which instantly makes a bracelet feel more modern. Moss green stays earthy, and the blackened brass half-moons add a graphic, slightly industrial edge. The half-moons also create a subtle shadow line that makes each bead separation visible. It's a clean look that works with denim, black tees, and even a simple white button-down.
Use 9mm moss green coin beads with a drilled center. Alternate: coin bead, blackened brass half-moon spacer (about 7mm), then coin bead again. Add 2mm black seed beads at the half-moon points to keep the pattern tight. String on nylon beading line (0.45mm) with a crimp cover at the clasp for a sturdy finish.
Pro tipIf the coins rotate, add one tiny 2mm seed bead at each spacer junction to "lock" the orientation.
AvoidSkip large gold-tone charms here - the shape contrast is the whole point.
4. Olive Clay Rounds with White Porcelain-Style Spacers
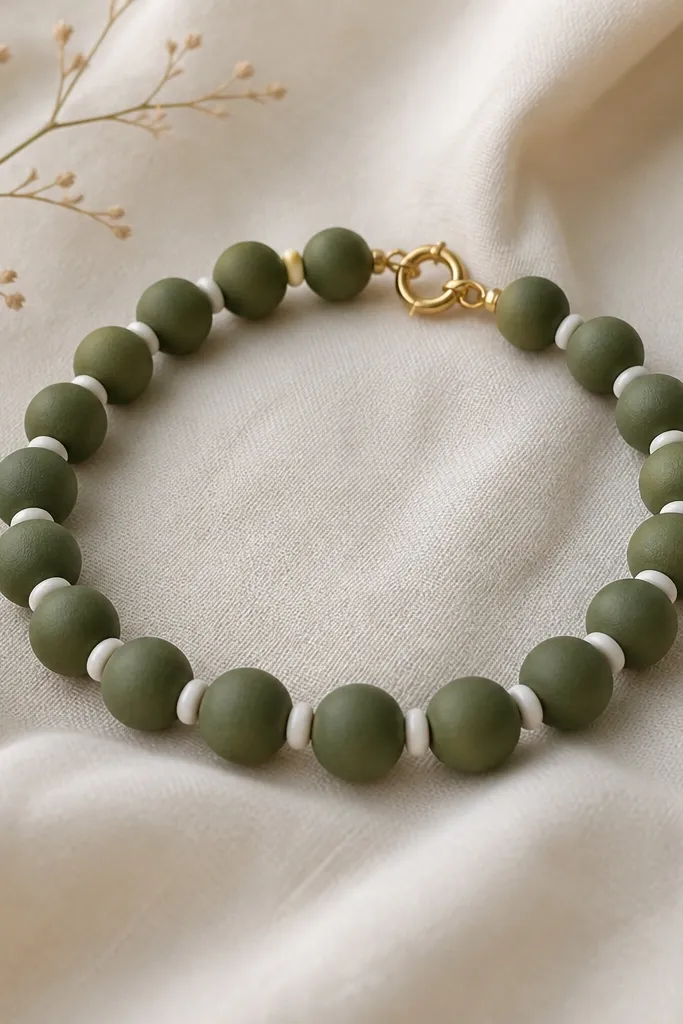
This is the cleanest "modern" green combo because it's basically olive plus light. The white spacers create a stripe effect around the wrist, so it looks intentional instead of random. Olive clay also has a slightly muted undertone that plays nicely with almost any outfit color. If you want green that doesn't look too holiday, this is the set.
Main beads: 8mm olive rounds. Spacers: 6mm white "porcelain" style beads with a matte glaze look. Keep the spacing consistent: one white spacer between each green bead. Use a 7mm gold jump ring and a small clasp that sits close to the wrist.
Pro tipThread a thin stretch cord through the white spacers twice if they spin - it keeps the bracelet from twisting.
AvoidAvoid off-white that's too yellow - it makes the olive look dull.
5. Green Marble Clay with Gold Zigzag Bars
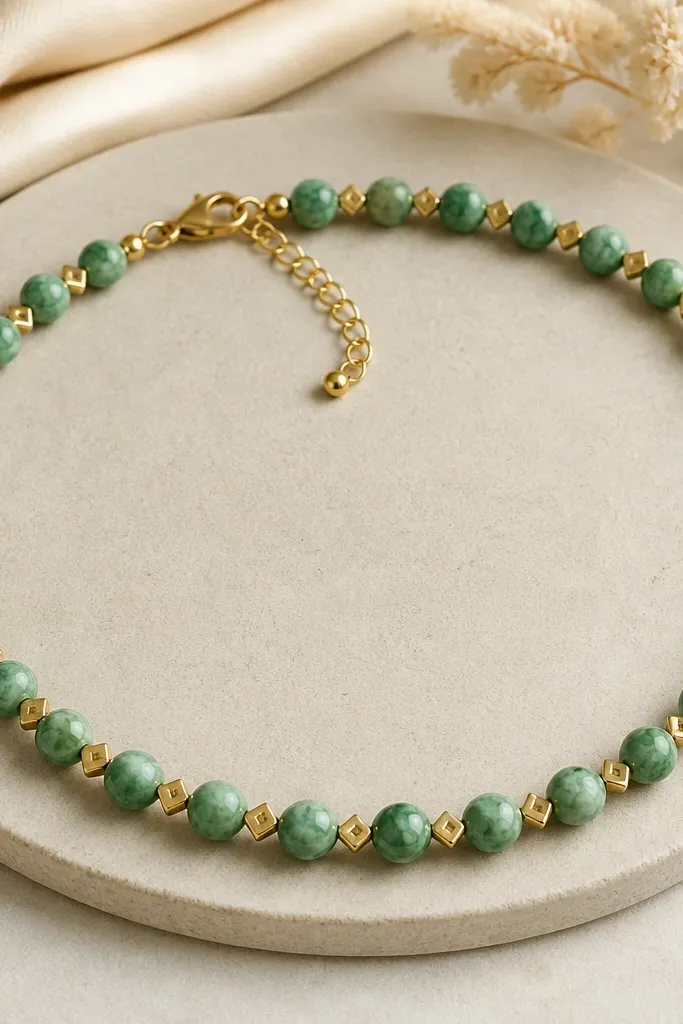
Marble-effect green already has movement, so you don't need lots of charms. The gold zigzag bars add a crisp geometric line that feels current. This bracelet catches light in two ways: swirled clay highlight and sharp metal edges. It looks like "designed" jewelry, even if you're using the same stringing setup you use for simpler builds.
Use 10mm marble green rounds as the base. Add a gold zigzag bar spacer (about 8mm long) between each bead. Add one tiny gold seed bead at each side of the zigzag bar to prevent metal contact with clay. Finish with a lobster clasp and a 1-inch chain extender so the fit stays comfortable.
Pro tipIf your zigzag bars slide, add a 2mm seed bead on both sides of each bar and keep the clay beads snug.
AvoidDon't use big chunky links - the zigzag bars lose their clean look.
6. Emerald + Sage Gradient with Clear Round Micro-Beads
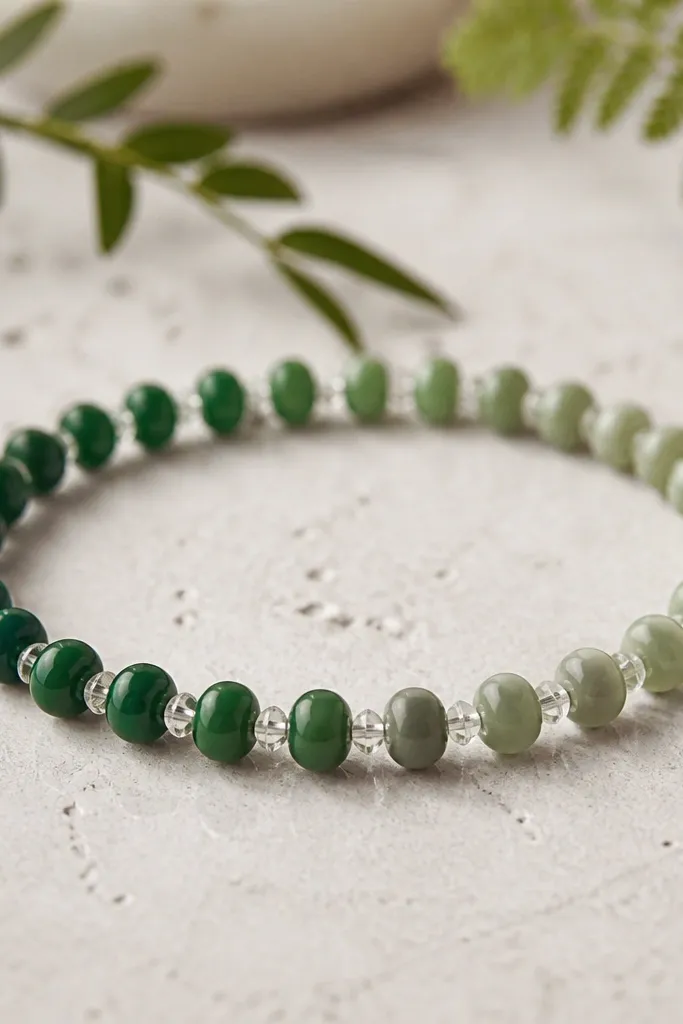
A smooth green gradient reads modern because it looks like color planning, not leftovers. The clear micro-beads act like a transparent "glue" that keeps spacing even and adds sparkle without changing the palette. This is one I wear when I don't want a strong contrast but still want the bracelet to pop. The clear beads also hide small size differences between clay beads.
Choose 10mm rounds in three shades: deep emerald, mid green, sage. Arrange from dark to light across the bracelet. Between each clay bead, use 3mm clear round micro-beads. String on stretchy cord, knot tight, and trim close to the knot so it doesn't create a bulky spot.
Pro tipLay out the beads in a gradient order on your table first - it's faster than trying to rearrange once you start stringing.
AvoidAvoid skipping the clear micro-beads - that's what keeps the gradient looking polished.
7. Speckled Green Confetti with Tiny Silver Stud Beads
Speckled clay beads already look like confetti. Pairing them with tiny silver stud beads adds a modern "dot" effect that feels graphic. This bracelet looks best when the clay is the star and the silver is the punctuation. It's also forgiving - if your clay beads aren't perfectly uniform, the speckling hides it.
Main beads: 9mm speckled green rounds. Spacers: 3mm silver stud beads between every clay bead. Keep the pattern consistent: stud, clay, stud, clay all the way around. Use a small silver magnetic clasp if you want quick on/off, and test that it doesn't pull the bracelet out of alignment.
Pro tipIf your clasp area flips, add a single seed bead right next to the clasp connection point to keep the tension even.
AvoidDon't add large charms to speckled designs - it turns the confetti look into clutter.
8. Forest Green Barrel Beads with Skinny Leather Wrap Ends
Barrel beads give you a more sculpted look than rounds, and the leather ends make it feel handmade in a good way. Forest green clay plus black leather reads modern and grounded. The leather wrap also lets you adjust the fit without using a metal clasp. I like this for fall outfits and for people who hate fiddly closures.
Use 8x6mm forest green barrel beads. String them on waxed cotton cord (0.8mm) so the leather end knots hold well. Make two short leather wrap ties at the ends using 1/8 inch leather strips, wrapping twice and gluing the last wrap. Space the beads with 4mm matte black seed beads every few gaps to keep it balanced.
Pro tipPre-cut leather strips to 3 inches each so you have enough room to wrap twice without running out.
AvoidAvoid slippery cord types - nylon thread makes the leather ties loosen.
9. Olive + Copper Leaf Charms with Matte Clay Rounds
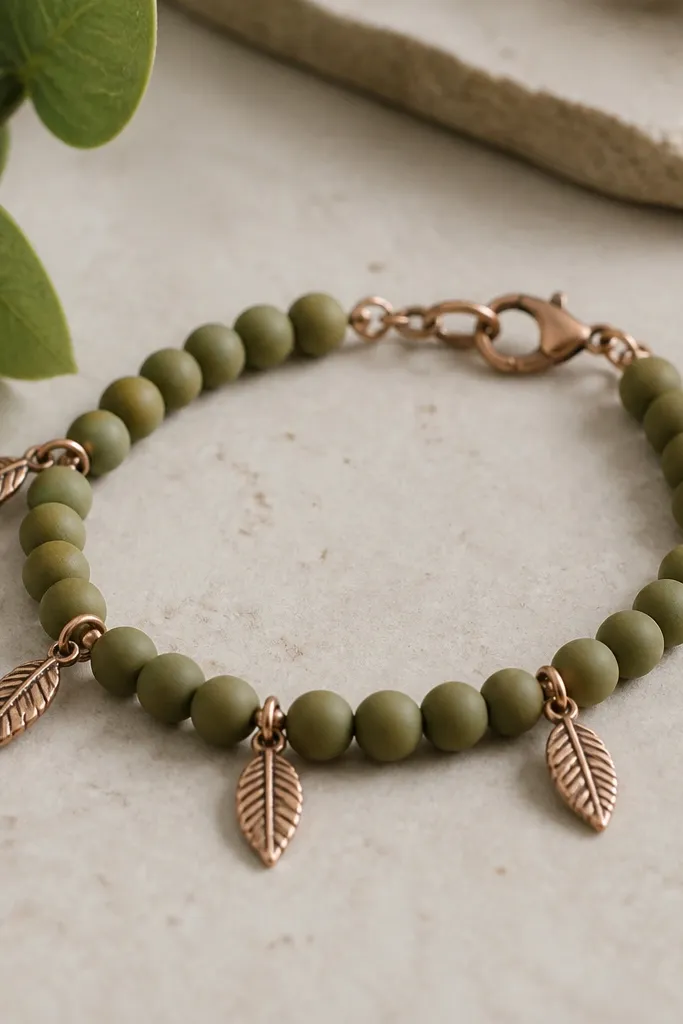
This bracelet looks modern because the leaf charm is small and spaced out. Matte olive keeps it soft, while copper gives warm contrast. The leaf shape adds a subtle organic line without turning the piece into a theme bracelet. It's the easiest way to make green clay feel "finished" even if you're using simple round beads.
Main beads: 8mm matte olive rounds. Place a copper leaf charm (around 10-12mm wide) every 3-4 clay beads. Add 2mm copper seed beads around the charm to blend it into the pattern. Use stretchy cord for comfort, but keep the charm holes aligned so the charm hangs flat.
Pro tipHang charms slightly off-center by rotating them before you knot - that's what gives the leaf a natural drape.
AvoidDon't place a leaf charm between every bead - it looks busy fast.
10. Green Clay Beads + Black Faceted Spacer Beads
Faceted black spacers make green look sharper. The clay provides softness; the faceted beads provide crisp sparkle. Using two close greens - like moss and olive - keeps it modern without adding a third distracting shade. This one also photographs well because the black facets throw tiny highlights.
Pick two green shades: 8mm moss and 8mm olive. Alternate them, then insert a 4mm black faceted spacer between each clay bead. Use 3mm silver seed beads at every clasp-side junction only. String on elastic cord and check that the clasp area doesn't create a twist by sliding the bracelet around your finger.
Pro tipIf the black facets catch on your skin, add one extra silver seed bead between facet and clay to smooth the contact point.
AvoidAvoid matte black spacers here - the look depends on facets.
11. Jade Green Flat Oval Beads with Tiny White Tassel Ends
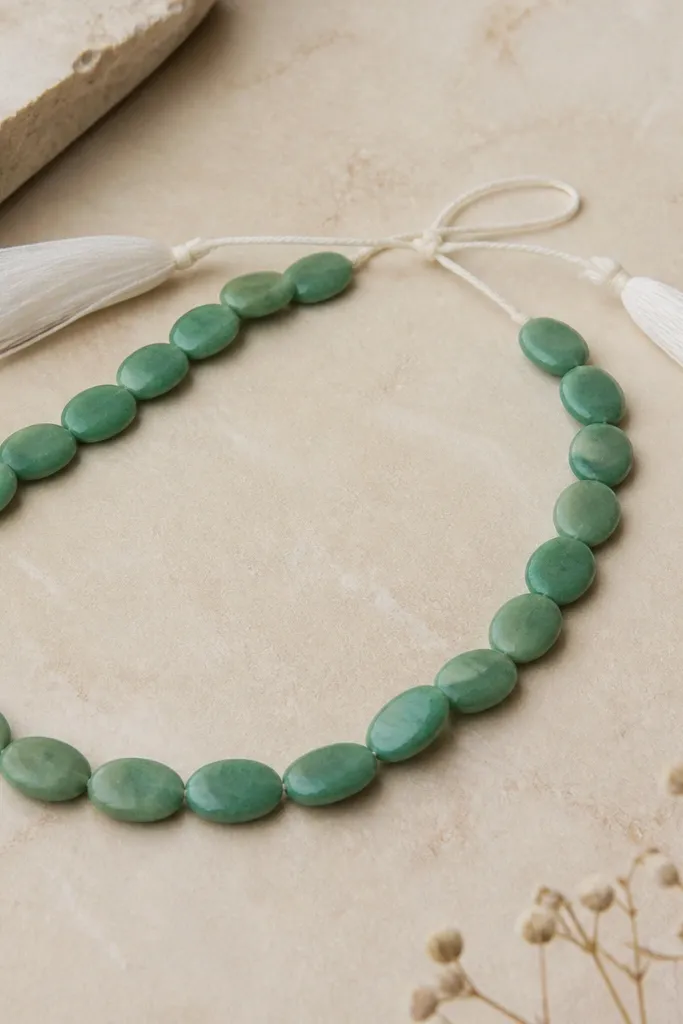
Flat oval beads create a sleek, elongated look that feels modern on the wrist. The white tassel ends add a light, playful movement, but they're tiny enough to stay classy. Jade green is bright without being neon, so it works with neutrals and denim. This bracelet feels airy because the tassels swing when you move.
Use 10x7mm jade flat oval beads. String on braided nylon cord and tie a secure knot at each end, then trim the cord. Build tassels from 6-8 strands of white embroidery thread, tied around a 1-inch segment of thread. Attach tassels by wrapping the knot area with thread and gluing it in place.
Pro tipKeep tassels at 1.25-1.5 inches long so they don't snag on sleeves.
AvoidSkip thick tassel yarn - it looks bulky and cheap next to flat clay beads.
12. Sage Green + Cream Beads with Two Gold Bar Stops
This design looks planned because it has two "stop points" - the gold bars near the clasp. Alternating sage and cream keeps the palette soft, and the bars prevent the bracelet from looking like random bead mixing. It also makes the clasp area look intentional, which is where most homemade bracelets look sloppy. The gold bars catch light and make the whole piece read more polished.
Main beads: alternate 9mm sage clay rounds with 9mm cream clay rounds. Add a 6mm gold bar spacer at each side near the clasp, then continue the alternating pattern. Use 0.6mm gold spacer seed beads between every bead for consistent spacing. Finish with a small adjustable clasp so the bars sit centered.
Pro tipMeasure the bracelet length twice, then place the clasp so the two gold bars land at the same distance from each end.
AvoidDon't use too many gold bars - two stops are enough.
13. Green Galaxy Swirl Beads with Antique Silver Filigree Drops
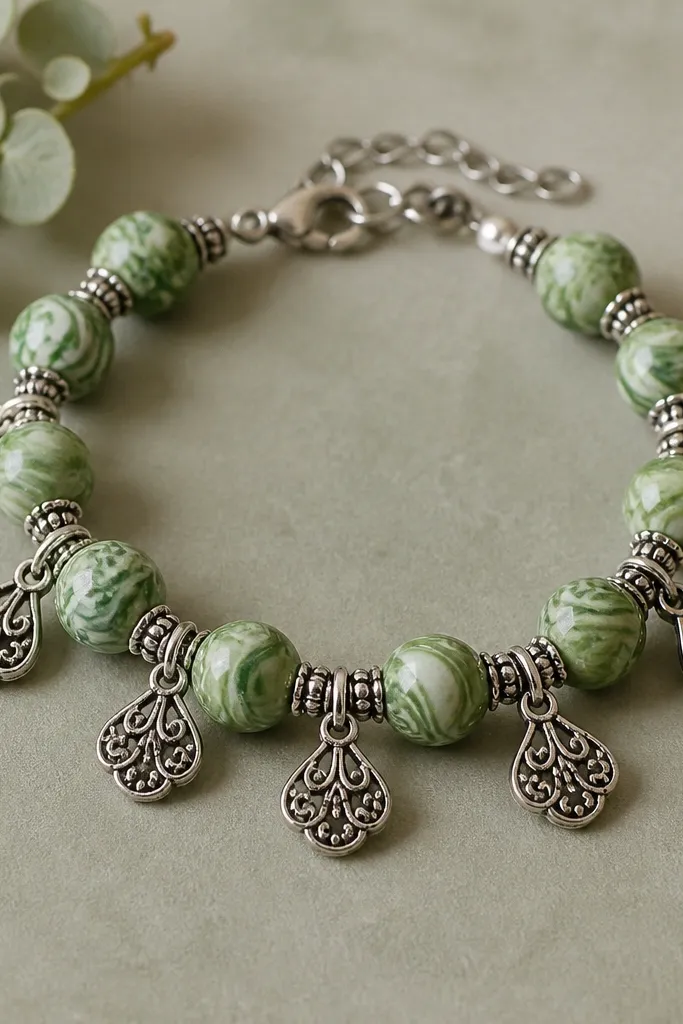
When your clay beads already look like a galaxy swirl, you need one kind of metal element that doesn't compete. Antique silver filigree drops add an old-silver detail that frames the swirl without changing the color story. This bracelet reads modern because the filigree is used as a single focal motif, not repeated everywhere. It's also great if you want something that looks special without being loud.
Use 10mm green galaxy swirl rounds. Place an antique silver filigree drop charm (about 12-15mm long) every 4-5 clay beads. Keep spacers minimal: 3mm antique silver rounds between the rest. String on silk thread with a knotting technique, so the charms hang straight and don't rotate into each other.
Pro tipIf drops twist, knot twice on the charm side and leave a 2-3mm thread gap so gravity can pull it into place.
AvoidAvoid bright shiny chrome silver - it clashes with the swirl look.
14. Chalky Green Beads with Semi-Transparent Green Glass Rounds
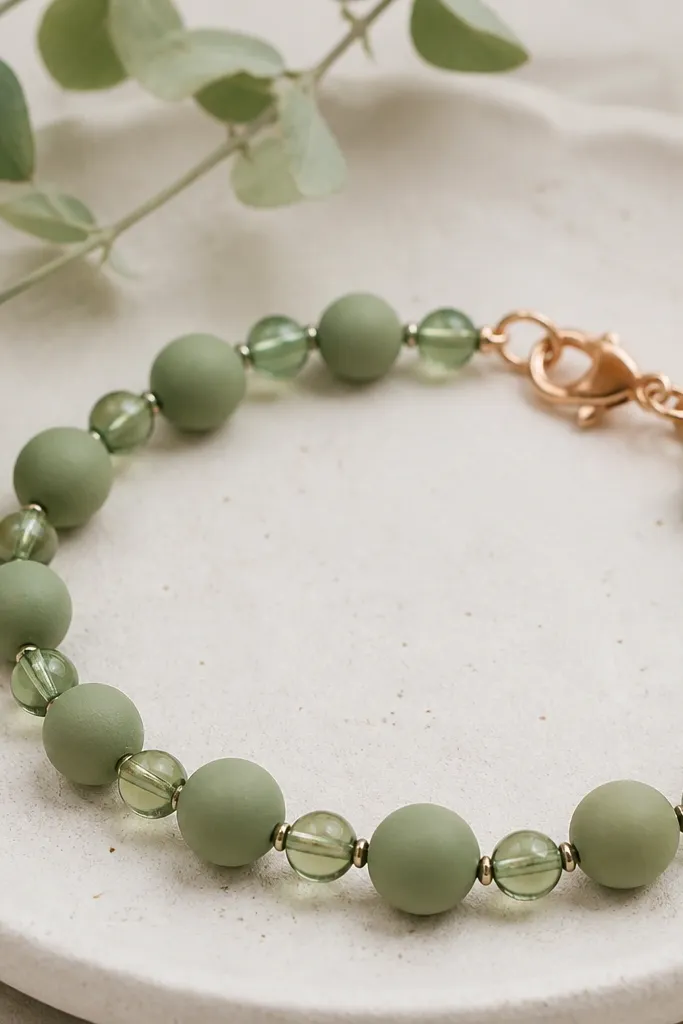
Chalky green clay gives a soft, powdery look. Semi-transparent green glass beads add depth because they let light pass through, so the bracelet looks layered. The rose-gold clasp warms the palette without overpowering the green. This combo feels modern because it plays with translucency and texture - not just color.
Main clay: 8mm chalky matte green rounds. Glass rounds: 6mm semi-transparent green glass, alternated with clay beads. Add 4mm rose-gold spacer beads only at every third gap so the bracelet doesn't turn into a metal-heavy piece. Use stretchy cord and check that the glass beads don't pinch against the clay when you bend your wrist.
Pro tipWipe glass beads with a dry microfiber cloth before assembling - fingerprints dull the translucency.
AvoidAvoid mixing too many glass colors - one transparent green shade is enough.
15. Green Clay Beads with Micro Chain Fringe at the Ends
Micro chain fringe makes a bracelet look jewelry-grade because it adds motion at the ends where eyes naturally land. The clay beads stay simple, and the fringe does the "movement" work. If you keep the fringe short, it reads modern instead of costume-y. I like this when I want green but don't want charms swinging all over the wrist.
Use 9mm green clay rounds as the main beads. String with stretchy cord or beading line, then attach a small jumpring at each end. Add micro chain (around 1mm links) cut into 1.5-inch lengths, then attach 8-10 strands per side. Finish with a small clasp at the back so the fringe hangs straight.
Pro tipCut chain strands with sharp scissors and then trim one strand at a time to match lengths - it looks even faster than you think.
AvoidDon't make fringe longer than 2 inches - it tangles and looks messy.


