1. Under-Desk Power Strip + Cable Loop Rail
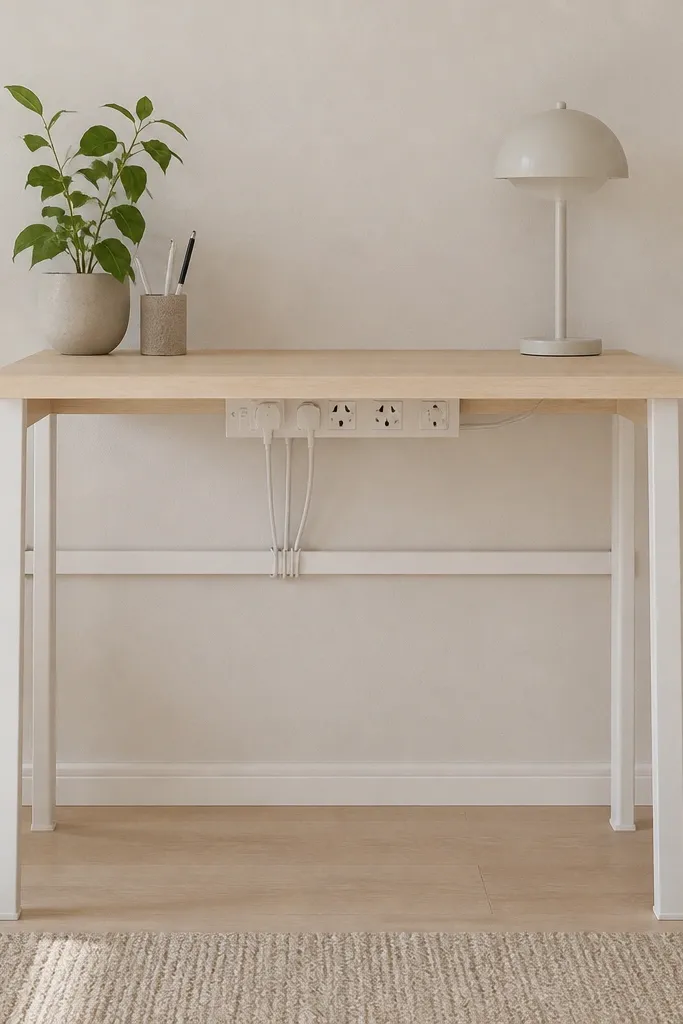
This setup cleans the mess at the source. When the power strip lives under the desk, you stop seeing a cluster of black cords beside your keyboard. The cable loop rail gives each cord a short, repeatable path so nothing drapes across the workspace. I like a matte white rail against a light wood desk because it looks intentional, not like DIY clutter.
Mount a power strip using two adhesive-backed cable clips plus one small metal L-bracket or a strip of industrial velcro under the desk. Add a slim cable loop rail - even a 12-inch metal towel bar works - and secure it with screws so it doesn't sag. Keep the longest cable loop about 6 to 8 inches so it reaches your laptop without slack puddles.
Pro tipLabel the ends with tiny masking tape tags before you tuck them away so you can swap devices in seconds.
AvoidAvoid zip ties on the visible section of the cord - they look harsh and make future changes annoying.
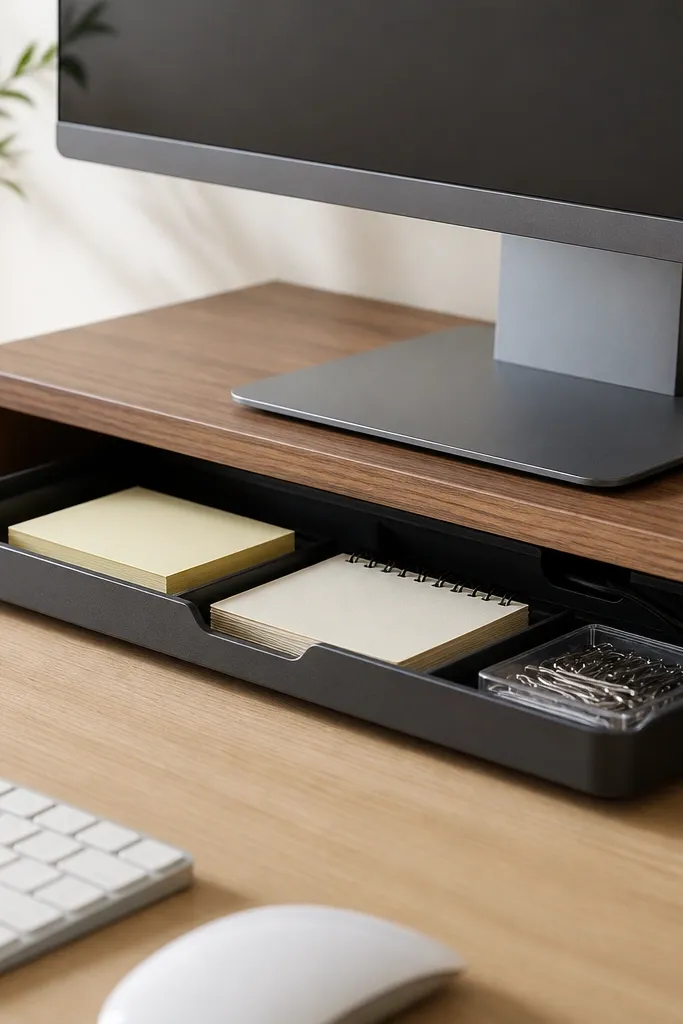
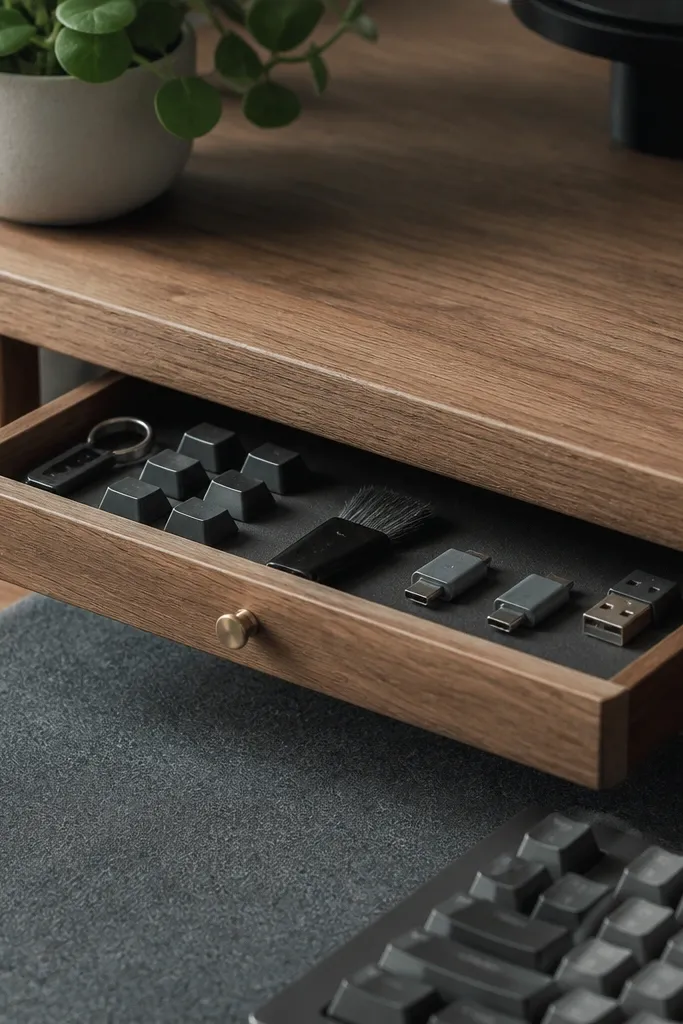
2. Linen-Front Desk Drawer Organizer
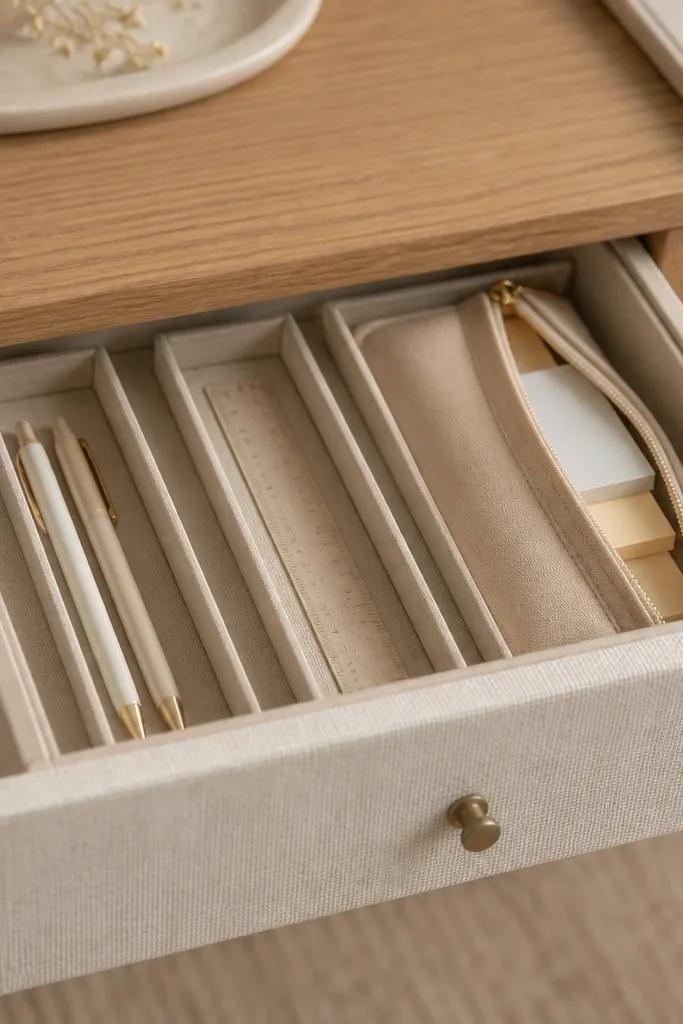
If your desk drawer turns into a "grab whatever" drawer, a linen-front organizer changes the whole vibe. The fabric hides the chaos while the internal compartments keep you from digging. Linen looks soft and warm, which matters in small spaces where storage can feel harsh. I use this when I need my desk to look calm even if I'm juggling work and school supplies.
Use a drawer insert with fixed dividers or build one from thin plywood strips painted the same cream as your desk. Line the base and outer faces with iron-on fabric or glue-down linen so it grips paper and doesn't slide. Keep compartments shallow - around 1.25 to 1.75 inches deep for pens and 3 inches deep for sticky notes.
Pro tipAdd a small strip of hook-and-loop tape inside the pen area so the pen cups don't shift when you open the drawer quickly.
AvoidAvoid glossy plastic liners - they make a drawer look cheap and they catch glare on camera or phone photos.
3. Cork Board Backdrop for Notes and Cable Reminders
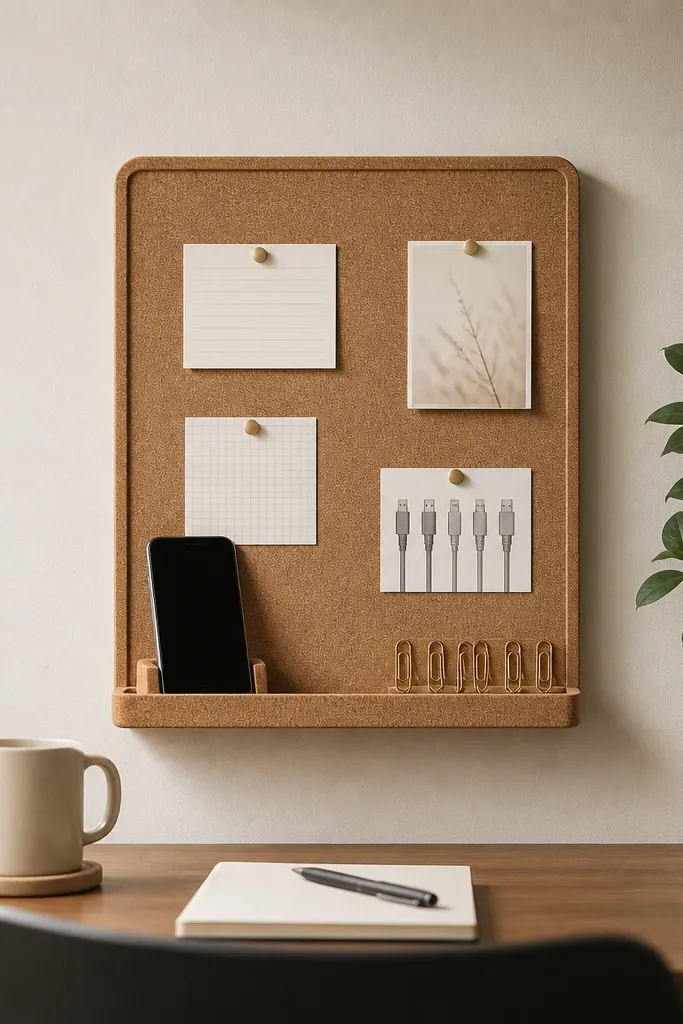
This is how you keep your desk organization visible without stacking paper everywhere. Cork gives you instant "paper homes" for the notes you actually use, so loose sheets don't wander onto the desk. I like it behind the monitor or laptop because it frames the workspace and looks warm. It also reduces the number of times you search for a charger because you can pin a reminder card.
Buy a cork sheet about 24 x 18 inches and frame it with a thin stained wood strip or leave it natural with a black edge frame. Use thumbtacks only for the top layer; keep pinned items to 5 to 8 max. For the tray ledge, mount a small 1-inch lip or attach a shallow plastic-free cork shelf.
Pro tipWrite cable reminders in thick marker on cream card stock so they stay readable from across the room.
AvoidAvoid pinning dozens of notes - once it looks full, you stop checking it and the desk returns to piles.
4. Clear Acrylic Pen Tower with Hidden Base Tray
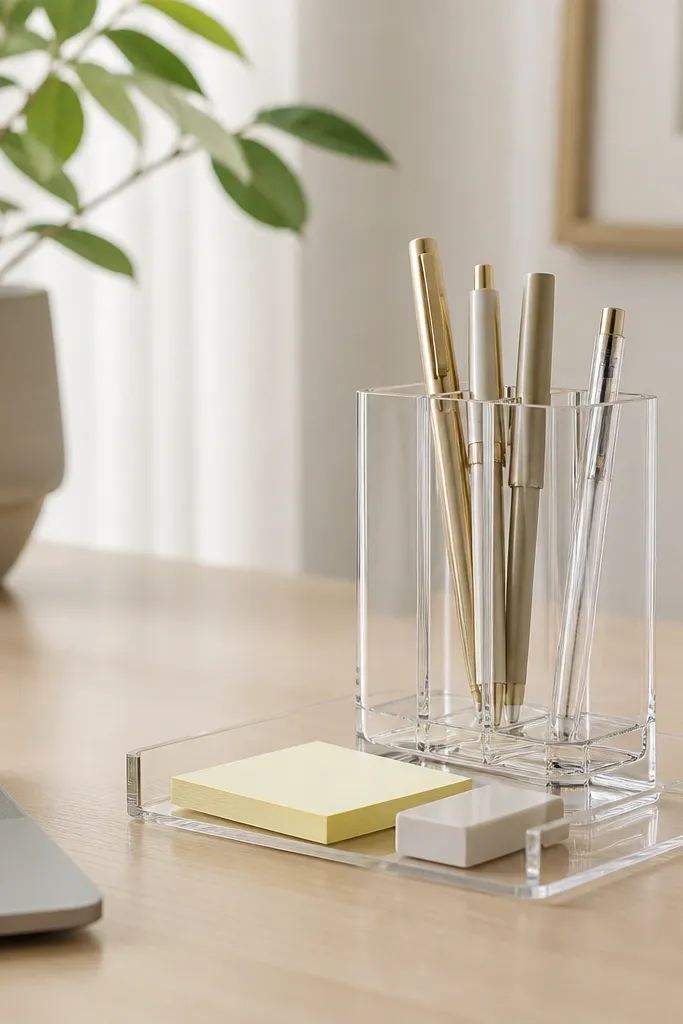
Clear acrylic makes small space apartment desk organization feel lighter because you can see what's inside. The hidden base tray is the styling trick: it keeps refills and tools from cluttering the floor or desk edge. I use this for pens, markers, and small office tools that I grab daily. The tower keeps them upright, so they don't roll and become a mess.
Choose an acrylic tower with a base footprint around 4 x 4 inches so it doesn't eat desk space. Add a shallow tray underneath - 1-inch tall max - so it stays out of your line of sight. Pair with a desk mat in a muted color (greige, olive, or dusty blue) so the acrylic doesn't look sterile.
Pro tipPut only "daily grab" items in the tower; everything else goes in a drawer or lidded bin so the tower stays tidy.
AvoidAvoid mixing random heights of containers on the same side of the desk - it looks cluttered even if it's technically organized.
5. File Folder Wall Rack for Bills and Kids Papers
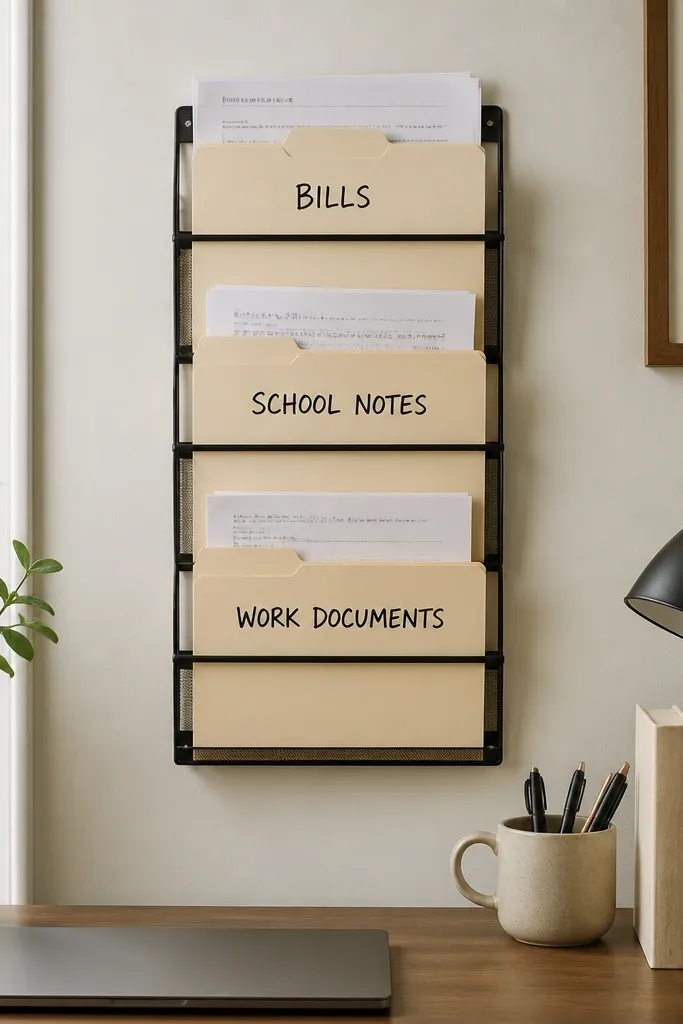
Paper storage is where small desks fail, especially with kids' school sheets. This rack keeps paper vertical and visible, which reduces the "where did that go?" moment. The file folders also give you an instant category system without buying a bulky filing cabinet. I like using it when your desk is also the family drop zone.
Mount a simple wooden rail system or use a metal wall file rack with three to four slots. Choose standard letter-size folders but trim tabs if needed so they don't hit the desk edge. Write labels on the folder tab using a paint pen so they don't smear when kids touch them.
Pro tipAdd one folder called "To File" and commit to emptying it every Friday - that prevents slow pile build-up.
AvoidAvoid storing loose paper behind a folder cover with no divider - it still turns into a stack.
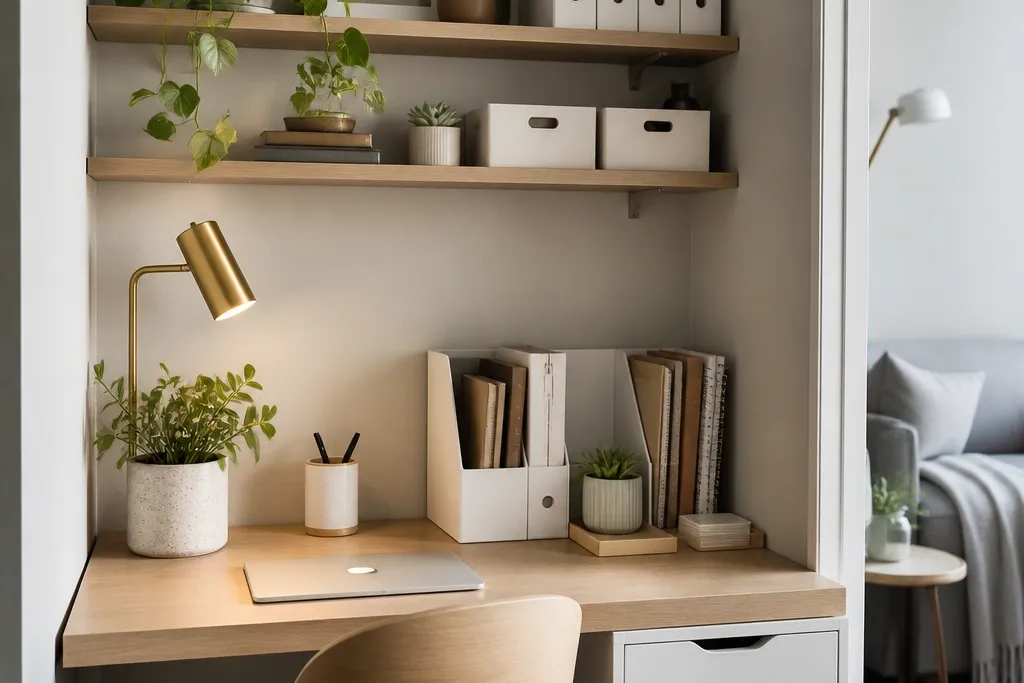
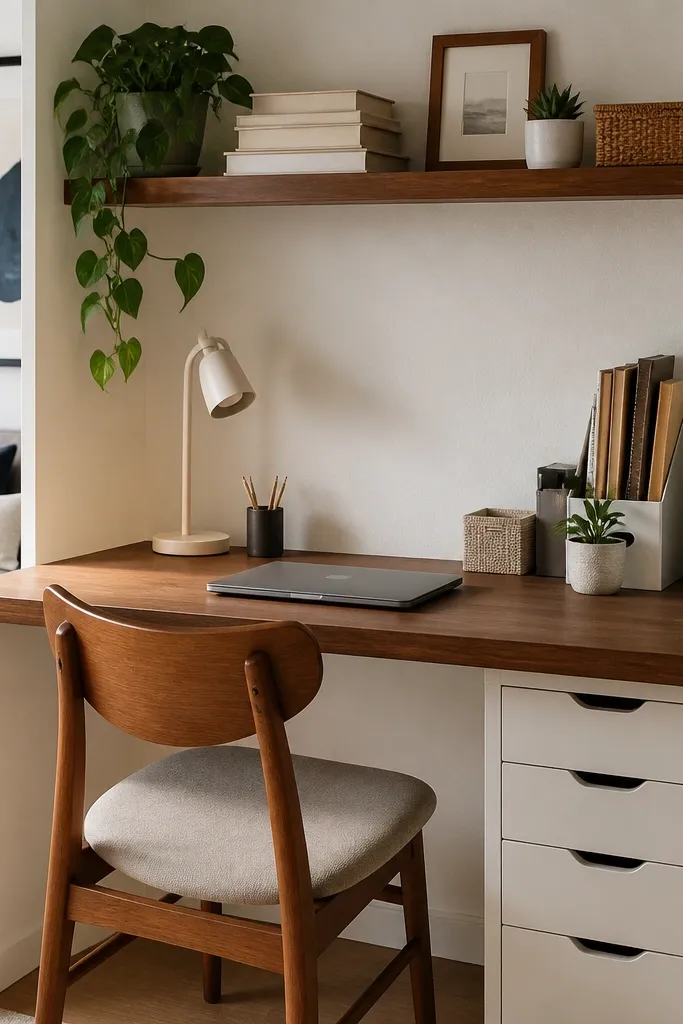
6. Slim Floating Shelf for Supplies You Touch Daily
A floating shelf gives you extra storage without taking floor space. When you keep daily supplies up and within reach, your desk top stays for the things you're actively using. I use this when I have a small desk that can't fit a standing organizer. The shelf also helps the setup look styled because it creates a "top line" in the room.
Install a shelf 10 to 12 inches deep so it's useful but doesn't jut into your view. Add a tray for small items so they don't slide forward. Keep the top shelf items to three categories: writing tools, paper refills, and one decorative anchor.
Pro tipUse felt pads under cups so they don't squeak and so the shelf doesn't scratch when you move things.
AvoidAvoid putting heavy books on a shelf that's only secured with two anchors - it will sag over time.
7. Under-Monitor Tray for Sticky Notes and Clips
You don't need a huge organizer to fix desk clutter. An under-monitor tray keeps your quick-grab items at eye level but off the desk surface. It also makes your desk feel "engineered" because the clutter has an invisible boundary. I like it for sticky notes, clips, and a small notepad you use all day.
Find or build a tray that sits 2 to 3 inches below the monitor. Use a metal or wood tray with a lip so items don't fall forward. Keep the tray area under 12 x 8 inches so it stays tidy and doesn't become a second desk.
Pro tipUse a small clip strip on the side so you can grab paperclips one-handed without digging.
AvoidAvoid stacking sticky notes flat - use a small vertical holder so it doesn't turn into a messy pad.
8. Rolling Cart with One Drawer for Kids' Homework
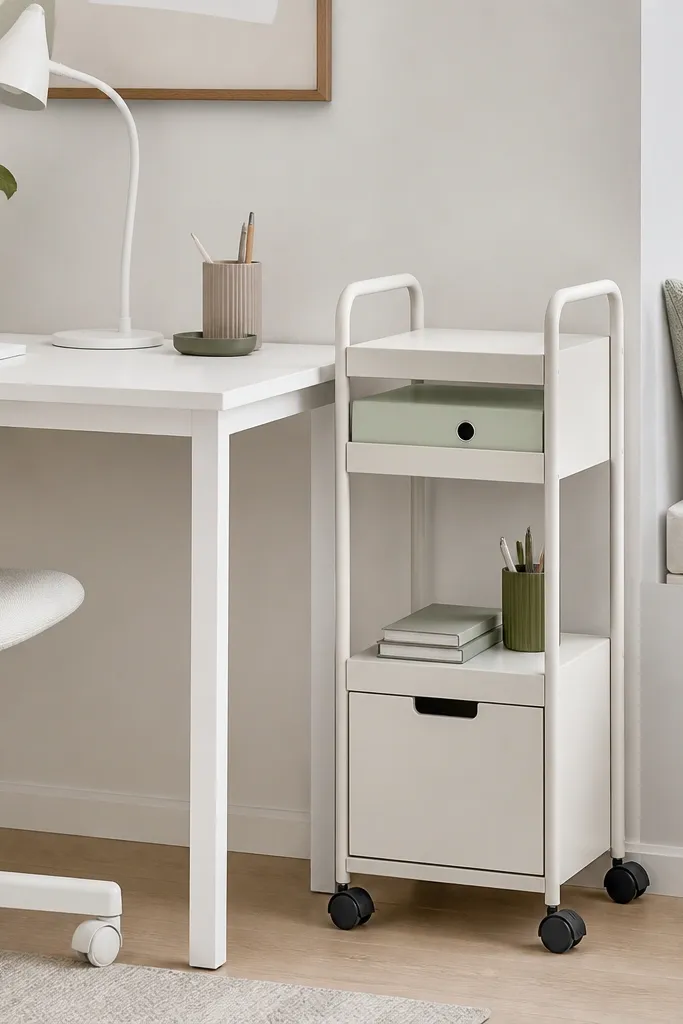
A rolling cart is the fastest way to separate "desk work" from "kid stuff." One drawer for homework means papers don't spill onto your desk when school starts. I like carts because they move out of the way when you need to vacuum or when guests come over. Style-wise, choose one finish and stick to it - matte white or black looks best in small rooms.
Use a cart with at least two shelves plus one drawer so you can hide messy items. Add a hanging file folder inside the drawer so worksheets don't fold themselves into chaos. Keep the cart within 3 feet of the desk so you're not making extra trips.
Pro tipPut a small zip pouch on the top shelf for crayons, scissors, and tape so it's one grab, not ten.
AvoidAvoid leaving the cart half open - open shelves look messy fast once kids add stuff.
9. Magnetic Tool Strip for Scissors and Tape
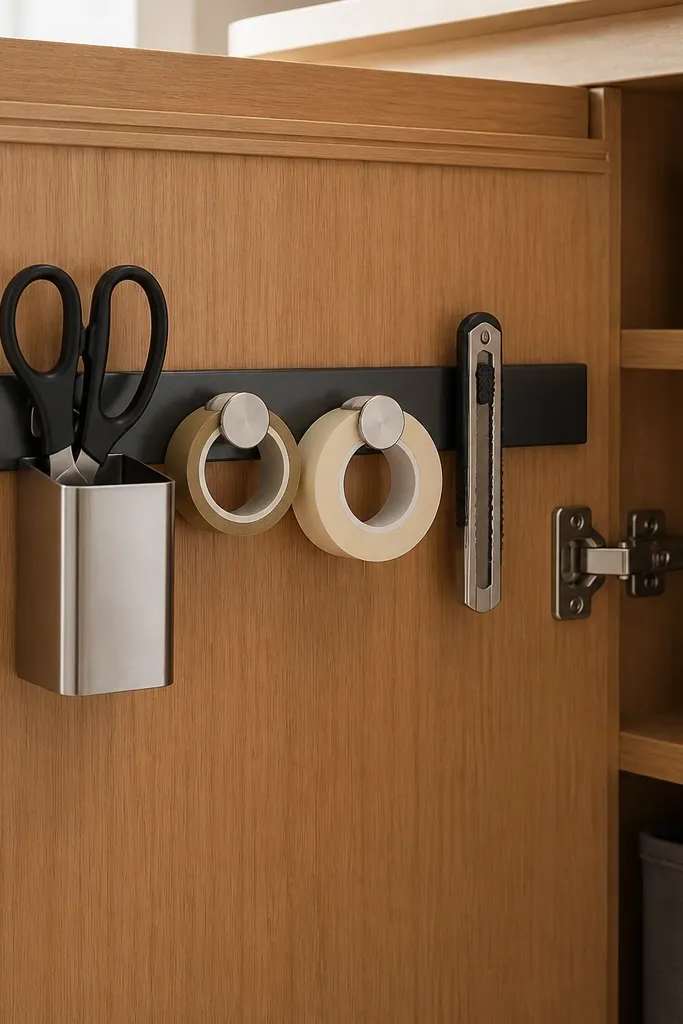
This is one of my favorite small space apartment desk organization hacks because it stops tools from rolling around. Magnetic storage also keeps sharp items in one place, which matters in a home with kids. The strip looks clean when you use matching metal holders. You get a "tool wall" without building a full pegboard.
Mount the strip on a vertical surface next to your desk - cabinet side, inside panel, or the back of a desk organizer. Use holders that match the strip strength so tools don't slide. Keep tape rolls to two sizes max so the strip stays uncluttered.
Pro tipStore one spare tape roll in a lidded container nearby so you don't hunt when you run out.
AvoidAvoid magnets that are too weak - if the scissors droop, the whole system feels unreliable.
10. Pegboard Desk Back Wall with Color-Coded Baskets
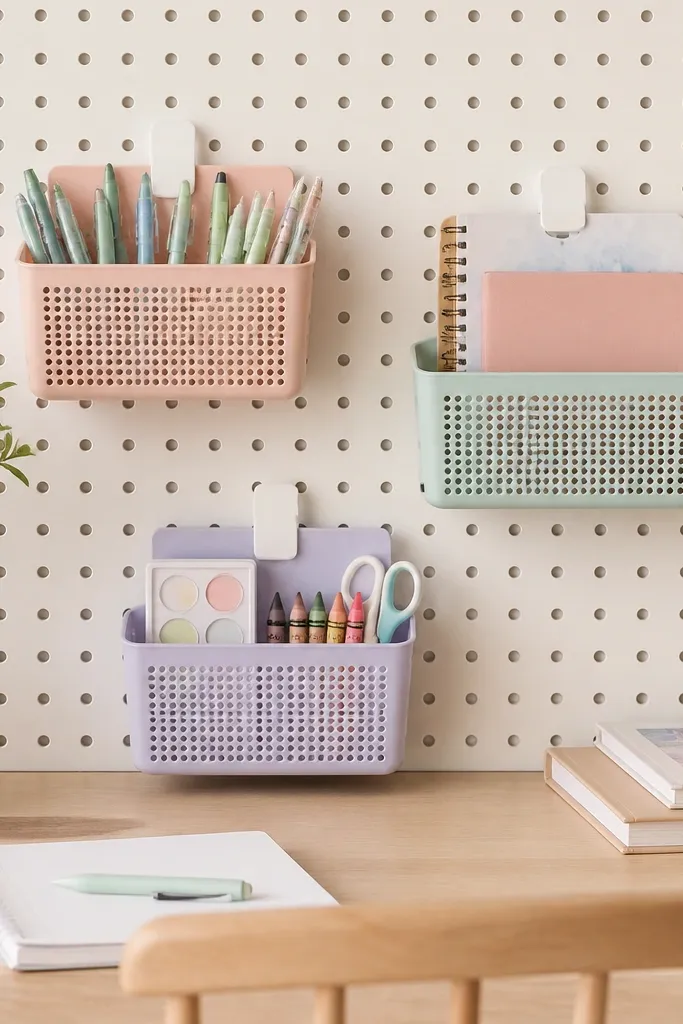
Pegboard turns your back wall into storage, which is exactly what small desks need. It also looks intentional because everything hangs in consistent slots. Color-coded baskets keep school supplies separate from work tools, so you don't mix pens and crayons. I like this when you want the desk area to look like a dedicated station, not a random corner.
Use a 2 x 2 foot pegboard section if space is tight. Clip baskets with metal hooks so they can be rearranged. Keep basket widths around 6 to 8 inches so the wall doesn't feel crowded.
Pro tipUse the same label color for each category (blue for work, green for school) so you can spot items fast.
AvoidAvoid hanging heavy items at shoulder height - pegboards bend and it starts to look sloppy.
11. Desk Mat with Built-In Cable Channel (DIY Cut Line)
A mat with a cable channel makes your desk look finished. Your cables stop crossing the mouse area, and the mat hides the rough edges of cord routing. Olive or charcoal looks best because it hides scuffs from daily use. I've done this with store-bought mats by cutting a straight channel and sealing the edges.
Choose a rubber or faux leather mat about 30 x 16 inches. Mark a 2-inch wide channel along the bottom edge where your cables drop. Use a sharp craft knife and cut slowly, then seal the edges with flexible fabric glue so it doesn't fray.
Pro tipRoute your "main" cable through the channel and keep the rest plugged into a single hub so you don't add extra cord paths.
AvoidAvoid cutting too close to the stitching or seam - it will split after a few weeks.
12. Stackable Letter Trays with Color-Coordinated Paper Labels
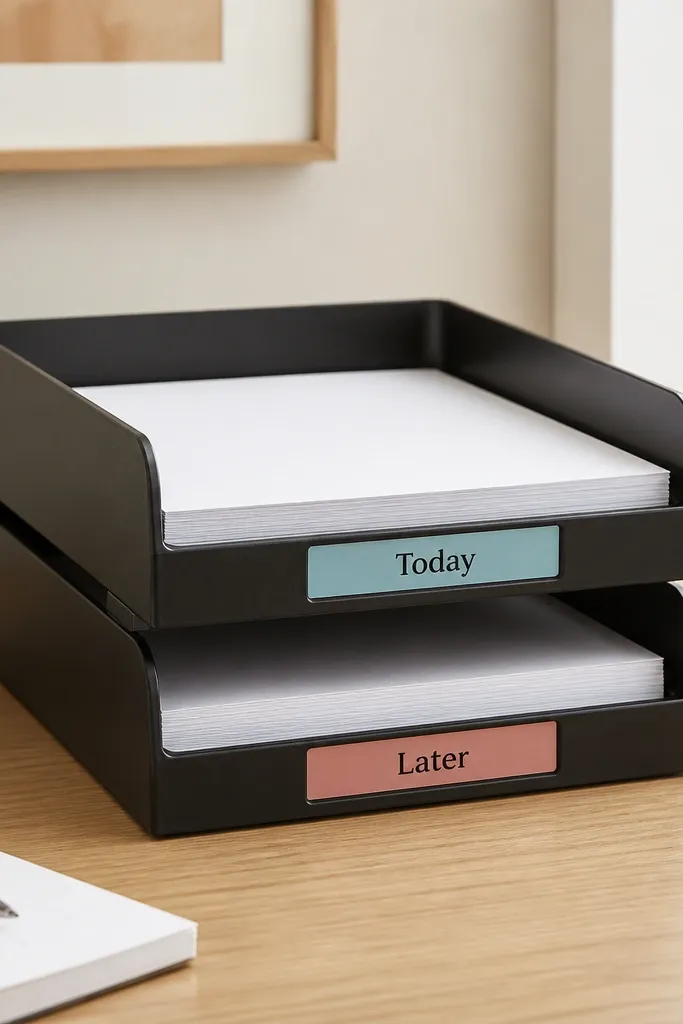
Stackable letter trays keep paper upright so it doesn't turn into a flat pile. The colored front labels make it quick to sort without reading every time. I like using two trays instead of five because too many stages turns into more clutter. It also looks clean because trays have consistent edges and heights.
Buy trays that are the same brand or at least the same height so the stack looks uniform. Use label tape in two colors and place it centered on the front lip. Keep the paper thickness to about 1 inch per tray so it doesn't slump.
Pro tipUse one tray for incoming mail and one for "ready to file" so you don't mix tasks.
AvoidAvoid leaving old papers in the trays - once they age, the desk looks permanently messy.
13. Vertical Book-Led Shelf for Notebooks and Reference Cards
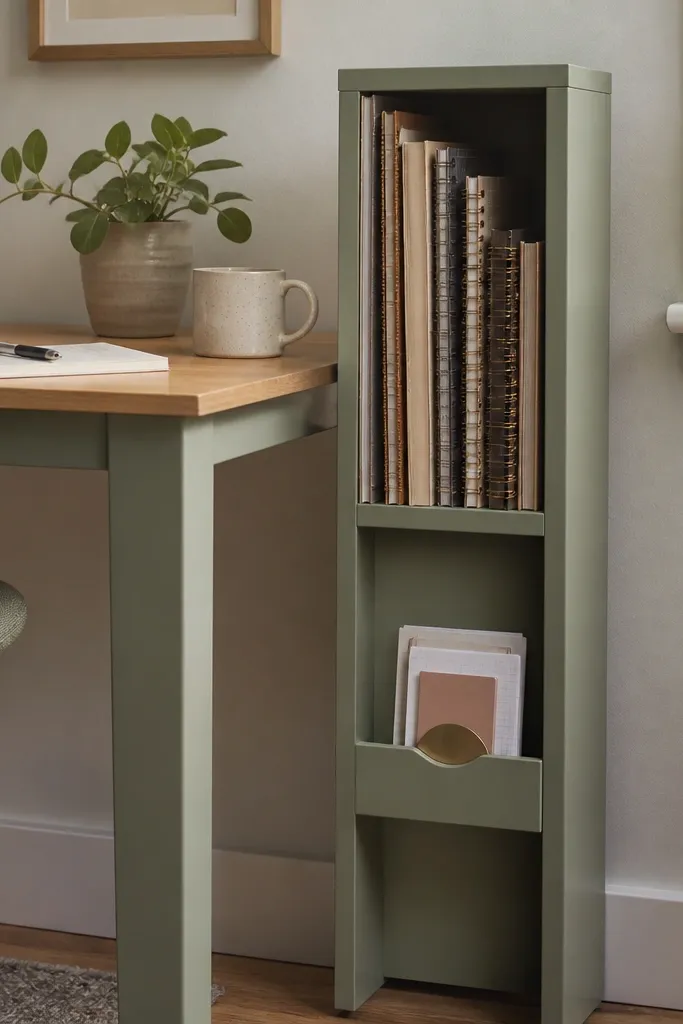
Vertical storage makes small space apartment desk organization feel structured. Notebooks upright stop that "paper accordion" look and keep covers clean. A ledge for reference cards keeps frequently used material in reach without needing a drawer. I like painting the shelf to match your desk or chair so it blends instead of standing out.
Build or buy a narrow shelf about 8 to 10 inches wide with dividers spaced 1.25 to 2 inches apart. Use a plywood backing so cards stay behind the shelf lip. Paint with matte acrylic and let it cure overnight before loading heavy books.
Pro tipStore your top three notebooks only, and keep all other notebooks stacked in a closet or bin.
AvoidAvoid cramming too many notebooks - they lean, and the whole setup looks unstable.
14. Lidded Woven Basket for Random Daily Stuff
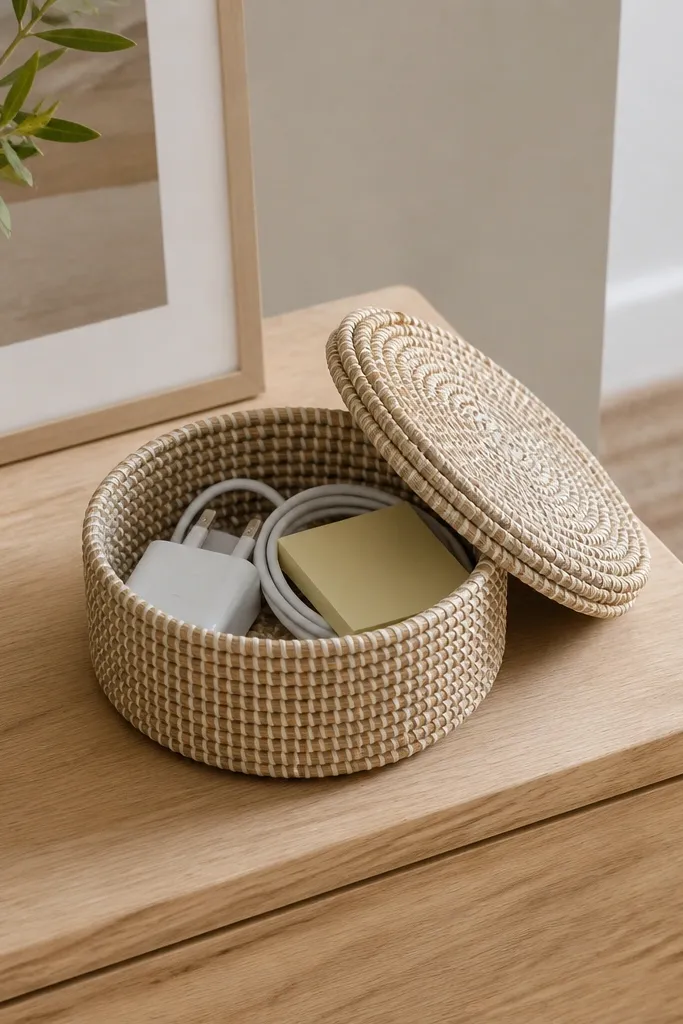
This is the "reset button" for your desk. When you have random stuff landing on your surface, you drop it into one lidded basket and close it. Woven baskets look warmer than plastic and they hide clutter without turning your desk into a storage closet. I use this when kids are home because it stops the daily mess spiral.
Choose a basket that fits a desk corner footprint around 12 x 10 inches. Add a small divider insert inside if you keep chargers and small tools - otherwise cords tangle. Keep the lid snug so it doesn't pop open when you bump the desk.
Pro tipPut the basket on the non-mouse side so you never reach across your workspace to grab it.
AvoidAvoid a basket with a floppy liner - it collapses and turns into a messy mound.
15. Drawer-Style Under-Shelf Organizer for Keyboard Extras
Under-shelf storage is invisible until you need it, which is perfect for small space apartment desk organization. This keeps your keyboard area clean while still letting you grab accessories quickly. I like pull-out drawers because they reduce the "digging" mess. It also makes the desk feel custom even when it's just DIY.
Attach a shallow shelf above the desk, then mount a small drawer unit underneath using slides rated for lightweight items. Keep the drawer depth around 3 to 4 inches. Use a small tray insert so adapters don't scatter.
Pro tipLabel the drawer front with a tiny icon label (USB, cleaning) so you can find things without reading.
AvoidAvoid heavy drawers under a shelf - sagging makes the whole desk look unfinished.
16. Floating Shelf + Curtain Rod for Hanging Desk Supplies
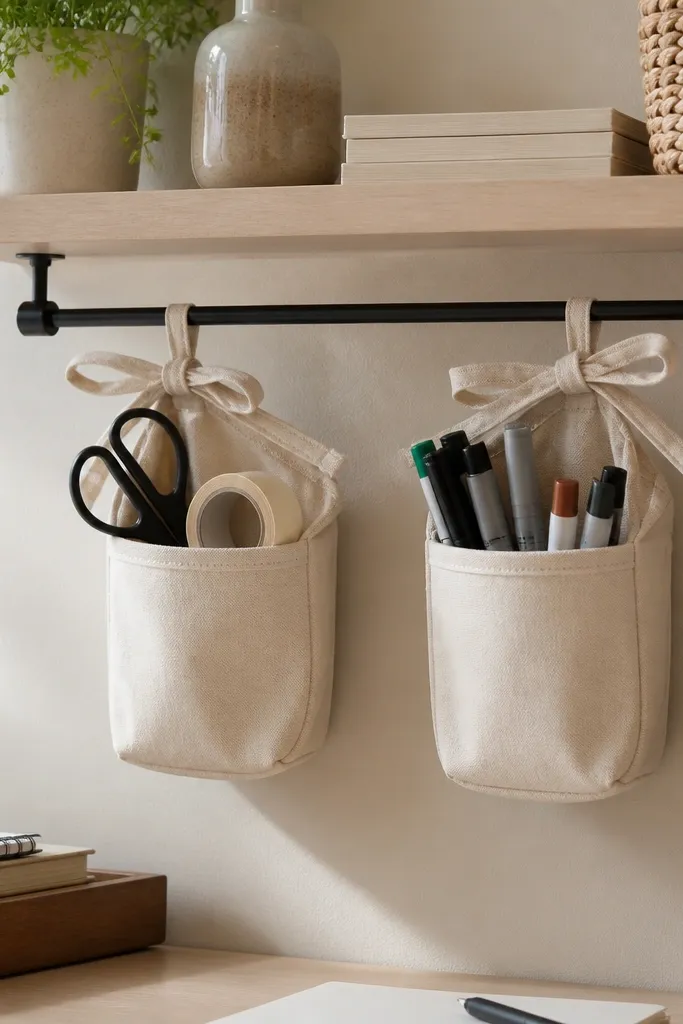
Hanging pouches use vertical space that most people ignore. They keep small supplies contained and easy to grab, which is huge when you're working with kids materials nearby. Canvas pouches look soft against a desk setup and don't scream "storage." The curtain rod gives you a sturdy top rail without building a full peg system.
Mount a lightweight curtain rod under a shelf or to the wall just above desk height. Stitch or buy two small canvas pouches with a top channel that slides onto the rod. Keep pouch openings facing outward so you can see contents quickly.
Pro tipUse one pouch for "cut and paste" and one for "writing tools" so you don't mix categories mid-day.
AvoidAvoid pouches with thin, flimsy bottoms - they collapse and spill.
17. Two-Tone Desktop Tray for Laptop, Notes, and Phone
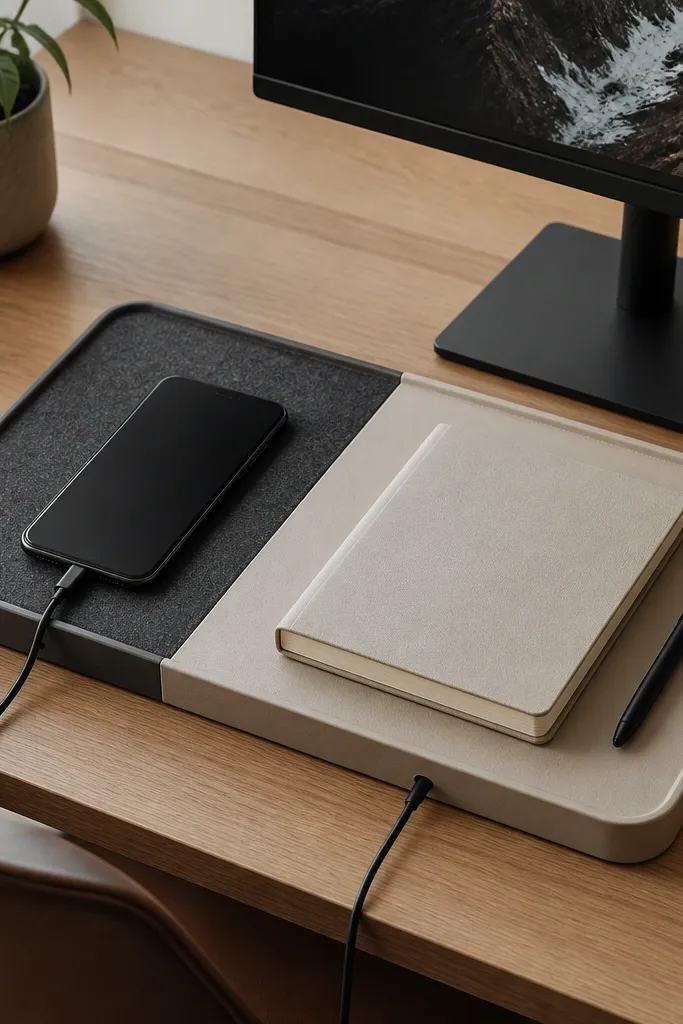
A desktop tray creates a boundary that your items naturally stay within. That boundary is what makes small space apartment desk organization look intentional instead of accidental. The two-tone finish helps you separate tasks visually: phone and calls on the darker side, writing on the lighter side. I've used this layout for hybrid work days, and it cuts down on desk clutter because everything has a "home base."
Use a tray about 20 x 14 inches so it fits laptop edge, notebook corner, and phone without crowding. If you DIY, use a thin plywood base and glue two vinyl sheets on top - textured for grip, smooth for writing. Seal edges with matte varnish to prevent peeling.
Pro tipKeep a phone stand on the tray corner so it never goes flat and attracts fingerprints and smudges.
AvoidAvoid a tray that's too small - if your items hang off, you lose the boundary effect.
18. Fabric Cable Sleeve for Desk Edge Drop
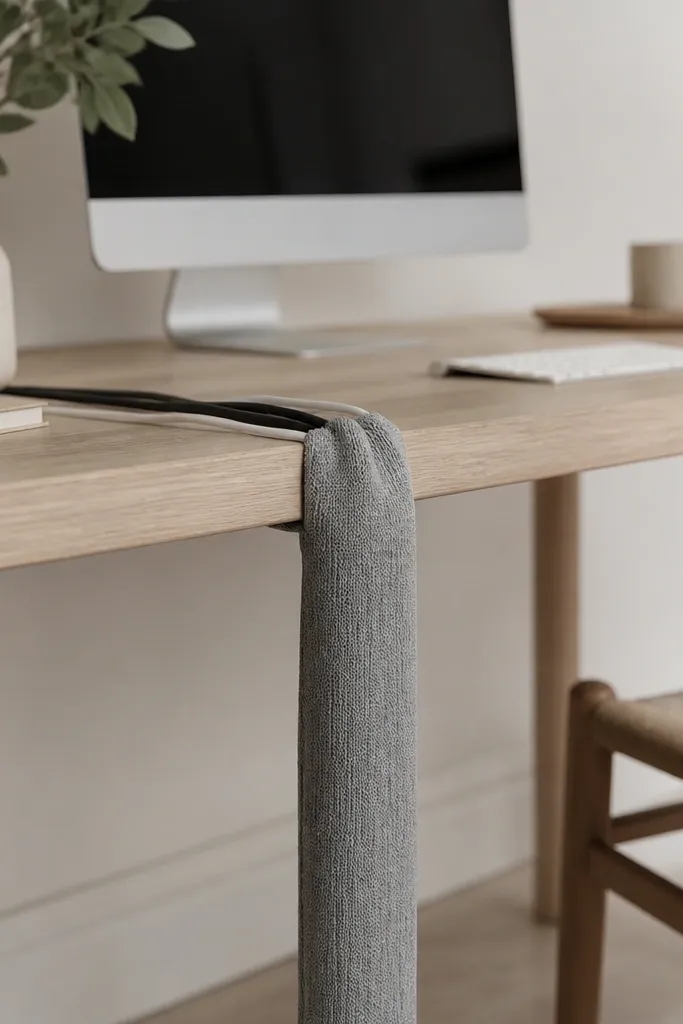
Hard plastic cable covers can look industrial in a cozy apartment. A fabric sleeve makes the cords blend into the room and reduces visual clutter. It also prevents cords from snagging on chair legs or kids' feet. Knit or woven sleeves look softer and they hide minor scuffs from daily movement.
Buy a braided fabric cable sleeve or make one from stretchy fabric. Measure your cord bundle diameter and choose a sleeve with a snug fit - you want it to sit flat, not balloon. Attach the sleeve to the underside using two small Velcro tabs so it doesn't slide.
Pro tipBundle only the cords you use together (charger + laptop cable) so you don't end up with a thick sleeve that never fits.
AvoidAvoid sleeves that are too loose - loose fabric twists and looks messy.
19. Desk Corner Peg + Hanging Basket for Scissors, Rulers, Tape
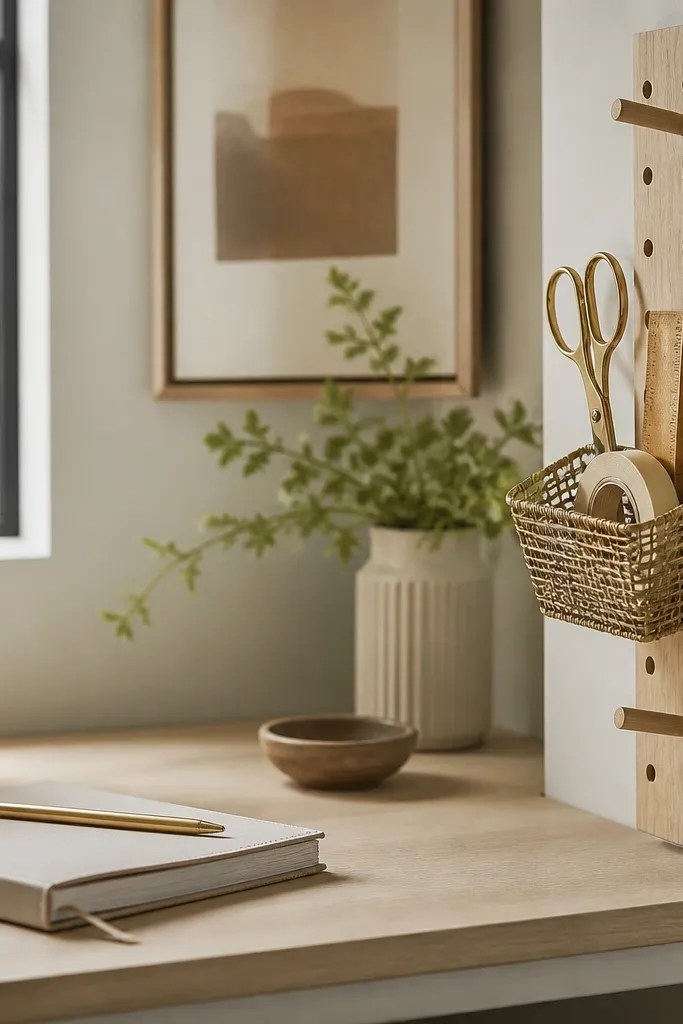
Corners are wasted space in most small desks, and that's exactly where you want storage. A corner peg plus a hanging basket gives you fast access without taking up desk top inches. I like this for craft and office tools because it keeps sharp items and long items from lying around. When it looks organized, the rest of the desk stays calmer.
Mount a small vertical peg rail on the side wall near the desk corner. Use hooks or clips sized for scissors and a separate clip for tape. Choose a basket with a lip so tools don't slide out when you pull it forward.
Pro tipHang a small laminated instruction card inside the basket for tape replacement steps if kids use it.
AvoidAvoid overcrowding - if you can't see three items at a glance, you'll stop using the system.


