
1. Pegboard Tool Wall with Color-Coded Hooks
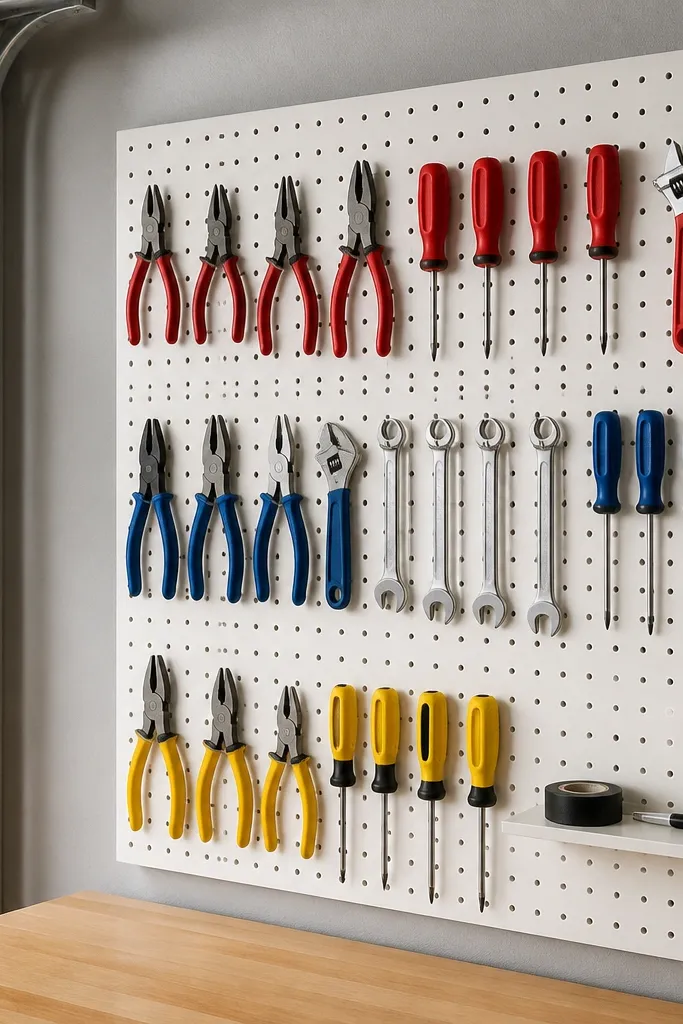
Pegboard makes tools visible, so you stop digging through drawers. I like using color-coded hooks because it keeps categories consistent even when you add one more tool. The look stays clean because every hanging spot is the same shape and spacing. Use a bright pegboard or paint to keep the wall from looking dingy against the gray garage floor.
Mount 1/4-inch pegboard to studs with screws every 8 inches along the top rail. Paint the pegboard white or light gray with a primer made for metal/wood. Use plastic hook rings in three colors and group tools by handle color or tool type. Keep frequently used tools within arm reach - roughly 40 to 60 inches from the floor.
Pro tipBefore you hang, lay your tools on the floor in rows and take a photo. Copy that order on the pegboard so you don't "re-invent" the layout every time.
AvoidAvoid using mismatched hook sizes that leave gaps - it looks messy even when everything is technically stored.
2. Clear-Lid Tote System for Screws, Bolts, and Nails
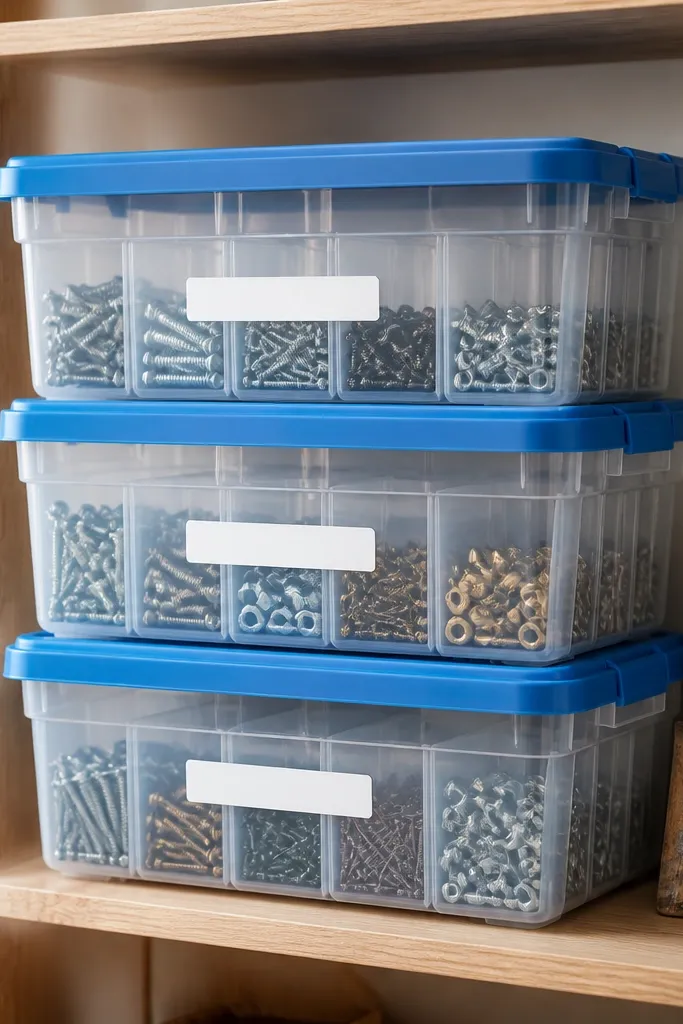
Clear lids let you see what's inside without opening containers, which is the whole point. I've found that hardware stays organized longer when you store it in shallow totes with smaller inner compartments. Bright lids look tidy and make it obvious which tote belongs where. This setup also looks good because the labels line up in a grid.
Use shallow totes about 12 to 14 inches wide and store them on a wire or wood shelf. Put smaller organizers inside (about 6 x 4 inches) so you can grab one type at a time. Label with a thick marker on white label tape and cover with clear packing tape for durability.
Pro tipWrite the date you opened a bag on the label. When you run low, you know what to reorder instead of buying duplicates.
AvoidSkip opaque bins with no labels - they turn into mystery boxes after one week.
3. PVC Pipe Corner Storage for Long Cords
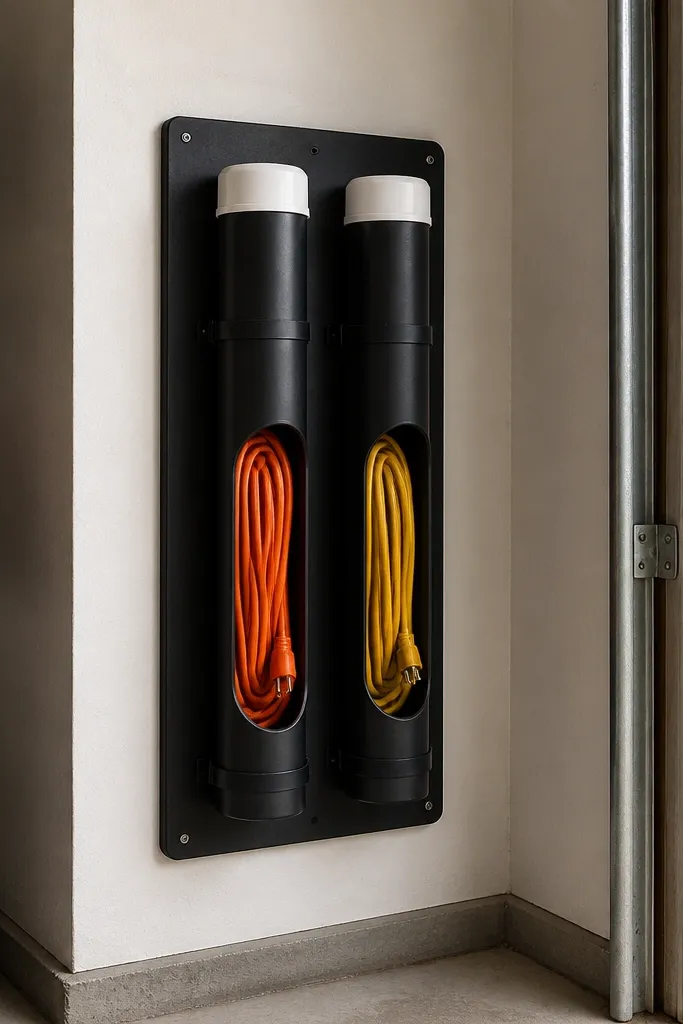
PVC pipe storage is one of the cheapest ways to keep cords from tangling on the floor. The clear "tube" look also makes the garage feel more intentional. It works best for cords you use often but don't need to reach instantly. I like it because it hides mess while keeping access simple.
Cut 4-inch diameter PVC into 18 to 24-inch lengths and glue end caps. Mount the pipes to a scrap board that's 1/2-inch thick. Leave the top open if you coil cords in from above, or use removable caps if you want a tighter seal against dust. Paint the board and pipe exterior with a plastic-safe spray paint.
Pro tipWrap cords with a Velcro strap before storing. A coiled cord that stays tight looks better and pulls out without snagging.
AvoidDon't mount pipes on drywall without finding studs - the weight of coiled cords will pull it off.
4. Overhead Ladder Hooks with a Swing-Down Safety Strap
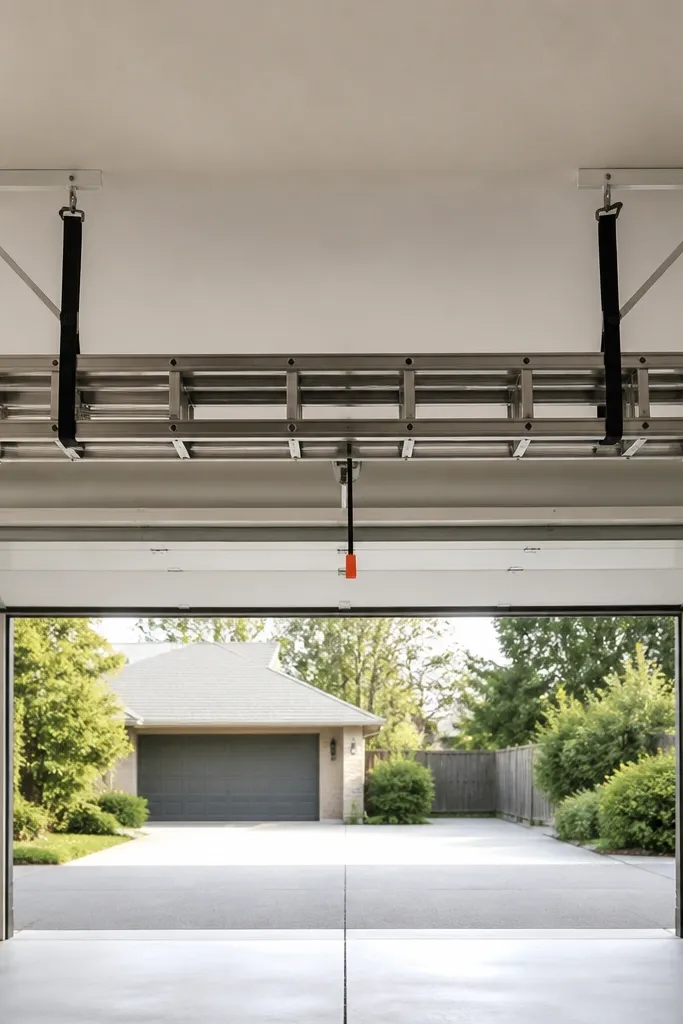
Overhead storage clears floor space instantly, and it keeps ladders out of the way of kids and bikes. I also like overhead setups because they look intentional when the ladder is centered and strapped down. Adding a swing-down strap makes it easy to lift and lower without wrestling the ladder. Use this when your garage ceiling has clearance and you store ladders seasonally or weekly.
Mount two heavy-duty ceiling hooks into joists or rafters with lag screws. Use a ratchet strap or webbing strap to secure the ladder at two points. Keep the ladder flat against the straps and leave enough slack to lower it straight down. Add a bright tag to the strap so you grab the same point every time.
Pro tipTest the strap tension by lifting the ladder two inches off the floor. If it shifts, tighten the strap points before you store it for good.
AvoidAvoid ceiling mounts that only hit drywall anchors - that's a fast way to end up with a damaged ceiling and a ruined ladder.
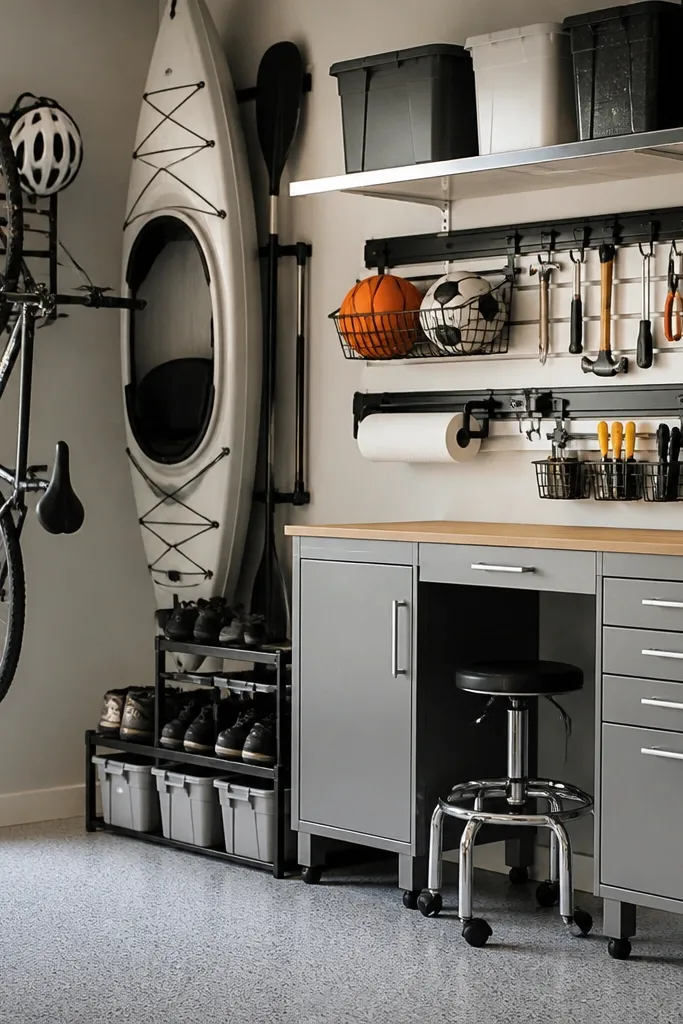
5. Wall-Mounted Bike Hooks with a Folding Cover
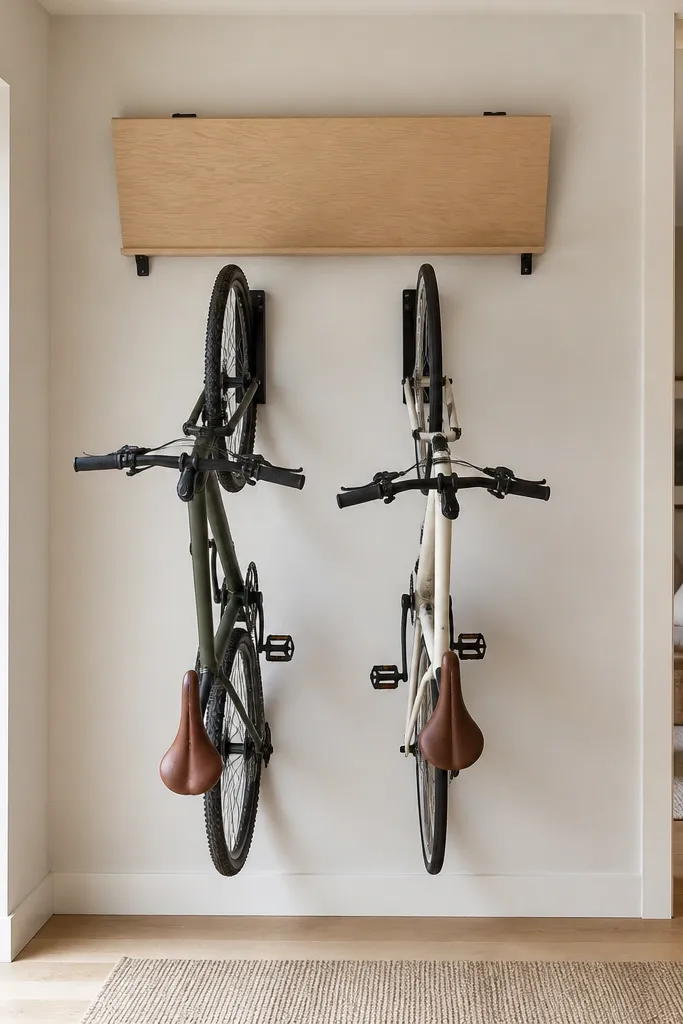
Vertical bike storage keeps tires off the floor and makes the garage look organized even when bikes are messy. A folding cover keeps bike scuffs from rubbing the wall and makes the whole corner look finished. I use this for kids bikes because they take up space fast and need a consistent home. The visual order matters - straight hang lines look cleaner than leaning bikes.
Use bike hooks designed for wall mounting and install them into studs. Hang bikes by the frame, not the handlebars, and keep the wheel clearance so it doesn't scrape. Add a small plywood panel that pivots on hinges and folds away when you lift the bikes. Paint the panel with a scuff-resistant interior paint.
Pro tipHang the bikes at slightly different heights so you can grab the top handle without bumping the other bike.
AvoidSkip hooks mounted into studs that are too far apart - bikes will wobble and scrape the wall.
6. Workbench Drop-Front Parts Drawers
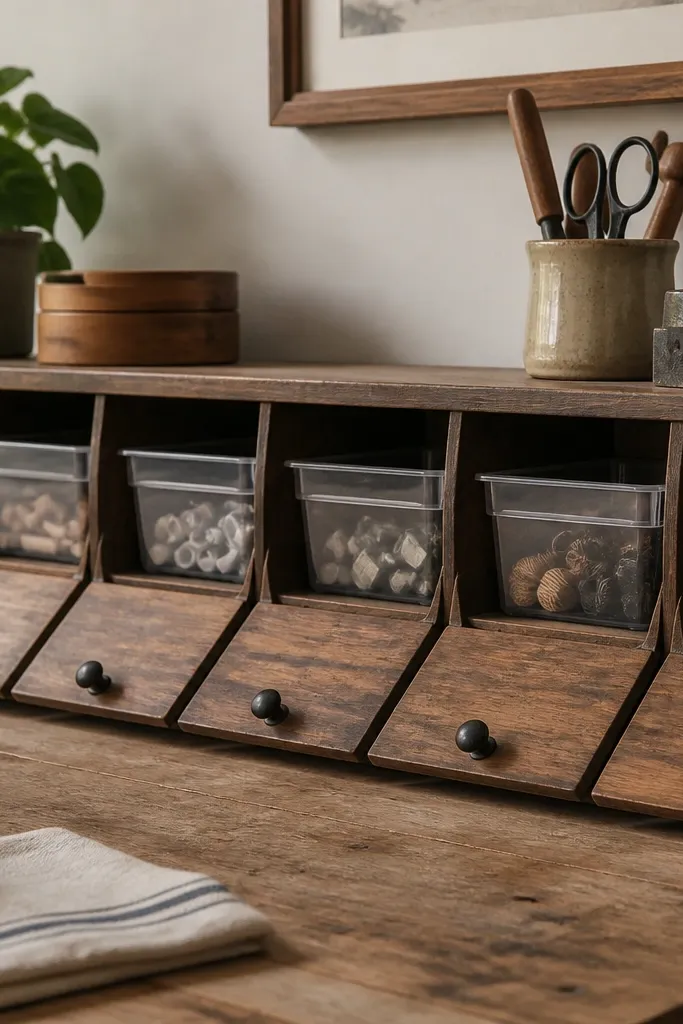
Drop-front bins let you access parts without opening a drawer fully. I built mine with shallow bins so everything stays visible and easy for kids or guests to use. The stained wood front gives warmth against the gray garage. This setup also keeps small parts from migrating into random toolboxes.
Build a frame under the workbench using 1x lumber and add hinges so each front panel drops. Use shallow organizers about 10 inches wide and label them on the front edge. Add a rubber door stop so the panel doesn't slam. Finish the wood with polyurethane for wipe-clean durability.
Pro tipLabel bins with both a word and a simple icon like a screw head silhouette so kids can return items without reading.
AvoidAvoid deep drawers for tiny parts - they turn into a bottomless pit.
7. Magnetic Strip for Wrenches and Metal Hand Tools
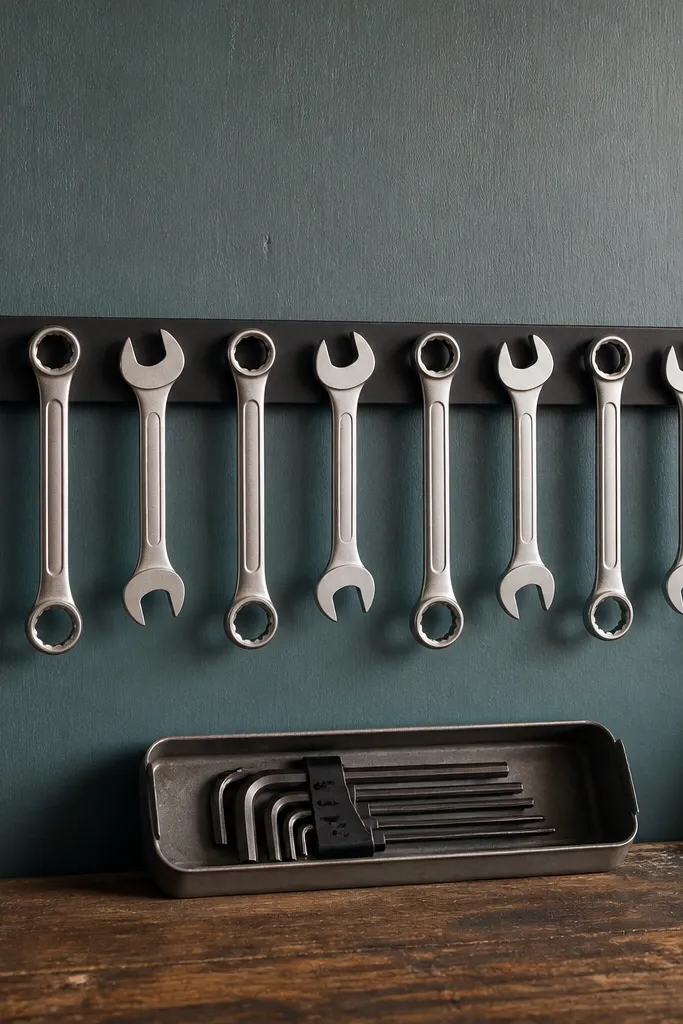
Magnetic storage is clean-looking and fast. When tools are magnetic, you can see the whole set at once, and grabbing one doesn't disturb the rest. I like placing the strip near the workbench because it cuts tool walking back and forth. The board keeps the magnets from flexing and makes the strip look like a finished panel.
Use a magnetic strip long enough to hold all wrenches with 1/2-inch spacing. Mount it to a 3/4-inch plywood board with screws and then anchor the board into studs. Add a small tray beneath for hex keys that don't stick well. Use light paint on the board so the metal tools pop.
Pro tipWipe the strip with a dry microfiber cloth before you mount. Dust under the magnet makes tools slide over time.
AvoidSkip weak adhesive mounts - a magnetic strip needs solid mechanical fastening.
8. Folding Table Craft Station for Kids Garage Cleanup
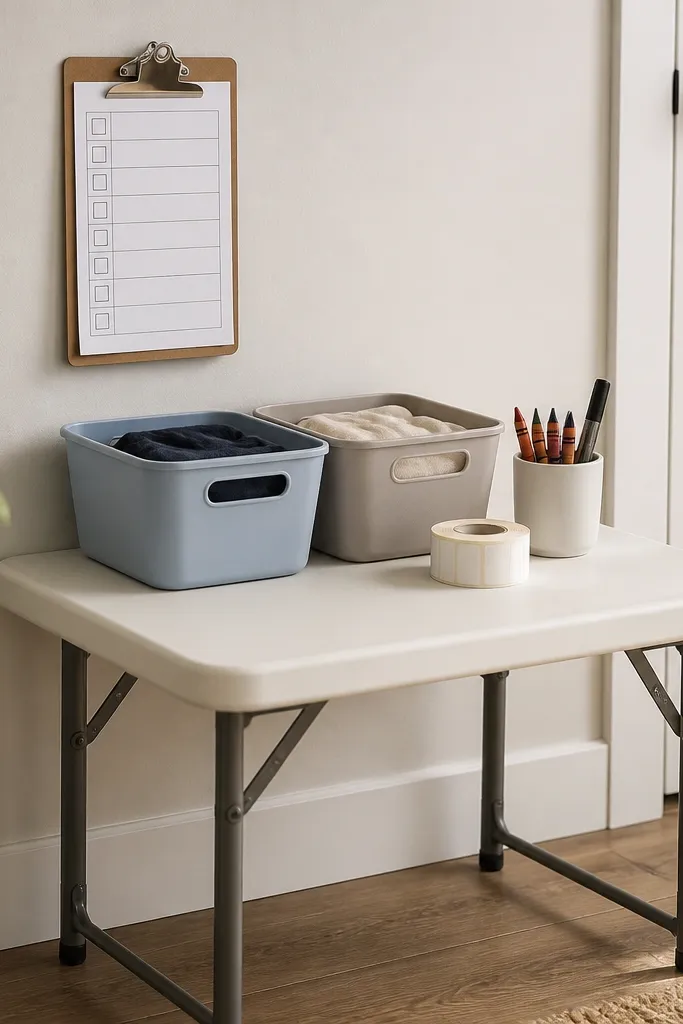
Kids clean up faster when the task has a simple visual routine. This station gives them a place to label bins, check off chores, and put small items back where they belong. The table height is key - low enough that a 6-year-old can reach. It also keeps cleaning tools and labels off the floor.
Use a folding table about 20 to 24 inches tall and mount a clip board to the wall above it. Put two open-front bins on the table for "clean now" and "needs a new home." Keep label tape, a permanent marker, and crayons in a lidded cup so they don't scatter. Laminate the checklist so it survives garage dust.
Pro tipMake the checklist match your zones, with 3 check boxes only: tools, yard items, and trash.
AvoidAvoid tall bins with lids for kids - they don't return items correctly and the lid stays open.
9. Wall Shelf for Car Supplies with a Drop-In Tray

Car supplies get greasy and messy fast, so you need a shelf that contains spills. A drop-in tray keeps bottle leaks from staining the wall or shelf. I like arranging items by how often you use them: grab-and-go bottles on the front edge, towels stacked behind. The shelf makes the area look "set up," not like random items tossed in.
Mount two shelves 8 to 10 inches apart vertically. Use a plastic drip tray sized to the shelf footprint and leave 1 inch clearance under the bottles. Store microfiber towels in a fabric bin so they don't snag on dust. Use a consistent color scheme for labels so it looks intentional.
Pro tipPut a small piece of non-slip shelf liner under the bottles so they don't slide when the floor gets wet.
AvoidSkip open shelves with no tray - one leaky bottle turns the whole area into a sticky mess.
10. Budget Hose Reel Stand from a Wooden Pallet Frame
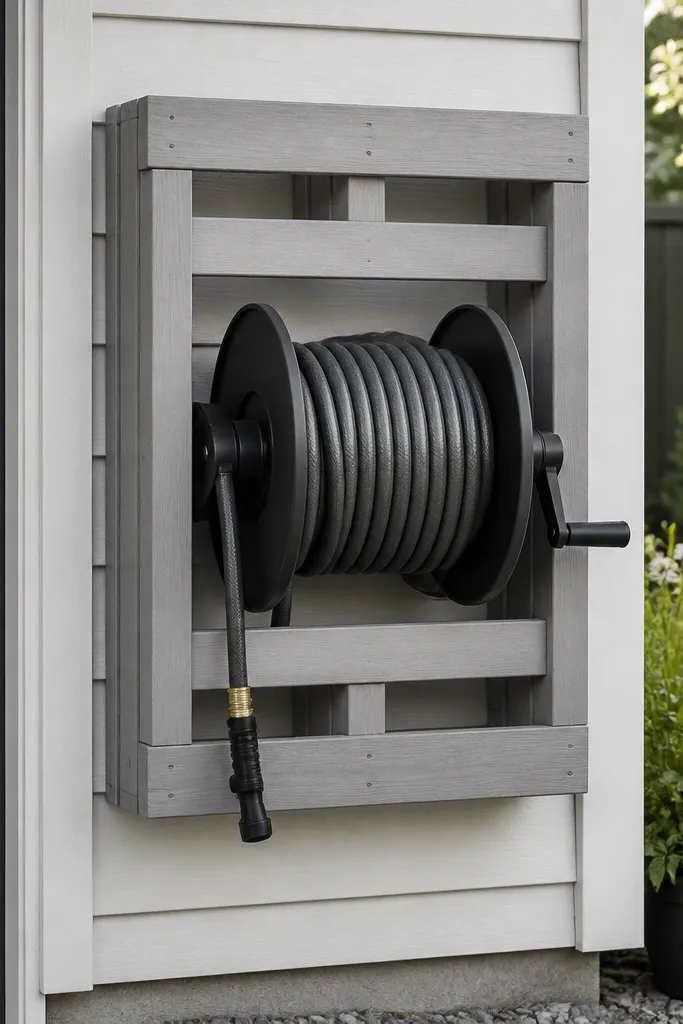
A hose reel stand keeps hoses from turning into a floor snake. Using a pallet frame makes it look handmade in a good way, and it's cheap if you can get pallets for free. This setup also keeps the hose off the garage floor so it doesn't pick up grit. The visual payoff is immediate because the hose is always in the same place.
Sand and de-nail a pallet board, then cut the frame so it's sturdy. Paint with a primer and then a satin topcoat for wipe-clean results. Bolt the hose reel to the frame using hardware rated for outdoor load. Keep the reel at about waist height so you don't fight it when winding.
Pro tipAdd two small eye hooks on the side for the spray nozzle and a spare connector so they don't fall behind the reel.
AvoidDon't leave splinters - pallet wood must be sanded smooth or it will snag hands and clothes.
11. Slatwall with Labeled Bins for Yard Tools
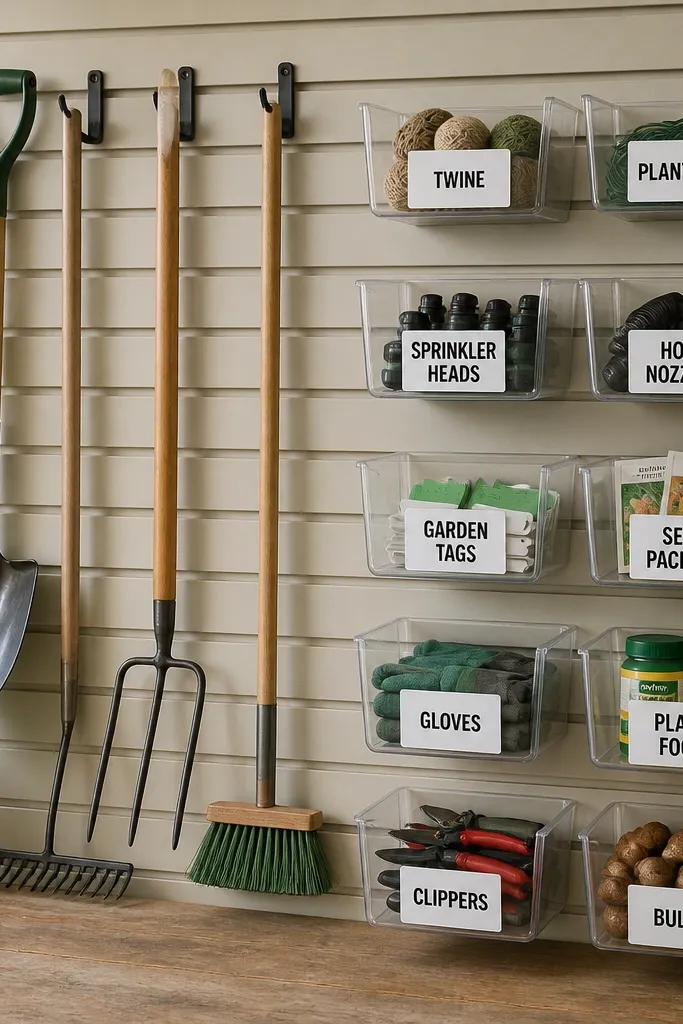
Slatwall makes it easy to rearrange without drilling new holes. I used it for yard tools because the seasons change what we need, and slatwall lets me move bins in minutes. The labeled bins keep small items like seed packets and twine from getting lost. It looks clean because all hooks and bins line up on the same grid.
Install slatwall into studs and add a mix of hooks and clear-front bins. Use 8 to 12 inch bins for small items and deeper bins for gloves. Label each bin with a thick marker and cover with packing tape. Keep the most-used items within easy reach and store seasonal extras higher.
Pro tipUse a single label format: word first, number second (example: "Twine - 1"). It makes refills faster.
AvoidAvoid labeling everything the same way without size cues - you'll grab the wrong bin when you're rushing.
12. Corner Shelf with Wicker-Style Storage for Gloves and Masks
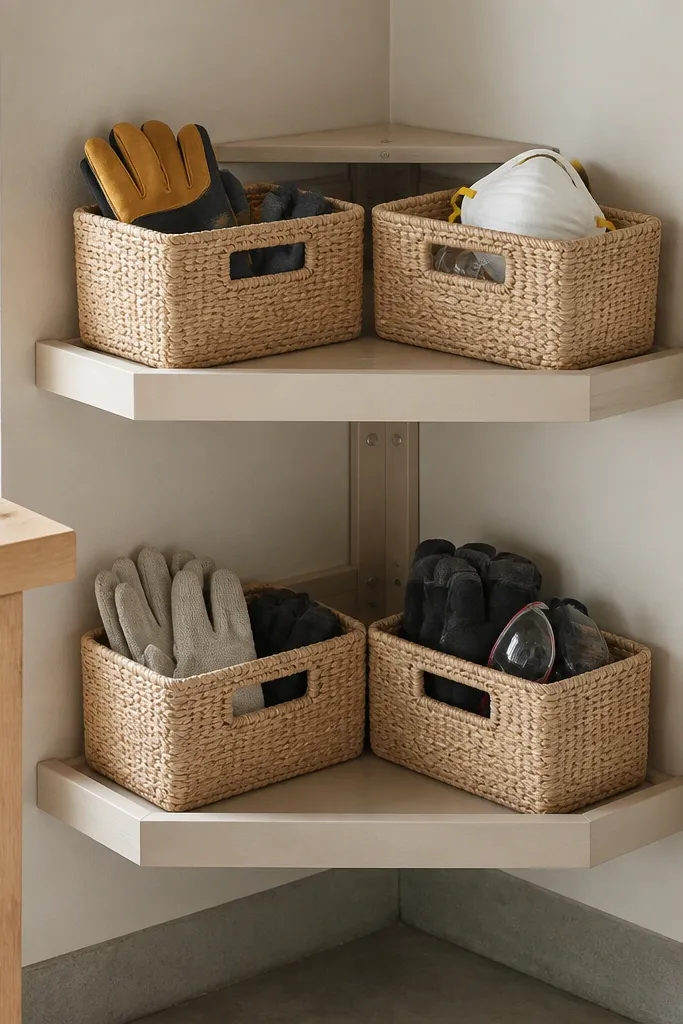
Woven-style bins soften the garage look and keep personal protective gear from living in a random drawer. I like them for gloves because you can see the color of glove sets quickly. The corner shelf makes use of dead space and keeps the items near where you actually use them. The result is a warmer, more organized feel without spending a lot.
Use a small corner shelf unit and choose bins that fit with a 1/2-inch gap so they don't scrape. Label the shelf edge, not the bin side, so you can read it from the doorway. Keep masks in a small zip pouch inside the bin so they stay clean. Use light tan or gray bins so the garage doesn't look too dark.
Pro tipHang a small hook for a reusable rag next to the gloves bin so cleanup happens right there.
AvoidSkip bins that are too deep - you'll shove items to the bottom and forget what's there.
13. Magnetic Label Holders on the Tool Box Lid
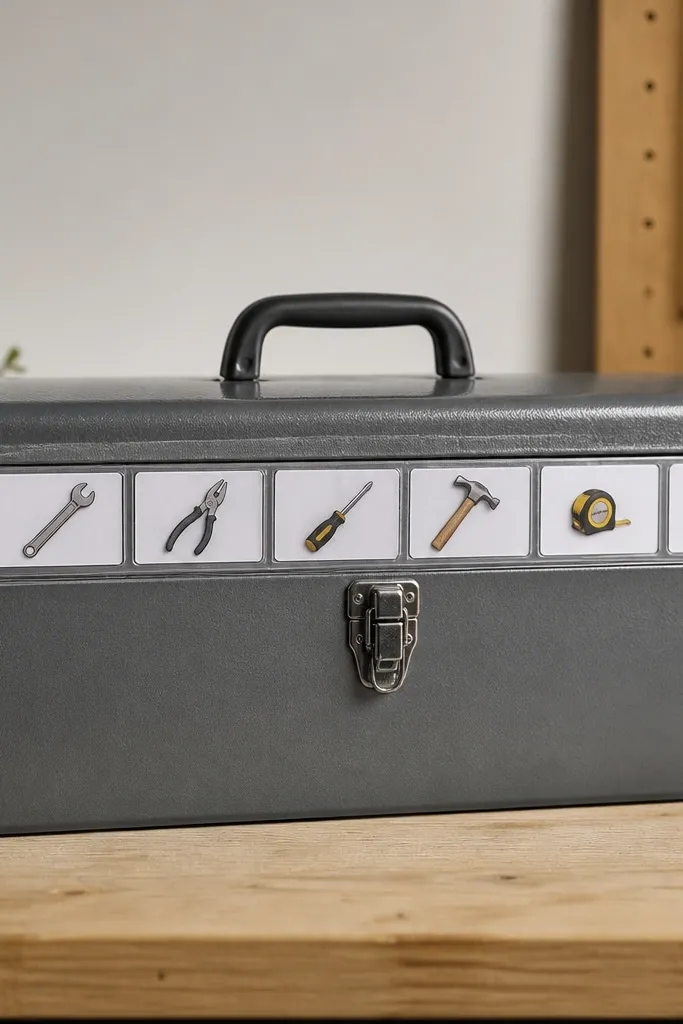
Tool boxes get messy because lids are where you dump things during a project. Magnetic label holders keep the label readable even when you wipe the box. I've used this on a metal top toolbox where labels used to peel off. It looks tidy because the labels sit in a single straight line.
Buy magnetic label sleeves or make your own with a clear document holder and magnets. Attach to the lid and keep each label in a plastic sleeve. Print labels on white paper, then laminate or cover with clear tape. Use one label per compartment so you don't guess later.
Pro tipWrite labels with a thick black marker even if you print - the marker adds contrast that's easier to read in garage light.
AvoidAvoid cheap paper labels directly on metal - garage dust and cleaning spray will peel them.
14. Stackable Storage Cubes for Seasonal Kids Gear
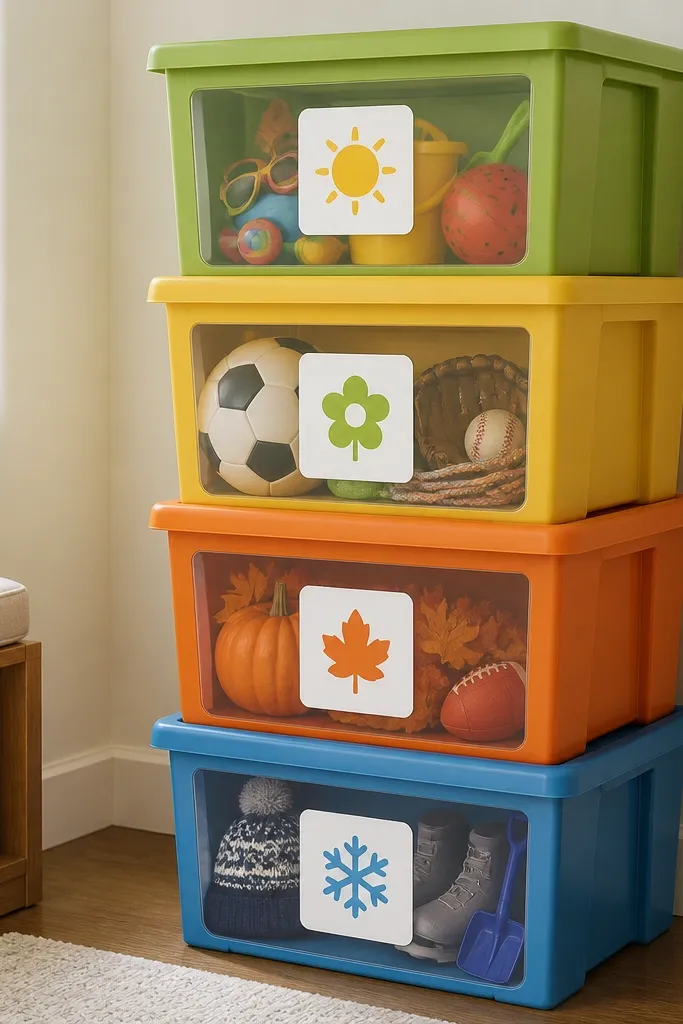
Seasonal kids gear is the stuff that ruins organization because you need it sometimes, not every day. Stackable cubes with lids keep dust down and make swapping seasons easy. I keep each season in a separate cube so we don't mix summer scooters with winter helmets. The bright lids also make it easy for kids to identify their things.
Use stackable bins with clear fronts and locking lids. Choose cube sizes that fit the shelf or floor space without forcing them. Label by season and item type, like "Summer - Bikes" or "Winter - Skates." Keep the most used season at eye level and store other seasons higher.
Pro tipTape a small inventory list inside the lid. When a kid empties the bin, you know what should be back in it.
AvoidSkip one giant bin for everything - you'll end up with mixed toys and nobody wants to sort.
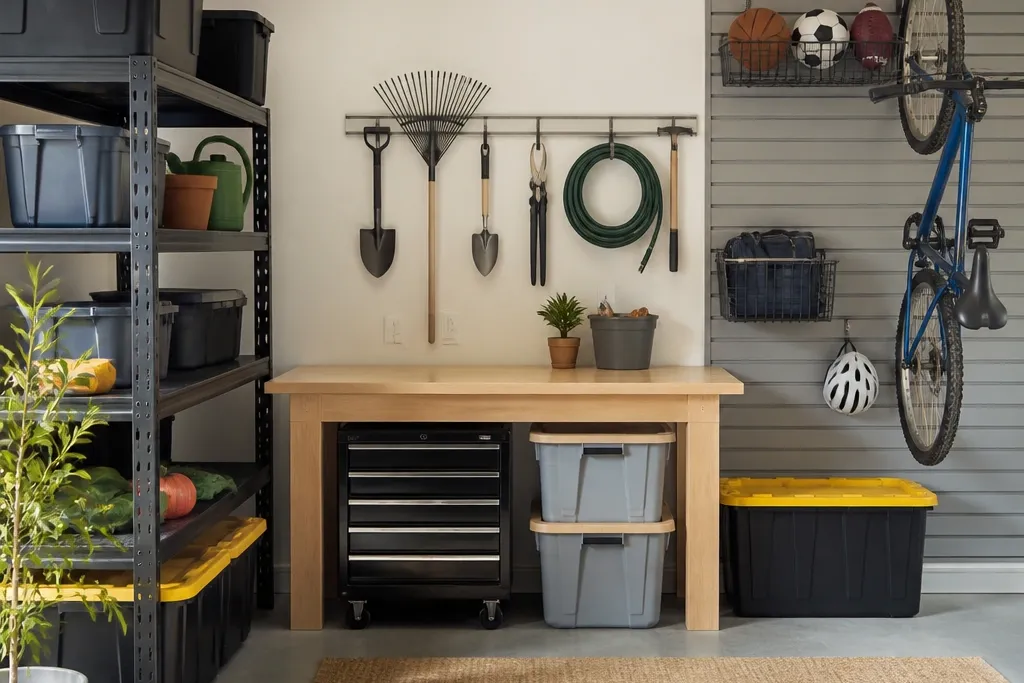
15. Budget Peg Rail for Shovels and Rakes
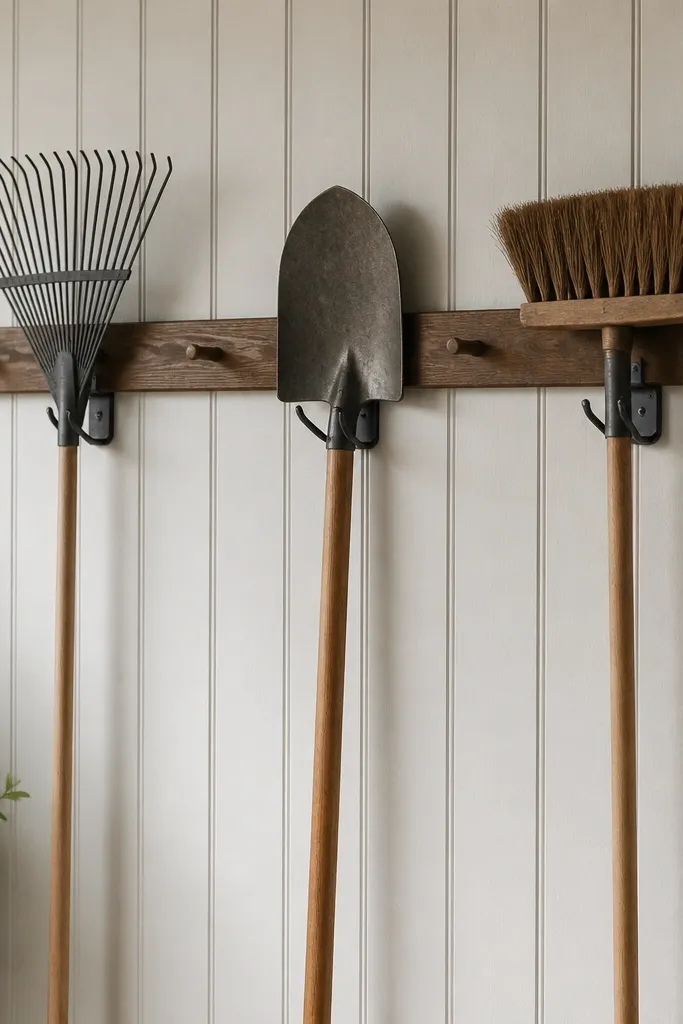
Long yard tools need support along their length so they don't lean and fall. A horizontal peg rail keeps shovels and rakes off the floor and makes the garage feel instantly cleaner. I like using heavy-duty hooks because they handle weight without bending. The even spacing makes the wall look organized instead of random.
Mount a horizontal rail into studs and use hooks rated for outdoor tools. Hang the rake with the handle supported near the middle and the shovel supported near the top third. Keep hooks spaced so handles don't touch each other and scratch. Paint the rail black or dark gray to hide scuffs.
Pro tipAdd a small rubber sleeve on the hook so metal handles don't rattle.
AvoidAvoid hanging tools by the blade edge or bristles - those points bend and the tool ends up crooked.
16. Shoe Rack Style Bin Wall for Small Garage Shoes and Boots
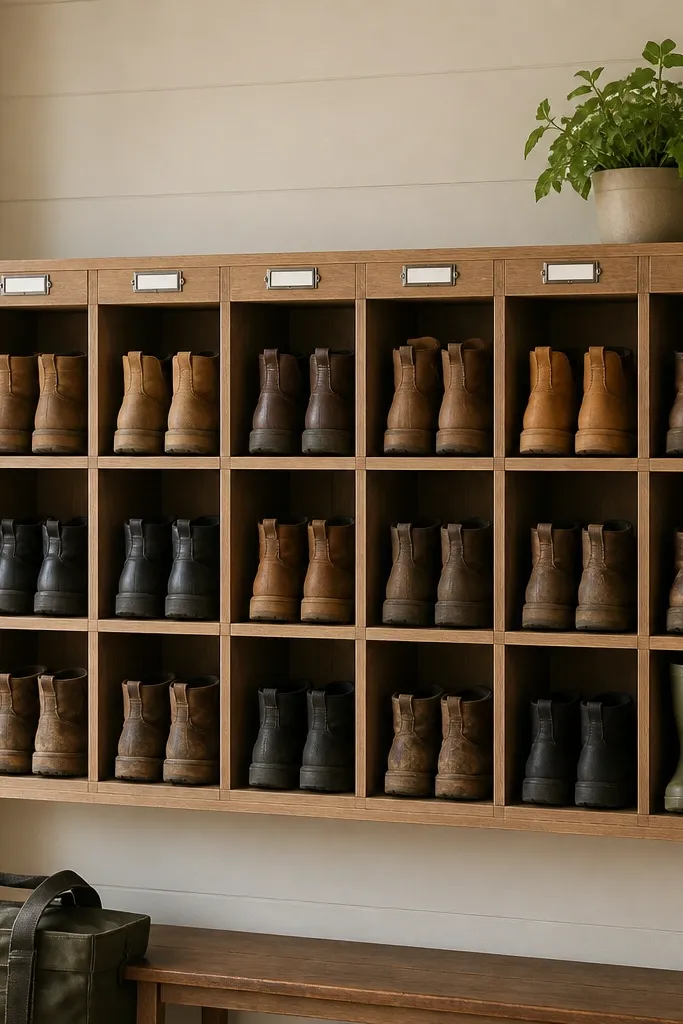
Boots and shoes pile up near the door and make the floor look messy even when everything else is organized. A shoe rack wall solves that by giving each pair a vertical home. I like open cubbies because you can slide boots in quickly after yard work. The rack also makes the entry feel cleaner for kids and guests.
Use a metal or plastic shoe rack with cubbies about 10 inches wide. Mount it at kid height plus your own reach for easy access. Label each cubby with the person's name or a symbol, then add a small tray below for muddy socks. Wipe the rack weekly with a damp cloth.
Pro tipStore boot spray and a small brush in a hanging pouch next to the rack so the boots get cleaned before they go back.
AvoidSkip low-quality racks that flex - boots fall over and the whole look collapses.
17. Kitchen-Style Canisters for Dry Shop Supplies
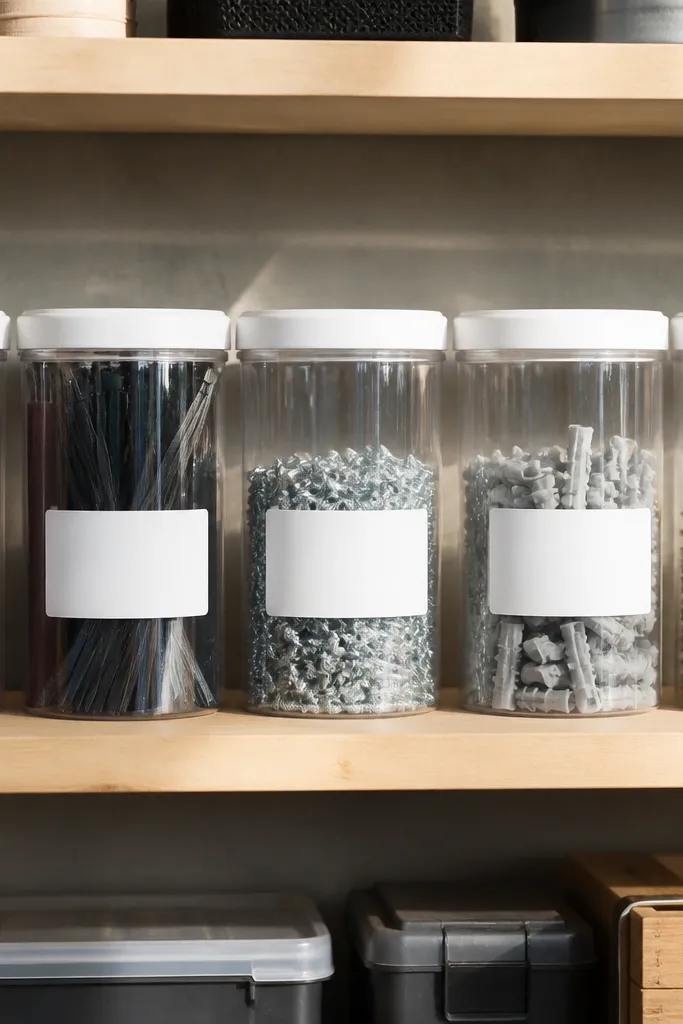
Dry shop supplies are perfect for canisters because they're small, dusty, and easy to misplace. Clear canisters look clean and make it obvious when you're running low. I've had the best luck with white lids and bold labels so the shelf looks uniform. This is one of the fastest ways to make a garage look "done" without building anything.
Use canisters 1 to 2 quarts for things like zip ties and sandpaper. Store them on a shelf at eye level so you don't rummage. Label with a label printer or thick marker, then seal labels with clear tape. Keep only dry items in these so you don't trap moisture.
Pro tipPut the most-used size in front and the extras behind. The front canister should be the one you grab every time.
AvoidAvoid mixing too many categories in one jar - it turns into a guessing game.
18. Floor-Level Tool Roller Caddy for Quick Grab

A rolling caddy stops tools from migrating across the garage during projects. I keep one "grab cart" for the current job so everything stays in one place while you work. The visual order looks good because bins are labeled and the drill has a dedicated spot. It also helps with kids, since they can roll the cart back to the work zone.
Choose a cart with shelves you can wipe and bins that fit each shelf. Use small bins with clear sides for bits and nails. Put heavier items on the bottom shelf to keep it stable. Keep the cart near the workbench but not in a walking path.
Pro tipAdd a strip of Velcro inside the cart for the drill battery charger cord so it doesn't hang and tangle.
AvoidSkip carts with wobbly wheels - the cart tips the moment someone bumps it.
19. Corner Storage Bench with Hinged Tool Lid

A bench gives you seating and hidden storage, so the corner doesn't look like a dumping zone. I used a hinged lid because it keeps items contained while still letting you find what you need quickly. The cushion makes the area more inviting, and the label panel makes it obvious where things belong. This works great for kids because it's easy to open and close.
Build or buy a bench with a lid that opens wide enough to reach in comfortably. Use bins inside sized to the bench footprint so they don't slide. Store bulky items like tarps, extension cord reels, or extra gloves. Paint the outside with a durable finish and add non-slip pads on the bottom.
Pro tipUse a piece of foam on the lid underside so bins don't scratch when you close it.
AvoidAvoid benches with tiny openings - you'll shove items in and never find them again.
20. Magnetic Tool Holder for Metal Screwdriver Sets
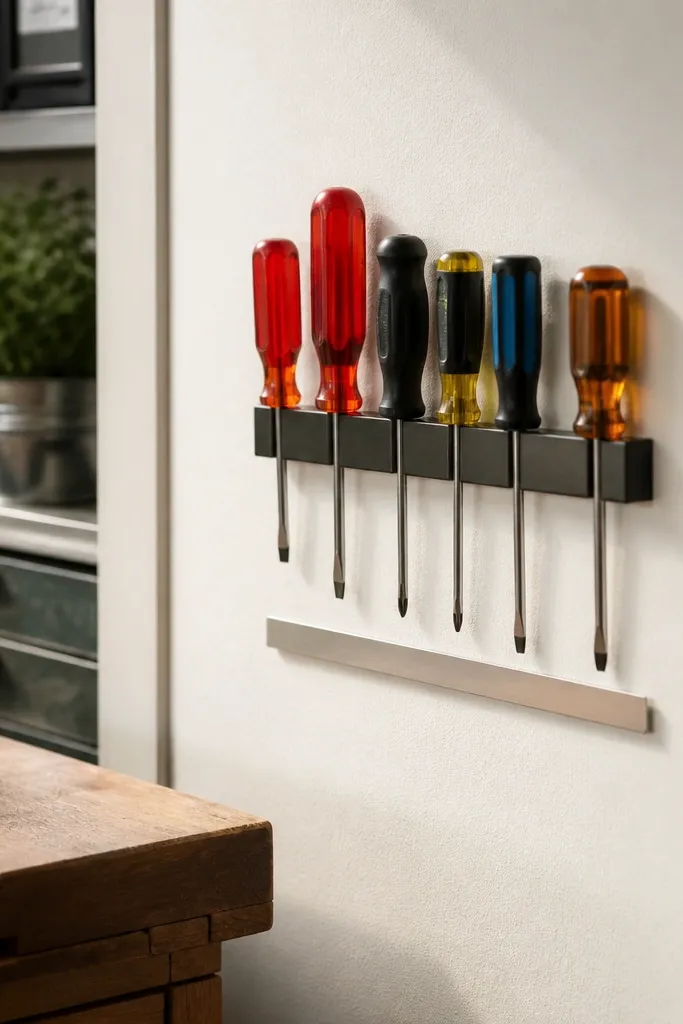
Small magnetic holders keep screwdrivers from disappearing into drawers. When screwdrivers are visible, you grab the right one faster and the garage looks more organized. I like placing it inside a door or near the workbench because it's where you reach for them during projects. The compact size makes it a clean, beginner-friendly upgrade.
Use a magnetic strip holder sized to your screwdriver set so each one has space. Mount into studs or a solid frame. Add a small tray for bits that don't stick well. Finish the holder with a simple paint color that matches the workbench or wall.
Pro tipMark each screwdriver with a small color dot on the handle so kids return them correctly.
AvoidSkip mounting on weak drywall anchors - screwdrivers add weight and pull the holder out.
21. Labeled Hanging Storage for Paint Brushes and Rollers
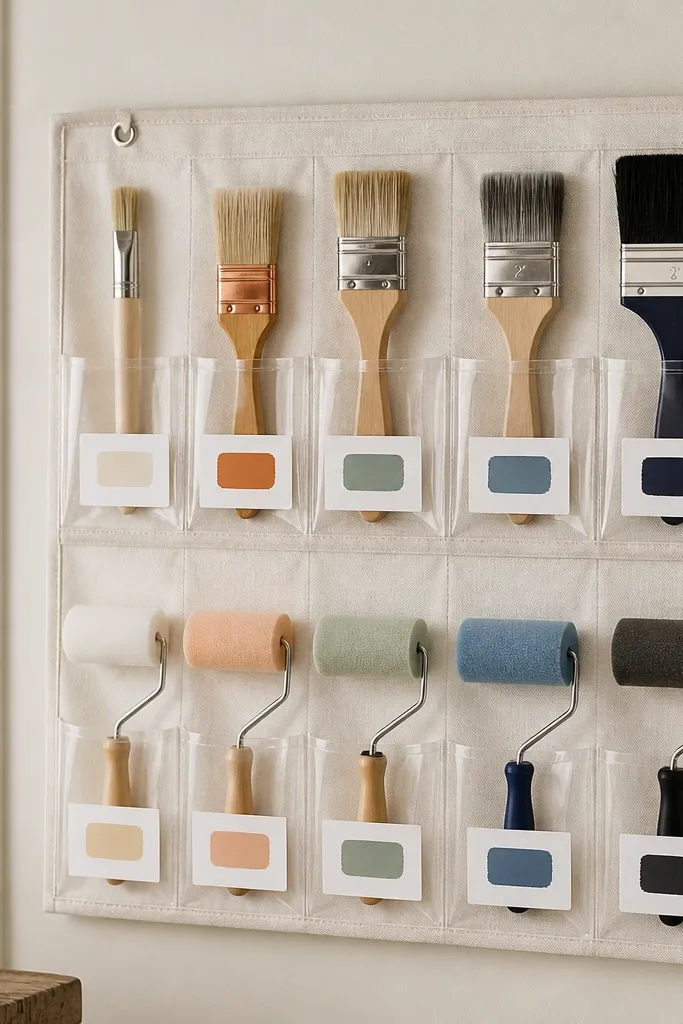
Hanging storage keeps painting tools from drying out in a bag or getting tangled in a drawer. Clear pockets let you see which roller cover you used last and whether it's clean. I like adding a small color swatch label because paint colors are harder to remember than you think. This setup also looks neat because everything hangs straight.
Use a clear hanging organizer with multiple pockets or add clear plastic sleeves to a board. Keep brushes in pocket sleeves so bristles don't crush. Label each pocket with roller nap length and paint color. Store the hanging organizer near the painting supplies shelf, not on the far side of the garage.
Pro tipAfter cleaning, let brushes dry upright in a cup before you store them in the pockets.
AvoidAvoid reusing a pocket for multiple roller types - you'll grab the wrong one mid-project.
22. Garage Floor Border for Bike and Car Zones Using Tape Lines
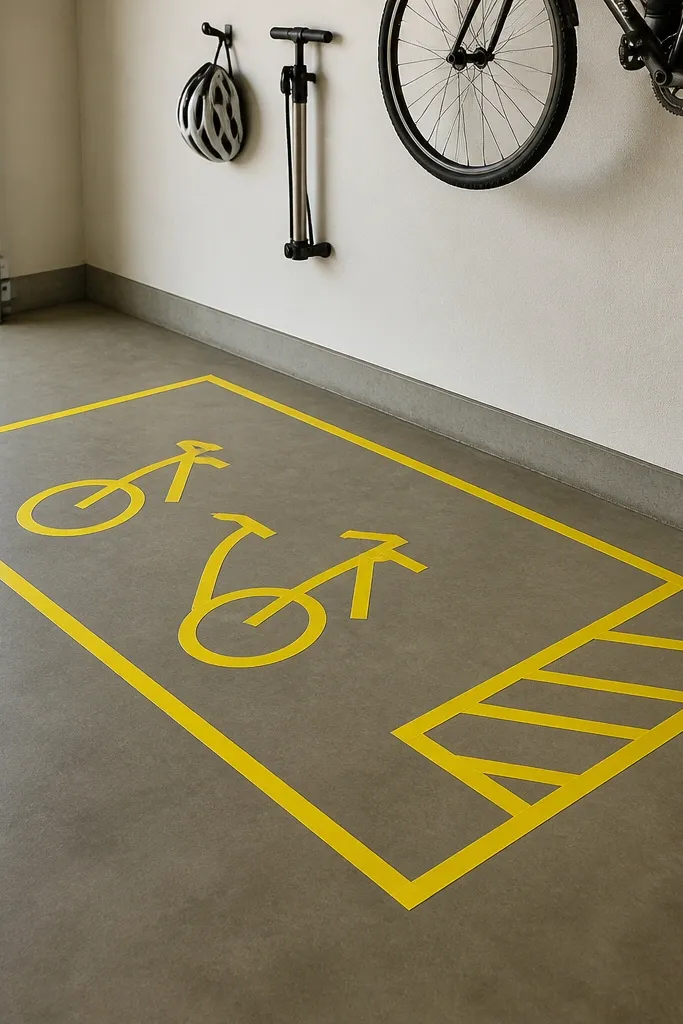
Floor lines are the cheapest organization upgrade I've used because they guide where things go without any hardware. It's especially helpful in garages where kids bring bikes in and out. I've found that marking zones reduces clutter more than adding one more bin. The look is crisp because the lines make the floor feel mapped.
Use garage floor marking tape or heavy-duty painter's tape if you're testing. Measure your walking path first, then draw rectangles for bike storage and car-care supplies. Keep tape width consistent and press edges firmly with a flat tool. Reapply when you clean with strong degreasers.
Pro tipTake a photo of the floor lines and print it on a small sheet. Put it near the door so you can reset the layout if tape peels.
AvoidSkip curved, messy lines - sloppy tape looks like a temporary fix that never gets maintained.
23. Hanging Ladder of Tool Totes by the Door
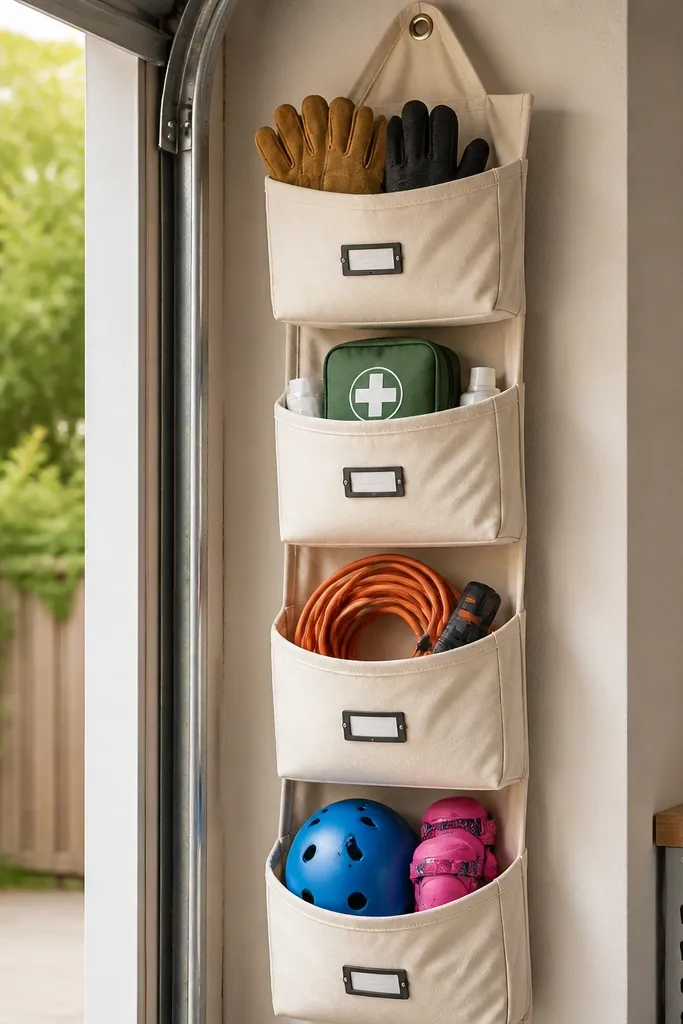
A door-side hanging system reduces the number of trips you make during yard work and repairs. Canvas totes look softer than hard bins and they hide small mess while still being organized. I like keeping safety gear and quick-fix supplies near the door because that's where you stop to grab them. The hanging setup also keeps the floor clear during snow days and rainy weekends.
Mount a vertical rail or hooks on studs near the door. Use totes with sturdy handles and a flat front so labels stay readable. Label each tote with a bold word and a small icon. Keep heavier items low and lighter items higher.
Pro tipUse a clear plastic sleeve for the label so it doesn't smear when you wipe the totes.
AvoidAvoid flimsy totes that sag - they look sloppy and labels peel off from constant bending.