
1. Keyboard-Lane Catch Tray with a Weighted Base
This is the desk equivalent of putting a landing pad under a helicopter. Everything that normally lands on the desk - pens, tiny tools, quick notes - gets one home right where your hands drop items. The weighted base keeps the tray from sliding when kids push the chair in and out.
Use a desk tray about 12 x 8 inches with straight sides. Add a non-slip shelf liner under it, cut to the tray's footprint. Line the inside with 1 sheet of kraft paper trimmed to fit, then tape the corners down so it doesn't curl.
Pro tipIf your tray feels too small, don't resize it - move the "overflow" to a labeled bin on the side so the tray stays tidy.
AvoidAvoid using an empty tray with no liner - bare plastic shows everything and looks messy fast.
2. Cable Clips Along the Desk Edge with a Paper Backing
Loose cords make a desk look chaotic even when everything else is clean. This setup routes cables to one side and keeps them from draping across the front edge. The paper backing hides the messy bundle so the desk looks intentional.
Stick 3-5 cord clips to the underside front edge of the desk, spacing about 4 inches apart. Behind the clips, tape a 1-inch-wide strip of white or light kraft paper to block the view of the cable run. Use zip ties only if you need to bundle two cords into one line.
Pro tipLabel the end of each cable with a small piece of masking tape so you can re-route devices without guesswork.
AvoidAvoid putting clips on the top surface - they catch dust and look cluttered.
3. Stacked File Boxes for School Papers and Home Mail
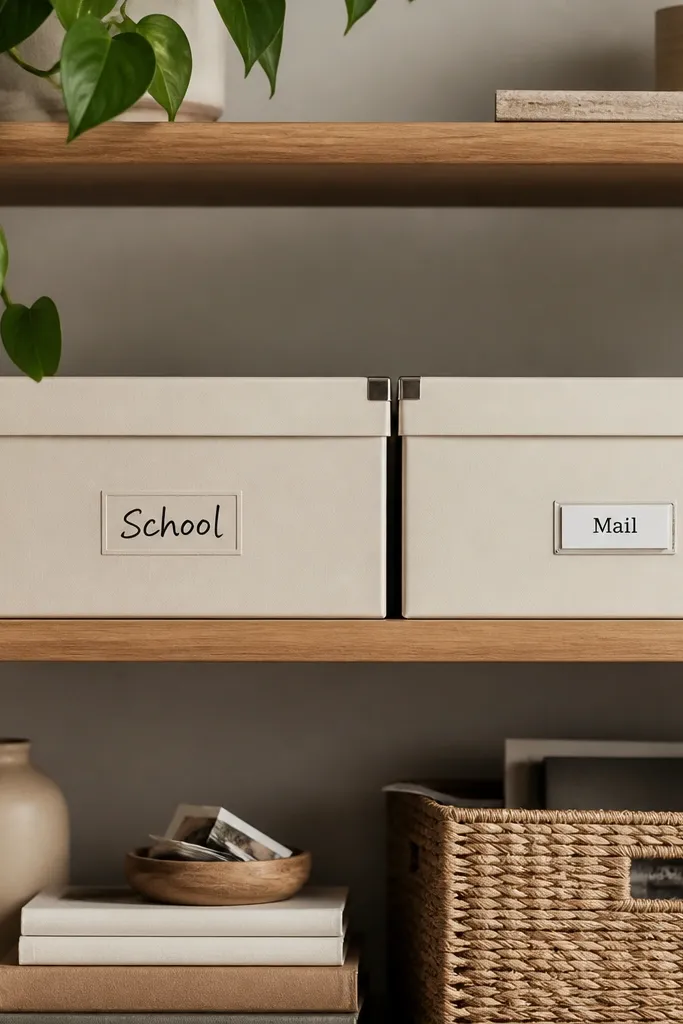
Paper piles don't have to be a daily battle. Two boxes - one for incoming school papers and one for home mail - separate what needs action from what needs sorting later. Matching colors makes the setup look clean even when the contents change.
Use shallow file boxes (about 10-12 inches wide) so you can see what's inside. Add a simple label maker label on the front and a second label on the side for quick grabbing. Stack them so the taller one is on the back if you're working at a desk with a low shelf.
Pro tipSet a weekly timer and empty the 'School' box in one pass - it keeps the desk from turning into storage.
AvoidAvoid a single "papers" box - it turns into a dump spot.
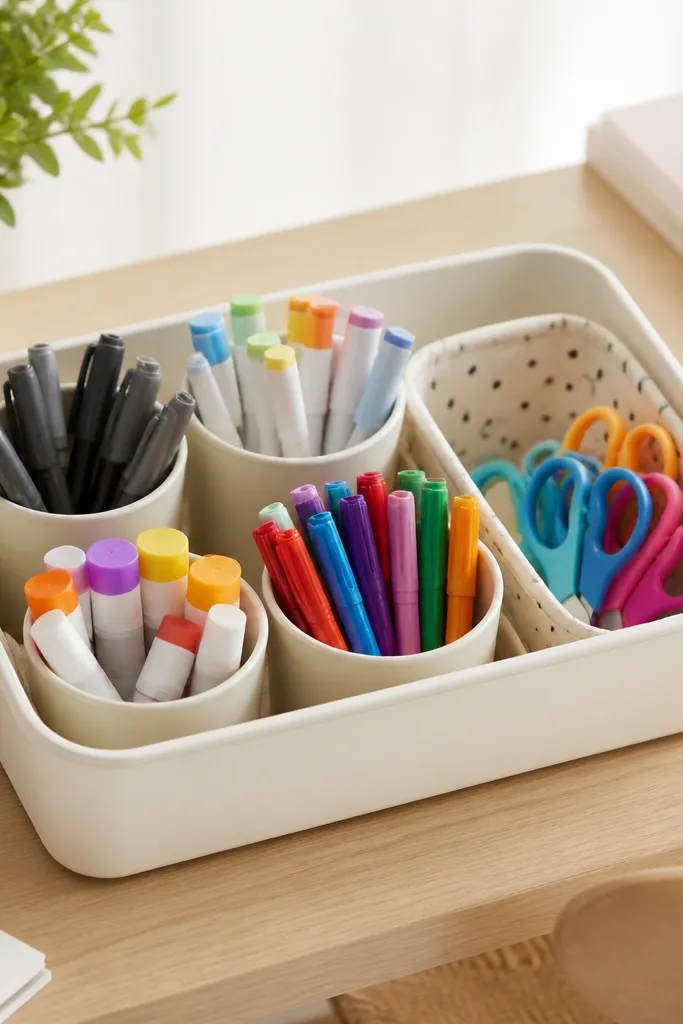
4. Cup + Divider Pen Organizer That Actually Fits Real Pens
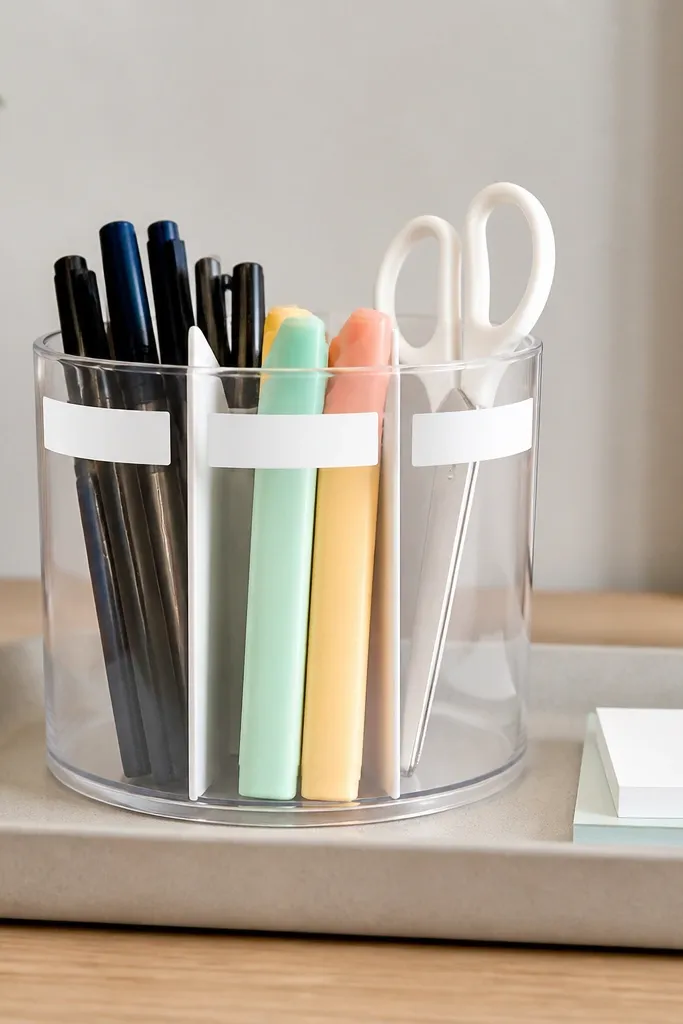
Most pen organizers are sized for perfect office pens, not the thick markers kids use. This divider method makes sections by thickness so pens don't tip and roll. Clear cup + card dividers keeps it looking bright while still being practical.
Cut divider cards from thin cardboard or file folder plastic. Make three sections: one for skinny pens (about 1 inch wide each slot), one for highlighters (wider slots), and one for scissors (a single wide pocket). Tape the dividers to the inside with double-sided tape so you can remove them later.
Pro tipStore tape and clips in a separate tiny tray - if they live with pens, you'll dig and dump every time.
AvoidAvoid using only a single cup with no dividers - everything becomes a jumbled grab pile.
5. Magazine Holder for Rulers, Notebooks, and Clipboard Work
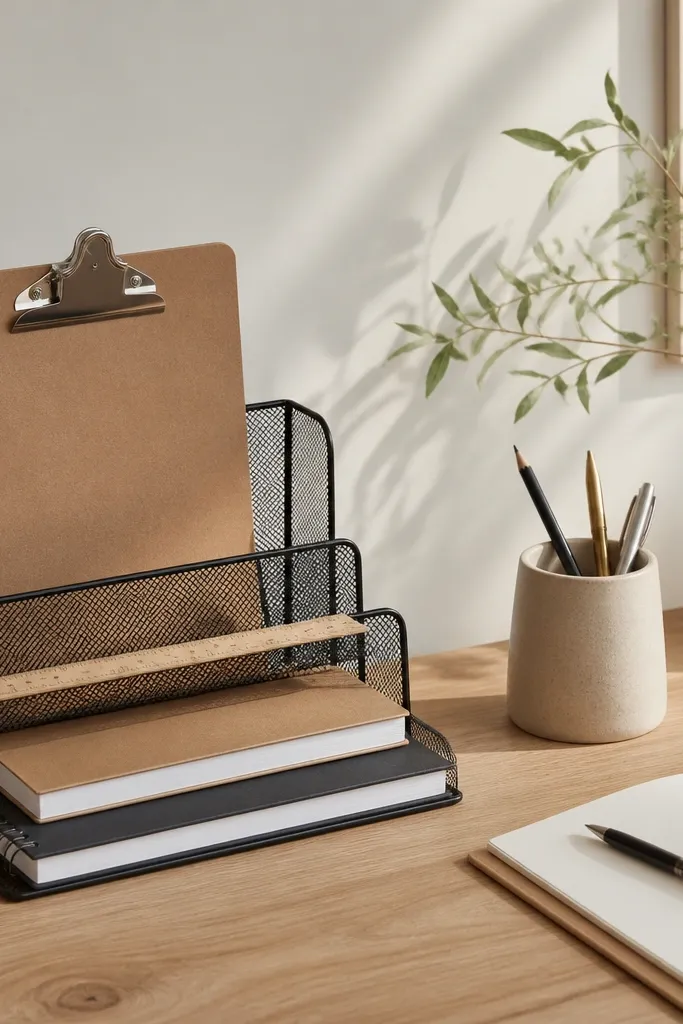
A magazine holder is a fast way to add vertical storage without drilling. It keeps long items from sliding across the desk and gives you a visible "grab stack" for the next task. The open front looks neat because you can see what's there.
Pick a holder with at least three compartments. Place it so the widest opening faces you at a slight angle. Add a thin felt pad under the holder to stop it from scraping the desk surface.
Pro tipLabel the bottom edge with a strip of painter's tape so kids learn where each notebook belongs.
AvoidAvoid placing it right in the middle of the desk - you lose working surface.
6. Under-Monitor Riser from a Flat Storage Bin Lid
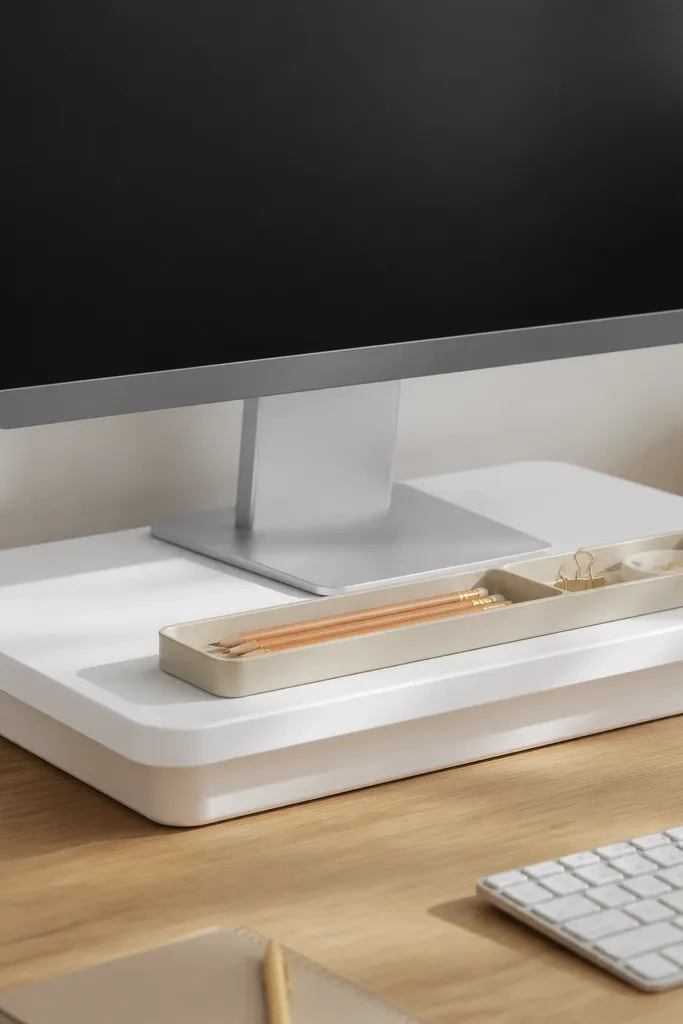
If you need more surface without buying furniture, use the dead space under the monitor. The riser creates a front "zone" for daily items and keeps them off the desk edge. It also makes the desk look taller and cleaner.
Find a flat lid from a storage bin (about 16-20 inches wide). Cover it with white contact paper or a matte painted finish. Glue or tape 4 small rubber feet to the underside so it doesn't slide.
Pro tipKeep only the top 5 items on the riser: pens, sticky notes, a ruler, and one small tray.
AvoidAvoid stacking tall items under the monitor - it blocks airflow and looks cramped.
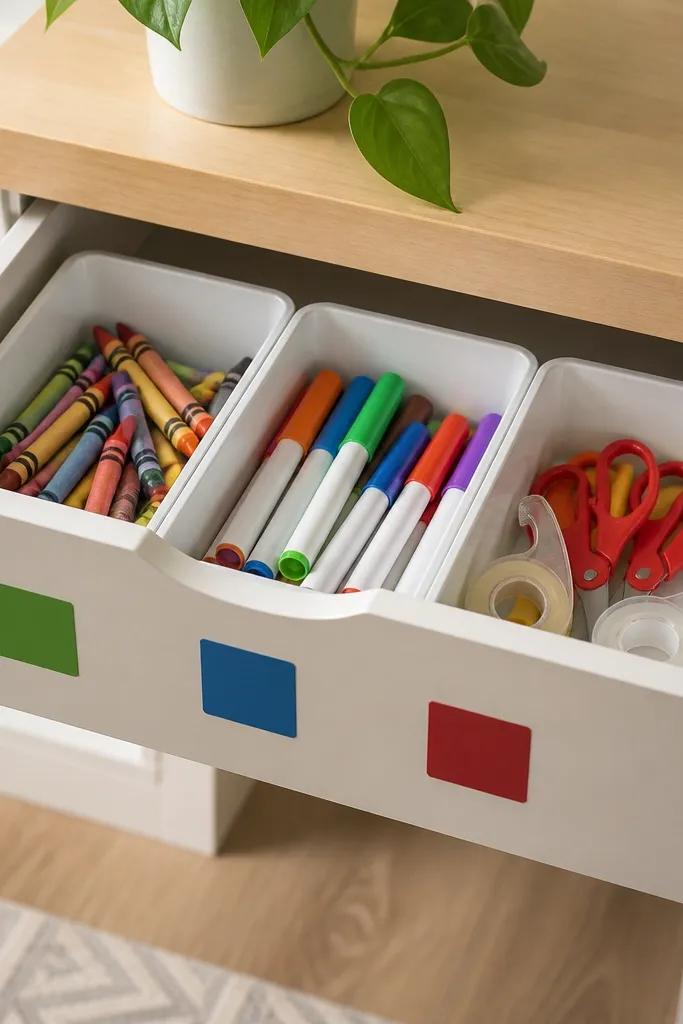
7. Drawer Dividers Made from Cookie Sheet Liner Squares
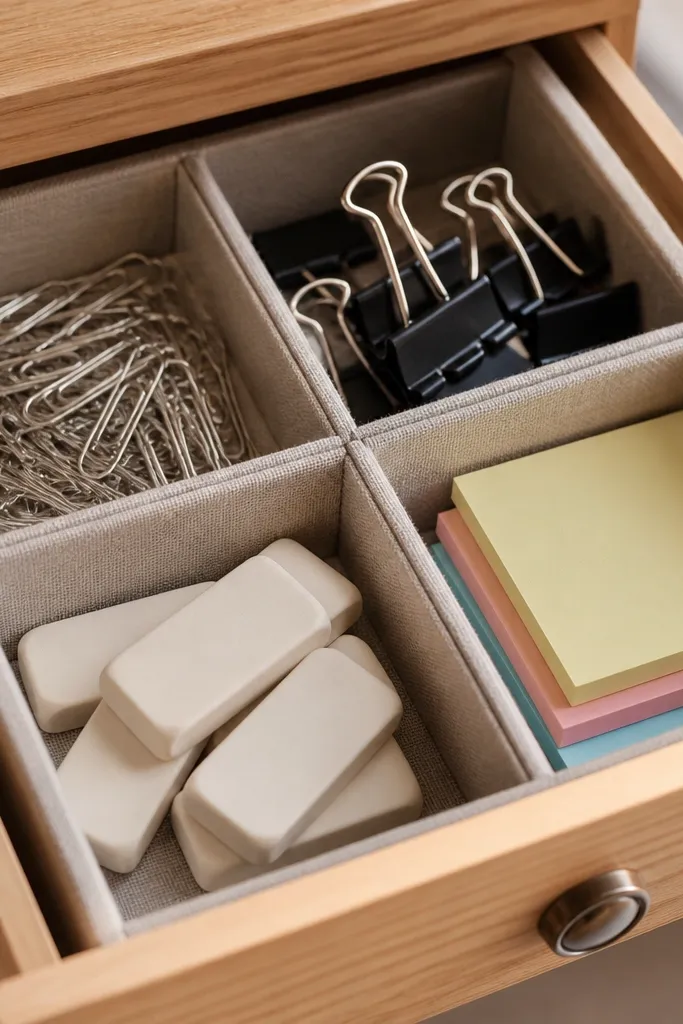
You can get clean drawer compartments without buying fancy dividers. The non-slip liner squares keep small items from sliding into each other, and the texture hides scuffs. It keeps the drawer usable for kids because they can grab one section at a time.
Cut non-slip drawer liner into 2-inch squares. Arrange squares in a grid and connect them with a piece of painter's tape along the seam so they stay put. Make larger zones for scissors and tape dispensers using 3-4 inch squares.
Pro tipWrite the item name on a 1-inch tape label and stick it to the drawer lip above each section.
AvoidAvoid using slippery plastic as dividers - clips and tape slide and clump.
8. Sticky Note Station with a Clip Rail

Sticky notes multiply like weeds. A clip rail gives them one visible stack and prevents them from turning into a paper avalanche. The clips also hold a pen and a small notepad without extra plastic.
Use a short metal picture rail or a thin shelf strip. Attach 3 binder clips at equal spacing. Clip a sticky note pad to the top and tuck a notepad behind the rail edge. Paint the rail white or black so it matches your desk accessories.
Pro tipKeep one color for reminders (yellow) and one for homework (pink) so kids can find the right pad instantly.
AvoidAvoid storing sticky notes in a drawer - you'll stop using them and the desk gets messy again.
9. Acrylic Desk Trays with Color-Coded Lids
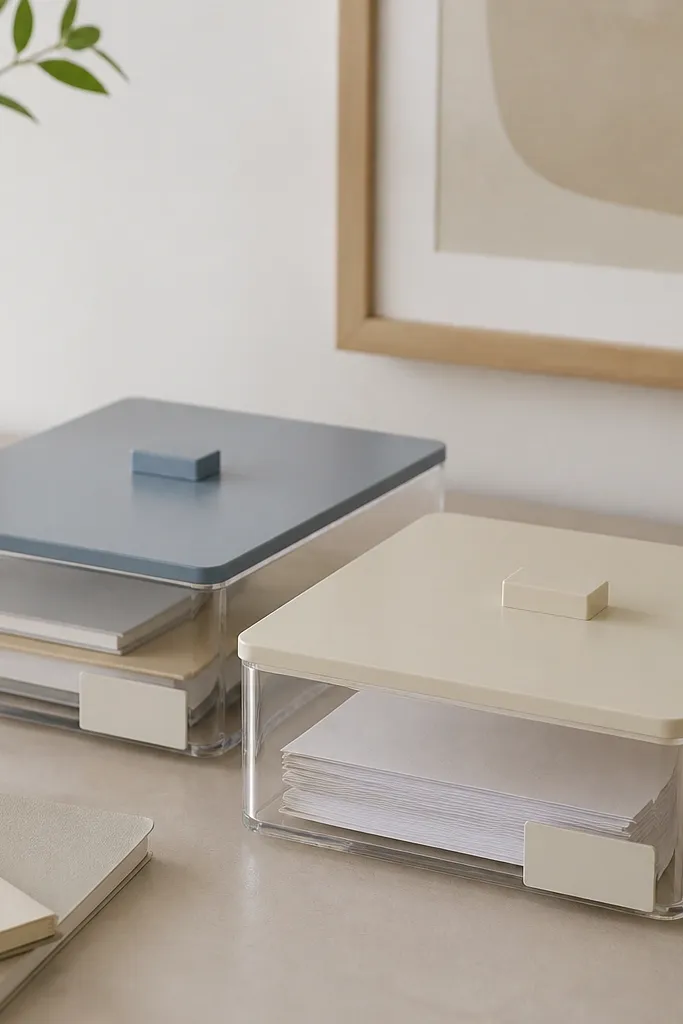
Clear trays look clean, but they can feel messy if everything is visible. Adding lids and color-coded tops makes the desk look organized even when you're mid-project. It also protects markers and glue from drying out.
Use two shallow acrylic trays with removable lids. Choose lid colors that match the room: muted blue for school supplies, cream for paper. Label each tray with a small sticker on the lid edge and a second label on the tray front.
Pro tipStore only supplies that belong together: one tray for writing tools, one for craft extras like tape and small scissors.
AvoidAvoid leaving acrylic trays open with lots of loose items - the visual clutter is immediate.
10. Corner Spoon Shelf for Scissors, Tape, and Glue
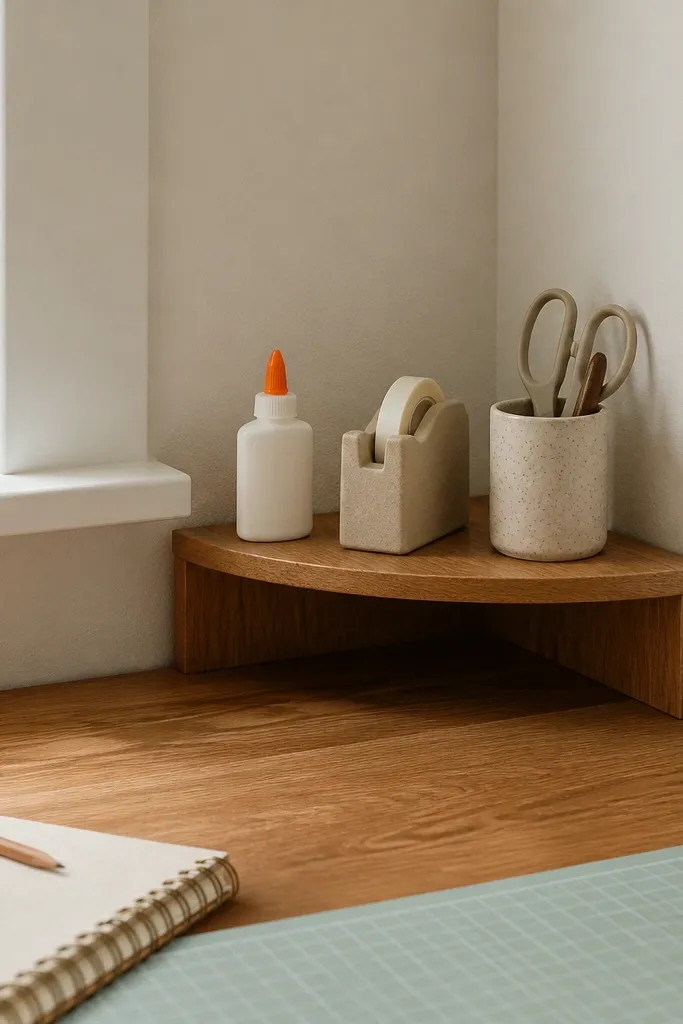
If your desk corner is dead space, it's also where clutter collects. A small shelf turns that corner into a controlled station for the tools kids grab constantly. Keeping glue upright prevents leaks and keeps the area looking clean.
Use a small floating shelf or a corner shelf about 8-10 inches wide. Add a non-slip mat on the shelf surface. Arrange items in one direction so the labels face out and kids grab without turning everything.
Pro tipPut a shallow tray under the shelf edge to catch drips - it saves your desk finish.
AvoidAvoid storing glue and markers on the desk surface - spills make everything look worn.
11. DIY Pegboard Grid with Washi Tape Labels
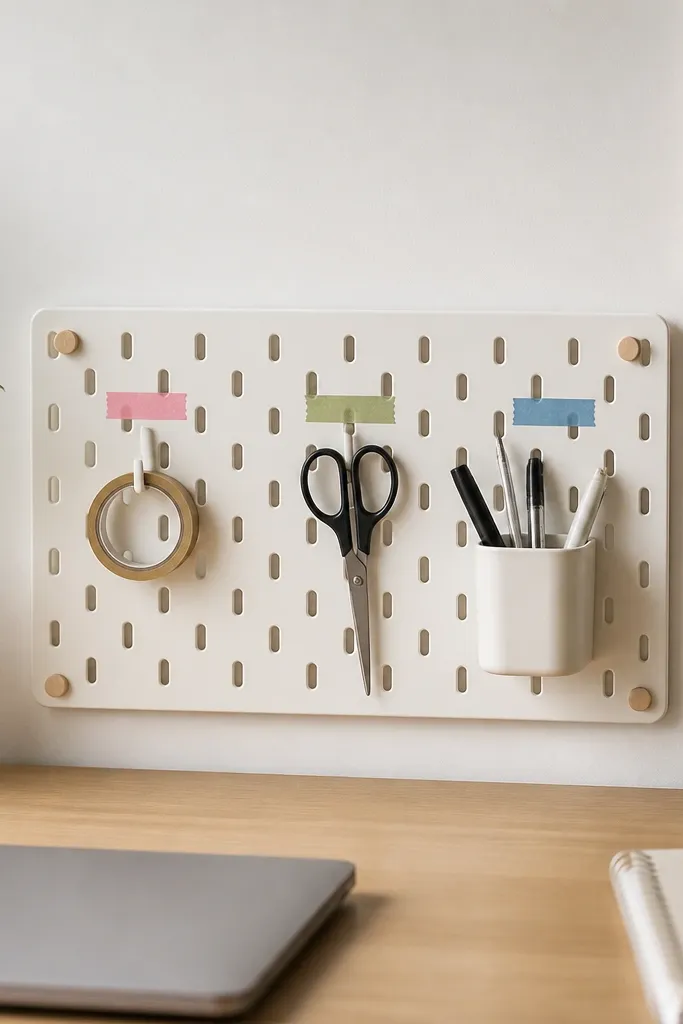
Pegboard makes organization visible and repeatable, which matters when kids are using the desk. The hook layout keeps items off the desk and off the floor. Washi tape labels are easy to change when you switch projects.
Use a pre-cut pegboard panel or a small board mounted with adhesive hooks if you can't drill. Hang a few sturdy hooks and one cup hook for pens. Label each hook with a strip of washi tape and a short word label.
Pro tipLimit hooks to 6-8 so the board doesn't turn into a clutter display.
AvoidAvoid using tiny hooks for heavy items - they bend and everything falls.
12. Labeled Tension Rod for Hanging Measuring Tools
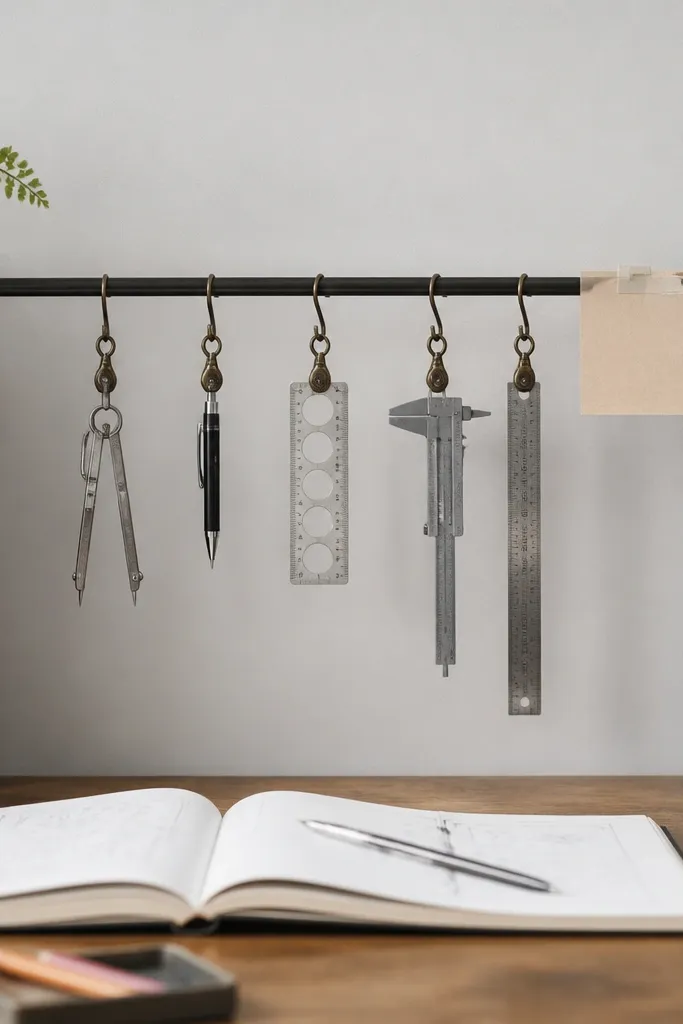
Measuring tools are long, awkward, and they end up on the desk surface if you don't hang them. A tension rod creates a clean vertical storage line behind the working area. Clips keep items from swinging and tangling.
Place two bookends or blocks behind the desk to hold the tension rod. Clip measuring tape, rulers, and a thin level to the rod using binder clips. Add a label to the rod end so kids put it back in the right spot.
Pro tipWrap the ruler edges in painter's tape before clipping so corners don't scrape the board.
AvoidAvoid hanging cords on the same rod - they tangle with the tools.
13. Desk Corner Shelf Ladder with Two Bins
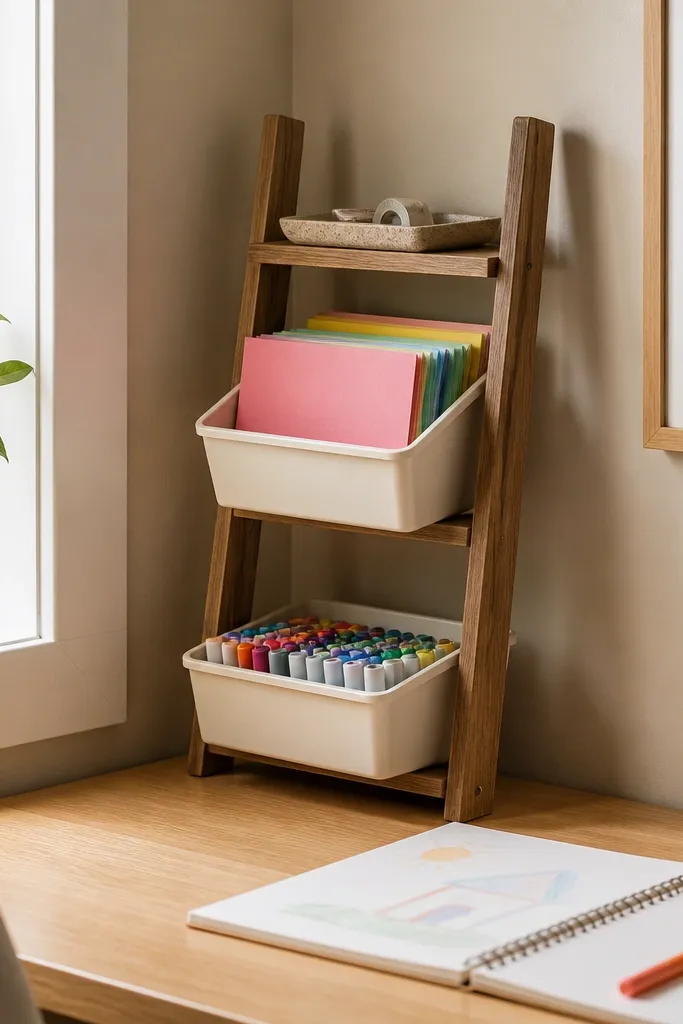
This is vertical storage that still looks cute. The ladder shape gives you different heights for different tasks: paper on one level, tools on another. Bins hide messy contents while keeping the desk visually light.
Use a mini ladder shelf about 24-30 inches tall. Put bins on the middle rungs and a shallow tray on top for small daily items. Choose bins in one color family and line them with matching craft paper so everything looks coordinated.
Pro tipKeep the highest bin for low-mess items like clean rulers or extra notebooks.
AvoidAvoid overloading the top rung - gravity makes the whole setup look messy.
14. Rolling Cart with a Single Theme Shelf
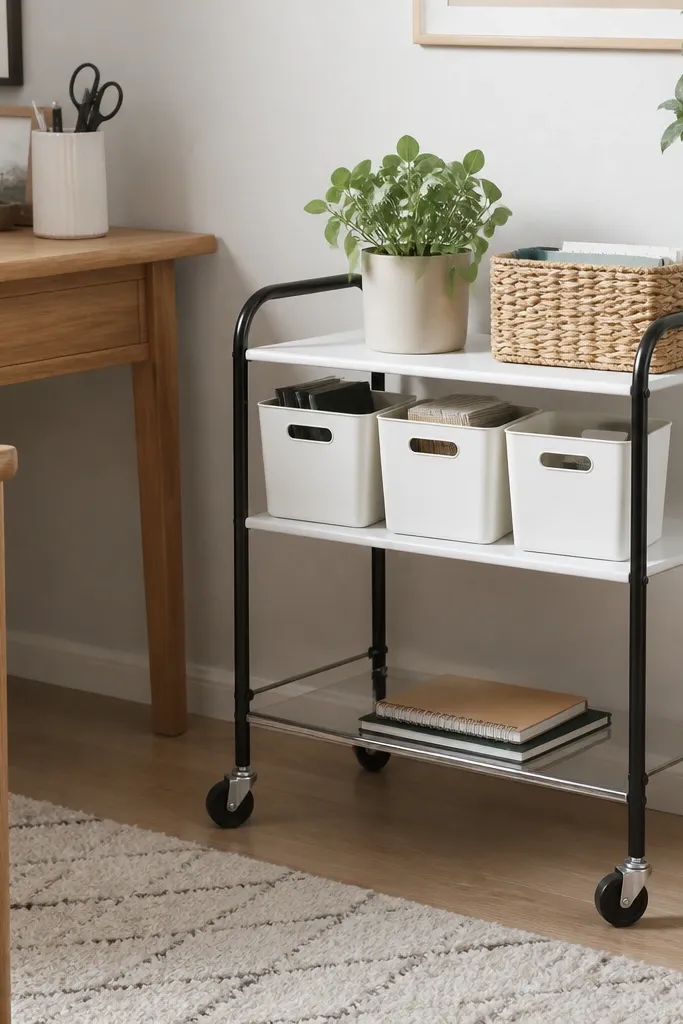
A rolling cart gives you extra storage without building anything. The "single theme shelf" idea keeps it from becoming a junk cart. One shelf is for active school work bins, and one shelf is for a clean stack so the desk area stays calm.
Pick a cart with at least two shelves and wheels that lock. Cover one shelf with contact paper in a matte finish so it doesn't show glare. Put two to four bins max on that shelf and label them.
Pro tipUse a tote-style bin for the biggest item group so kids can carry it to the table without unpacking.
AvoidAvoid putting every random supply on the cart - it stops looking organized fast.
15. Wall-Back Organizer Pocket from a Shoe Box Divider
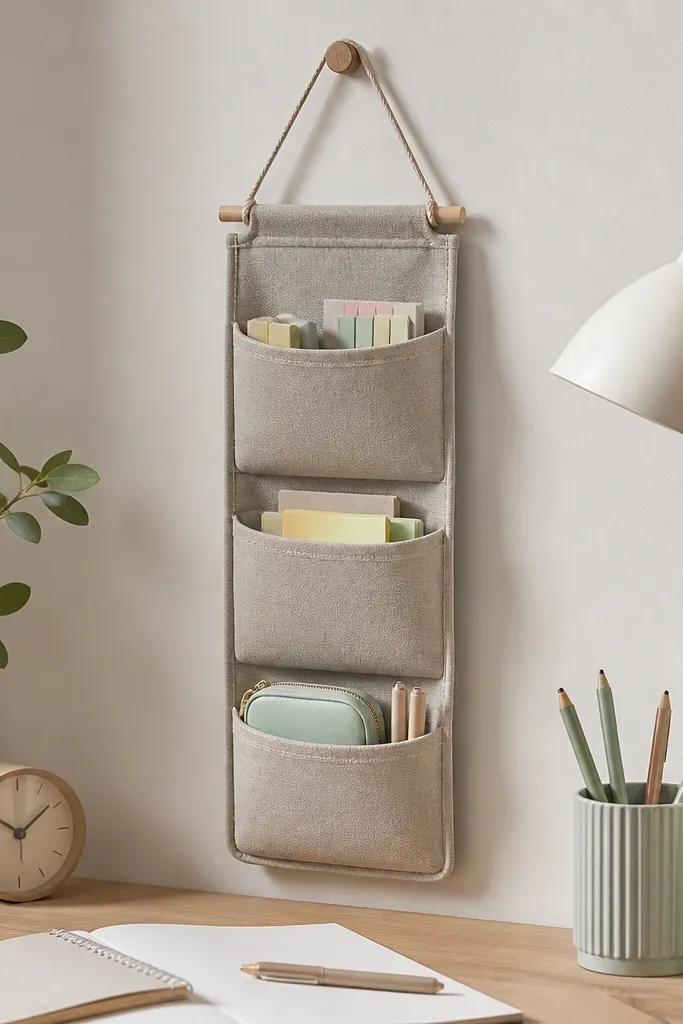
When a desk has no drawer space, the wall becomes storage. A pocket organizer keeps small items off the desktop and gives a consistent place for each group. It also makes the desk look tidy from the side angle, which is what people notice.
Use felt or thick fabric and sew or glue a simple divider into three sections. If you're not sewing, use heavy-duty fabric glue and reinforce the edges with bias tape. Mount the pocket with strong adhesive strips or a few small wall hooks.
Pro tipPut the pocket behind the chair side so kids can reach it without climbing across the desk.
AvoidAvoid thin paper pockets - they sag and look sad after a week.
16. Under-Desk Bin for Backpacks and Homework Folders
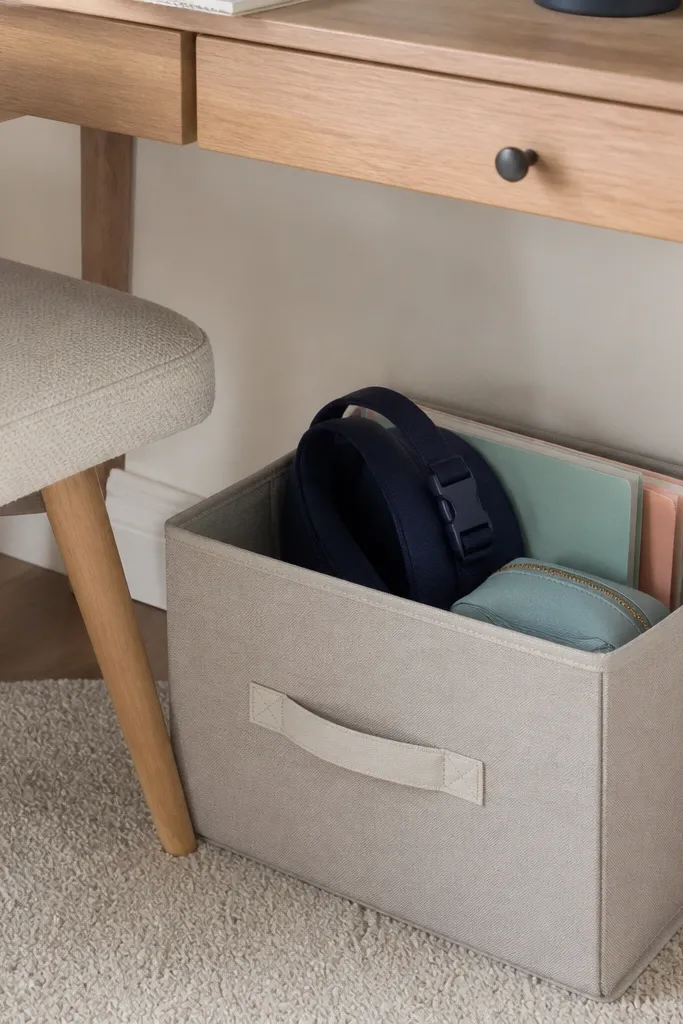
Under-desk storage keeps the floor from turning into a second clutter pile. A fabric bin looks softer than plastic and hides the mess when folders aren't perfectly neat. Labeling keeps kids from stuffing everything into the same opening.
Choose a bin that fits the under-desk clearance, usually 14-16 inches wide for typical desk spaces. Put folders upright so they don't fold and crease. Add a label on the front and a second label on the side for quick identification.
Pro tipUse one zip pouch inside the bin for small items like extra pencils and erasers so they don't disappear.
AvoidAvoid storing loose loose paper at the bottom - it gets wrinkled.
17. Tape Dispenser Station with a Magnetic Strip
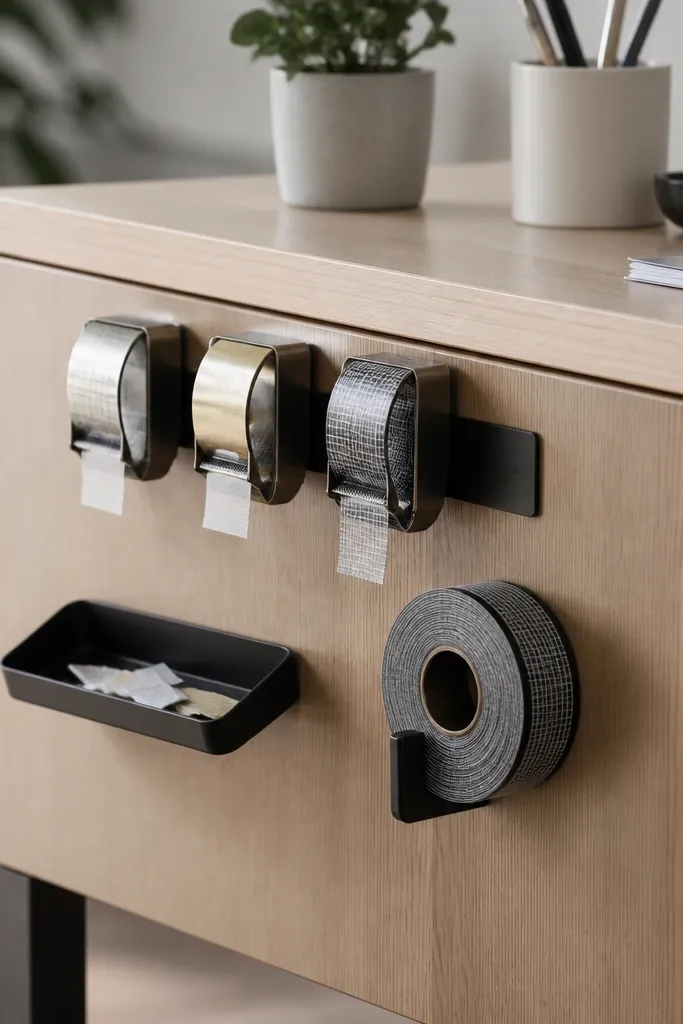
Tape is the messiest desk item because it's always in use and always rolling away. A magnetic strip grabs metal tape dispensers and keeps them in one line. The catch tray at the base stops tape ends from sticking to the desk.
Mount a magnetic strip on the side of the desk or inside a shelf lip. Use dispensers that have a metal backing or attach a small metal plate to clip-on holders. Keep one small tray underneath for tape ends and spare rolls.
Pro tipMark the return spot with a small dot of paint or tape so kids put the dispenser back without hunting.
AvoidAvoid placing tape near heat sources or windows - adhesive dries and starts tearing.
18. DIY Notebook Stand from a Book + Foam Board
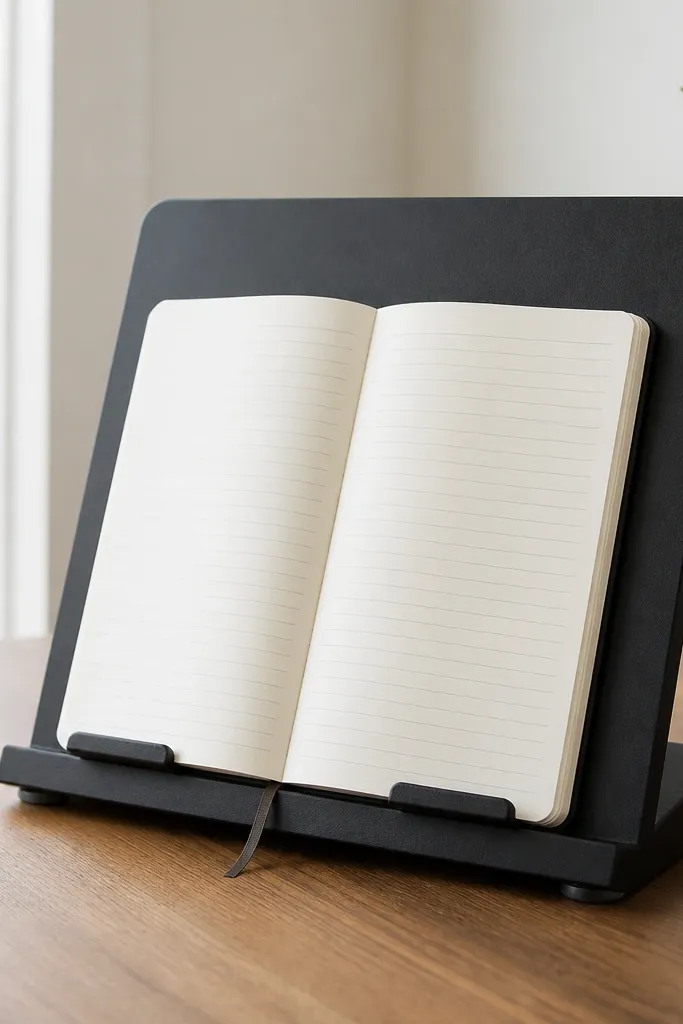
A notebook stand keeps pages from sliding and reduces the desk pile effect. It also makes your workspace look intentional because the notebook is always in a consistent spot. Foam board is light, so it's beginner-friendly and quick to adjust.
Cut foam board to form a triangle brace. Cover it with matte black or white contact paper to match other desk items. Add rubber feet at the bottom so it doesn't scrape.
Pro tipMake two angles: one steep for writing, one flat for reading, and switch based on the task.
AvoidAvoid shiny contact paper - it reflects light and makes the stand look cheap.
19. Craft-Supply Tray with a Liner and Removable Sections
Craft supplies spread because they're different shapes. A liner and removable sections let you rearrange when the project changes. It keeps the desk looking neat even on messy days because the grouping stays consistent.
Use a tray 14-16 inches wide. Add a washable liner in a solid color so it looks clean even when stained. Place 2-4 small cups for markers and glue sticks, and leave one larger open section for paper scraps.
Pro tipKeep a small "trash corner" section for scraps so paper doesn't spread across the tray.
AvoidAvoid mixing wet glue items with dry markers - leaks make everything look off.
20. Minimal Monitor-Side Shelf for Daily Essentials
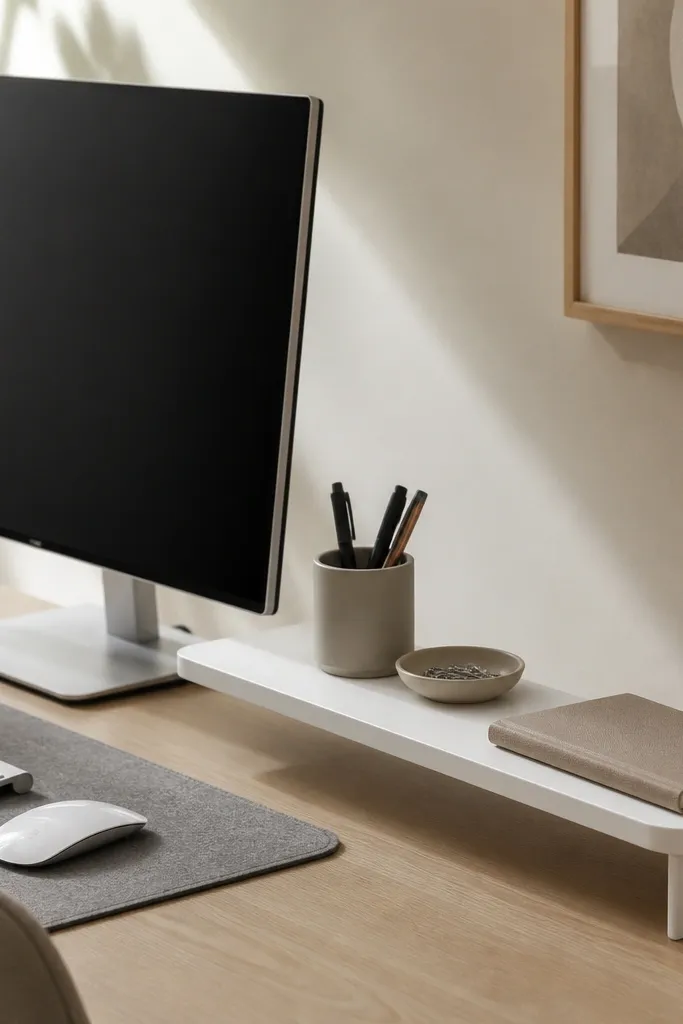
Side storage is where most desks get cluttered because people reach there without thinking. A slim shelf limits what you can place there, which keeps it visually calm. When you keep only daily essentials on it, the desk looks tidy even mid-day.
Use a shelf that's about 6-8 inches wide. Place it within arm reach of your keyboard side. Use one pen cup, one paperclip dish, and one closed notebook - that's the whole shelf rule.
Pro tipIf you need more storage, add a second shelf instead of filling the first one.
AvoidAvoid leaving random chargers and cables on the shelf - they make the shelf look messy.
21. Kids' Supply Drawer with Color-Marked Fronts
This is the most beginner-friendly way to keep a kids desk organized because the labels match what they already see. Color-marked drawer fronts reduce the number of decisions kids have to make. The drawer stays tidy because items return to the same compartment every time.
Use small bins inside the drawer so each color group stays separate. Put the label on the drawer front at kid-eye level, not inside the drawer. Keep scissors and tape in the same compartment to reduce "where did it go?" moments.
Pro tipUse a dry-erase marker label on the drawer until you know the final supply list.
AvoidAvoid text-only labels for kids who can't read yet - they'll ignore the drawer.
22. Tri-Fold Desk Organizer from a File Folder
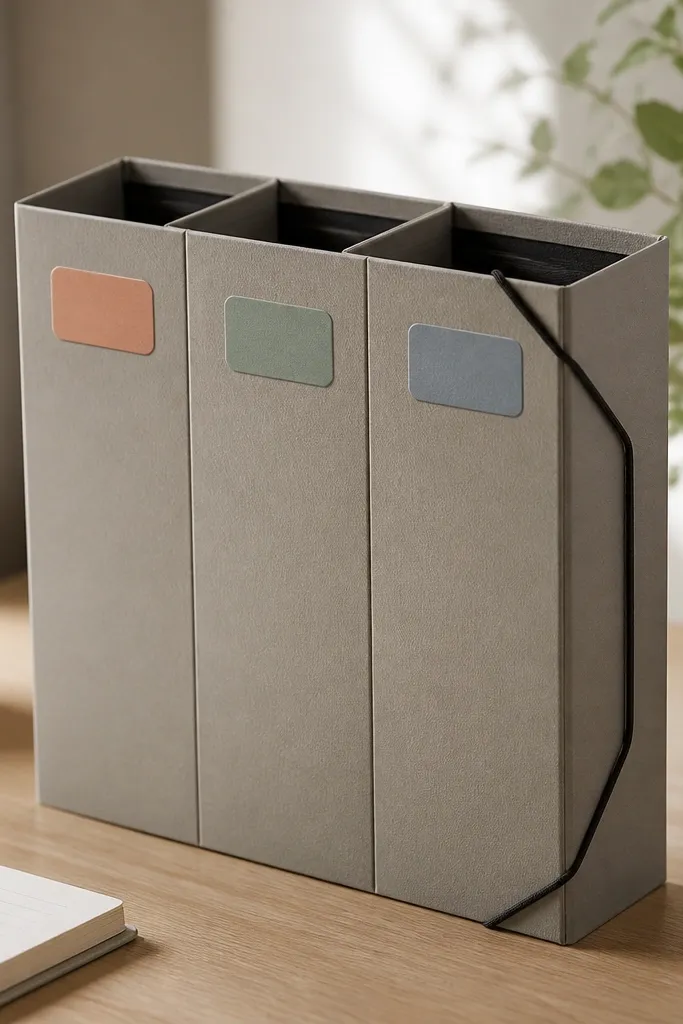
This is the cheapest way to get structure in minutes. The tri-fold creates three stations: active notes, incoming mail, and finished papers. It looks clean because the paper edges are neat and the elastic keeps it from opening into a mess.
Use a sturdy file folder or foam board covered with paper. Add elastic bands across the outside to close it when not in use. Label each panel with a simple sticker so kids know where to put papers during homework.
Pro tipKeep the organizer on the side of your desk, not in the center, so it doesn't take up your main work area.
AvoidAvoid flimsy paper - it collapses after a few days and looks worn.