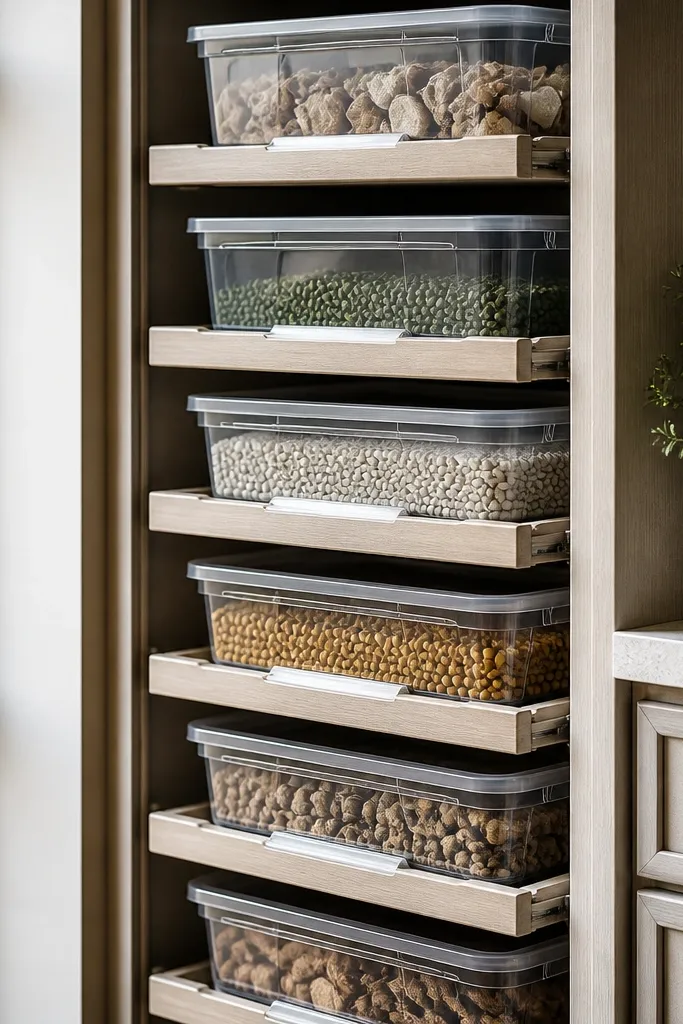
1. Frosted 6-Quart Bin Wall for Paint, Caulk, and Adhesives
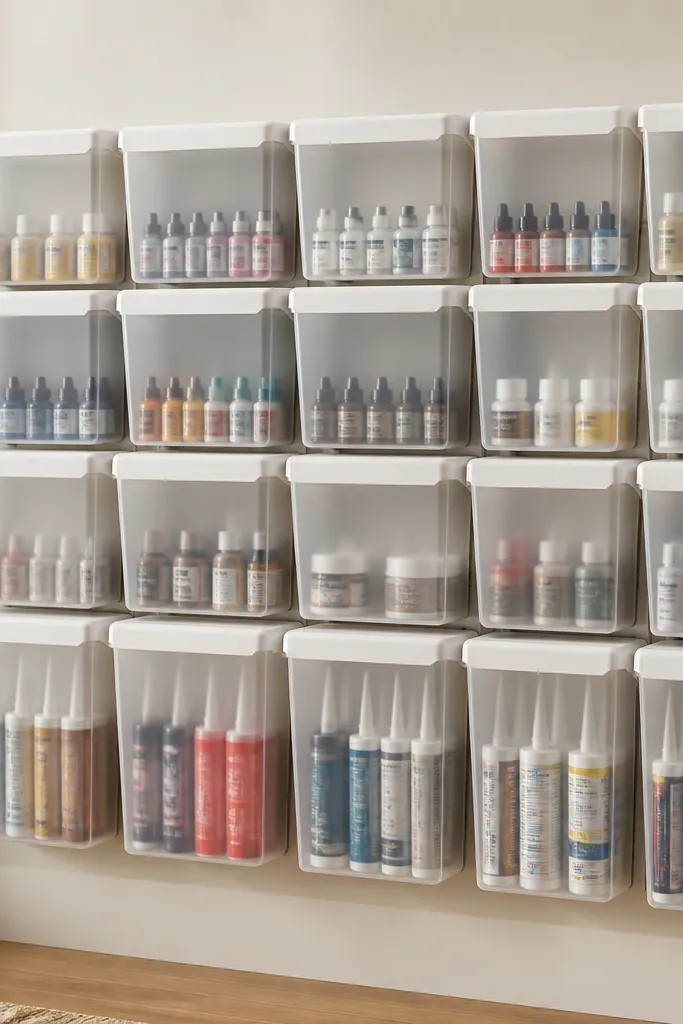
This setup makes messy small chemicals look calm and uniform. I used frosted bins because they hide fingerprints and minor dust, while still letting you see fill levels. The bins sit on a white rail system so every front face lines up - that alignment is what makes a compact garage look organized instead of "stored." The result is a tidy paint corner where you can grab the right tube without pulling a dozen things out.
Mount a rail with level measurements: keep the top bin lip around 72 inches from the floor so you can reach it without a step stool. Use 6-quart size bins for cartridges and caulk tubes; for tiny caps and mixing sticks, add one narrow bin insert. Label with a label maker on a matte white tape strip, placed centered on the bin face.
Pro tipGroup by product type, not by brand - caulk goes together, primer goes together. Put your "open today" items in the two bins closest to eye level.
AvoidDon't use shiny clear bins with no labeling - the glare and dust marks make everything look worse.
2. Pegboard Tool Strip with Color-Coded Hook Zones
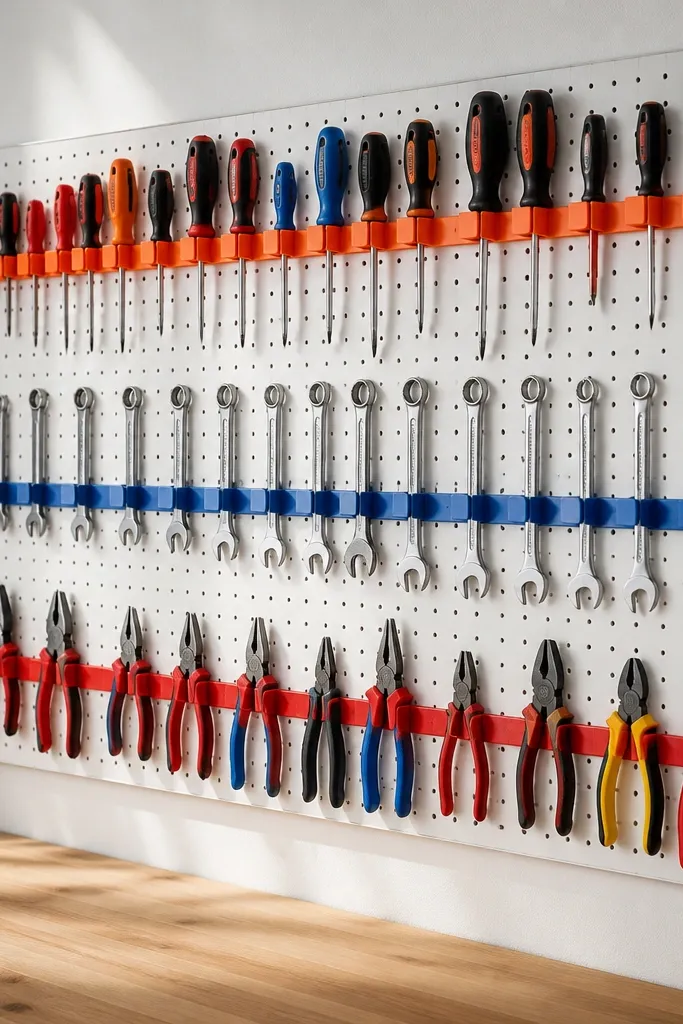
Pegboard is the fastest way I've found to make a compact garage feel "designed." I split it into zones using colored hooks: red for hand tools, blue for car tools, and green for household fixes. That color cue prevents the classic problem where tools end up in random spots after one busy weekend. When everything returns to a specific hook line, the wall always looks neat.
Use 1/4-inch thick pegboard sheets mounted to studs if possible. Space hooks so the widest tool clears the one next to it by about 1/2 inch. Keep the longest items (like a 14-inch wrench) on the same band so the visual height stays consistent.
Pro tipWrite the tool names directly on small white label stickers and stick them on the pegboard under the hook. It helps kids and guests put things back correctly.
AvoidAvoid overcrowding the pegboard - if tools touch each other, you'll stop putting them back.
3. Door Rail Hanging for Rakes, Extension Cords, and Tow Straps
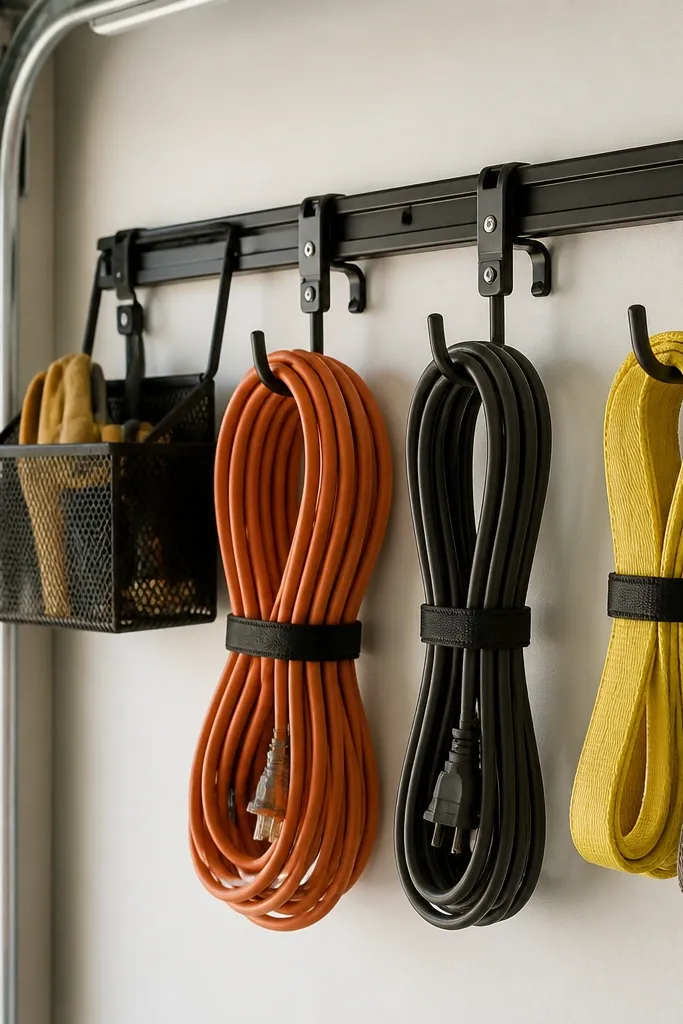
The garage door is wasted space unless you use it on purpose. I hang long, flexible items here because they don't need floor clearance and they don't get stepped on. A rail with multiple hook heights makes it easy to keep coiled cords from tangling and straps from turning into a knot pile. It also looks clean because the items hang in a single direction.
Install a horizontal rail system at about 48 inches from the floor for cords and straps, then add a second lower row around 30 inches for folded gloves and small accessories. Use S-hooks for straps and cord hooks with a rounded edge for cords. Fold straps in thirds so the clip point sits near the rail.
Pro tipWrap extension cords with a simple cord wrap card and Velcro tie, then clip the loop to the same hook every time.
AvoidSkip thin wire hangers that bend - they look messy fast when straps start sliding.
4. Stackable Drawer Unit for Hardware with Front-Face Labels

A drawer stack is the cleanest way I've found to store small fasteners in a compact garage. Clear fronts let you see contents, but the key is labeling the face so you don't open multiple drawers to find one bolt. I use a mix of drawers: one for drywall screws, one for wood screws, one for washers, and one for zip ties. It creates a "parts counter" feel even in a tight space.
Choose drawers that are shallow enough to keep small bins from tumbling. I like 3-inch tall drawer bins for screws and 2-inch tall bins for washers. Label with size and head type, like "#8 x 1-1/4 pan head" - not vague names.
Pro tipSort by job, not by container. Put the exact items for common tasks (mounting shelves, bike repair, hanging tools) into one drawer set.
AvoidDon't mix sizes in one drawer - it looks organized until you need the right one.
5. Corner Ladder Shelf for Bulk Bags and Seasonal Items

A corner ladder shelf uses the shape of your garage instead of fighting it. I put bulk items here that are too big for drawers but too messy for neat wall bins. Because it's open-frame, you can see what's on each shelf and the corner doesn't feel like a wall of storage. It also keeps heavy bags off the floor without building a full cabinet.
Use a shelf with 3 to 4 shelves and set the bottom shelf high enough to avoid sweeping dust under it. Keep sealed bins on upper shelves and a single heavy bag on the lowest one. If the corner is narrow, use a shelf that is 16 to 20 inches wide.
Pro tipAdd a simple label strip to the front edge of each shelf - I use black tape with white marker for quick updates.
AvoidAvoid placing loose items on the shelves - bags leak and spill marks ruin the look.
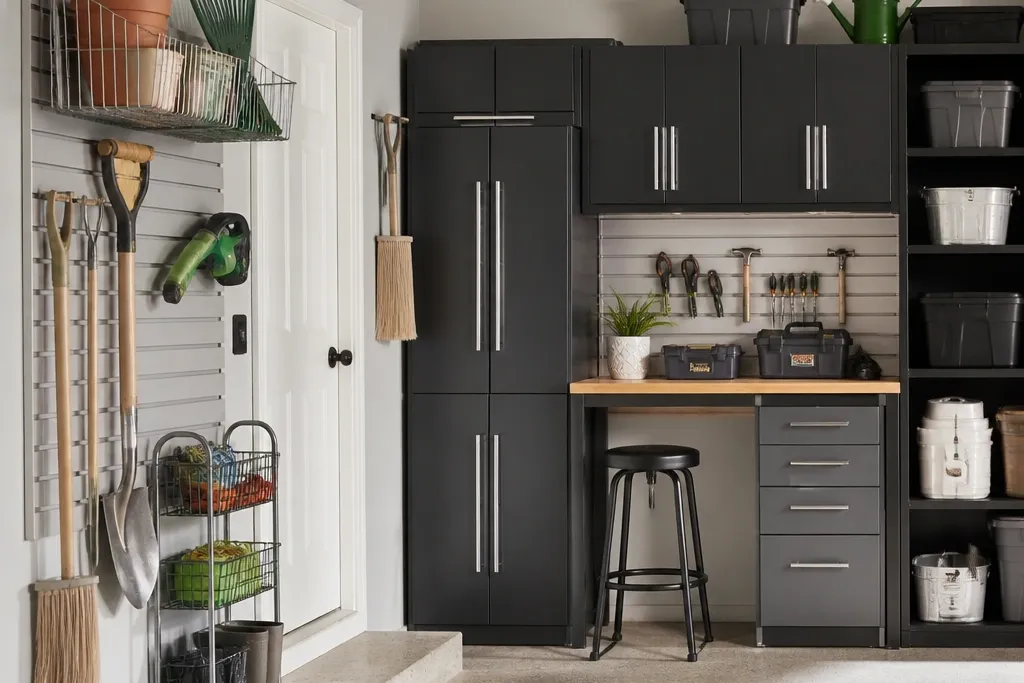
6. Shallow Wall Cabinets for Car Wash Supplies
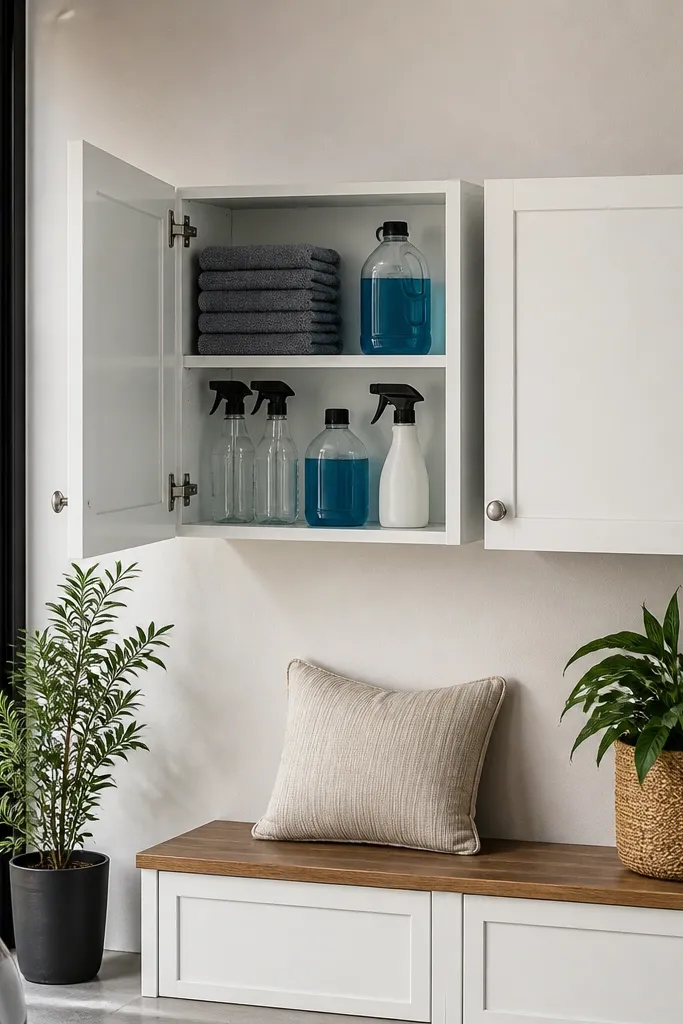
Shallow wall cabinets make car supplies look like they belong in a bathroom, not on a concrete floor. I keep the mess behind doors: soap, tire cleaner, spray bottles, and microfiber towels. In a compact garage, hiding the clutter reduces the visual noise that makes everything feel smaller. The white finish reflects light, which makes the corner look brighter.
Mount cabinets above a bench or work surface so you still have a place to set a bottle while you work. Use cabinet doors with soft-close hinges if you can - they stop slamming when kids bump them. Inside, attach a small rail for spray bottles and a hook strip for gloves.
Pro tipHang microfiber towels on small hooks inside the door so they dry and don't stink in closed bins.
AvoidDon't store wet towels in sealed containers - the smell builds fast.
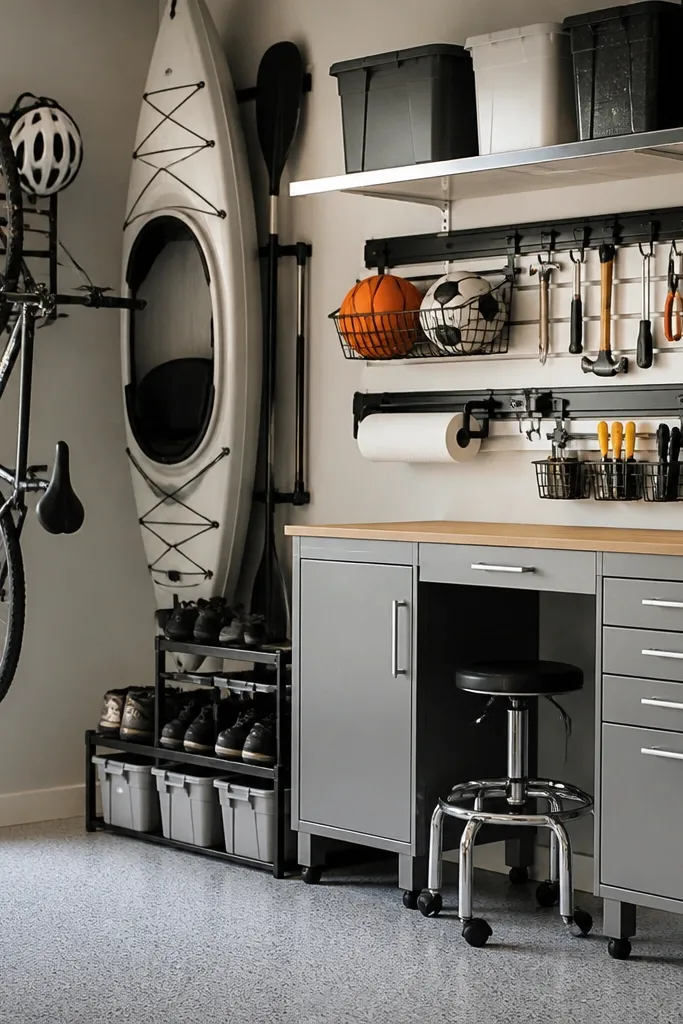
7. Vertical Bike Stand + Tire Tool Basket
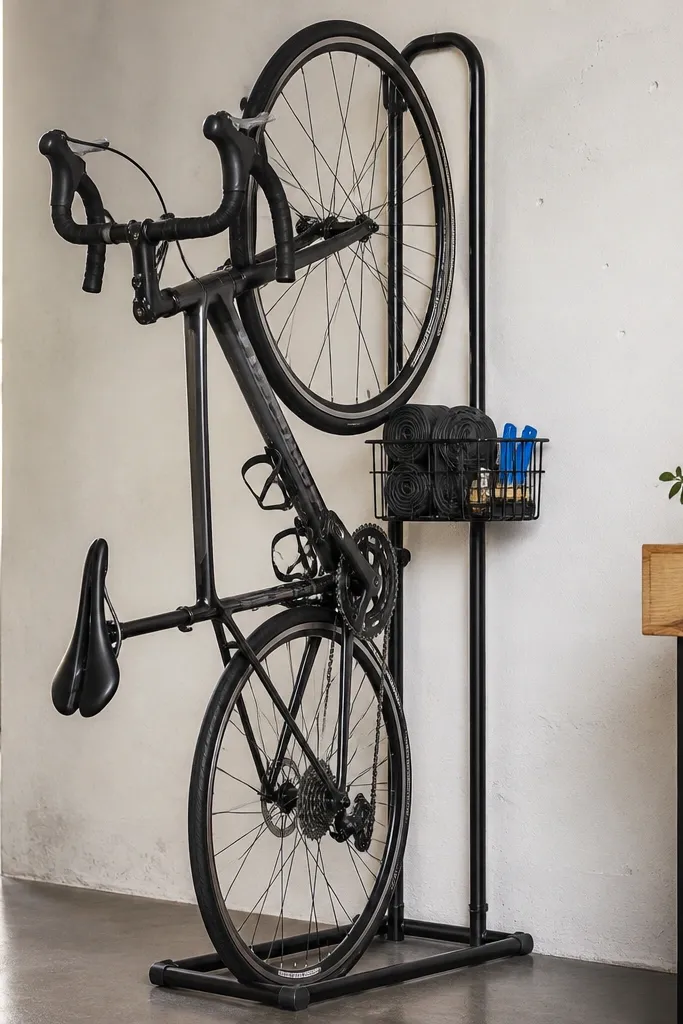
Keeping a bike upright is the simplest way to stop it from taking over your floor. I pair it with a small wire basket so the pump adapter and tire levers stay with the bike. That way, you don't drag tools across the garage every ride. The vertical line also makes the space look intentional, especially when you keep the floor clear around the stand.
Use a wall-mounted or floor-to-wall stand that holds the bike frame, not the wheels. Keep the basket at about knee height so you can grab tools without leaning. Store spare tubes in a small zip bag inside the basket to prevent smearing.
Pro tipAttach a small checklist card to the inside of the basket lid: "tubes, levers, patch kit."
AvoidSkip storing greasy tools in open bins - they stain and look dirty instantly.
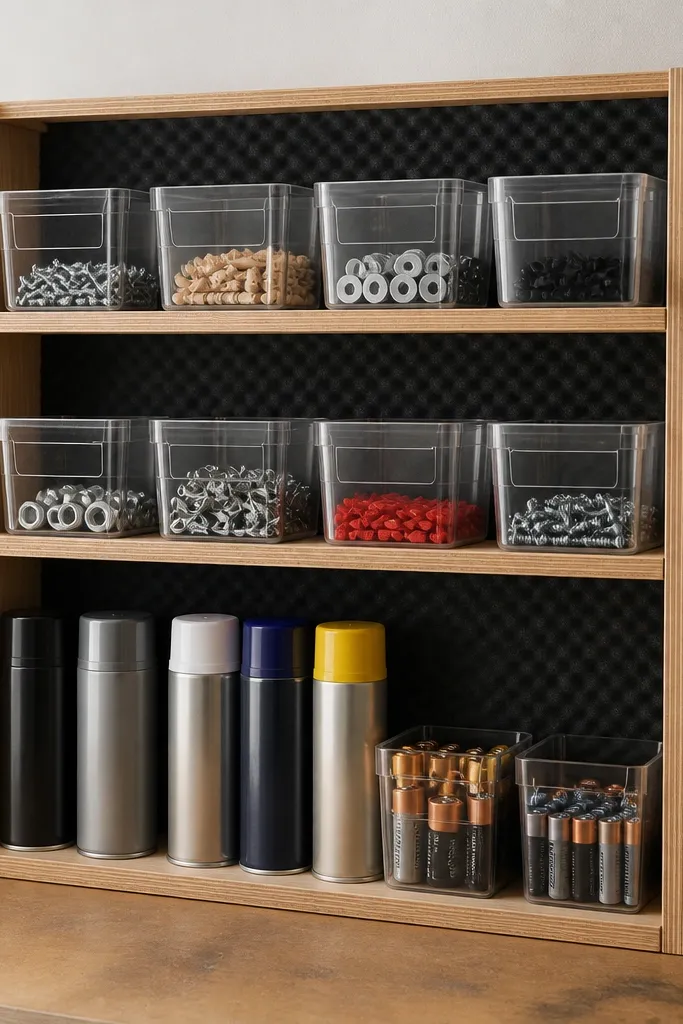
8. Magnetic Strip for Pocket Tools and Drill Bits
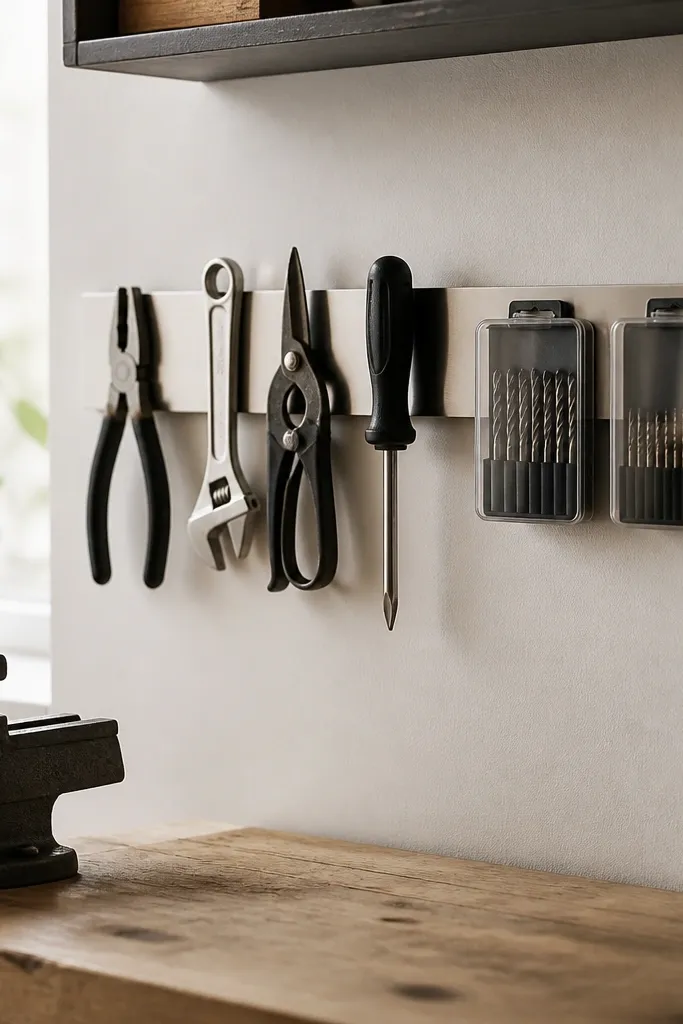
Magnetic strips make small metal items look organized because they line up in a clean row. I use one strip for pocket tools like box cutters and small wrenches, and I add a second strip for drill bit cases. The key is keeping the items small enough that they don't fall - you want a firm grip and a neat layout. It also saves drawer space in tight garages.
Mount the strip into studs with screws, not just drywall anchors. Use shallow bit cases or a magnetic bit holder with a cover so chips don't spread. Keep the strip length under 24 inches if you're working with limited wall space so it stays visually tight.
Pro tipLabel bit cases by size and length, like "1/4 x 6-inch."
AvoidDon't mount magnets on a painted wall that chips - the strip will wobble and look uneven.
9. Under-Bench Pull-Out for Paint Rollers and Gloves
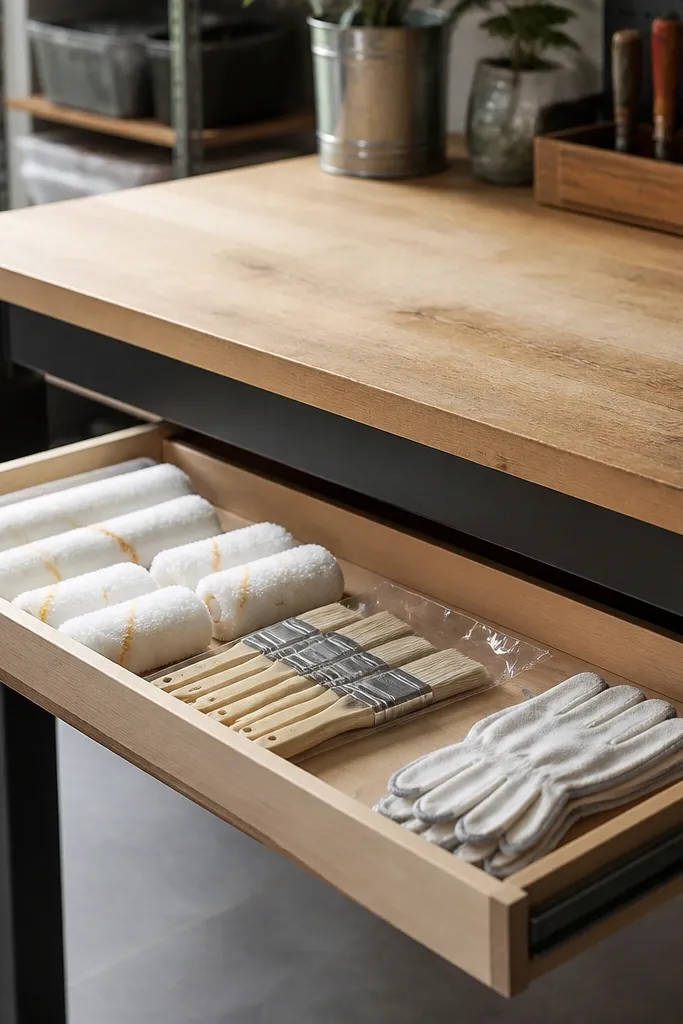
Under-bench storage is a compact win because it uses the dead space you walk past. I installed a pull-out tray with low sides so roller sleeves don't flop out. Keeping gloves and roller sleeves here means you don't dump them on the bench every time you paint a shelf or touch up a wall. The tray keeps the garage looking "finished" even during projects.
Use a pull-out drawer slide rated for at least 50 pounds. Make the tray about the same width as the bench leg spacing, usually 18 to 22 inches. Line the tray with a thin rubber mat so paint drips wipe clean.
Pro tipAdd a small divider for gloves so they don't get sticky with paint residue.
AvoidAvoid using an open shelf under the bench - dust and spills collect and it looks gross fast.
10. Corner Peg Rail for Cleaning Supplies in Matching Bottles
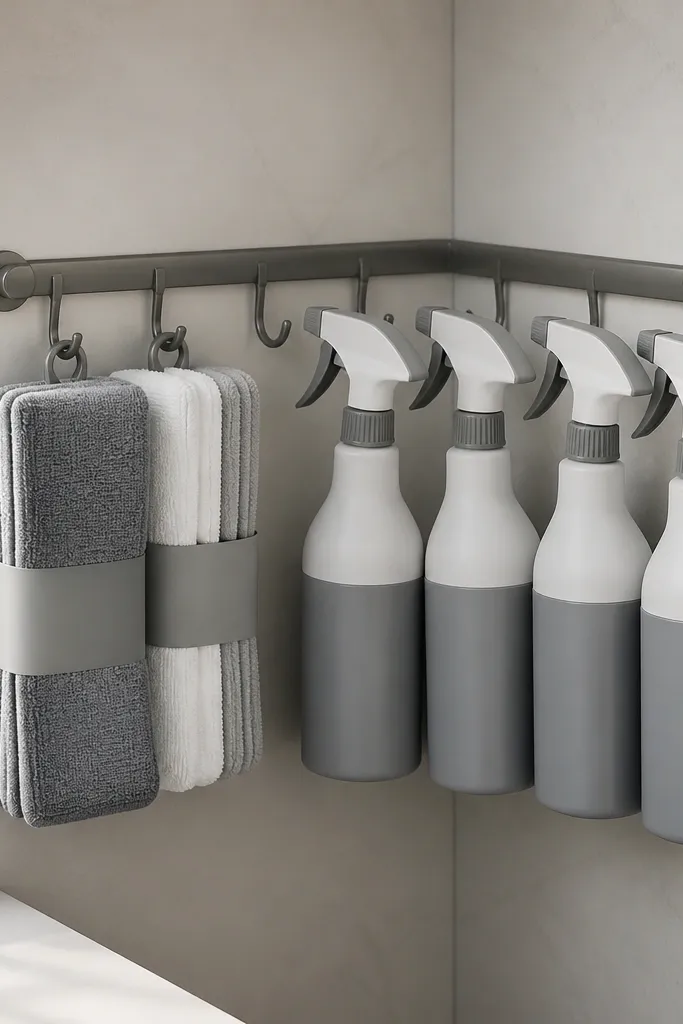
If your cleaning supplies look scattered, the whole garage looks chaotic. I use a peg rail in the corner and keep only matching bottles on it: one for degreaser, one for glass cleaner, one for all-purpose. The matching colors make the wall look cohesive even when you have multiple brands in the garage. This also makes it faster to clean up after a project.
Use refillable bottles with flat sides so they hang evenly on hooks. Add one shelf above the hooks for extra microfiber packs. Keep the rail height so the nozzles sit around chest level - you want quick grab access.
Pro tipPut a small tag on each bottle with the exact use, like "brake dust" or "bike chain."
AvoidSkip random bottles of different shapes - the uneven hanging makes it look thrown together.
11. Overhead Storage Rack with Color-Matched Bins
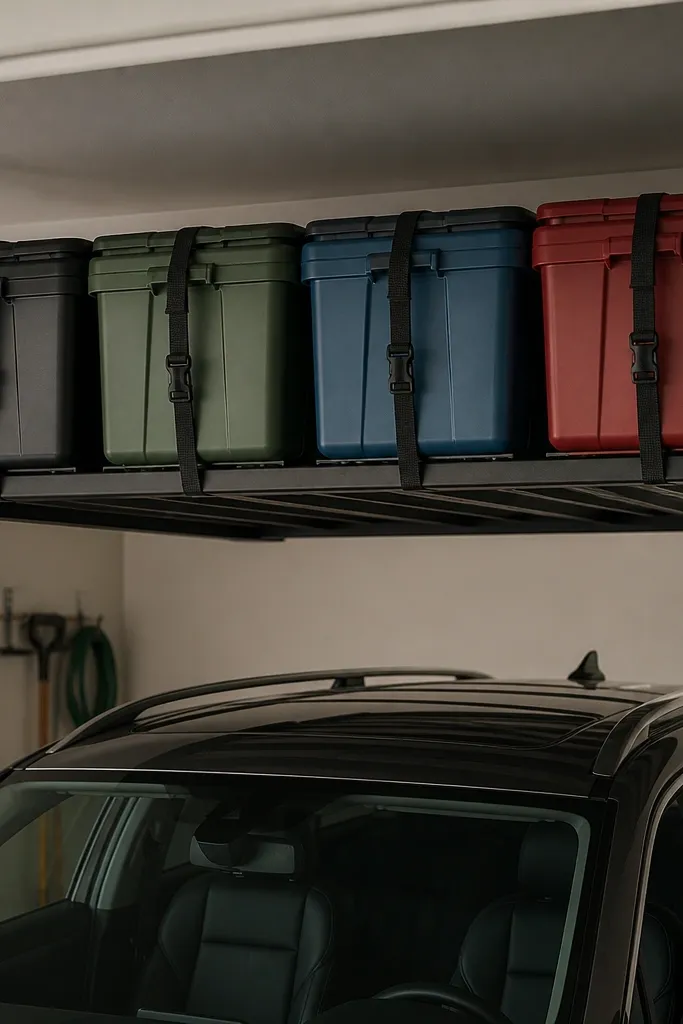
Overhead racks are how you clear the center of the garage without building a full cabinet. I use overhead storage for seasonal bins: holiday decorations, spare extension cords, and winter car supplies. The color-matched bins keep the overhead area from looking like a junk ceiling. When the bins are strapped down and aligned, it looks neat even from the doorway.
Install the rack into joists or solid framing - don't rely on thin drywall. Use bins with handles and add ratchet straps to prevent shifting. For compact spaces, keep the bins shallow so they don't block the garage door track.
Pro tipUse one color for "seasonal" and another for "holiday" so you can pull the right set in seconds.
AvoidAvoid stacking loose totes above your head - one fall makes the garage feel unsafe.
12. Magnetic Labeling System for Bin Faces
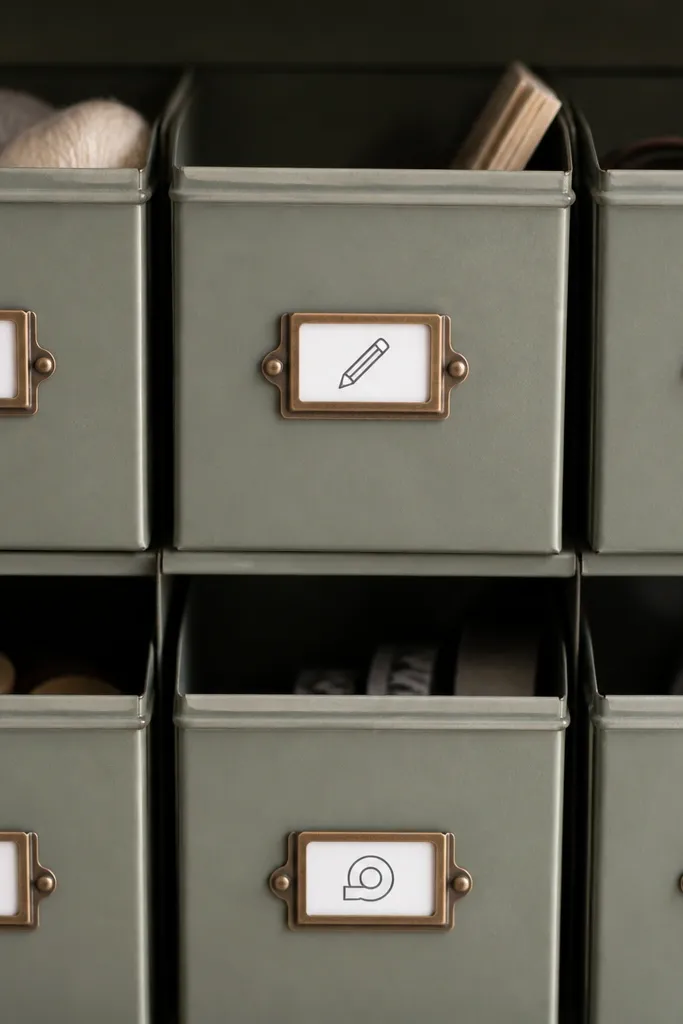
Labeling is where compact organization either looks sharp or turns into a jumble. I use magnetic label holders for bins so I can update the label when I switch seasons or reorganize. The label sits on the front face at eye level, so you don't have to open lids to confirm contents. It also keeps handwriting tidy and consistent.
Buy small magnetic label holders that fit on the front of your bin material. Print categories with icons: "bolts," "washers," "paint," "car." Keep labels at the same height on every bin so the wall looks uniform.
Pro tipUse a two-line label: category on top, size or type on bottom.
AvoidSkip sticker-only labels that peel - the edges lift and it looks messy.
13. Fabric Tool Roll Hanging for Small Repairs
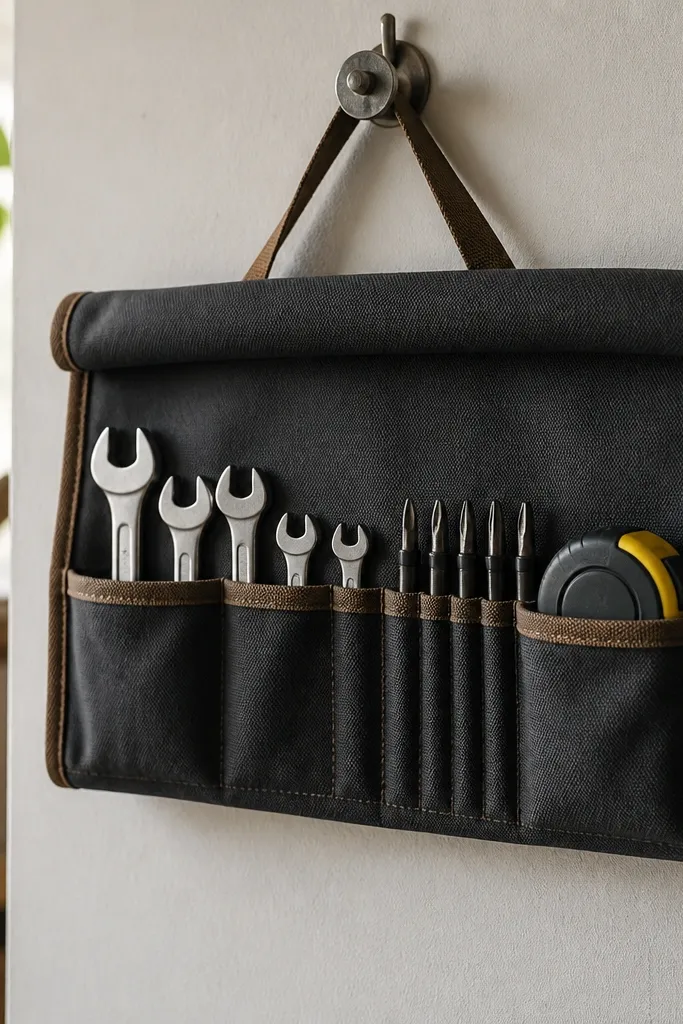
A tool roll is compact storage that also travels to where you're working. I keep it by the workbench so I don't scatter bits across the table. The pockets keep screwdrivers and small tools from clanking together. When the roll hangs neatly, it looks like a single item, not a pile of parts.
Choose a fabric roll with clear pocket sections or sturdy pocket dividers. Roll it tight and secure with a strap so the pockets don't loosen. Hang it on a single hook near your main workspace, around 50 inches high.
Pro tipPut the most-used screwdriver bits in the top pocket so you grab them without unrolling the whole thing.
AvoidAvoid thin rolls that sag - they look messy once tools start bulking the fabric.
14. PVC Pipe Organizer for Broom Handles and Dowel Rods
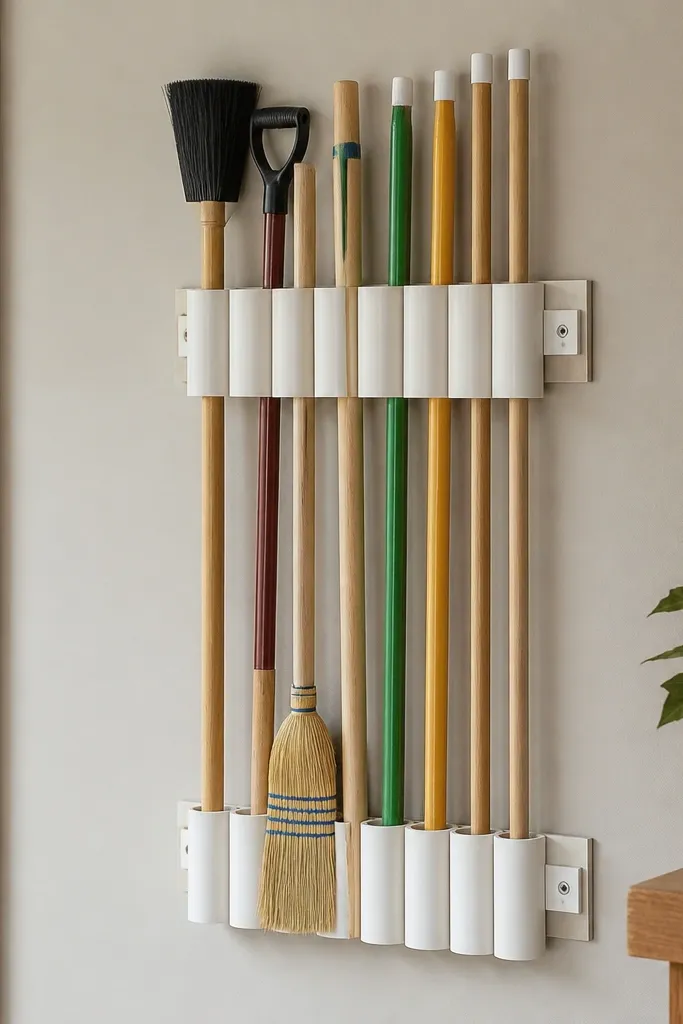
PVC pipe organizers look clean and they're cheap, which matters when you're doing compact garage organization. I cut short lengths of PVC and mount them so long handles stand upright without leaning and falling. The smooth interior prevents scratches on handles and the open tops let you drop items in quickly. It also makes the long-tool area look uniform.
Cut PVC to handle lengths plus 1 to 2 inches for clearance. Mount the pipes to a plywood backing sheet for stability, then attach to studs. Cap the bottom with a rubber end cap to reduce noise and protect the wall.
Pro tipPaint the PVC a matte off-white so it blends with most garage walls.
AvoidAvoid mounting pipes directly to drywall - it pulls loose and the rack tilts.
15. Bin-on-Frame Shelf for Sports Balls and Cleaning Pads
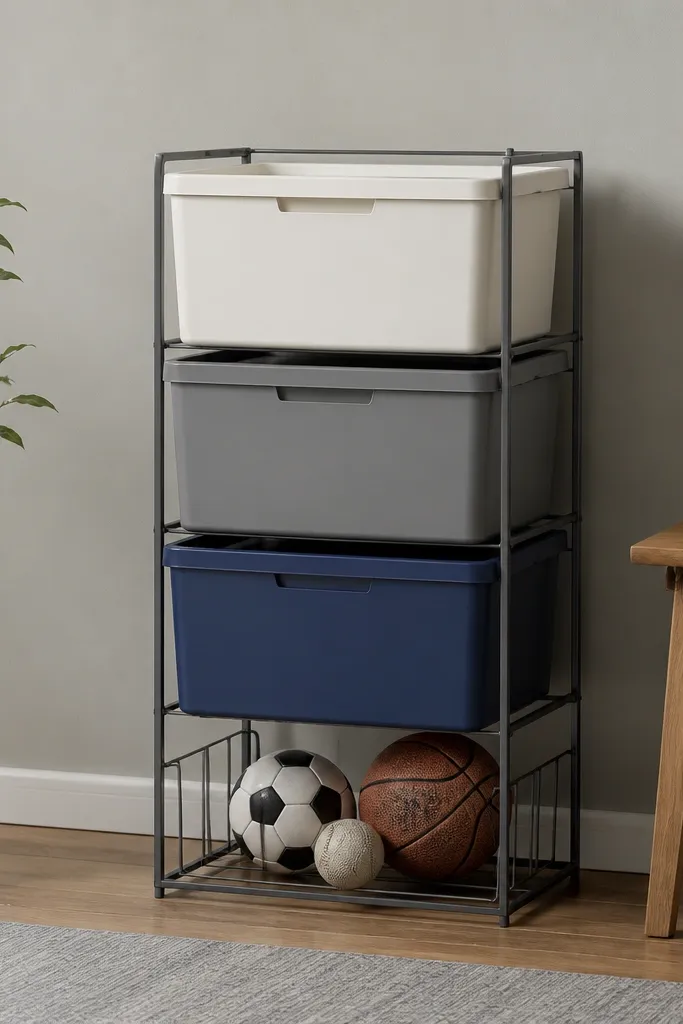
This is a good option when you need a shelf but you don't want the look of a full cabinet. I built mine with a metal shelf frame and used shallow bins for pads, sponges, and small garage accessories. The bins hide the mess, while the open frame keeps it light and easy to rearrange. It also works for kids' sports items that always end up in the garage.
Use shallow bins around 10 to 12 inches deep so they don't stick out into walkways. Keep the top shelf for lightweight bins and the bottom shelf for heavier items like balls or extra buckets. Add a simple label on the bin front and a second label on the shelf face for quick scanning.
Pro tipUse one bin just for "cleaning pads" and refill it from a larger pack - it stops pads from spreading everywhere.
AvoidSkip tall bins stacked too high - you'll stop using them and they turn into dust collectors.
16. Workbench Pegboard Backer for Cord Management
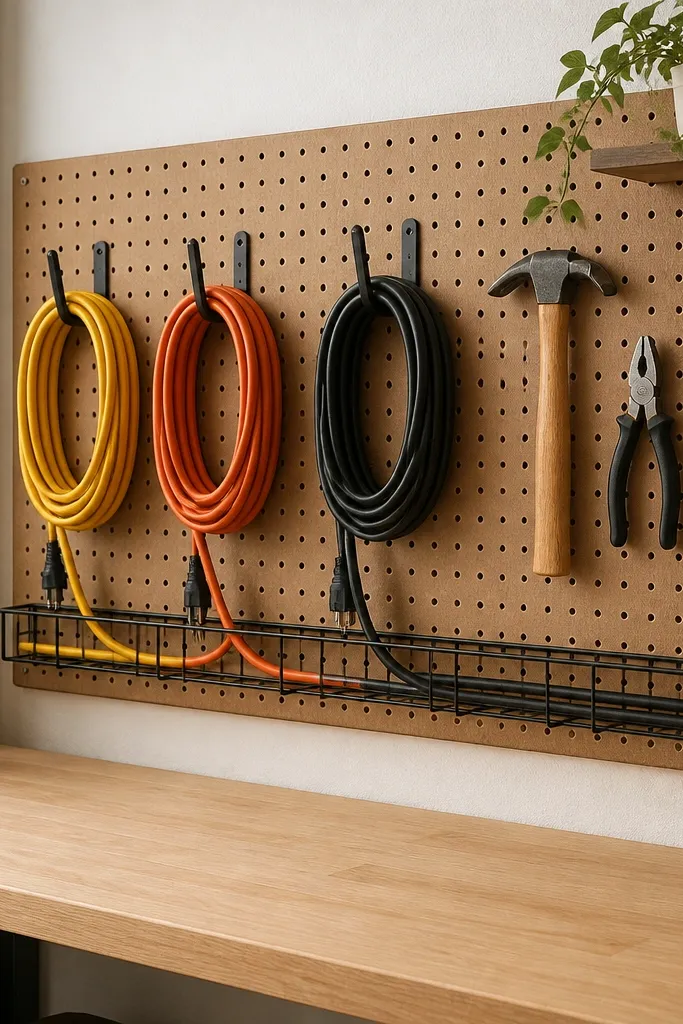
Loose cords turn a compact garage into a trip hazard fast. I mount a pegboard backer behind the bench and add cord hooks plus a small cable tray. When the cord drops into the tray and loops around hooks, it stays controlled and doesn't tangle with tools. The look is clean because all cord lines follow the same path.
Add two rows of hooks: one at about 36 inches for mid-length cords and one at 60 inches for the bulk of the cord loop. Use a tray with raised edges so the cord doesn't slide off. Keep the power strip mounted on the pegboard so plugs don't hang loose.
Pro tipUse Velcro ties and label each cord by length, like "25 ft" or "50 ft."
AvoidAvoid tying cords around tool handles - it bends tools and looks sloppy.
17. Clear Lid Tote Stack with Sliding Bin Trays
Sliding trays are how you make a tote stack usable in a tight garage. I use clear-lid totes for items that need visibility: drill bit cases, spare attachments, and small seasonal hardware. The sliding trays let you pull the front tote out without unloading the whole stack. It keeps the system compact and still practical.
Use tote sizes that stack evenly and fit the tray footprint. Keep the bottom tote for heavier items and the top for lighter items. Label the tote front lip so you can read it when the lid is closed.
Pro tipPut a "most-used" tote on the top front position so you don't fight the stack every time.
AvoidAvoid mixing tote sizes - gaps create uneven pull and the whole thing looks DIY in a bad way.
18. Laundry-Style Sort Baskets for Gloves, Towels, and Shop Rags
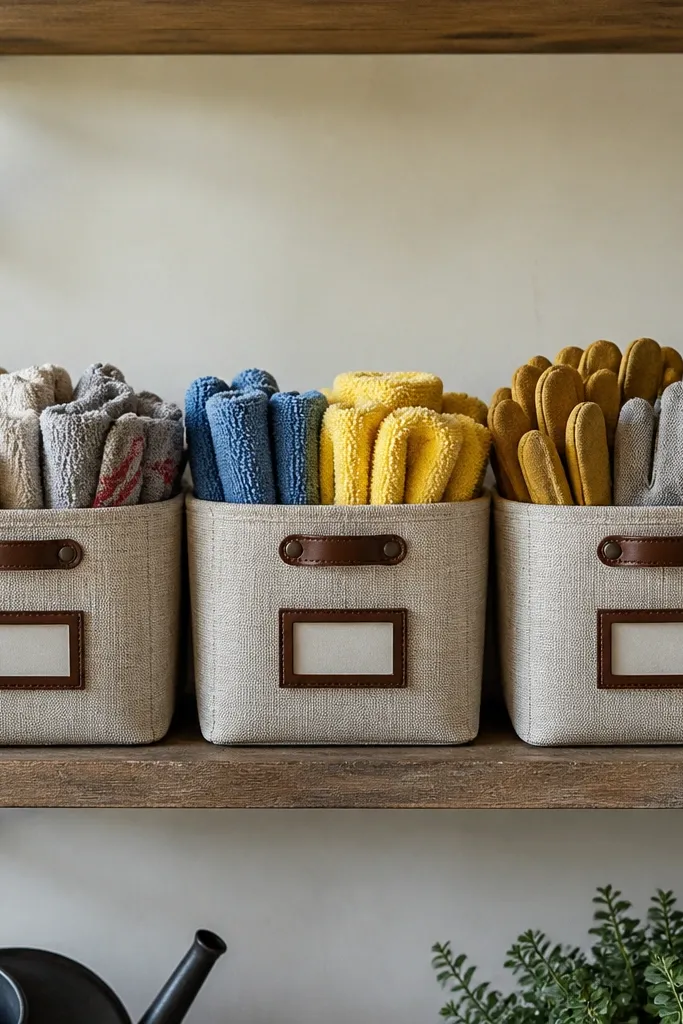
This is the only cleaning-related system I've used that stays tidy because it's simple. I keep three labeled baskets instead of one jumble: gloves, microfiber towels, and shop rags. The baskets look neat and they're easy for kids to return to the correct bin. In a compact garage, that means fewer "where did the rag go?" moments.
Use wire or fabric baskets with stiff sides so they keep their shape. Mount them on a shelf at about 44 to 52 inches so you can grab quickly. Line the bottom with a washable liner so drips don't soak into the shelf.
Pro tipMake one basket the "dirty drop" basket and wash weekly. It stops rags from turning into a smell problem.
AvoidSkip open bins on the floor - they collect dust and look stained within a month.
19. Small Shelf Unit for Spares with Door-Stop Foam Panels
Open shelves can look clean if you stop items from sliding. I line the back and sides with door-stop foam so spray cans and small containers settle into place. That prevents the "everything leaned forward" mess that happens in compact garages. The foam also reduces clatter when you bump the shelf.
Use a small 2- or 3-shelf unit and keep the shelf depth under 12 inches so it doesn't protrude. Add foam strips on the back edge and side edges to create a gentle stop. Use uniform containers with matching lid styles for a consistent look.
Pro tipKeep batteries and small electronics in one bin with a clear label so you don't rummage around for months.
AvoidAvoid mixed container heights on open shelves - the uneven stack reads as clutter.
20. Tool Drawer Insert for Screws, Nails, and Bits with Color Tabs
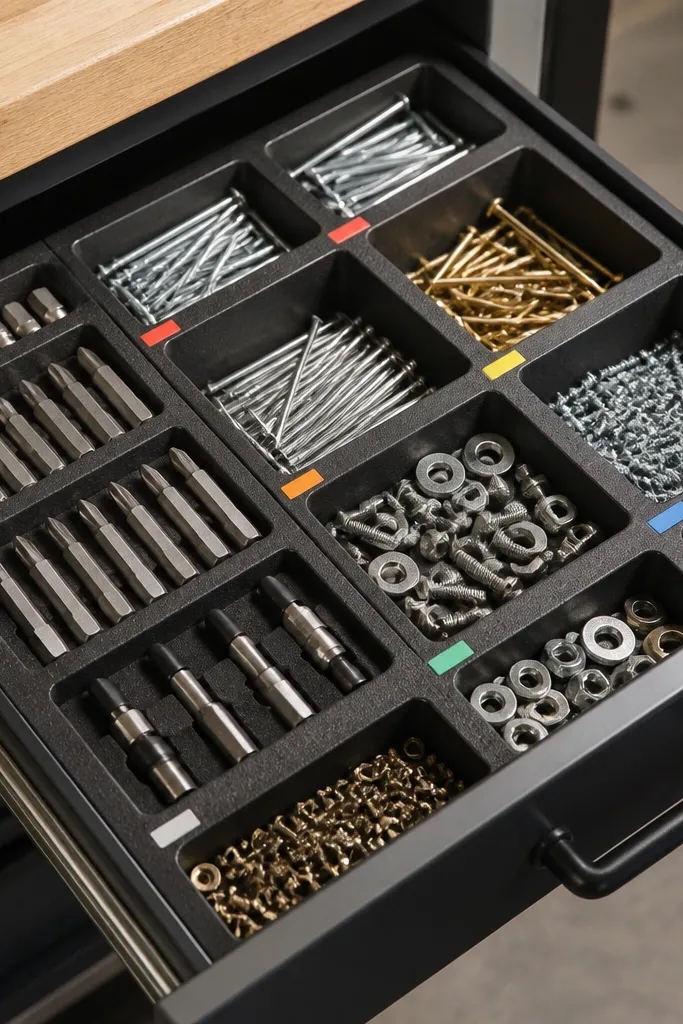
If you want compact organization to look like a real workshop, drawer inserts do it. I use foam or rigid plastic dividers so every piece has its own slot. The color tabs make it easy to see what drawer section you need during a project. It's fast to put away because nothing rolls or mixes.
Measure your drawer interior and build inserts that leave 1/4 inch clearance for smooth opening. Use small bins inside slots for nails and screws so you can remove just one compartment. Stick color tabs on the slot edge, not on the bin face, so the drawer stays readable.
Pro tipKeep one "emergency" slot for mixed tiny screws so you don't contaminate the main sorted bins.
AvoidDon't skip the dividers - a drawer full of loose screws looks chaotic even when it's "organized."


