1. Cable-Clipped Desk Edge for Chargers
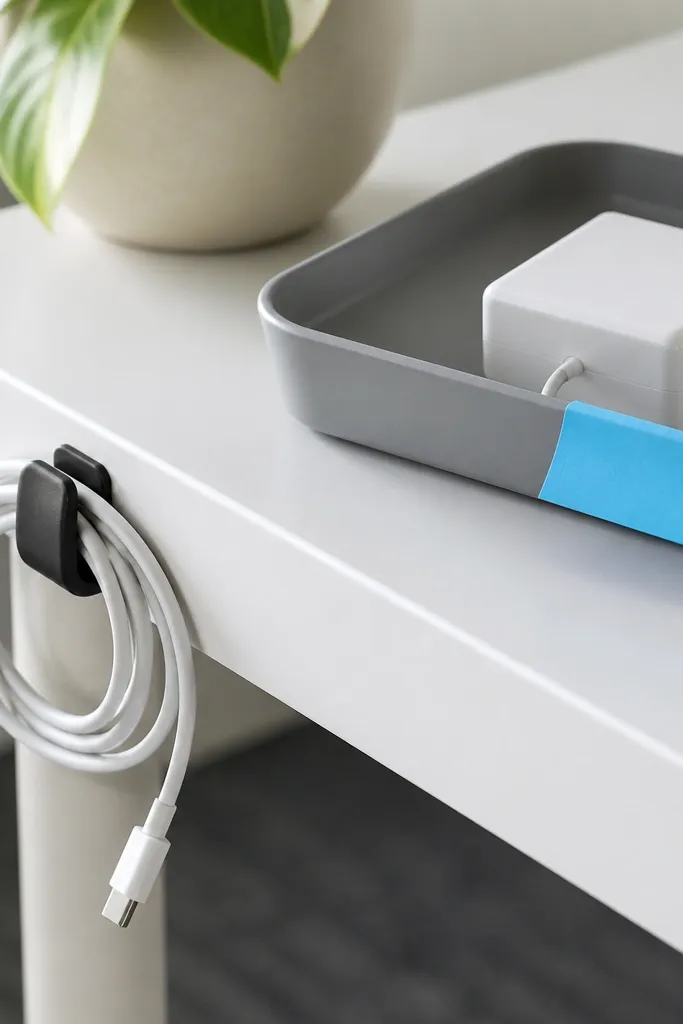
Loose charger cords turn a desk into a tangle fast, especially with kids using tablets or headphones. A desk-edge cable clip keeps the cord from drooping into the middle, and the tray gives the brick a landing spot so it doesn't migrate. I like matte black clips against light desks because they look intentional, not like temporary tape.
Use 2-3 adhesive cable clips spaced about 4-5 inches apart along the desk edge. Place the power brick in a shallow tray that's no deeper than 1.5 inches, so it doesn't hog space. Color-match the tray with an existing desk item (gray, black, or the same wood tone) so it blends.
Pro tipCoil the cable with a loop that fits the tray - if it's longer than the tray footprint, it will spill every time kids yank it.
AvoidAvoid clear tape to hold cords - it yellows and makes the setup look like a repair job.
2. Stackable Letter Tray Tower for Homework Papers
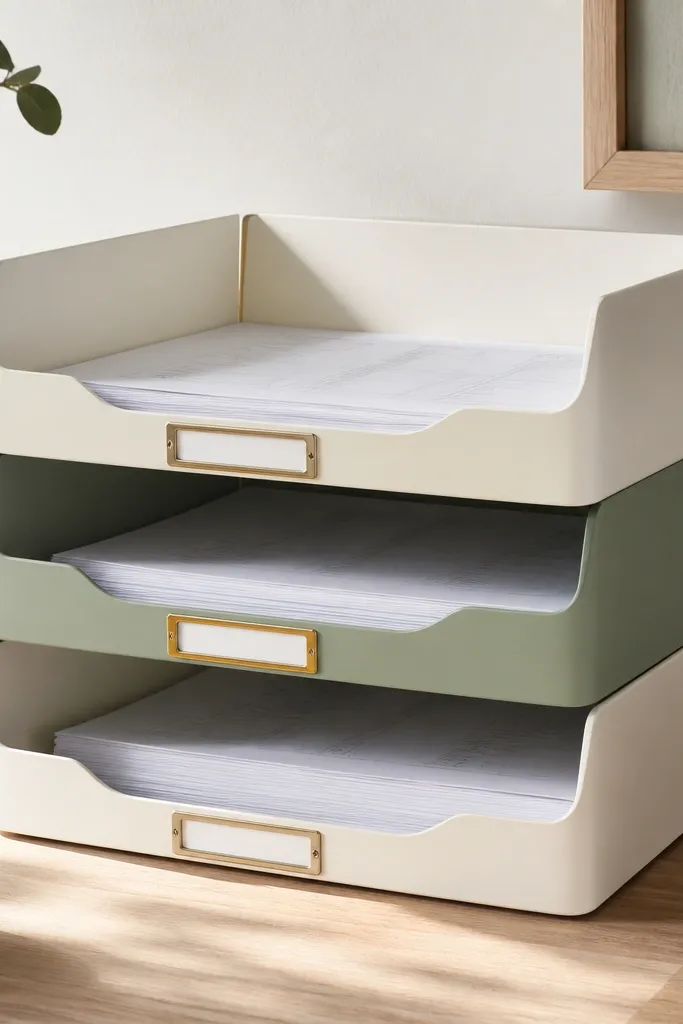
Paper clutter looks chaotic because it spreads. Stackable letter trays stop the spread and create a simple flow for daily school tasks. The labels make it clear where papers go - no "where do I put this?" conversations. The alternating colors keep it cute and not institutional.
Choose trays that are 10-12 inches wide and stack with stable feet. Put "Today" at the top left, "Sign" in the middle, and "Filed" at the bottom right. Use thick label tape in one font style; I prefer matte white tape with black marker for a crisp look.
Pro tipKeep one extra tray empty - when the week gets messy, you can move overflow there instead of mixing everything.
AvoidDon't use tiny labels that kids can't read from across the room.
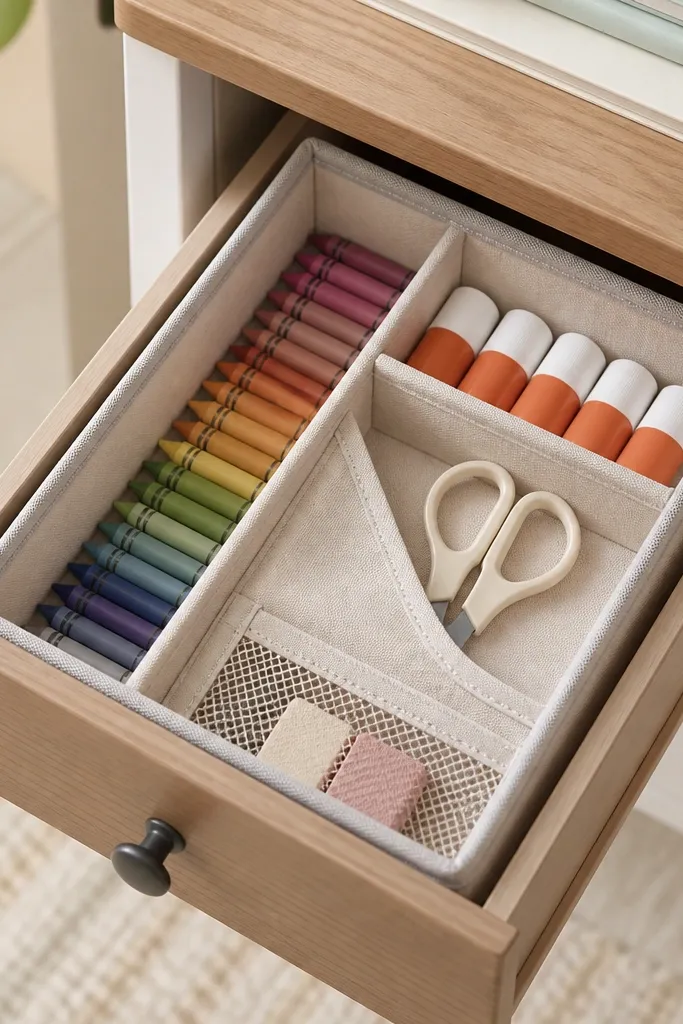
3. Corner Command Station with a Small Lidded Bin
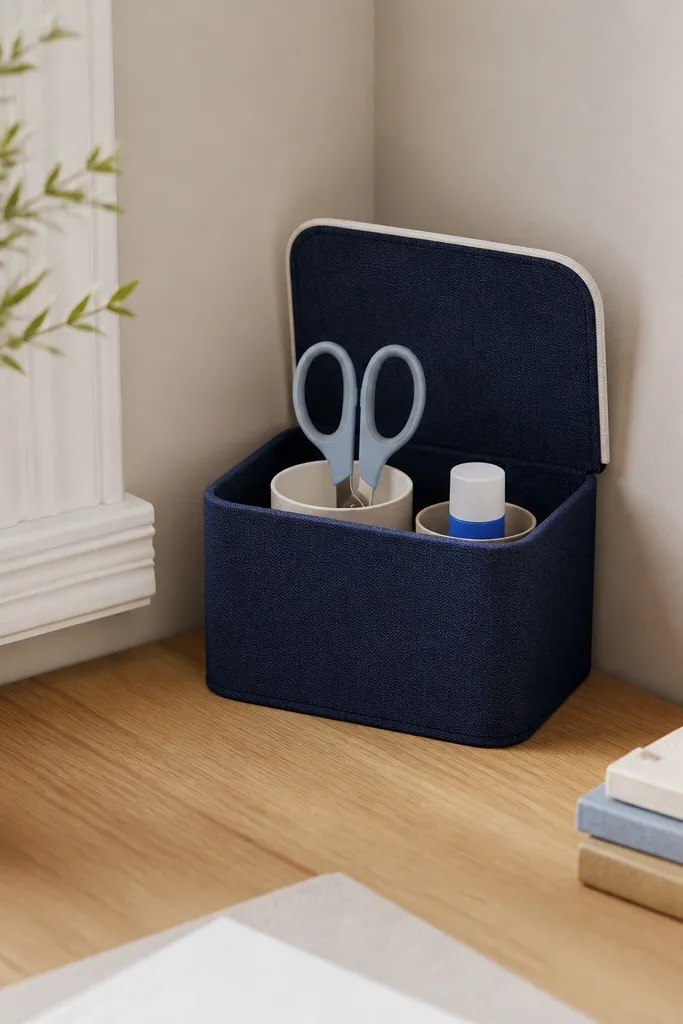
Corners are where clutter gathers, but they also hide storage. A small lidded bin in the corner makes supplies feel contained while still letting kids grab what they need fast. I like a lid because it visually blocks stray paper bits and crayon shavings. The navy fabric reads soft, which matters for kids' desks.
Pick a bin about 10x10 inches and under 8 inches tall so it doesn't block sightlines. Inside, use two slim pencil cups (about 3 inches wide) for scissors and glue, plus one shallow spot for tape. Keep the bin lid aligned with the desk edge so it looks like it belongs there.
Pro tipAssign the bin to "craft only" or "school tools only." When one category is locked, you don't constantly re-sort.
AvoidAvoid oversized bins that swallow everything - kids won't dig and it becomes a black hole.
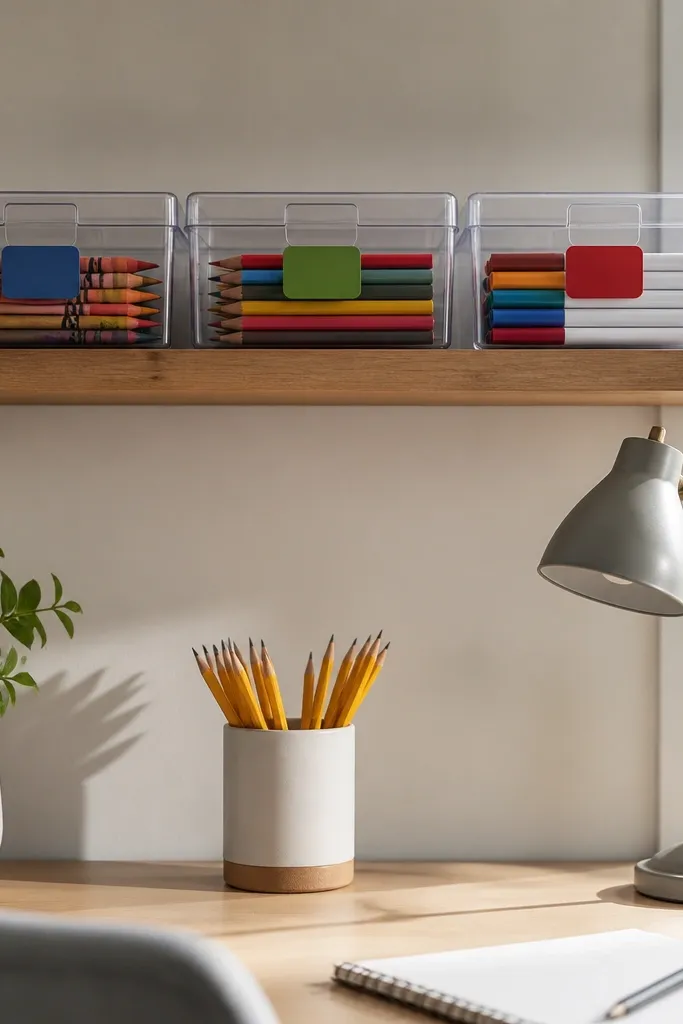
4. Clear Pencil Cups with a Color-Block Label Strip
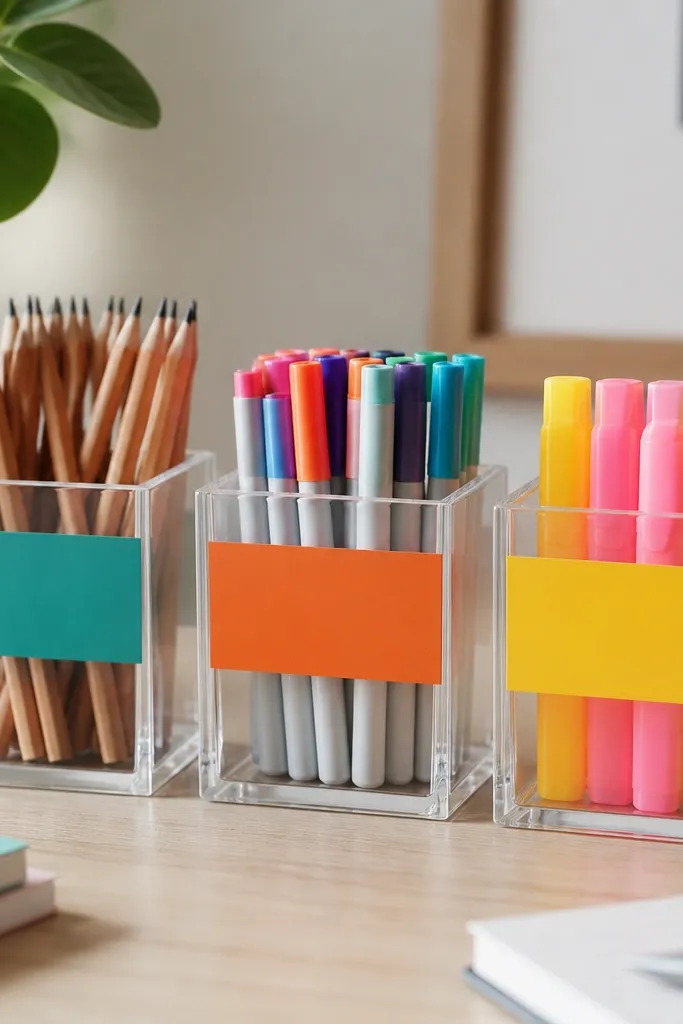
Clear cups let you see what's actually in use, and color-block labels make returns fast. Kids grab what they need without rummaging through mixed cups. The color strips also make the desk look designed, not random. It's one of my go-to quick in 5 minutes desk organization moves because it takes almost no setup.
Use three cups with matching height (around 4-5 inches). Place them in a straight line along the left edge of the desk, leaving at least 1 inch between cups. Labels should be the same width and placed at eye level on each cup - I use a 1-inch-wide strip across the front.
Pro tipWrite the label in chunky letters with a black marker on the colored tape so it stays readable on plastic.
AvoidAvoid handwritten labels directly on clear plastic - they smear and look messy.
5. Under-Monitor Riser with a Shallow "Inbox" Tray
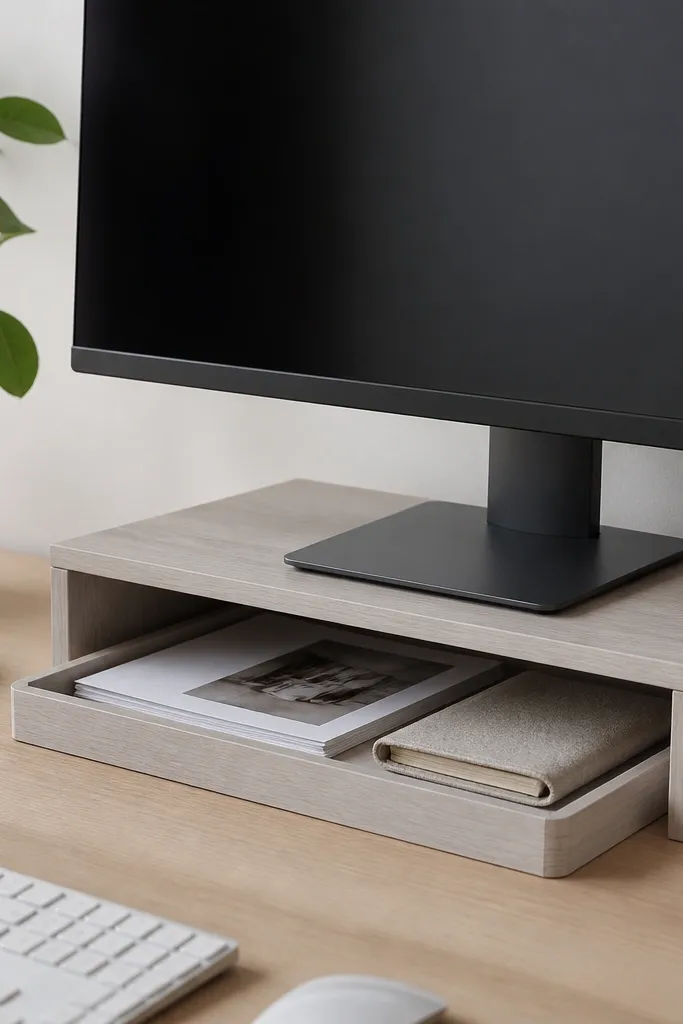
Most desks waste the vertical space under a monitor. A riser gives you a clean shadowed area for an inbox tray, so papers don't sit on the main workspace. I like shallow trays because they limit how much can pile up. When the tray is full, you deal with it instead of letting the pile grow.
Use a riser height of about 3-4 inches so the tray fits without blocking the monitor stand. Choose a tray with a low lip so papers slide in and out easily. Keep the inbox for "print to-do," not finished work, so the desk looks orderly.
Pro tipMark the tray front with a simple symbol - a checkmark for "done" and a blank for "to-do."
AvoidAvoid deep trays - they hide papers and turn into a slow-moving clutter drawer.
6. DIY Washi Tape Organizer Strip on a Clipboard
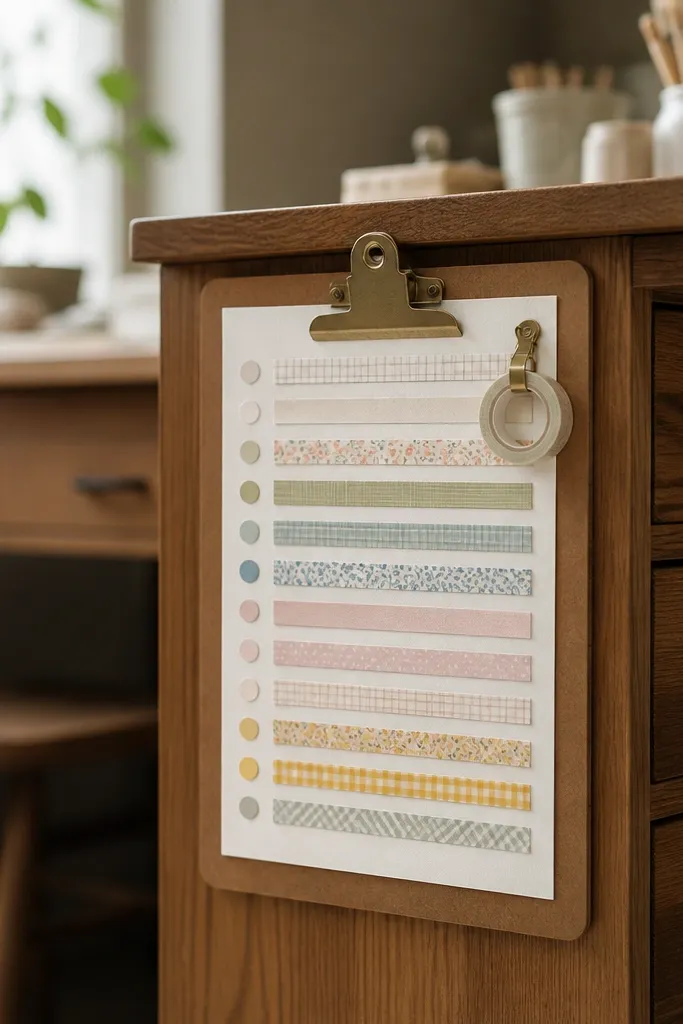
Washi tape is fun, but it turns into scattered rolls. Mounting a simple organizer strip on a clipboard keeps rolls visible and stops the hunt. The cardstock backing looks clean, and it's easy for kids to add a roll back in the right row. This is a small aesthetic move that makes craft desks look calmer.
Cut cardstock to fit the clipboard clip width. Use washi tape strip samples as "slots," and label the rows with dots of the same color as the tape. Mount the clipboard on the side of the desk using two screws or heavy-duty adhesive hooks.
Pro tipKeep only the tapes kids use weekly on the strip; store extras in a closed bin.
AvoidAvoid using thin paper without backing - it warps when kids tug at tape rolls.
7. Felt Marker Roll Up Pouch with Two Compartments
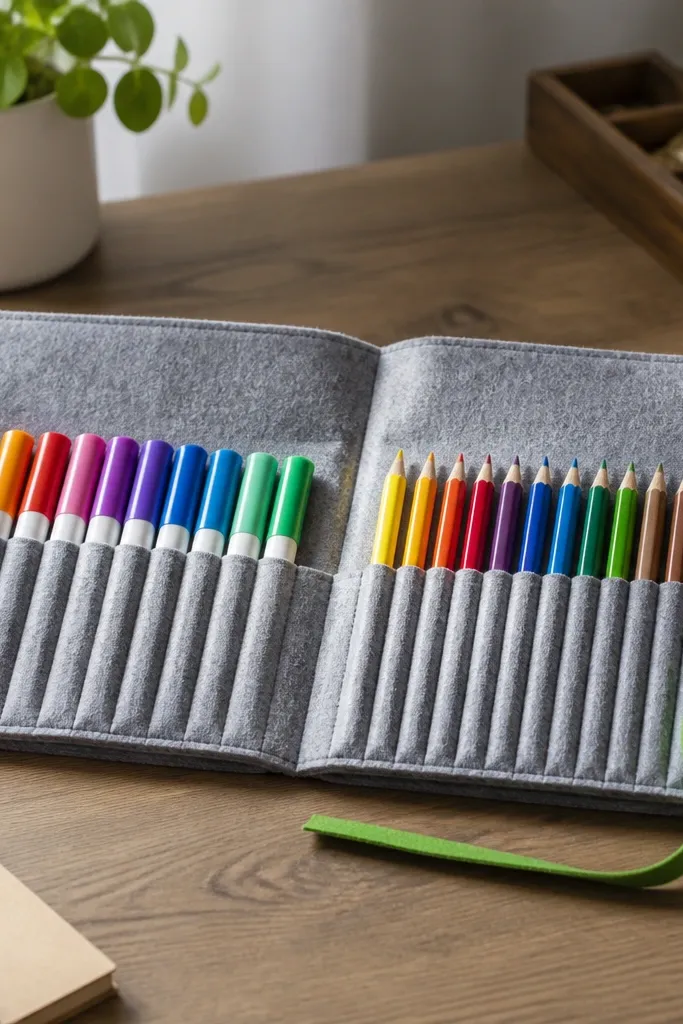
A roll-up pouch turns marker chaos into a neat set that stays put. It's also easy for quick in 5 minutes desk organization because you roll it back up and it takes almost no counter space. Felt hides scuffs and looks tidy even when kids use it daily. Two compartments prevent mixed sets that kids can't sort quickly.
Use thick felt (at least 3-4 mm) so it stands up. Make pockets wide enough for marker bodies - about 1 inch per marker pocket with a little stretch. Tie the roll with a loop-and-button or fabric strap so it doesn't unroll on its own.
Pro tipPut the most-used markers in the left compartment so kids grab the same side every time.
AvoidAvoid pockets too tight - kids force pens in and the pouch looks stretched.
8. Pegboard with Mini Trays for Scissors, Rulers, Glue
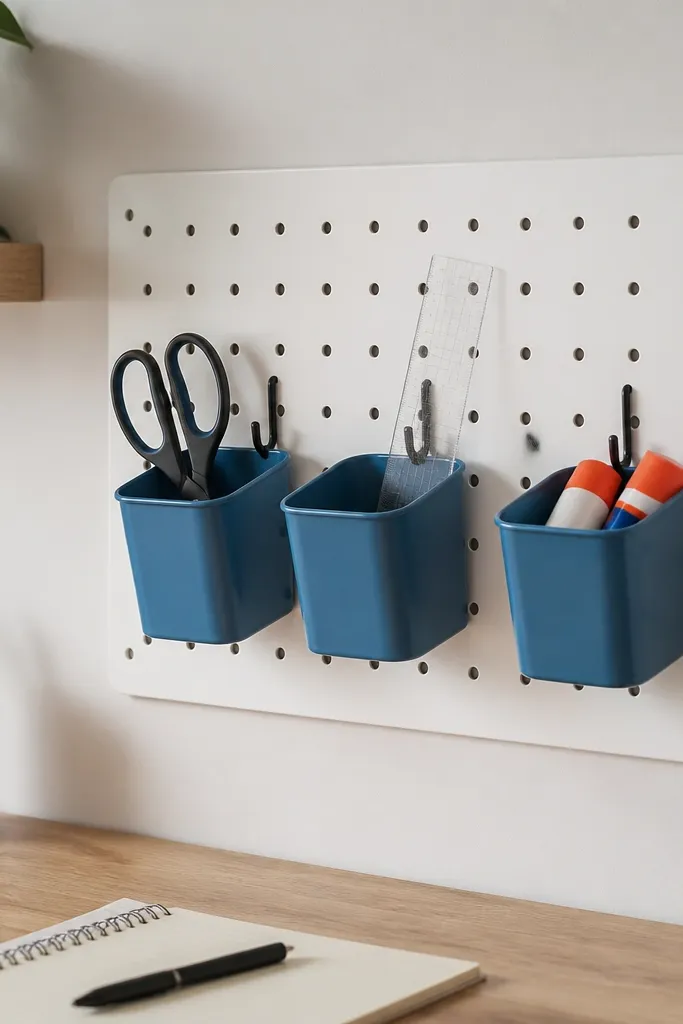
Pegboard makes storage look like it belongs there because it's organized by design, not by stacking. Mini trays keep small tools from sliding and make it easy to reset after school. I like metal trays because they wipe clean - glue is the enemy, and felt or fabric can stain. The result is crisp and kid-friendly.
Paint pegboard matte white for a clean look, then use black hooks. Hang trays so the bottoms sit about 2-3 inches above the desk surface. Keep only the tools kids use weekly on the pegboard - the rest goes in a closed drawer.
Pro tipUse one hook size for everything. When tray mounting hardware matches, it looks intentional even if you rearrange later.
AvoidAvoid overcrowding the pegboard - if everything hangs, kids stop noticing the "correct" places.
9. Magazine File for Tablet and Headphones
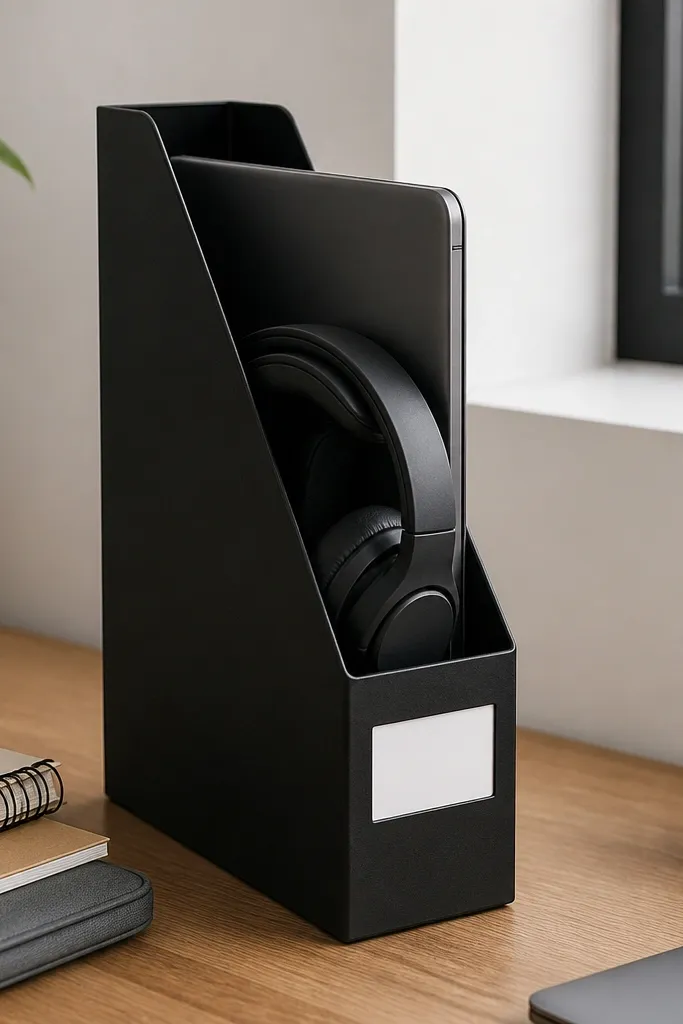
Tech items create clutter because they're bulky and easy to misplace. A magazine file keeps a tablet upright and gives headphones a vertical resting place. The black holder with a white label reads clean and uniform. This one is great for quick in 5 minutes desk organization because the reset is literally placing the tech back into the holder.
Use a holder that is tall enough for the tablet without tilting - about 12-14 inches. Place it on the right side of the desk so it doesn't bump left-handed writing areas. Keep headphones in the same orientation each day, with the headband facing outward.
Pro tipAdd a small strip of non-slip shelf liner under the tablet base so it doesn't slide during quick moves.
AvoidAvoid placing tech next to liquid bottles - one spill and everything looks worse.
10. Stacked Book Ledges as a Paper Stop
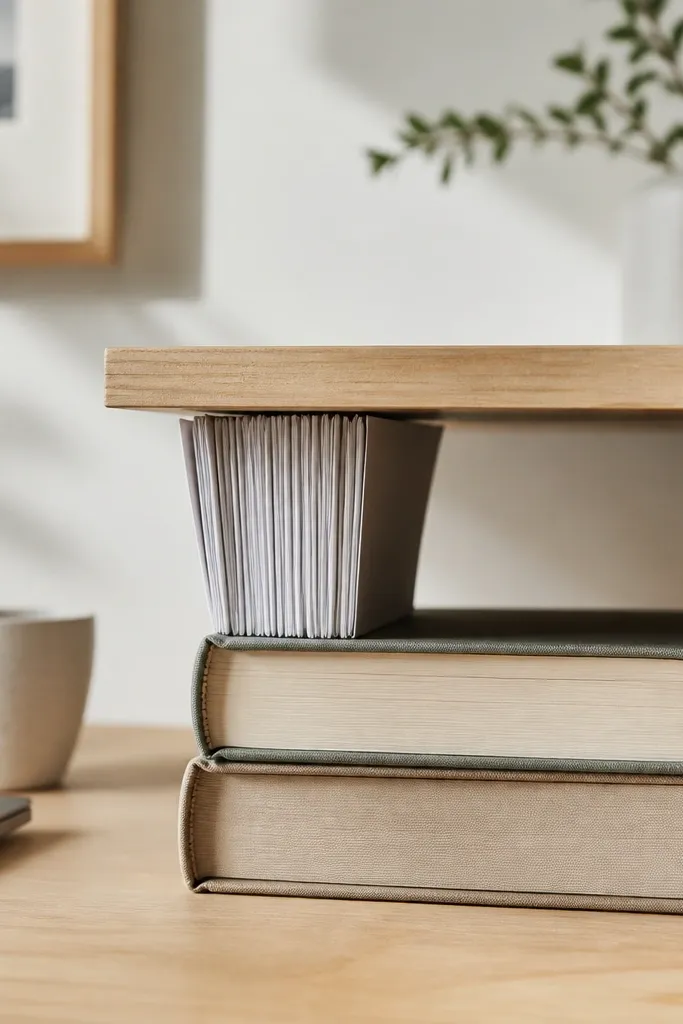
Paper stops are the simplest desk fix, and book-ledges are the budget version. You create a raised barrier so loose sheets don't slide into the center. It looks handmade but tidy when the colors of the books match. This works especially well for kids who pull papers forward while writing.
Use two books with flat covers so they stack evenly. Place a small wooden ledge on top (about 10 inches long) using shelf brackets or adhesive pads made for wood. Keep the ledge height around 3-4 inches so paper stays visible.
Pro tipPut a single folder behind the paper stack - the folder becomes the "backing" so the papers always look aligned.
AvoidAvoid wobbly stacks - if the ledge rocks, kids stop using it.
11. Fabric Drawer Organizer Insert for School Supplies
The drawer is where chaos hides. A fabric insert makes categories visible without needing labels everywhere. Fabric also softens the look, which matters on a kid desk where everything can look harsh and plastic-y. When supplies have sections, you can do a fast reset by opening the drawer and pushing each category into its spot.
Measure the drawer interior first. Choose an insert with walls at least 2 inches tall so markers don't tip over. Keep heavy items (glue, scissors) in the bottom section, and lighter items (erasers, pencil caps) in the top pockets.
Pro tipUse one insert for school supplies only. If you mix snacks, it becomes a drawer you avoid.
AvoidAvoid inserts with floppy dividers - they sag and make it look like you gave up.
12. Mini Tray for Sticky Notes and Small Paper Bits

Sticky notes multiply because they get used once, then left behind. A small tray gives them a single "home" and keeps the desk surface from turning into a patchwork. Ceramic looks clean and doesn't stain like fabric. This is one of my favorite quick in 5 minutes desk organization tricks because it's a single move: bring everything back to the tray.
Use a tray about 8-10 inches wide so it fits near the writing spot. Put sticky notes upright in a stack, not flat, so you can flip to the top note quickly. Add a small cup (or even a shot glass) for paper clips so they don't roll around.
Pro tipPick one sticky note color for "urgent" and keep only that color in the tray.
AvoidAvoid a tray that's too big - it invites more clutter than it contains.
13. Clear Stackable Boxes for Art Supplies with Color Tags
When art supplies are visible, kids use them. When they're mixed in one bin, everything gets dumped. Clear stackable boxes keep the desk look tidy while still letting you spot what's missing. Color tags make it quick to grab the right box and put it back. It's not fancy, but it looks organized because it's consistent.
Use boxes with the same width so stacks align cleanly. Put the most-used supplies at eye level. Keep labels on the front edge, not the lid top - kids grab from the front during busy mornings.
Pro tipAttach color tags with strong tape so they don't peel after frequent handling.
AvoidAvoid random label sizes - mismatched labels make the whole setup look thrown together.
14. Wire Basket Under Desk for Backpacks and Folders
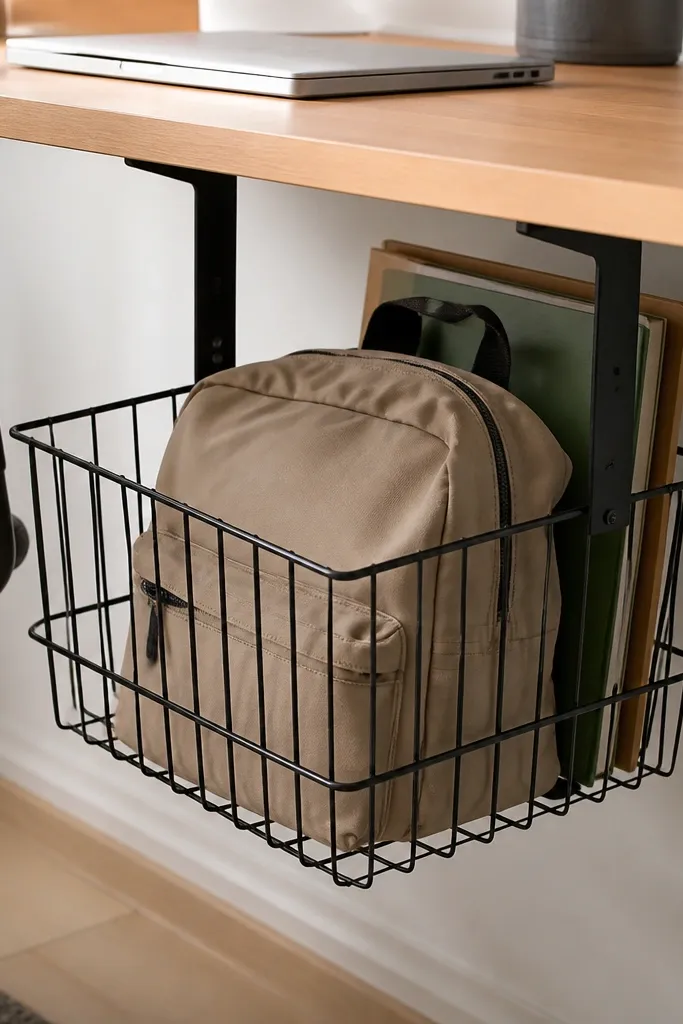
Under-desk storage is where you hide the daily mess without taking desk space. A wire basket is great for backpacks because it breathes and doesn't trap moisture like closed bins. For folders, it keeps them from piling on the chair or floor. When kids see the basket, they use it because it's right there.
Mount the basket so the rim is about 10-12 inches above the floor for easy access. Use two folders at a time - too many and they flop out. Keep the basket for "going to school" only, not random items.
Pro tipAdd a small strip of painter's tape on the basket floor edge to mark where backpacks should sit.
AvoidAvoid storing wet items in a closed bin - it smells and turns into a hygiene problem.
15. Desk Mat with a Center "No-Stack Zone"
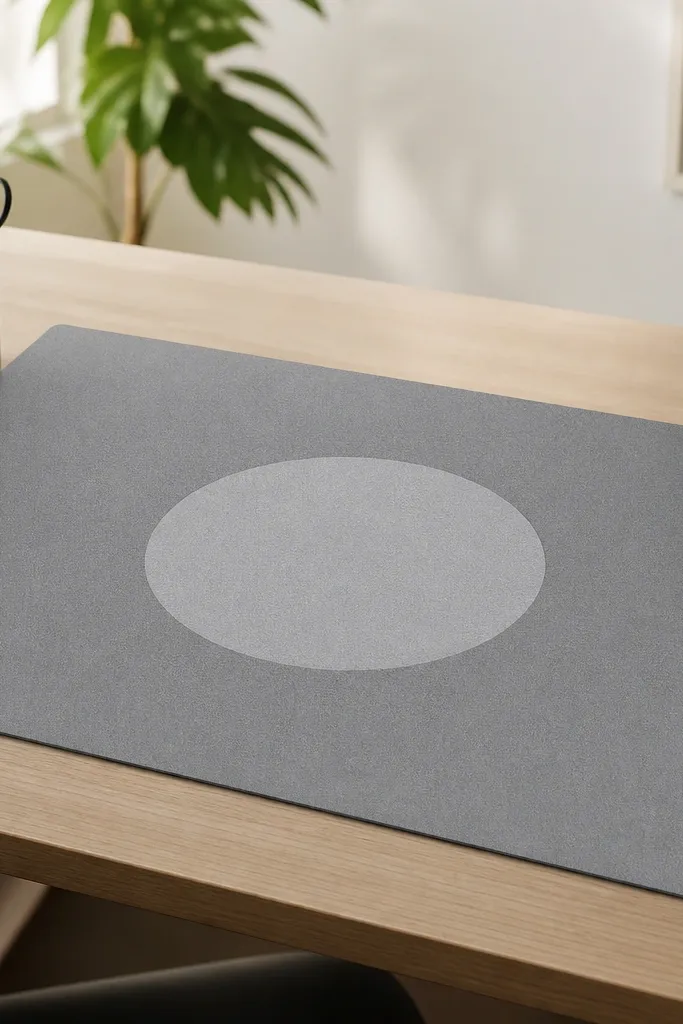
A mat changes how clutter behaves. When you have a defined center area, kids place work there instead of stacking papers wherever they land. The "no-stack zone" circle is a simple visual cue that makes the desk look intentional even when supplies are out. I've watched kids clean up faster because they can see the boundary.
Use a desk mat at least 24x18 inches so it covers the main writing area. Mark the circle with removable fabric tape or a washable vinyl stencil. Place pencil cups on the left, paper trays on the right, and keep liquids off the mat completely.
Pro tipChoose a mat with a slight texture so it doesn't slide under notebooks and cause frustration.
AvoidAvoid glossy mats that reflect light - it makes the whole desk look shinier and messier.


