1. Clear acrylic desk-edge tray with rainbow labels
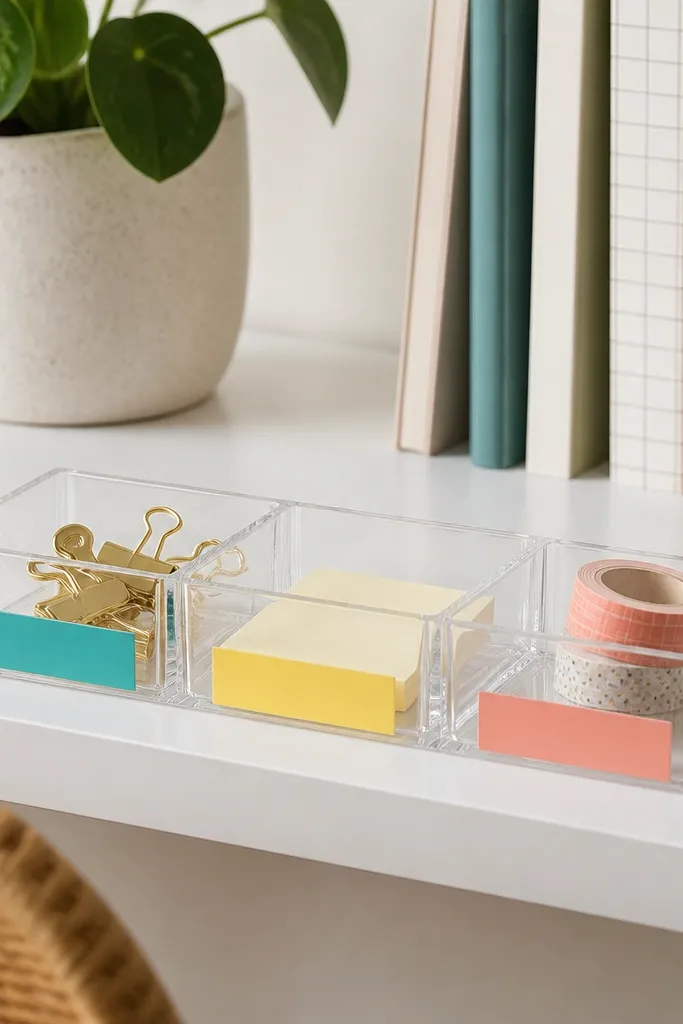
This setup looks clean because the items are hidden inside clear walls, but you can still see what's inside. The rainbow labels make it readable for kids without needing fancy handwriting. I like using a tray that rests on the desk edge so it doesn't require attaching anything to the desktop. The acrylic catches light and makes the whole front edge look styled instead of cluttered.
Choose a tray with a flat bottom lip and compartments at least 2.5 inches wide so marker caps and small erasers fit. Place it near where your child sits so they can grab from the front. Use label strips on the back wall of each compartment so the colors show through the clear plastic.
Pro tipUse painter's tape to test the exact position for a week before committing to labels. The tray layout will feel "natural" once you match it to the usual hand reach.
AvoidAvoid frosted acrylic if you want quick visibility - it makes the contents look dusty and harder for kids to sort.
2. Magnetic strip for scissors and metal supplies
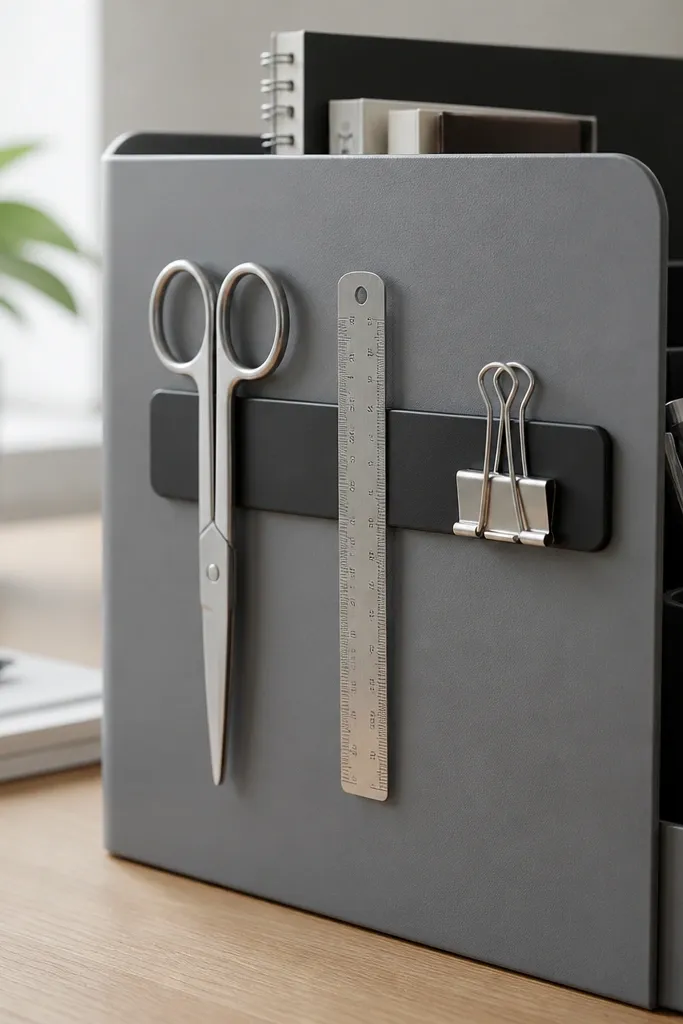
Metal tools look sharp when they hang vertically, and the strip keeps them from getting buried in paper. It's also fast for kids to reset because they just press the handle to the steel. I prefer a black strip against light desks because it reads intentional. When scissors are visible, fewer are lost under notebooks.
Use a magnetic strip that's at least 10 inches long with a strong hold. Mount it to a removable stand or the side of a shelf using command strips rated for the surface. Keep scissors oriented with blades pointed down so they don't snag.
Pro tipAdd a small strip of felt tape on the contact area where scissor handles touch so they don't scratch and squeak.
AvoidSkip thin magnetic tape rolls - they won't hold scissors reliably and you'll end up re-stacking them in a drawer.
3. Clip-on cable ties for charging cords
Cord clutter makes a desk look messy instantly, even if everything else is organized. Clip-on ties are a visual fix because they keep cords running in straight lines. I like this for kids' tablets because the charging port is usually on the same side every day. With cables controlled, the desk surface stays clear and the "aesthetic" holds.
Pick clips sized for 3 to 5 mm cables and attach them to the underside using adhesive pads rated for plastic or painted wood. Leave 2 inches of slack between clips so cords aren't yanked. Use a small tray at the corner to hold the charger brick so it doesn't roll.
Pro tipColor-code one cord path with a strip of colored tape on the underside so your child learns the route without thinking.
AvoidDon't wrap cords too tight around clips - you'll stress the cable and it fails sooner.
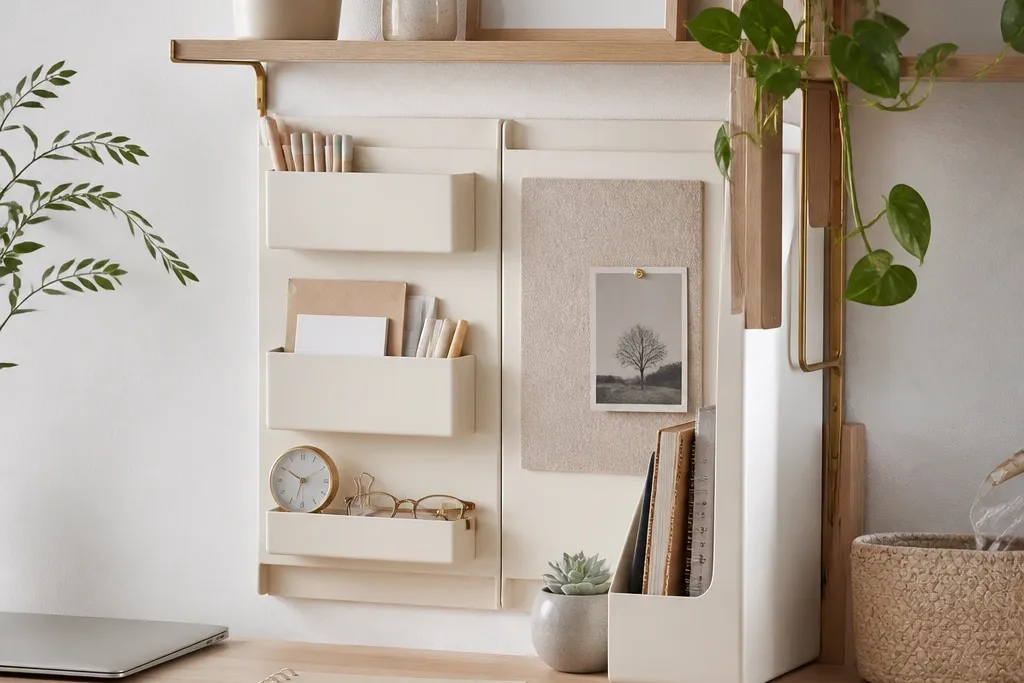
4. Magnetic paper tray on a steel bookcase panel
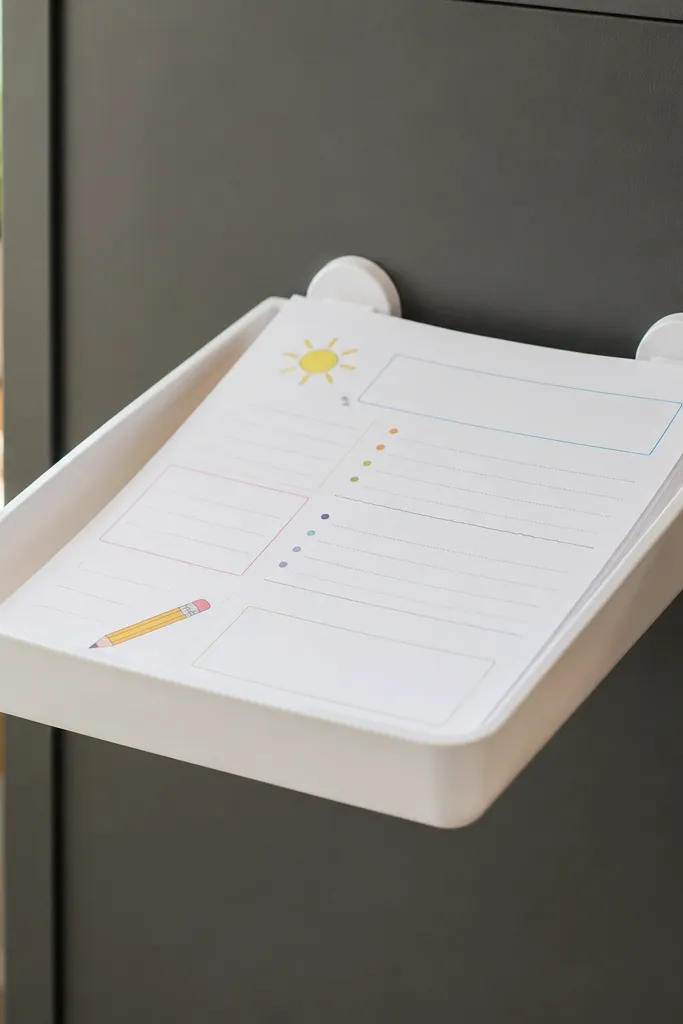
Magnetic paper trays keep paper upright without digging in a drawer. The steel panel makes it feel built-in, even though it's removable. I've used this beside desks when the desktop is too small for more organizers. The look is tidy because papers sit in one plane, not fanned out across the desk.
Buy a magnetic tray sized for letter paper and attach it to a steel board or magnetic surface near the desk. Keep "Today" at the top and "Back to School" on the lower edge of the tray. If your kid draws, add a small acrylic clip to hold finished pages upright.
Pro tipUse two trays with different heights so you can sort "in" vs "out" without labels. Height does the work.
AvoidAvoid overstuffing - when papers curl, the whole tray looks chaotic.
5. Desk-top riser with hidden storage drawers
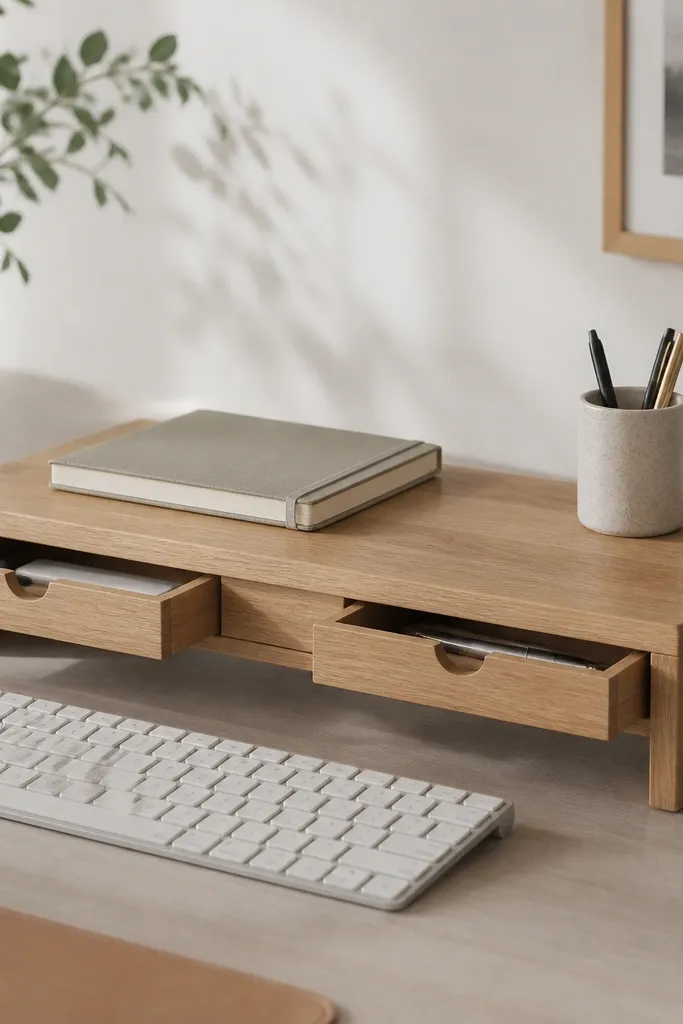
A riser makes the desk look intentional because it creates a clear front-to-back layout. The drawers hide the stuff that always multiplies - extra erasers, spare glue sticks, and sticky notes. I like wood finishes in light oak or white because they match most school supplies. It also keeps the keyboard area clear, which helps kids focus.
Choose a riser with drawers at least 6 inches wide so you can fit glue sticks standing up. Place it back from the keyboard by 2 to 3 inches so cords still reach the outlet. Put the most-used items on top and the rest in drawers.
Pro tipLine drawers with thin non-slip shelf liner so supplies don't slide when a drawer gets bumped.
AvoidSkip tiny drawers that force you to crumple supplies - that makes it look messy even if it's "organized."
6. Fold-flat canvas caddy for art supplies
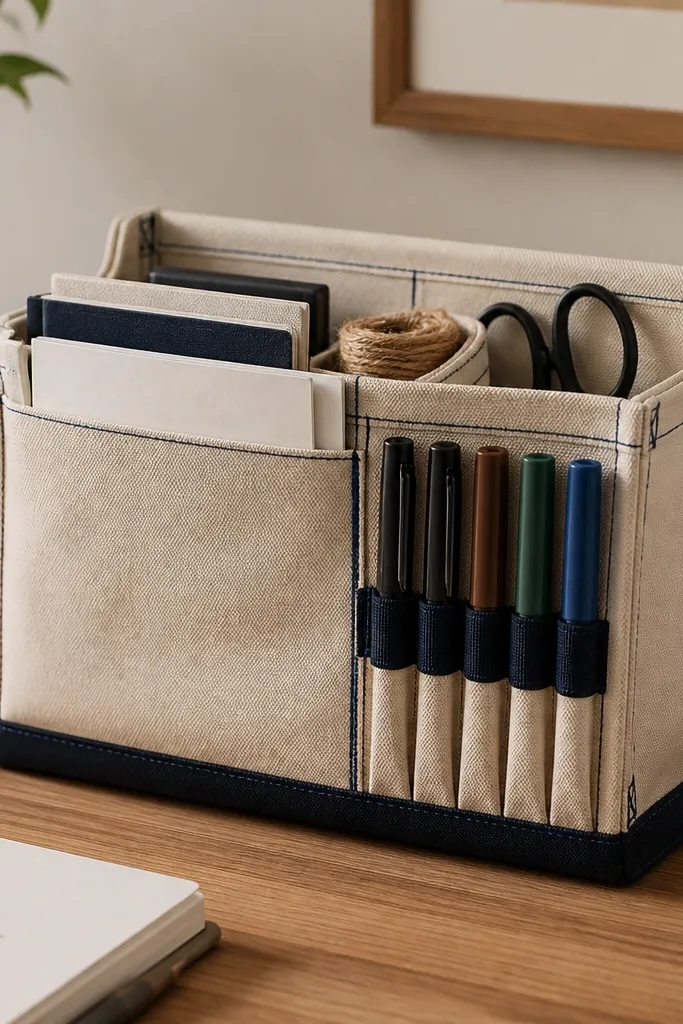
Canvas caddies look warm and they don't scream "plastic storage." The elastic loops keep markers from rolling, and the flat pocket holds paper so it stays aligned. I use this when kids are actively making things because it's easy to carry to the table. When you move the caddy away at night, the desk instantly looks calmer.
Pick a caddy that folds flat when empty so it doesn't take space. Use a size that sits within 12 inches of desk width so it doesn't crowd the chair. Keep scissors in a separate small cup so blades stay protected.
Pro tipAdd a fabric label patch with iron-on letters on the front pocket so sorting takes seconds.
AvoidAvoid caddies with floppy pockets - paper falls out and you end up with a pile on the desk.
7. Stone-look tray with mini jars for pens
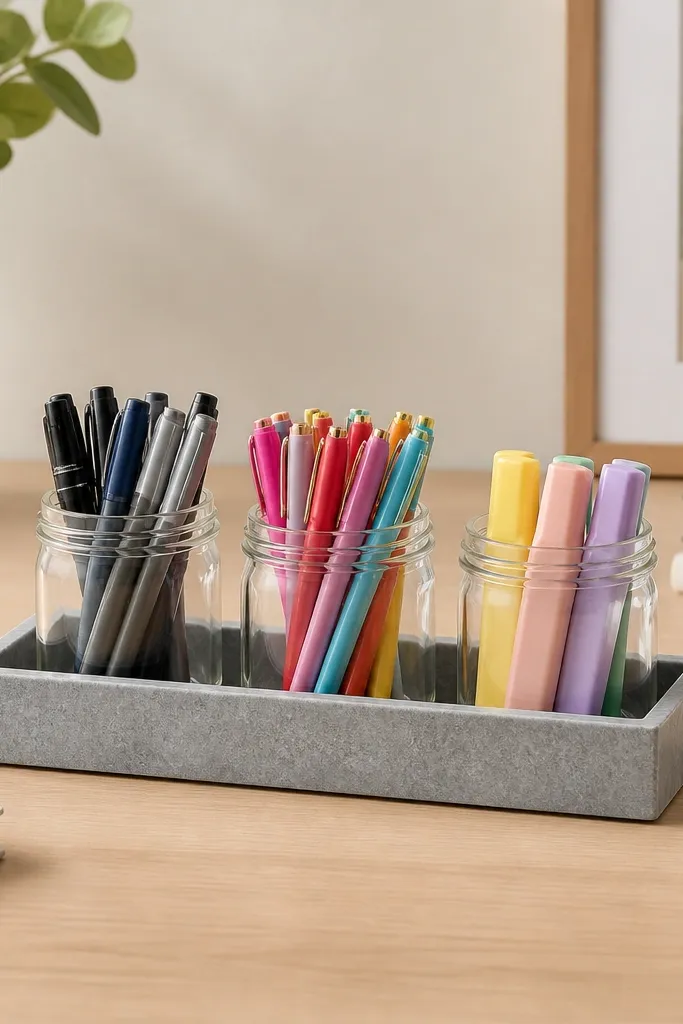
A tray gives you a single visual anchor, which makes the desk look styled even when the jars are full. I like stone-look finishes because they mute the chaos of bright school supplies. Separate jars by function - writing pens, highlighters, and "misc" - so kids stop dumping everything into one cup. The glass jars are easy to wipe clean after sticky marker incidents.
Use a tray about 10 to 14 inches wide so it fits within the keyboard area without blocking. Choose jars with flat lids or open tops and label the jar bottoms with small dots. Keep a microfiber cloth nearby for quick wipe-downs.
Pro tipPut the jar with the most-used items closest to the dominant hand side so your child grabs without reaching across the desk.
AvoidSkip a tray that's too deep - deep trays hide pens and you end up digging around.
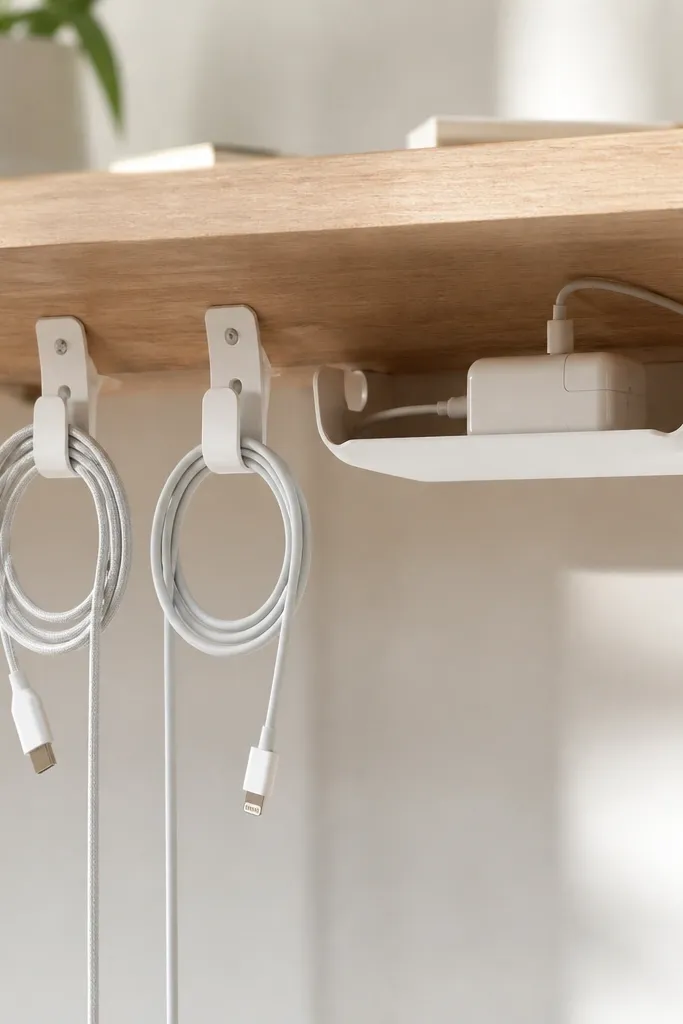
8. Command hook organizer for backpacks' small essentials
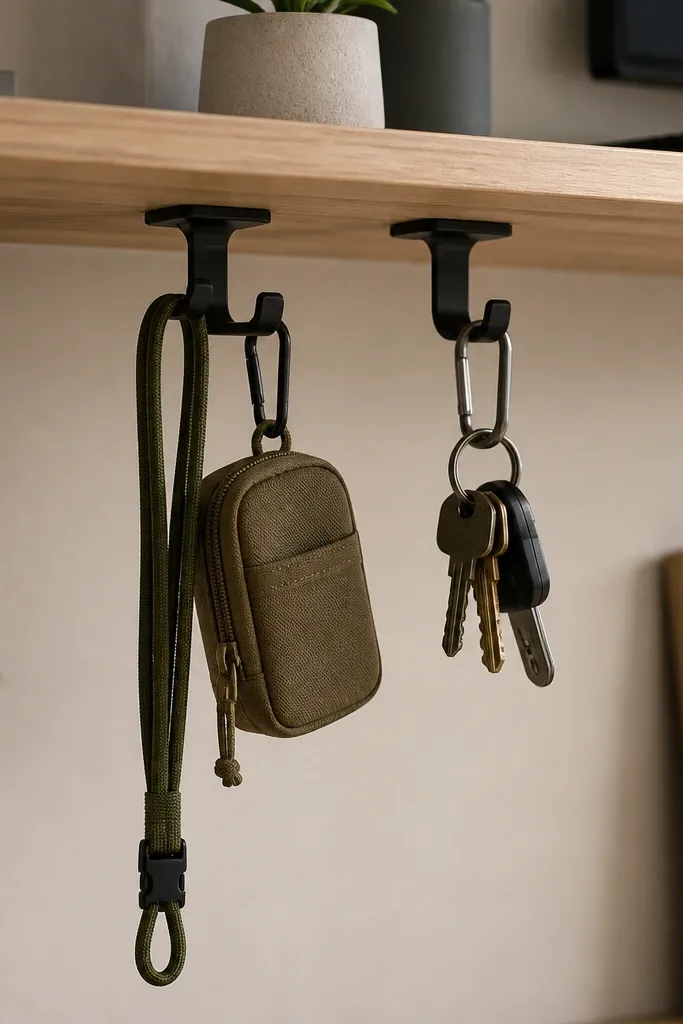
Under-shelf hooks keep tiny daily items off the desk surface, which is where clutter grows. It looks tidy because hanging items align vertically. I use this for the "small but annoying" stuff: headphones pouch, key ring, and a spare pencil case. Kids learn where it hangs, and you don't get the morning scramble.
Use hooks rated for weight and attach to the underside where there's enough clearance. Leave 2 inches between hooks so pouches don't tangle. Hang only lightweight items - heavy bags should go on a hook on the wall.
Pro tipUse a small fabric strap loop on each pouch so it slides onto the hook without twisting.
AvoidAvoid placing hooks on a dusty surface - adhesive failure looks sudden and messy.
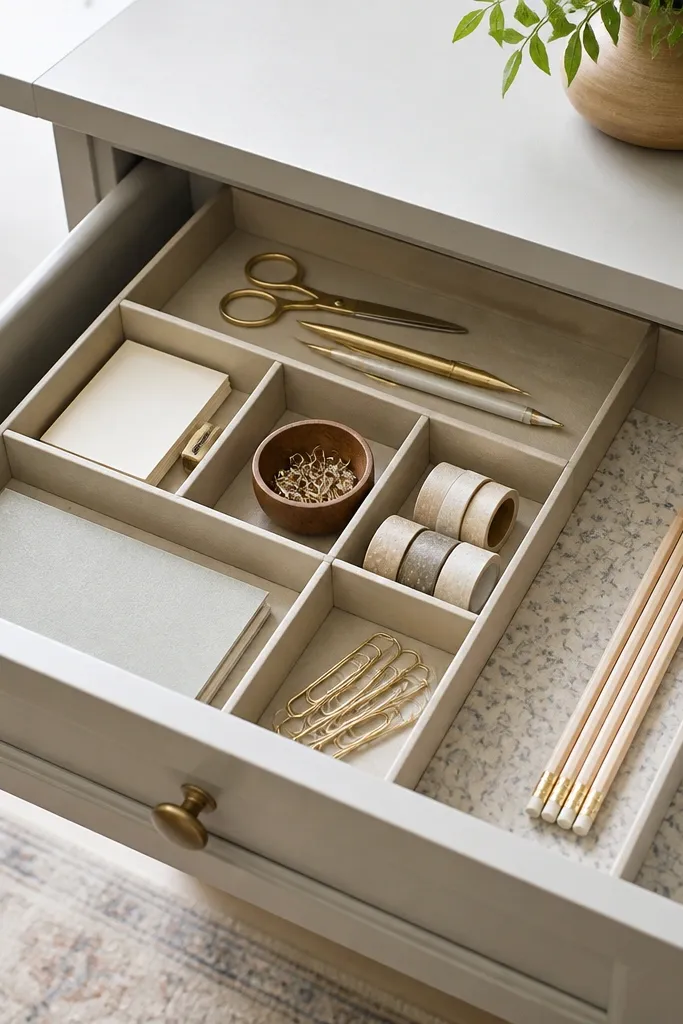
9. Removable drawer organizer for the desk edge
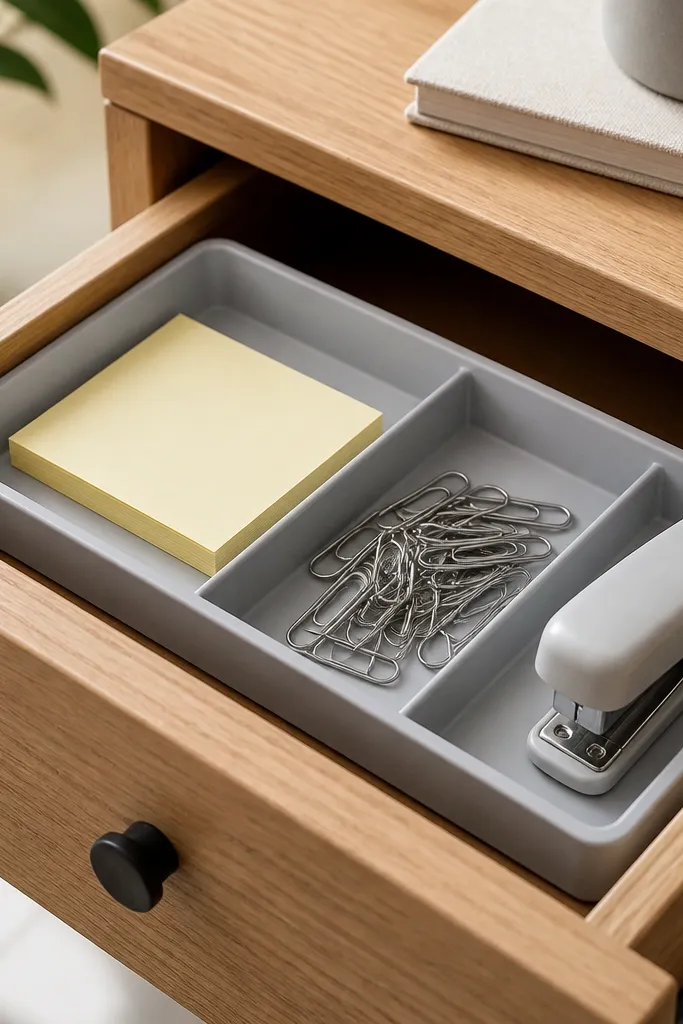
Even without drilling, you can get a "real desk system" by organizing the drawer that already exists. The insert makes supplies visible and prevents the drawer from becoming a mixed junk bin. For aesthetic, choose one neutral color and keep paper clips and staples in matching small bins. The desk top stays cleaner because the daily mess has a place to go.
Measure your drawer interior width and depth, then buy an insert with adjustable dividers. Keep one divider for "office basics" and one for "school basics" like glue sticks and scissors. Use a small label strip on the drawer front.
Pro tipStore the items kids use daily in the front compartments and keep backups in the back.
AvoidAvoid over-dividing - too many tiny sections make it harder for kids to reset.
10. Desktop vertical file using clear folders + clip rail
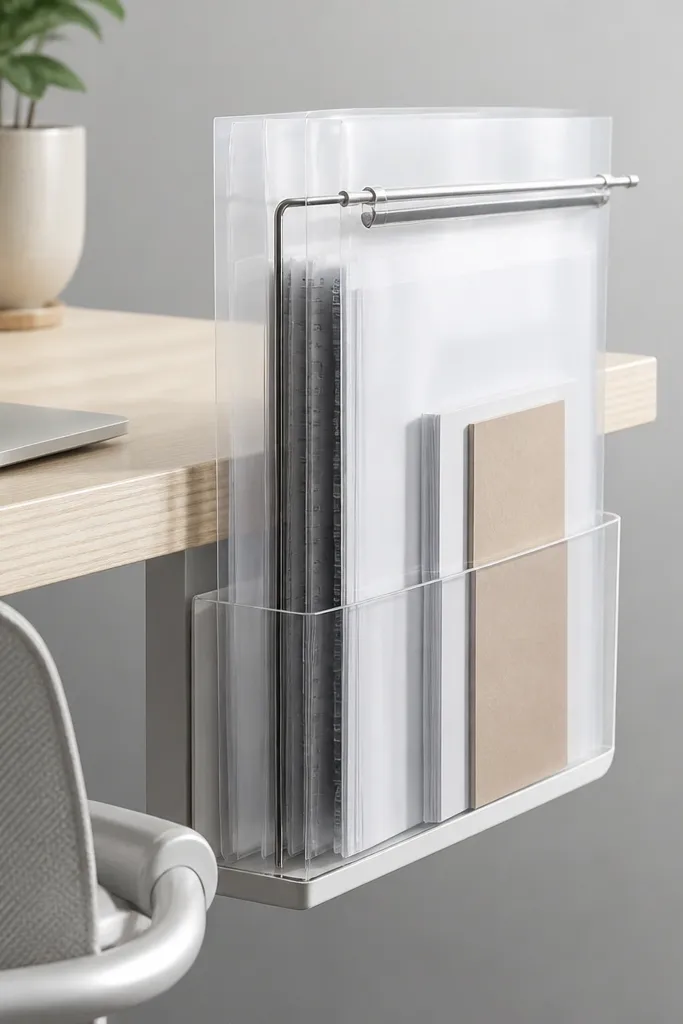
Clear folders show what's inside, so you don't end up with the "mystery stack" problem. When folders stand vertically, they take less horizontal space than piles. A clip rail stabilizes the tops, which keeps the look neat even when kids grab fast. This is one of the easiest ways I've found to keep homework papers from spreading across the desk.
Use folders that fit letter size and are thick enough to stay rigid. Attach a clip rail to the desk back edge or a removable stand behind the desk. Keep three folders: Today, To Sign, and Finished.
Pro tipPut a colored index card behind each folder so the category shows even when the folder's contents change.
AvoidSkip flimsy folders - they collapse and your vertical file turns into a leaning mess.
11. Magnetic whiteboard strip for reminders and schedules
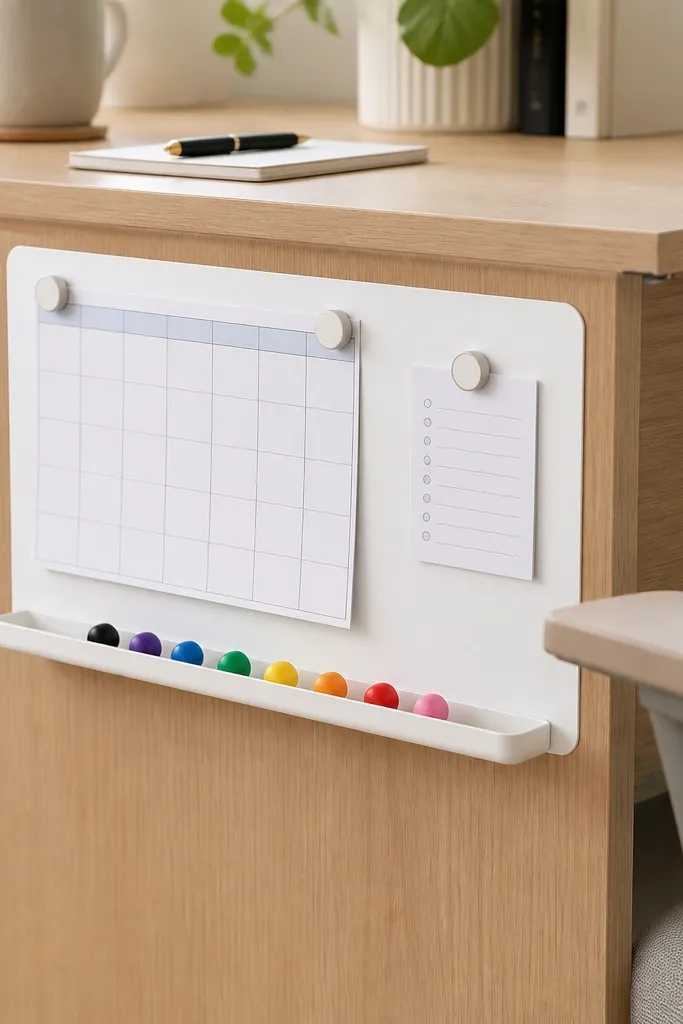
A narrow board keeps reminders in the same spot every day, so kids stop asking where things go. The magnets make it easy to swap pages without tape. This looks clean because it's a single surface, not random sticky notes everywhere. I use it for "homework due" and "supplies needed" so the desk stays calm during the school week.
Choose a strip board at least 12 inches long so writing fits. Mount it with removable adhesive hardware or a magnetic-friendly attachment to a steel side surface. Use a small tray for markers right below so nothing rolls away.
Pro tipWrite the checklist in thick marker and use small magnets for checkboxes so kids can finish without smudging.
AvoidAvoid mounting the board too low - kids lean on it and fingerprints make it look dirty.
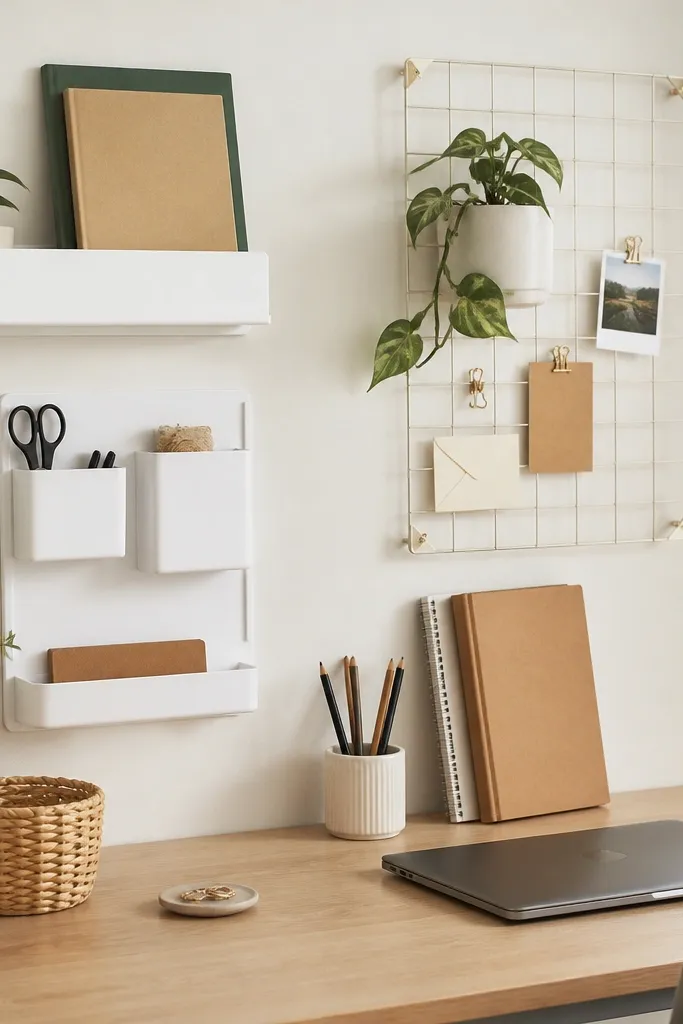
12. Desk-side hanging pocket organizer with color-coded sections
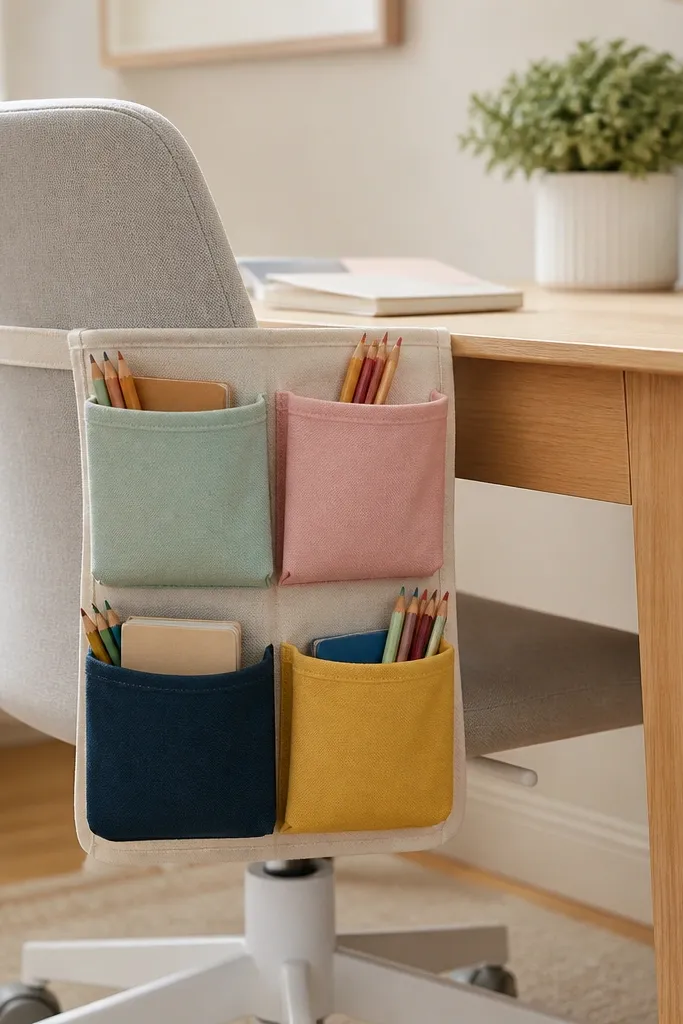
Side hanging pockets use vertical space that usually goes unused. Color-coded pockets make it fast for kids to put things back without reading tiny labels. I like fabric because it's quiet and flexible, so it doesn't clank when a kid grabs a pencil. It also gives the desk a soft, homey look.
Use an organizer with stiff top edges so it stays open. Attach it with over-the-chair hooks or removable ties that don't damage surfaces. Keep the heaviest items in the bottom pocket and light supplies in the top ones.
Pro tipPut a single "scatter pocket" in bright yellow so random items have a landing zone.
AvoidSkip pockets that are too deep - you can't see what's inside and kids end up dumping.
13. Removable under-desk shelf with cup holders
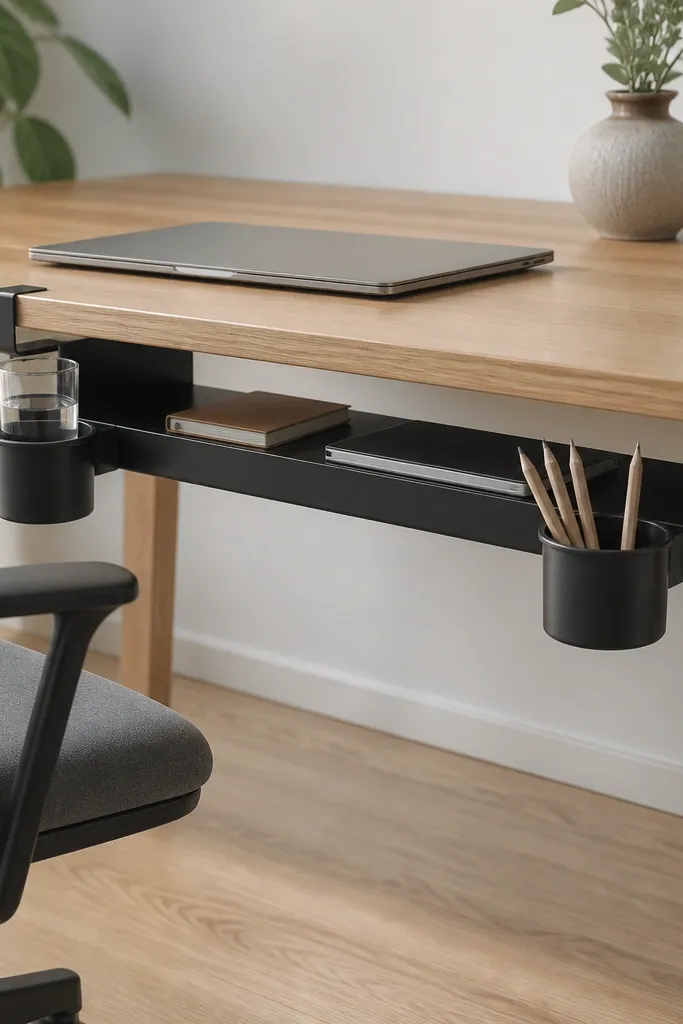
This is the fastest way I know to clear the desk surface without buying a full cabinet. The shelf turns the underside into a useful zone for cups and small tools. Cup holders keep spill-prone items from sliding. The look stays tidy because cups are out of the main sightline.
Use a clamp-on shelf designed for desks with thickness-compatible clamps. Keep the shelf height high enough that knees don't bump it. Choose cup holders that match your desk color - white plastic looks clean on light wood.
Pro tipAdd a small silicone mat on the shelf so cups don't ring or skid.
AvoidAvoid a shelf that sags - any wobble makes kids avoid using it.
14. Folded-paper organizer using a binder clip rail
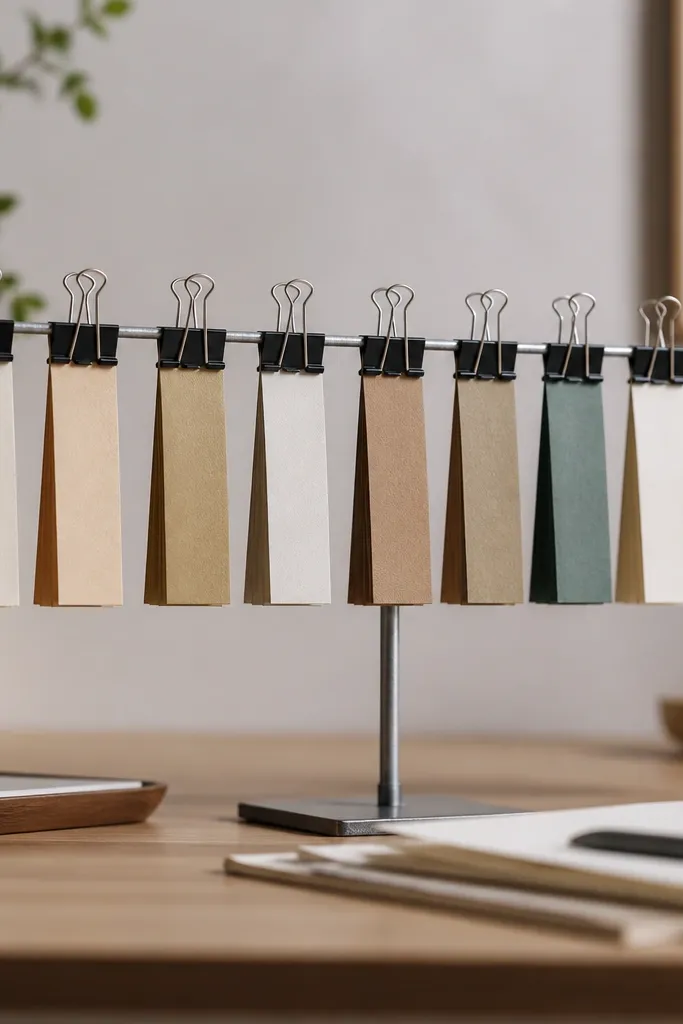
Binder clips make paper look graphic and intentional when you line them up. This is great for kids because folded papers don't slide like flat sheets. The clip rail also keeps your "to sign" notes separate from the bulk of homework. It's cheap, and you can change categories in seconds.
Use a metal rail or a thin shelf strip and attach it with removable adhesive pads. Fold papers into consistent sizes so they stand evenly. Clip the top edge only, leaving enough paper visible for quick scanning.
Pro tipColor the clips with removable vinyl dots so each category has its own visual cue.
AvoidSkip uneven clip spacing - it looks messy even if the content is sorted.
15. Magnetic spice-style tins for crayons and markers
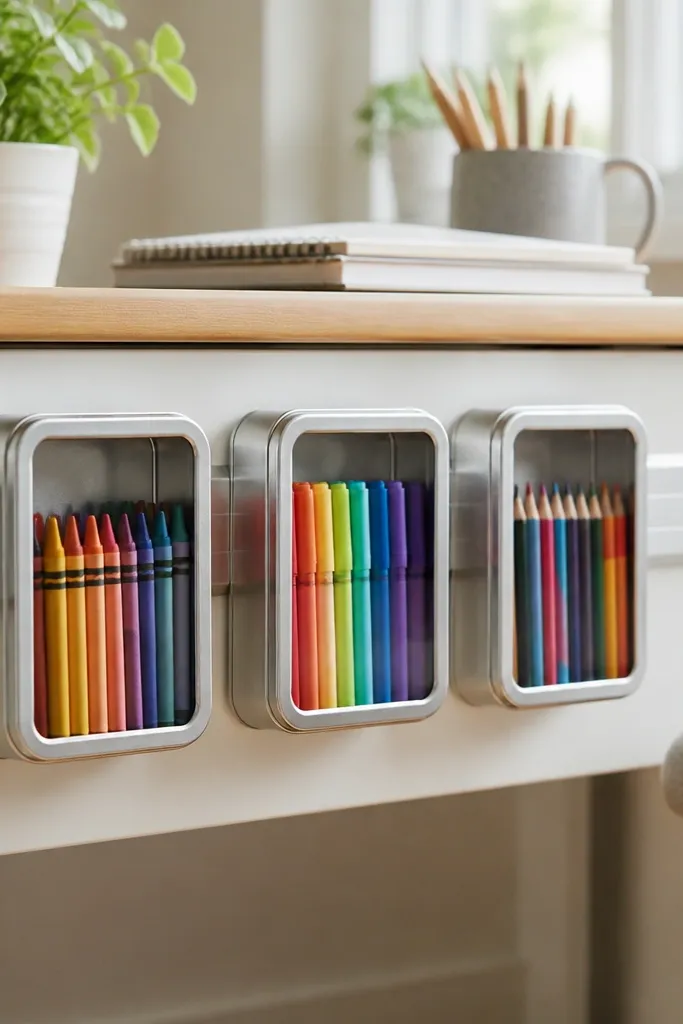
These tins look adorable and they solve the marker chaos fast. Because they're metal, magnets hold them in place without drilling. I like the tins because they stack neatly and kids can pull one tin out without digging. The labels make it easy to refill and keep colors separated.
Use shallow tins that are no taller than 3.5 inches so they don't block sightlines. Mount a magnetic strip or steel board behind the desk. Put crayons in one tin, markers in another, and colored pencils in a third.
Pro tipUse label tape that's easy to peel so you can update categories when school supplies change.
AvoidAvoid tins with sharp corners - kid hands catch and it looks beat up quickly.
16. Desk corner rotating organizer with removable inserts

A rotating carousel keeps supplies in view without taking over the whole desk. It also adds a fun element for kids, which makes them more willing to put items back. Removable inserts let you swap categories mid-week - markers one day, science tools the next. The look stays clean because everything sits inside the carousel walls.
Choose a carousel with at least 12 inches of diameter so items don't crowd. Place it in the corner where it won't block the chair. Use inserts that are easy to lift out so you can wash sticky stuff.
Pro tipWipe the rim with a slightly damp microfiber cloth before school starts - carousel lids collect dust fast.
AvoidSkip inserts that don't fit snugly - gaps make it look cheap and supplies fall out.
17. Acrylic stand for rulers and scissors with color rails
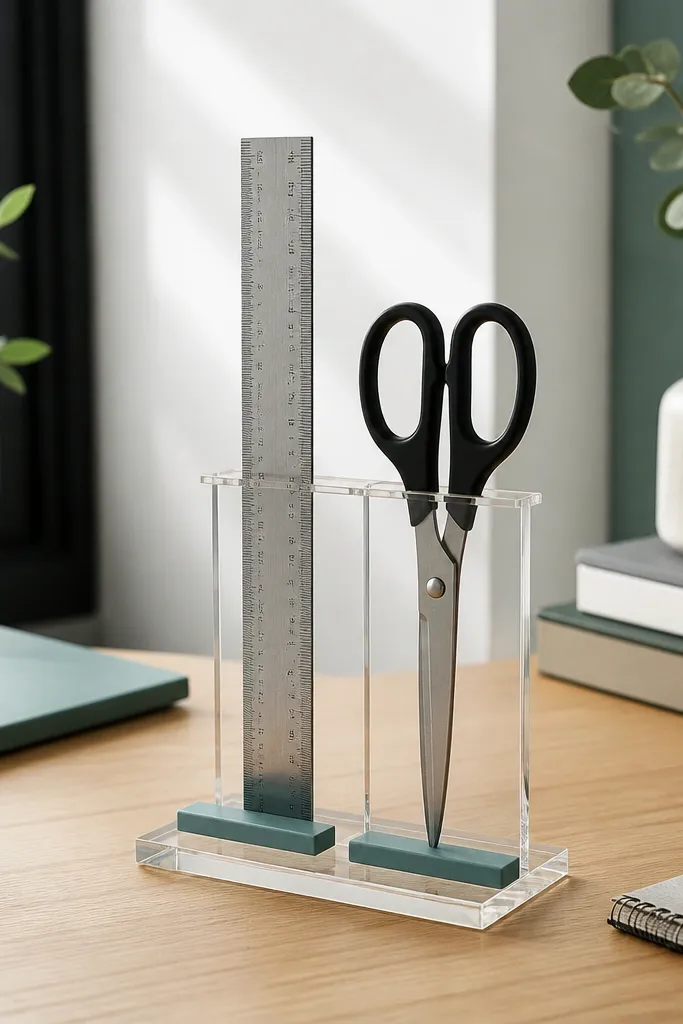
This stand makes long tools visible instead of hiding them under books. The clear acrylic keeps it modern, and the colored base anchors the look. I like that it keeps blades and edges separated so nothing gets scratched. It's a clean solution for the "we always lose the ruler" problem.
Pick a stand with a wide base so it doesn't tip when a kid grabs. Put the ruler in the back slot and scissors in the front slot so they don't bump. Use a colored vinyl strip on the base edge for category cues.
Pro tipAdd a small piece of foam tape under the scissors handles so they don't slide inside acrylic.
AvoidAvoid stands that only hold one tool - you'll end up adding random cups and the aesthetic breaks.
18. Suction-cup caddy for desk water bottle and wipes
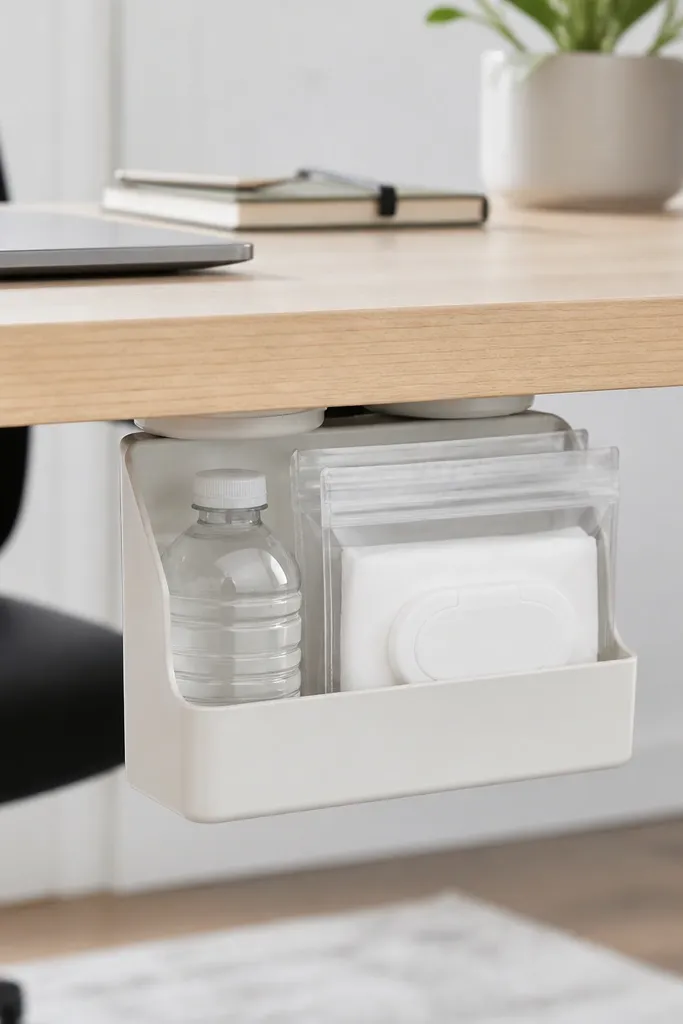
For kids, quick access to wipes matters. A suction caddy keeps it off the desk surface and reduces the "sticky hand on everything" problem. The clear pouch keeps wipes visible and stops crumbs from mixing in. I use this in play-and-learn setups where spills happen daily.
Choose suction cups rated for smooth surfaces and wait 24 hours after mounting before heavy loading. Keep the caddy small so it doesn't swing. Place it where it won't drip onto paper.
Pro tipPress the suction firmly for 20 seconds and test with a gentle tug before you hand it to a kid.
AvoidSkip suction on textured finishes - it fails and makes you reattach constantly.
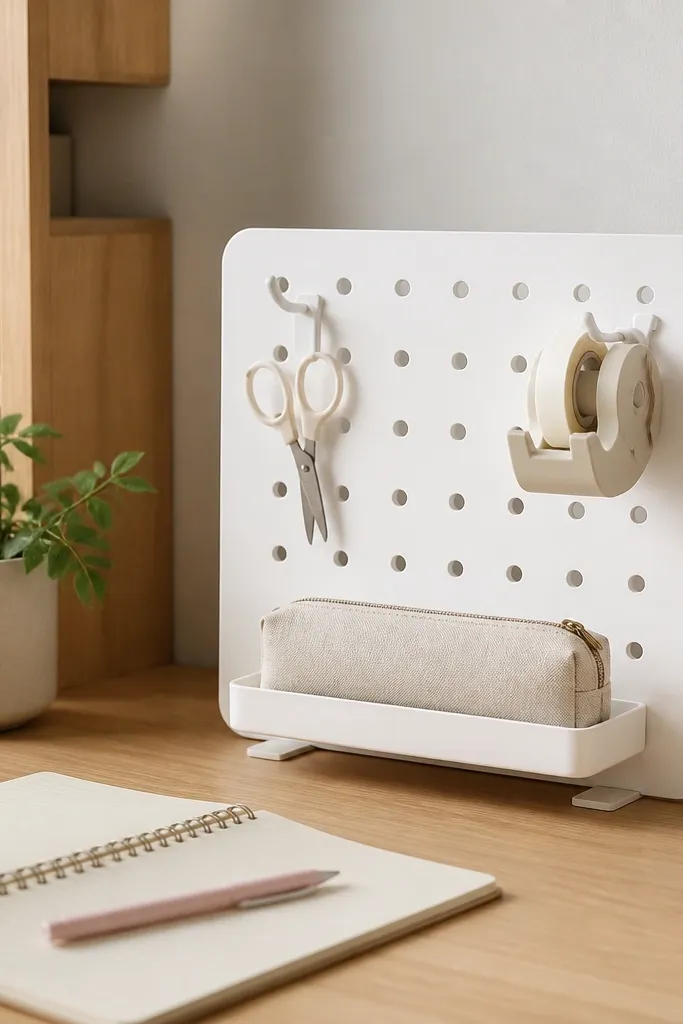
19. Removable desk-side pegboard panel for small hooks
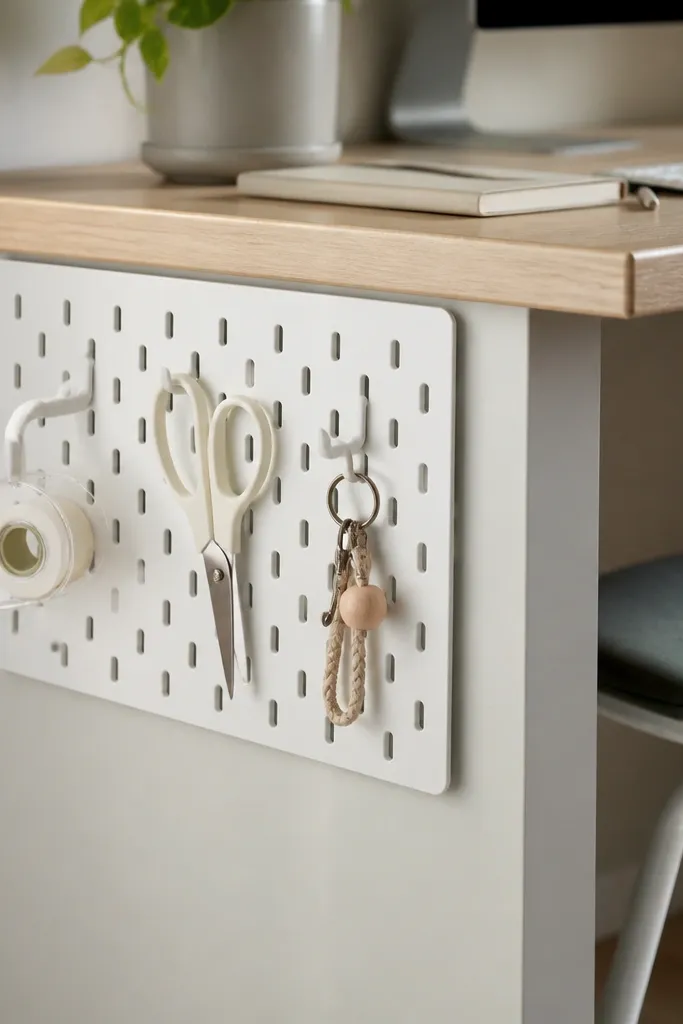
Pegboard panels look organized because you can see the tool outlines. The white board stays bright and kid-friendly, and small hooks keep items from clumping. I like using a removable panel because it gives you a whole "station" without drilling holes. Tape and scissors become part of the desk's everyday routine.
Use a small pegboard panel that matches your desk height and mount it with removable adhesive anchors. Space hooks so scissors hang without touching other tools. Add one small bin below for spare tape refills.
Pro tipHang only tools your child uses weekly so the board doesn't fill up and look cluttered.
AvoidAvoid too many hooks - it looks busy and kids stop returning items.
20. Under-desk magazine file with DIY label tabs
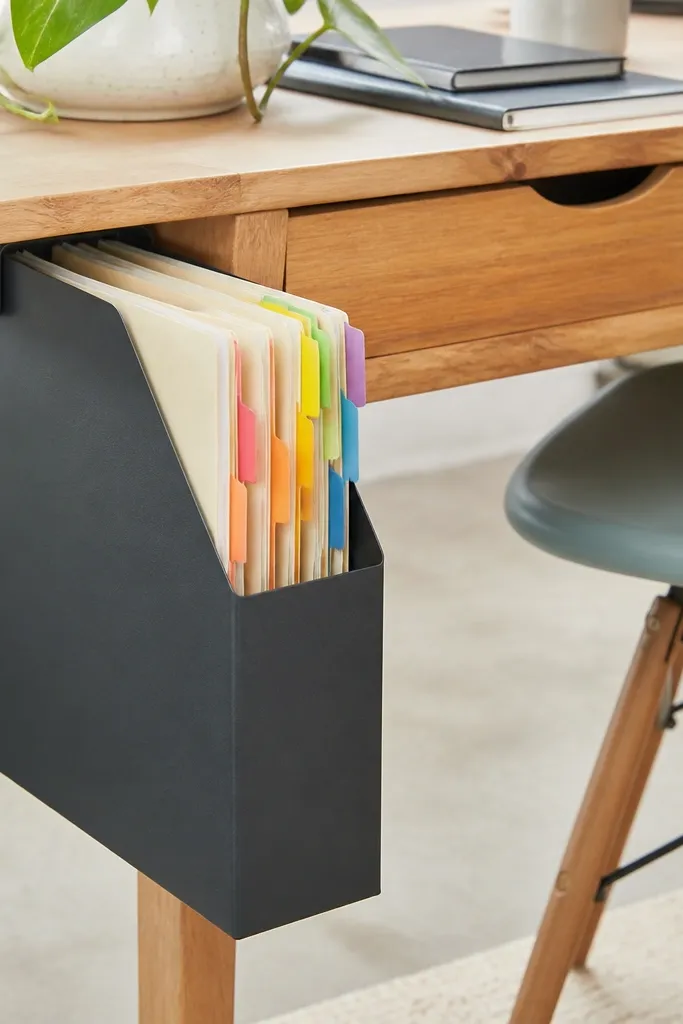
Magazine files are made for paper, so they keep folders upright and easy to flip through. Putting it under the desk keeps the top clean, and the color tabs make retrieval quick. For desk organization, the biggest win is that papers don't migrate to random corners. This looks neat because everything sits in one stacked column.
Use a file that fits letter folders and has a closed back so papers don't fall out. Place it under the desk with removable supports or clamp brackets. Label tabs with thick marker and color-code by subject or status.
Pro tipUse the folder edge as your label spot - it's visible even when papers are stacked.
AvoidSkip a file that's too wide - it bumps chair legs and gets shoved around.
21. Lidded jar set for crayons and pencils with matching lids
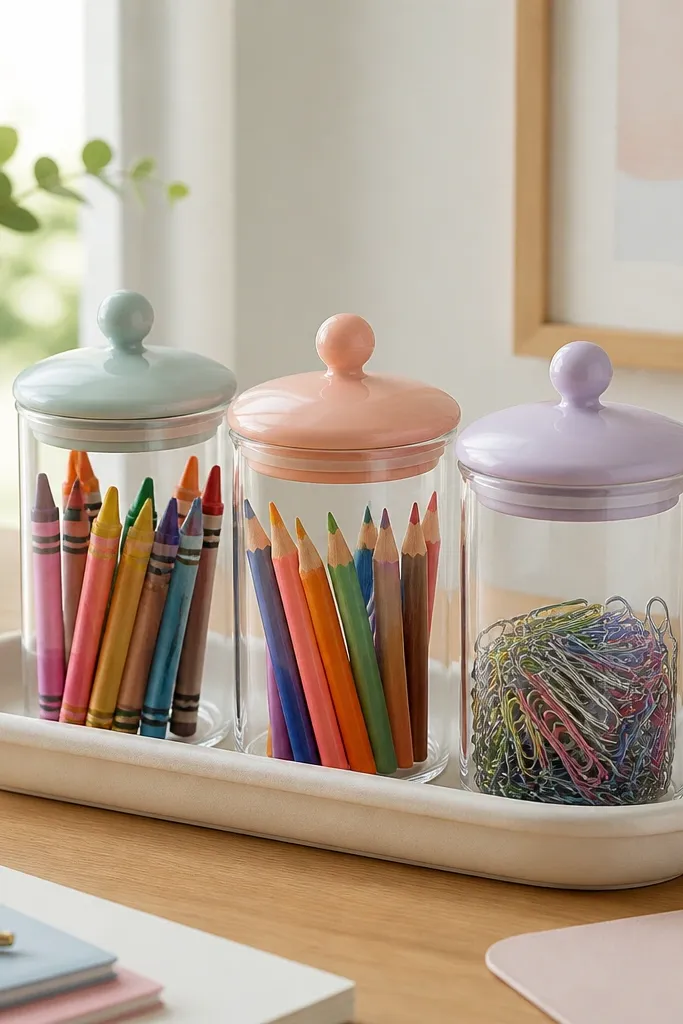
Lidded jars keep dust and tiny bits away from art supplies, and they look cohesive when lids match. I've found that kids spill less when the jar has a lid because there's less chance of a full dump. The set also makes the desk look curated without being delicate. Pastel lids give a kid-friendly look that still feels tidy.
Pick jars that are wide enough for pencils to slide in without bending tips. Use a tray to group them and keep them from spreading. Label each lid with a small icon-style sticker so kids can read without spelling.
Pro tipPut a small "refill" note inside the lid rim so you remember what to buy.
AvoidAvoid mismatched jar sizes - uneven height makes the tray look cluttered quickly.
22. Washable fabric desk drawer liner for instant reset
This is the boring-looking upgrade that makes everything look better. When the drawer floor is clean and grippy, containers don't slide and topple. Fabric liners hide minor scuffs and marker smudges better than bare plastic. The result is a drawer that looks "finished" even when kids rummage.
Cut the liner to fit the drawer base with a 1/4 inch overlap at the edges for easy removal. Use a fabric with a wipeable coating or choose a canvas that you can spot-clean. Pair it with one neutral organizer insert so the drawer doesn't look busy.
Pro tipUse Velcro dots on the liner corners so it doesn't shift when you pull containers out.
AvoidSkip slippery liners - containers slide and you get a messy drawer faster.
23. Magnetic board + rotating memo wheel for homework
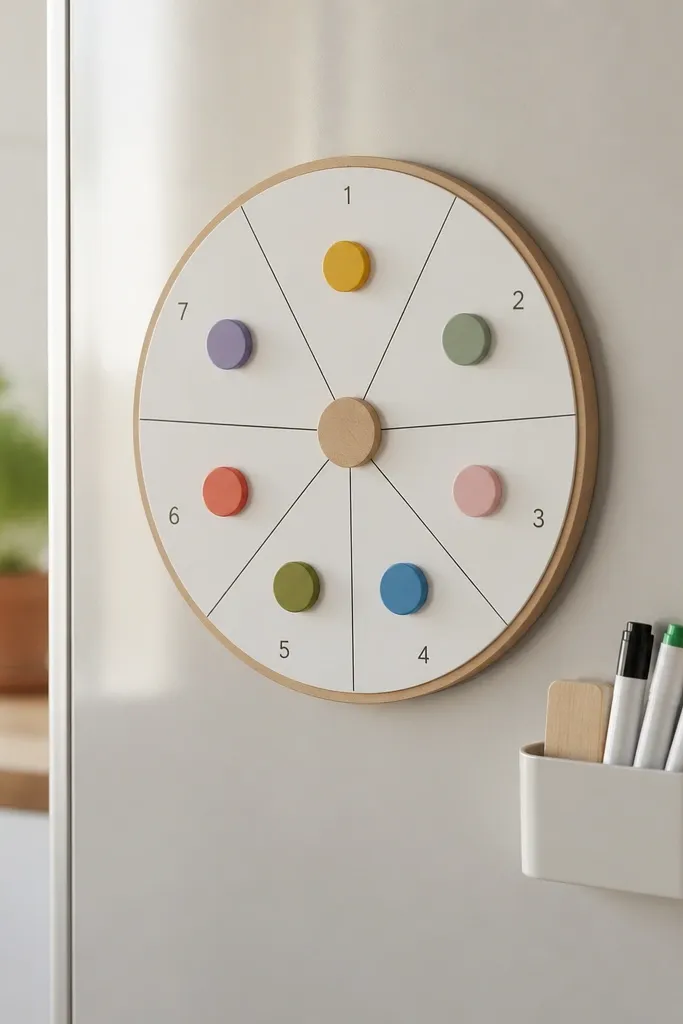
A memo wheel turns homework tracking into a physical routine. Kids like moving magnets, and the desk stays organized because the "what's due" info is always in one place. The magnetic board gives you a clean background, so paper scraps don't take over. When the wheel is the only reminder system, your desk looks calm even during busy weeks.
Use a magnetic board sized for the wheel and mount it with removable adhesive or on a magnetic surface. Add magnets for each day and keep a small tray for marker and eraser. Keep the wheel near the writing area so you don't walk across the room to check it.
Pro tipWrite due dates on small card magnets that you can swap weekly.
AvoidAvoid placing the board where glare hits - kids can't read it and they stop using it.
24. Desk-edge book stand with vertical "subject" sign strips
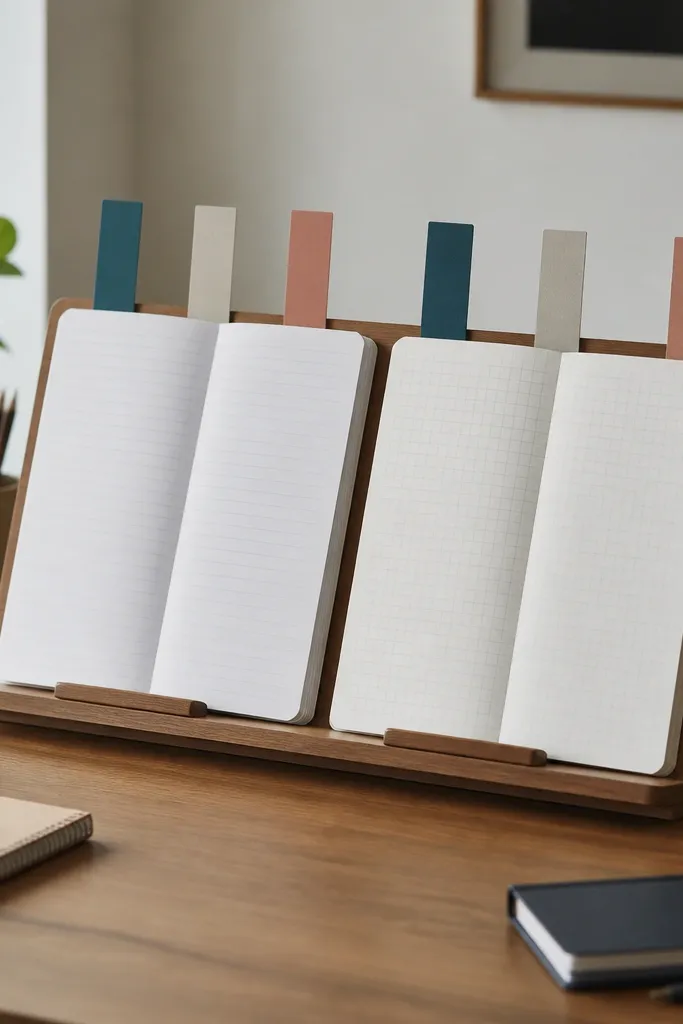
A book stand keeps open notebooks from collapsing into a pile. The stand also makes space for tools underneath, which improves the whole desk layout. Vertical subject strips give a tidy, designed look and help kids know where to put each assignment. It's one of those setups that looks good even when the desk is in active use.
Choose a stand with a lip that fits the desk edge thickness. Place notebooks with spines facing out so pages don't curl. Use card strips with colored tape borders behind each notebook for quick sorting.
Pro tipKeep one strip plain for "random papers" so you don't create a new label every time something shows up.
AvoidSkip stands that slide - if the stand moves, kids keep stacking notebooks on the desk surface.
25. Removable acrylic organizer tower with 4 labeled levels
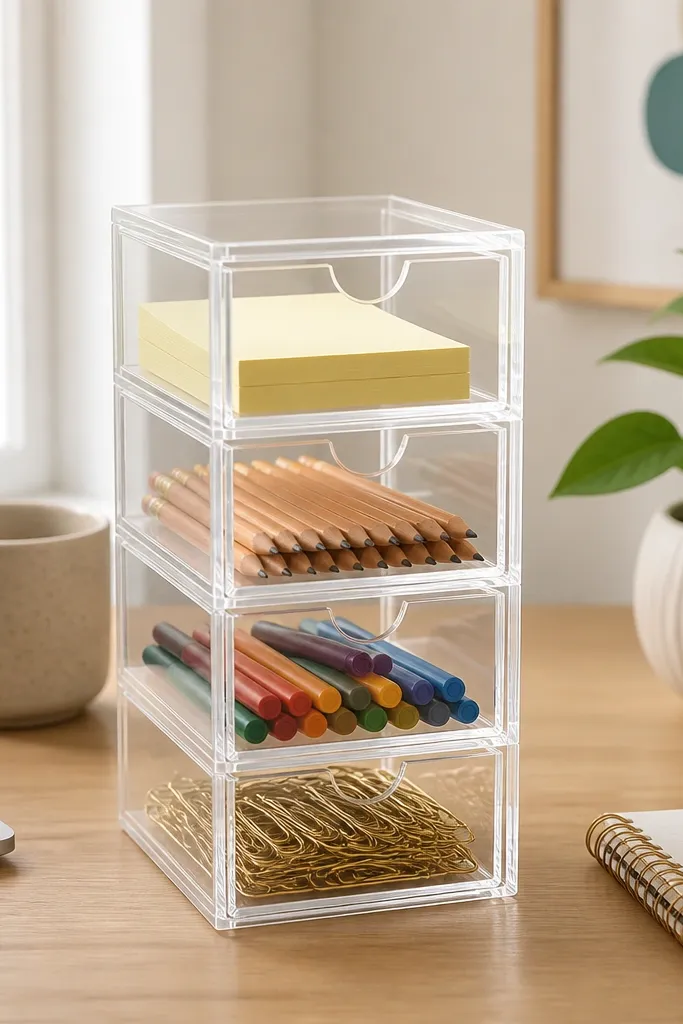
A vertical tower saves desk space and keeps supplies visible without a drawer dive. Clear compartments make it easy to spot what's missing, which helps during homework rush. I like four levels because kids understand it as "top for today, bottom for backups." The labels keep sorting consistent.
Pick a tower under 10 inches tall so it doesn't block the keyboard. Use label stickers on the front edges, not inside, so kids see them at a glance. Group sticky notes and small paper clips on the top two levels.
Pro tipAdd a thin strip of magnetic tape under the label area if you want to swap labels without peeling adhesive.
AvoidAvoid towers with tiny compartments - they force you to cram and it looks chaotic.
26. DIY desk organizer using a cork sheet and removable pushpins
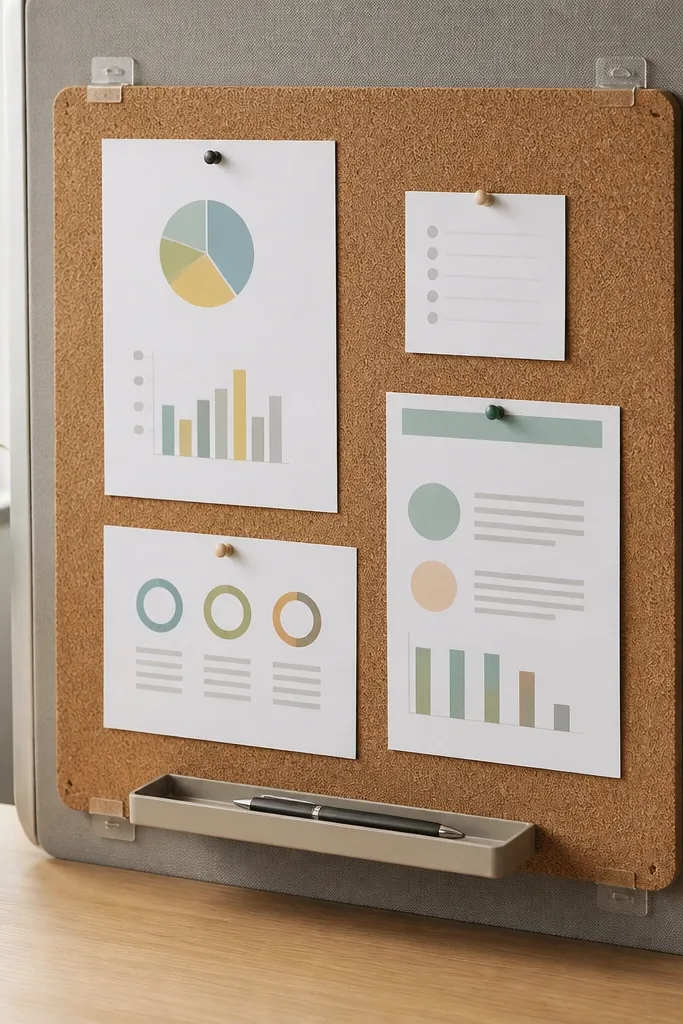
Cork is forgiving. It holds notes, keeps paper from sliding, and it looks warm and grounded. With removable mounts, you get the function of a pinboard without drilling. I use it for weekly permission slips and "keep at home" pages so they don't get lost in the backpack. It also reduces the sticky-note explosion because the notes have a home.
Use a cork sheet at least 12 by 16 inches if you want it to hold enough pages. Mount it to a removable board or directly to a desk-side surface using adhesive mounts meant for temporary installs. Keep pushpins spaced so your notes don't bunch.
Pro tipPin only 5 to 8 items at a time so the board stays readable.
AvoidAvoid pinning everything - a packed cork board looks like clutter fast.
27. Clip-on paper roll holder for wrapping craft paper
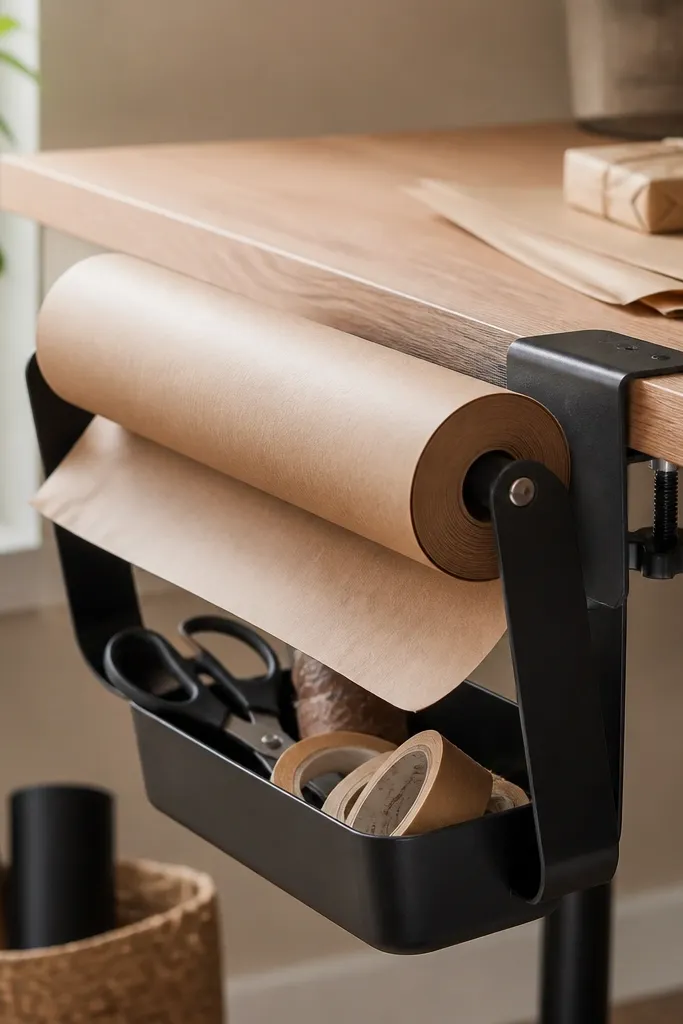
A roll holder keeps craft paper from turning into a crumpled mess on the desk. It also makes the desk look more like a craft station, which fits kids' projects. When the roll is off the tabletop, you get a clear writing area. The clip-on style is perfect for no-drill setups because you're using the desk edge.
Use a holder sized for the roll core diameter, usually 1.5 to 2 inches for common craft paper rolls. Clip it to the desk edge near the crafting side, not in the middle where you'll hit it with elbows. Pair it with a small bin for tape and scissors so the tools stay together.
Pro tipTape the end of the roll to the underside with a small strip so it doesn't unwind during play.
AvoidAvoid placing the roll holder too low - it blocks knees and kids bump it constantly.
28. Removable pegboard-style side organizer for school supplies
This is the "tool wall" look without the permanent holes. The panel gives you clear zones for each supply and it keeps the desk from turning into a pile. I like using a small shelf for tape and a hook line for scissors so kids learn the pattern. It looks clean because everything is vertical and aligned.
Mount a small pegboard panel with removable adhesive anchors designed for your surface. Keep hook items light and use the shelf for flat items like tape rolls. Add a single basket below for backup pencils.
Pro tipUse one accent color hook - like teal - for "today tools" so kids know what to grab first.
AvoidSkip mix-and-match panels - different hole sizes and finishes look messy.
29. Desk organizer mat with raised lanes for supplies
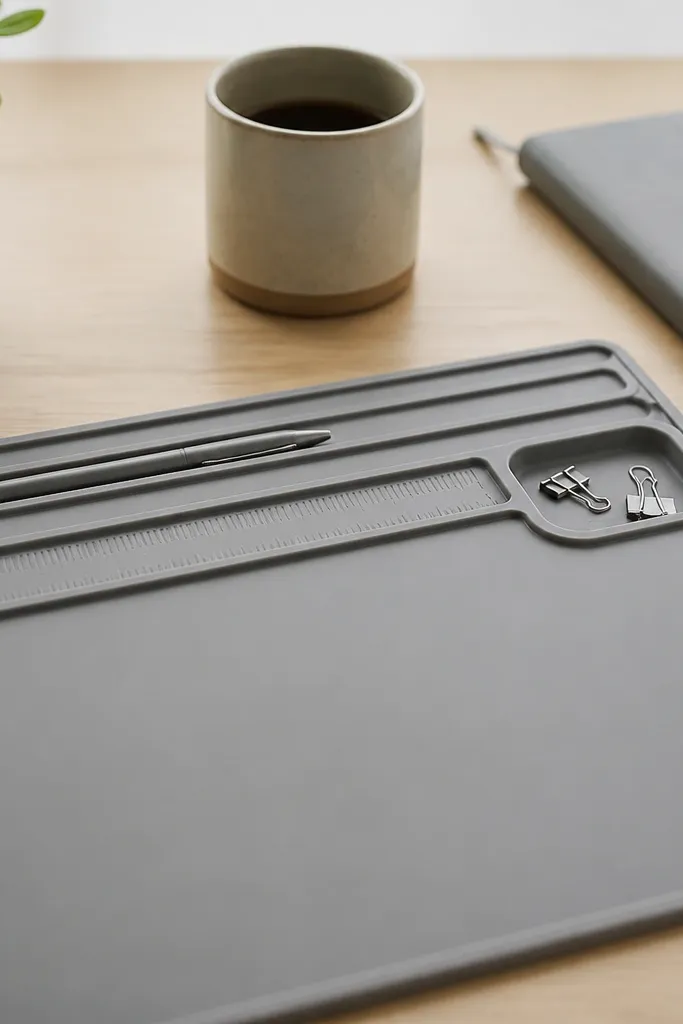
A mat makes the desk feel like it has built-in boundaries. Those raised lanes stop pens and rulers from rolling into each other, and the surface wipes clean after marker accidents. I like muted colors because the desk doesn't look like it's constantly covered in school supplies. It also helps kids understand where items belong because the mat guides the shape.
Choose a mat that covers at least the area in front of the writing spot. Put the mat centered so lanes align with the chair position. Add small trays at the sides for items that don't fit lanes, like glue sticks.
Pro tipUse a microfiber cloth and a tiny bit of dish soap to wipe the mat weekly. Marker residue dulls the look fast.
AvoidAvoid glossy mats - they show smudges and fingerprints more than you'd expect.
30. Stackable fabric bins with snap lids for daily supplies

Fabric bins soften the look and snap lids keep supplies from spilling when a kid pulls too hard. Stackable sizes give you a small footprint, and the lids hide the mess when you want the desk to look "done." I like using bins with a neutral base and one accent color on the lid so the system looks intentional. This is a great option when your child's supplies multiply overnight.
Pick bins that stack with flat tops so they don't wobble. Keep the top bin for daily items and the bottom for backups. Use a label on the side of each bin at kid eye level.
Pro tipStore one roll of painter's tape inside the largest bin. You'll use it for quick repairs and labeling.
AvoidSkip bins with weak snaps - lids pop open and you lose the tidy look.


