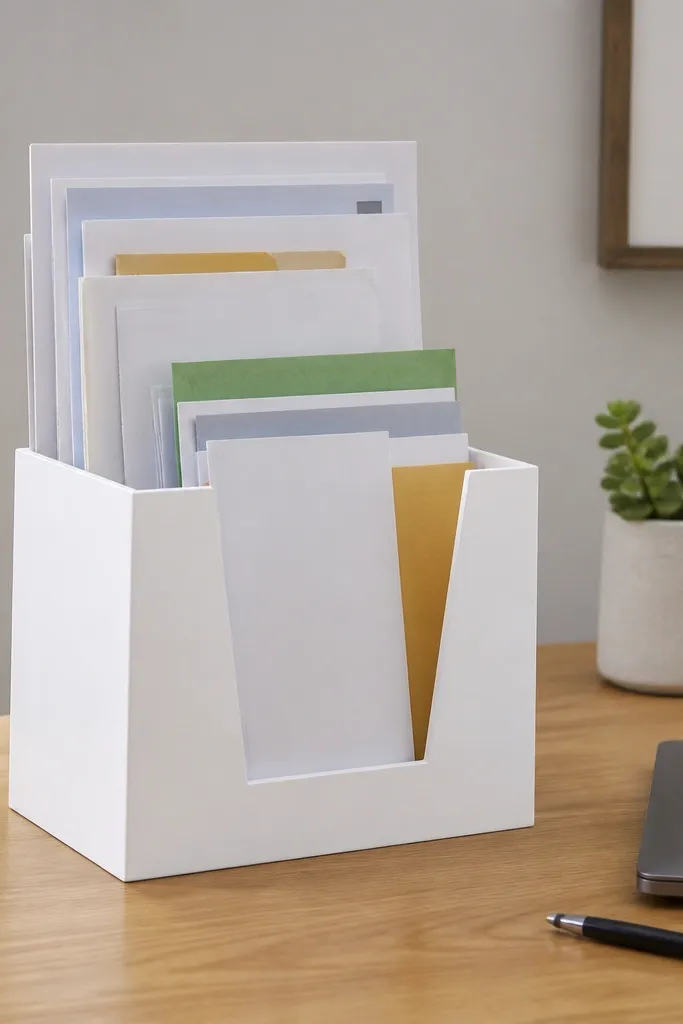
1. Slanted letter tray from a cut-down pizza box liner
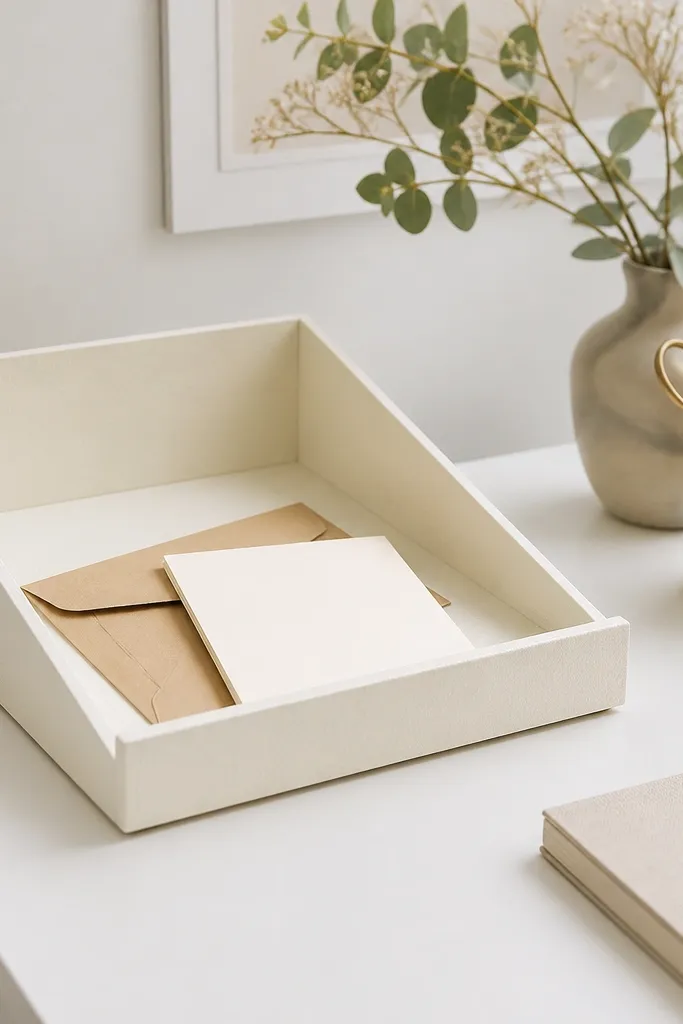
This is the fastest way I know to make paper look intentional. The slant stops envelopes from sliding into a pile, and the front lip keeps everything from spilling forward. I use matte contact paper in ivory so it looks like painted wood from a distance. The tray also hides the messy backs of receipts because only the clean face shows.
Cut the liner into a rectangle about 10 inches wide and 6 inches tall. Score a 1.5-inch fold at the back to create the slant, then glue and clamp with clothespins for 20 minutes. Cover all visible surfaces with matte ivory contact paper and burnish edges with a credit card.
Pro tipLabel the front lip with a small strip of black tape for "To File" so paper never becomes a wandering stack.
AvoidSkip glossy contact paper - it catches light and reads cheap on a minimalist desk.
2. Desk-edge cable channel made from a wooden picture-frame strip
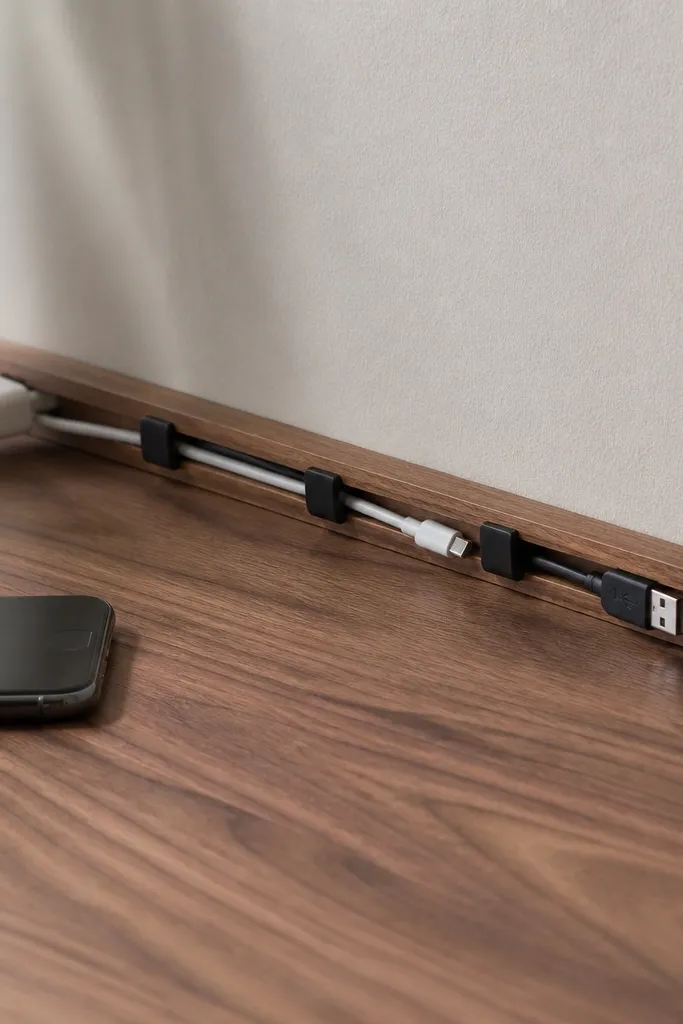
Cables drive minimalist desks crazy because they pull at everything. A channel along the back edge keeps cords running in one direction, so your front stays clean. I like wood strips because they blend with most desks and don't look like plastic bins. The lip also prevents cables from dropping onto the floor when kids tug.
Use a 1-inch wide picture-frame strip, cut to your desk width. Rout or sand a shallow channel about 6mm deep, then seal with matte water-based varnish. Screw it into the desk underside using two to three small pilot holes and add cable clips every 6 to 8 inches.
Pro tipLeave a 2-inch "service loop" at the monitor side so you can move the laptop without yanking the channel.
AvoidDon't run the channel too close to the front - you'll see cable lines every time you sit down.
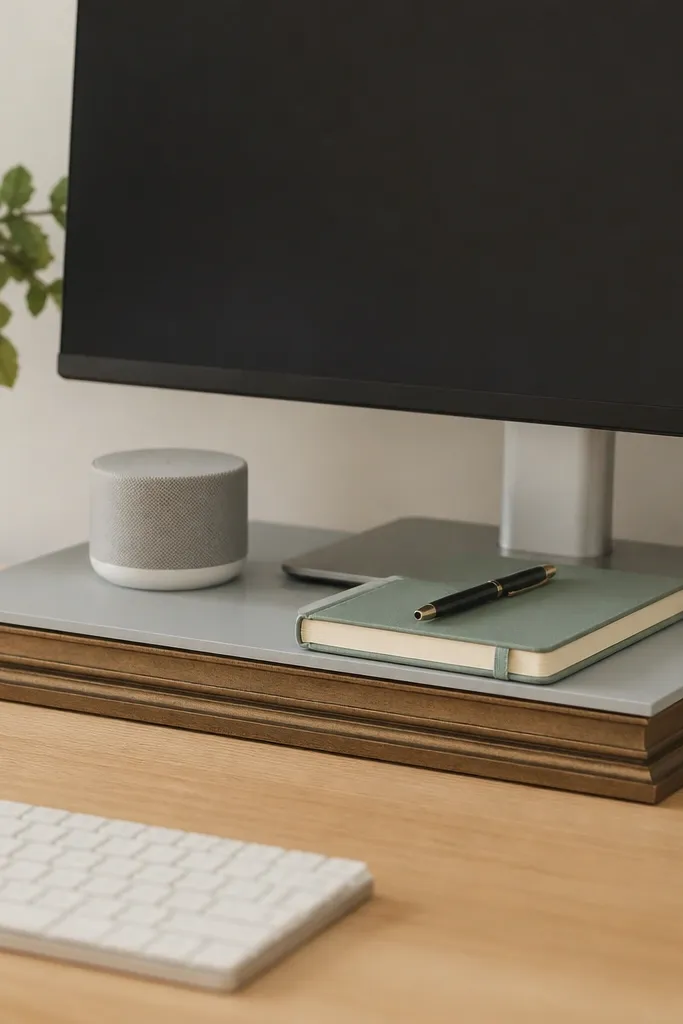
3. Felt pen organizer with vertical slots for 12 markers
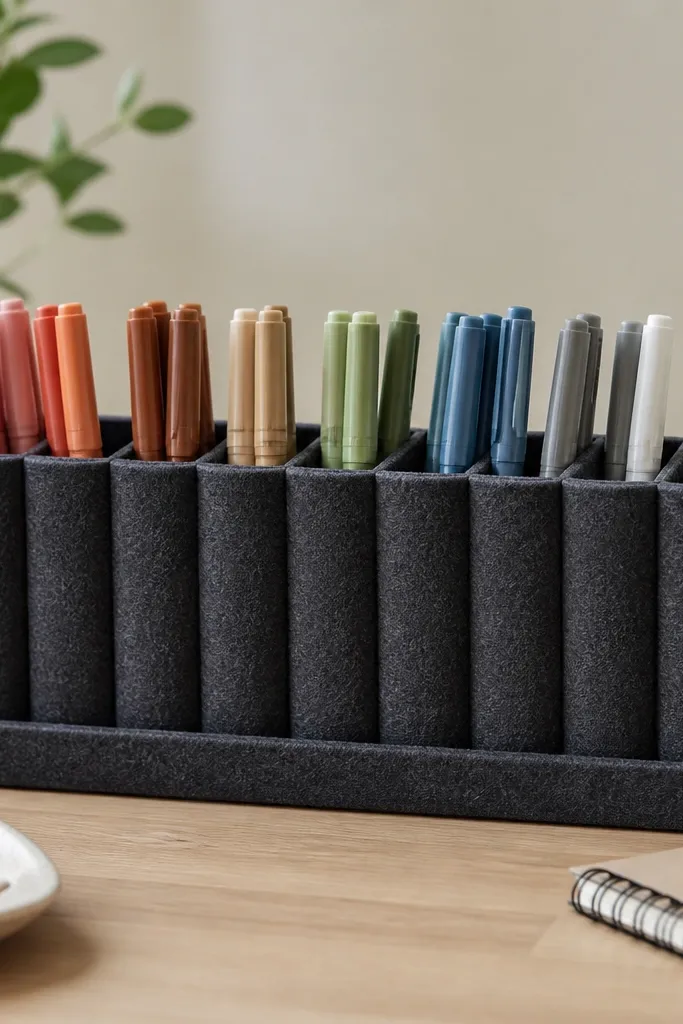
Felt grips markers without scratching and it hides small scuffs. Vertical slots stop the "marker tower" collapse that happens in kid desks. Charcoal gray reads modern and hides ink stains better than light colors. Because the slots are fixed, everything has a home and the desk surface stays clear.
Cut felt into a base 9 inches wide by 6 inches tall. Make 12 slots by cutting parallel slits 1/2 inch apart, stopping 1 inch from the bottom. Stitch or glue a 1-inch felt border at the top for a crisp edge so it doesn't fray.
Pro tipUse a scrap piece of felt as a removable "cap" to keep caps from drying out when kids leave pens open.
AvoidAvoid thick pile felt that sheds - it looks fuzzy and messy once it pills.
4. Turn a shoebox into a drawer-style supply organizer
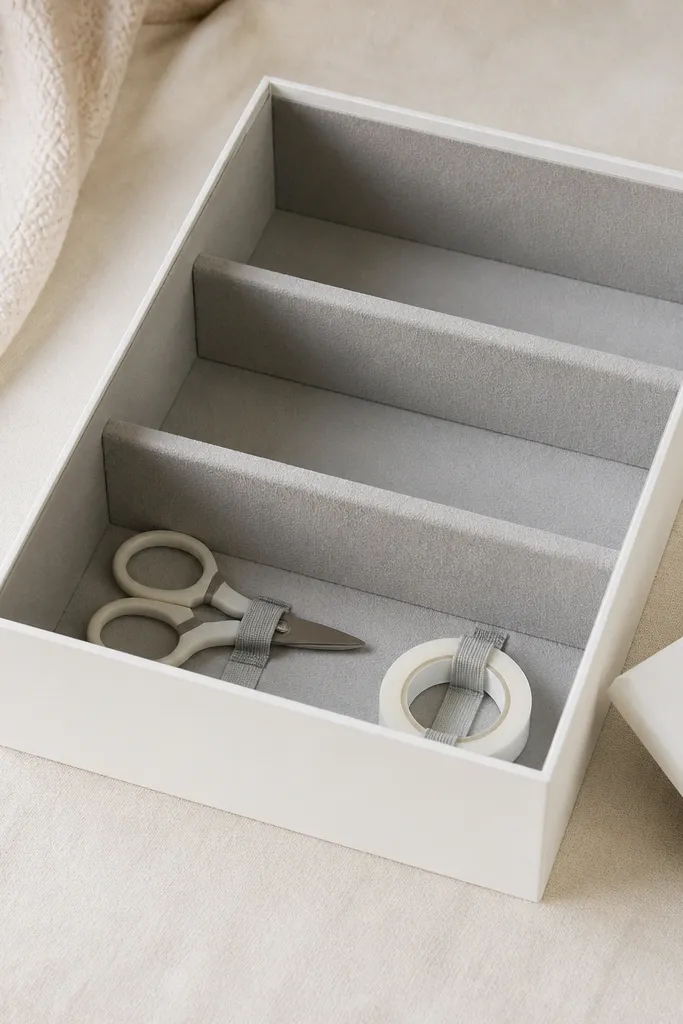
Shoeboxes are already the right size for desk drawers, and they're cheap enough to redo when kids grow. The fabric lining makes it feel calmer and softer than plain cardboard. Dividers keep small supplies from mixing - tape rolls should never sit next to paper clips. The elastic bands give a "snap-in" place for scissors so you don't hunt them.
Cut the shoebox lid off and sand any rough edges. Line with light gray cotton fabric or felt using spray adhesive. Add two dividers made from 1/2-inch foam board, then attach elastic bands with hot glue at 4-inch intervals.
Pro tipPut heavier items on the bottom and lighter items on top so the organizer doesn't tip when a drawer opens fast.
AvoidDon't skip a lid or cover if it's in a drawer - dust and loose bits end up on the desk later.
5. DIY acrylic-look tray from clear vinyl + binder clip feet
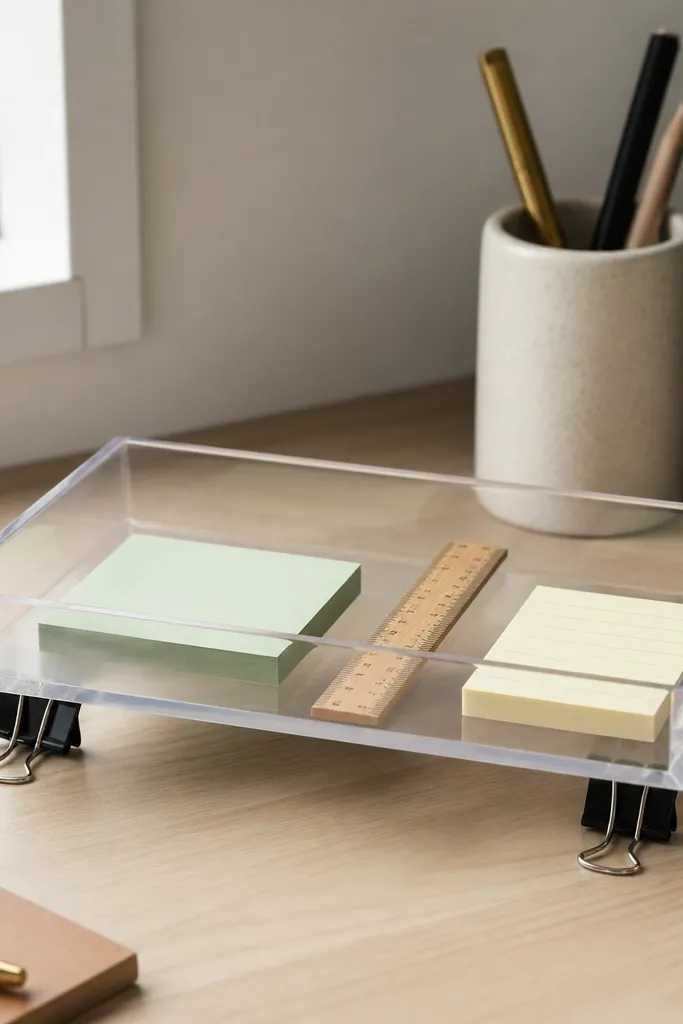
You get that clean, modern minimalist desk organization look without paying for acrylic. Clear vinyl lets you see what you need, and the tray edges look sharper than cardboard. Using binder clip feet keeps it from sliding and gives it a floating, "designed" feel. It's great for desk accessories you grab daily.
Cut clear vinyl (from a craft store roll) into a 10x7 inch rectangle. Fold and glue the sides around a thin foam board base so corners hold shape. Attach two binder clips upside down under the tray at the back corners so it grips the desktop.
Pro tipUse a matte black ruler as the tray base insert for a subtle contrast line.
AvoidDon't use shiny plastic wrap - it warps and looks wrinkled in daylight.
6. Pegboard mini wall behind desk using scrap wood + hooks
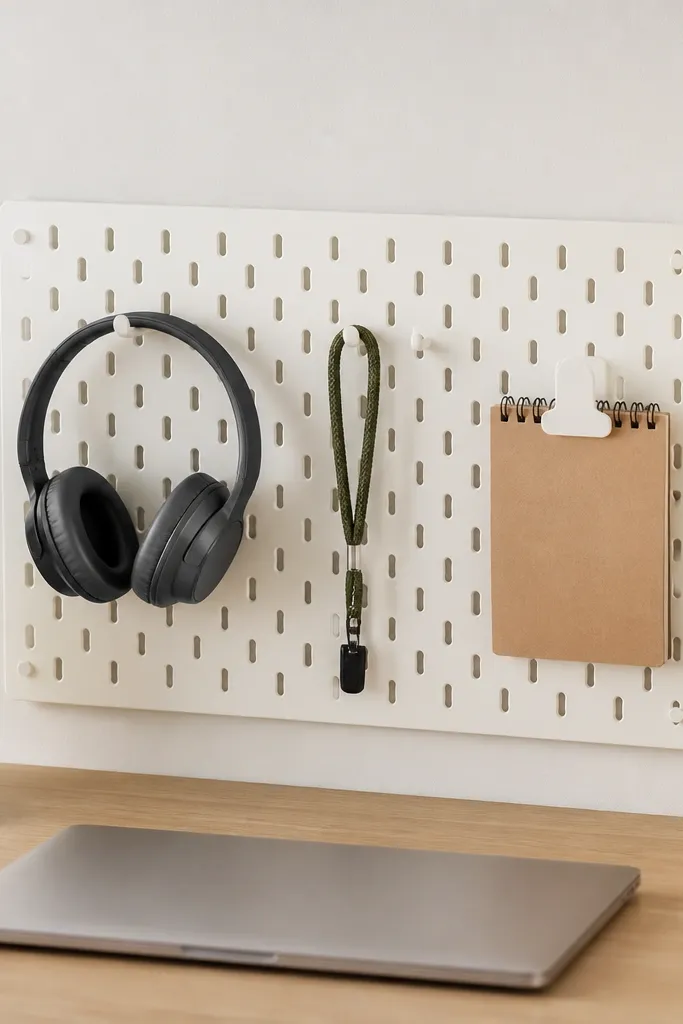
Pegboard turns chaos into a visible system. Your tools hang vertically, so kids don't stack them horizontally and create a mess. I like a mini panel because it keeps the focus behind the desk, not on the wall clutter. An off-white pegboard keeps the look modern and less "garage."
Cut scrap plywood to a 18x24 inch panel, sand, then paint matte off-white. Screw a pegboard sheet on top or use pegboard directly and mount with wall anchors. Add 6 to 8 hooks, plus one small tray hook for a notebook.
Pro tipHang the most-used items at kid height and the rest above reach so you don't fight the system.
AvoidAvoid mixing hook sizes randomly - it makes the wall look cluttered even when empty.
7. Magazine file from a foam board 'U' stand
A U stand holds paper upright without needing a store-bought folder system. Foam board keeps it lightweight so it doesn't sag or pull your desk drawer open. White with a slight gray tint reads modern and doesn't fight with colorful schoolwork. The open top lets you drop papers in quickly.
Cut foam board into two side panels and one base strip. Make the U about 8 inches wide and 7 inches tall, with 1-inch side lips to stop paper from falling out. Glue with a foam-safe adhesive and cover seams with thin gray tape.
Pro tipAdd one small strip of label tape on the front lip: "School" or "Bills" so paper doesn't become a single pile.
AvoidDon't make it too shallow - paper slumps and looks messy fast.
8. Drawer organizer grid from cereal boxes + removable tape hinges

This is the cheapest way I've found to get a grid that kids can actually use. Cereal boxes are stiff enough when laminated, and the compartments stop pencils and erasers from migrating. The removable tape hinge lets you reconfigure sizes when you switch from crayons to markers. The laminated look also keeps the compartments easy to wipe.
Flatten and cut cereal box panels into strips, then laminate with clear self-adhesive contact paper. Build a grid that fits your drawer - measure first. Use thin strips of removable tape at the bottom edges so dividers lift out without tearing the drawer lining.
Pro tipMake one long skinny compartment for rulers and one wider one for glue sticks so kids don't jam everything into the same spot.
AvoidAvoid single-layer cardboard - it bends and the grid collapses with daily use.
9. Minimalist notebook dock from a scrap wood plank and leather strap
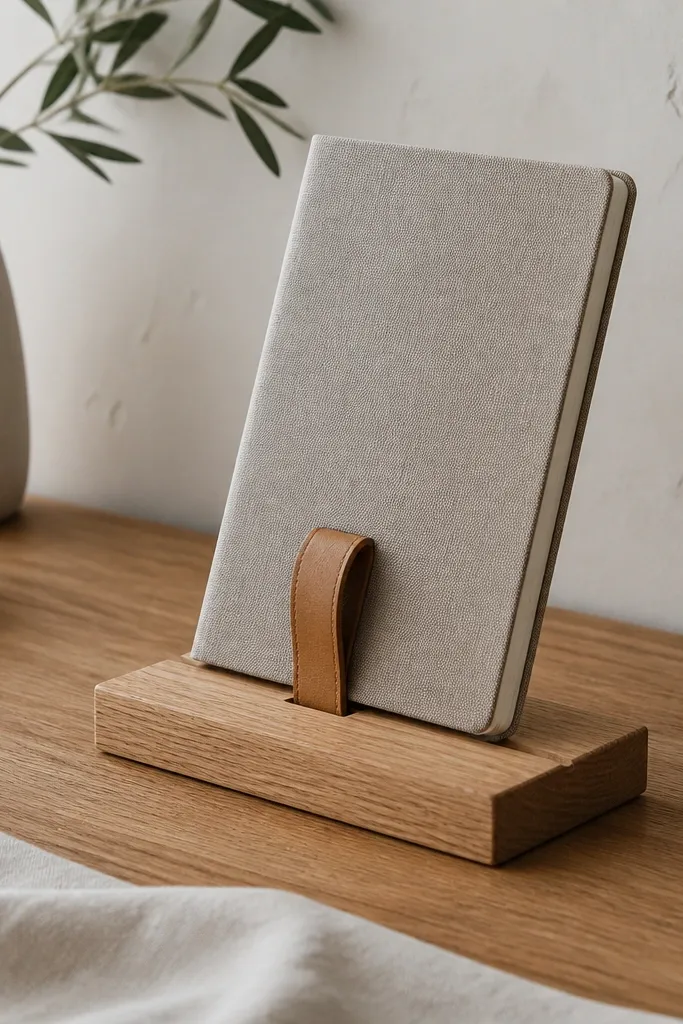
A notebook dock keeps the book from sliding around and gives your desk a designed look. The leather strap looks warm but still clean in a minimalist setup, especially with light wood. It also helps kids keep the notebook open in the same spot for homework without flopping it onto the keyboard. The strap is adjustable so it fits different notebook thicknesses.
Use a 10-inch long scrap plank, 2 inches wide, sanded and sealed with matte clear coat. Attach a leather strap with two small screws or rivets on each end, leaving a loop that grabs the notebook cover. Position it near the back edge so it doesn't block your writing space.
Pro tipRound the plank corners with sandpaper so it doesn't look like a rough cut.
AvoidSkip glossy sealant - it creates glare and makes the setup look less intentional.
10. DIY clipboard stand from a bent metal bracket and wood base

If your desk is always fighting with paper angle, this fixes it. A clipboard stand keeps sheets readable and stops the constant "paper stack leaning problem." The slight angle helps kids see instructions without pushing their heads down. Metal + wood reads modern and doesn't look like a craft project after a week.
Find a scrap metal bracket at a hardware store bin or salvage one from an old shelf. Cut a wood base about 6x4 inches, then screw the bracket upright. Paint the metal with matte black spray paint, let cure 24 hours, then attach to the wood base with wood screws and washers.
Pro tipAdd a small felt pad under the base so it doesn't scratch your desk surface.
AvoidDon't use a steep angle - sheets fall forward and you end up re-stacking anyway.
11. Sticky note and pen 'dock' made from a foam board L-shape
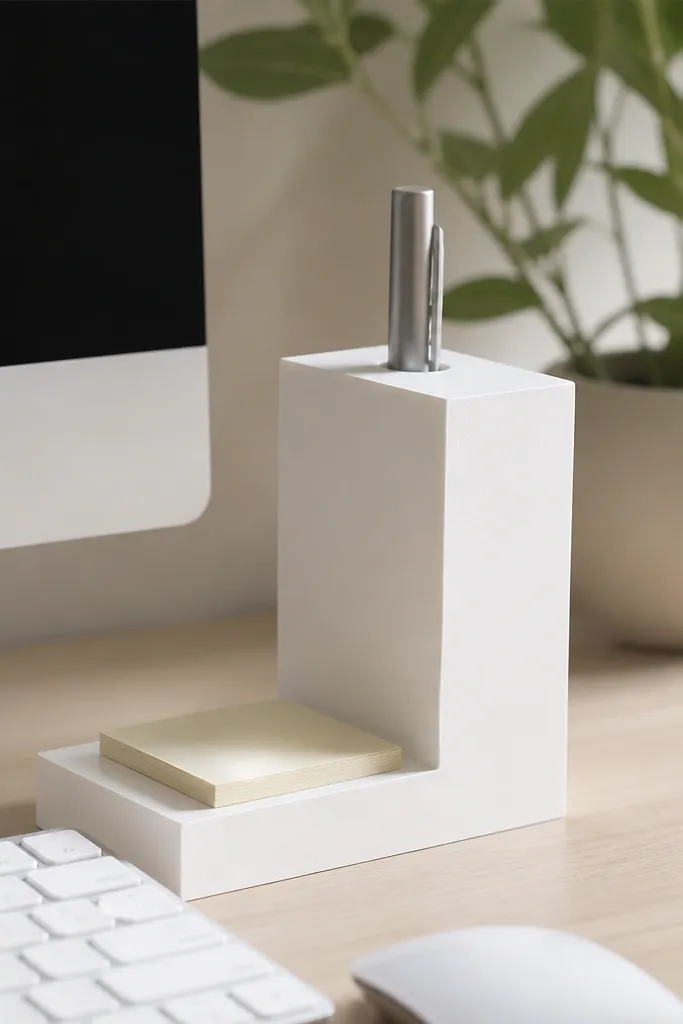
This is a small build with a big effect because it keeps the daily stuff in one reach zone. Sticky notes live on the ledge, pens sit in the slot, and your keyboard stays clear. Foam board is easy to cut and it holds edges clean when you cover it. Matte white looks modern and hides scuffs from weekly use.
Cut an L-shape: base 10 inches long by 4 inches deep, and a back wall 6 inches tall. Make the pen slot 1 inch wide and 5 inches tall, glued into place. Cover with matte contact paper in white or very light gray.
Pro tipPut the sticky note pad on the left side if you're right-handed, so your pen hand doesn't bump it.
AvoidSkip the back wall - without it, notes slide off and the look turns sloppy.
12. Caddy for kids' scissors and glue from a plastic milk crate section
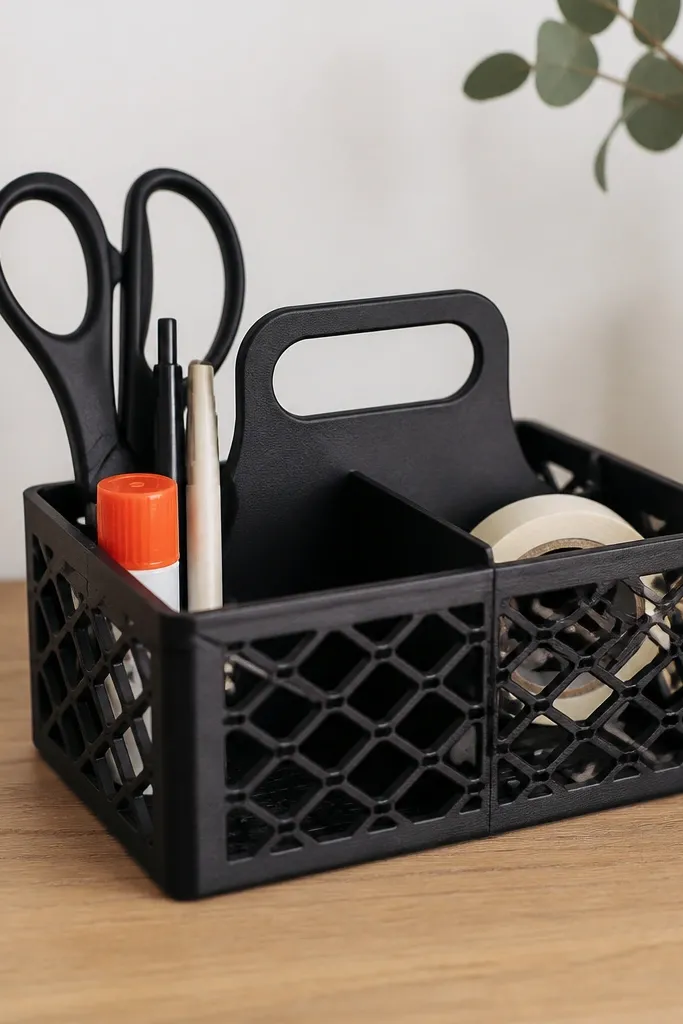
Plastic crate material is tough, and it survives kid drops. When you paint it matte black, it stops looking like a storage bin and starts looking like desk furniture. The two compartments keep glue and scissors from becoming a tangled mess. Because it has a handle, kids can carry supplies to the table without dumping them.
Cut a milk crate section into a 8x6 inch caddy with two internal dividers made from scrap plastic or foam board. Sand lightly, prime if needed, then spray with matte black paint. Add a thin foam pad at the bottom to stop tape rolls from rattling.
Pro tipUse short elastic loops inside for glue sticks so they don't fall sideways.
AvoidDon't use glossy paint - it shows every scuff and fingerprints.
13. Under-desk paper hangers using binder clips and curtain rod brackets
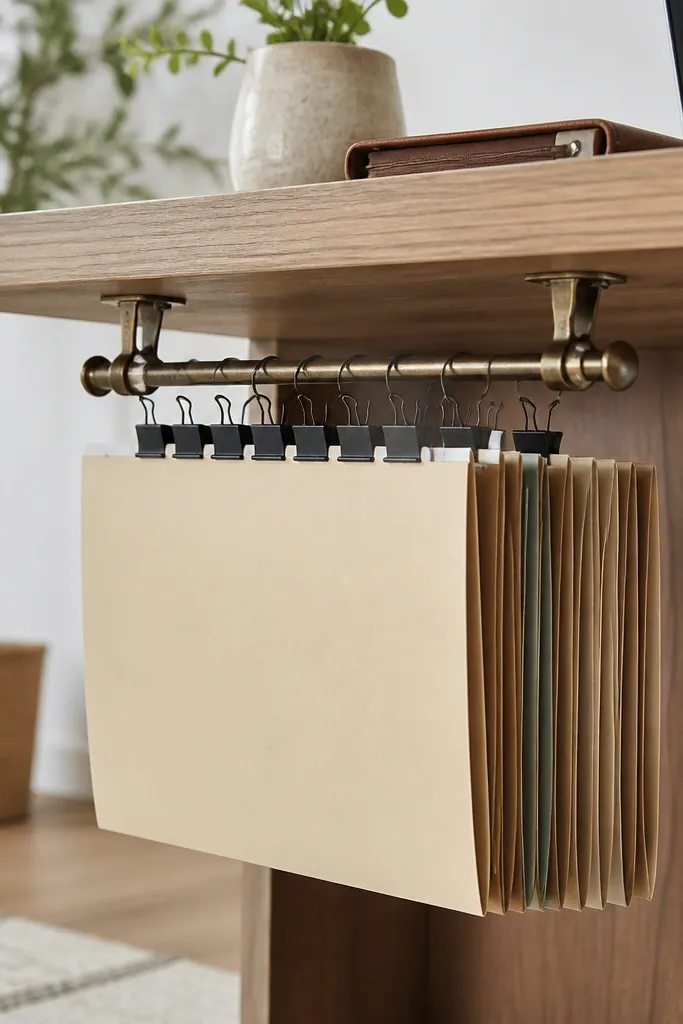
Hanging paper under the desk keeps the desk surface clean without putting everything in drawers. I like binder clips because they grab thick folders and open/close fast for kids. The rod keeps the hangers aligned so it doesn't turn into a swinging mess. This setup is great for homework sheets and permission slips you need daily.
Mount two small curtain rod brackets under the desk using screws into studs if possible. Add a short rod or even a thin dowel. Clip folders using large binder clips and keep the bottom edge 2 inches above the floor to avoid scuffing.
Pro tipUse two clip colors: one for "Today" and one for "Return" so kids know what to grab.
AvoidAvoid hanging too low - it bumps knees and becomes annoying fast.
14. Ruler + measuring tape holder from a toilet paper roll core and wood base
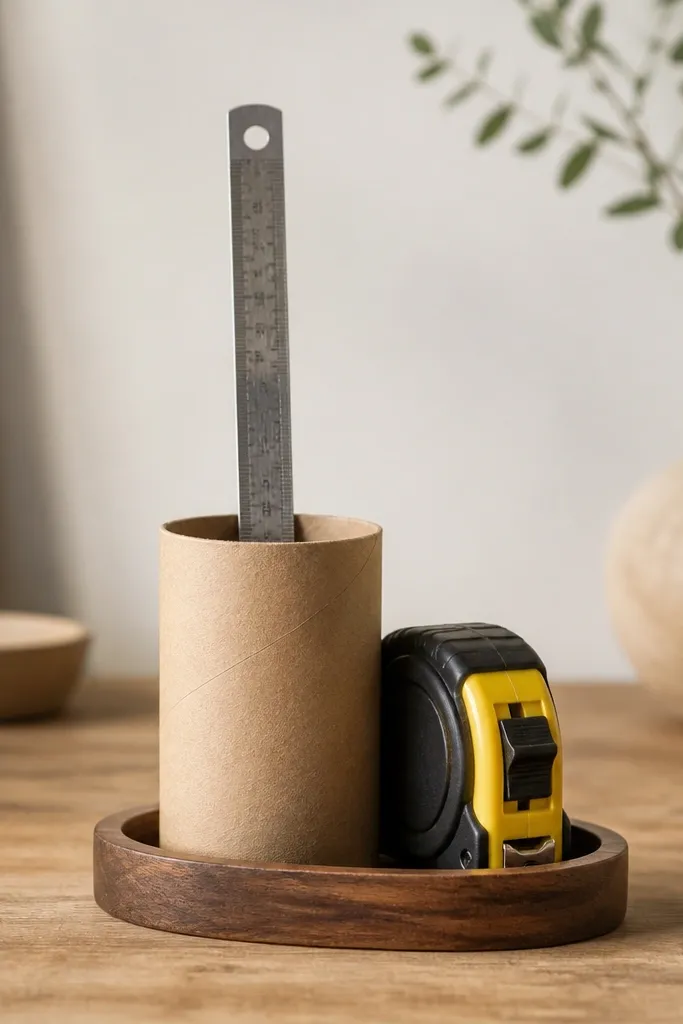
This is a sneaky way to keep measuring tools from taking over the desk. The kraft wrap looks warm and modern, especially on light wood desks. A core grips items so they don't slide, and the base stops it from tipping when kids reach in. It's also quick enough to make two - one for the desk, one for the art shelf.
Wrap a toilet paper roll core with kraft paper and glue the seam. Cut a shallow wood base 4x4 inches and glue the core centered. Add a small felt strip inside the core rim so the ruler doesn't clack.
Pro tipPaint the wood base matte off-white if your desk is dark so it doesn't look like a craft hack.
AvoidDon't leave the core bare - raw cardboard looks unfinished next to minimalist organizers.
15. Desk drawer 'stop' system using rubber cabinet bumpers
This is organization by behavior, not containers. When a drawer closes inconsistently, kids shove it harder, and items spill back out onto the desk. Rubber bumpers make the drawer stop at the same spot, so the divider grid stays aligned. It also reduces the "everything dumped at once" moment. The desk ends up looking cleaner because nothing migrates.
Open your drawer and find the track edge where it slams. Stick rubber cabinet bumpers at the contact points so the drawer meets them gently. Test closure 10 times and adjust bumper position if you hear rubbing.
Pro tipIf you use foam dividers, add a 1/4-inch gap at the back so the drawer doesn't crush them against the track.
AvoidAvoid using thick foam blocks - they fall off and you're back to slamming.
16. Paper clip and binder clip magnetic strip from a painted metal ruler
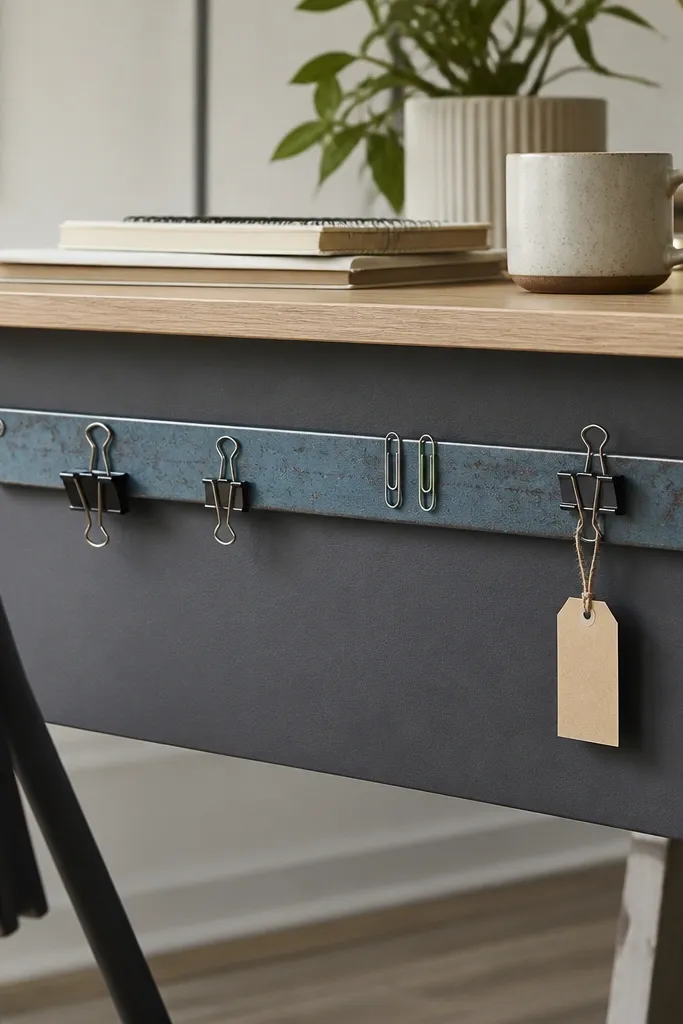
Magnet storage keeps tiny metal items from scattering into the drawer bottom. A painted metal ruler looks cleaner than generic magnetic strips because it has a defined shape and edge. The clips stick where you want them, so you grab them without digging. I use matte paint so the surface doesn't glare.
Buy a thin metal ruler or metal strip, paint matte, and let it cure fully. Mount it with two screws into a desk side or the underside of a shelf. Keep the strip height low so clips don't fall when you reach in.
Pro tipAdd a small loop of twine with a label for "Clip this" so kids clip papers right away.
AvoidDon't mount it too far from where you clip papers - you'll stop using it.
17. Monitor riser tray from a stack of picture frames and a foam board top
When your monitor sits too low, the desk looks crowded because everything has to fit around it. A DIY riser tray lifts the monitor and gives you a clean platform for daily items. Picture frames have straight lines that read modern. The foam board top is easy to wipe and keeps the surface looking flat and organized.
Stack two identical picture frames, upside down, and glue them together. Cut a foam board top sized to the inner opening, cover with light gray contact paper, and place it on top. Place only two items on the tray so it stays minimalist - I stick to a notebook and one small item.
Pro tipIf you need ventilation for a laptop, keep the tray low enough that vents aren't blocked.
AvoidDon't fill the tray - a riser looks best when it holds just a couple of things.
18. Fabric-covered 'drop zone' bin for backpacks and homework folders
This bin fixes the "stuff lands on the desk first" problem. Fabric softens the look and hides the fact it's cardboard, so it reads more like furniture than storage. The opening is wide enough for folders, but the sides keep paper from flopping out. It also trains kids to drop items in one place instead of creating a pile.
Use a sturdy cardboard box and cut the top opening about 10 inches wide. Wrap with oatmeal fabric using spray adhesive, then fold edges inward. Add two thin foam panels to the sides so the bin holds its shape when kids shove folders in.
Pro tipPut the drop zone on the same side every day - location consistency beats rules for kids.
AvoidSkip a stiff front edge - floppy openings look messy and paper spills out quickly.
19. Modular desk riser blocks from stacked cork coasters and glue
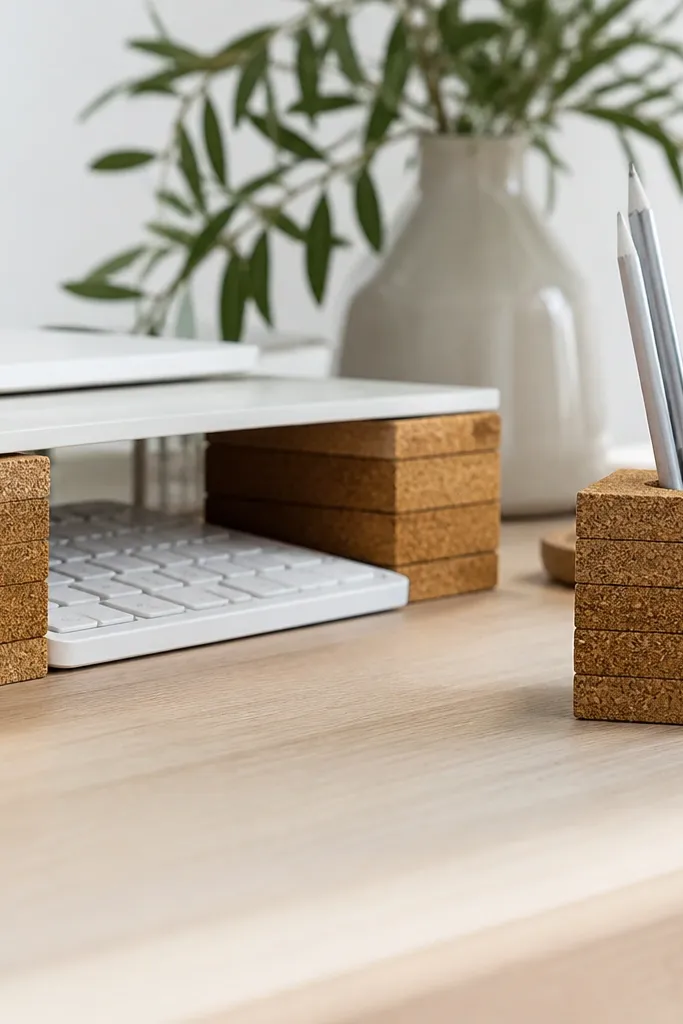
Cork is one of the best desk materials because it feels warm and it doesn't show every scratch. Stacking coasters creates modular risers so you can create levels for pens, a phone, or a small notebook. I like the natural cork color because it blends with wood desks and keeps the palette calm. These blocks also reduce sliding - your phone won't scoot away during homework calls.
Stack 3 to 5 cork coasters per block, then glue with a strong craft adhesive. Sand the top lightly if edges look uneven. Make blocks in two heights: one low for phone, one higher for a pen cup.
Pro tipWrap the top of one block with thin black felt to make it grip glass screens and reduce movement.
AvoidAvoid glossy sealant on cork - it looks plastic and catches light.
20. Cable tie wall hooks made from scrap wood and wide zip ties
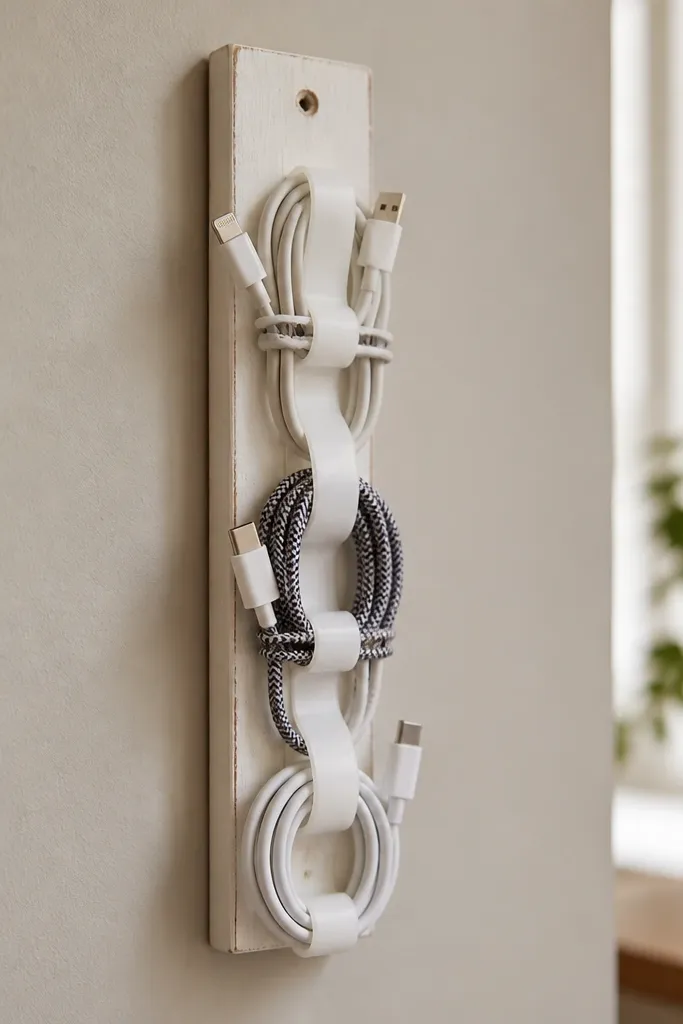
This is a cheap way to stop cable tangles without drilling a full channel. The loops act like a guide, so cables land where you want them and don't droop into the keyboard area. Wide zip ties are strong enough for daily use, and the off-white strip keeps it visually soft. It looks like a simple hanger system instead of random cord storage.
Cut a wood strip about 12 inches tall by 2 inches wide and paint matte off-white. Attach wide zip ties horizontally as loops and screw a small eye screw or nail at each loop end so the cable can feed through. Route cables through the loops and let them hang behind the desk.
Pro tipUse one loop for the charger and one for headphones so kids don't mix devices.
AvoidDon't use thin, flexible cords for the loops - they bend and cables fall out.


