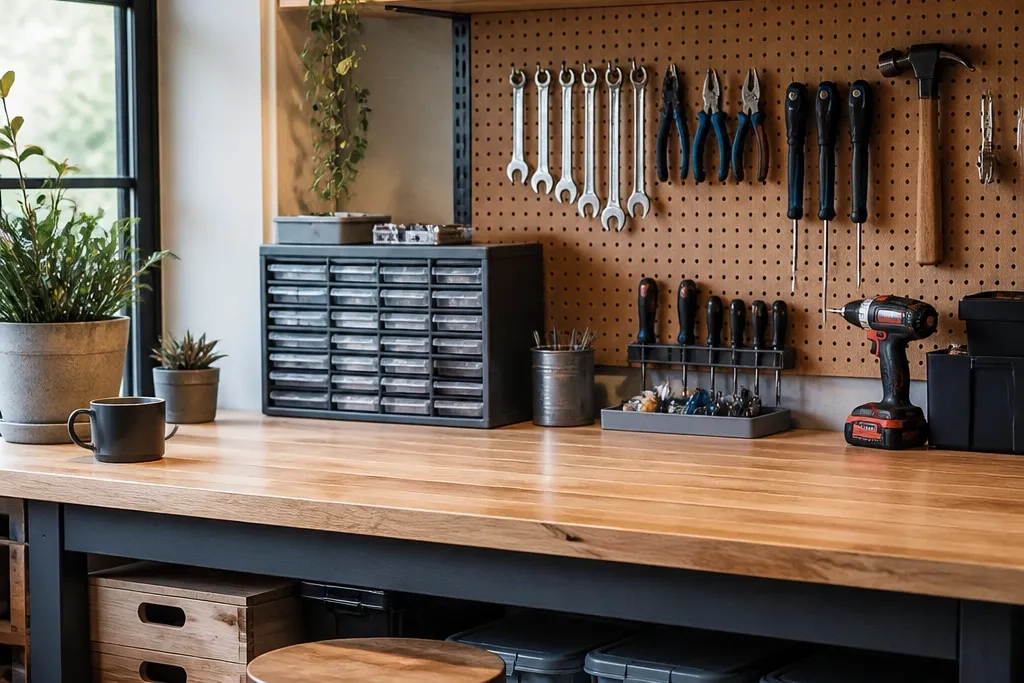
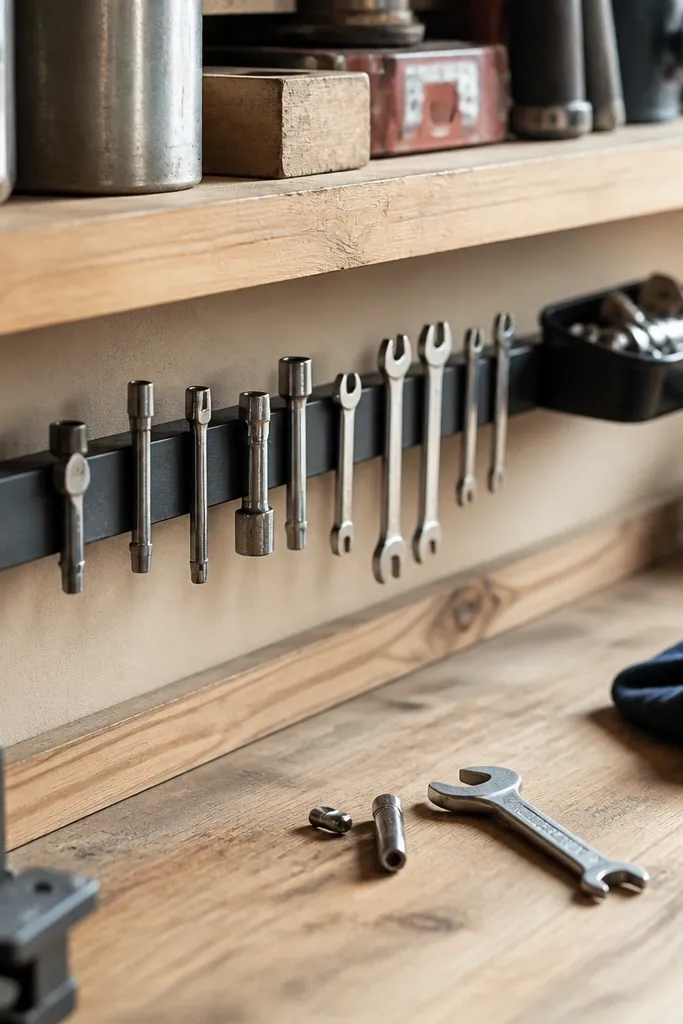
1. Pegboard tool rail with a labeled "grab zone" strip
This setup makes your most-used tools look intentional because they sit on the same horizontal line. I like a metal rail because it stops the pegboard from feeling like a random grid of hooks. The labeled strip adds order without covering the tools, so the bench looks clean even from across the garage. Use consistent hook types so every handle hangs the same direction.
Mount the pegboard so the tool hooks land 38-42 inches from the floor. Use one row of heavy-duty hooks for pliers/wrenches and a second row for screwdrivers. Keep labels on a single strip of clear plastic or laminated tape at the top third so the text stays readable. This works best when your bench sits against a wall and you can reach straight back without stretching.
Pro tipWrite labels with a label maker and add one "spare" hook per tool type so you never leave a tool sitting on the bench.
AvoidDon't mix hook styles - if some tools hang by the handle and others hang by the jaw, it looks messy fast.
2. Drawer-insert system for bits, blades, and tiny hardware
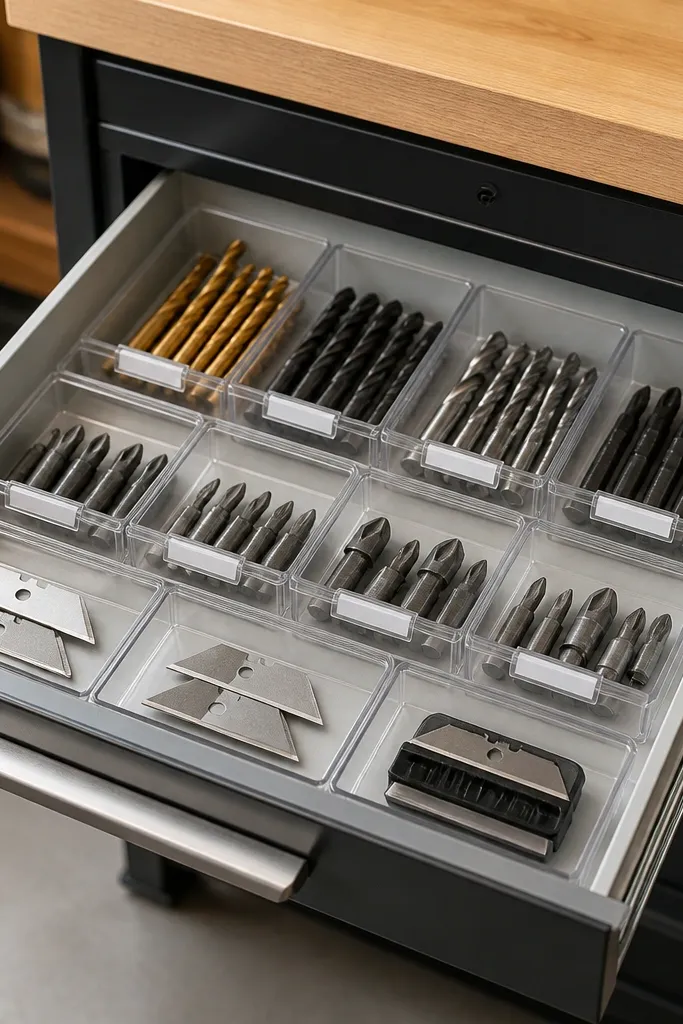
A drawer that divides small parts instantly looks organized because nothing rolls around. Clear inserts let you see bit sizes without digging, and the compartments stop you from mixing blades with bits. I've found this reduces "where did that go?" hunting by a ton because you can spot what's missing in seconds. The aesthetic is simple: white labels, clear plastic, and a tidy drawer edge.
Choose inserts that fit your drawer width with minimal gaps. If your drawer is 18 inches wide, aim for inserts that total around 16-17 inches so you still have a little space for your fingers. Sort by type first (bits vs blades) then by size, and keep the most-used sizes in the front compartments. Use a label that shows size and count, like "#2 x 25" instead of just "Phillips."
Pro tipAdd one empty "new/unknown" compartment so you don't dump mystery parts into a random bin.
AvoidDon't overfill compartments - if bins bulge, the drawer sticks and the layout looks sloppy.
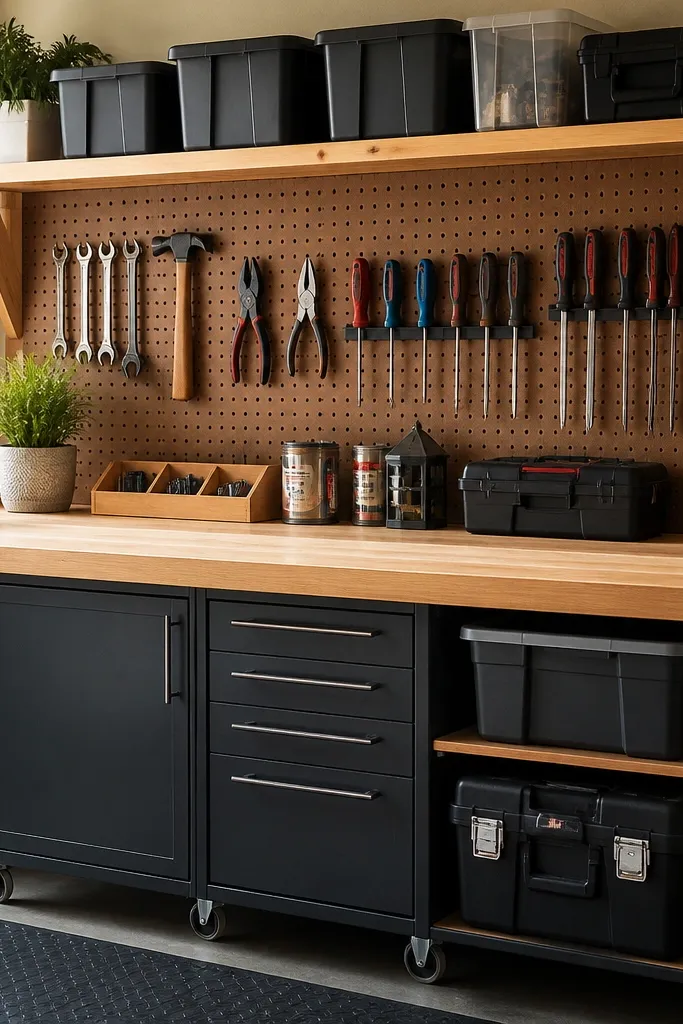
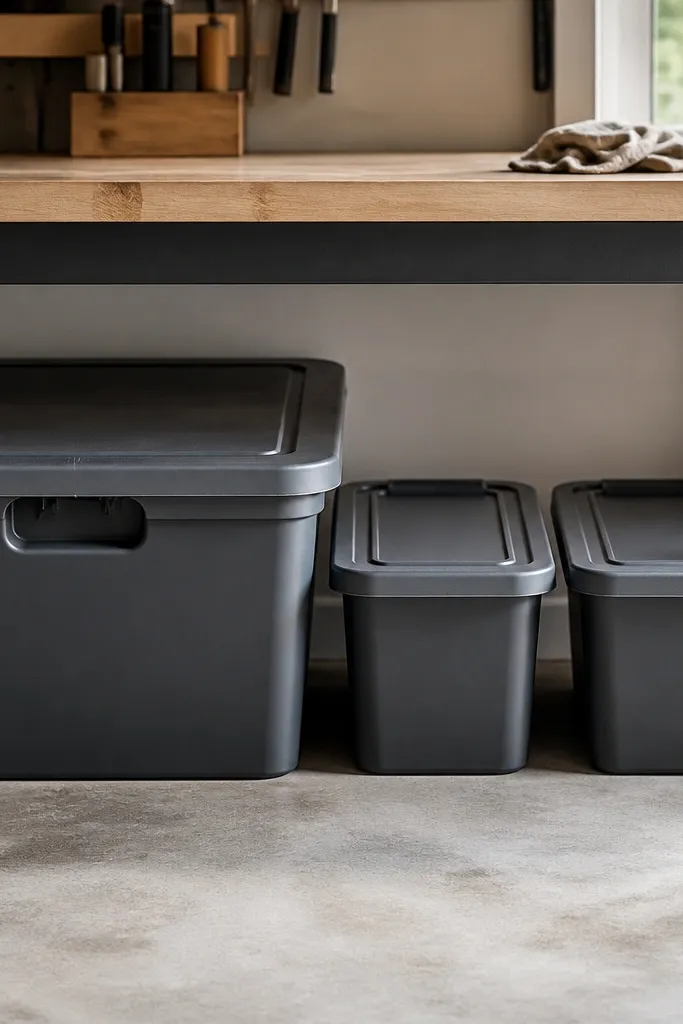
3. Stackable clear bins on a bench-side rolling shelf
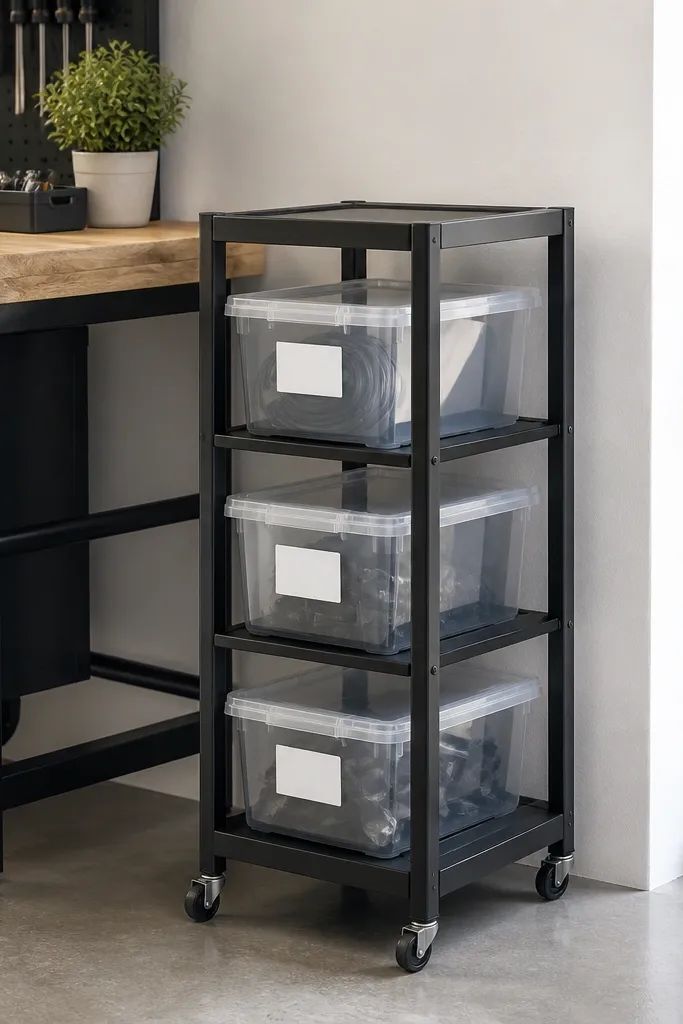
A rolling shelf keeps consumables close without crowding the bench surface. Clear bins make the area look neat because you can scan contents and spot dust or spills before they build up. I like this for screws, washers, zip ties, and adhesives because you grab them often and they multiply fast. The clean look comes from lining every label the same way and keeping bin heights consistent.
Use a cart with shelves tall enough for 6-8 inch bins. Keep the top level for light, quick-grab items (zip ties, tape, marker), middle for mixed hardware (screws/anchors), bottom for refills (extra sandpaper packs). Use bins that stack without wobble and add rubber shelf liner strips so they don't slide when you roll it.
Pro tipPut your most-used three bins on the middle shelf - you'll avoid bending and it stays faster.
AvoidDon't mix bin sizes randomly - uneven heights look chaotic even if each bin is labeled.
4. Magnetic strip for hand tools and metal bits
Magnetic storage makes metal tools look sleek because they hang in a straight line with no hooks or pegboard clutter. For a bench aesthetic, I like pairing a black magnetic strip with light labels so it looks intentional. This is great for socket adapters, small wrenches, and metal bit holders since they stay flat and visible. The "clean" look comes from keeping only metal items on the magnet - everything else goes in bins.
Mount the strip so it sits about 12-16 inches above the bench surface. Use a level and mark anchor points before drilling - crooked strips scream cheap. Keep tool sizes mixed but not random: group by task (socket adapters together, small wrenches together). Add a small lip tray underneath or beside it for items that don't stick well.
Pro tipStick a tiny label under each cluster like "Sockets" or "Wrenches" so your brain finds it instantly mid-project.
AvoidDon't store oily tools on magnets - they leave residue and smudges that look dirty in photos.
5. Fold-down tool caddy on the bench face
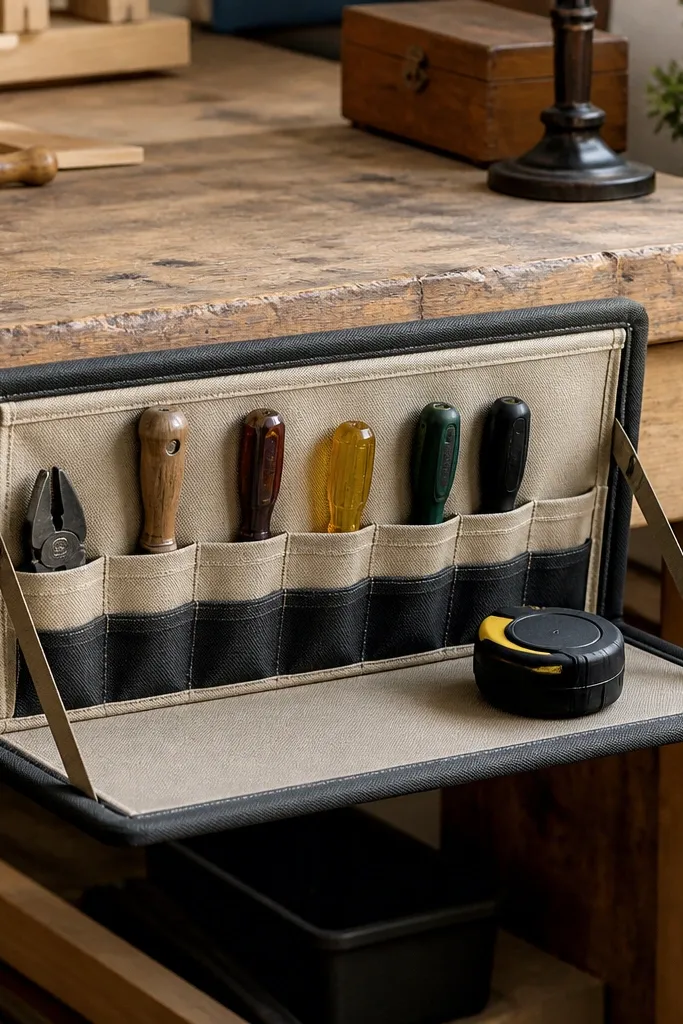
This is the "grab fast" solution that keeps your bench surface clear. The caddy holds the tools you reach for every few minutes, so you stop laying them on the wood and creating a pile. I prefer canvas pockets with rigid backing because they keep their shape and look clean. The fold-down feature also makes the bench front look tidy when you're not working.
Mount the caddy at the front edge of the bench so the open pockets land at about waist height. Use a caddy with pockets sized for your exact tools: tape measure pocket should be wide enough for the clip, screwdriver pockets should fit handles without bending. Keep it light - don't overload it with heavy sockets or it will sag.
Pro tipAdd one pocket for a sharpie and one for a small notepad so you stop writing on random scrap paper.
AvoidDon't use flimsy fabric pockets without structure - they collapse and your tools look scattered.
6. Cable wrap station with a cord reel and labeled power strip
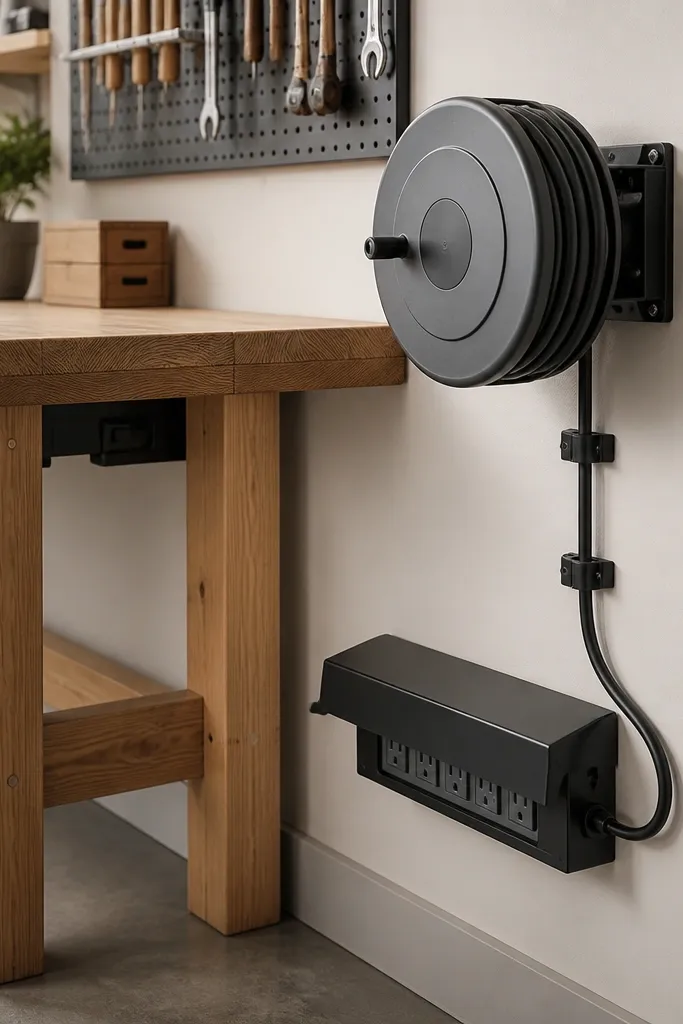
Messy cords make a bench look chaotic even when everything else is organized. A cord reel keeps the main line tidy, and labeled clips keep extension cords and chargers from becoming a knot nest. This also prevents damage to plugs because you're not yanking cords off the floor. The visual effect is clean lines - cords follow the same path and don't drape across the work surface.
Mount the power strip so the outlets face down or outward, not up where dust collects. Use adhesive or screw-on cable clips along a single vertical line next to the reel. Wrap cords with Velcro straps, not twist ties. Label the clips with what plugs into them: "Saw," "Charger," "Vac."
Pro tipKeep one short coiled cord for lights or small chargers; it stops you from dragging the whole reel across the garage.
AvoidDon't leave cords coiled on the floor - they pick up grit and the whole area looks dirty.
7. Lidded "oil and rags" bin station under the bench
This is the hidden spot that keeps your bench looking clean. Oils and greasy rags create a visual mess fast, even if you're careful. A lidded bin stops the smell and prevents drips that can stain the floor or bench legs. The aesthetic is simple and controlled: matching lids and labels so the underside doesn't look like a junk drawer.
Use one larger tote for oily rags and another small bin for shop towels. Add a small metal drip tray inside the big tote if you work with motor oil or chain lube. Mount a simple pull handle so you can open it one-handed. Keep the bin close to where you wipe hands so you don't walk across the garage with oily rags.
Pro tipPut a roll of shop towels in a separate bin - you'll stop using oily rags for everything.
AvoidDon't store open containers of oil on the bench - even a tiny spill makes the area look neglected.
8. Vertical "long bit" holder for drill and router bits
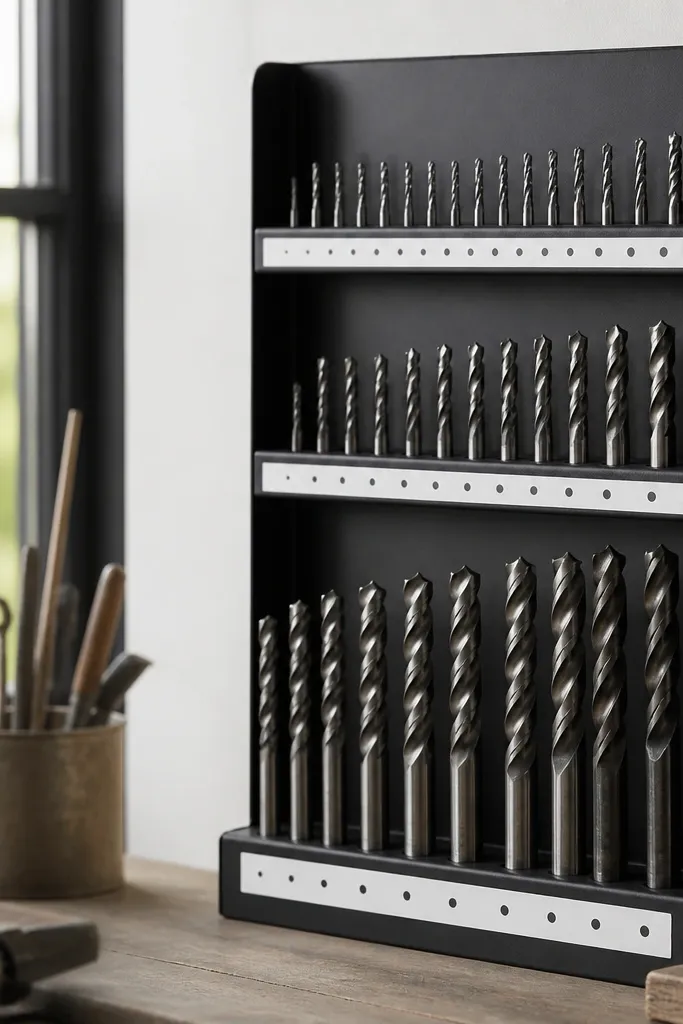
Long bits look cleaner when they stand up instead of lying in a drawer. This holder makes it easy to grab the right length without digging and it keeps cutting edges protected from getting nicked by loose hardware. I like matte black paint because it hides minor scuffs and keeps the look consistent with most garage tools. The labels help you find sizes faster than reading tiny engravings.
Use a rack made from scrap plywood or a store-bought bit holder with drilled holes sized for your bit shanks. Space holes so you can pull one bit without bumping neighbors - about 1 inch between hole centers works for most sets. Arrange by length first (short bits together, long bits together), then size. Add a label strip with the most-used range like "1/4 to 1/2."
Pro tipWrap the shank ends with a small strip of painter's tape during the first setup - it helps you mark sizes before you label permanently.
AvoidDon't cram too-tight rows - if bits rub each other, you'll see scratches and it looks messy.
9. Bench-top parts tray with removable compartments
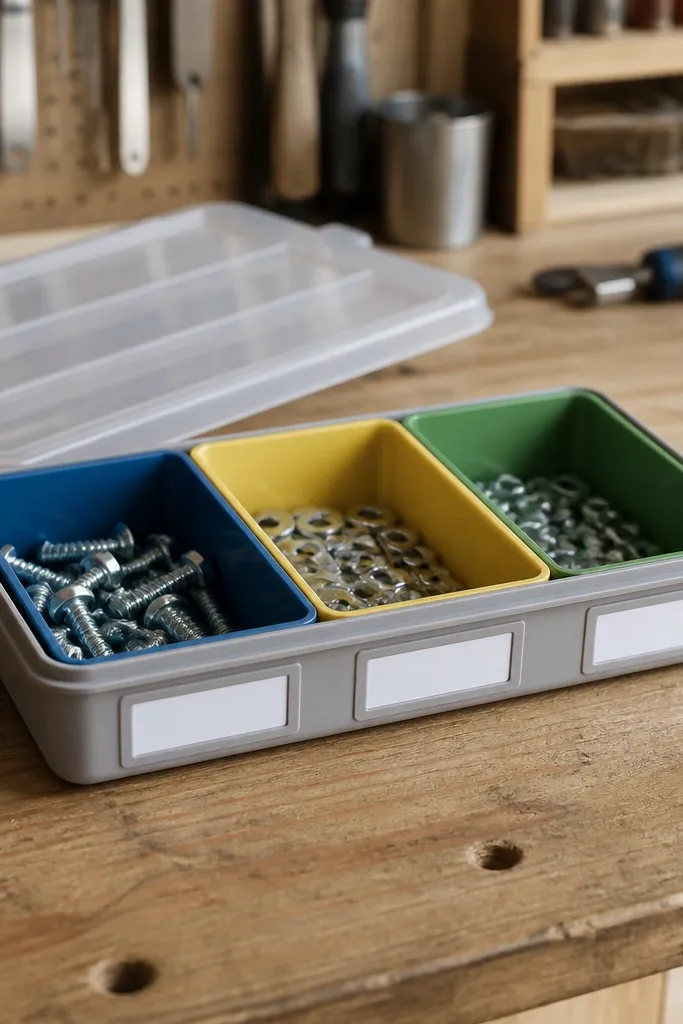
A parts tray is the fastest way to stop loose screws and washers from spreading across your bench. When you keep today's parts in one tray, your workspace stays photo-clean between steps. I like removable compartments because you can separate screws from washers without opening multiple bins. It also makes cleanup take five minutes instead of twenty.
Pick a tray that fits your bench depth so it doesn't block your clamp area. Use three compartments for most projects: fasteners, small washers/spacers, and "in-progress" pieces. Keep the tray in a consistent spot - I place mine at the front-left corner so it's always the same reach. Store the lid inside the tray so it doesn't disappear.
Pro tipPut a small cup holder insert or spare small bin for drill bits you're actively using so they don't roll.
AvoidDon't use a deep, open tray with no compartments - everything mixes and you end up dumping it back out.
10. Clamp rack made from scrap 2x4 and foam-lined hooks
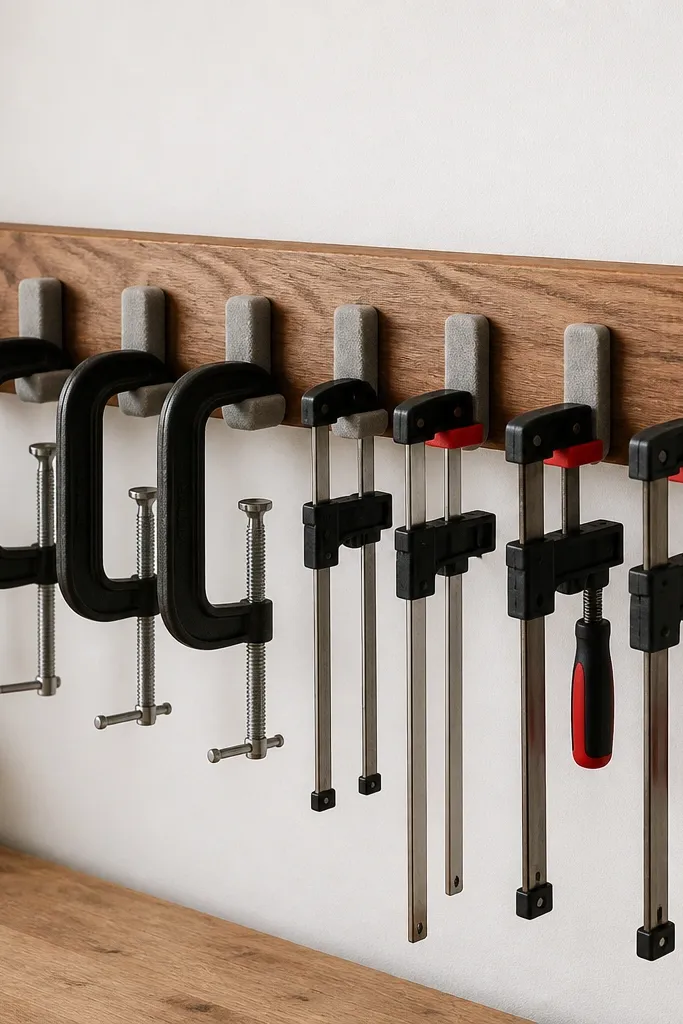
Clamps are bulky and they ruin the look when they're stacked on the floor. A wall rack puts them in tidy rows and protects the jaws with foam liners. The medium wood tone looks warm and matches pegboard setups without needing fancy finishes. Because clamps hang angled, you can grab one quickly without pulling the whole stack.
Cut a 2x4 to the width of your clamp collection, then drill pilot holes for screw-in hooks. Add foam pads where the metal touches to avoid scratches. Space hooks so the clamp handles clear each other - leave about 3-4 inches between hook centers for most C-clamps. Mount it above your bench reach box so it stays visible but not in your way.
Pro tipLabel clamp sizes with small tape tags on the foam - "2 in," "6 in," "12 in" - so you grab the right one first try.
AvoidDon't hang clamps directly on bare metal hooks - scratches look sloppy and you'll end up storing them differently.
11. Clear-lid "measuring and layout" organizer
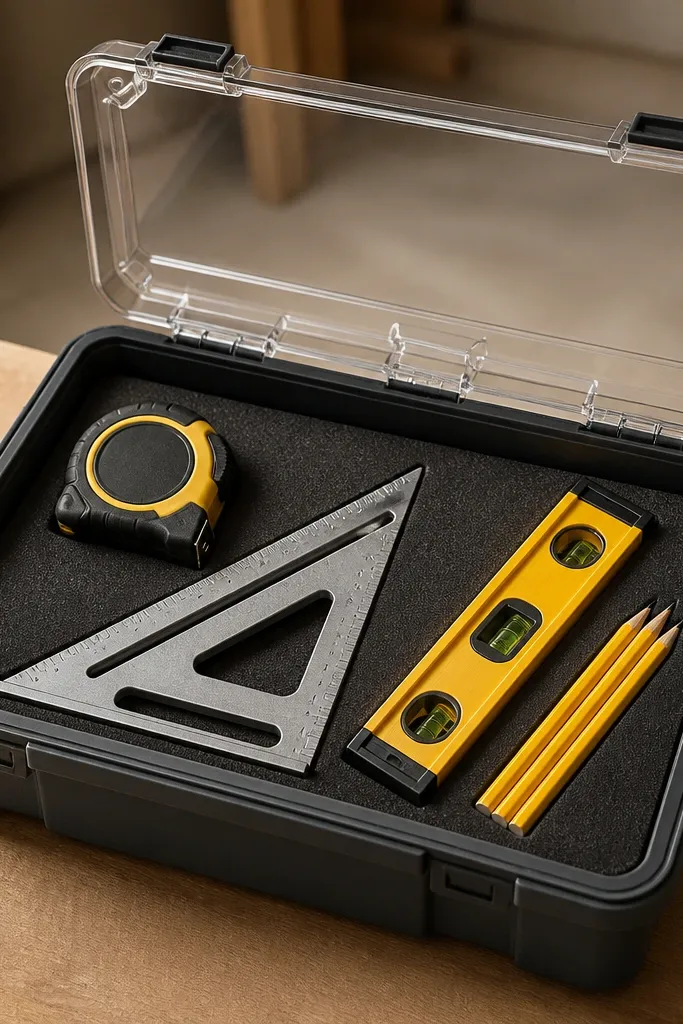
Measuring tools make a bench look professional when they're grouped and protected. I like clear-lid bins with foam because the tools stay in place and dust stays off the faces. Foam inserts also prevent metal edges from chipping and keep everything looking sharp. This organizer makes it easy to do a layout job without rummaging through drawers.
Use a bin sized for your longest tool - include the speed square and a small level. Cut foam pockets with a hobby knife so each tool has a snug fit and doesn't flop. Arrange items by grab order: pencil/marker, tape measure, square, level. Put the bin near the bench edge you naturally work from.
Pro tipAdd a small strip of blue painter's tape inside the lid that lists what's inside - it keeps the arrangement consistent even if someone else uses the bench.
AvoidDon't throw measuring tools into a mixed bin with bits - the bench looks like a parts dump.
12. Tool wall shelf with a lip to stop "bench sprawl"
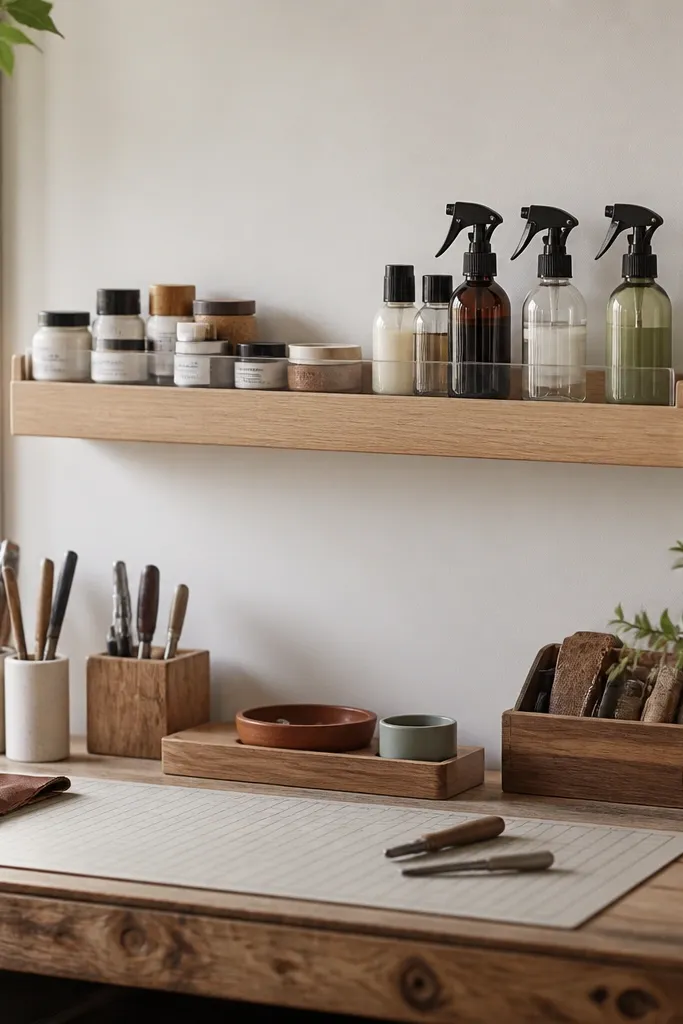
A shelf with a lip solves the problem of small items sliding onto the bench. I use it for things that are clean enough to store open but too messy to leave on the surface: spray bottles, spare blades, and commonly used consumables. The lip creates a visual boundary, so it reads tidy even when you've got a few items out. Aligning containers to one edge makes the whole wall feel designed.
Mount the shelf 48-54 inches up, centered above your bench. Keep containers short so you don't block your view while working. Use clear bins or matching bottles so everything looks like it belongs together. If you use spray bottles, keep them behind a small clear acrylic guard so overspray doesn't settle on tools.
Pro tipGroup items by height: tall bottles to the back, small bins to the front. It keeps the shelf from looking cluttered.
AvoidDon't use a deep shelf with no lip - items migrate forward and end up on the bench.
13. Pegboard + bin combo for fasteners sorted by head type
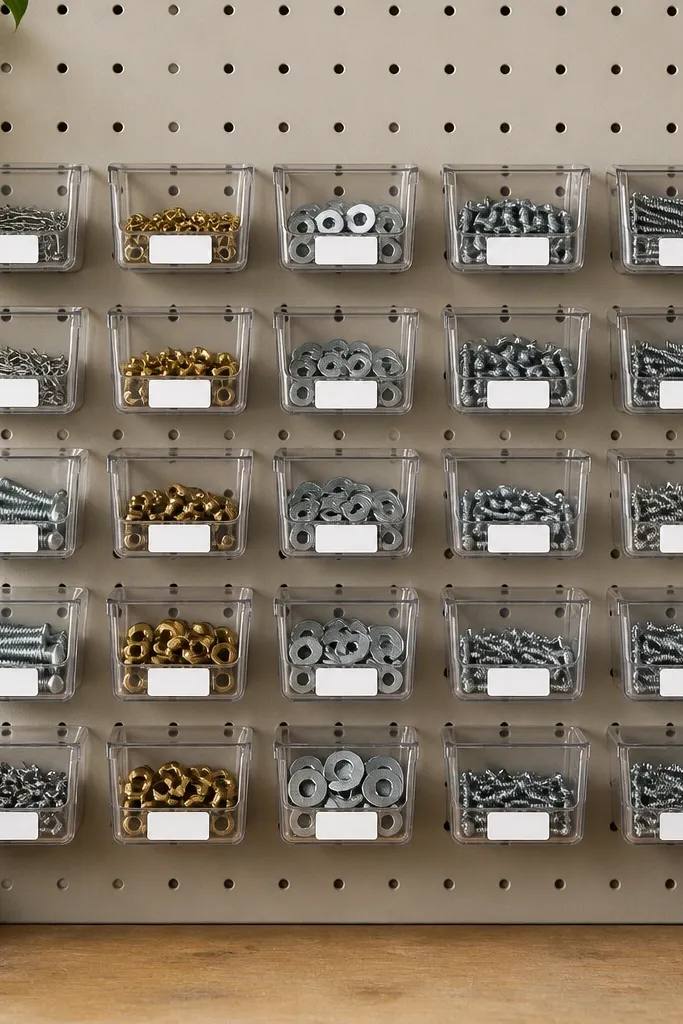
Sorting fasteners by head type makes your work faster and the organization looks cleaner. Instead of one "screws" pile, you get "flat head," "pan head," and "washer" visually separated. Clear peg-mounted bins keep everything visible, and the pegboard grid makes the panel look structured. I like this because it turns the wall into a quick reference area, not storage chaos.
Use pegboard with small bin hooks sized for your bin weight. Label each bin by head type and diameter, like "Flat #8 x 1.5" so you don't guess later. Keep the most-used three bins closest to the bench reach box. For washers, use shallow bins so they don't bury smaller pieces.
Pro tipAdd a "low stock" label stripe to each bin so you can see when to refill without opening it.
AvoidDon't label only the brand or "misc" - unlabeled bins look like junk even if they're organized.
14. Matte-finish bench surface zones with tape outlines
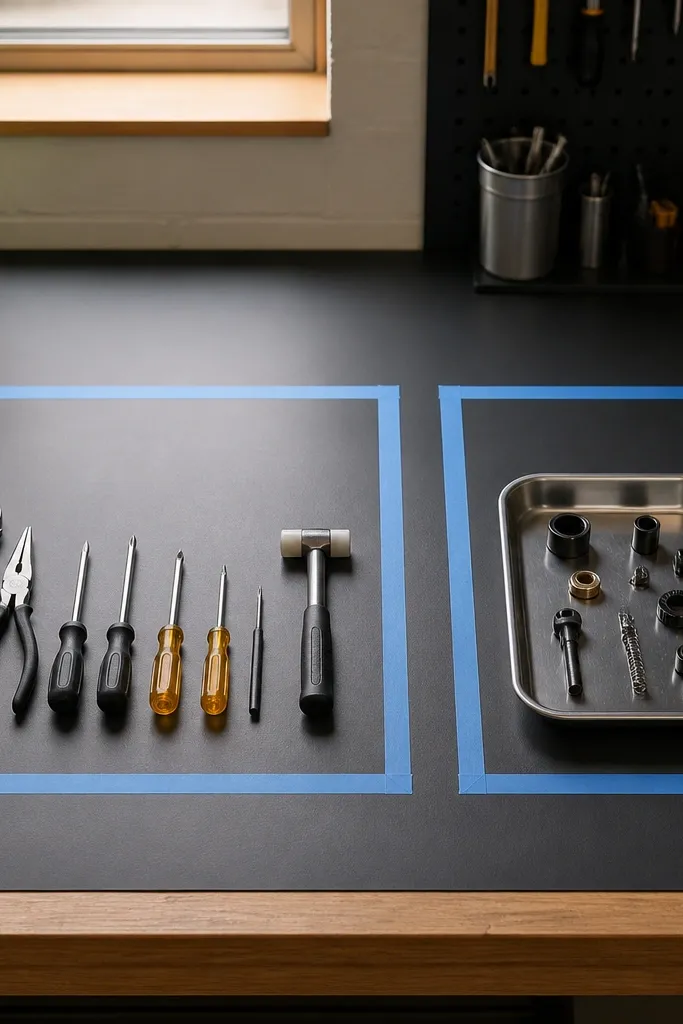
This is the simplest trick that keeps the bench from turning into a dumping ground. By drawing two zones with painter's tape, you train your hands where things go during the project. I use a matte finish surface because shiny surfaces show smudges and fingerprints under garage lighting. The taped outlines also make it obvious when you've left something outside the work area.
Clean the bench top first with a degreaser wipe and let it dry. Apply painter's tape to mark two rectangles: one for tools, one for parts tray and small hardware. Keep the tool zone closer to you and the parts zone closer to the edge you work from. After a weekend project, replace tape if edges lift - don't try to peel old tape later.
Pro tipUse two tape colors: green for tools and yellow for parts. Color-coding makes it faster to reset between steps.
AvoidDon't mark zones after the bench is oily - tape won't stick and the lines look crooked.
15. Labelled "consumables" wall rack in matching color bins
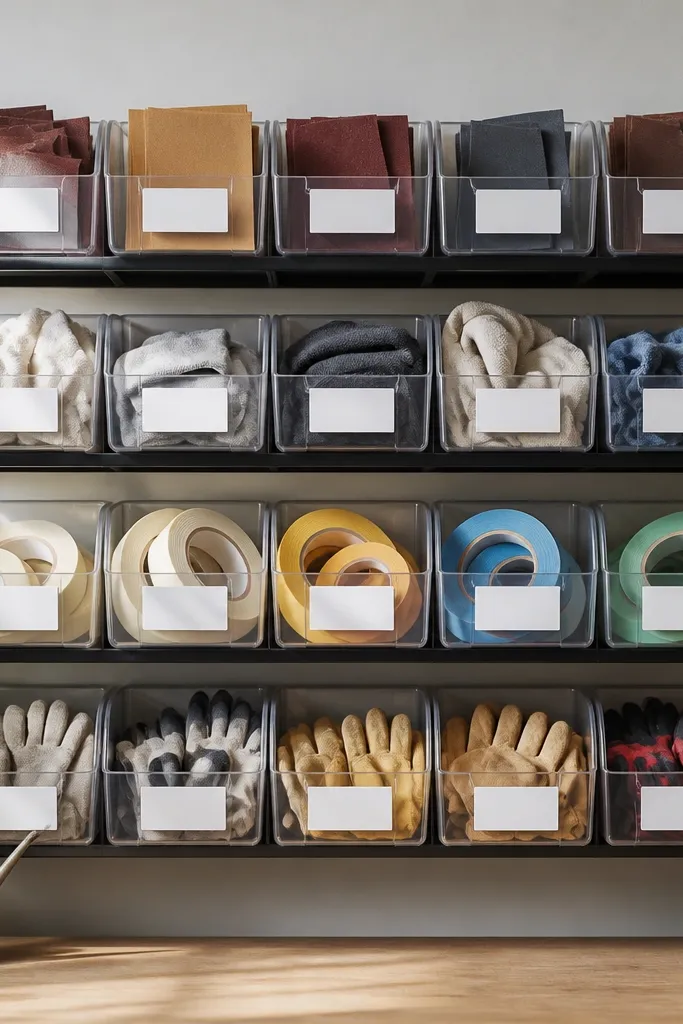
Matching bins make a garage look intentional. When all consumables sit in the same style of container, your eye reads "organized" instead of "stored." This works especially well for sandpaper, masking tape, gloves, and disposable blades because these items multiply and get hard to track. The visual effect is clean rows with readable labels at a glance.
Mount bins on a slatwall or pegboard using the same bin size across the rack. Fill each bin loosely and keep the label on the front face, not the lid. Put frequently used items at eye level and refills higher up. If you use colored bin bases, keep them one shade family so the wall doesn't look like a craft store.
Pro tipUse a label format with size and type, like "120 grit - 10 sheets" so you don't open bins to check.
AvoidDon't mix consumables that smell or stain with clean items in the same bin - it looks wrong and it is wrong.


