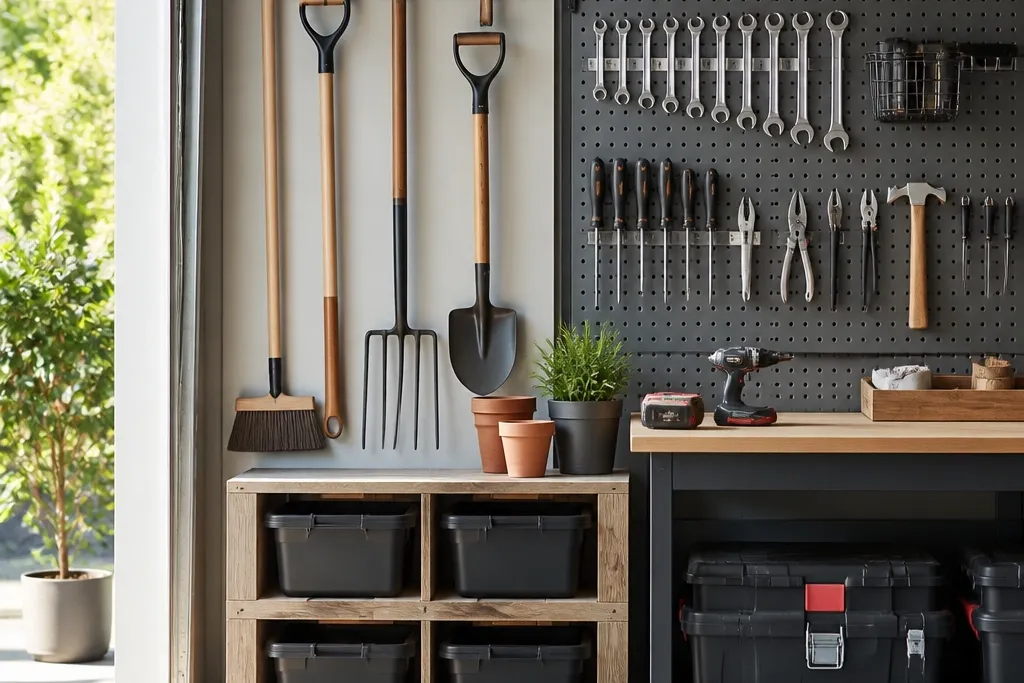
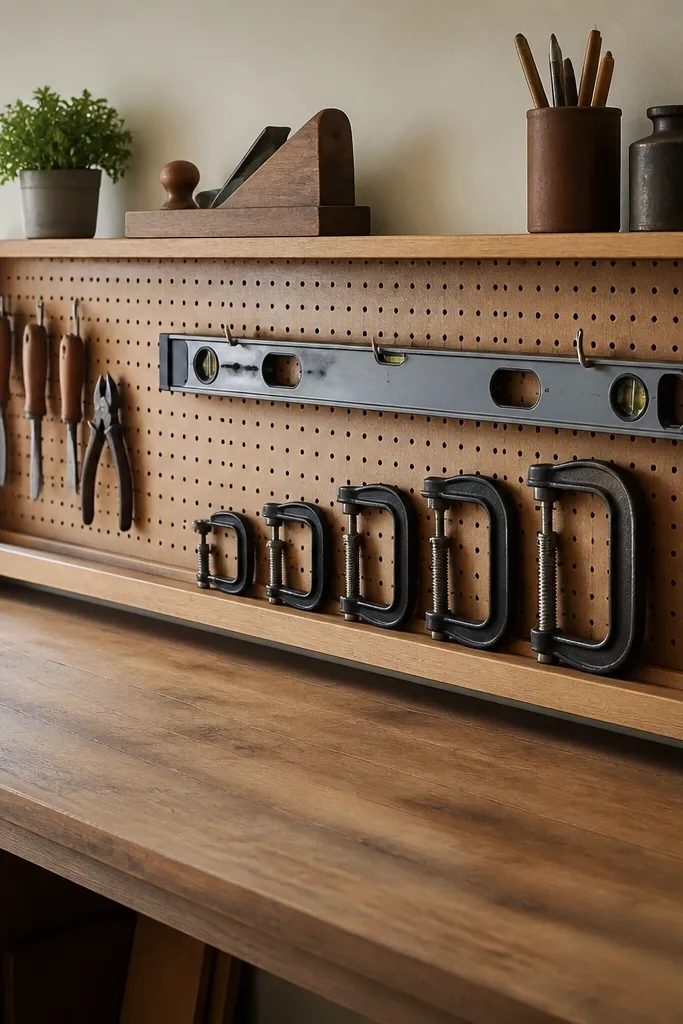
1. Pegboard rail with tool "zones" for grab-and-go
I like pegboard when it's framed with a rail because it stops tools from slowly sliding off hooks. I use a single color pegboard backing and then keep the hooks all the same finish so the wall reads clean, not cluttered. Hang by zone so kids learn a pattern: left side is hand tools, middle is pliers, right side is measuring and levels. When the handles line up, the garage looks calmer even before you're fully organized.
Measure your most-used tools first. Mark a line at 48 inches from the floor for tool handles, then mount the rail 1 to 2 inches above that line so the working ends don't block each other. Use 3/8-inch pegboard with heavy-duty hooks for hammers and adjustable plier hooks for anything with jaws.
Pro tipHang only one tool type per row so returns are obvious to a kid in a hurry. If a hook can't hold the tool without wobbling, swap the hook now - wobble kills the whole system.
AvoidAvoid mixing deep and shallow hooks in one row; the tools end up at different angles and look messy fast.
2. Clear-lid drawer bins for drill bits and tiny hardware
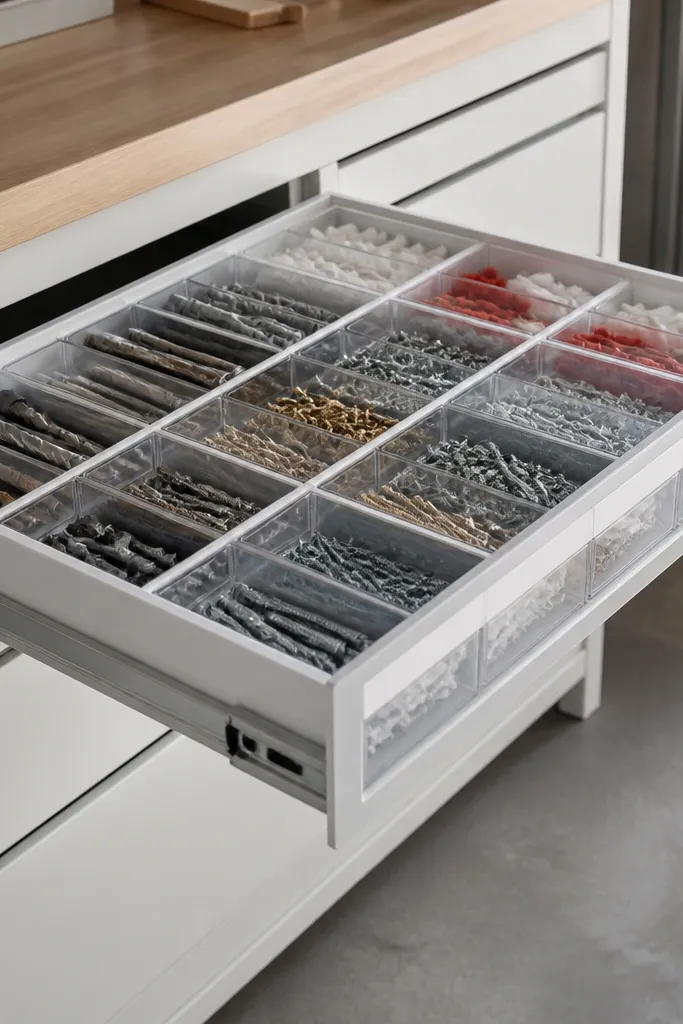
Clear-lid bins are the best compromise when kids need to find things without dumping everything. I use them for drill bits, small screws, wall anchors, and router bits. Labels on the front beat labels on the side because little hands don't tilt bins to read. The lid prevents "surprise rain" when someone pulls the drawer too hard.
Use bins sized to your drawer depth so the front label sits flush at eye level. I aim for bins that leave about 1/2 inch of clearance between bins so you can lift one out without fighting. Stick labels to the bin front with clear tape over the label so it doesn't peel from shop dust.
Pro tipWrite labels like a kid talks: "1/4 in bits" and "drywall anchors 1/2 in". Keep the label font big enough to read from across the garage.
AvoidDon't mix loose hardware types in one bin; one mixed bin turns into a dump pile by week two.
3. Magnetic strip for screwdrivers and small metal tools
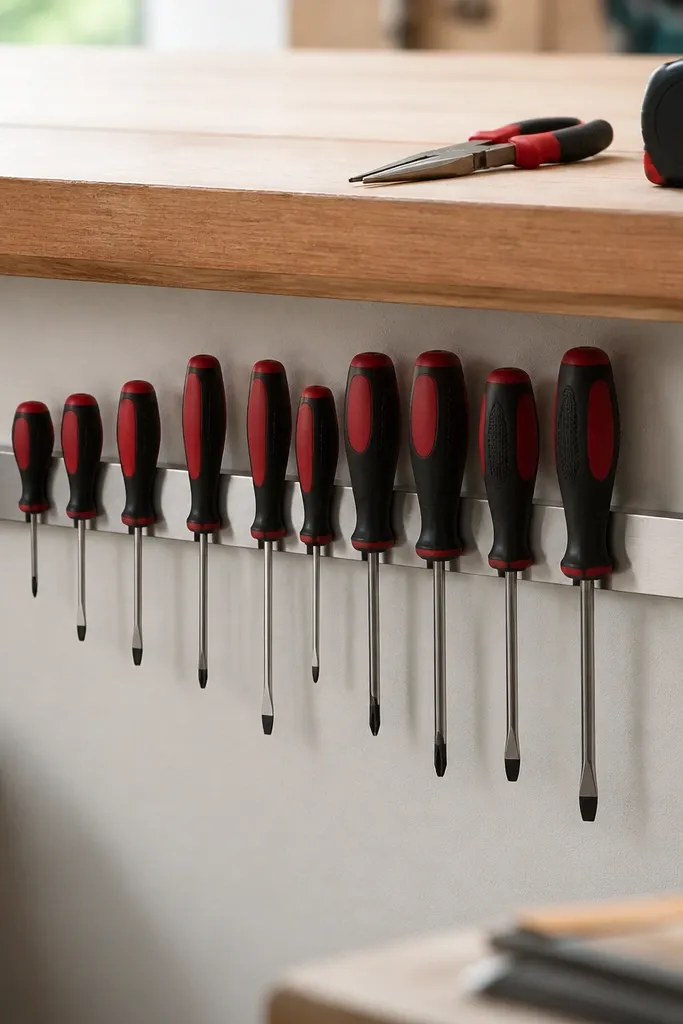
A magnetic strip is fast, clean, and easy for kids to understand because tools "snap" into place. I install it under the bench lip so tools hang where you naturally reach while working. The metal tools look organized because they sit in a straight line with no hook clutter. For aesthetics, I keep the strip and the surrounding surfaces one tone - brushed metal and white or light gray.
Use a magnetic strip at least 24 inches long so you can fit 6 to 10 screwdrivers. Mount with screws into studs or into a plywood backing so it doesn't sag. Keep heavier items like a small set of pliers near the center of the strip where magnets are strongest.
Pro tipUse a strip with a strong pull and test it by grabbing the handles and tugging sideways. If it shifts, remount before you organize.
AvoidSkip the super-thin magnetic strip; light strips look good for a week and then tools start sliding.
4. PVC pipe organizer rack for wrenches and long-handled tools

PVC pipe slots hold long-handled tools without needing hooks that bend over time. I use it for wrenches, pry bars, and anything that wants to lean. Painting the PVC and backing board makes it look like a designed piece instead of a leftover DIY. Kids can see the openings and learn where each handle goes.
Use 2-inch schedule 40 PVC for most wrench handles and cut openings with a clean edge. If your wrenches vary, measure the widest handle and set slot spacing so the tools don't overlap. Glue caps on the bottom to keep dust out and prevent tools from scraping the floor.
Pro tipAdd a thin strip of foam at the pipe rim so metal doesn't clank and scratch when kids return tools quickly.
AvoidDon't leave sharp PVC edges exposed; they snag gloves and make the rack look unfinished.
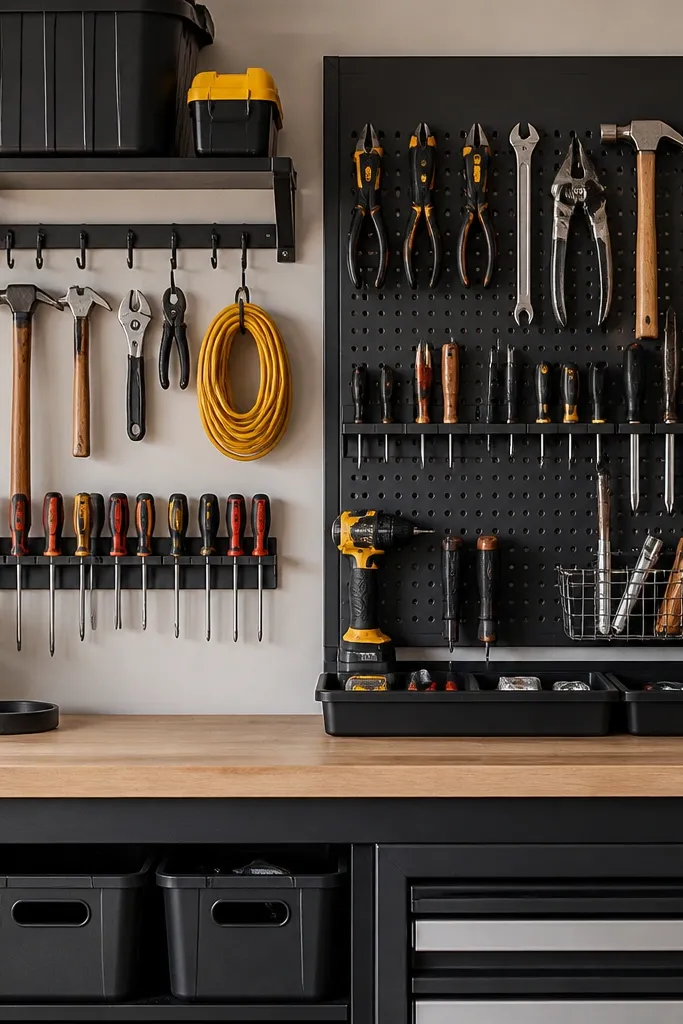
5. Side-of-bench pegboard strip for pliers and cutters
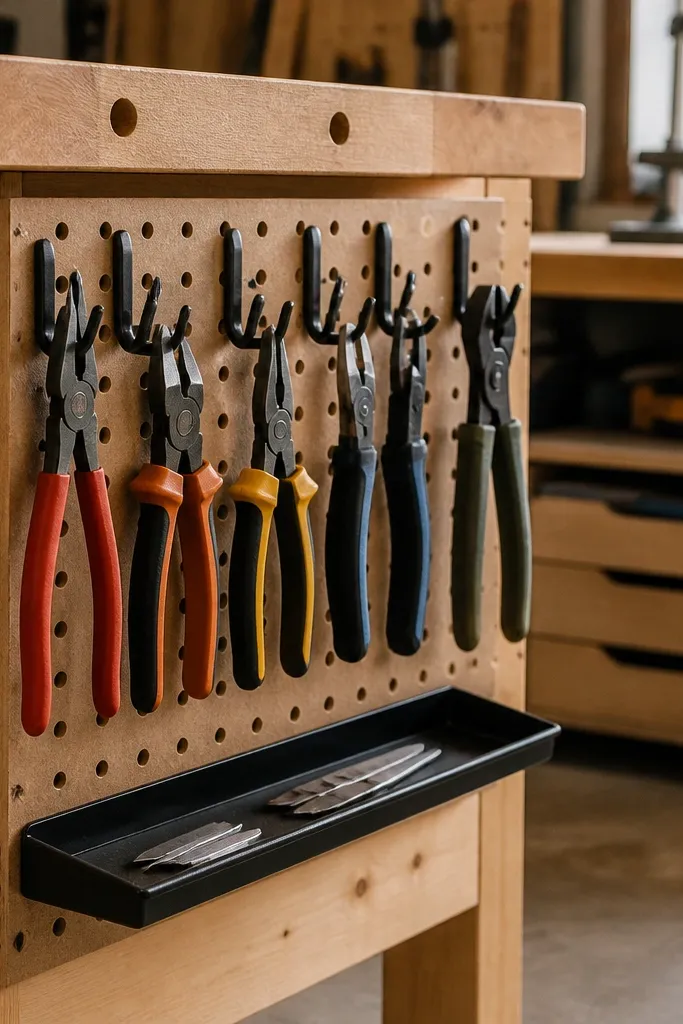
This is the fastest win when your main problem is tools living on the bench surface. A narrow pegboard strip keeps pliers and cutters in one place and makes bench space feel bigger. I like black hooks with a light pegboard so you get clear contrast. For kids, it's easier when the handles line up and the cutting ends are all pointing the same direction.
Mount the strip so the tool handles sit around 40 to 48 inches from the floor, depending on your kid height. Use plier hooks sized to each tool so they sit flat. Add a small bottom tray for blades and bits so nothing rolls off the bench.
Pro tipPut your most-used cutters and needle-nose pliers in the top row, and reserve the lower row for less-used tools.
AvoidAvoid hanging heavy cutters too high; they swing when the bench gets bumped and that's how everything ends up on the floor.
6. Wall-mounted "tool drop" bin for returning cordless tools
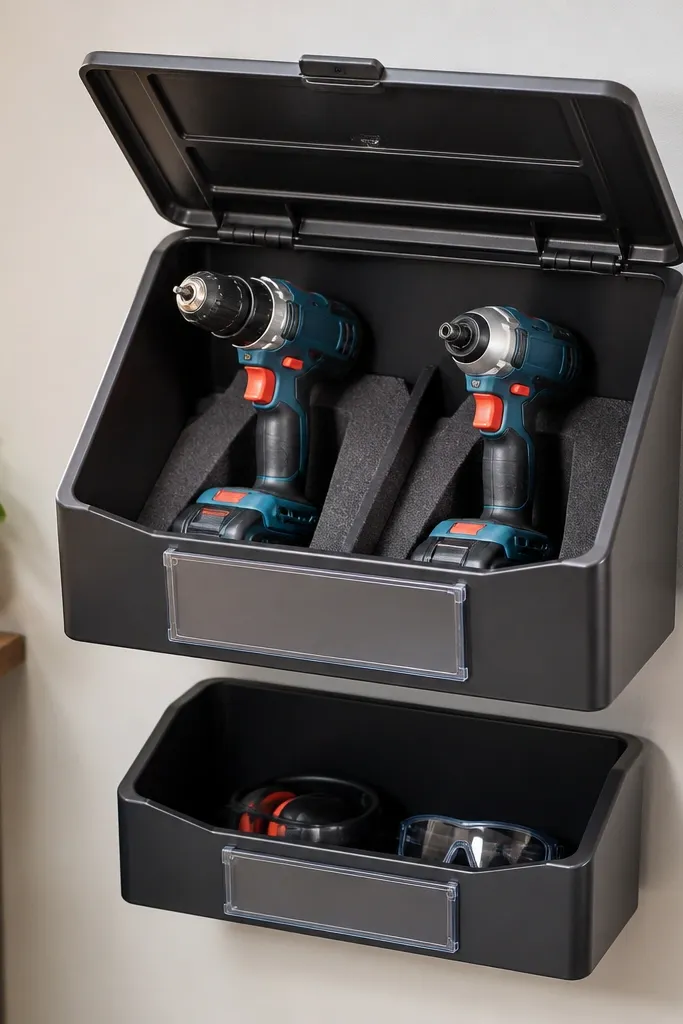
Kids love bins because they feel like a game - drop it in. This works best for cordless drill/driver because the bin foam stops them from knocking into each other. I use a hinged lid to keep dust off and to stop batteries from becoming a loose rattle. The look stays neat because tools are contained, not hanging in random angles.
Buy a plastic storage bin with a lid and mount it to studs. Cut foam wedges so the drill handle and battery pack don't shift. Keep the bin opening wide enough for quick returns but narrow enough that tools can't tip over.
Pro tipLabel the bin lid with a simple icon label: drill + driver. Kids follow icons faster than written text.
AvoidDon't mount the bin too low; a low bin turns into a reach-and-grab zone and kids will start "helping" with tools unsupervised.
7. Magnetic socket rails on the inside of a cabinet door
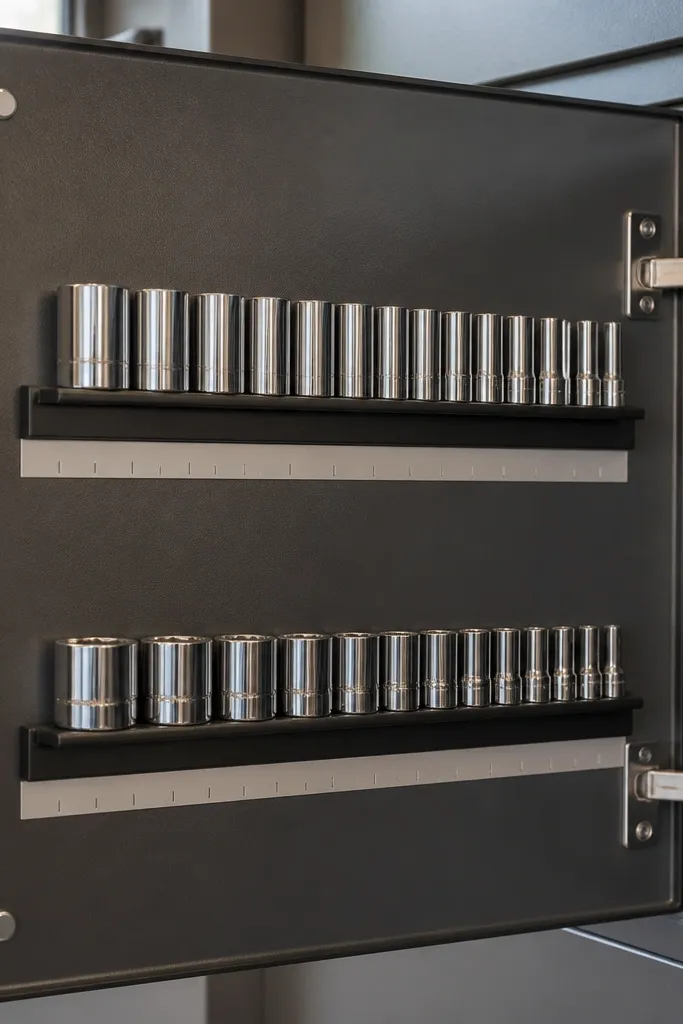
Socket chaos is real. Door-mounted magnetic rails keep sockets at eye level and make it easy to see what's missing. The rails also keep sets from mixing, which is a big deal with kids because they grab the whole bundle and dump it. The door setup hides the mess when you close the cabinet.
Use magnetic rails long enough to hold a full set without gaps. Mount rails with screws into the cabinet frame, not just the thin panel. Add a label under each rail for size ranges so you can replace quickly.
Pro tipSort sockets by the first number on the ring (like 10, 12, 13) and label the rail accordingly. Mixed sets drive me nuts.
AvoidDon't use strong magnets that attract loose steel from nearby drawers; you'll end up with stray pieces stuck where you don't want them.
8. Workbench pegboard top shelf for levels and clamps
Levels and clamps are awkward because they're long but also bulky. A top shelf or back ledge keeps them from leaning on walls and turning into a fall risk. The pegboard backing gives you hook options for hanging the level loop and the clamp handles. Kids can still reach the clamps zone if you mount it high enough and keep sharp tools elsewhere.
Build a simple ledge from 1x4 wood, then attach it to studs behind the pegboard. Use 2 to 3 hooks for levels so it hangs straight. For clamps, use a lip at the front so clamp jaws don't slide off when the garage door bumps the wall.
Pro tipHang the level so the bubble vial faces outward; it makes it obvious which one is the right length.
AvoidAvoid stacking clamps on top of each other; they scratch and they always end up stuck together.
9. Labeled bin wall for kid-safe "project tools"
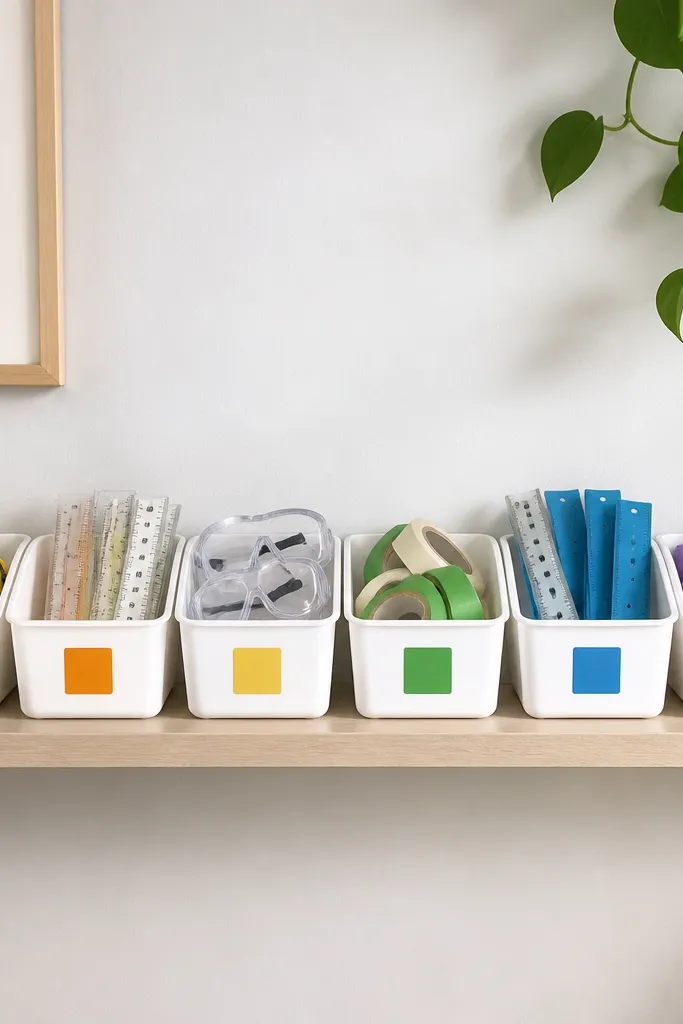
If kids are using the garage for crafts or help, you need a separate tool zone that doesn't include real hazards. I keep kid-safe measuring and marking supplies in identical bins so they learn the routine fast. The color-coded labels help even when a kid can't read yet. This keeps the main tool organization system from getting ruined by random "helping" bins.
Use low bins on a shelf around 32 to 36 inches high. Keep real tools like saws and drill bits out of this zone. Use painter's tape labels first, then replace with tougher vinyl labels once you confirm the list your kid actually uses.
Pro tipPut painter's tape and a chunky marker in the same bin so kids can label their own projects without asking.
AvoidSkip mixed-height bins; the odd one out becomes the dumping ground.
10. Cable-tidy hook strip for extension cords and chargers

Cord mess makes tool organization look worse because it's always in the way. A dedicated cord strip makes extension cords and chargers disappear into a clean pattern. I use Velcro ties to keep coils consistent, and the hooks keep weight off the outlets. It looks tidy because every coil is the same size and sits in the same spot.
Mount heavy-duty hooks into studs or into a plywood backing. Use two large hooks for cords and smaller hooks for charger cables. Add a small label tag for each cord so kids don't grab the wrong one.
Pro tipWrap cords in the same direction every time and tie at the same point. Consistency makes the system feel effortless.
AvoidDon't hang cords by the plug; it twists the cord ends and looks sloppy.
11. Drawer insert for hand tools with foam cutouts
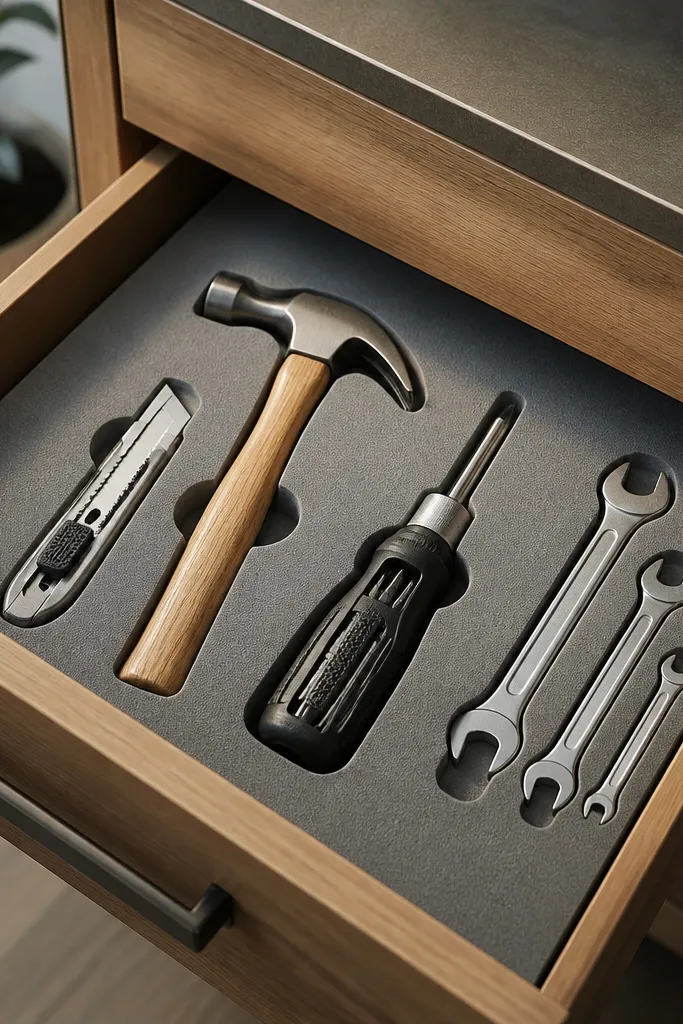
Foam cutouts are the most satisfying way to keep small hand tools from migrating into the junk drawer. When tools fit the foam exactly, kids can't shove them in sideways. I use gray foam because it hides dust and looks clean even after months. The drawer front stays plain, so the garage looks organized rather than "storage clutter."
Buy foam sheet 1/2 inch thick and trace each tool handle shape. Cut with a sharp utility knife and keep the cuts tight so tools grip without force. Place the drawer insert so it's centered and doesn't slide - friction from foam edges works well.
Pro tipCut one extra shallow slot for a replacement bit case or spare blade so returns stay easy.
AvoidDon't make foam slots too loose; loose foam turns into a pile because tools fall out during quick returns.
12. Corner ladder-style rack for long-handled yard tools
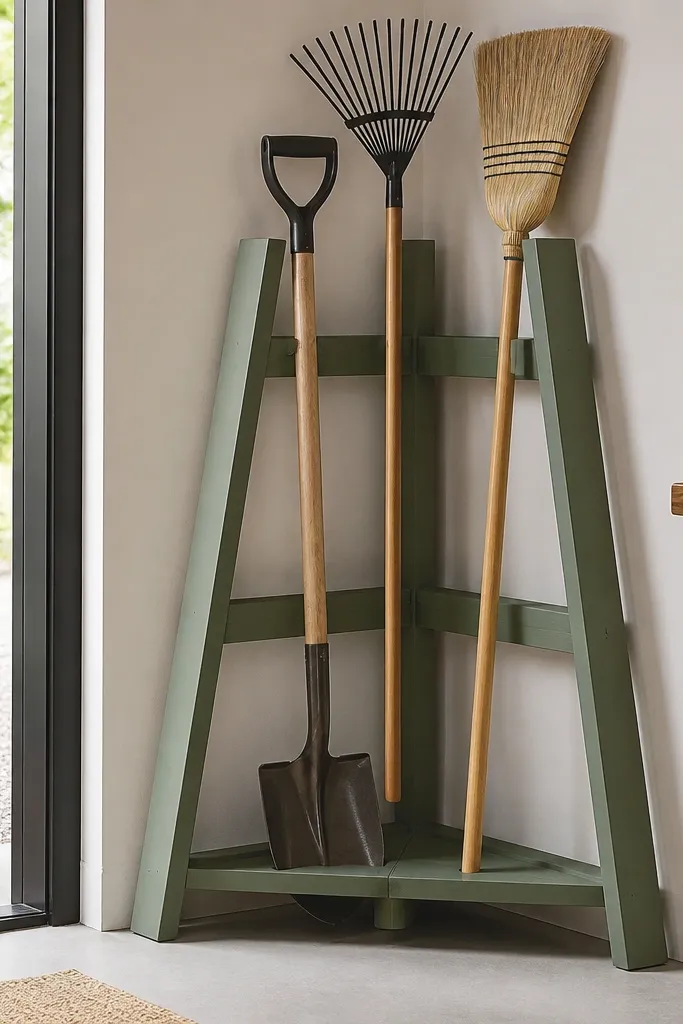
The corner is wasted space until you use it right. A ladder-style rack holds long-handled tools at a safe angle so they don't topple. I paint the rack the same color as the garage trim so it looks intentional. For kids, a corner rack is safer than leaning tools against the wall because the guides stop sliding.
Build two vertical braces anchored into studs. Add horizontal rungs or guides spaced so handles sit in their own "lane." Keep the top guide higher than kid reach so they don't try to grab the whole rake.
Pro tipAdd felt pads where handles touch the wood to stop scratches and squeaks.
AvoidAvoid a rack with wide open gaps; handles slide out when someone bumps the corner.
13. Tote-and-label system for paint and touch-up supplies
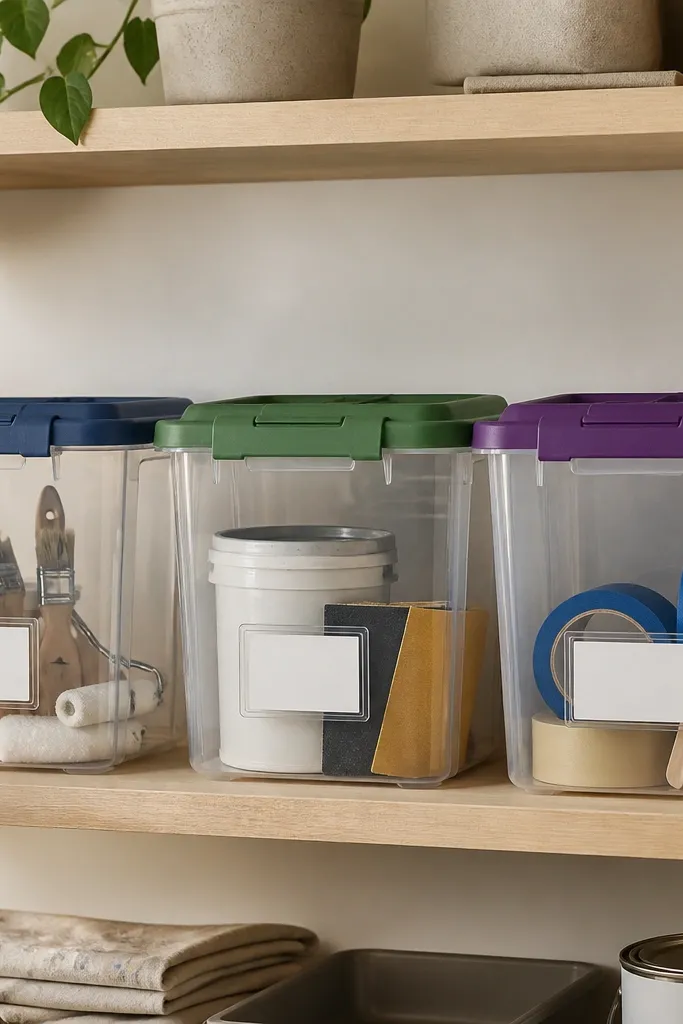
Paint supplies ruin tool organization because they spill and leak if they're stored loose. I use clear totes with colored lids so the shelf looks uniform. Labels go on the front card holder so you can swap lists when you run out of supplies. Kids can help with "safe" supplies like tape and brushes, and the tote keeps everything together.
Use totes that stack neatly and fit your shelf width. Add a small divider inside for blades or mixing sticks so they don't cut through plastic. Keep sandpaper in a sealed bag inside the tote so dust stays contained.
Pro tipStore brushes handle-up in a small cup inside the tote so bristles don't get crushed.
AvoidSkip open bins for paint tools; paint drips and turns the garage shelf into a sticky mess.
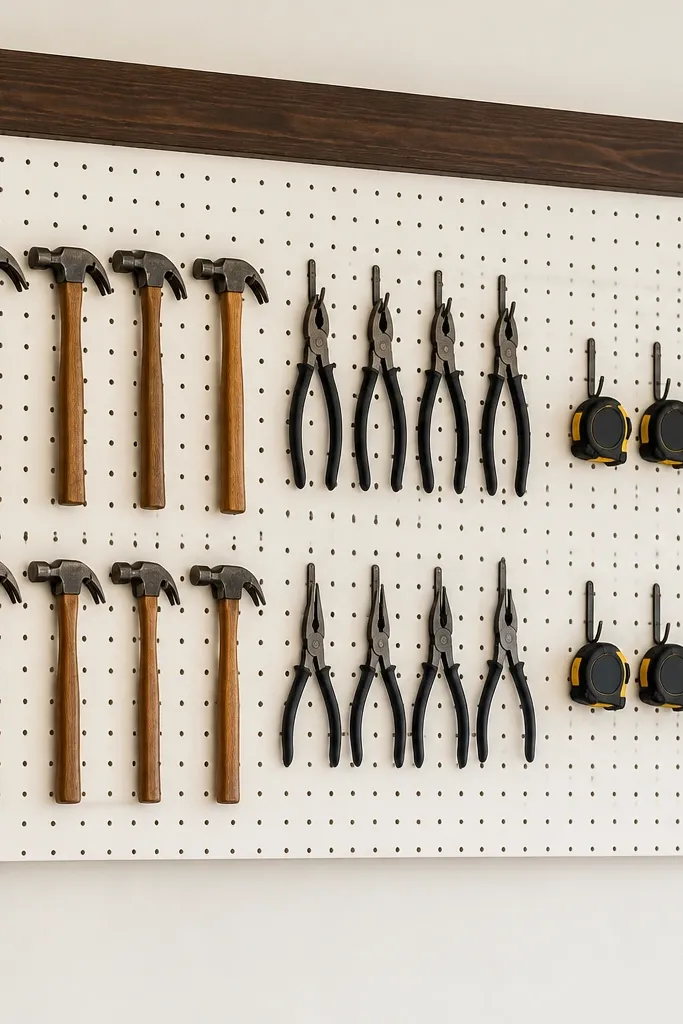
14. Floor-level tool shadow board for frequently used hand tools
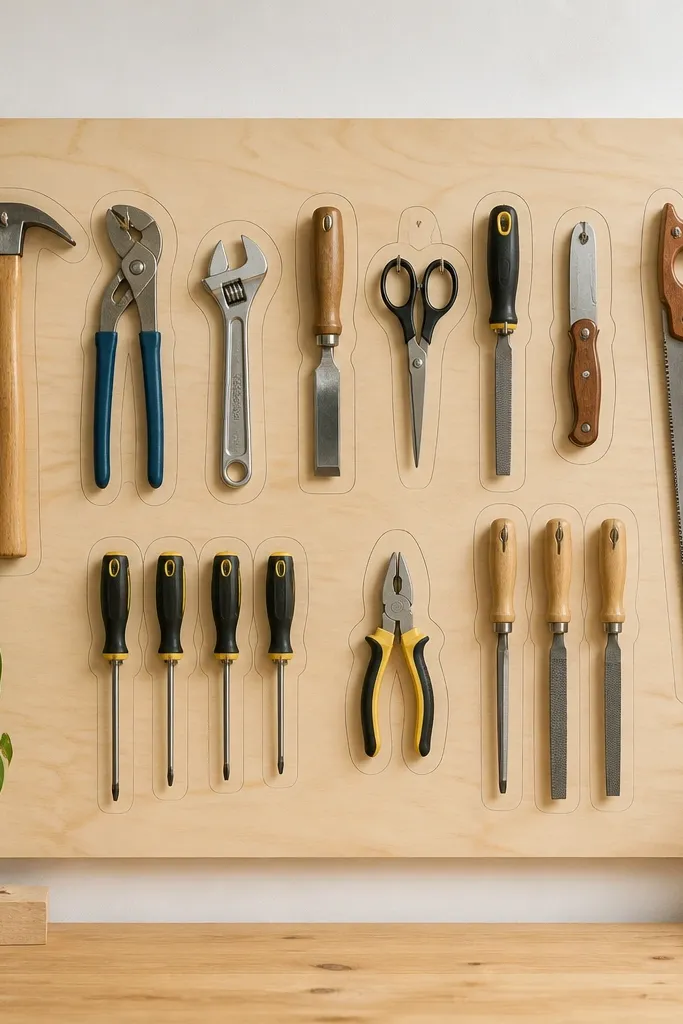
A shadow board works because it teaches the return spot with zero reading. I use it for frequently used hand tools like a tape measure, utility knife, small pry bar, and a set of hex keys. Matte paint on the board makes the outlines easy to see, and the tool silhouettes look clean when everything is in place. Kids do better with "where it goes" when it's a visual outline.
Mount at a reachable but not grabby height for kids - around 36 to 42 inches if you're supervising. Trace each tool handle outline with painter's tape, then paint or mark the outline. Use small hooks spaced so tools don't collide when pulled out quickly.
Pro tipMark the outline with two lines: one for the tool handle and one for a small accessory like a blade case. It stops the "where did the blade go?" question.
AvoidAvoid glossy paint on the board; glare makes outlines hard to see and the system feels pointless.


