1. Matte Black Socket Rail Wall with Numbered Zones
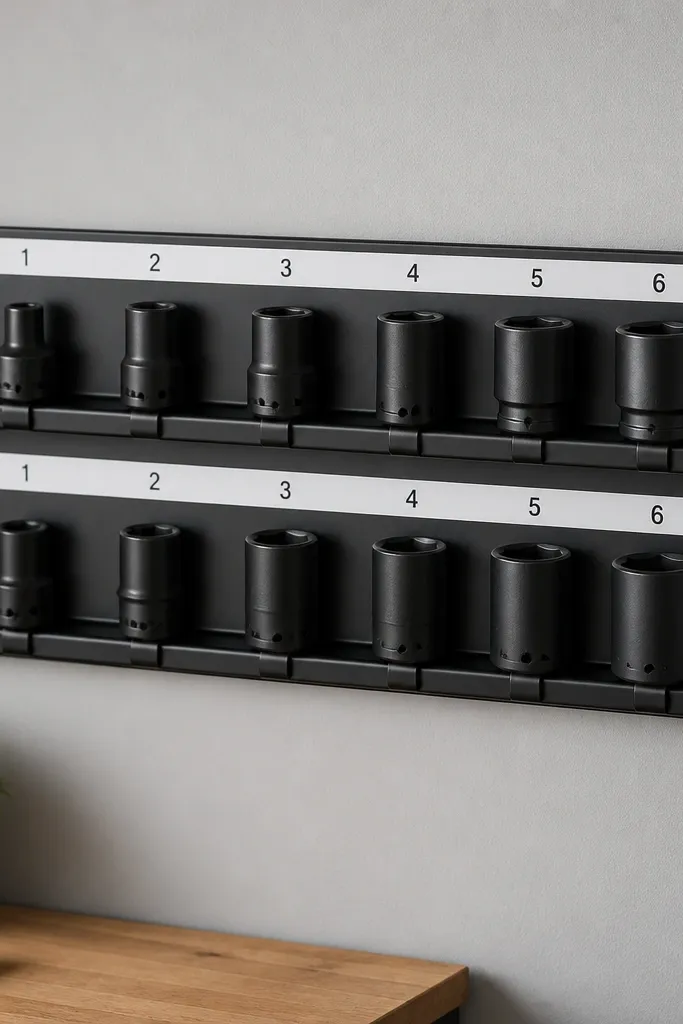
I like a socket rail because sockets are the most "grabby" tools - you can see the size instantly. Matte black rails look modern and hide minor scuffs better than chrome. Numbered zones keep you from mixing metric and standard in a way that drives you crazy halfway through a job.
Mount the rail at about 50 inches from the floor so you can see sizes without kneeling. Use a level and spacers if your studs are uneven. Label with wide tape-backed labels on the wall, not on the sockets, so you can swap labels quickly.
Pro tipWrite the label numbers on a sticky note and move it to the wall as you learn your most-used sizes.
AvoidDon't mount the rail too high or too low - if you have to stretch or crouch, it stops being "organized" fast.
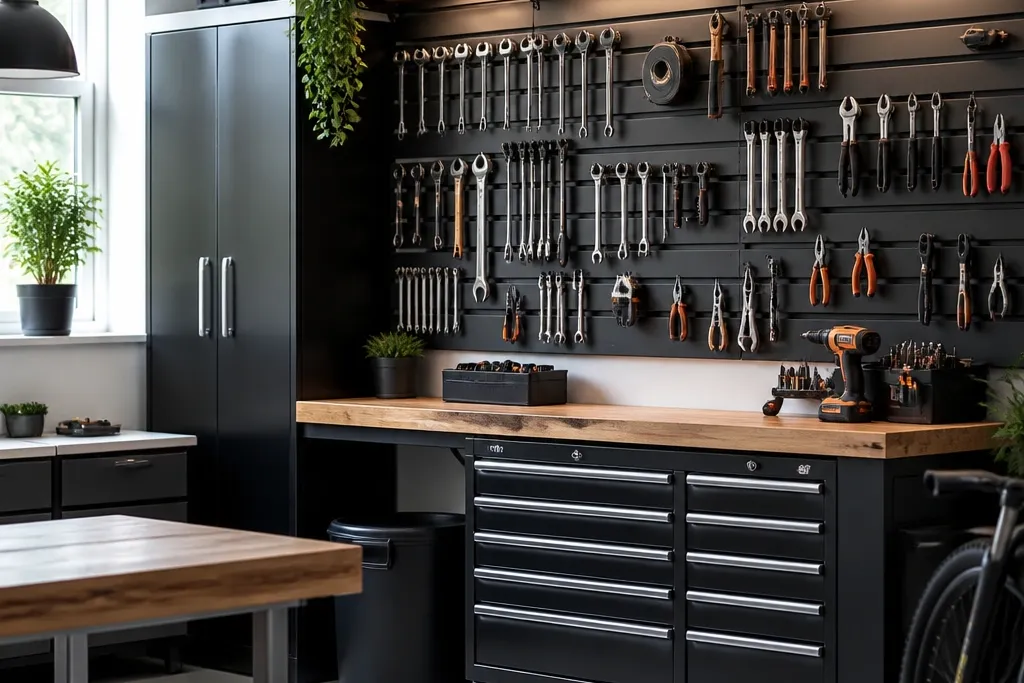
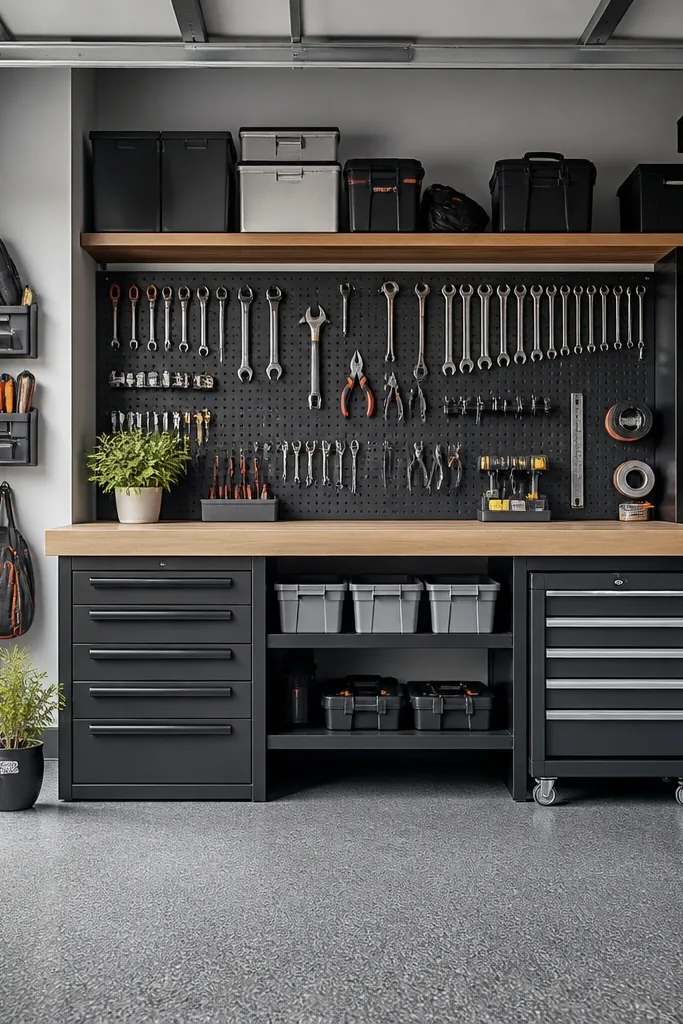
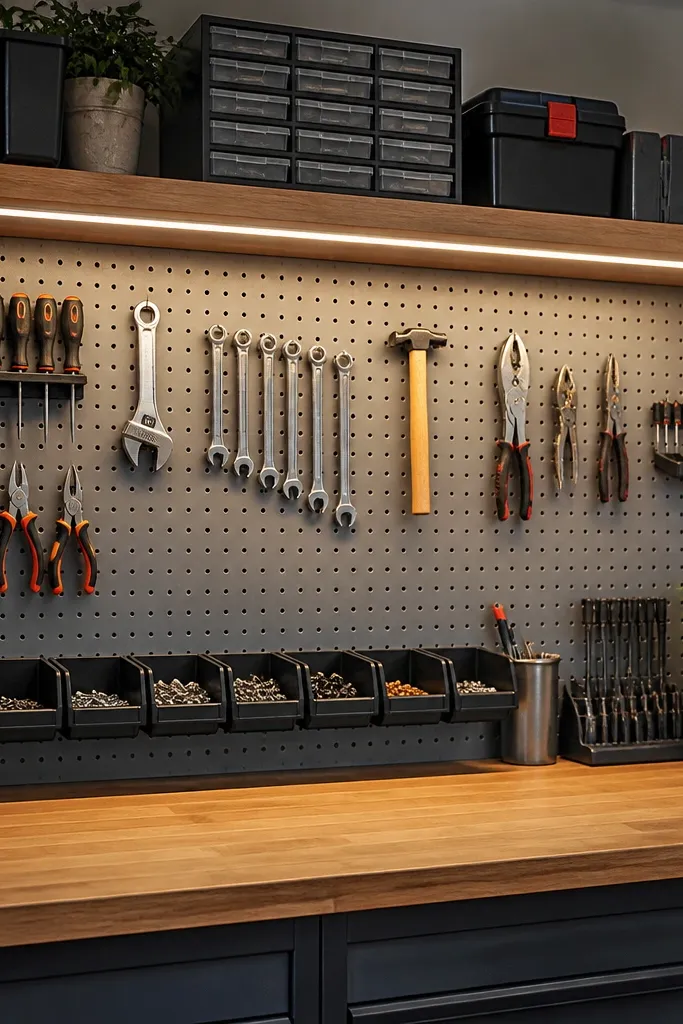
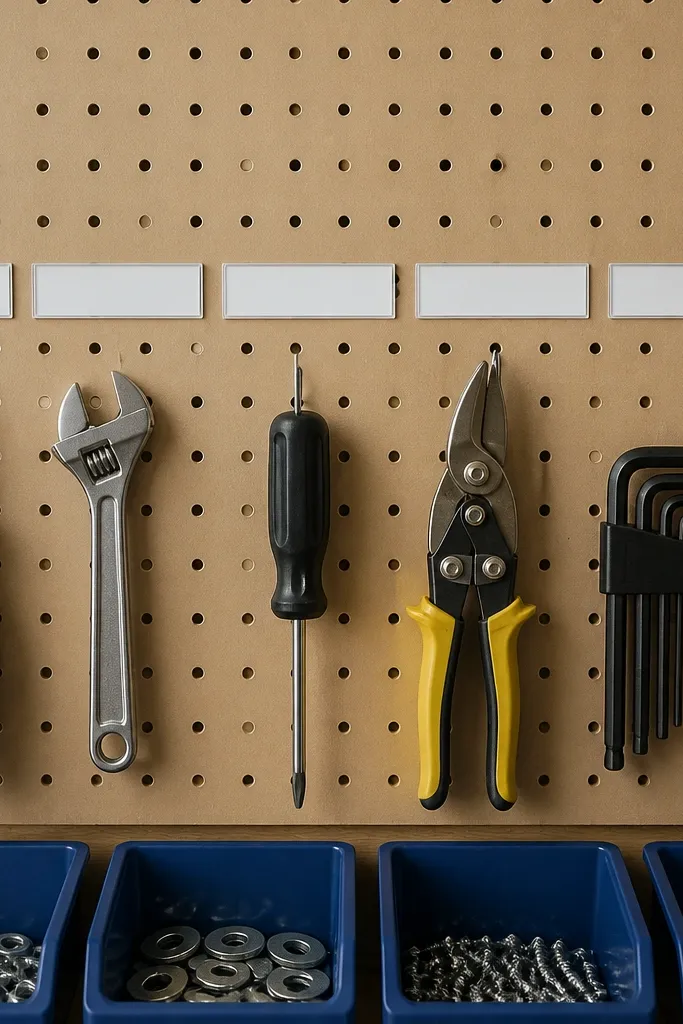
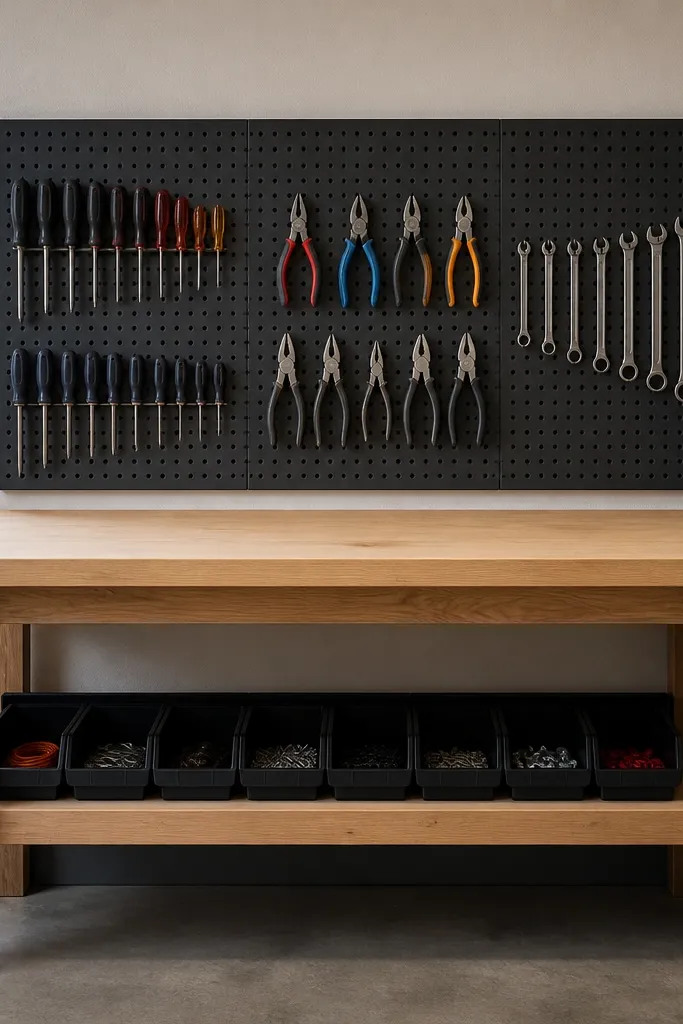
2. Pegboard + Powder-Coated Hook Grid for Hand Tools
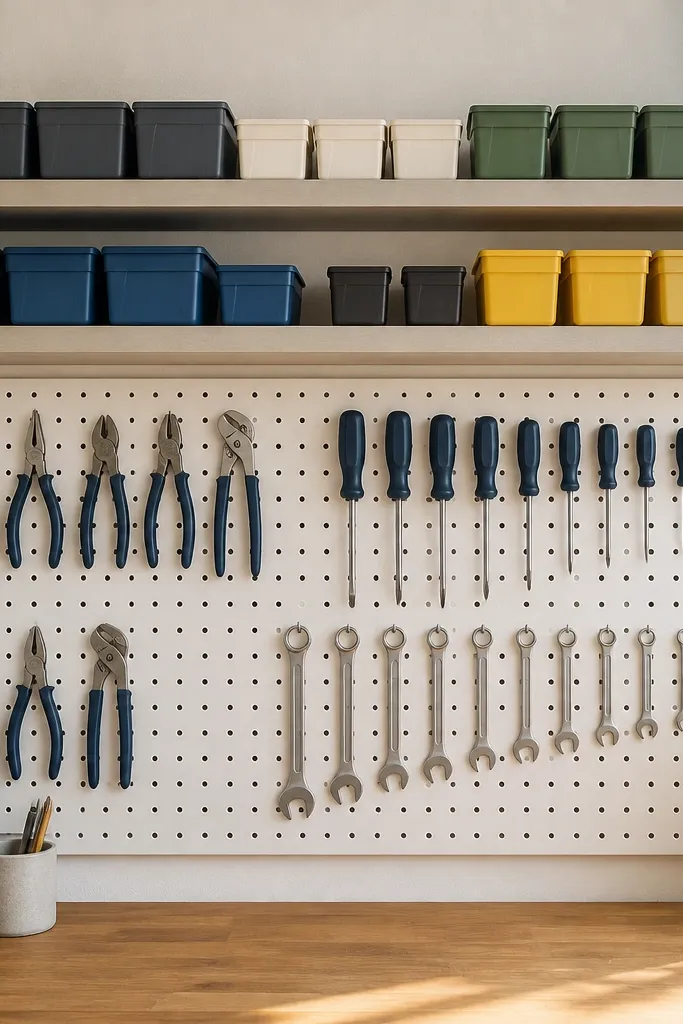
Pegboard works when you treat it like a grid system. Powder-coated hooks keep the look consistent and reduce rust spots. I group hand tools by motion: hand tools that you grab by handle go on the lower right; screwdrivers on the left; pliers centered.
Use 1/4-inch pegboard with a painted or sealed surface. Space hooks so there's at least 2 inches between tool bodies. Add two shallow shelves above - one for bits and one for small accessories like nut drivers.
Pro tipLay out hooks on the floor using painter's tape first, then transfer the pattern to the wall.
AvoidDon't hang heavy tools by thin hooks without checking the hook load - sag makes everything look sloppy.
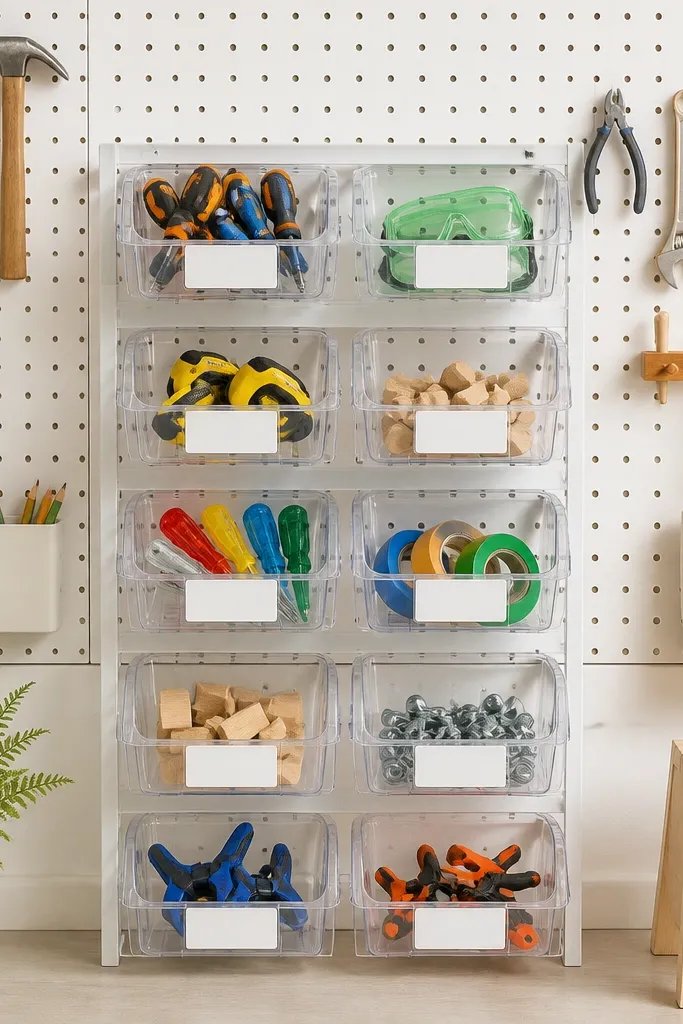
3. Clear Lid Tool Drawer Inserts for Bulk Bits and Fasteners
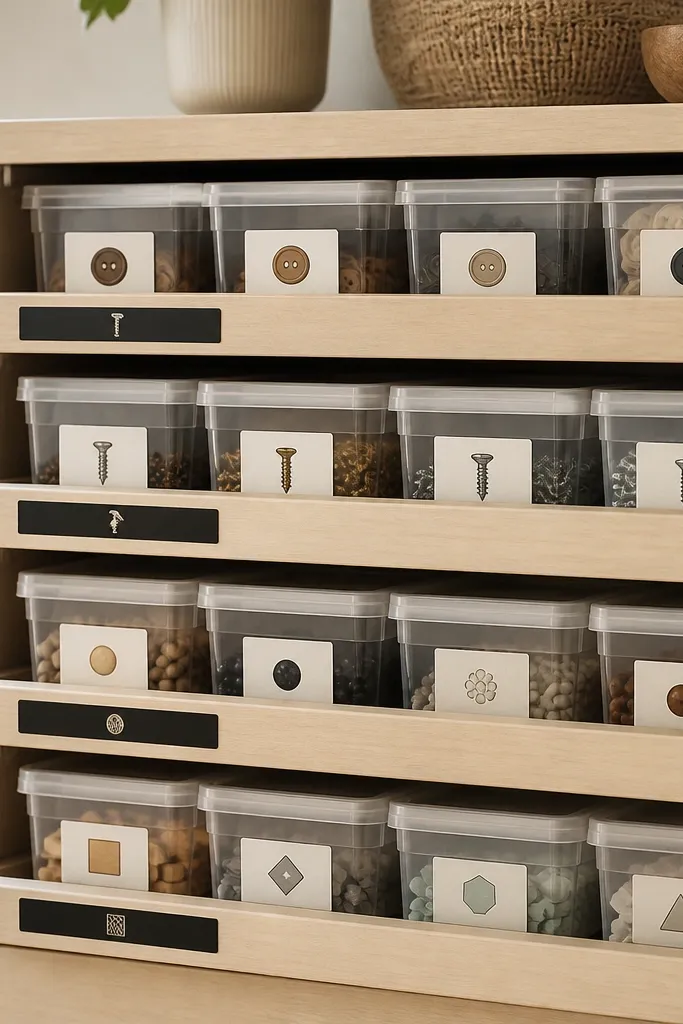
The modern part is the front-facing clarity. Clear bins let you spot contents without pulling drawers, and snap lids keep dust off. I separate by function: drill bits in one drawer, screw assortment in another, washers by diameter in a third.
Use bins sized to your drawer depth so they don't rattle. Stick to one label style: white label tape with black text, 1-inch tall. Keep the most-used drawer in the top third of the cabinet so you don't dig.
Pro tipAdd a small "refill" bin for common sizes so you can restock without hunting through the garage.
AvoidDon't mix loose fasteners into one bin - you'll end up dumping it out to find a single size.
4. DIY Drill Driver Charging Cradle with Cable Clips
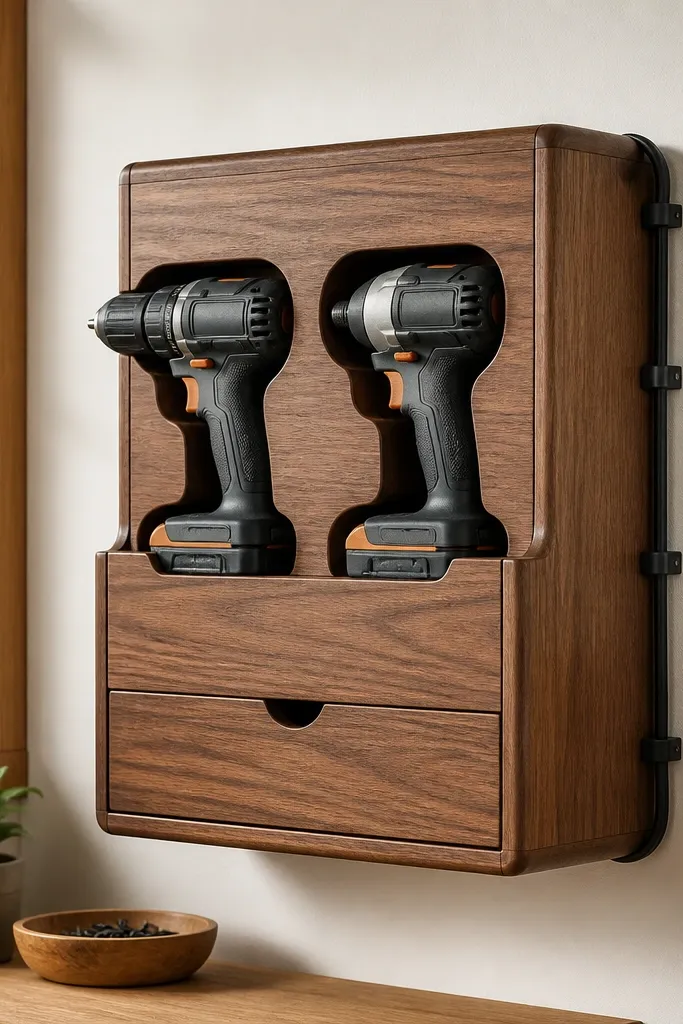
I built a cradle because drills are never "put away" when they're just leaning in a corner. Cutouts stabilize the tools so they don't slide, and cable clips stop the charger cords from turning into a tangled mess. The hidden power strip keeps the setup looking clean.
Cut two half-moon slots sized to your tool battery shape, then line the edges with felt or thin rubber sheet so metal doesn't scratch. Mount at about 54 inches high. Use a concealed power strip inside a shallow box with an access door.
Pro tipMark the cradle cutout edges with chalk first, then test-fit with the batteries installed.
AvoidDon't mount the cradle without leaving cord slack - tight cords pull chargers loose and look messy.
5. Wall-Mounted Bike and Tool Hybrid Storage Rail
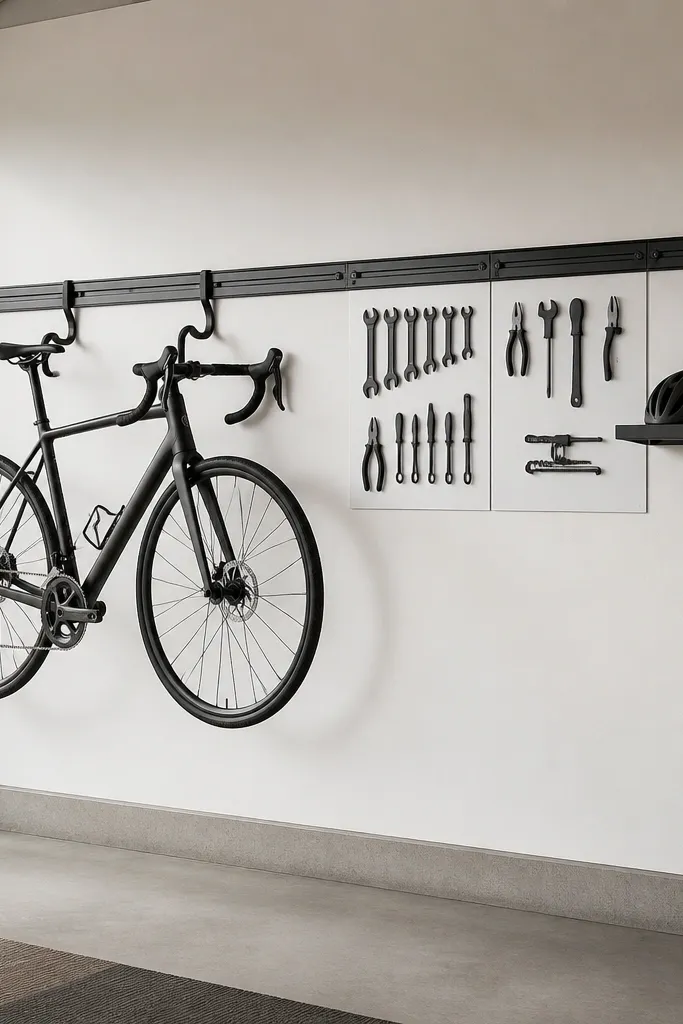
This setup works in garages where kids' gear crowds the wall. You get one clean rail line for bikes, and you keep tools in the same visual system so you don't end up with separate clutter zones. The modern look is from the single straight mounting line and consistent hook style.
Use one continuous rail or multiple aligned heavy brackets with a level line. Keep bike hooks on one side and hand-tool hooks on the other, leaving a 6-inch gap between the two areas so helmets and tools don't bump. Add a small lower shelf for gloves and first-aid items.
Pro tipPaint the backing panel white or light gray so black hooks and tools pop.
AvoidDon't mix hook types - mismatched hooks make the wall look chaotic even if it's organized.
6. Pegboard Roller Tray for Paint Brushes and Rollers
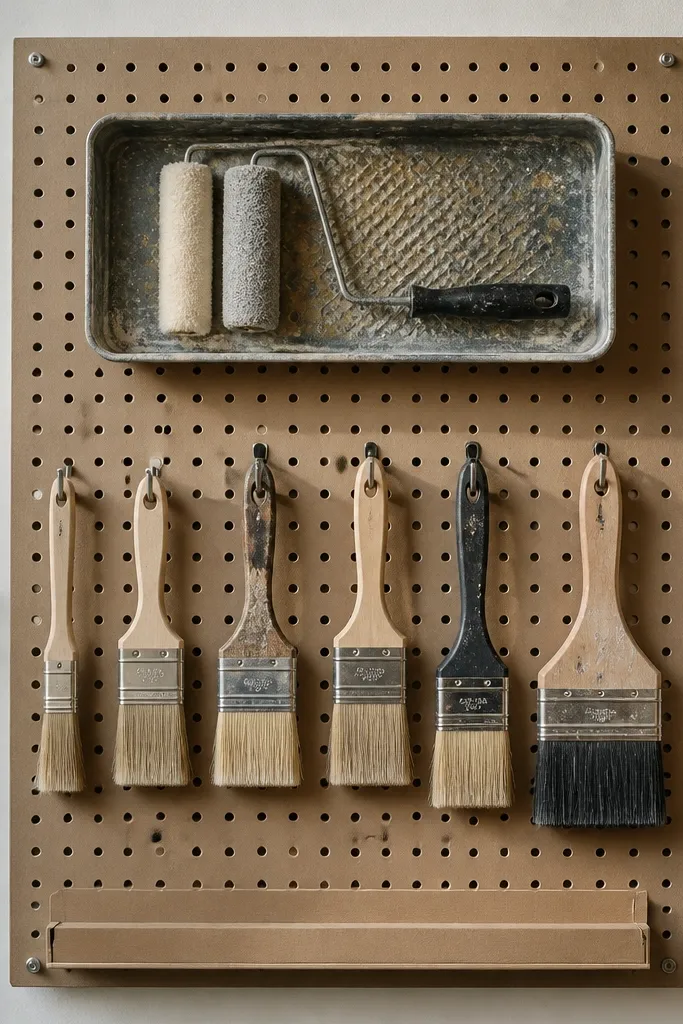
If you do any garage painting, brushes and rollers end up in random cups and bins. A roller tray keeps the roller handle upright and prevents drips from pooling. Hanging brushes keeps bristles from getting crushed and looks tidy because everything is the same direction.
Use a metal drip tray or shallow baking pan mounted to the pegboard with standoffs so it clears the board. Hang brushes with hooks that grip the handle, not the bristles. Keep this zone near the door or workbench so you don't carry wet tools across the garage.
Pro tipAdd a small removable cup for solvent rags right under the hooks.
AvoidDon't store wet rollers in a closed bin - they smell and the garage looks instantly messy.
7. Sealed Plywood Shelf with Magnetic Tool Strip Ends
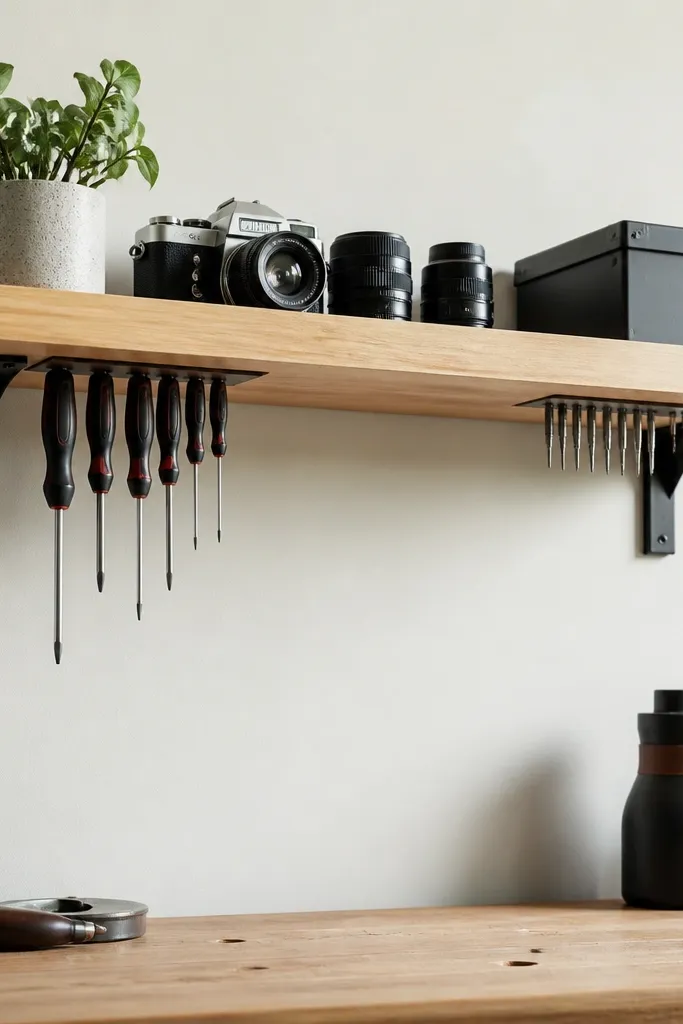
Magnetic strips on the ends give you a clean "landing spot" for small metal tools. The sealed plywood shelf reads warm and modern together, especially with black brackets. It also keeps frequently grabbed items off the pegboard so your wall has room for bigger tools.
Seal the plywood with two coats of clear matte polyurethane. Install black brackets and keep the shelf depth around 8 inches so bins fit without blocking the wall. Use magnetic strips that are at least 12 inches long for stability.
Pro tipPut the magnets at the ends so the center stays clear for a toolbox lid or small parts bin.
AvoidDon't use bare plywood - it scuffs and stains fast in a garage.
8. Corner Tool Tower Using 2x4 Frames and Stackable Bins
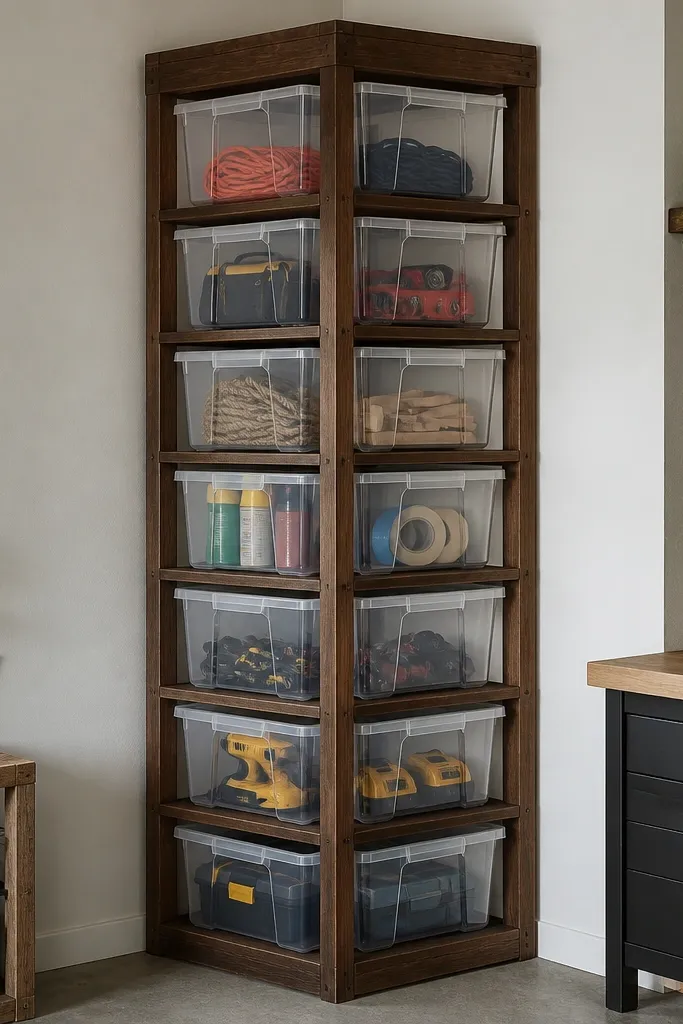
Corners waste space unless you build for them. A simple tower makes vertical storage feel intentional, not like you shoved bins in a corner. Clear bins keep you from forgetting what's inside, and the grid layout looks modern because it's aligned.
Build a frame from 2x4s with 16-inch wide bays. Use bins that fit the bay width with a small gap for easy pull-out. Anchor the unit to studs so kids can't tip it.
Pro tipLabel by size ranges, not by vague categories like "tools." Example: "1/4 to 3/8" or "M6 to M10."
AvoidDon't leave bins unanchored - a bumped tower turns organized bins into a spill.
9. Workbench Front Drawer Organizer with Sliding Tray Inserts
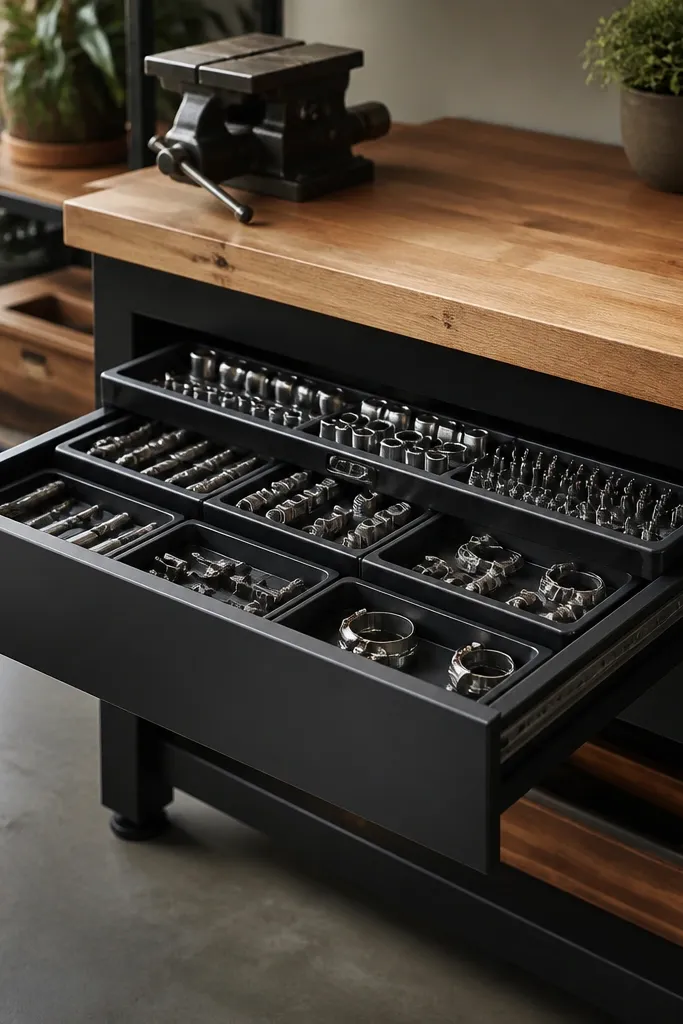
If your workbench drawer is a catch-all, you lose time every time. Sliding trays let you pull the exact section out instead of dumping a drawer. Matte black drawer fronts keep it modern and hide minor scuffs from daily use.
Use a drawer insert system with 3-4 compartments and at least one deep slot for long driver bits. Install soft-close slides if you plan to open it often. Keep the most-used items in the shallow compartments closest to the drawer opening.
Pro tipMeasure your most-used hand tools and build compartments around their footprint, not around the insert's generic size.
AvoidDon't cram trays too tight - if you fight the drawer, you stop using it.
10. Wall-Top Pegboard Strip for Ladders of Small Tools

I use the high wall for tools that don't need daily access. This keeps your eye-level areas clean and makes the garage feel larger. The modern look comes from the narrow strip, consistent spacing, and labels that match the rest of the system.
Mount the strip around 78 inches high so you only reach it with a step stool. Put measuring tools in upright holders so they don't bend. Use small, light hooks - you're storing accessories, not heavy power tools.
Pro tipKeep a single "grab kit" bag up here for quick weekend tasks so you don't roam the garage.
AvoidDon't store heavy stuff up high - it's unsafe and it makes the whole layout feel wrong.
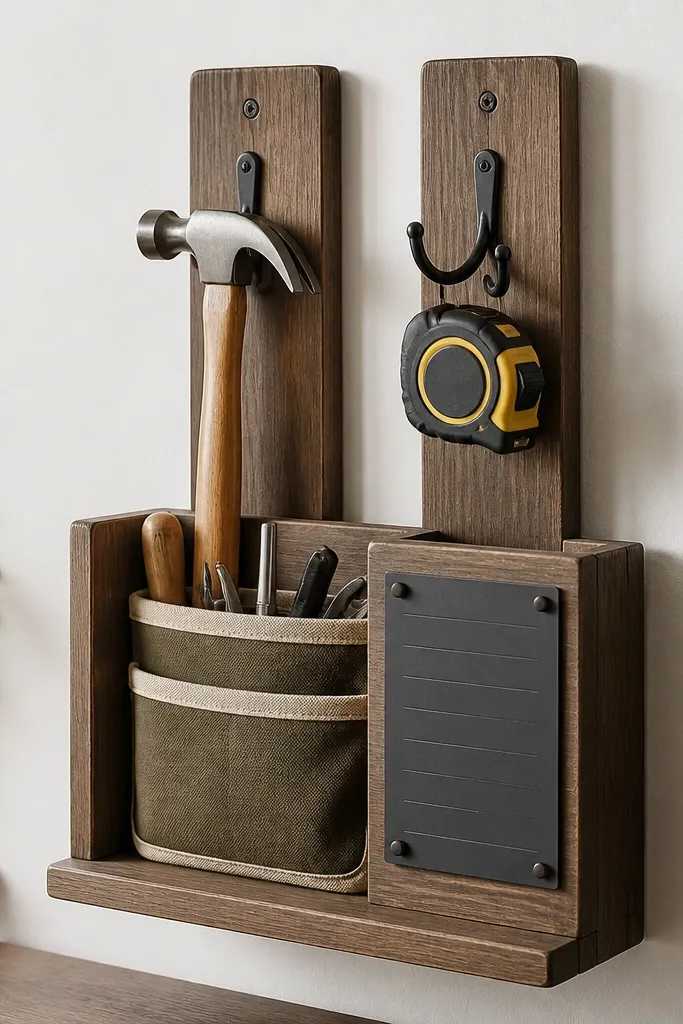
11. Tool Shadow Board for Screwdrivers and Wrenches
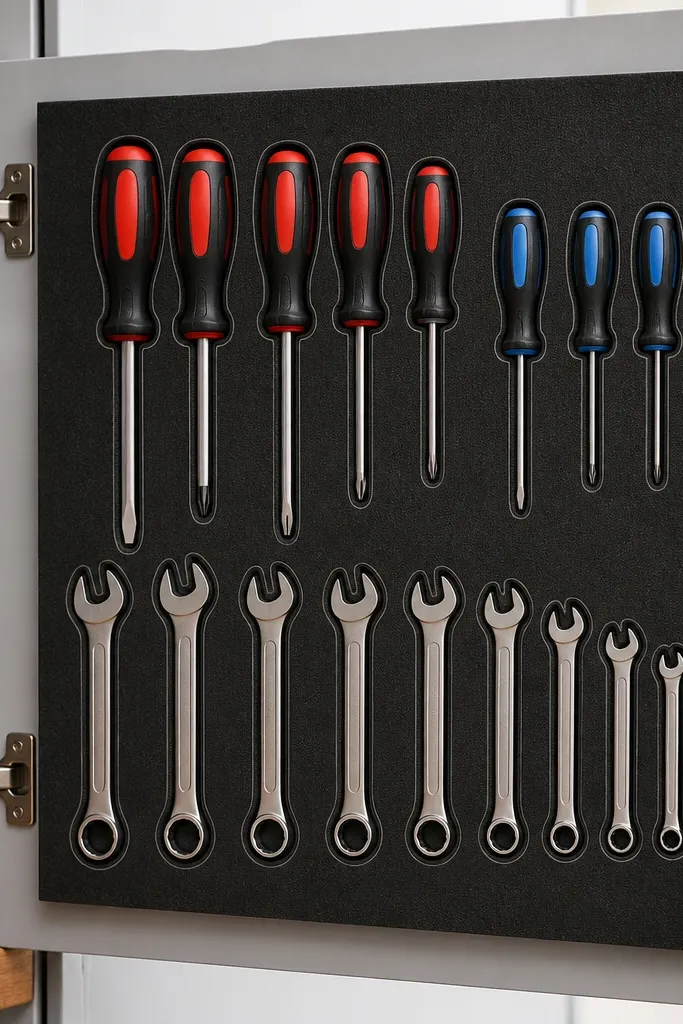
Shadow boards make tools look intentionally placed. I like them for screwdrivers, wrenches, and bits because the outline tells you instantly if something is missing. The modern look is the uniform dark background and crisp tool outlines.
Use a sheet of 1/2-inch EVA foam or cork with adhesive backing. Trace each tool, cut with a sharp blade, and test fit so the tool sits snug without forcing. Mount inside a cabinet door so the board stays protected from dust.
Pro tipStore the "missing tools" checklist on the back of the door so kids and adults can restock quickly.
AvoidDon't use thin foam - it tears around the tool and looks worn fast.
12. Magnetic Strip for Drill Bits and Small Metal Attachments

Bits are small enough to disappear, so magnets stop the "where did that go?" problem. It looks modern when it's mounted cleanly under a shelf or along a cabinet side. The trick is using narrow strips and spacing so bits don't pile together.
Mount the strip with screws into studs or solid backing. Use multiple short strips instead of one long strip if you have different categories. Keep the strip near your drill cradle so you grab bits immediately.
Pro tipPut a small strip of painter's tape on the metal as a temporary label while you decide the best layout.
AvoidDon't cram bits tightly - they clump and you still end up digging.
13. Pegboard Bin Ladder for Kids' Safe Tool Storage
Kids' tools need a system that looks neat even when they're learning. Clear bins on a pegboard keep items visible and limit mess to one bin at a time. I keep the "safe" tools in the 24-36 inch band so kids can reach without climbing.
Use small clear bins with rounded bottoms so they pop out easily. Label each bin with a big icon and text. Mount bins in a staggered ladder so you can see lids and grab handles.
Pro tipHang a small checklist card next to the bins with 5 items max so it's not overwhelming.
AvoidDon't put sharp tools in kid-height bins - it ruins the whole purpose of safe organization.
14. Rust-Proof Hose Reel + Nozzle Holder Wall Station
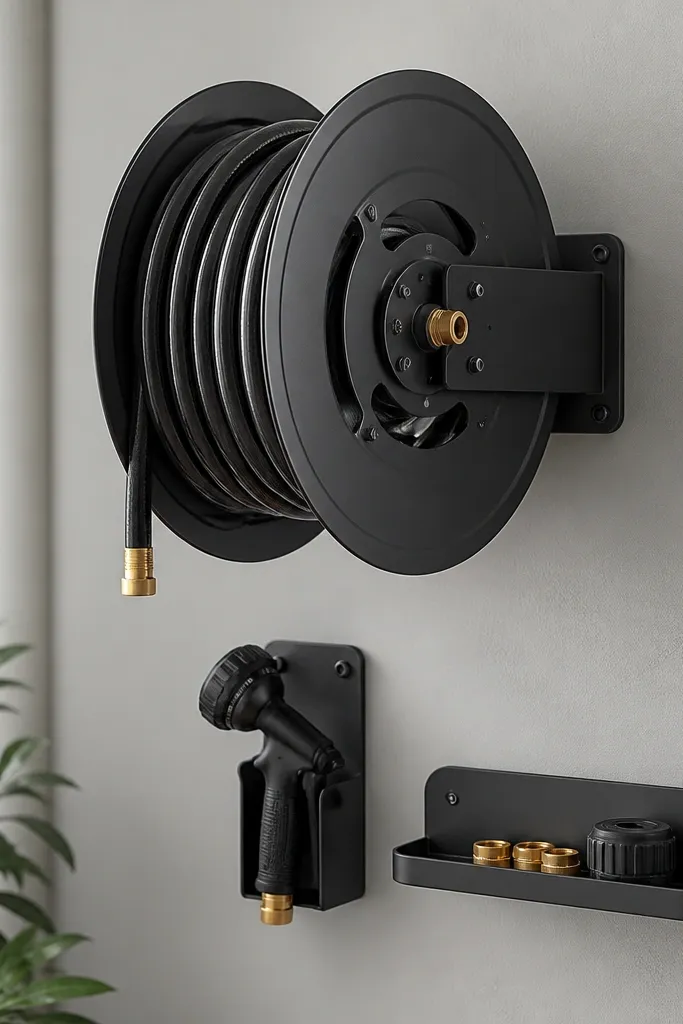
Garden hose clutter is the reason garages look messy even with good tool storage. A wall station keeps hose ends from dragging across the floor. The modern finish comes from matching the reel and holders in the same dark color family.
Mount the reel near where you use the hose, but keep the bottom at least 18 inches above the floor so it doesn't scrape. Add a nozzle holder with individual slots for spray heads. Keep spare fittings on a tiny shelf so they don't end up in a drawer.
Pro tipUse a quick-drain hose adapter so water doesn't sit in the nozzle holder.
AvoidDon't coil the hose on a random hook - it kinks and looks messy in a week.
15. Overhead Ceiling Rack for Long Tools and Extension Cords
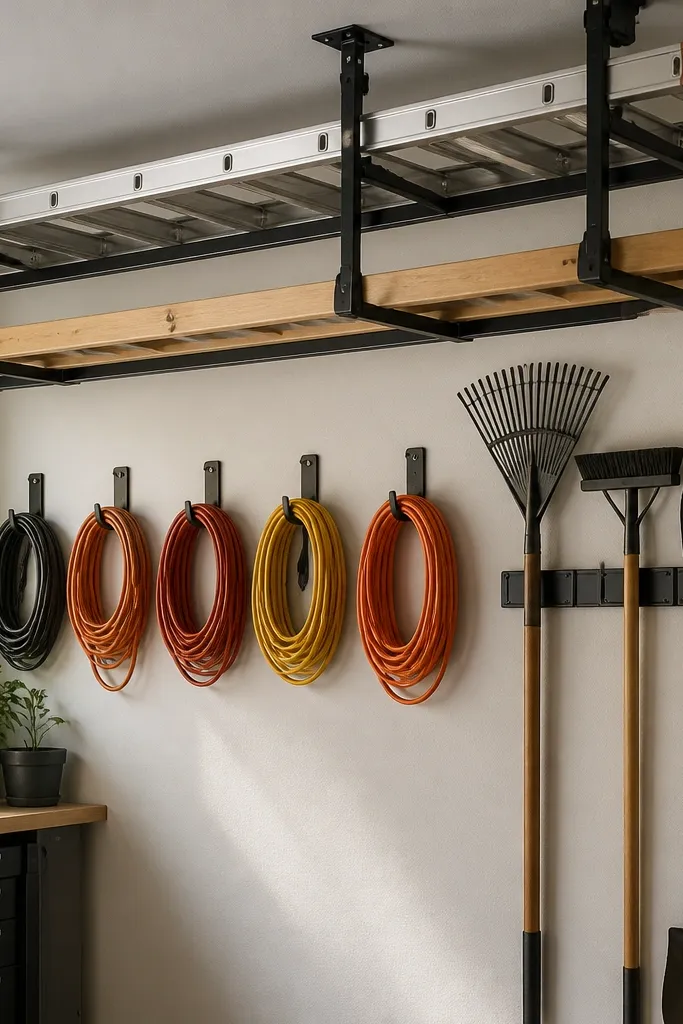
Modern garages use the ceiling, but only if it's organized. I store extension cords and long-handled tools overhead so the walls and floor stay open. The look is clean because everything is parallel and the labels face down.
Use heavy-duty ceiling hooks with straps that can handle weight. Keep the rack centered and measure clearance under the lowest garage door point. Label cords with tape tags and keep coils in Velcro ties.
Pro tipAdd a small pull-down handle on one cord so you can reach without climbing.
AvoidDon't hang random cords loose - they tangle and you lose the modern clean look immediately.
16. Tool Tote Dock Station for Quick-Grabs
A dock station keeps your "grab it and go" tote from living on the floor. It also makes the modern look because the tote has a home spot that lines up with the rest of your wall layout. I use it for weekend jobs - car checks, small repairs, and yard quick fixes.
Build a dock with a base shelf 1 inch wider than your tote footprint so it sits without wobble. Use two side guides to stop sliding. Mount at about chest height so you grab it easily but it stays out of kids' reach.
Pro tipPut a small checklist card holder on the wall so the tote is never empty when you start a job.
AvoidDon't dock the tote on the same wall spot as your chargers - you'll end up bumping cords every time.
17. Cabinet Door Organizer for Measuring Tools and Level Sets
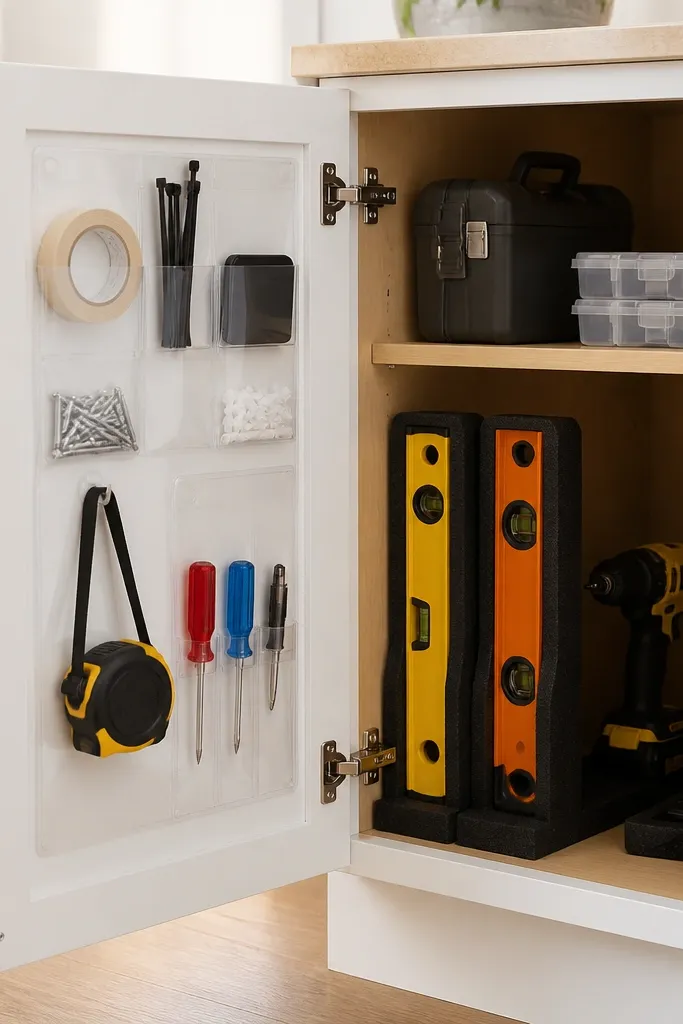
Cabinet doors are perfect for measuring tools because you don't need them visible all day. Clear pockets keep small items from falling behind shelves. The modern look comes from matching cabinet color with black hardware and using uniform pocket sizes.
Use rigid clear pockets so they don't sag and distort your layout. Cut foam inserts for levels so they don't rattle. Keep tape measures in loops sized to their width.
Pro tipMount the organizer on the door that opens toward your workbench so you don't walk across the garage with tools in hand.
AvoidDon't overload door pockets - when they bulge, the whole system looks cheap.
18. LED Under-Shelf Lighting for Tool Visibility
Good lighting is what makes modern organization actually usable. When labels are easy to read, you return tools faster, and the garage feels less cluttered. I've seen this fix "almost organized" setups that still looked messy because shadows hid the labels.
Use 12V LED strips with a diffuser cover so the light doesn't glare. Install a switch near the workbench and run low-voltage wire in clips. Place lights under shelves pointing slightly toward pegboard labels.
Pro tipTest the light angle with your phone flashlight before final wiring - you want labels readable, not shiny reflections.
AvoidDon't mount LEDs too close to pegboard hooks - you'll cast harsh glare on metal tools.
19. Floor-Level Magnetic Strip for Screw Bits and Nails in a Work Zone
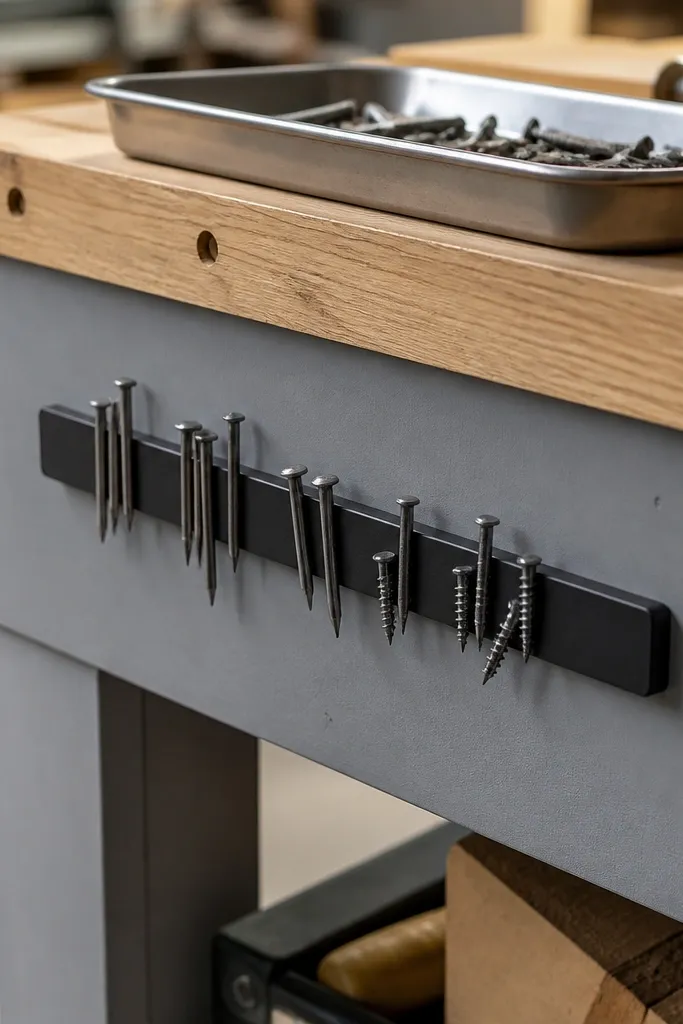
If you work at a bench, tiny metal pieces walk off into the world. A floor-level magnetic strip catches steel bits and keeps your work zone tidy. It also looks clean because it's a single line of tools instead of a scatter.
Mount the strip on the bench side panel at about 10 inches above the floor. Add a small catch tray above it so you can drop bits without them falling. Use a matte finish bench panel so the strip doesn't look like an afterthought.
Pro tipKeep a small brush nearby to sweep loose debris onto the magnet line.
AvoidDon't use a super strong magnet - it makes bits hard to remove and you'll get frustrated.
20. Sealed Utility Wall with Color-Coded Tool Cards
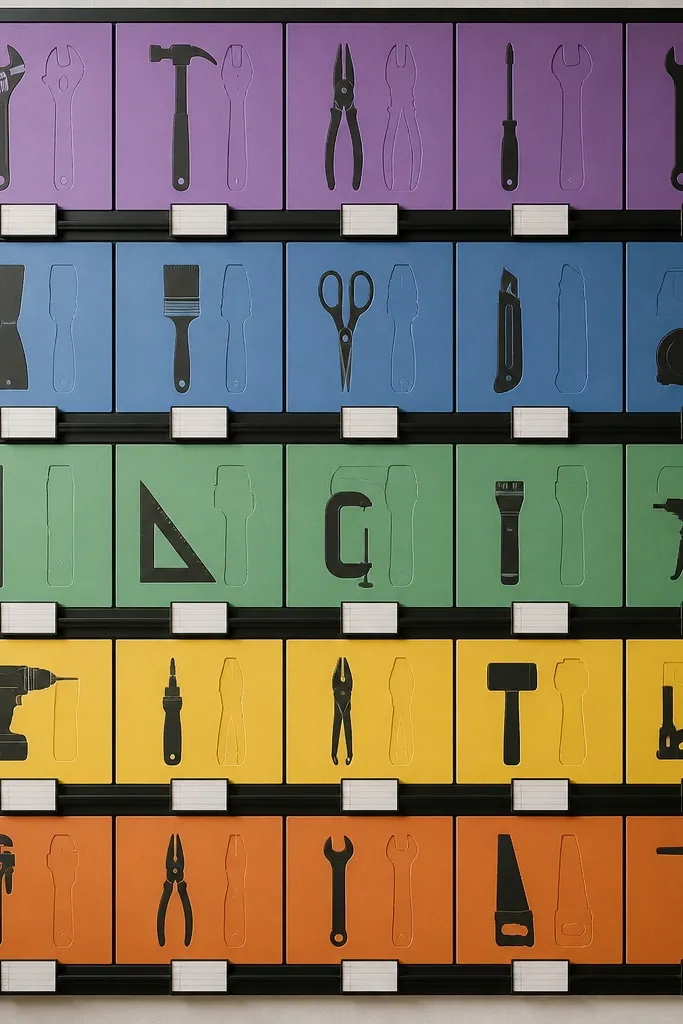
Tool cards make the system feel modern because it looks like a plan, not a pile of hooks. I use three colors only: blue for fastening, green for measuring, red for cutting. When kids help, they match the color card to the spot and the return process is simpler.
Use index card holders or small clear sleeves mounted next to each tool zone. Print tool names in large text and keep the card size consistent across the wall. Seal the wall backing if you're using pegboard or plywood so it wipes clean.
Pro tipMake one card for "missing tools" and keep it in a visible spot so you can fix the system quickly.
AvoidDon't add too many colors - it turns into a rainbow and the labels stop meaning anything.
21. Stackable Tool Chests with Color-Matched Drawer Labels
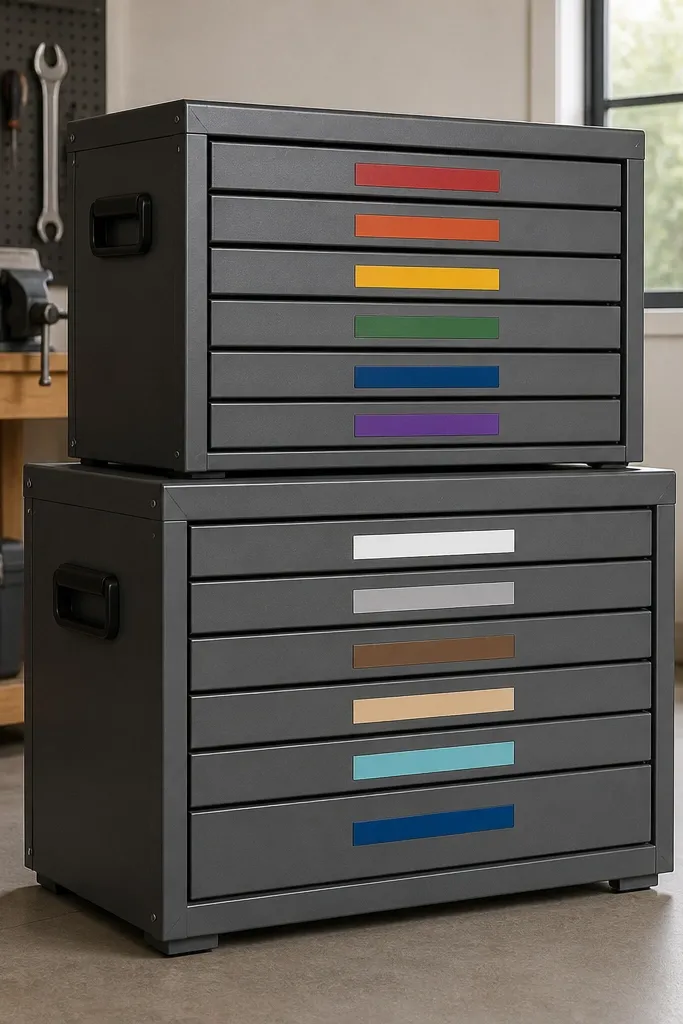
Stackable chests keep heavy tools low and stable, and the modern look comes from uniform drawer labeling. I like color-matched labels because they make it easy for everyone in the family to return items to the right drawer. When the drawer front is readable, you stop leaving tools on the bench.
Pick one chest finish (matte gray or matte black) and commit. Use label strips 1 inch tall with black text on white or white text on black. Keep the top drawers for bits and hand tools, and put power tool accessories in the lower tier.
Pro tipUse a label maker with a strong adhesive tape so labels survive grease and wipe-downs.
AvoidDon't label tiny - you'll squint, and then you'll start putting stuff back wherever you can reach.
22. Heat-Shielded Wall Mount for Soldering Iron and Hot Tools
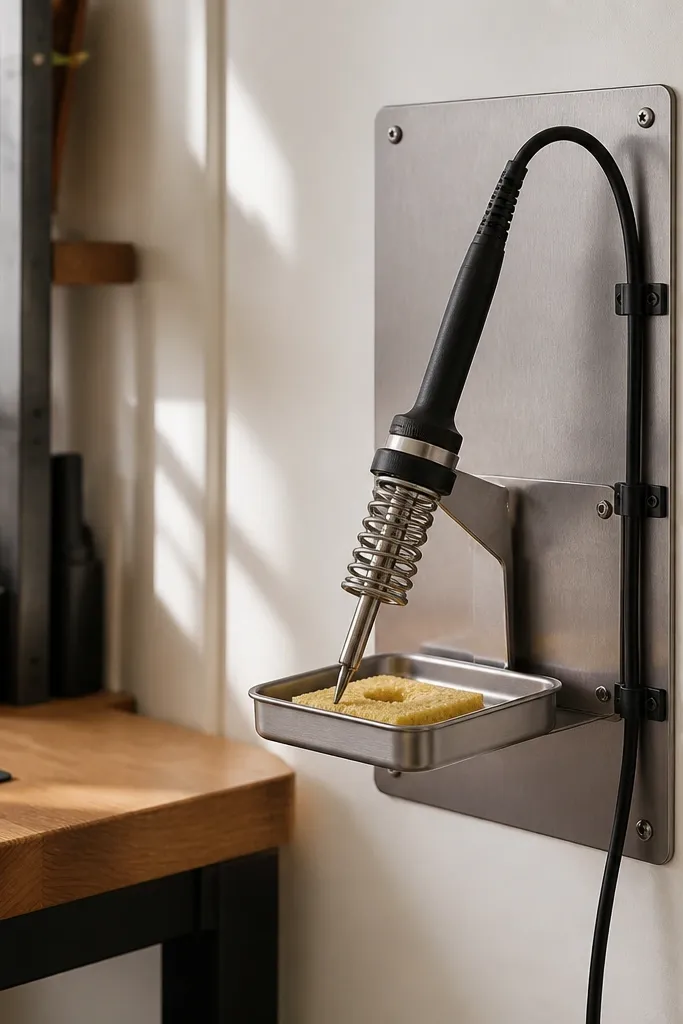
Hot tools ruin the look fast when they live on a bench with cords sprawled. A heat-shielded mount gives you a safe, consistent home spot. It also keeps the modern vibe because the station is contained and the cord has a defined route.
Use a heat-resistant board like cement board or a metal heat shield backing. Mount a metal stand tray with screws and keep the iron resting point aligned. Clip the cord with heat-safe clips so it doesn't droop.
Pro tipAdd a small timer label near the station so the iron doesn't get left on after a job.
AvoidDon't mount hot tools on bare wood - it stains and warps over time.
23. DIY Cable Management Rail for Chargers and Extension Cords
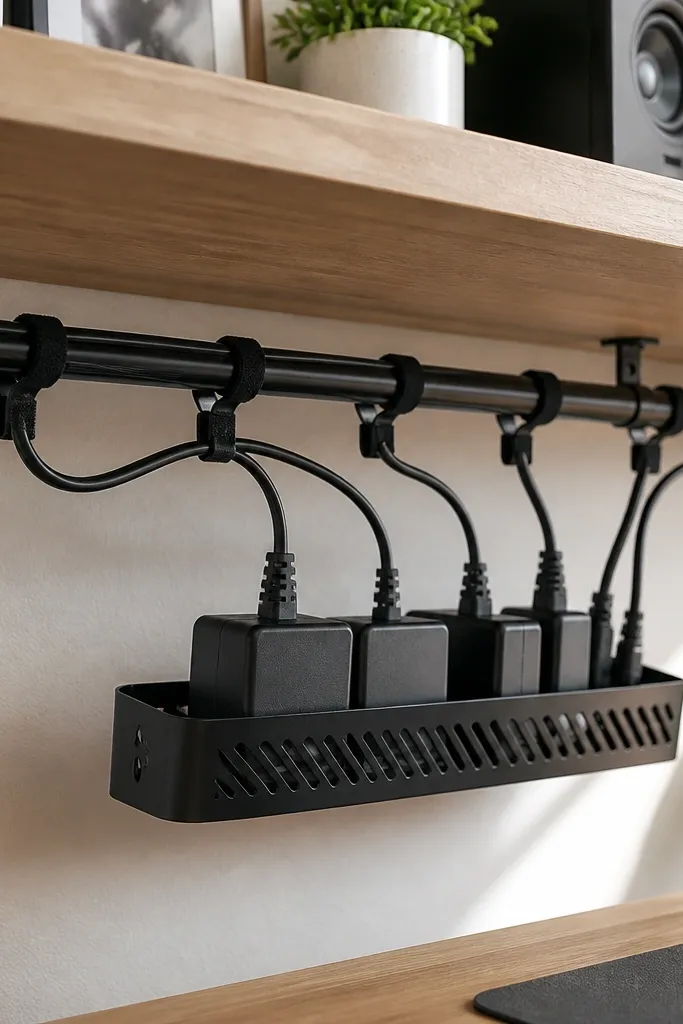
Modern garage organization includes cables, not just tools. A cable rail makes chargers and extension cords look intentional and prevents cord spaghetti. When cords have a home, you stop wrapping them around handles and you stop losing them under bins.
Use a mounted rail with standoffs so straps don't rub on sharp edges. Keep charger bricks in a ventilated tray with a label on top. Route cords in consistent arcs and tie them with Velcro, not plastic twist ties.
Pro tipLabel each charger by tool model using a small label on the brick and on the wall spot.
AvoidDon't let cords hang loose from hooks - it looks messy and they tangle when pulled.
24. Modern Pegboard Label Strip System with Wipe-Clean Tape
Labels are what keep the organization modern instead of just "pretty." I use wipe-clean tape because garage grime happens, and I don't want paper labels peeling off after two weeks. The alignment - label strip straight across - makes the whole wall look designed.
Use a tape label system with consistent font size and spacing. Apply labels to the pegboard backing or to a thin plastic strip mounted at the same height. Re-label after you do your first two projects so the system matches real usage.
Pro tipWrite labels with a marker that matches your tape's recommended ink so the text stays crisp after wiping.
AvoidDon't use tiny handwriting - it turns into clutter when you're busy.
25. Workbench Pegboard Back Panel with Tool Rows at Eye Level
This is the setup I use most because it keeps your "daily tools" in reach. Eye-level rows mean you grab without scanning the garage. The modern look comes from the three-row structure and the same hook spacing across the panel.
Mount the pegboard so the top row sits around 54-60 inches. Keep one shelf under it for bits and one small tray for frequently used fasteners. Use a single color palette: white pegboard, black hooks, light wood shelf.
Pro tipMake one row for "job start" tools (tape measure, screwdriver, bit set) so you can grab everything at once.
AvoidDon't scatter tools across the board - empty space should be intentional, not random.


