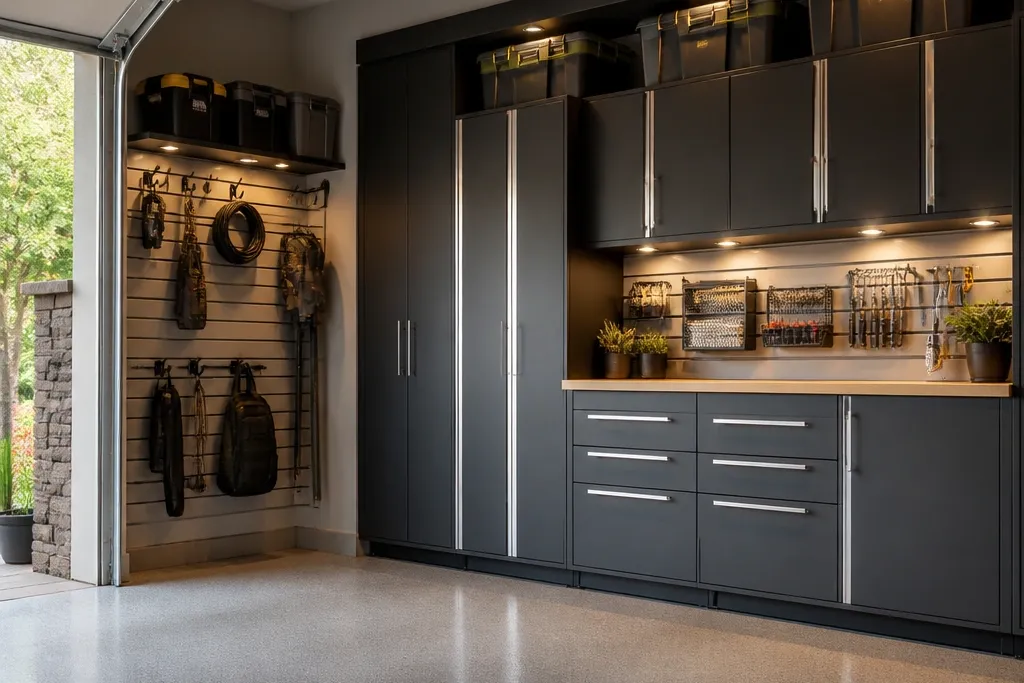
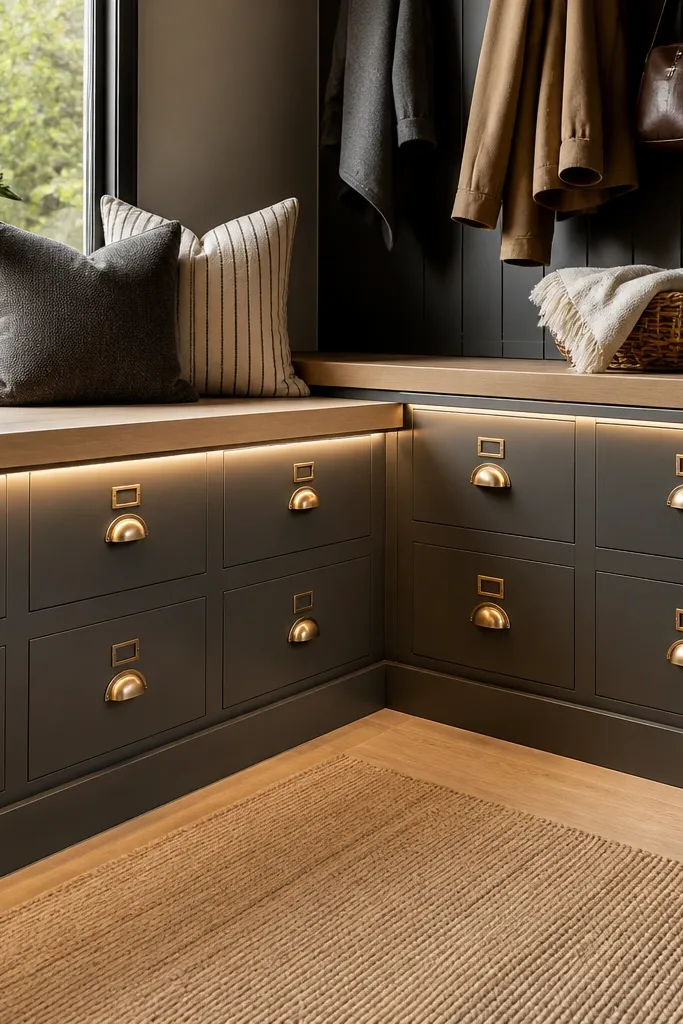
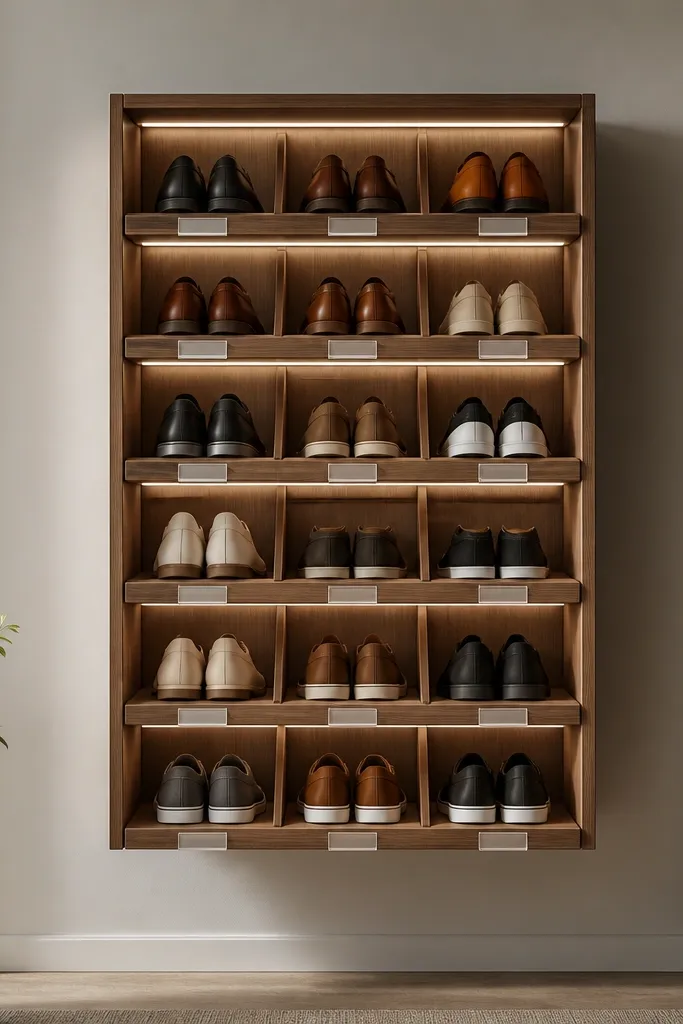
1. Under-shelf LED strips with a white diffuser channel
This setup makes storage look intentional because the light is even and glare-free. The frosted diffuser spreads the beam so you see bins and labels, not LED dots. I like white channels because they match painted plywood and MDF and keep the light from looking "blue." When the shelf light hits the front of storage bins, you can find things without turning your head like a lighthouse beam.
Use 12V or 24V LED strip in a 1 to 2 inch wide channel with a frosted cover. Mount the channel to the underside of the shelf with short screws into studs or blocking, not just drywall anchors. Keep a 1/4 inch gap between the diffuser edge and the shelf lip so the light doesn't get blocked by a shadow line.
Pro tipPlace the first strip so it lights the top half of bin fronts, not the floor. If you can read bin text while standing at the doorway, the placement is right.
AvoidAvoid mounting bare LED tape where you see the individual chips - it looks cheap and creates hot spots.
2. Cabinet-door puck lights that turn on when you open storage
Puck lights on doors feel clean because the light only appears when you need it. It also improves safety for kids - they can open a bin and instantly see what's inside. I've used this in play-supply cabinets and it keeps "mystery drawer" chaos down. The look is tidy because the lights are hidden on the cabinet face, not dangling from the ceiling.
Use slim 3W to 5W LED puck lights with an internal switch that responds to a magnetic reed or a simple door switch. Mount the puck near the hinge side so it throws light across the interior. If you use magnetic triggers, glue a small magnet to the door and place the sensor on the frame.
Pro tipAim the puck slightly toward the back wall of the cabinet so the bottom doesn't stay dark.
AvoidSkip placing the light at the very bottom of the door - you'll get shadows across the middle shelves.
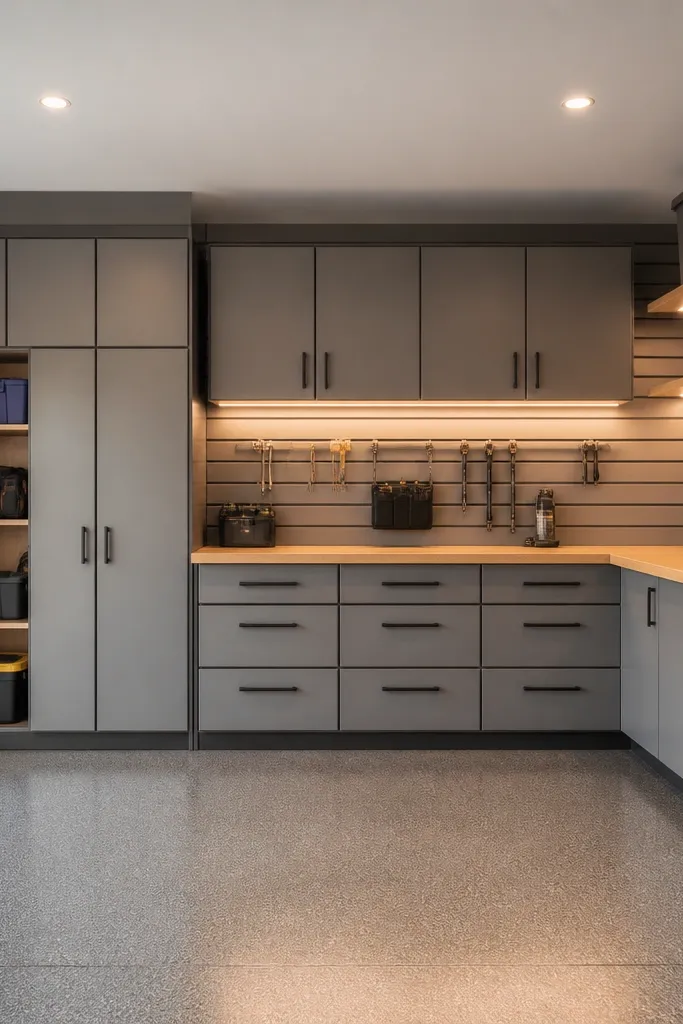
3. Motion-sensor strip lights under the tool pegboard
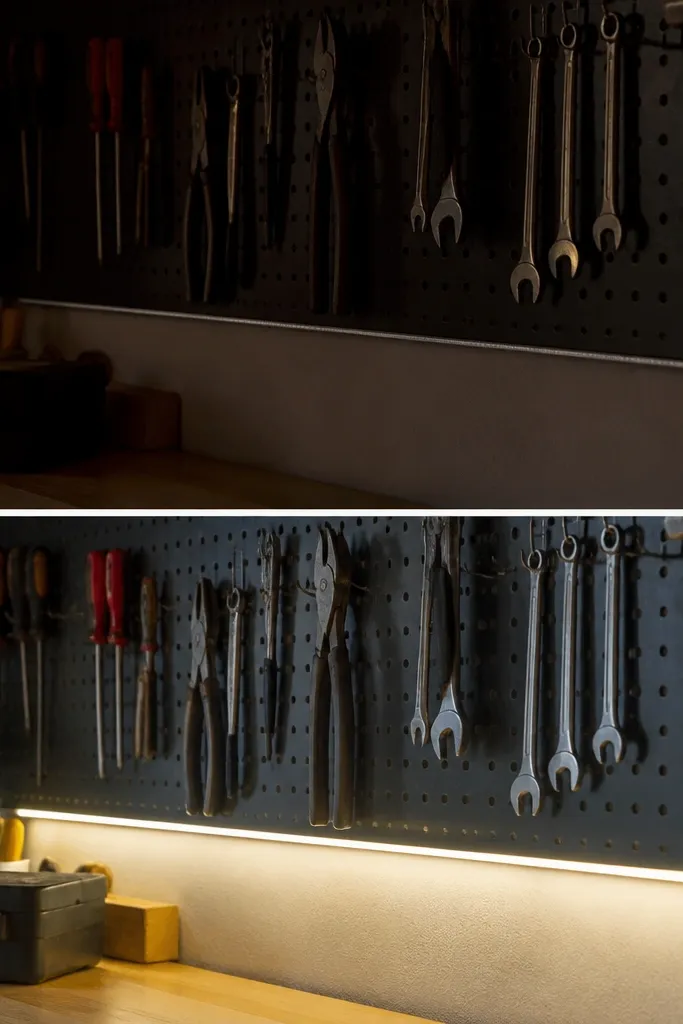
This is the quickest way I know to make tool storage usable at night. Motion sensors mean the light turns on when you reach for something, so you don't leave bright lights on all evening. The strip under the pegboard gives you a "stage light" effect, making tool shapes easy to spot. It also looks great because the light line is straight and clean.
Mount the LED strip under the pegboard bottom rail with a clear or frosted lens. Use a motion sensor controller rated for LED strips and set the sensitivity so it triggers when you approach the wall. Run the wiring through a painted raceway so you don't see cables.
Pro tipSet the sensor delay to 20 to 40 seconds. Long enough to grab tools, short enough to avoid glare while you work.
AvoidDon't point the strip straight up at your eyes - angle it slightly across the hooks.
4. LED "label glow" inside clear storage bins
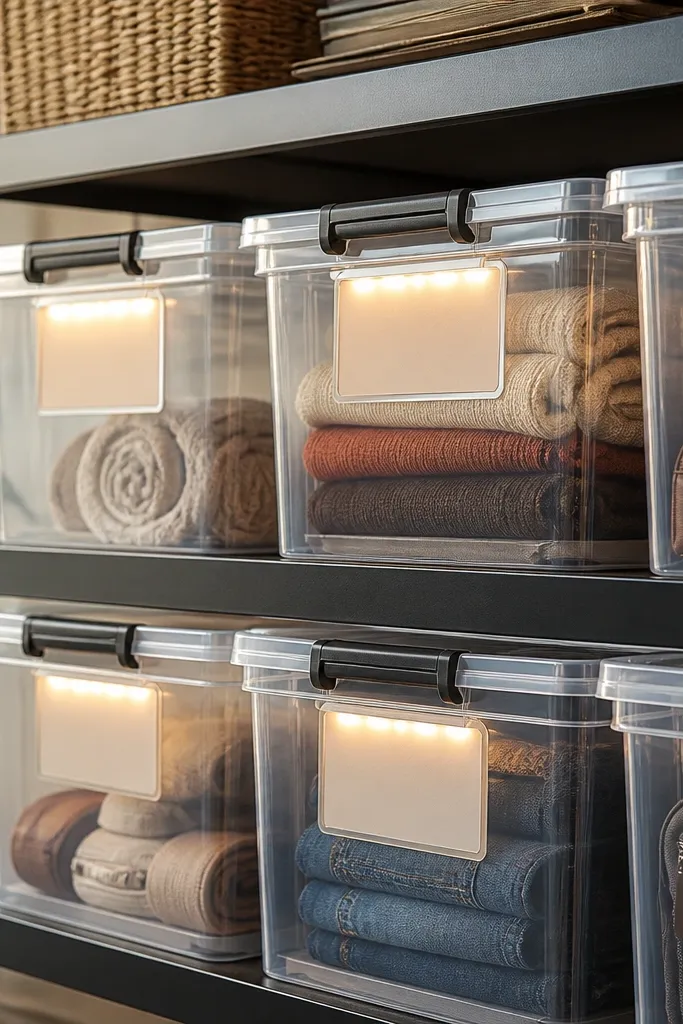
Clear bins look modern, and adding light makes the labels readable from a distance. I've done this with kids' sports gear and it cut the yelling down because everyone can see the label without opening every bin. The glow effect looks neat because the light travels through the clear plastic instead of reflecting off metal. It also helps you spot which bin is half-full without digging.
Use a short flexible LED strip inside the bin lid or side wall, powered by a small USB adapter or a removable plug. Put the LED near the label area, not at the bottom, so the text stays bright. Use warm white for a cozy look and to avoid the "hospital" color on clear plastic.
Pro tipPrint labels on matte white sticker paper and seal with clear tape. Gloss labels reflect the LED and get hard to read.
AvoidAvoid using raw LEDs taped directly to the bin wall - you'll see bright dots through clear plastic.
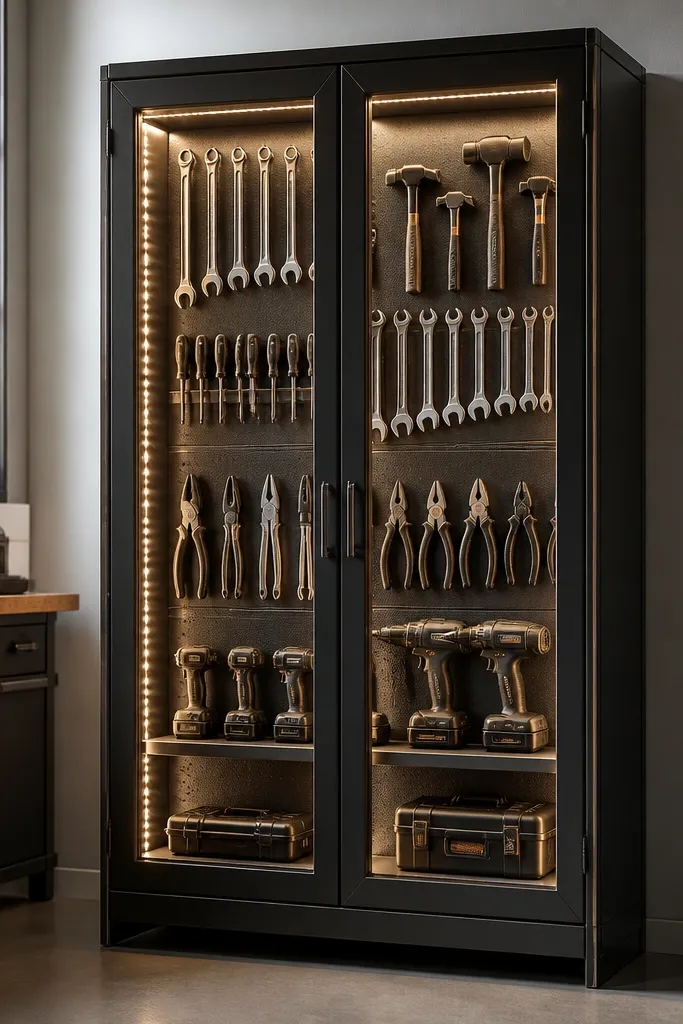
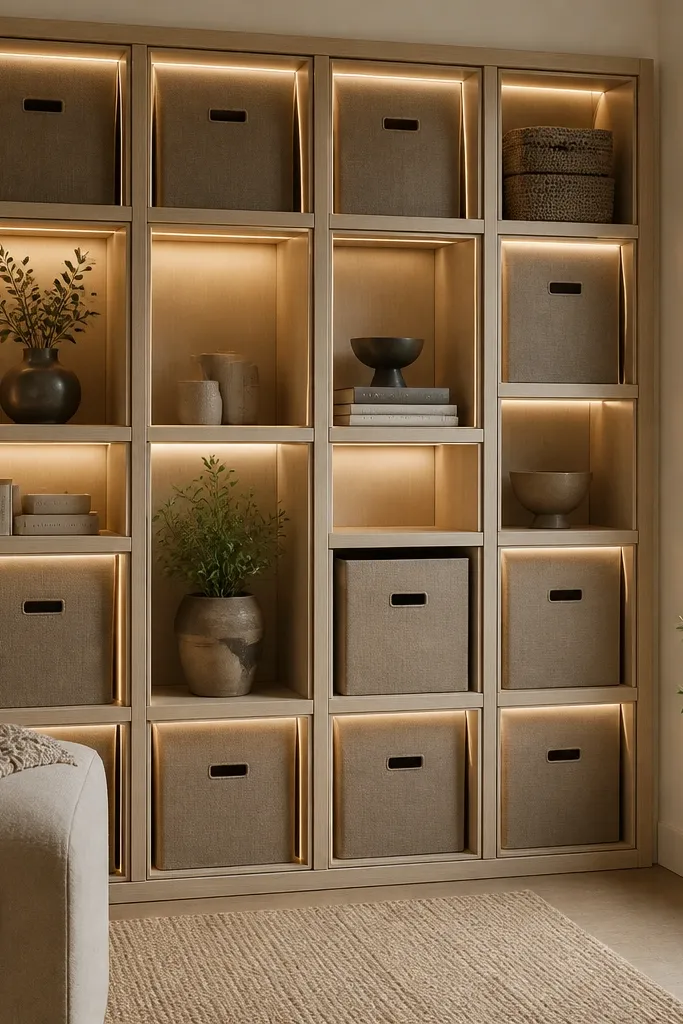
5. Backlit pegboard frame using acrylic diffuser sheets
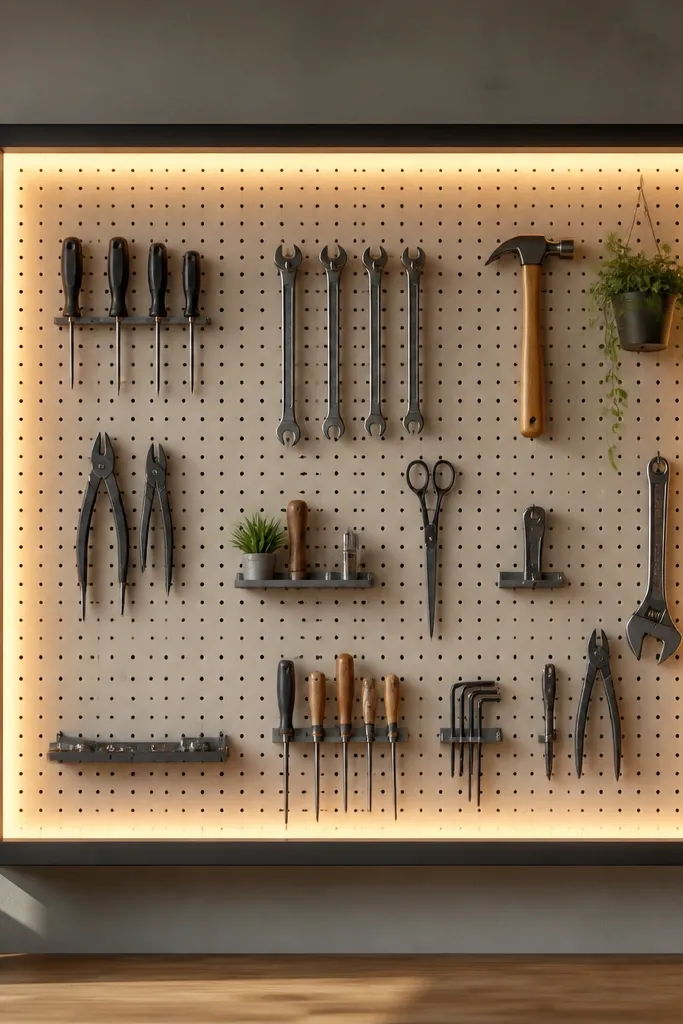
This is the "designer" version of tool lighting. The frosted acrylic diffuses the LEDs so you get a gentle backlight instead of a harsh strip. Tools pop against the light because dark silhouettes contrast with the glow. It also makes the whole wall feel intentional, like a built-in display.
Build a simple rectangle frame from 1x2 pine and mount frosted acrylic behind or just around the pegboard. Place LED strips behind the acrylic edges and wire to a dimmable driver. Keep the pegboard offset so the light doesn't directly hit your eyes.
Pro tipUse a dimmer knob at 30% for everyday - it looks better than full brightness.
AvoidSkip using clear acrylic - you'll see the LED line and it looks messy.
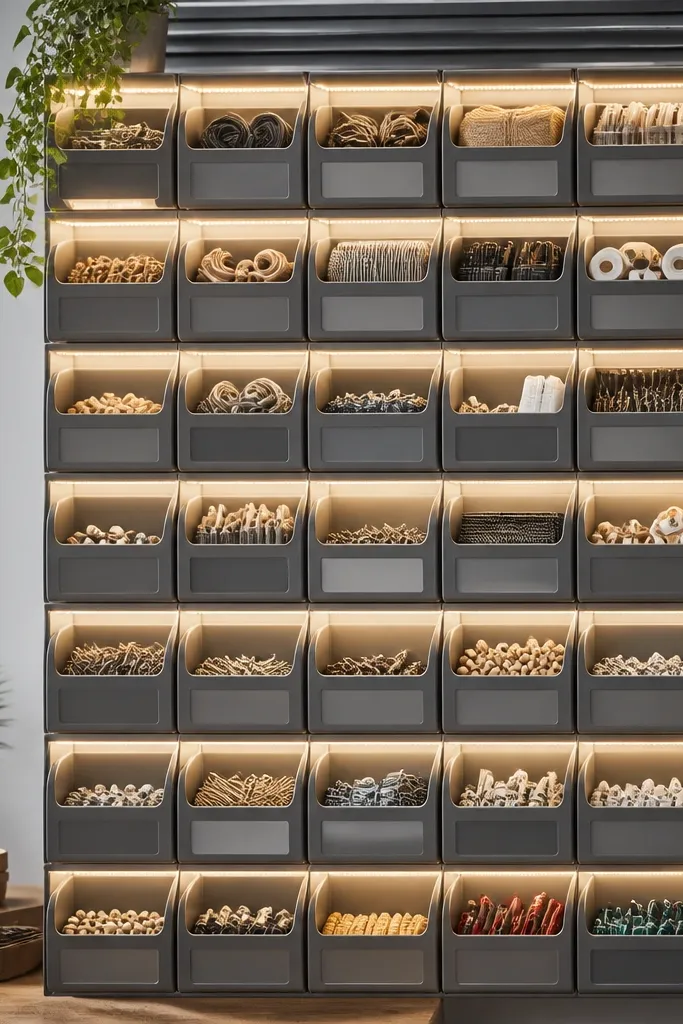
6. LED strip inside a rolling storage cart drawer
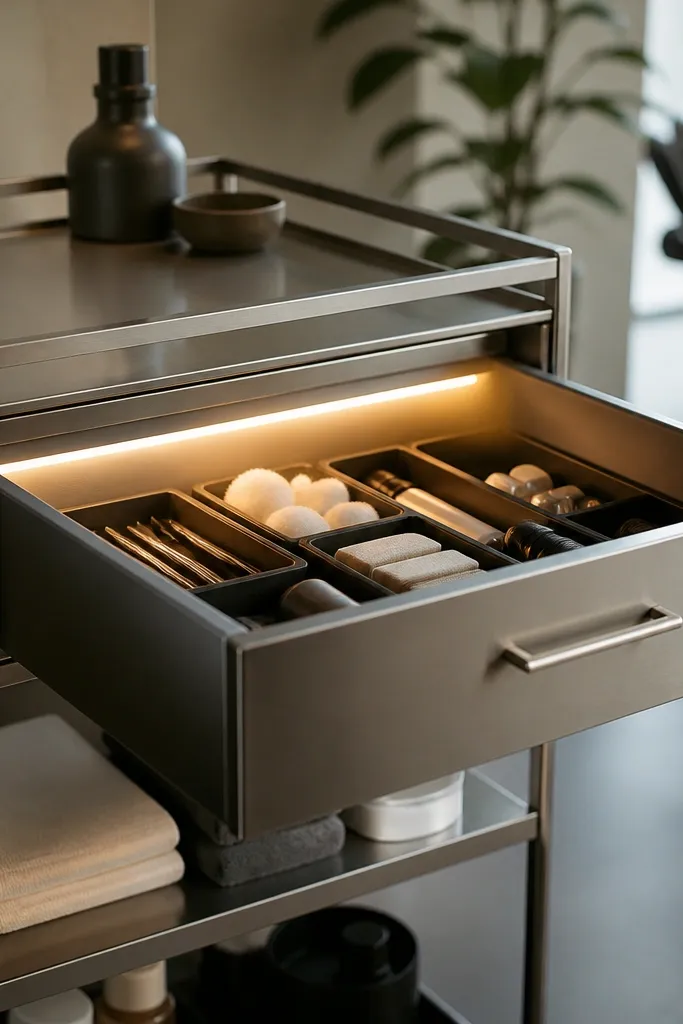
This makes a cart feel like a cabinet - you can open one drawer and instantly see everything. I've used this for kids' art supplies and it prevents the "dump-and-search" habit because the contents are visible. The light also looks clean since it's inside the drawer, not on the outside. It's one of the best ways to add lighting without drilling your garage walls.
Stick a flexible LED strip inside the drawer with a channel or thin aluminum tape guide. Use a rechargeable puck-style battery pack if you want zero wiring, or run a thin cable through the cart frame. Keep the LED along the back so it throws light forward across organizers.
Pro tipUse low-profile organizers with matching label sizes so the beam hits similar surfaces.
AvoidDon't put the LED too close to the drawer front - you'll create glare on lids and plastic bins.
7. Under-bench LED strip with cable management raceway
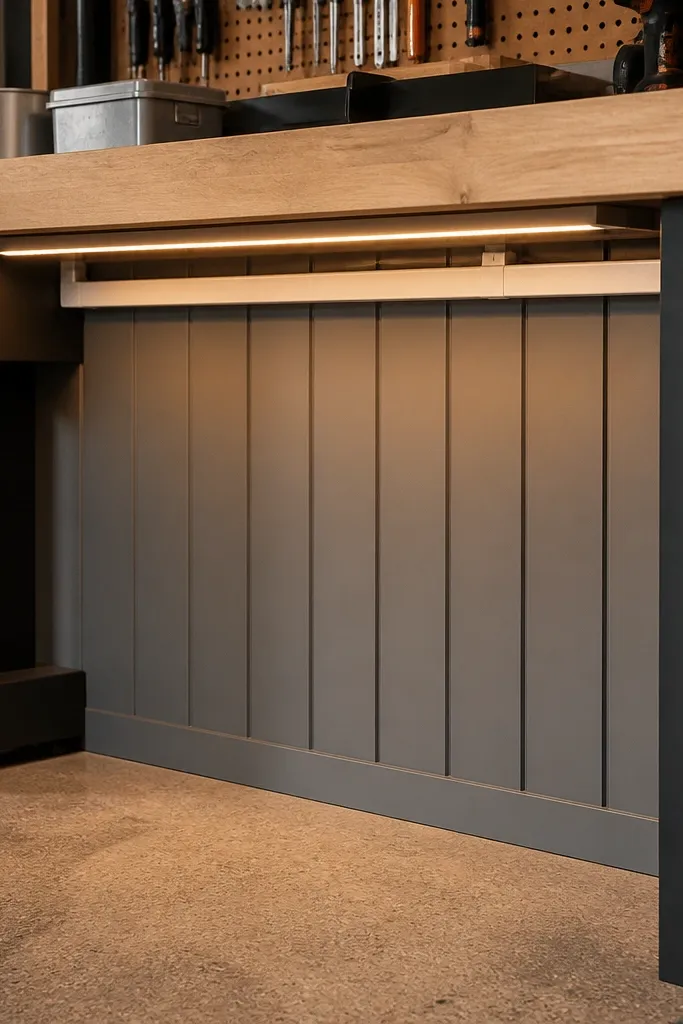
You get the best of both worlds: bright task lighting and a tidy underside. The raceway makes the wiring look like part of the build, not a last-minute fix. I've had this setup for a year and it still looks clean because nothing sags or hangs. When you can see your tools and your cords at the same time, you stop tripping and you stop losing small parts.
Use a 12V strip in a slim aluminum channel with a frosted cover. Mount the channel under the bench 1 to 2 inches from the front edge. Route the cable through a snap-on raceway and connect to a power supply mounted on the wall behind the bench.
Pro tipAdd a second short strip aimed at the bench wall so you can read labels on pegboard shelves above.
AvoidAvoid running cords across open floor space - it turns into a snag point.
8. Ceiling track light aimed at labeled storage zones

Track lights are the best "set it and forget it" option when you want a gallery look. You can aim each head at a different shelf cluster, so kids can see toy bins and you can see paint cans without glare. I like this when the garage has a low ceiling because you can aim light where you need it instead of blasting the whole space. The aesthetic is clean because the light heads are small and modern.
Install a track with three to five heads. Use 3000K bulbs for warmer storage zones and 4000K for work areas. Aim the beams so they hit vertical bin fronts and not your face when you stand in front of the shelving.
Pro tipMark the shelf heights with painter's tape before you aim - it stops you from guessing.
AvoidDon't aim track lights directly at reflective plastic bins - the glare makes labels unreadable.
9. LED rope light inside shelf toe-kicks for a floating look
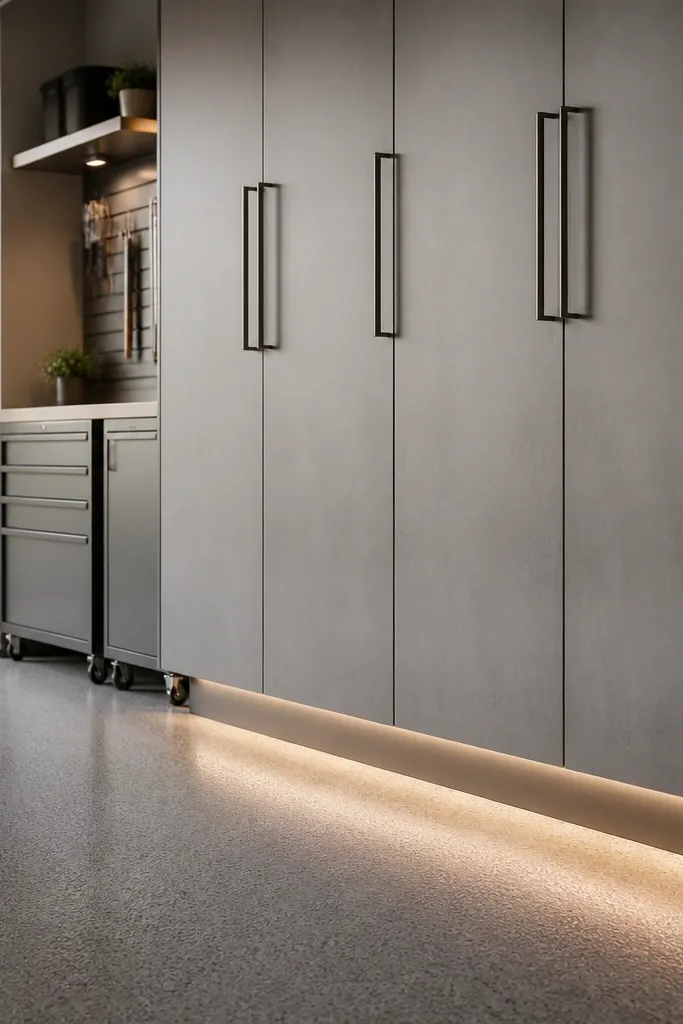
This gives you that "floating furniture" vibe, even in a garage. The light is low, so it highlights the base of storage and makes the unit look finished. I've used this on base cabinets with kids' bins and it makes nighttime access less chaotic. The warm glow also hides dust shadows along the floor.
Cut a shallow channel under the cabinet base or use a commercial toe-kick LED channel. Place rope light in warm white and diffuse it with a frosted cover if the rope is visible. Keep the power supply accessible so you can swap it without tearing apart shelves.
Pro tipUse a dimmer so the glow is noticeable but not bright enough to bother anyone sleeping nearby.
AvoidAvoid visible rope light without diffusion - it looks like a DIY afterthought.
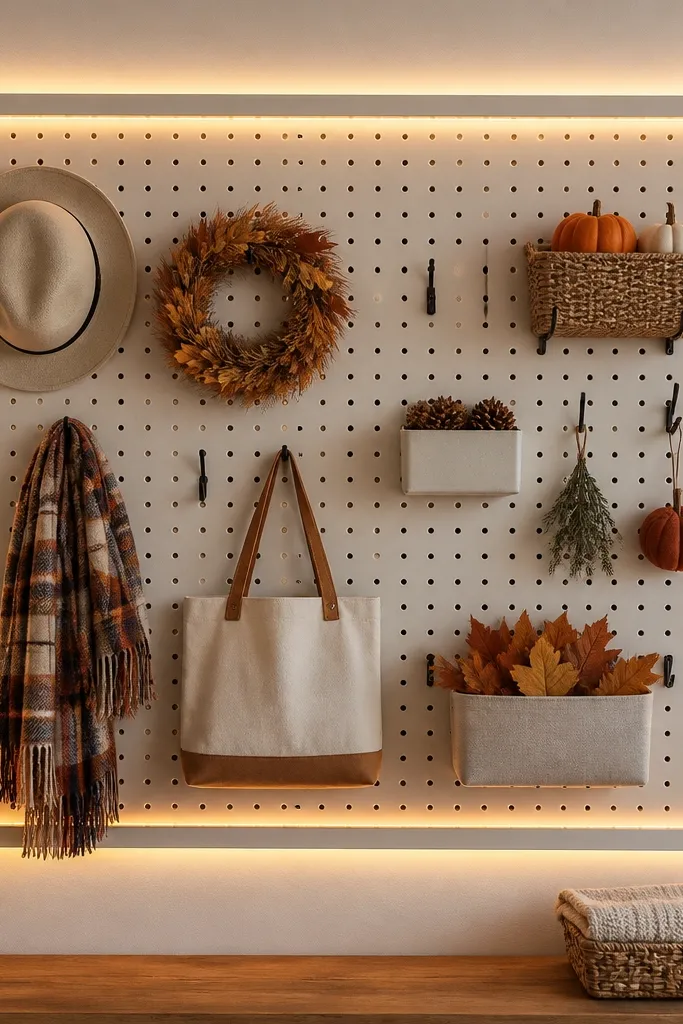
10. Backlit vinyl pegboard labels with thin LED edge lighting
Label visibility is the whole point of good garage organization. When labels glow, you don't have to read tiny text in low light. This also looks neat because the glow is localized to the label area, not the entire wall. I use this for frequently accessed tools and kid-safe items like scissors and tape.
Mount vinyl label holders on the pegboard and install a thin LED strip behind a frosted acrylic strip along the pegboard edge. Power the strip with a small controller and keep wires behind a painted backing board. Use warm white to keep colors from washing out on vinyl.
Pro tipPrint labels with bold black text on white and cover with matte clear laminate.
AvoidSkip using thin glossy vinyl - it reflects LED points and makes text hard to read.
11. LED-lit vertical bin wall for kids' sports gear
A vertical bin wall looks organized fast because each bin has a consistent size and position. Adding LEDs makes it easy for kids to pick the right bin without dumping the whole shelf. The look is clean because the lights align across compartments. I've done this in a narrow garage corner where overhead light doesn't reach the floor.
Use a fixed grid of compartments (plywood boxes with dividers or a modular bin system). Install a short LED strip at the top of each compartment line, wired together to one driver. Keep wiring behind the backing panel and use warm white so sports gear colors look natural.
Pro tipUse the same label height for every bin so the glow lines up like a row of signs.
AvoidAvoid mixing bin heights - the light will highlight the gaps and it looks uneven.
12. Clear acrylic shelf risers with LED strip underneath
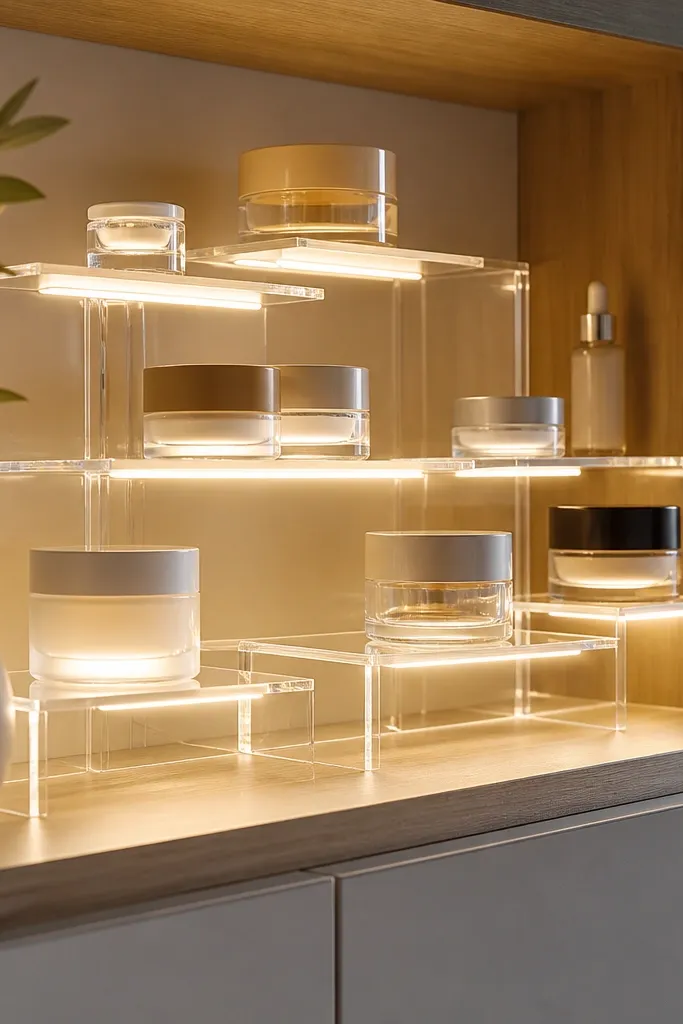
This looks modern and it makes small items feel curated. The clear acrylic hides some of the shadows so the light feels soft, not harsh. I use this for small kid craft supplies and for measuring cups and funnels. Because the containers sit on risers, the light hits the label faces and keeps the items easy to spot.
Cut clear acrylic risers or use commercially available clear shelf blocks. Install an LED strip in a channel under the shelf deck, aimed toward the risers. Keep the LED warm white and use matte labels so the glow doesn't reflect.
Pro tipUse containers with matching lid colors. When lids match, the shelf looks intentional even with a glow.
AvoidSkip using thick frosted acrylic for the risers - it kills the floating effect.
13. Magnetic rail lights over a tool wall
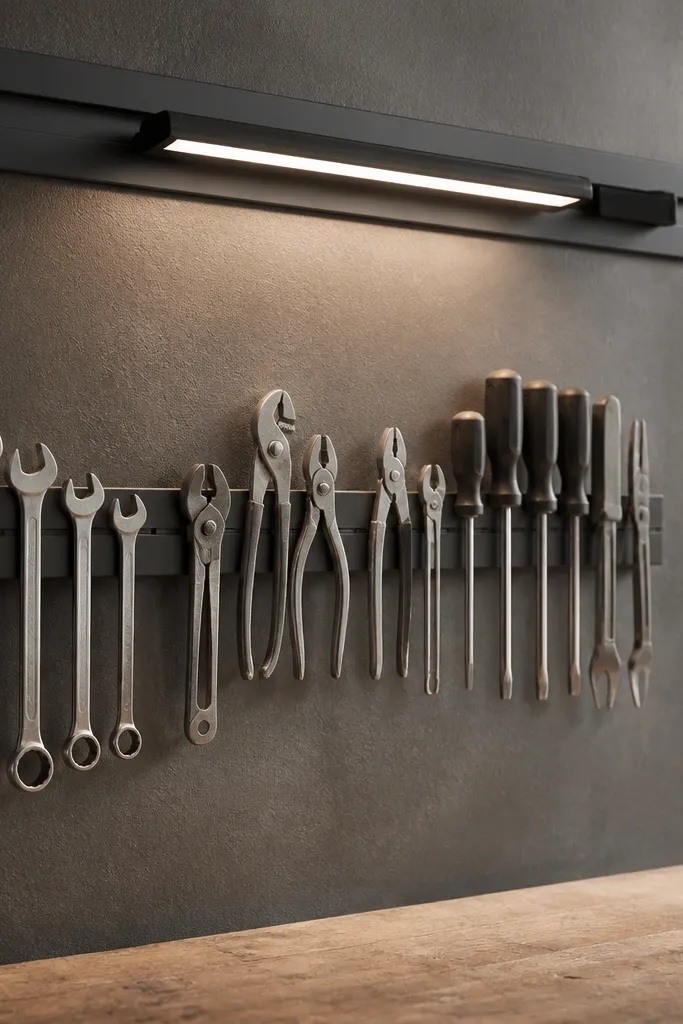
Side lighting makes metal tools look crisp and it helps you spot missing tools instantly. The magnetic rail means you can move the light without rewiring - I do this when I change tool placement. It's also great for garages used by kids because you can adjust the light away from their eye line. The aesthetic is sleek since the LED bar sits like a modern appliance strip.
Use a magnetic light bar system or a mount that allows removal. Place the light 6 to 10 inches above the tools and angle it down toward the tool faces. Use a neutral white (4000K) so metal and plastic parts look accurate.
Pro tipAdd a simple checklist label on the wall at the same height as the light beam.
AvoidDon't mount the light too low - you'll cast shadows under the magnetic bar.
14. LED-lit vertical bike rack with reflective trim
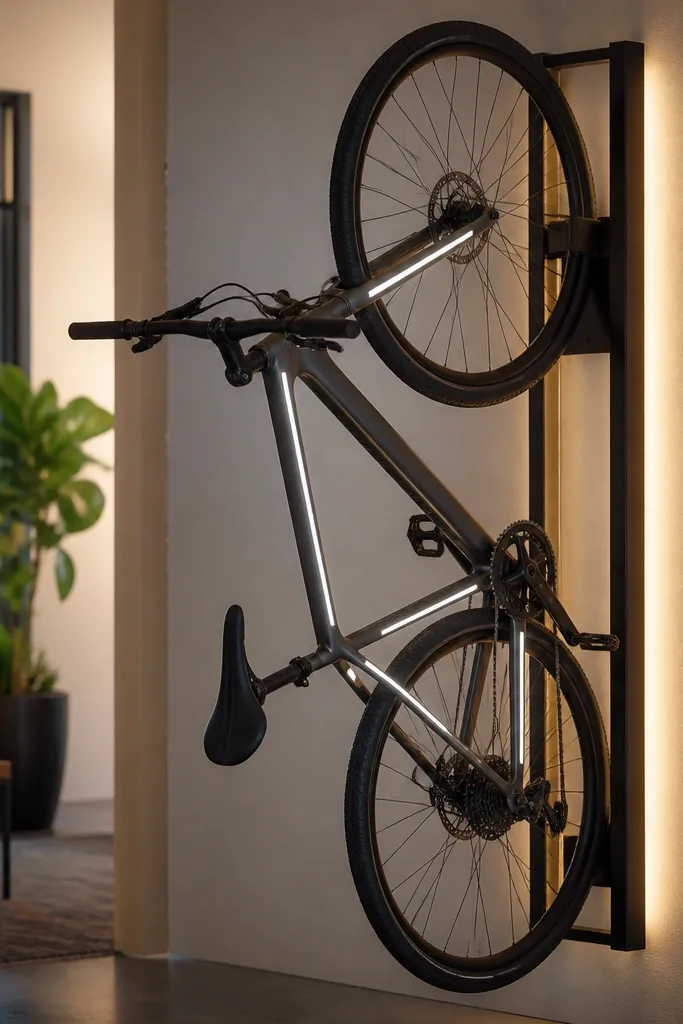
Bike storage looks cleaner when the rack has a clear outline. LEDs along the rack supports trace the shape so you can park the bike quickly and safely. Reflective trim makes the bike easier to see in low light without turning the whole garage into a stadium. I used this for a family garage where bikes sit near the door and people trip over straps.
Use warm white LED strips on the rack supports inside a slim channel. Add reflective tape or a small reflective edge guide on the rack where the bike frame lands. Power with a plug-in driver mounted high on the wall.
Pro tipMark the rack contact points with a small piece of tape so you align the bike the same way every time.
AvoidSkip placing LEDs where they can get hit by bike tires - scuffs and broken strips happen fast.
15. LED-lit wine-box style bin wall for seasonal items
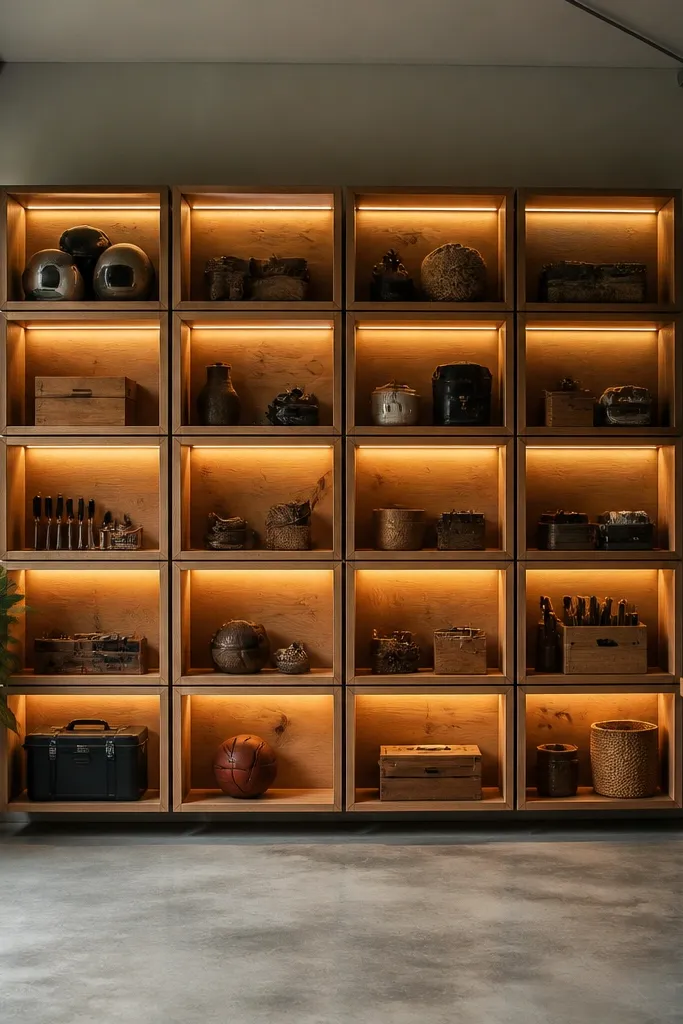
Wood boxes look cozy, and light makes the grain show instead of hiding in shadows. This is a good option for seasonal storage like holiday decor or winter gloves because boxes keep everything contained. LEDs on the side create a gentle gradient that makes the wall look warm, not harsh. The vibe is more "organized corner" than "storage area."
Build or buy uniform wooden boxes with open fronts. Mount an LED strip along the top edge of each box opening and cover it with a thin frosted acrylic strip. Seal the wood with a matte clear coat so it doesn't glare under LEDs.
Pro tipUse warm white at 2700K and keep brightness moderate so the wood doesn't look orange.
AvoidAvoid glossy wood finishes - they reflect LEDs and create ugly bright streaks.
16. LED-lit pegboard tool shadow boxes
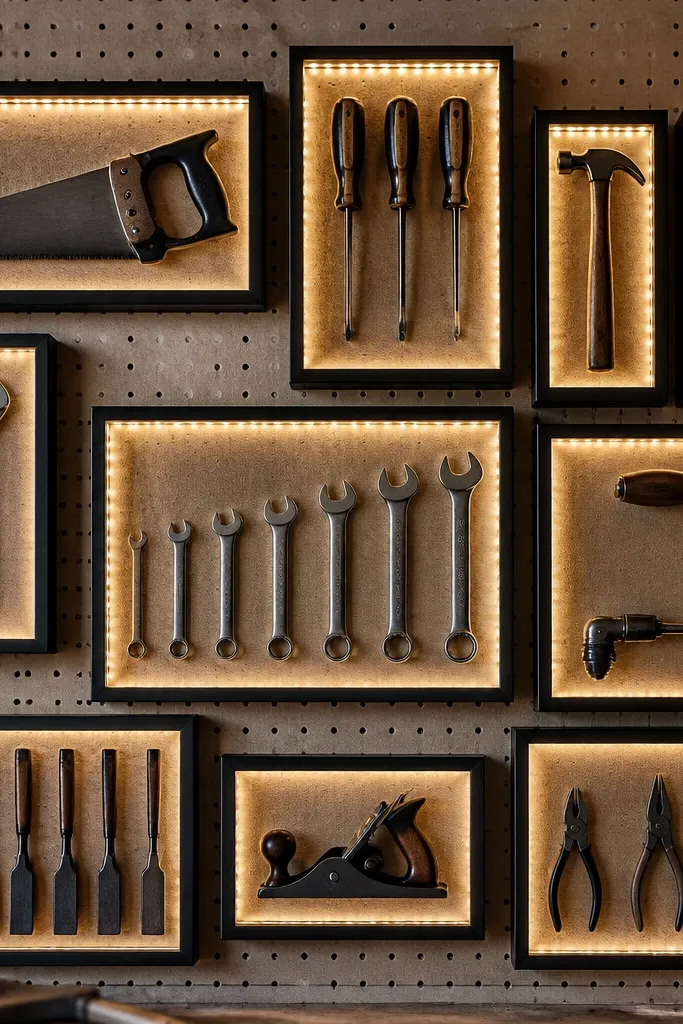
Shadow boxes make tools look like art and they stop the "where did it go" problem. The LED inside the frame pulls focus to the tool silhouette, so you see what's missing at a glance. I used this for a set of kid-safe tools like measuring tape, scissors, and a small screwdriver. The frames also protect tools from dust, so they stay nicer.
Use clear polycarbonate or acrylic for the front and build shallow frames from thin wood. Mount a slim LED strip along the inner edges of the frame. Keep the tool placement consistent so the light hits the same areas each time.
Pro tipUse a matte black backing behind the tool so the glow makes the tool outline pop.
AvoidSkip using a shiny backing - it reflects the LED and flattens the tool outline.
17. Under-stair-style LED strip for storage drawers in a corner
Corner storage is where lighting usually fails because overhead light bounces away. A strip under the shelf edge fixes that by throwing light directly onto the drawer fronts. I like this for kids' backpacks, sports bags, and extra shoes because you can see labels and zippers quickly. The look stays clean because the LED is tucked under a fixed overhang.
Mount a frosted LED channel to the underside of the corner shelf. Use drawer pulls with a contrasting color so the light catches them. Keep your wiring in a corner conduit or behind a removable panel.
Pro tipUse a dimmer and set the glow just high enough to find handles - you don't need full brightness for drawers.
AvoidDon't rely on overhead light bounce alone - corners stay dim and the bins turn into mystery boxes.
18. LED-lit rolling shelf for paint, stain, and spray cans
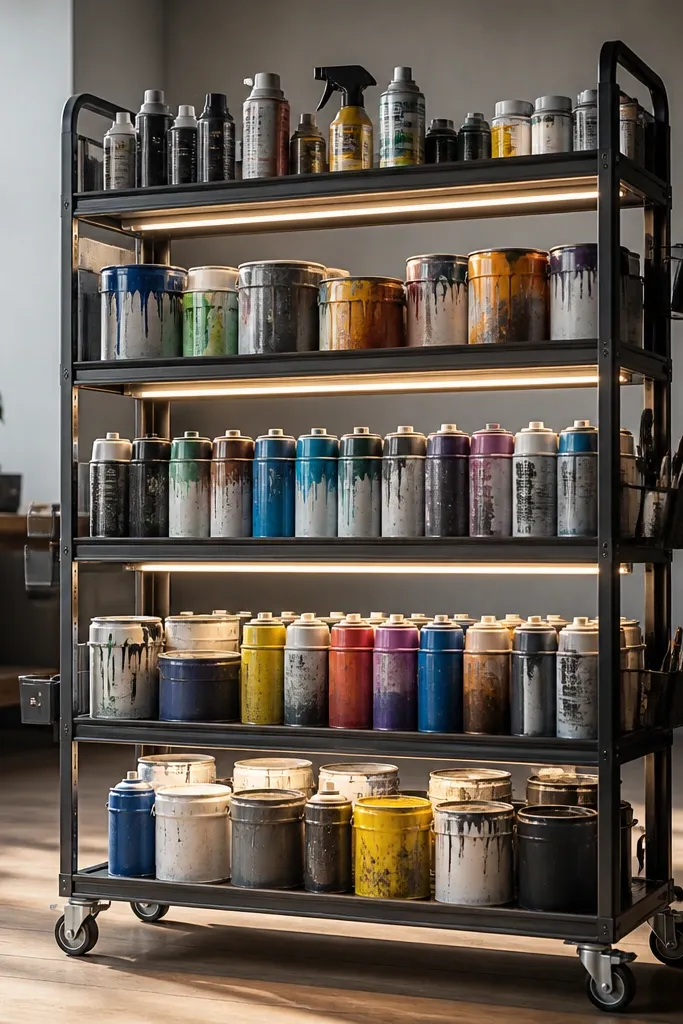
When chemicals live in a rolling shelf, you need light that follows the shelves. LEDs under each tier let you read labels without pulling every can out. I use this for paint and spray cans because the labels are small and easy to mix up. The rolling part makes it look intentional instead of cluttered because you can pull the shelf toward you and the light stays aligned.
Use a flexible LED strip under each shelf tier and run wiring through the column so it doesn't pinch. Choose a neutral white 4000K for true color reading. Add a protective lens if you store aerosol cans that might splash.
Pro tipLabel lids with large numbers and match them to a simple color chart on the wall.
AvoidAvoid warm-only lighting for color-matching products - it skews the label colors.
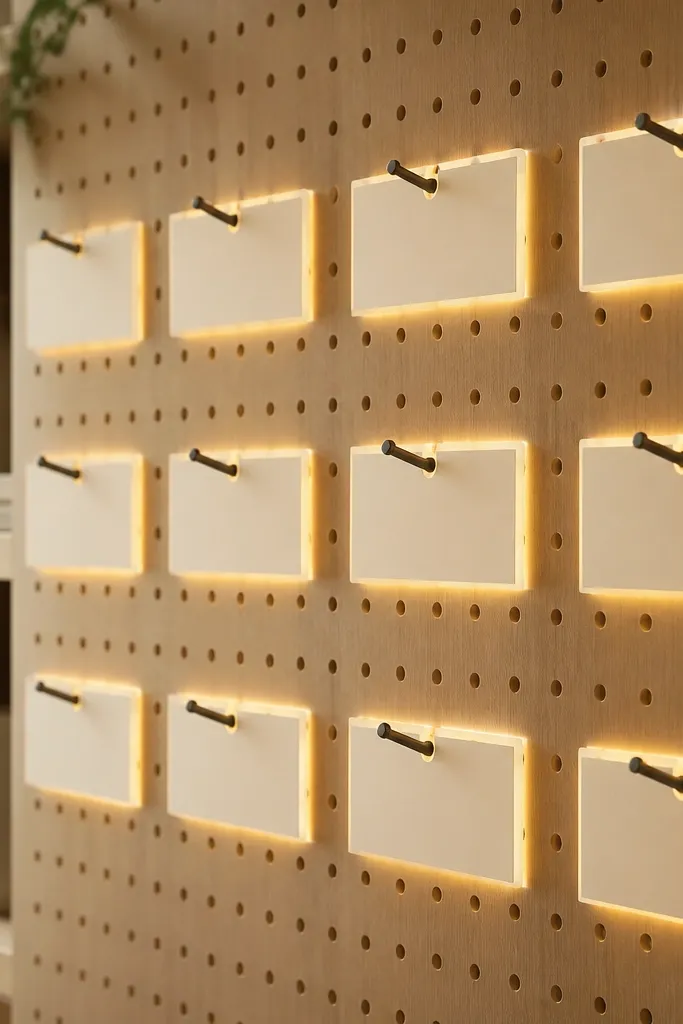
19. LED strip backlight behind pegboard accessory compartments
Backlighting makes small accessories easier to see because it reduces the "dark pocket" effect. I like a light-colored backing board like white PVC or painted plywood so the LEDs reflect evenly. It also looks tidy because the light comes from behind, not from visible strips across the front. Kids can spot the right cable ties or tape roll without rummaging.
Cut compartments into pegboard or mount small boxes on the pegboard. Place LEDs behind the backing board and keep a diffuser so you don't see the strip. Wire to one controller and keep connections accessible behind the pegboard edge.
Pro tipUse organizers with translucent fronts for the small stuff - the backlight makes labels pop.
AvoidDon't mount LEDs directly behind dark backing - you'll get a dim center and bright strip edges.
20. LED-lit storage ladder with step markers and glowing bins
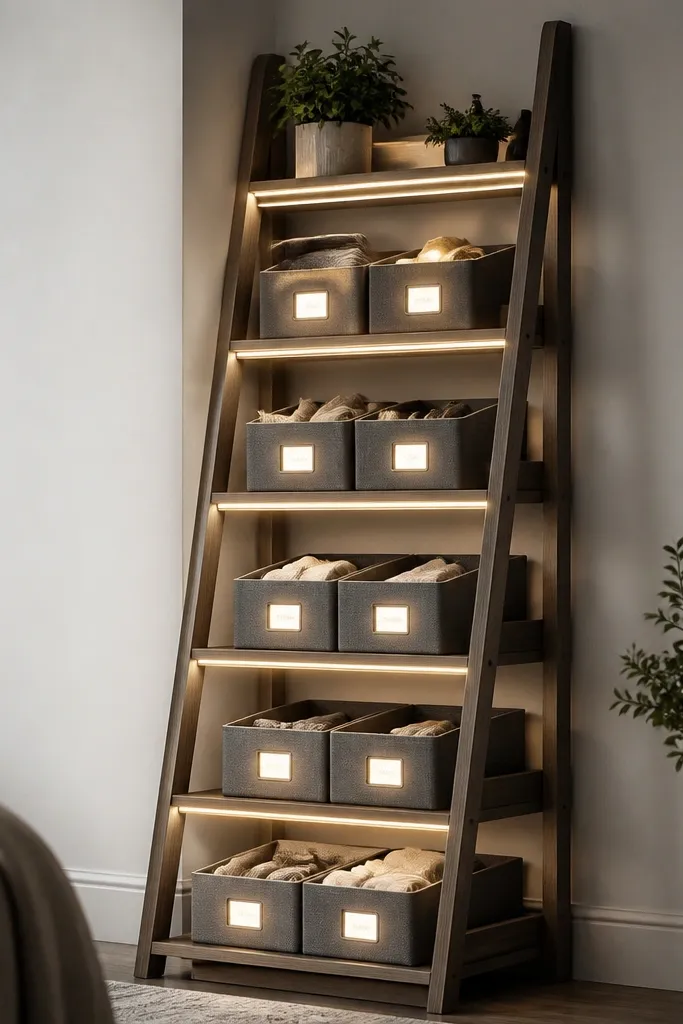
A ladder shelf already has a built-in rhythm. Adding LEDs along the steps turns that rhythm into a visual guide, so you know where stuff goes even in dim light. I've used this for reusable garage cleaning supplies and for kids' art paper stacks. The glow at step height makes the whole unit feel like a signpost, not a pile.
Mount LED strips along the underside edges of each step. Use warm white and keep the diffuser frosted. Position the unit so the labels face outward toward where you stand.
Pro tipMake one label per step bigger than the rest so you always start with the right level.
AvoidAvoid placing LEDs only on the very bottom step - you'll still have dark zones above.
21. LED-lit bin dividers with color-coded light sections
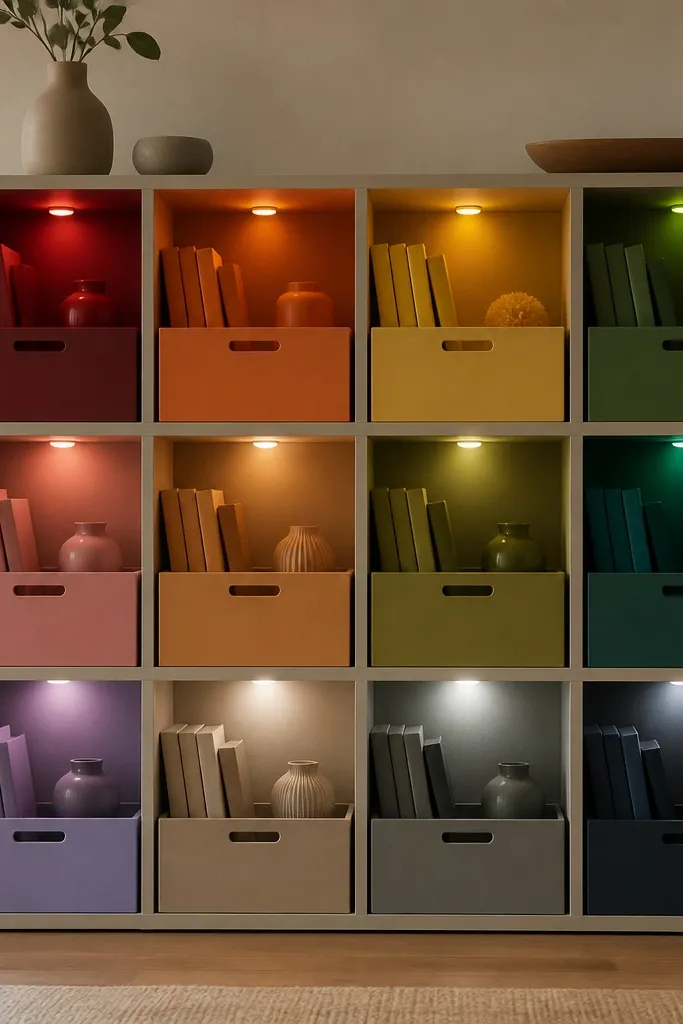
Color-coded lighting makes the organization system intuitive. I used this for a garage where kids help with chores, and it keeps categories from mixing up. Warm color-only LEDs look better than harsh RGB because you still get a cozy tone. It also helps when labels are hidden behind items - the light color tells you where to look.
Use a controller that supports multiple warm color channels or separate LED strips with fixed warm tones. Assign each category a color and label it clearly. Keep the LED diffused with a frosted cover so the colors blend smoothly.
Pro tipMatch the light color to bin label sticker color, not the toy item color. You want the system to stay consistent even if items change.
AvoidSkip using bright red or blue - they look aggressive and make everything feel chaotic.
22. LED-lit pegboard bins with hinged lids
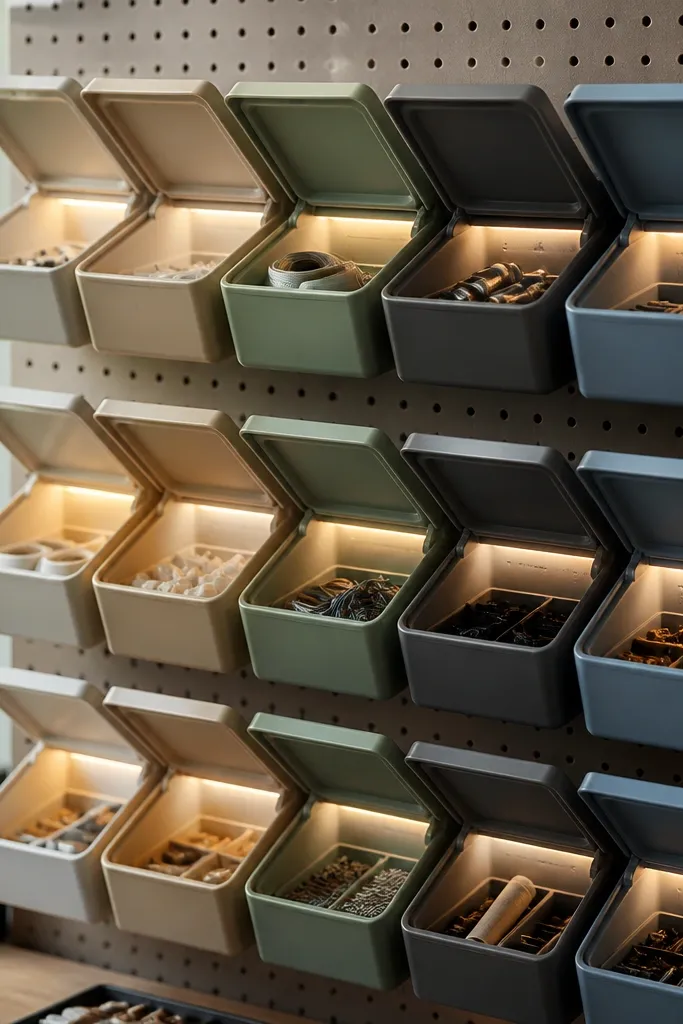
Hinged lids are great for stuff that kids pull out and forget to close. LEDs inside the bin make it easy to see the remaining items and keeps the bin from turning into a dark hole. I built these for small hardware and it reduced "lost parts" because the bin contents are visible. The look is tidy because the light lives inside the bin, not on the wall.
Use small plastic or wood bins with a hinged lid. Mount a compact LED strip or puck inside the bin and add a switch triggered by the hinge. Use warm white and line the bin interior with white foam board so the light spreads.
Pro tipAdd a simple icon label on the lid so kids can match the bin before they open it.
AvoidAvoid placing the LED on the side only - you'll create shadows on the far side of the bin.
23. LED-lit ceiling shelf for hanging bikes and sports balls
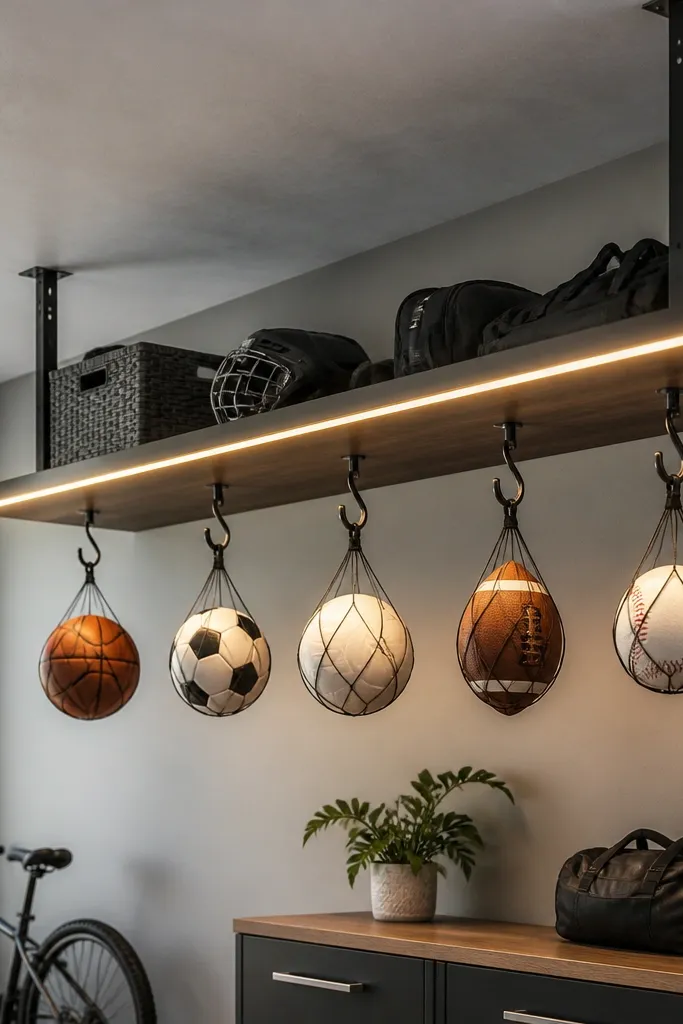
Ceiling storage is out of the way, but it's useless without light. Edge LEDs on the shelf make the hooks and balls visible so you can grab them without stacking ladders. I use this for sports balls and helmets because they're easy to find when the shelf glows. It also looks clean because the light line follows the shelf edge.
Install a shelf with a clear edge lip and mount LED strips in a channel under the lip. Keep warm white so the garage feels friendly. Use a stable power connection with strain relief so the wires don't get yanked when you move items.
Pro tipPut the LED at the underside edge so it lights the hook area, not the ceiling.
AvoidDon't mount LEDs on the top of the shelf - the light won't reach the items you need.
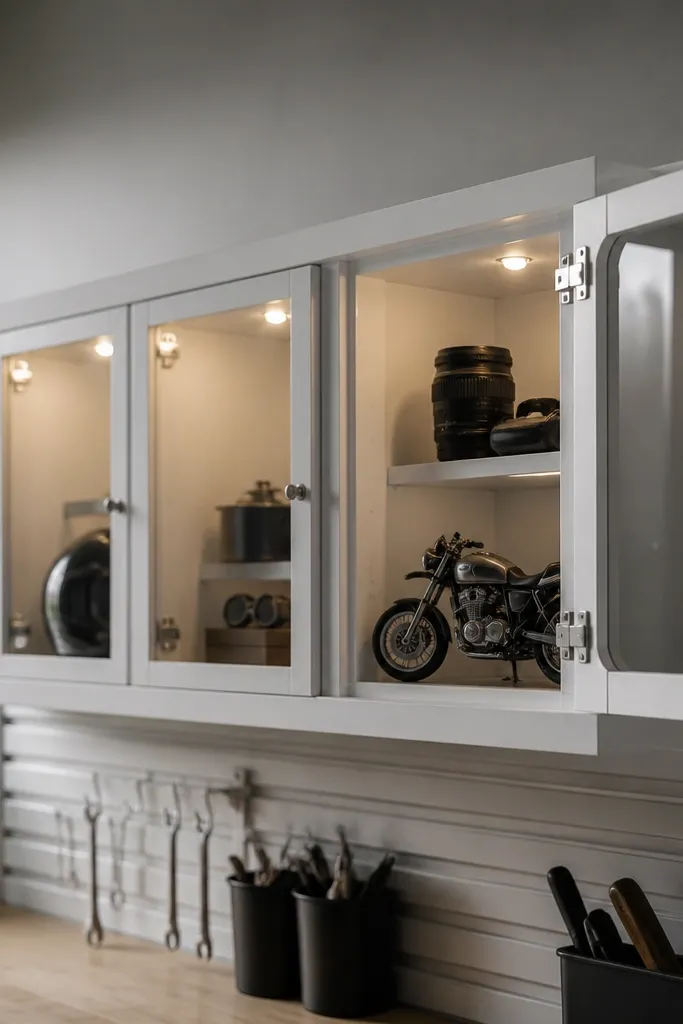
24. LED-lit vertical tool cabinet with glass front panels
Glass fronts plus LEDs make the storage look like a shop display. The cabinet stays organized because you can see what's inside without opening the door. I like this for garage tools that you want to keep clean and for kids' science kits where parts are easy to count. The glow through glass looks expensive, even when it's simple.
Use a cabinet with enough depth for LED channels on the inside edges. Install warm white strips with frosted covers to avoid bright hotspots. Wire to a door switch so the light turns on when you open the glass door.
Pro tipUse matte black or dark backing inside the cabinet so tools contrast well.
AvoidSkip clear glossy shelves inside - they reflect and hide tool labels.
25. LED-lit storage wall using picture-frame style trim
This gives you a clean, architectural look because the light follows a frame. It's great when you have kids' storage sections you want to look like a gallery wall. The border glow helps you see each section quickly, even if the garage light is off. I've used picture-frame trim to hide wiring and keep the whole wall looking finished.
Build rectangular frames from 1x2 trim around each bin section. Install LED strip inside the frame with a frosted lens so you see a smooth border. Paint frames a matte color like off-white or charcoal to match your garage wall.
Pro tipKeep all frames the same width so the glow lines line up across the wall.
AvoidAvoid uneven frame spacing - the light makes misalignment obvious.
26. LED-lit floor-level storage for long-handled tools

Long-handled tools disappear visually when overhead light hits at an angle. Floor-level LEDs help you see the tool heads and where each tool attaches. I like this setup in garages with tall shelving because the top lights don't reach the bottom. The aesthetic feels practical and tidy because the light is anchored to the storage rack.
Mount a frosted LED strip along the base of the tool holder in a channel. Keep warm white so the light looks soft on wood and painted metal. Use a quick-access plug so you can remove the holder or adjust it later.
Pro tipAdd a small label strip at the same height as the glowing tool heads.
AvoidSkip bare LEDs at floor level - dust and scuffs show up fast.
27. LED-lit pegboard border for seasonal hanging decorations
A perimeter light makes a pegboard feel like a defined storage zone. It's especially good for seasonal items because you can change what hangs inside without changing the lighting. The border reduces shadows on the inside area and makes hooks easier to spot. I use it for holiday extension cords and kids' outdoor gear.
Install LED strip along the pegboard perimeter behind a thin diffuser frame. Use a warm white and a dimmer so the border glow isn't too bright. Wire the perimeter to a single controller with a hidden junction box.
Pro tipUse one bright label at the top center of the pegboard so you know what category lives inside.
AvoidAvoid putting the border too close to the hooks - it creates glare on metal tool heads.
28. USB-rechargeable LED strip for temporary garage organization stations
This is the "I'm changing the garage layout every month" solution. Rechargeable strips let you test lighting placement before you commit to drilling. The look is still neat because the strip is clipped into a channel or rail on the station. I used this during a garage reorg with kids' camps - it kept everything visible without permanent wiring.
Buy LED strips with a rechargeable battery or USB power pack and mount them under a small removable shelf lip. Clip or screw the channel so the strip sits aligned. Keep the battery pack in a small zippered pouch attached underneath so it doesn't rattle.
Pro tipTake one photo from your usual standing spot to check glare. Move the strip based on what the photo shows.
AvoidSkip dangling strips with no channel - they sag and look messy fast.
29. LED-lit hanging-shelf for shoe storage with clear label tabs
Shoe storage is a mess magnet because it sits low and gets dim. Under-shelf LEDs make the label tabs visible and keep the openings easy to grab. I used this for kids' everyday shoes and it reduced the "which pair is inside?" problem. The aesthetic is clean because the light stays under the shelf and doesn't spill across the floor.
Mount a LED strip under the hanging shelf frame with a frosted cover. Use warm white and keep brightness moderate. Add clear label tabs on the front of each slot and print large black text so kids can read without kneeling.
Pro tipUse label tabs with the same color backing for each child or family member.
AvoidAvoid placing the LED behind the shelf frame - the light won't reach the label tabs.
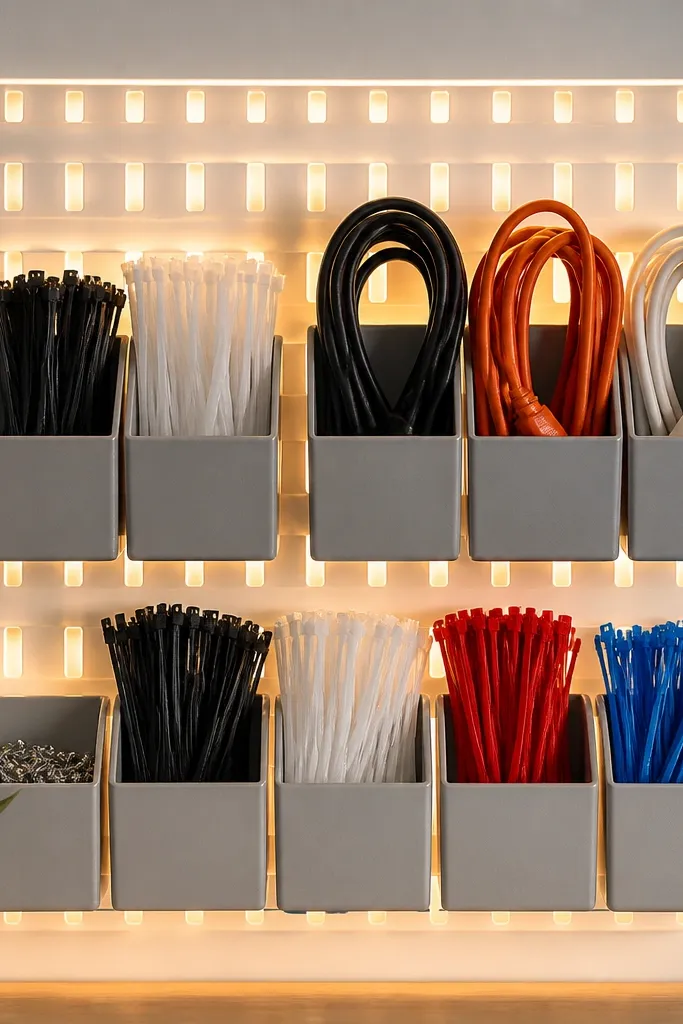
30. LED-lit pegboard cord organizer with illuminated cable labels
Cord chaos is the fastest way a garage looks cluttered. Illuminated cable labels help you match the right cord to the right tool without tracing it. I built this for extension cords and it made it easier for my kids to put cords back in the right hooks. The glow also makes the organizer look like a system instead of random hangers.
Use pegboard hooks with numbered labels and mount a small LED strip behind a white backing board. Add a frosted diffuser so labels don't get hot spots. Wire to a small switch near the pegboard so you can turn it on when you're working.
Pro tipUse heat-shrink label sleeves on the cords and keep the pegboard label numbers big.
AvoidSkip handwritten labels on small tape - under LED lighting they smear and look messy.


