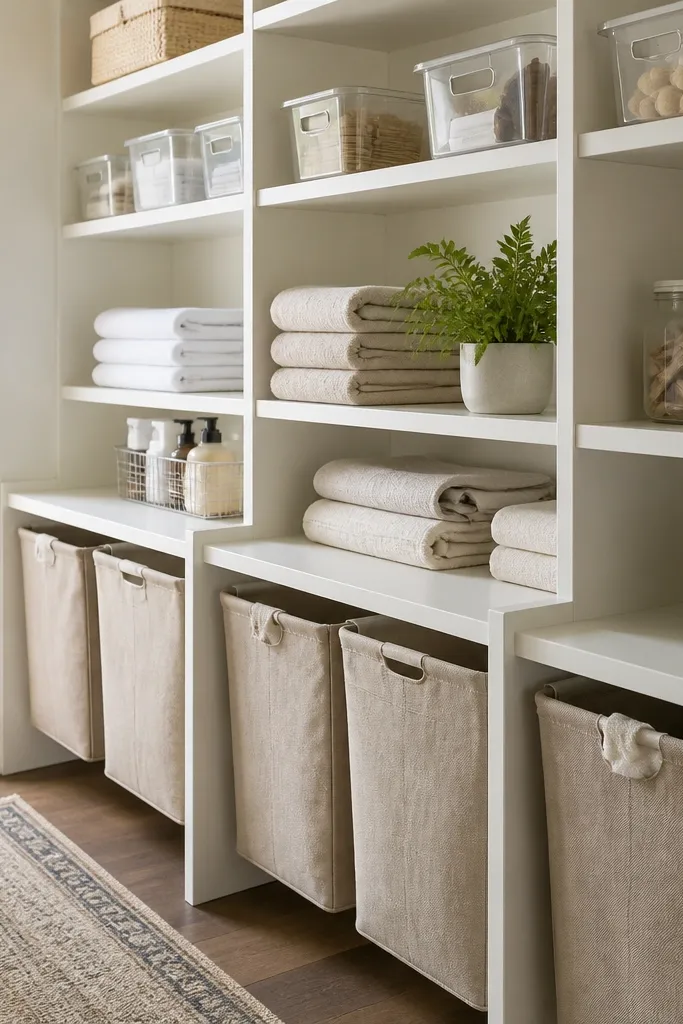
1. White melamine wall shelves with rounded edges
Melamine holds up in a garage because the surface wipes like a countertop, and it doesn't drink stains the way raw wood does. The rounded front edge makes it kid-friendly - fewer scuffs and splinters. White shelves brighten a dark garage corner and make the bins look more "put together" even when you're storing messy stuff.
Use 3/4-inch melamine boards cut to consistent depth (like 10 to 12 inches). Add a simple edge banding strip or buy pre-finished rounded-edge boards. Mount to a stud or use proper anchors for the wall type, keeping the shelf spacing around 12 to 14 inches for toy and gear bins.
Pro tipBefore mounting, wipe the melamine with a damp cloth and dry it - dust under screws can make brackets squeak later.
AvoidSkip bare wood shelves in a garage; they look rough fast once water or oil hits.
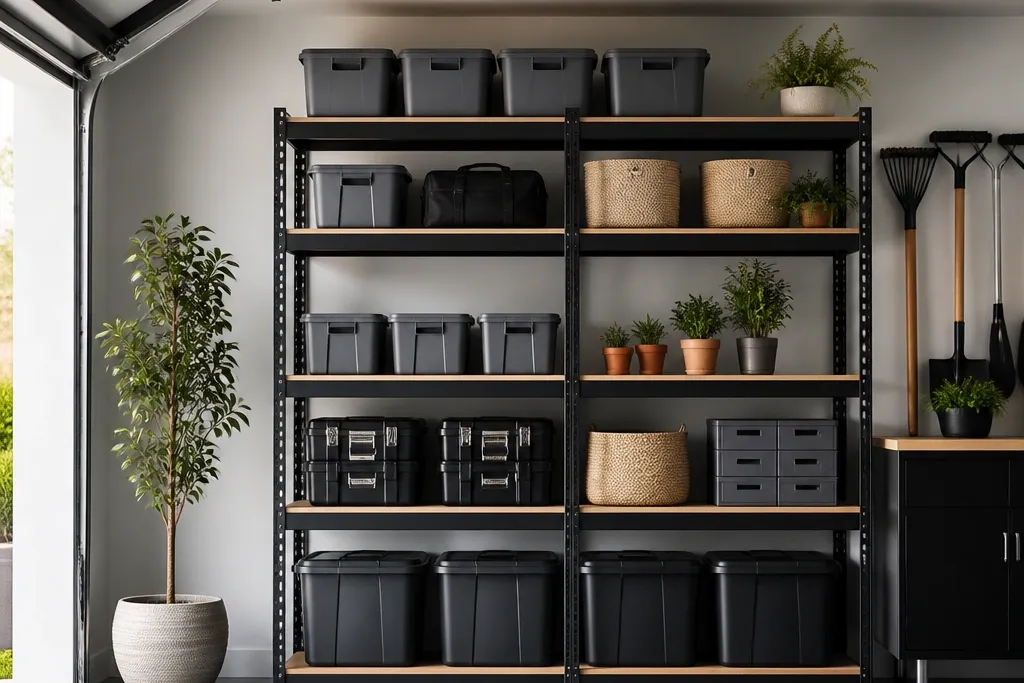
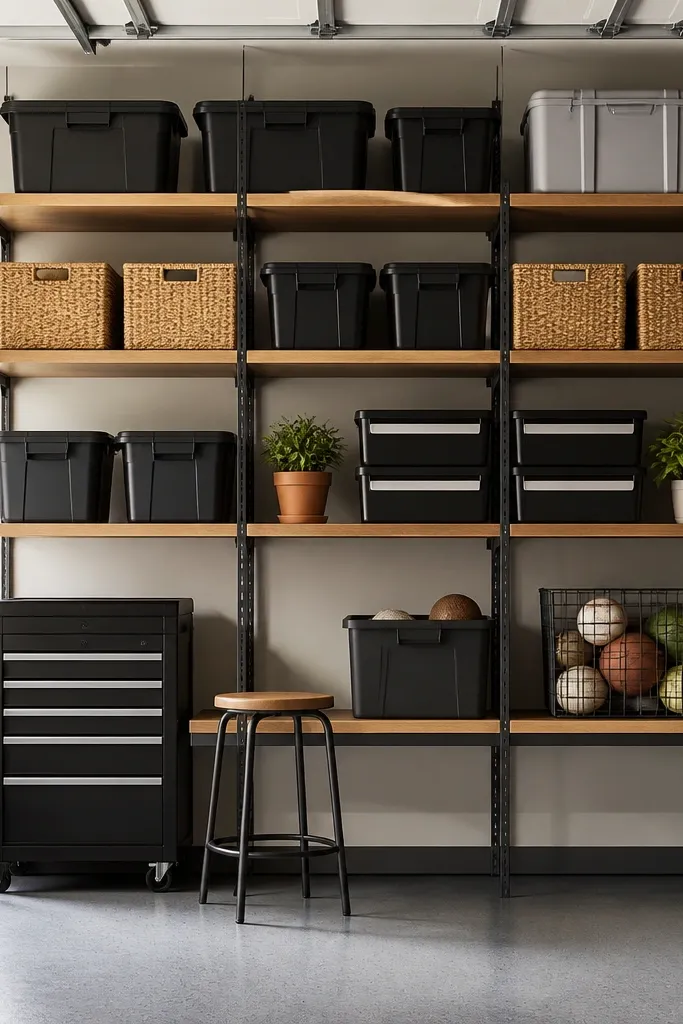
2. Powder-coated steel frame with wood-look composite boards
Powder-coated steel resists rust, which is the biggest maintenance headache in garages. Composite boards with a wood-look finish give you the warm look without the warping and splintering that comes with unfinished plywood. The black frame makes the bins pop and hides dirt better than bright metal.
Pick a frame with adjustable brackets and lock pins, then use composite shelves cut to size (or buy pre-cut). Keep the top shelf for lightweight items and store heavy bins on the lower two levels to reduce sag over time. Finish your bin area with a consistent 2 to 3 inch lip so anything small doesn't fall forward.
Pro tipUse locking casters only if you need mobility; otherwise, anchor the frame to wall studs for fewer shifts and less tightening.
AvoidDon't mix shiny metal shelves with glossy bins and no labels - it turns into visual clutter in minutes.
3. Garage corner shelving with L-brackets and sealed plywood
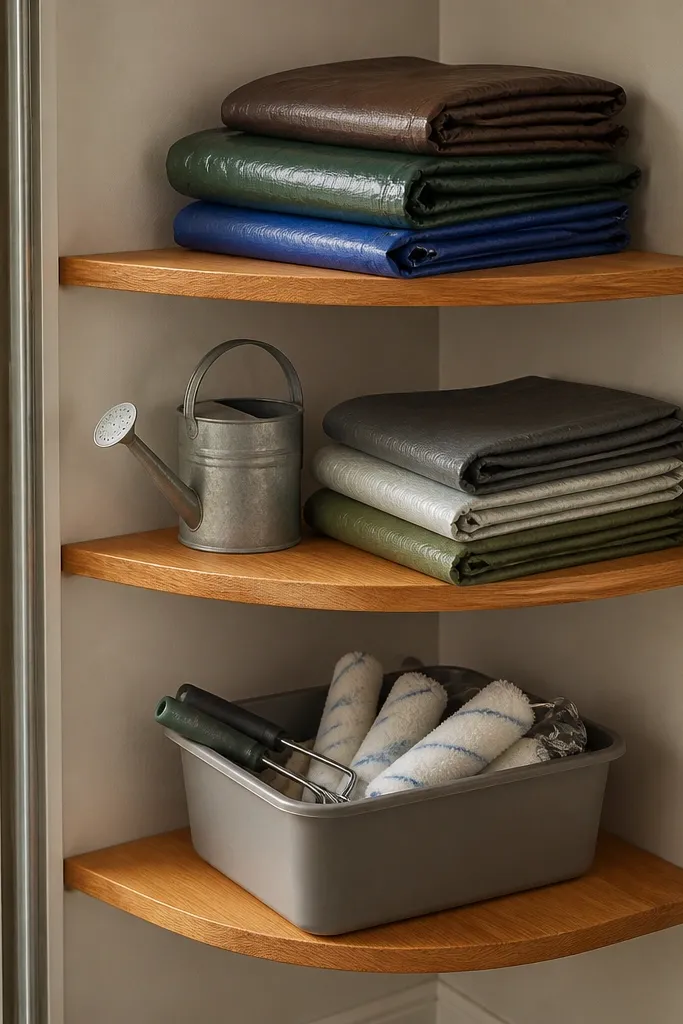
Corners waste space, and a corner shelving run fixes that while keeping the garage tidy. Sealed plywood gives you a clean wood look, but the key is sealing all sides so it doesn't swell when humidity spikes. L-brackets make the build sturdy without fancy joinery.
Use 3/4-inch plywood, sand to 120 grit, then seal all sides with two coats of clear polyurethane (including the underside). Build three shelves at 16, 24, and 32 inches from the floor based on what you store. Use coated screws and paint the bracket edges if you want a uniform look.
Pro tipStain the plywood first, then seal - the stain locks in before the finish so you don't get blotchy patches later.
AvoidAvoid skipping the underside; that's where the swelling starts and the shelf edges start to look uneven.
4. Overhead storage rack with plastic bins and safety lip
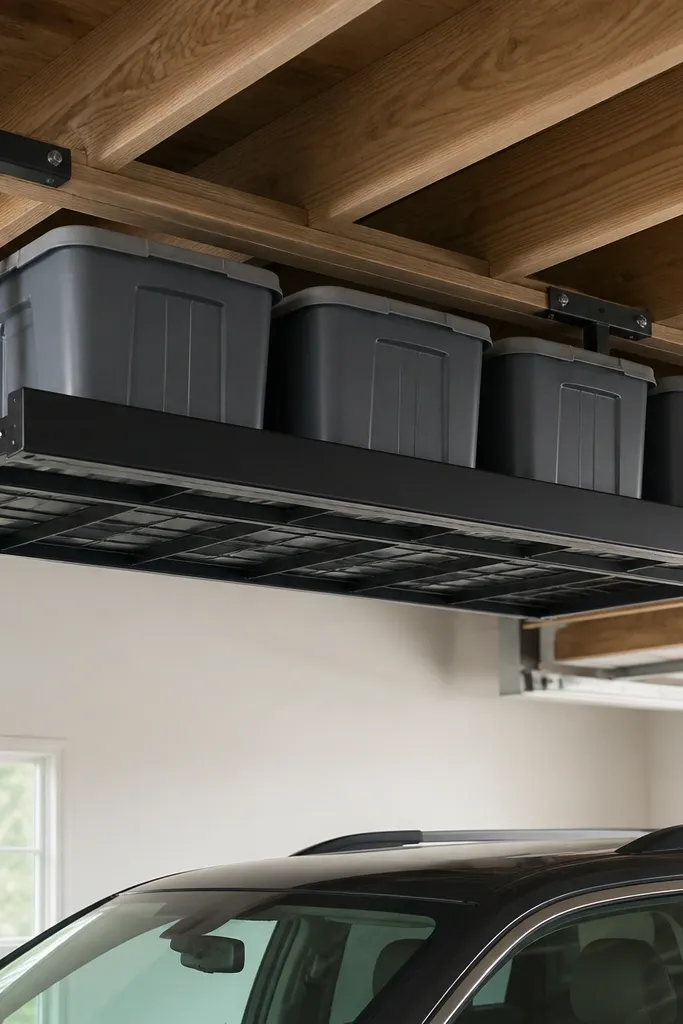
Overhead storage keeps the floor clear and makes the garage feel bigger fast. Using plastic bins reduces shelf maintenance because you're not wiping spills off raw wood every week. A safety lip prevents the "bin creep" that happens when kids pull things out.
Mount to joists with proper hardware and keep the rack height high enough that you don't bump it, but low enough to reach bins comfortably (usually around 6 to 8 feet depending on your ceiling). Install a front lip made from a thin metal strip or a 1x2 edge board sealed and painted. Use bins with matching sizes so stacking stays neat.
Pro tipLabel the bin lids with a thick marker and a label maker - the overhead access means no one reads small tags on the side.
AvoidDon't store heavy items on top bins without checking your rack rating and fasteners.
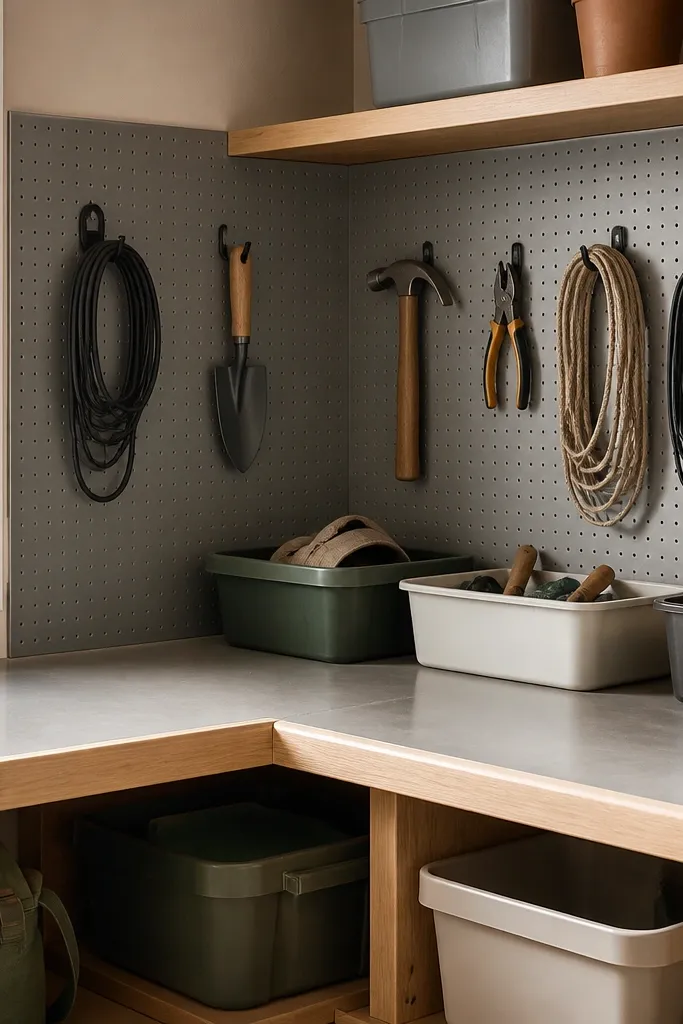
5. Pegboard tool shelves with a sealed board top
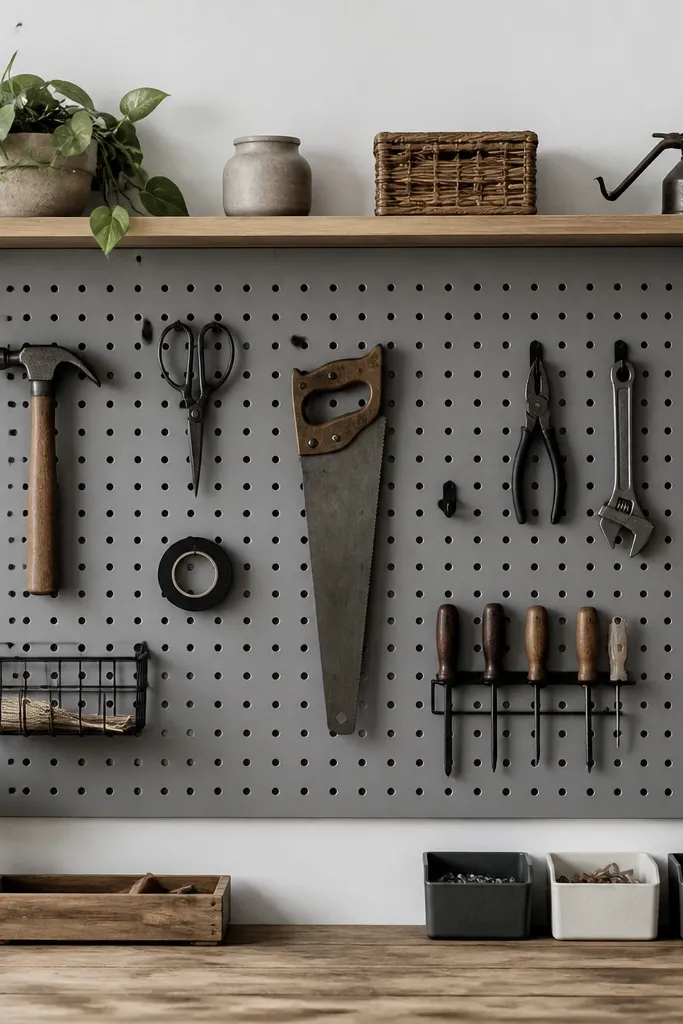
Pegboard makes it easy to see what's where, and that cuts the daily mess because kids can return items to the same spots. A sealed shelf top on the pegboard keeps oil and dust from staining the wood. This setup looks tidy even when you're using it daily because the tools visually "organize" themselves.
Use a pre-made pegboard panel, then mount a 2x12 shelf section sealed with polyurethane. Place the shelf above common tool heights so kids don't reach under hooks. For bins, use small lidded containers for screws and batteries - keep them off the floor and off the floor clutter.
Pro tipPaint the pegboard and let it cure fully before adding hooks; fresh paint marks easily and looks messy.
AvoidAvoid leaving the shelf unsealed; pegboard dust sticks to raw wood and looks gray forever.
6. Shiplap-inspired slat wall with floating shelves
A slat wall gives you a clean, repeating pattern that looks intentional even if you rearrange bins. Floating shelves keep the look light and reduce the "blocky" feel of standard garage racks. Sealed wood shelves match the slats and wipe down easily.
Use a slat wall system or build your own with 1x3 slats spaced consistently (like 1/2-inch gaps). Seal and paint everything before mounting shelves. Install floating shelves using hidden brackets so the shelf underside stays clean. Keep shelf depth around 10 to 12 inches so bins don't stick out.
Pro tipUse the same color for shelf brackets and slat paint so hardware disappears.
AvoidSkip random spacing on the slats; uneven lines make the whole wall look DIY-in-a-bad-way.
7. Farmhouse-style open shelves with removable bin liners
Open shelves can look messy fast, but removable bin liners make it look styled while keeping the function. The off-white paint brightens the garage and hides minor scuffs better than bare wood. You also get easy cleanup because you can pull the liners, wash them, and put them back.
Paint 2x12 shelf boards with a durable enamel, then seal the top with a clear coat. Use fabric bin liners with a rigid bottom insert so they don't sag. Keep toy and seasonal items in liners so the open shelf stays visually calm.
Pro tipAdd a 1-inch lip at the front so liners don't slide forward when kids pull bins out.
AvoidAvoid thin paint with no topcoat; it chips on the shelf edge and looks rough quickly.
8. Stacked cube storage with water-resistant laminate tops
Cube storage makes it easy to assign categories, and that reduces the "pile" effect that turns shelves into junk land. A water-resistant laminate top handles drips and wipes clean. Painted plywood gives you a smooth look, and cubes let you mix bin sizes without redesigning the whole system.
Build a 2x4 or 3x3 cube unit using 3/4-inch plywood, then paint with a primer plus enamel. Cover the top with a laminate sheet or use melamine as the top. Leave the bottom row for larger bins and keep the middle for kid-access items around 10 to 12 inches off the floor.
Pro tipPut heavier bins in lower cubes to keep the unit from getting wobbly when someone yanks a bin.
AvoidDon't use open cubes with no bins; loose items make the shelf look chaotic immediately.
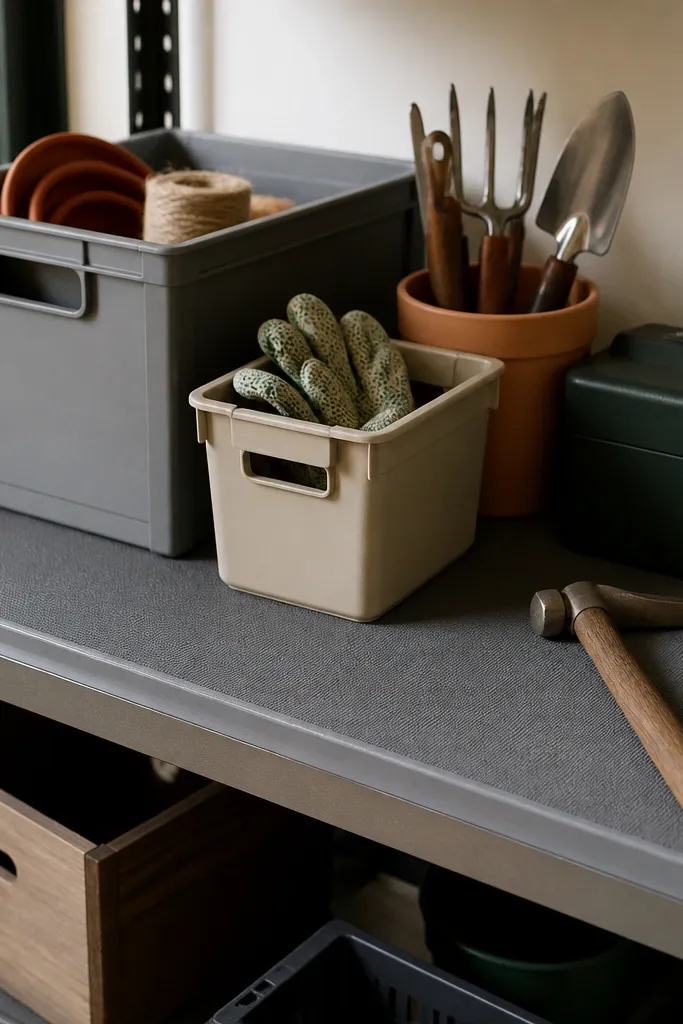
9. Garage shelving with clear poly bins and labeled shelf tags
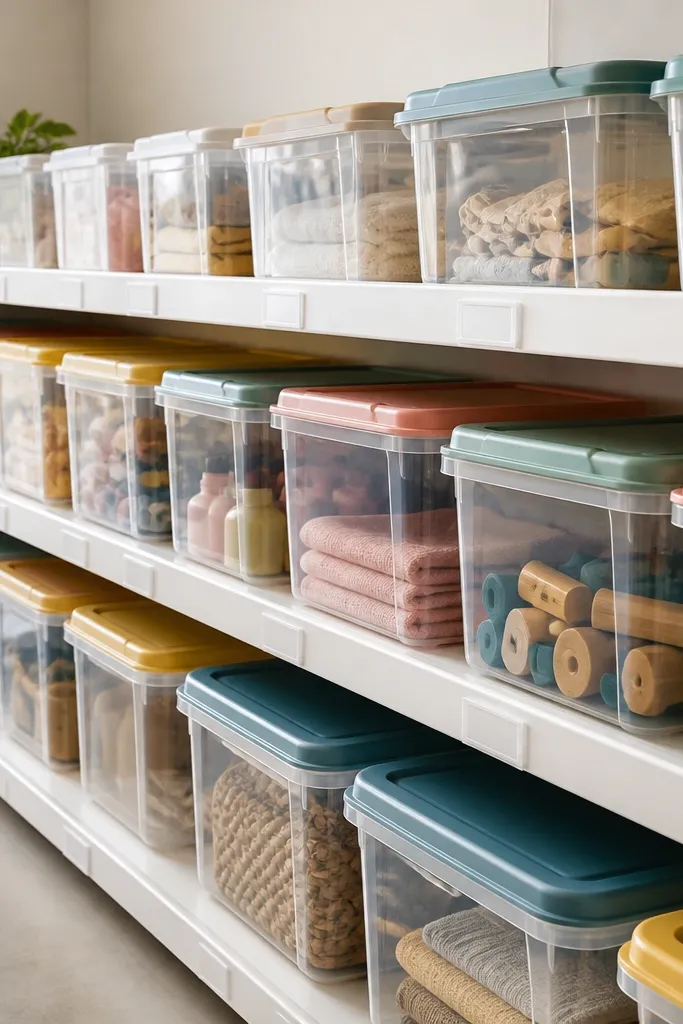
Clear bins reduce maintenance because you can spot what's missing without digging and knocking things over. Shelf tags keep kids from guessing, so fewer items end up on the wrong shelf. White shelf edges and consistent spacing make the whole run look crisp.
Use 12-inch deep shelves with a smooth finish. Add a 1-inch front edge so bins don't slide and you get a clean line. Use color-coded lids: blue for tools, green for yard supplies, red for kids art.
Pro tipPrint labels on waterproof label paper and stick them to the inside of the bin lid so they don't peel from grime.
AvoidAvoid mixing random bin heights; the shelf looks sloppy when bins don't sit flush.
10. Utility shelf with drip rail for paint and chemicals
If you store paint, stain, or car fluids, the maintenance problem is drips, not dust. A drip rail catches small spills so they don't soak into wood and stain everything around it. Using a darker sealed finish hides minor marks between cleanings.
Build shelves from sealed plywood or use melamine boards. Add a thin metal drip rail under the front lip, like a bent aluminum strip, and seal the mounting points. Put paint cans in a shallow tray or a bin with a removable liner so cleanup is quick.
Pro tipKeep a spray bottle of warm soapy water and a microfiber cloth on a hook next to the shelf so messes get wiped in 30 seconds.
AvoidDon't store open buckets directly on wood; even "small" leaks become permanent stains.
11. Peg rail + narrow shelves for sports gear
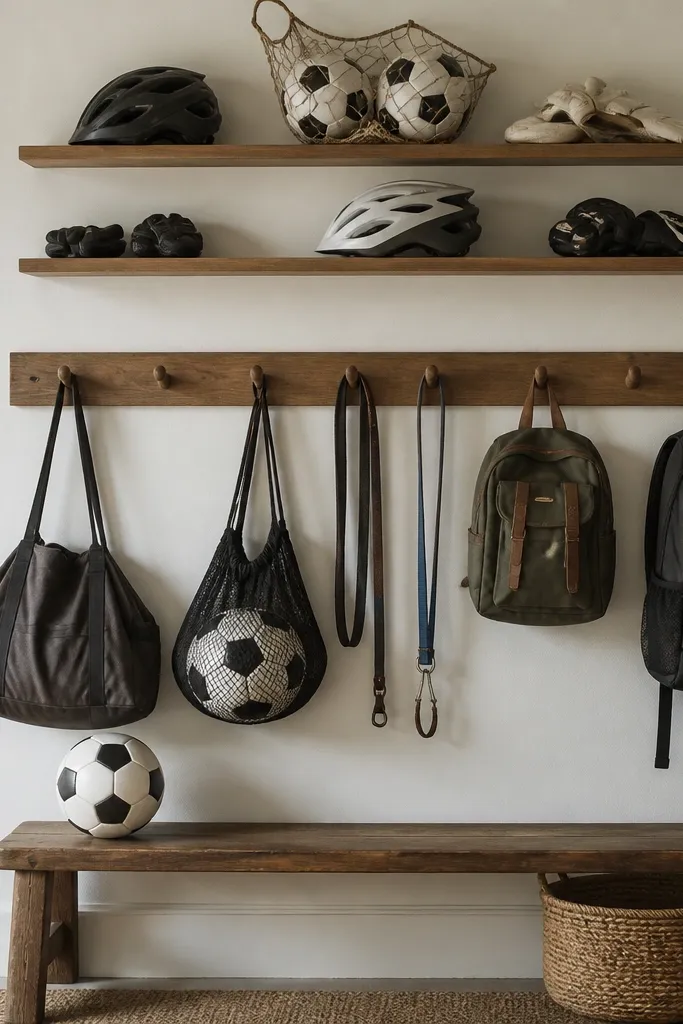
Sports gear has awkward shapes, so narrow shelves plus hooks keeps items from falling into each other. The maintenance win is simple: everything has a spot, so the garage floor stays clearer. A sealed shelf top makes it easy to wipe off mud and sand.
Use a peg rail or slotted track along the wall, then mount shelves about 8 to 10 inches deep. Seal the shelf surface with two coats and avoid glossy finishes that show every smudge. Use nets and hanging organizers so balls don't roll into clutter.
Pro tipHang the most-used items at kid height, and keep heavy gear higher so teens aren't climbing.
AvoidAvoid deep shelves for sports gear; they push items back and create a forgotten pile.
12. DIY bar-style shelving with hanging baskets underneath

Hanging baskets under shelves keep small items from stacking into a mess. The bar frame is durable and doesn't trap dust like enclosed cabinets do. The open look also makes the garage feel less cramped, which matters when kids use the space daily.
Build a frame from steel angle or buy a bar-style shelving kit. Use wire baskets sized to your shelf spacing, and set them so they clear the floor by a few inches. Top shelves can be melamine for easy wipe-down.
Pro tipChoose baskets with a powder-coated finish and smooth wire - they wipe clean and don't rust at the welds.
AvoidDon't hang baskets too low; vacuuming gets annoying and dust collects.
13. Cedar tone shelves with exterior-grade sealant
Cedar tone looks warm and makes a garage feel less like a storage cave. Exterior-grade sealant keeps the color stable and reduces water absorption when humidity swings. Matte finishes hide minor fingerprints and scuffs from kid handling.
Use exterior-grade plywood or boards, sand to 120 grit, then apply a stain and two coats of exterior sealer. Keep shelf edges rounded or use edge banding so the touch points don't splinter. Space shelves to match your biggest bin - measure the bin footprint before cutting boards.
Pro tipWipe off stain drips right away; cured drips look like hard spots under garage light.
AvoidAvoid glossy clear coats in a garage; every fingerprint shows under overhead bulbs.
14. Hidden storage shelves using cabinet doors on the front
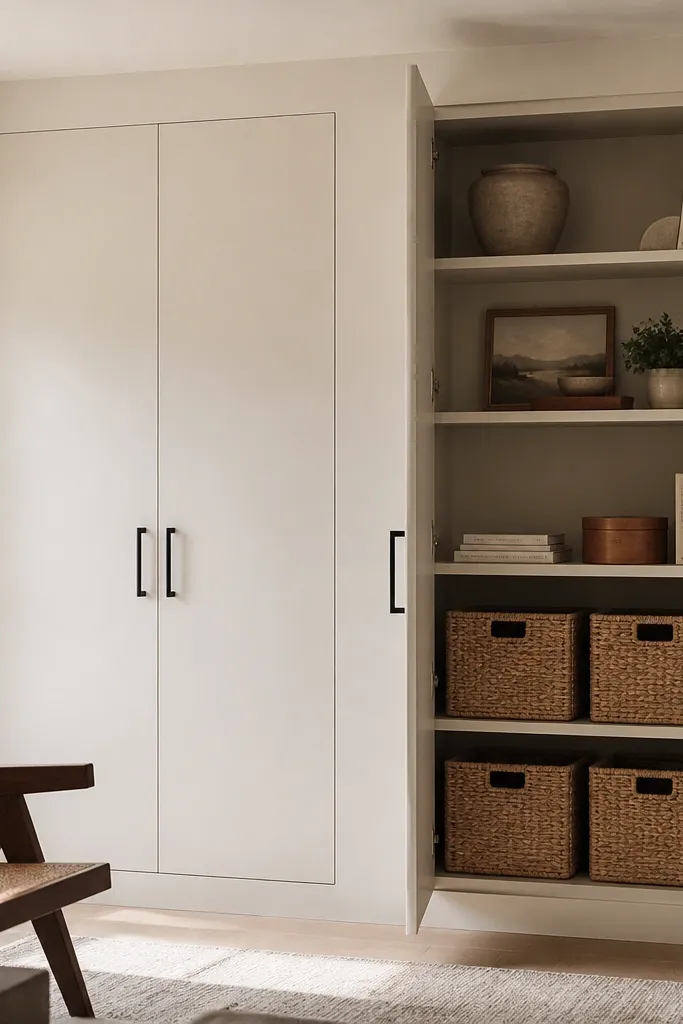
Kids leave things out. Cabinet doors fix that visual chaos without you constantly reorganizing. The inside shelves can be simple melamine for wipe-clean surfaces, while the front doors keep the garage looking tidy even when you're not.
Build or buy a shallow cabinet frame sized to your wall space. Use melamine shelves inside and install soft-close hinges if you can - it keeps doors from slamming. Add ventilation gaps if you store damp items like wet boots or tarps.
Pro tipUse black pulls and keep them consistent across doors; it makes the whole unit look planned.
AvoidSkip doors with cheap pressboard shelves inside; they swell and the doors start to sag.
15. Skim-coated plywood shelves with washable paint finish
If you want a clean painted look without maintenance drama, you have to smooth the surface first. Skim-coating plywood reduces grain and helps the paint stay uniform, so it wipes without looking patchy. A satin finish hides scratches better than high-gloss.
Use plywood, fill seams, and skim coat with a thin compound. Sand to 180 grit, prime, then paint with a cabinet-grade enamel. Seal the top with a clear satin protective coat so water and cleaner wipes don't dull the color.
Pro tipLet the clear coat cure for a full 72 hours before heavy bin placement so it resists scuffs.
AvoidAvoid painting over dusty plywood; you get fisheyes and the finish looks uneven forever.
16. Shelf liners made from vinyl with raised edges
Shelf liners turn a maintenance problem into a swap-out. When a jar leaks or a kid spills slime in the wrong bin, you wipe the liner and keep the shelf underneath clean. Raised edges keep drips from running off the liner onto the shelf surface.
Measure the shelf top and cut vinyl with a craft knife. Use adhesive-backed vinyl or contact cement for a tight fit, then press the corners firmly. Choose a matte or textured vinyl so it doesn't look glossy and cheap in overhead light.
Pro tipCut liners slightly oversized, then trim after you test-fit; a perfect edge looks intentional.
AvoidAvoid thin plastic liners that crinkle; they catch dirt and look messy.
17. Rolling cart shelves with lockable wheels for seasonal rotation
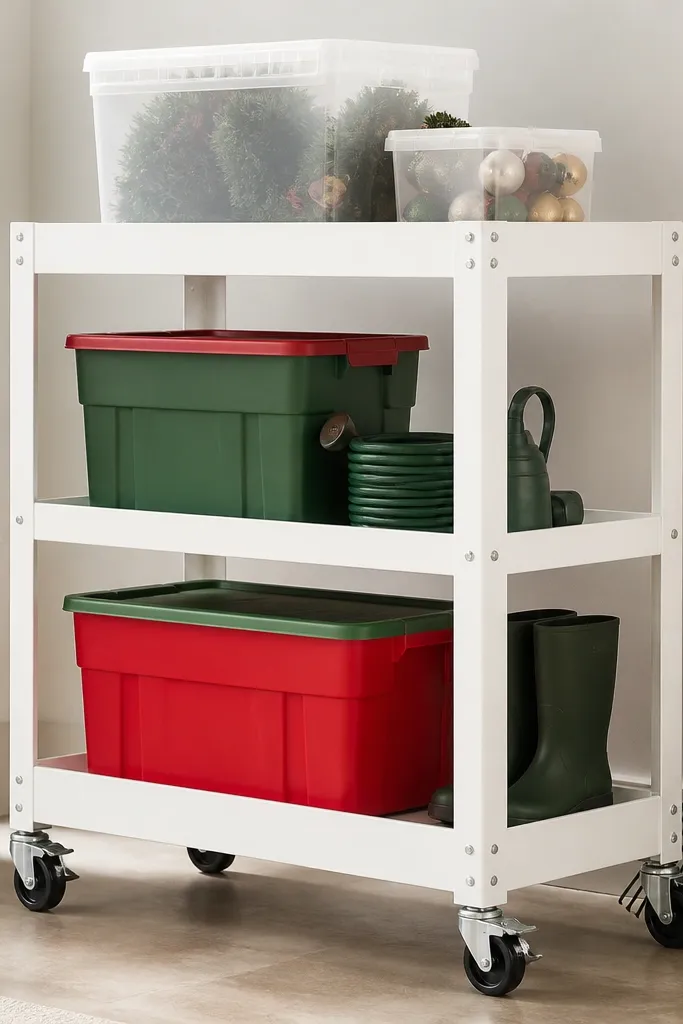
Seasonal items need flexibility, and a rolling cart gives you that without rebuilding the garage. Locking wheels stop the cart from drifting when kids pull bins out. Melamine shelves keep cleanup fast after rain gear or muddy sports items.
Pick a cart with at least two shelves so you separate heavy items from light ones. Add bin labels on the front so you don't open every box. Keep the cart near the door for fast seasonal swaps and wipe it down weekly with a damp cloth.
Pro tipUse wheel locks you can press with your shoe - it's faster than bending down.
AvoidAvoid carts with wobble shelves; they flex and bins start to tip.
18. Tall vertical shelving with slide-out baskets

Slide-out baskets are low maintenance because you don't have to lift bins out to grab what you need. That reduces spills and knocks, especially with kids. Wire baskets also dry faster after a wet item gets tossed in the wrong place.
Use a vertical rail system or build a frame with mounted drawer slides rated for your basket weight. Install baskets sized to your shelf width and keep the top shelf for light items only. Use powder-coated wire for rust resistance.
Pro tipLabel the front of each basket and keep the labels large enough to read from standing height.
AvoidSkip cheap drawer slides; they stick with dust and you end up forcing baskets back in.
19. Stair-step shelving for bikes and long-handled tools
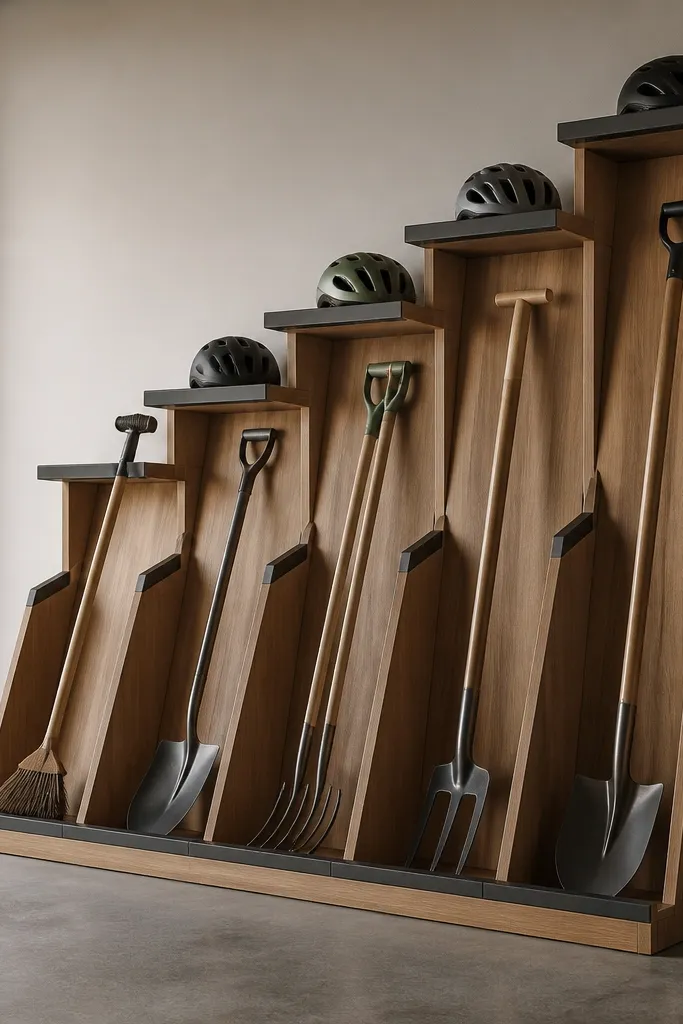
Stair-step layouts stop long items from crowding each other and turning into a tangled mess. You also get a visually interesting pattern that looks organized instead of random. Sealed wood keeps drips from creating permanent stains behind bikes and tools.
Build three or four staggered platforms with consistent depth, around 12 inches. Use angled brackets or tool holders to support long handles. Place heavier bike accessories on lower steps and keep small items on the top steps for easy access.
Pro tipUse a dark edge trim on the front of each step; it hides scuffs from accidental bumps.
AvoidAvoid straight shelves with long tools leaning - they fall and the shelf edges get chewed up.
20. Under-shelf bins with clear fronts for craft supplies
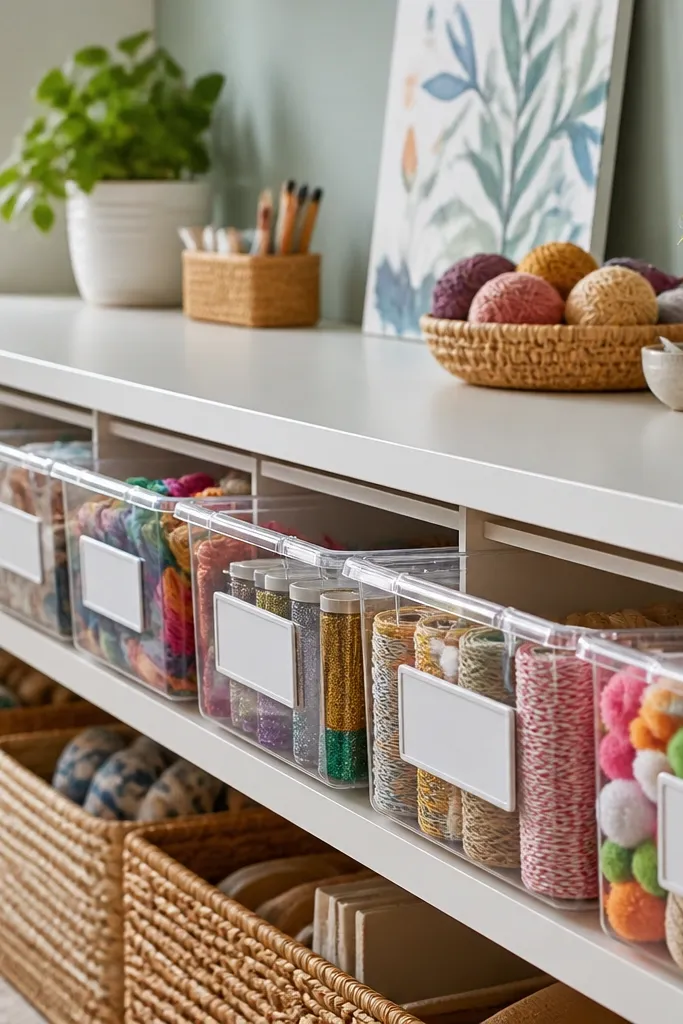
Kids love craft supplies when they can see them, and clear bins reduce the "I can't find it" mess. Putting bins under the shelf keeps the top surfaces cleaner, which matters in a garage where you also store tools. Sealed shelf tops handle glue drips and paint splatter.
Use a shelf depth of about 12 inches and mount under-shelf bin rails so bins sit snug under the lip. Choose clear bins with removable lids and paper inserts. Seal the shelf top with a protective coat so you can wipe off residue quickly.
Pro tipUse a single color label strip for all craft bins so the whole row looks intentional.
AvoidAvoid open bins without lids for glue and tape; they make a sticky shelf bottom fast.
21. Corner peg + shelf combo with waterproof backing board
Corners get splashback from mops, wet shoes, and garden tools, so a waterproof backing board keeps the wall looking clean. The peg area handles tools and cords, while the shelf holds bins and small gear. This layout reduces maintenance because you're not constantly cleaning around clutter.
Use a waterproof panel like PVC board behind the peg area, then mount the pegboard or slotted system over it. Seal the shelf board top and edges. Place bins so they sit above the splash zone, usually keeping the bottom shelf edge at least a foot off the floor.
Pro tipKeep cords on hooks with twist ties; loose cords end up wrapped around shelf legs and get dusty.
AvoidSkip plywood backing in corners; it warps and the wall looks stained even if your shelf is fine.
22. Matte black industrial shelves with fabric dust skirts
Industrial shelves look sharp, and the dust skirt makes the whole thing look finished. The skirt also catches small dust and keeps the area behind bins cleaner, so you wipe fewer surfaces. Matte black hides smudges and looks consistent under garage lighting.
Use powder-coated black shelves or steel frames. Cut fabric dust skirts from durable polyester, then hem the edges and attach with Velcro strips to the shelf underside. Keep the skirt height short so it doesn't drag on the floor when bins shift.
Pro tipWash the skirts once or twice a season; they look new and keep your shelf line clean.
AvoidAvoid stretchy fabric that sags; it looks sloppy and gets dusty fast.
23. Clear acrylic label strips on metal shelves
Label strips make it easy for kids to put things back correctly, which cuts maintenance more than any cleaning hack. Clear acrylic keeps the labels visible and protects them from garage grime. Metal shelves with a smooth finish wipe clean, and the label system keeps categories consistent.
Use metal shelves that have a flat front lip. Install acrylic label strips with standoffs or screws so labels sit under the lip. Choose bins that match shelf width so the fronts line up with the label strip.
Pro tipWrite labels in permanent marker on white cardstock, then slide into the acrylic - it updates fast when kids outgrow categories.
AvoidSkip handwritten labels on tape stuck directly to bins; they peel and look messy in a month.


