1. The "Car-Door Grab Path" Wall Map
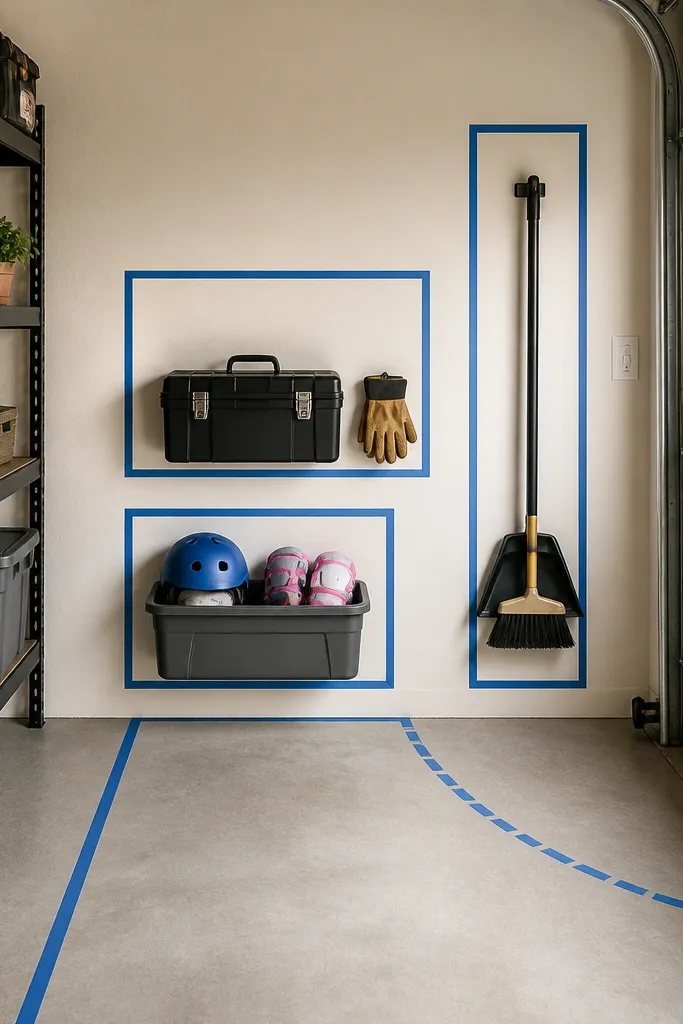
I mark the wall using painter's tape where my hands actually go. I place frequently used stuff at mid-height so you don't have to reach over your head or bend every time. The key is leaving a clear walkway down the center so you can move around the car without doing parkour. This makes your garage feel "bigger" because you stop wrestling with obstacles every trip.
Start by opening the garage door fully and tracing the swing area with tape. Then stand where you park and reach to where you'd naturally grab a tool - that becomes your mid-height line, usually around 42 to 48 inches from the floor for adults. Put bins for kids at about 24 to 30 inches so they can reach without climbing.
Pro tipDo a real grab test with the stuff you use most - not the stuff you wish you used - and adjust the tape zones until the path feels effortless.
AvoidAvoid centering shelves on the wall studs and ignoring door swing clearance - it makes the whole system unusable.
2. Pegboard + Bin Ledge for Small Tools That Vanish
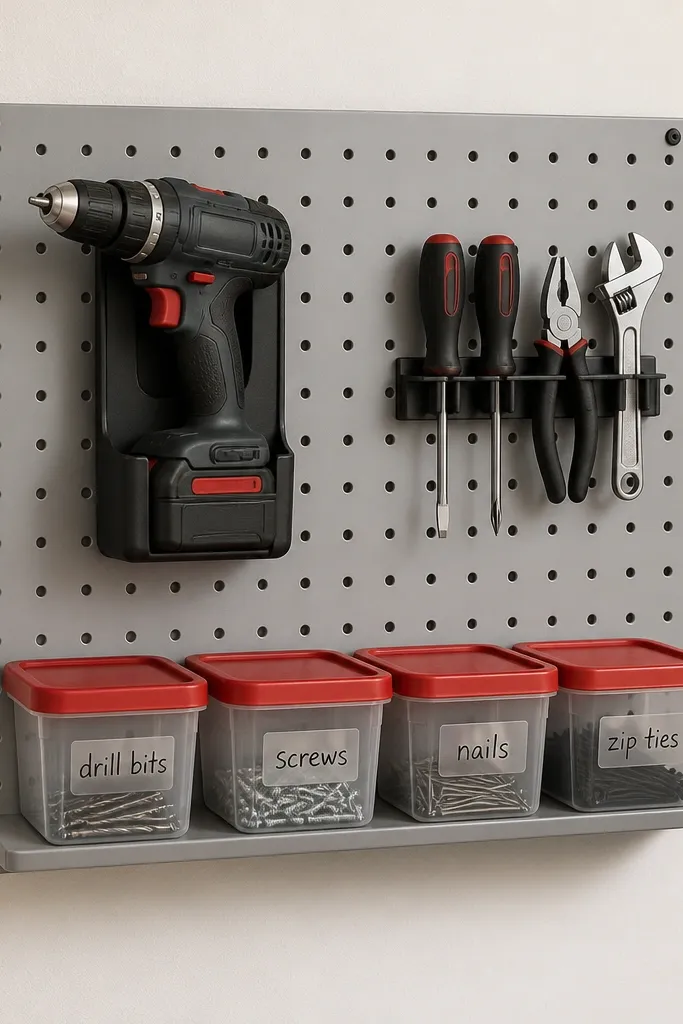
Pegboard works when you treat it like a tool station, not decoration. I use a ledge underneath for the tiny stuff that usually falls behind the workbench - bits, screws, zip ties. Clear bins let you see what's low without opening anything. The visual order cuts the "where is it?" loop that turns into clutter.
Use a pegboard with pre-measured hole spacing and mount it with proper anchors. Keep the ledge shallow, about 6 to 8 inches deep, so you don't lose headroom or block the bins. Stick to two color families: pegboard stays neutral (light gray or white) and lids are one bright color like red for quick scanning.
Pro tipLabel bins with big letters using a paint marker, then add a small dot on the pegboard beside each hook so return placement is obvious.
AvoidAvoid hanging everything from random hooks - if the tools don't have a fixed spot, the pegboard turns into a dumping wall.
3. Wire Shelving for Paint + Cleaners (Airflow Matters)
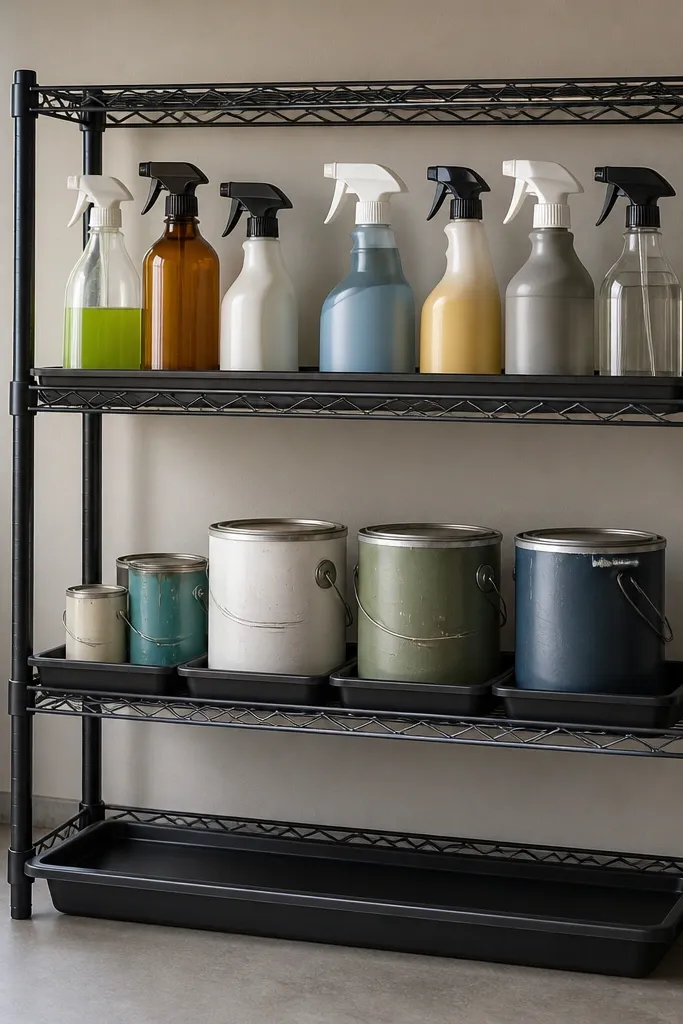
Wire shelving is the difference between "organized" and "organized but gross." With wire racks, fumes and condensation don't trap as much around cans and spray bottles. I line paint and cleaners on trays so drips don't stain the shelf. It also lets you see levels at a glance, which stops the constant buying of the same product because you can't find the old one.
Use trays that fit the wire shelf width so nothing tips when you pull a can out. Keep heavy items on the bottom tier - I load the bottom with full-size cans and the top with lighter bottles. Add a drip tray under the unit if you store anything that has a chance of leaking.
Pro tipWipe the shelf fronts once a month with a damp microfiber cloth and a little degreaser - wire racks show grime fast, and clean lines make the whole system look intentional.
AvoidAvoid solid shelving for chemicals without ventilation - it traps mess and makes stains harder to clean.
4. Labeled Clear Bins for Kids' Garage Stuff
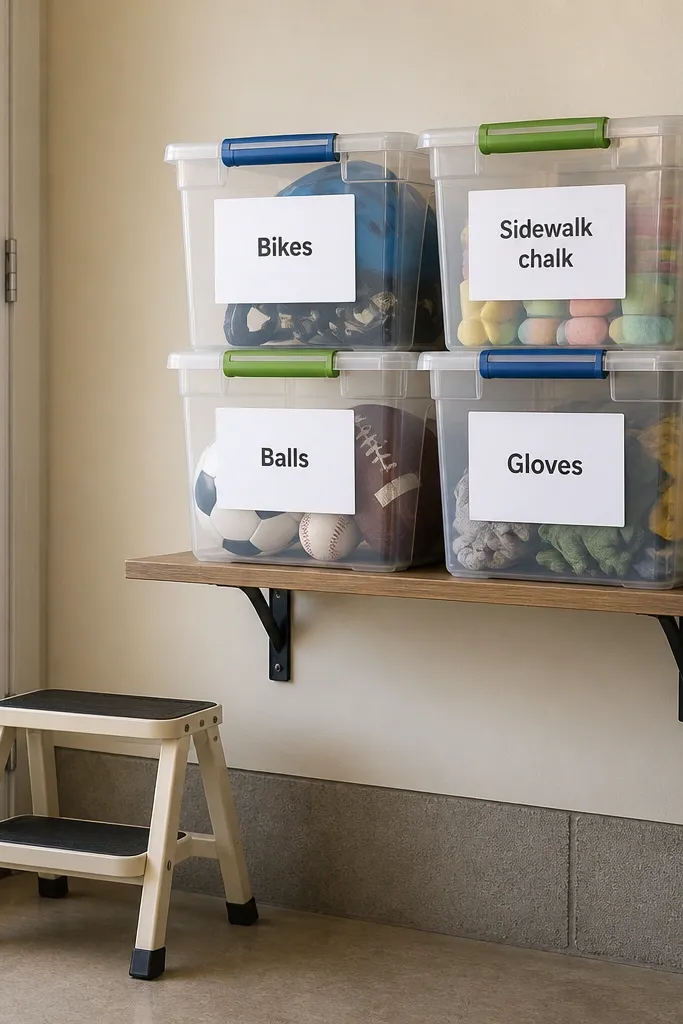
Kids don't follow your rules. They follow labels and reach height. Clear bins make it easy to spot what's missing. Low placement means they can put items away without dragging a chair across the garage. The result is fewer toys and tools migrating into the driveway or under the workbench.
Use a low shelf height that puts bin bottoms around 12 to 16 inches off the floor, with lids or open fronts that they can manage. Choose bins with wide handles so small hands don't struggle. Keep categories tight: one bin for balls, one for chalk, one for gloves - avoid mixing random categories in the same bin.
Pro tipMake the labels a repeatable system: same font size, same color per category, and a simple picture label for each bin.
AvoidAvoid opaque bins with tiny stickers - kids guess, and guessing becomes clutter.
5. Workbench Wall Cabinet for "Grab When Needed" Supplies

A wall cabinet keeps the stuff you grab mid-project from turning into a pile on the bench. I use it for sandpaper, batteries, extra screws, and spare rags. The cabinet also stops spills from reaching the bench surface. It's one of the fastest ways to make a garage look "done" because it removes the daily mess.
Mount the cabinet so the bottom shelf is around chest height for you. Use small organizers inside - clear plastic with snap lids works well so you can see what's in each compartment. Add two magnetic holders on the outside for one-hand grabs like utility knife and tape measure.
Pro tipKeep a running checklist on the inside of the door and update it when you open a new pack - it stops "I thought I had another box" clutter.
AvoidAvoid a cabinet with deep shelves and no bins - stuff slides to the back and you end up with a second pile.
6. Bike and Long-Handle Storage with Ceiling or Wall Hooks
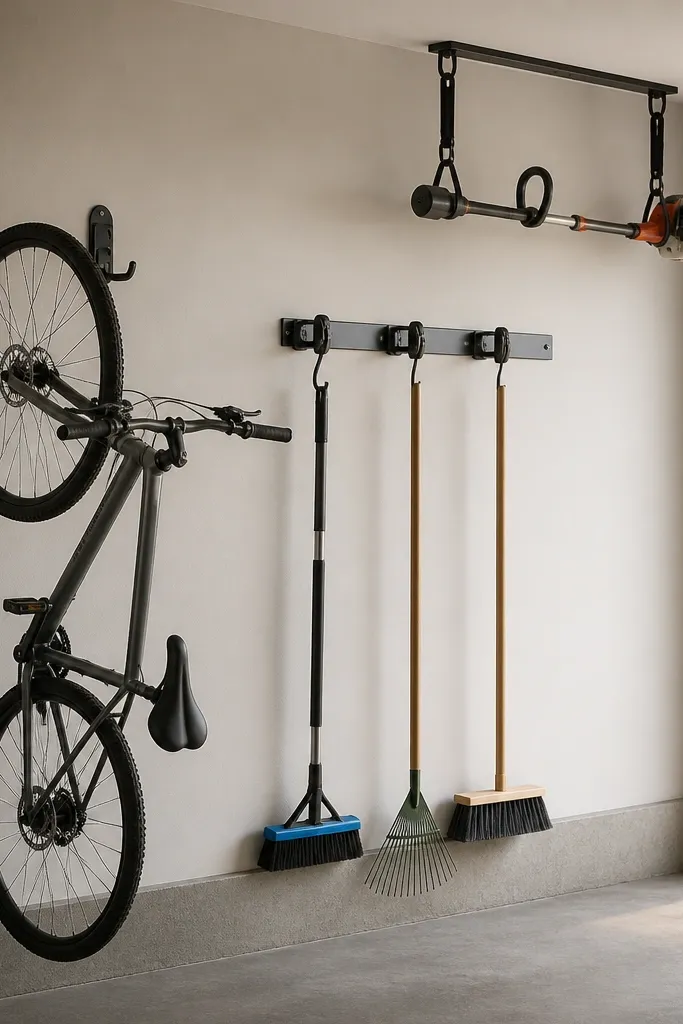
Long-handled tools steal floor space and create constant trip hazards. When I moved mine, I stopped storing them behind the car and put them on hooks instead. Bikes get stored by the front wheel with a stable hook so they don't tip and scratch. Hanging these items makes the floor usable again for the mower and for kids to move through.
Use hooks rated for weight and mount into studs. Keep long-handles angled slightly so the ends don't collide with the door edge. For ceiling storage, hang only lightweight seasonal items and leave enough clearance for the mower handle swing.
Pro tipTest the hook placement by swinging the garage door and walking the path with a broom in hand - you want zero contact points.
AvoidAvoid storing long tools at floor height "until later" - they become permanent clutter.
7. The 2-Bin System for "Fix It Later" vs "Trash/Recycle"
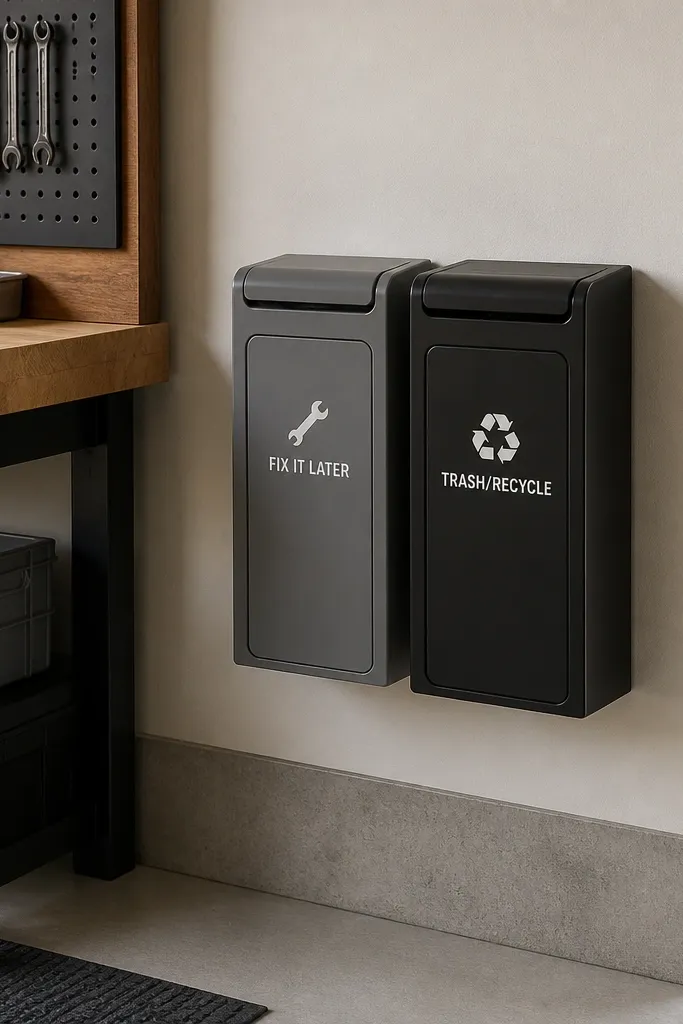
I learned the hard way that piles form when you don't have a decision boundary. When you're working, you need a place for parts you might reuse and a place for waste that doesn't go into the main clutter zone. These two bins keep the work area clean because everything has a destination the moment it comes off a project. Garage organization improves faster when the mess has rules.
Mount the bins within arm reach of the workbench so you don't walk across the garage with a handful. Use hinged lids so small screws and wrappers don't fall out. Keep the bins close together but not side-by-side on the floor - wall mounting makes them harder to ignore.
Pro tipSet a weekly 10-minute reset: empty FIX IT LATER into a labeled container or discard it, then wipe the bins.
AvoidAvoid adding another "misc" box with no sorting - you just create a bigger junk drawer.
8. Pegboard Labels That Match Your Actual Return Motion
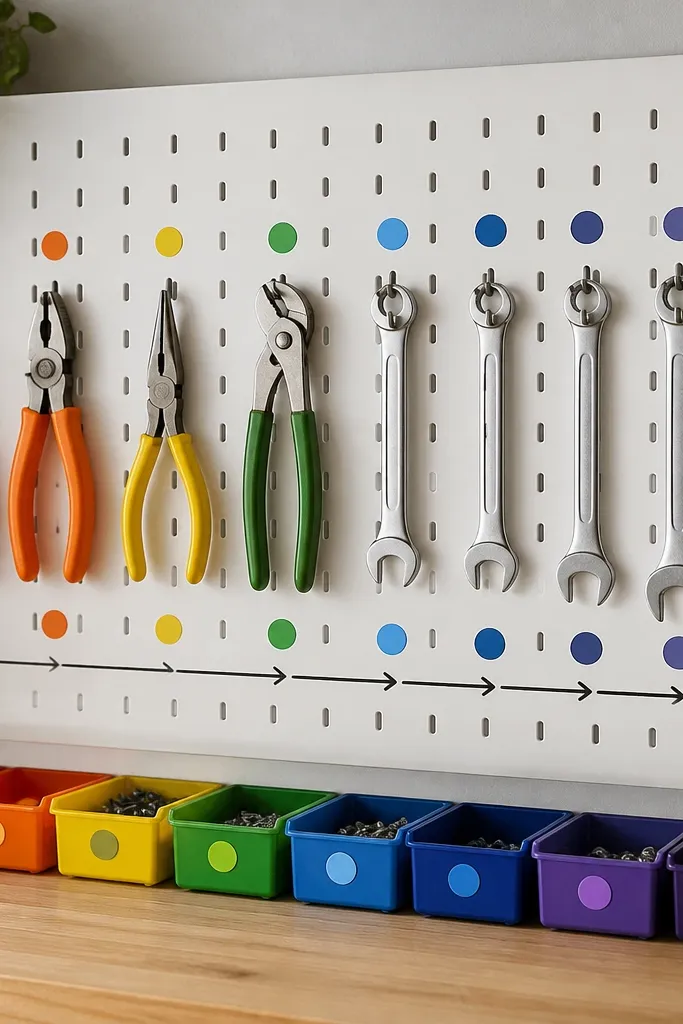
Labels only work if they match how you put tools back. I label by return motion, not by what the tool is. For example, pliers go in a specific top row spot, and the bin below has the matching color circle so you can grab and return without thinking. This reduces the "close enough" problem that fills the pegboard with mismatched tools.
Use a simple color system with two or three colors max - too many colors becomes noise. Place labels next to the hook, not on a separate sheet. Keep the tool silhouettes visible on the pegboard so you can spot them even from a glance.
Pro tipMark the pegboard with a small dot for where your hand naturally lands; then label that dot. It speeds up return placement.
AvoidAvoid tiny labels and no color coding - you'll read them while holding a tool and the tool ends up on the bench.
9. Garage Wall Shelf with a Front Lip to Stop Slid-Off Bins
A shelf without a front lip is basically a moving walkway for bins. I added a 1-inch lip on the front edge and my bins stopped sliding forward when you pull one out. The shelf looks cleaner because bin fronts line up instead of drifting. It also helps with kid storage because bins stay in a predictable line.
Use plywood cut to the shelf depth you want, then attach a narrow strip for the front lip. Paint with a durable finish like semi-gloss so you can wipe it down quickly. Keep bin sizes consistent so the shelf looks uniform and the lip actually holds them.
Pro tipTest-fit one bin before painting - if the bin sits too loosely, the lip won't stop sliding.
AvoidAvoid storing clear bins on a flat shelf - the first time you pull one, the rest drift and the whole system looks sloppy.
10. Magnetic Tool Strip for Keys, Small Blades, and Tape Measure
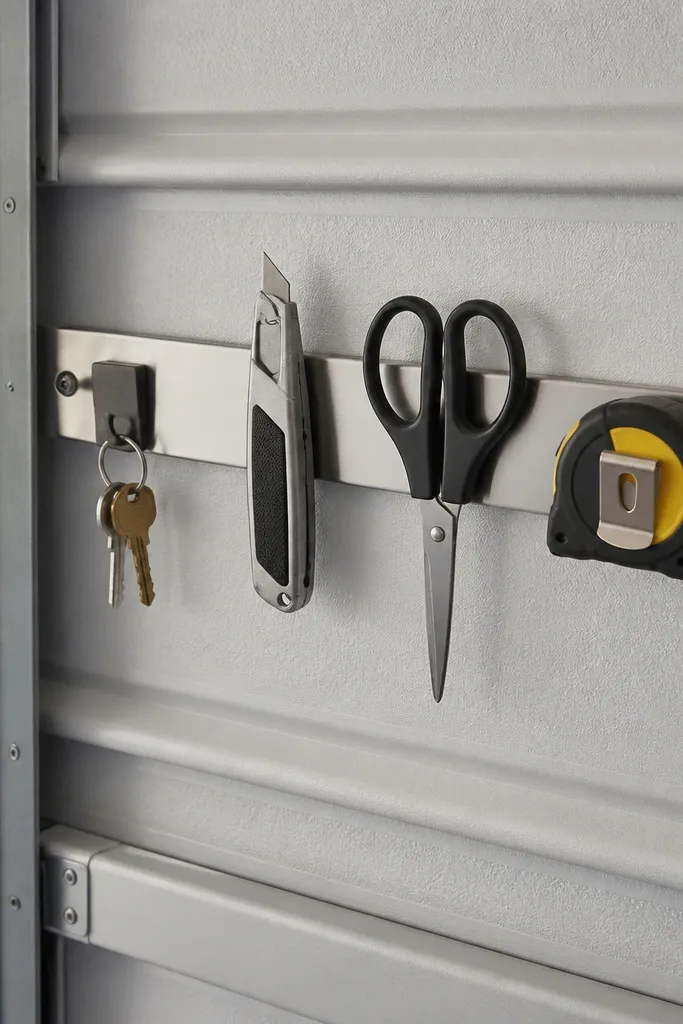
Magnetic strips keep small metal tools from disappearing into drawers or the junk pile under the bench. I use them for tape measure, scissors, and blade holders because I grab them mid-task and I need them to be easy to return. The garage door interior is a smart spot because it's out of the way and doesn't steal wall space from larger storage.
Mount the strip with the right screws and into solid material. Keep items small enough that they don't fall off when the door vibrates. Place it near your workbench so you're not walking across the garage to find a tape measure.
Pro tipAdd a small label card behind a clear sleeve so you can list the items that belong on the strip.
AvoidAvoid placing the strip where the door opener arm or storage bins block the items - you'll stop using it.


