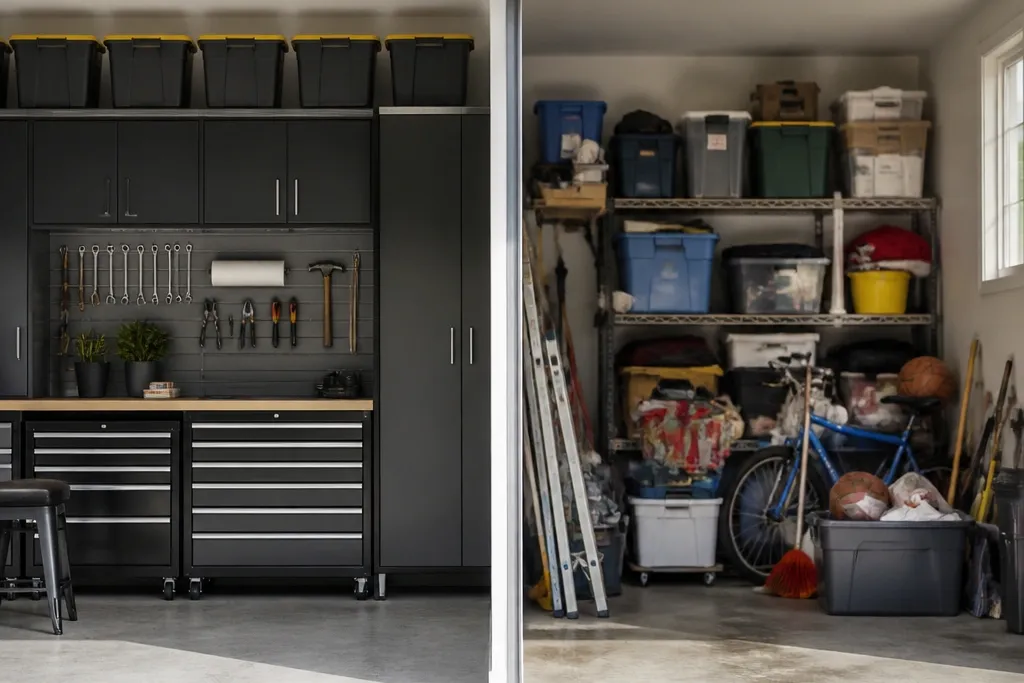
1. Two-Row Pegboard Tool Wall With Color-Coded Hooks

I did this on my own garage wall after I got tired of digging through a plastic tub for the same wrench every weekend. Pegboard makes tools visible, and color-coded hooks keep the "where does this go?" question from turning into chaos. The light gray background makes labels readable, and the two-row layout keeps heavier tools low and lighter ones up top. It looks tidy because the tools form a consistent grid.
Use 1/4-inch pegboard panels and mount them with furring strips so air can move behind it and screws bite cleanly. Keep the bottom row about 18 inches from the floor and the top row around 42 inches, then choose hooks sized for the tool handles you actually have. I like matte black label stickers placed directly under each tool silhouette.
Pro tipPrint labels with big text and a small icon. My go-to is "Wrench - 10mm" with a wrench icon, so kids can match without reading everything.
AvoidAvoid mixing hook sizes randomly - it makes the wall look cluttered even when it's technically organized.
2. Clear-Lid Bin System for Sports Gear by Season
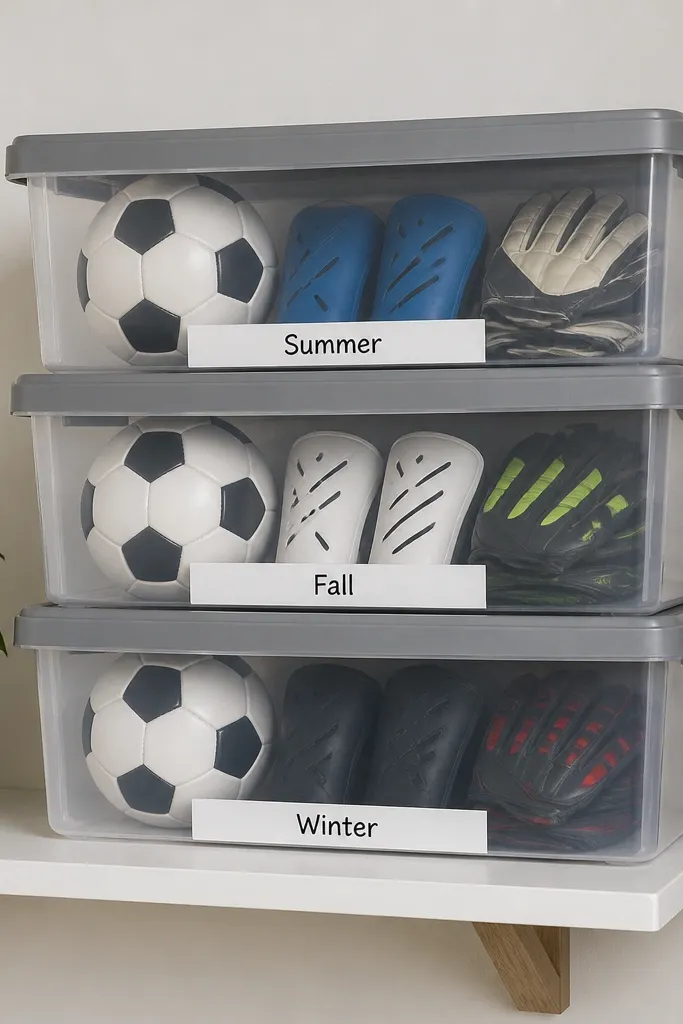
This is the quickest way I've found to stop sports gear from migrating across the driveway. Clear lids let you see what's inside without opening every bin, and the gray lids hide the mess when you're not showing it off. Labeling by season matches how families actually use gear - you're not hunting for cleats in February. The visual order looks clean because each bin has the same height and label placement.
Use bins with a flat front and stacking ridges so they sit square on shelves. Choose one shelf depth (I use 12-14 inches) and keep every bin's footprint the same. Put the most-used season at eye level for you and a lower shelf for kids.
Pro tipAdd a small strip of non-slip shelf liner under the bins so they don't slide when you grab one.
AvoidAvoid stuffing bins too full - if lids bow, the garage starts looking sloppy fast.
3. Wall-Mounted Ladder Hook Rack With Numbered Pads
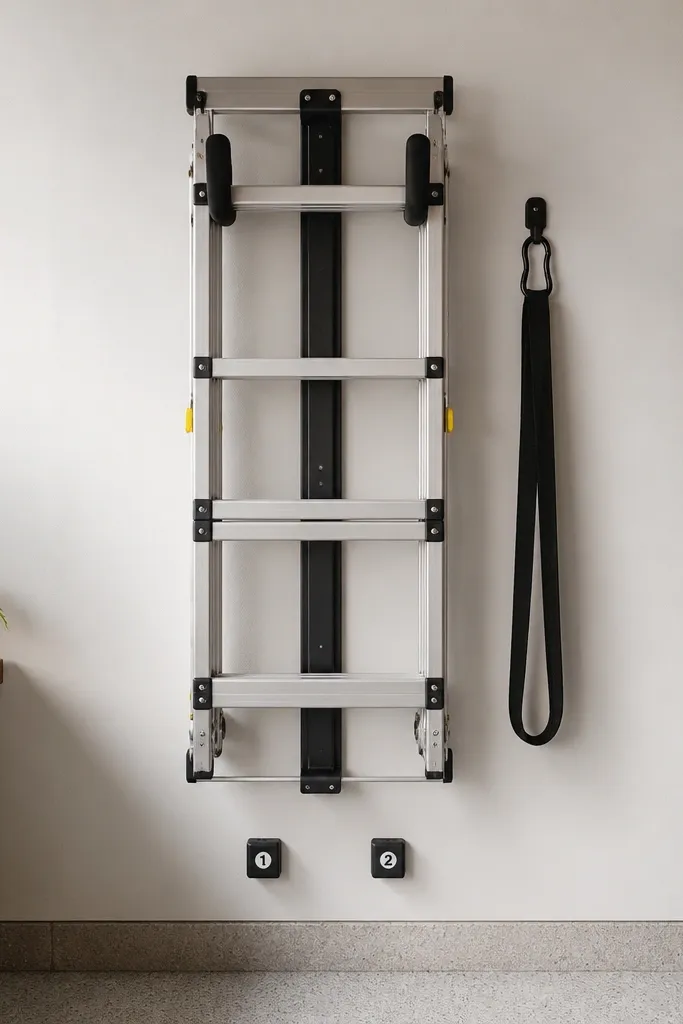
Ladders are heavy and they take up space in a way that makes garages look messy even when everything else is organized. A wall-mounted hook rack keeps it upright and contained, and padding prevents scratches and dull dents. Numbered pads give you a repeatable "parking spot," which matters when you're juggling kids, tools, and a quick job. The rack looks intentional because the ladder stays perfectly aligned.
Mount the rack into studs, not drywall anchors. I use two padded hooks spaced so the ladder's rails sit evenly, with the ladder's bottom resting about 2-3 inches above the floor. Add a short nylon strap on a side hook to keep it from swinging.
Pro tipWipe the ladder rails once before storing and apply a thin silicone cloth to reduce metal squeaks when you move it.
AvoidAvoid mounting into drywall - the rack can shift and the ladder will look crooked the next time you hang it.
4. Low Shelf With Lidded Kids Bins for "Grab-and-Go" Cleaning
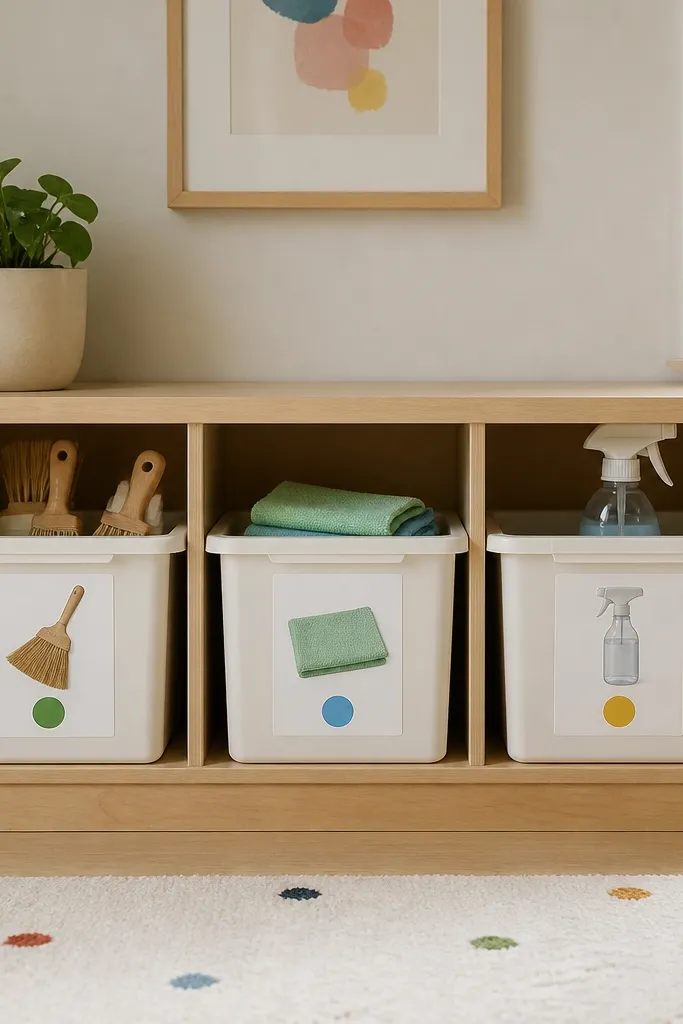
If kids help clean, you need storage that makes the right choice easy. I put lidded bins on a low shelf so nothing gets knocked over, and the lids stop dust from settling into cloths. The color dot system is what keeps it from turning into "random bin time." This setup looks clean because the shelf front stays uniform and the clutter stays inside bins.
Mount the shelf so the top surface is around 24-28 inches from the floor. Use bins around 10-12 inches wide so each tool sits flat. I label with a picture plus one word: "Brooms," "Cloths," "Spray."
Pro tipPut microfiber cloths in a small mesh bag inside the bin so they don't tangle around spray caps.
AvoidAvoid open buckets at kid height - they tip, and the garage ends up looking messy in one afternoon.
5. Magnetic Strip for Small Metal Parts Near Workbench
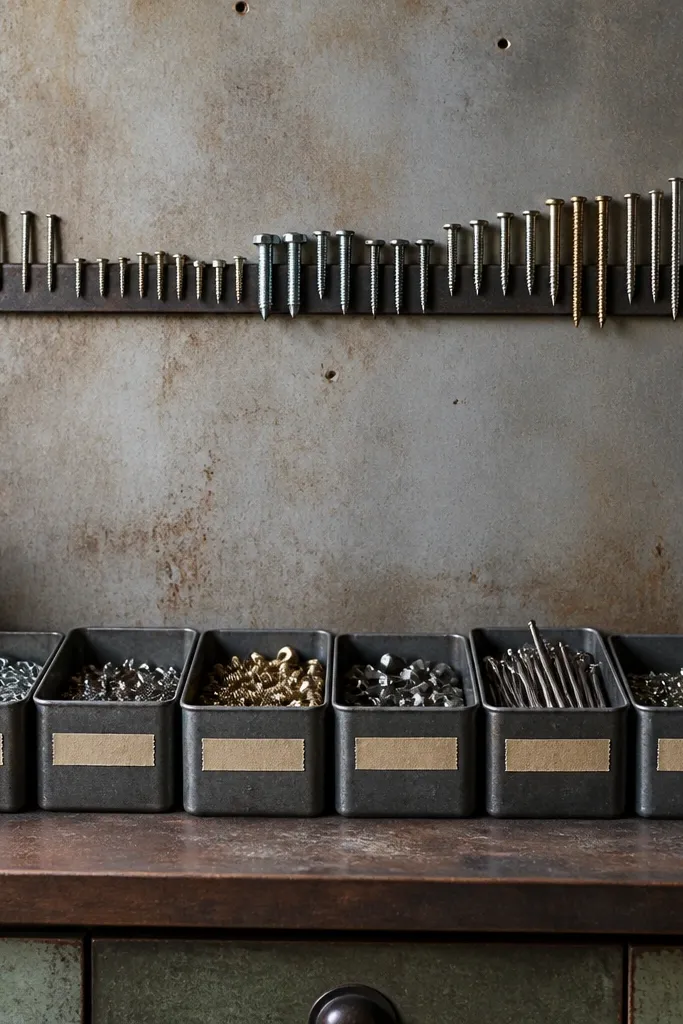
Small hardware is the fastest way to make a garage look chaotic. A magnetic strip keeps nails and screws from spreading across the bench, and metal tins make it easy to grab a handful then put it back. I like the area near the workbench because that's where you actually lose parts. The visual order looks tidy because the tins line up in a straight row.
Use a magnetic strip at least 24 inches long and mount it level into studs. Put the tins in one consistent order by size - big washers left, small screws right. I keep the labels simple: "3/8 bolts," "Drywall screws," "Washers - small."
Pro tipAdd a thin felt pad behind each tin so it doesn't rattle and shake loose.
AvoidAvoid placing the strip too high - if you reach up for tins, you'll leave them on the bench.
6. Pegboard Drawer Inserts for Paint Tools and Tape
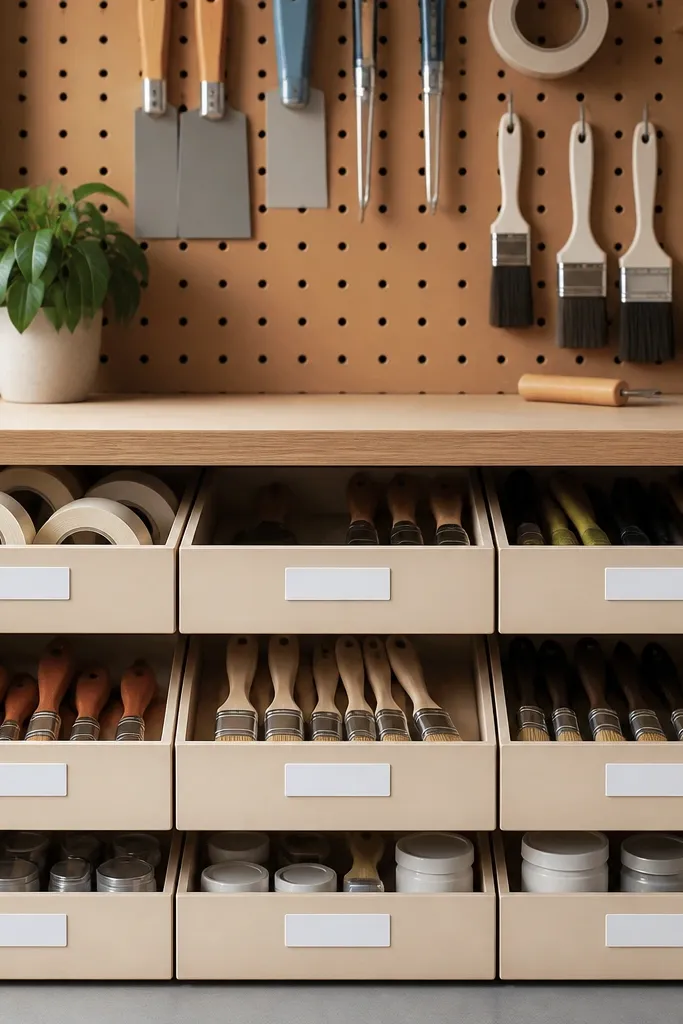
I used to toss paint tools into a single bin, then I'd spend time sorting brushes and running out of tape. Drawer-style inserts on pegboard keep items at eye level and stop the mess from spilling. The shallow depth is key - you can see everything without digging. It looks clean because the drawer fronts match and the pegboard background stays visible.
Make shallow inserts with 2x2s and 1/4-inch plywood bottoms, or buy pegboard drawer kits if you want speed. Keep drawers under 4 inches tall for tape and under 6 inches for putty knives. Store brushes handle-down in a small cup so drips don't pool.
Pro tipLabel tape by width (1 inch, 2 inch) and put the most-used width at the center drawer.
AvoidAvoid storing dried brushes flat - they ruin the bin and look gross fast.
7. Corner Floor Cabinet With Rolling Door for Bulky Car Items
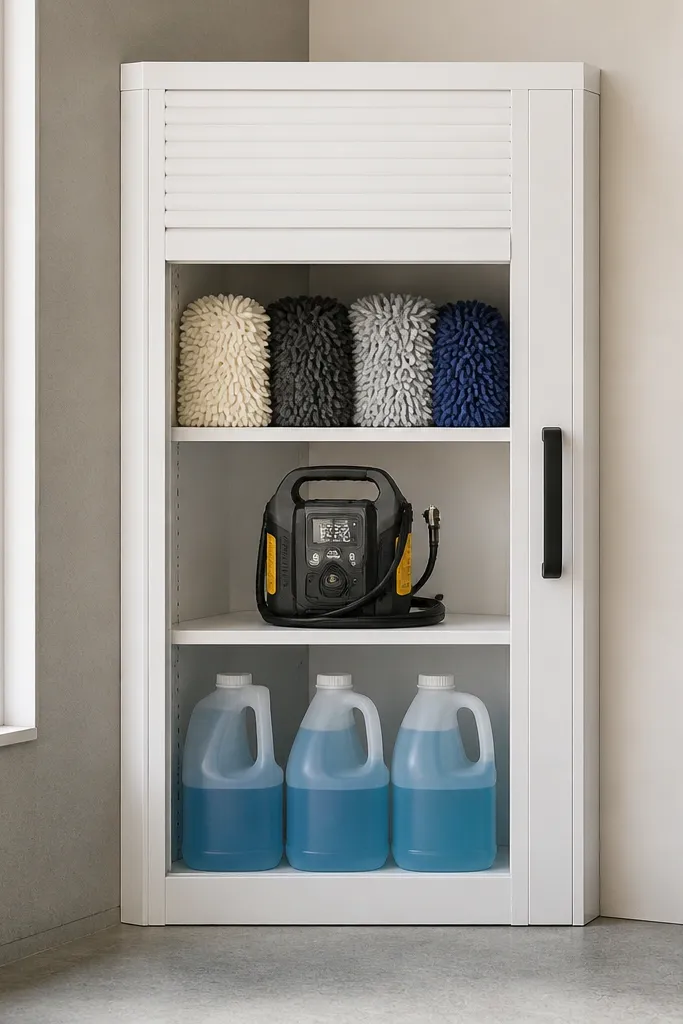
Corners collect the stuff you swear you'll deal with later. A floor cabinet with a rolling door keeps car cleaning gear contained without taking over the whole garage. The rolling door is easier than a swing door when you're moving around kids or dragging a hose. It looks organized because the cabinet face is closed and the corner stays clear.
Pick a cabinet with adjustable shelves and a footprint that fits the exact corner angle. I set mine so the bottom shelf clears the floor by 1-2 inches for easy sweeping. Store jugs on the lower shelves and keep mitts on the middle shelf in a single layer.
Pro tipUse shelf liners in a textured gray so bottles grip and don't rattle when you open the door.
AvoidAvoid stacking car jugs on the floor - they tip and the garage floor ends up stained.
8. Overhead Ceiling Racks for Inflatable Toys and Seasonal Boxes
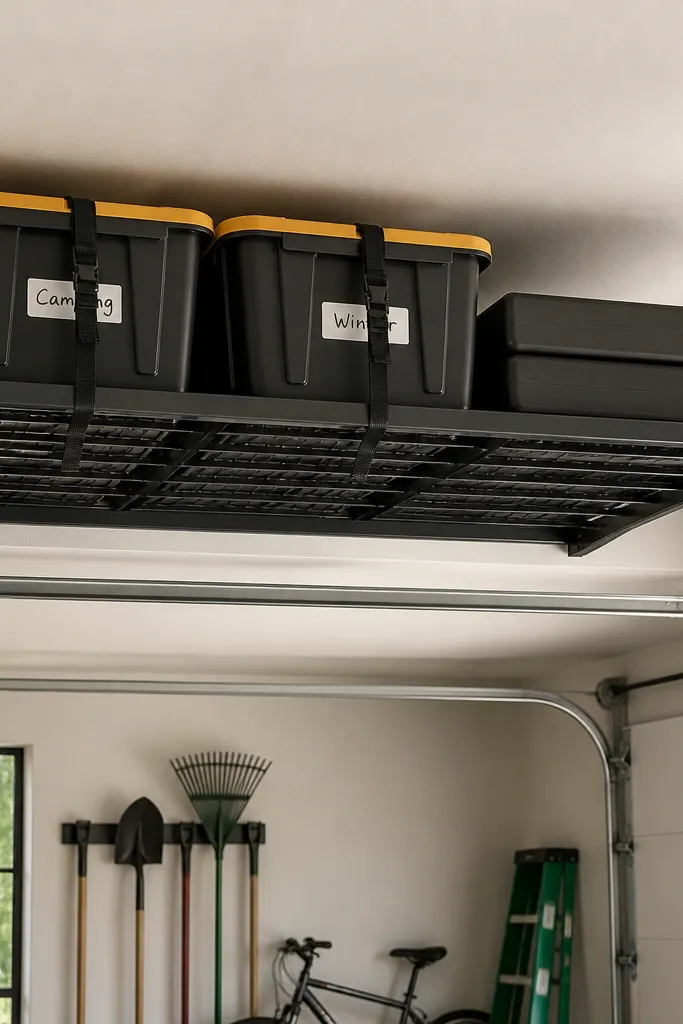
Ceiling storage is where your garage stops feeling cramped. Overhead racks keep big, seasonal items off the floor, which makes everything else feel more usable. Straps prevent shifting and keep bins from bumping each other. Labels stay visible from a ladder because the fronts face the same direction.
Use ceiling racks rated for weight and mount into ceiling joists. Keep the rack height so you can reach the front edge with a step ladder, not a full climb. I store holiday inflatables in long bins and heavy seasonal bins in flat boxes with corner protectors.
Pro tipTie a short bright tag to the strap ends so you can pull them quickly without hunting.
AvoidAvoid putting ceiling items directly above your work zone - you'll smack your head and stop using the system.
9. Cable and Extension Cord Reel Station With Labeled Clips
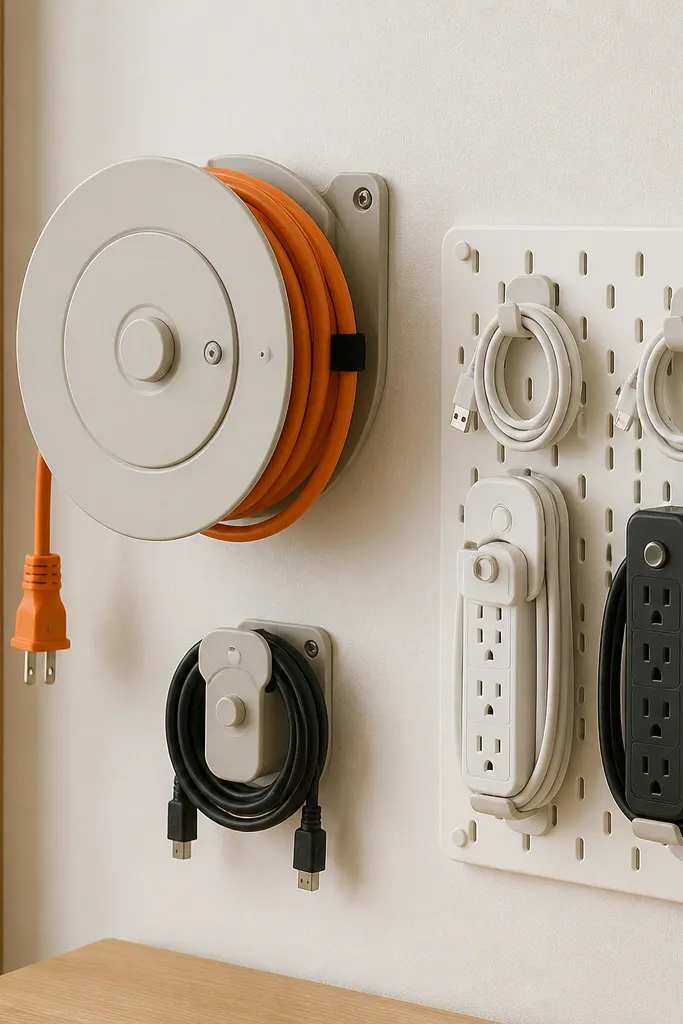
Cord clutter makes a garage look messy even when everything else is organized. A wall reel keeps the extension cord in one place and prevents kinks that make outlets feel unreliable. Clips for power strips and charging cables stop the "random pile behind the toolbox" problem. The station looks clean because cords are coiled and the clips create a straight visual line.
Mount the reel near where you plug in - usually the workbench or a wall outlet. Keep two holders: one for the longest cord and one for a shorter cord for kids' projects. Label each clip with the tool it powers: "Leaf blower," "Workshop," "Bike pump."
Pro tipWrap the plug ends with a strip of colored tape matching the label so you can identify fast in low light.
AvoidAvoid storing cords loose - tangled cords make people stop returning them.
10. Stair-Step Shelf for Paint, Solvents, and Brushes

Paint and solvents look bad when they're stacked randomly. A stair-step shelf keeps cans upright and visible, and it gives brushes a drip-friendly spot. The stepped design means you see what you have without pulling everything down. It looks organized because each item has a dedicated spot and the shelf edges frame the items.
Use a shelf with 3-4 levels, each step deep enough that cans can't slide forward. Put the heavier paint on the lower steps and keep brush cups at shoulder height. I use clear cups for brushes so bristles don't hide and you can see what's still usable.
Pro tipStore rags in a sealed metal can with a lid - it keeps smells down and the shelf stays clean.
AvoidAvoid mixing solvent bottles with open rags near them - spills look awful and cleanup takes forever.
11. Garden Tool Wall With Wooden Dowel Spacers
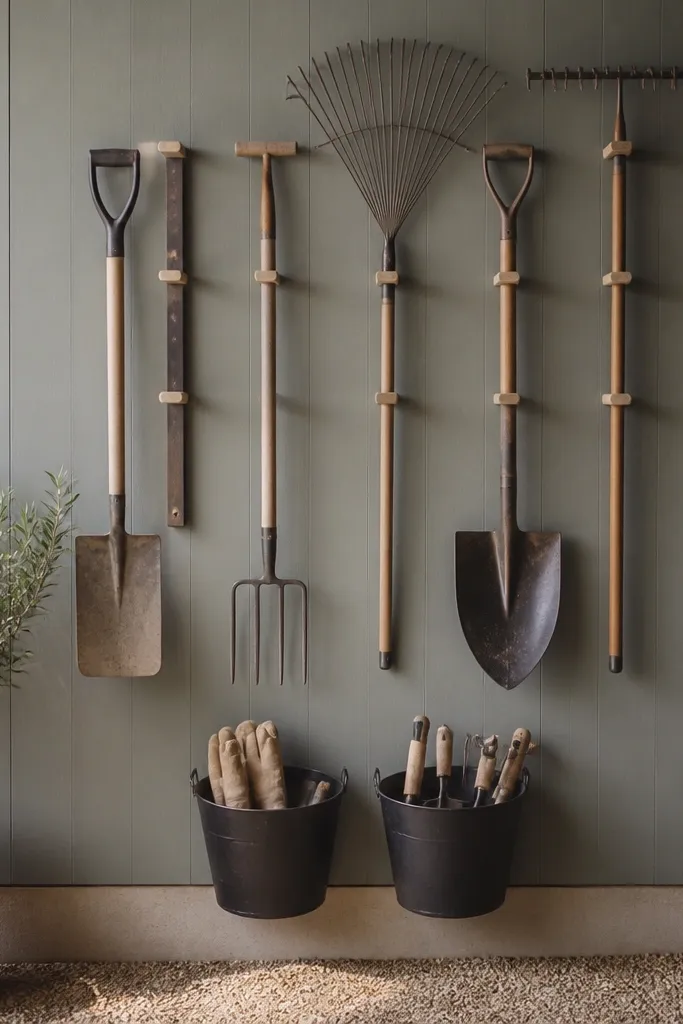
Garden tools spread out and fall over if you store them like regular tools. Wooden dowel spacers keep handles separated so everything hangs straight and doesn't scrape. I like hanging them vertically because it saves floor space and keeps blades from facing the garage door. The wall looks orderly because the tools line up by type and the spacers create clean gaps.
Mount a vertical rail system into studs, then add short dowels as separators spaced 4-6 inches apart. Hang long tools on the outer portion and short hand tools closer to the center. Keep gloves in a mounted bucket so they're always together.
Pro tipAdd a quick wipe-down hook for soil-covered tools so you're not bringing dirt onto the shelf.
AvoidAvoid hanging tools with blades touching each other - it chips edges and makes the wall look messy.
12. Bike Parking Rack With Rubber Cradles
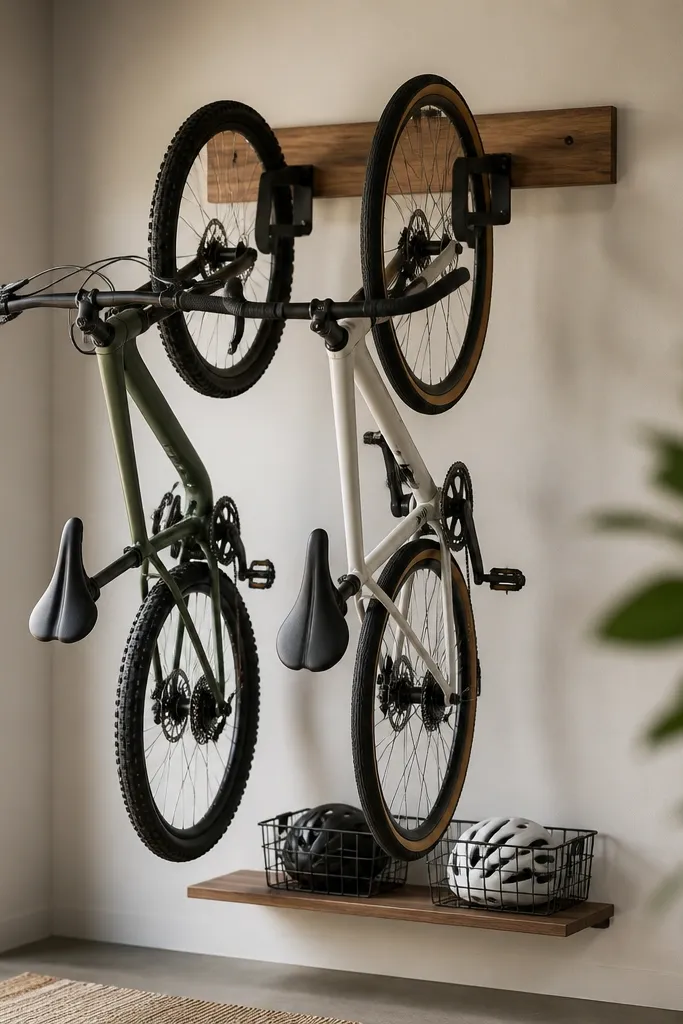
Bikes look like clutter because they take up the floor and tip if you bump them. A wall rack with rubber cradles supports the tires and keeps the bikes from scraping the wall. The angled parking helps you grab the bike without lifting it over a pile. It looks organized because the bikes share the same orientation and the tires sit in identical cradle positions.
Mount the rack into studs and set the height so the wheel center is about 16-20 inches from the floor. Use rubber cradles or tire hooks with rubber sleeves to prevent paint damage. Put helmets and small accessories in a single bin under the bikes.
Pro tipAdd a small name label on each cradle so kids know which bike goes where.
AvoidAvoid stacking bikes on top of each other - the garage floor stays crowded and the rack gets ignored.
13. Labeled Hardware Pegboard Organizer for Screws, Bolts, and Anchors
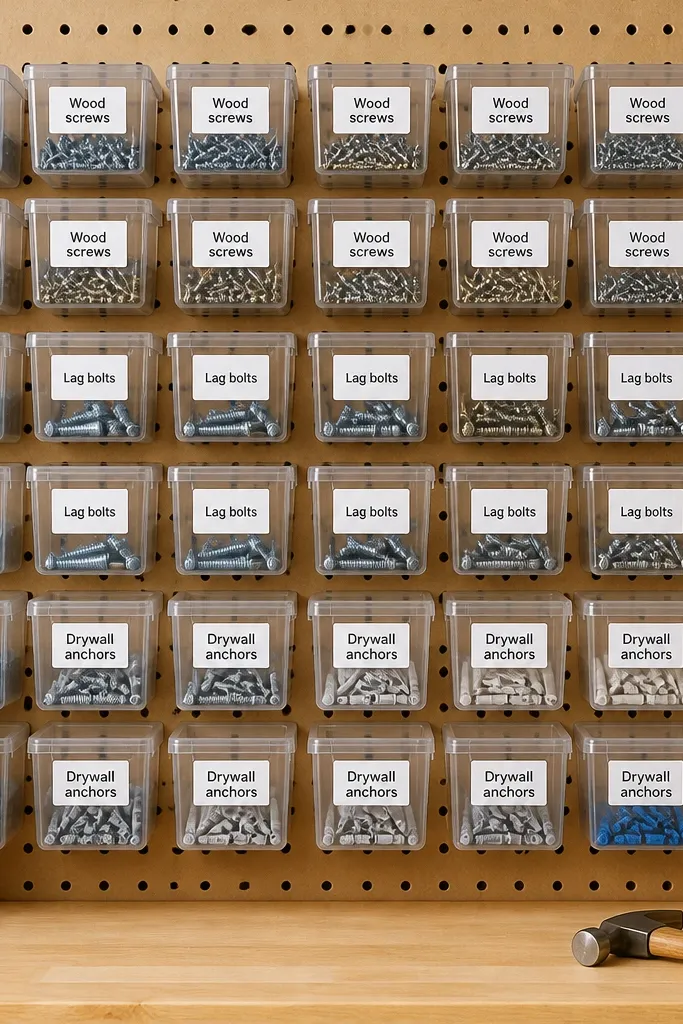
This is one of the best upgrades I've made because hardware is the hardest thing to keep tidy. Small clear boxes let you see what you're grabbing, and the pegboard grid keeps the layout consistent. When you label by type and size, you stop buying duplicates. The pegboard also makes the garage feel more like a work area than a storage dump.
Use small organizer boxes that snap into pegboard hooks or sit in shallow pegboard compartments. Label each box with type and diameter, like "Wood screws 2 inch" and "Drywall anchors 1/4." Keep the most-used sizes on the center row for quick reach.
Pro tipCreate a simple restock rule: if a box label is missing or empty, you replace it within 24 hours of finishing the project.
AvoidAvoid using handwritten labels on clear tape that peels - they fade and the whole wall looks messy.
14. Wall-Top Shelf for Tool Manuals and Warranty Cards With Photo Labels
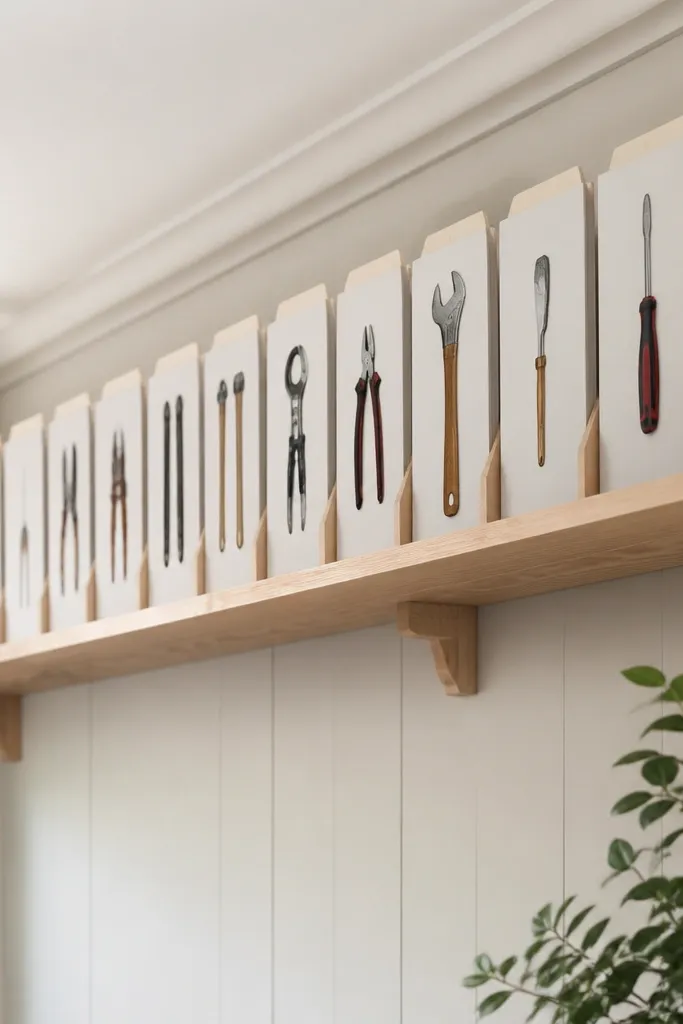
Manuals and warranty cards are the kind of stuff you shove into a drawer, then you can't find when you need it. A narrow shelf with vertical folders keeps documents flat, readable, and easy to return. Photo labels make it kid-proof because kids can match the tool picture instead of reading small words. The shelf looks clean because everything is in the same vertical orientation.
Use a vertical document holder or make a simple file box with dividers so folders don't flop. Put the shelf above the kids' reach, but low enough that you can grab with a step ladder. I store folders in clear front sleeves for wipe-clean surfaces.
Pro tipStaple a small checklist inside each folder like "model number location" so you don't hunt again.
AvoidAvoid storing manuals in loose stacks - they curl, get dusty, and end up spread across a bench.


